一、什么是SpringSecurity
Spring Security是一个能够为基于Spring的企业应用系统提供声明式的安全访问控制解决方案的安全框架。它提供了一组可以在Spring应用上下文中配置的Bean,充分利用了Spring IoC,DI(控制反转Inversion of Control ,DI:Dependency Injection 依赖注入)和AOP(面向切面编程)功能,为应用系统提供声明式的安全访问控制功能,减少了为企业系统安全控制编写大量重复代码的工作。
二、SpringBoot2.0以上版本整合SpringSecurity
依赖
	<!-- 管理依赖 -->
	<dependencyManagement>
		<dependencies>
			<dependency>
				<groupId>org.springframework.cloud</groupId>
				<artifactId>spring-cloud-dependencies</artifactId>
				<version>Finchley.M7</version>
				<type>pom</type>
				<scope>import</scope>
			</dependency>
		</dependencies>
	</dependencyManagement>
	<dependencies>
		<!-- SpringBoot整合Web组件 -->
		<dependency>
			<groupId>org.springframework.boot</groupId>
			<artifactId>spring-boot-starter-web</artifactId>
		</dependency>
		<dependency>
			<groupId>org.projectlombok</groupId>
			<artifactId>lombok</artifactId>
		</dependency>

		<!-- springboot整合freemarker -->
		<dependency>
			<groupId>org.springframework.boot</groupId>
			<artifactId>spring-boot-starter-freemarker</artifactId>
		</dependency>
        <!--spring-boot 整合security -->
		<dependency>
			<groupId>org.springframework.boot</groupId>
			<artifactId>spring-boot-starter-security</artifactId>
		</dependency>
	</dependencies>
	<!-- 注意: 这里必须要添加, 否者各种依赖有问题 -->
	<repositories>
		<repository>
			<id>spring-milestones</id>
			<name>Spring Milestones</name>
			<url>https://repo.spring.io/libs-milestone</url>
			<snapshots>
				<enabled>false</enabled>
			</snapshots>
		</repository>
	</repositories>
application.yml
# 配置freemarker
spring:
  freemarker:
    # 设置模板后缀名
    suffix: .ftl
    # 设置文档类型
    content-type: text/html
    # 设置页面编码格式
    charset: UTF-8
    # 设置页面缓存
    cache: false
    # 设置ftl文件路径
    template-loader-path:
      - classpath:/templates
  # 设置静态文件路径,js,css等
  mvc:
    static-path-pattern: /static/**
三、SpringSecurity有两种认证模式
3.1、HttpBasic模式
什么是Basic认证
在HTTP协议进行通信的过程中,HTTP协议定义了基本认证过程以允许HTTP服务器对WEB浏览器进行用户身份证的方法,当一个客户端向HTTP服务器进行数据请求时,如果客户端未被认证,则HTTP服务器将通过基本认证过程对客户端的用户名及密码进行验证,以决定用户是否合法。客户端在接收到HTTP服务器的身份认证要求后,会提示用户输入用户名及密码,然后将用户名及密码以BASE64加密,加密后的密文将附加于请求信息中, 如当用户名为mayikt,密码为:123456时,客户端将用户名和密码用“:”合并,并将合并后的字符串用BASE64加密为密文,并于每次请求数据 时,将密文附加于请求头(Request Header)中。HTTP服务器在每次收到请求包后,根据协议取得客户端附加的用户信息(BASE64加密的用户名和密码),解开请求包,对用户名及密码进行验证,如果用 户名及密码正确,则根据客户端请求,返回客户端所需要的数据;否则,返回错误代码或重新要求客户端提供用户名及密码。
编写认证类SecurityConfig
@Component
@EnableWebSecurity
public class SecurityConfig extends WebSecurityConfigurerAdapter {

	// 用户认证信息
	@Override
	protected void configure(AuthenticationManagerBuilder auth) throws Exception {
		// 设置用户账号信息和权限
		auth.inMemoryAuthentication().withUser("admin").password("123456").authorities("addOrder");
	}

	// 配置HttpSecurity 拦截资源
	protected void configure(HttpSecurity http) throws Exception {
		http.authorizeRequests().antMatchers("/**").fullyAuthenticated().and().httpBasic();
	}
}
启动项目
访问:127.0.0.1/login
SpringSecurity为我们提供了一个简单的登录界面(后边会讲如何替换为我们自己的登录界面)

点击"取消"报错
There is no PasswordEncoder mapped for the id "null"
原因:升级为Security5.0以上密码支持多中加密方式
解决办法:在上边类里添加如下代码恢复加密方式即可
@Beanpublic static NoOpPasswordEncoder passwordEncoder() {
	return (NoOpPasswordEncoder) NoOpPasswordEncoder.getInstance();
}
3.2、FromLogin模式
FromLogin模式是以表单形式进行认证的
将上边的configure方法里边换成下边这种即可
	// 配置HttpSecurity 拦截资源
	protected void configure(HttpSecurity http) throws Exception {
        http.authorizeRequests().antMatchers("/**").fullyAuthenticated().and().formLogin();
	}
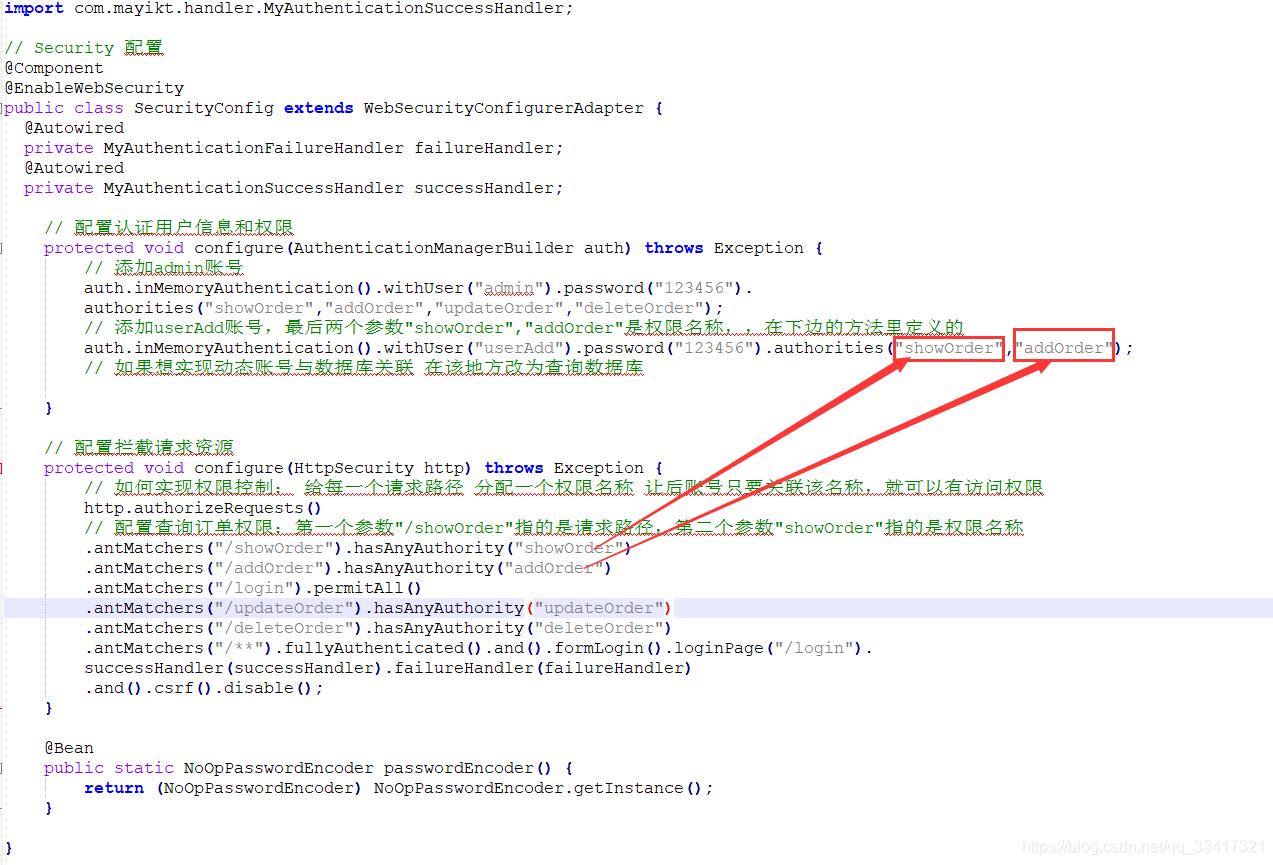
四、实现权限的分配
admin用户可以访问所有页面,其他不同的用户只能访问属于自己的页面
package com.mayikt.config;

import org.springframework.beans.factory.annotation.Autowired;
import org.springframework.context.annotation.Bean;
import org.springframework.security.config.annotation.authentication.builders.AuthenticationManagerBuilder;
import org.springframework.security.config.annotation.web.builders.HttpSecurity;
import org.springframework.security.config.annotation.web.configuration.EnableWebSecurity;
import org.springframework.security.config.annotation.web.configuration.WebSecurityConfigurerAdapter;
import org.springframework.security.crypto.password.NoOpPasswordEncoder;
import org.springframework.stereotype.Component;

import com.mayikt.handler.MyAuthenticationFailureHandler;
import com.mayikt.handler.MyAuthenticationSuccessHandler;

// Security 配置
@Component
@EnableWebSecurity
public class SecurityConfig extends WebSecurityConfigurerAdapter {
  @Autowired
  private MyAuthenticationFailureHandler failureHandler;
  @Autowired
  private MyAuthenticationSuccessHandler successHandler;

	// 配置认证用户信息和权限
	protected void configure(AuthenticationManagerBuilder auth) throws Exception {
		// 添加admin账号
		auth.inMemoryAuthentication().withUser("admin").password("123456").
		//注意:下边的参数里可以添加集合,即应该是从数据库里查出来转为集合放进这里,而不是写死
		authorities("showOrder","addOrder","updateOrder","deleteOrder");
		// 添加userAdd账号,最后两个参数"showOrder","addOrder"是权限名称,,在下边的方法里定义的
		auth.inMemoryAuthentication().withUser("userAdd").password("123456").authorities("showOrder","addOrder");
		// 如果想实现动态账号与数据库关联 在该地方改为查询数据库
	}

	// 配置拦截请求资源
	protected void configure(HttpSecurity http) throws Exception {
		// 如何实现权限控制: 给每一个请求路径 分配一个权限名称 让后账号只要关联该名称,就可以有访问权限
		http.authorizeRequests()
		// 配置查询订单权限:第一个参数"/showOrder"指的是请求路径,第二个参数"showOrder"指的是权限名称
		.antMatchers("/showOrder").hasAnyAuthority("showOrder")
		.antMatchers("/addOrder").hasAnyAuthority("addOrder")
		.antMatchers("/login").permitAll()
		.antMatchers("/updateOrder").hasAnyAuthority("updateOrder")
		.antMatchers("/deleteOrder").hasAnyAuthority("deleteOrder")
		.antMatchers("/**").fullyAuthenticated().and().formLogin().loginPage("/login").
		successHandler(successHandler).failureHandler(failureHandler)
		.and().csrf().disable();
	}
	@Bean
	public static NoOpPasswordEncoder passwordEncoder() {
		return (NoOpPasswordEncoder) NoOpPasswordEncoder.getInstance();
	}
}
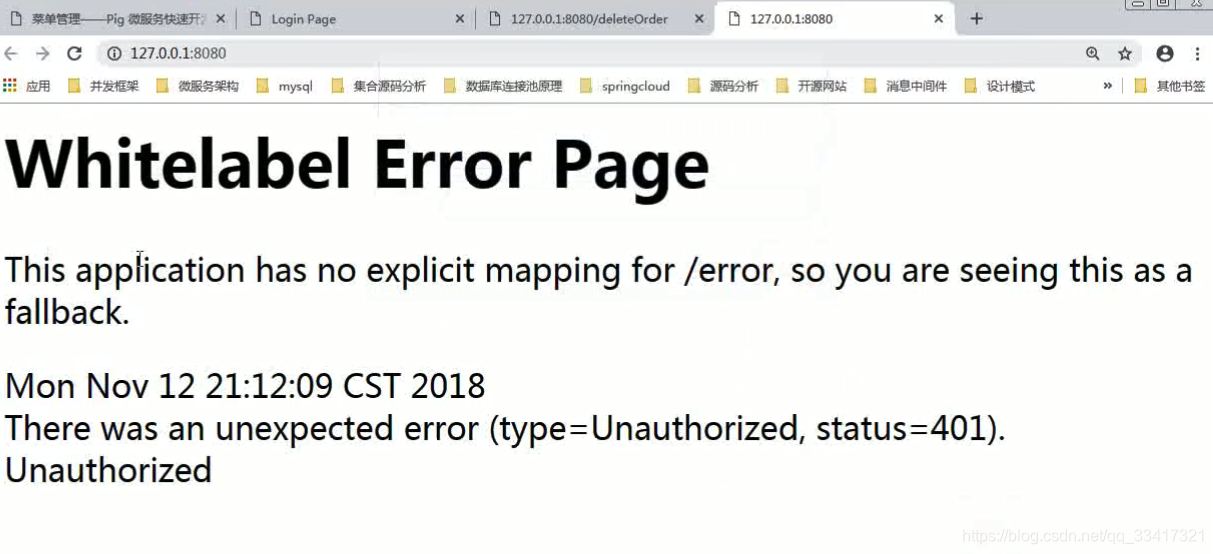
此时userAdd用户没有删除和更新的权限,它访问删除与更新的路径时,报错:
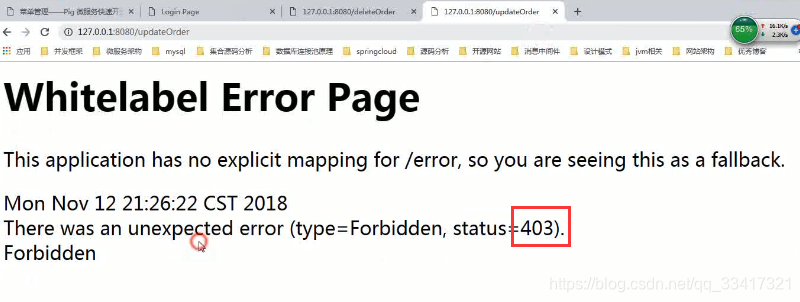
403:权限不足
401:没有授权(没有授任何权限)
这个错误提示页面对于用户来说是不友好的,要改成我们自己写的页面
修改403页面
这里是SpringBoot2.0以上版本配置SpringSecurity错误页面(与SpringBoot2.0以下版本配置的方式是不一样的)
定义一个配置类:
/**
 * 自定义 WEB 服务器参数 可以配置默认错误页面
 *
 * @author sgw
 * @version 2019年12月25日
 */
@Configuration
public class WebServerAutoConfiguration {
	@Bean
	public ConfigurableServletWebServerFactory webServerFactory() {
		TomcatServletWebServerFactory factory = new TomcatServletWebServerFactory();
		ErrorPage errorPage400 = new ErrorPage(HttpStatus.BAD_REQUEST, "/error/400");
		ErrorPage errorPage401 = new ErrorPage(HttpStatus.UNAUTHORIZED, "/error/401");
		ErrorPage errorPage403 = new ErrorPage(HttpStatus.FORBIDDEN, "/error/403");
		ErrorPage errorPage404 = new ErrorPage(HttpStatus.NOT_FOUND, "/error/404");
		ErrorPage errorPage415 = new ErrorPage(HttpStatus.UNSUPPORTED_MEDIA_TYPE, "/error/415");
		ErrorPage errorPage500 = new ErrorPage(HttpStatus.INTERNAL_SERVER_ERROR, "/error/500");
		factory.addErrorPages(errorPage400, errorPage401, errorPage403, errorPage404, errorPage415, errorPage500);
		return factory;
	}
}
在相应的路径放上我们自己的403页面:

新建ErrorController:
@Controller
public class ErrorController {
	@RequestMapping("/error/403")
	public String error() {
		return "/error/403";
	}
}
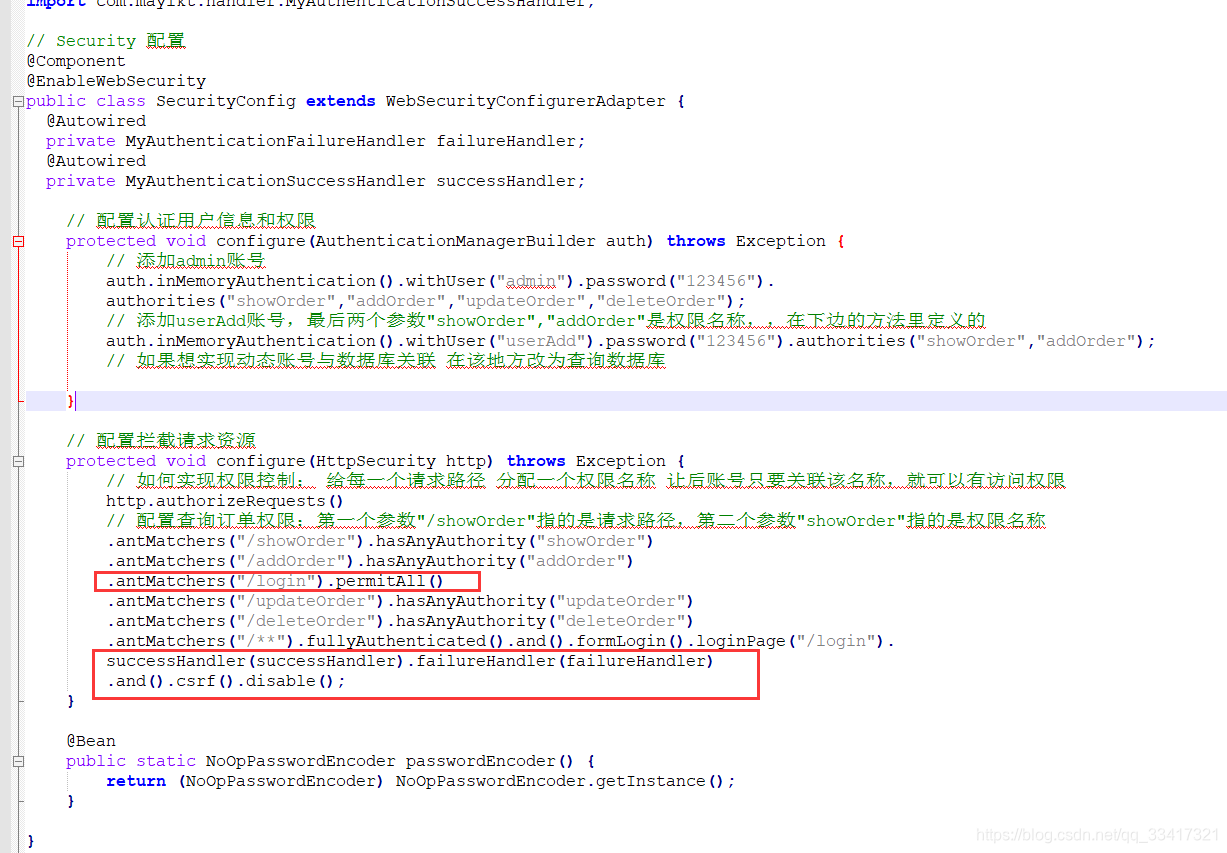
五、替换为我们自己的登录界面
修改fromLogin模式登陆页面
注意替换configure(HttpSecurity http) 方法的最后一行:改为自己的登录界面
@Component
@EnableWebSecurity
public class SecurityConfig extends WebSecurityConfigurerAdapter {

	// 用户认证信息
	@Override
	protected void configure(AuthenticationManagerBuilder auth) throws Exception {
		// 设置用户账号信息和权限
		 auth.inMemoryAuthentication().withUser("admin").password("123456").authorities("showOrder","addOrder","updateOrder","deleteOrder");
		 // 添加 useradd账号 只有添加查询和添加订单权限
		 auth.inMemoryAuthentication().withUser("userAdd").password("123456")
			.authorities("showOrder","addOrder");
	}

	// 配置HttpSecurity 拦截资源
	protected void configure(HttpSecurity http) throws Exception {
//		// 拦截请求, 权限名称
		http.authorizeRequests()
		.antMatchers("/showOrder").hasAnyAuthority("showOrder")
		.antMatchers("/addOrder").hasAnyAuthority("addOrder")
		//不能拦截登录请求
		.antMatchers("/login").permitAll()
		.antMatchers("/updateOrder").hasAnyAuthority("updateOrder")
		.antMatchers("/deleteOrder").hasAnyAuthority("deleteOrder")
		//并且关闭csrf,禁止后就不需要传token了(解决跨站点攻击)
		.antMatchers("/**").fullyAuthenticated().and().formLogin().loginPage("/login").and().csrf().disable();
	}

	// SpringBoot2.0抛弃了原来的NoOpPasswordEncoder,要求用户保存的密码必须要使用加密算法后存储,在登录验证的时候Security会将获得的密码在进行编码后再和数据库中加密后的密码进行对比
	@Bean
	public static NoOpPasswordEncoder passwordEncoder() {
		return (NoOpPasswordEncoder) NoOpPasswordEncoder.getInstance();
	}
}
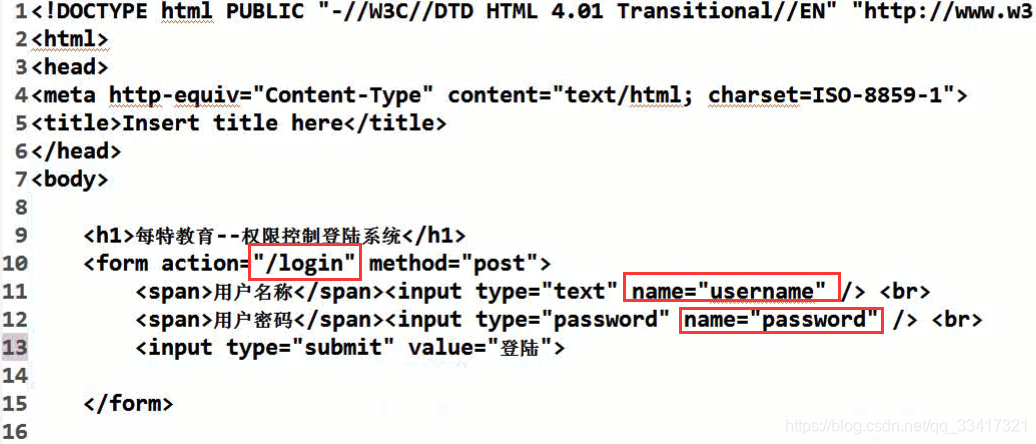
在Controller里添加:
// 自定义登陆页面
	@GetMapping("/login")
	public String login() {
		return "login";
	}
上边的配置主要就是这两个地方
注意:自定义的页面里这几个值只能这样写,因为SpringSecurity是根据这几个值做判断的
六、判断是否登录成功
自定义两个类,分别实现下边两个接口即可
- AuthenticationFailureHandler 认证失败接口
- AuthenticationSuccessHandler 认证成功接口
//认证失败
@Component
public class MyAuthenticationFailureHandler implements AuthenticationFailureHandler {

	public void onAuthenticationFailure(HttpServletRequest req, HttpServletResponse res, AuthenticationException auth)
			throws IOException, ServletException {
		System.out.println("用户认证失败");
		//跳到指定界面
		res.sendRedirect("http://www.maltose.com");
	}
}
//认证成功
@Component
public class MyAuthenticationSuccessHandler implements AuthenticationSuccessHandler {
	// 用户认证成功
	public void onAuthenticationSuccess(HttpServletRequest req, HttpServletResponse res, Authentication auth)
			throws IOException, ServletException {
		System.out.println("用户登陆成功");
		//重定向到首页
		res.sendRedirect("/");
	}
}
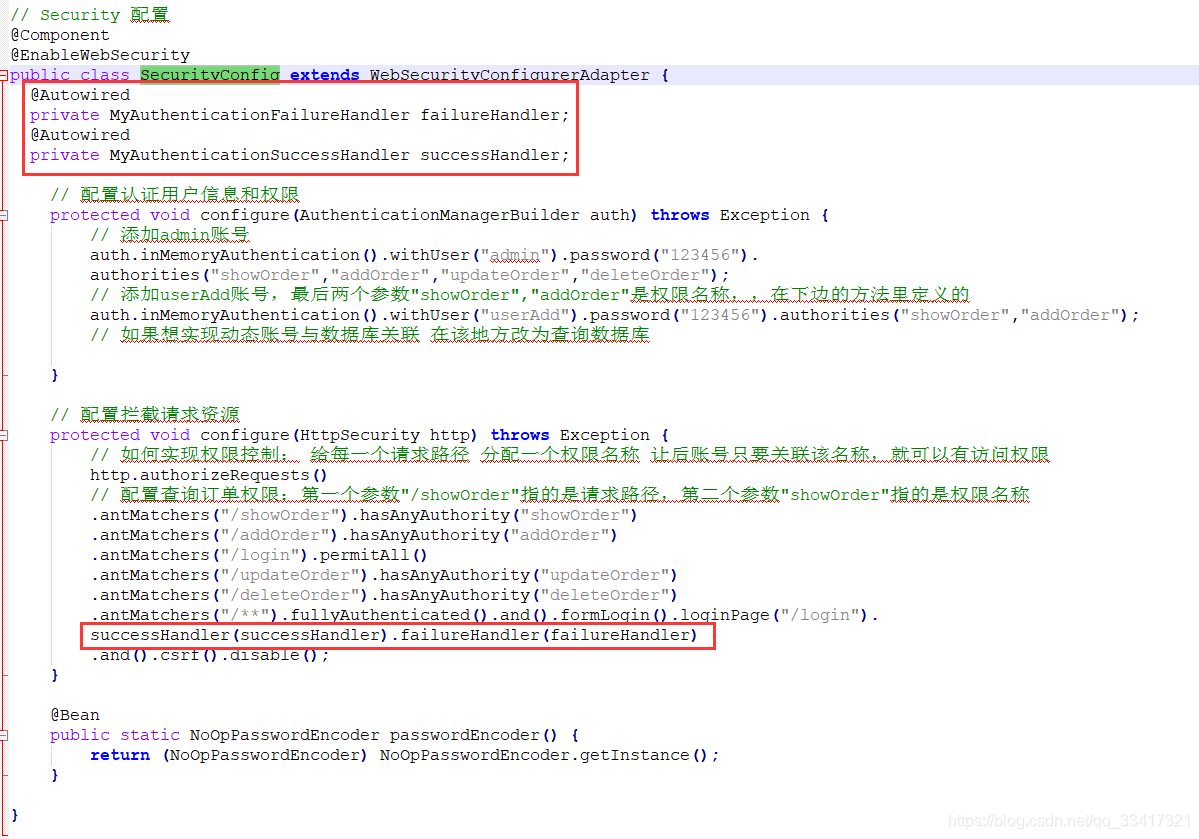
SecurityConfig类改造:
@Component
@EnableWebSecurity
public class SecurityConfig extends WebSecurityConfigurerAdapter {
	@Autowired
    private MyAuthenticationSuccessHandler successHandler;
	@Autowired
    private MyAuthenticationFailureHandler failHandler;
	// 用户认证信息
	@Override
	protected void configure(AuthenticationManagerBuilder auth) throws Exception {
		// 设置用户账号信息和权限
		 auth.inMemoryAuthentication().withUser("admin").password("123456").authorities("showOrder","addOrder","updateOrder","deleteOrder");
		 // 添加 useradd账号 只有添加查询和添加订单权限
		 auth.inMemoryAuthentication().withUser("userAdd").password("123456")
			.authorities("showOrder","addOrder");
	}

	// 配置HttpSecurity 拦截资源
	protected void configure(HttpSecurity http) throws Exception {
//		// 拦截请求, 权限名称
		http.authorizeRequests()
		.antMatchers("/showOrder").hasAnyAuthority("showOrder")
		.antMatchers("/addOrder").hasAnyAuthority("addOrder")
		.antMatchers("/login").permitAll()
		.antMatchers("/updateOrder").hasAnyAuthority("updateOrder")
		.antMatchers("/deleteOrder").hasAnyAuthority("deleteOrder")
		//并且关闭csrf
		.antMatchers("/**").fullyAuthenticated().and().formLogin().loginPage("/login").successHandler(successHandler).failureHandler(failHandler).and().csrf().disable();
	}

	// SpringBoot2.0抛弃了原来的NoOpPasswordEncoder,要求用户保存的密码必须要使用加密算法后存储,在登录验证的时候Security会将获得的密码在进行编码后再和数据库中加密后的密码进行对比
	@Bean
	public static NoOpPasswordEncoder passwordEncoder() {
		return (NoOpPasswordEncoder) NoOpPasswordEncoder.getInstance();
	}
}
上边改的地方主要是:
七、RBAC权限模型
基于角色的权限访问控制(Role-Based Access Control)作为传统访问控制(自主访问,强制访问)的有前景的代替受到广泛的关注。在RBAC中,权限与角色相关联,用户通过成为适当角色的成员而得到这些角色的权限。这就极大地简化了权限的管理。在一个组织中,角色是为了完成各种工作而创造,用户则依据它的责任和资格来被指派相应的角色,用户可以很容易地从一个角色被指派到另一个角色。角色可依新的需求和系统的合并而赋予新的权限,而权限也可根据需要而从某角色中回收。角色与角色的关系可以建立起来以囊括更广泛的客观情况。
RBAC核心就是下边这五张表
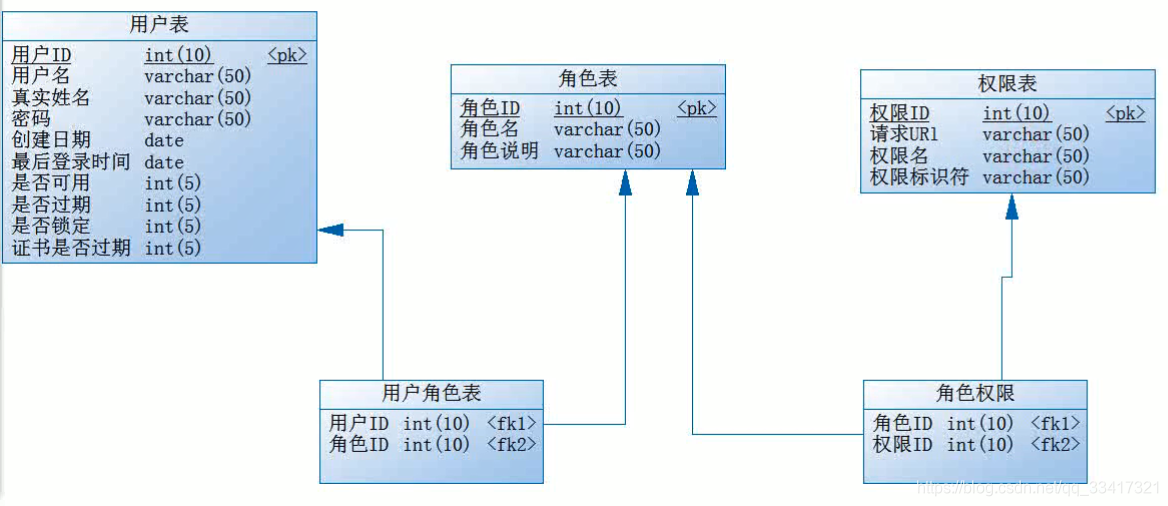
- 用户角色表:实现一个用户多个角色
- 角色权限表:实现一个角色有多个权限
上边五张表的建表语句
SET FOREIGN_KEY_CHECKS=0;

-- ----------------------------
-- Table structure for sys_permission
-- ----------------------------
DROP TABLE IF EXISTS `sys_permission`;
CREATE TABLE `sys_permission` (
  `id` int(10) NOT NULL,
  `permName` varchar(50) DEFAULT NULL,
  `permTag` varchar(50) DEFAULT NULL,
  `url` varchar(255) DEFAULT NULL COMMENT '请求url',
  PRIMARY KEY (`id`)
) ENGINE=InnoDB DEFAULT CHARSET=utf8;

-- ----------------------------
-- Records of sys_permission
-- ----------------------------
INSERT INTO `sys_permission` VALUES ('1', '查询订单', 'showOrder', '/showOrder');
INSERT INTO `sys_permission` VALUES ('2', '添加订单', 'addOrder', '/addOrder');
INSERT INTO `sys_permission` VALUES ('3', '修改订单', 'updateOrder', '/updateOrder');
INSERT INTO `sys_permission` VALUES ('4', '删除订单', 'deleteOrder', '/deleteOrder');

-- ----------------------------
-- Table structure for sys_role
-- ----------------------------
DROP TABLE IF EXISTS `sys_role`;
CREATE TABLE `sys_role` (
  `id` int(10) NOT NULL,
  `roleName` varchar(50) DEFAULT NULL,
  `roleDesc` varchar(50) DEFAULT NULL,
  PRIMARY KEY (`id`)
) ENGINE=InnoDB DEFAULT CHARSET=utf8;

-- ----------------------------
-- Records of sys_role
-- ----------------------------
INSERT INTO `sys_role` VALUES ('1', 'admin', '管理员');
INSERT INTO `sys_role` VALUES ('2', 'add_user', '添加管理员');

-- ----------------------------
-- Table structure for sys_role_permission
-- ----------------------------
DROP TABLE IF EXISTS `sys_role_permission`;
CREATE TABLE `sys_role_permission` (
  `role_id` int(10) DEFAULT NULL,
  `perm_id` int(10) DEFAULT NULL,
  KEY `FK_Reference_3` (`role_id`),
  KEY `FK_Reference_4` (`perm_id`),
  CONSTRAINT `FK_Reference_4` FOREIGN KEY (`perm_id`) REFERENCES `sys_permission` (`id`),
  CONSTRAINT `FK_Reference_3` FOREIGN KEY (`role_id`) REFERENCES `sys_role` (`id`)
) ENGINE=InnoDB DEFAULT CHARSET=utf8;

-- ----------------------------
-- Records of sys_role_permission
-- ----------------------------
INSERT INTO `sys_role_permission` VALUES ('1', '1');
INSERT INTO `sys_role_permission` VALUES ('1', '2');
INSERT INTO `sys_role_permission` VALUES ('1', '3');
INSERT INTO `sys_role_permission` VALUES ('1', '4');
INSERT INTO `sys_role_permission` VALUES ('2', '1');
INSERT INTO `sys_role_permission` VALUES ('2', '2');

-- ----------------------------
-- Table structure for sys_user
-- ----------------------------
DROP TABLE IF EXISTS `sys_user`;
CREATE TABLE `sys_user` (
  `id` int(10) NOT NULL,
  `username` varchar(50) DEFAULT NULL,
  `realname` varchar(50) DEFAULT NULL,
  `password` varchar(50) DEFAULT NULL,
  `createDate` date DEFAULT NULL,
  `lastLoginTime` date DEFAULT NULL,
  `enabled` int(5) DEFAULT NULL,
  `accountNonExpired` int(5) DEFAULT NULL,
  `accountNonLocked` int(5) DEFAULT NULL,
  `credentialsNonExpired` int(5) DEFAULT NULL,
  PRIMARY KEY (`id`)
) ENGINE=InnoDB DEFAULT CHARSET=utf8;

-- ----------------------------
-- Records of sys_user
-- ----------------------------
INSERT INTO `sys_user` VALUES ('1', 'admin', '张三', '15a013bcac0c50049356b322e955035e\r\n', '2018-11-13', '2018-11-13', '1', '1', '1', '1');
INSERT INTO `sys_user` VALUES ('2', 'userAdd', '小余', '15a013bcac0c50049356b322e955035e\r\n', '2018-11-13', '2018-11-13', '1', '1', '1', '1');

-- ----------------------------
-- Table structure for sys_user_role
-- ----------------------------
DROP TABLE IF EXISTS `sys_user_role`;
CREATE TABLE `sys_user_role` (
  `user_id` int(10) DEFAULT NULL,
  `role_id` int(10) DEFAULT NULL,
  KEY `FK_Reference_1` (`user_id`),
  KEY `FK_Reference_2` (`role_id`),
  CONSTRAINT `FK_Reference_2` FOREIGN KEY (`role_id`) REFERENCES `sys_role` (`id`),
  CONSTRAINT `FK_Reference_1` FOREIGN KEY (`user_id`) REFERENCES `sys_user` (`id`)
) ENGINE=InnoDB DEFAULT CHARSET=utf8;

-- ----------------------------
-- Records of sys_user_role
-- ----------------------------
INSERT INTO `sys_user_role` VALUES ('1', '1');
INSERT INTO `sys_user_role` VALUES ('2', '2');
根据下边的SQL,即可查询一个用户有哪些权限:

最后一个参数就是用户名;运行结果

代码实现
添加依赖,整合Mybatis框架
	<!-->spring-boot 整合security -->
	<dependency>
		<groupId>org.springframework.boot</groupId>
		<artifactId>spring-boot-starter-security</artifactId>
	</dependency>
	<!-- springboot 整合mybatis框架 -->
	<dependency>
		<groupId>org.mybatis.spring.boot</groupId>
		<artifactId>mybatis-spring-boot-starter</artifactId>
		<version>1.3.2</version>
	</dependency>
	<!-- alibaba的druid数据库连接池 -->
	<dependency>
		<groupId>com.alibaba</groupId>
		<artifactId>druid-spring-boot-starter</artifactId>
		<version>1.1.9</version>
	</dependency>
	<dependency>
		<groupId>mysql</groupId>
		<artifactId>mysql-connector-java</artifactId>
	</dependency>
application.yml:
# 配置freemarker
spring:
  freemarker:
    # 设置模板后缀名
    suffix: .ftl
    # 设置文档类型
    content-type: text/html
    # 设置页面编码格式
    charset: UTF-8
    # 设置页面缓存
    cache: false
    # 设置ftl文件路径
    template-loader-path:
      - classpath:/templates
  # 设置静态文件路径,js,css等
  mvc:
    static-path-pattern: /static/**
####整合数据库层
  datasource:
    name: test
    url: jdbc:mysql://127.0.0.1:3306/rbac_db
    username: root
    password: root
    # druid 连接池
    type: com.alibaba.druid.pool.DruidDataSource
    driver-class-name: com.mysql.jdbc.Driver
新建Mapper:
public interface UserMapper {
	// 查询用户信息
	@Select(" select * from sys_user where username = #{userName}")
	User findByUsername(@Param("userName") String userName);

	// 查询用户的权限
	@Select(" select permission.* from sys_user user" + " inner join sys_user_role user_role"
			+ " on user.id = user_role.user_id inner join "
			+ "sys_role_permission role_permission on user_role.role_id = role_permission.role_id "
			+ " inner join sys_permission permission on role_permission.perm_id = permission.id where user.username = #{userName};")
	List<Permission> findPermissionByUsername(@Param("userName") String userName);
}
public interface PermissionMapper {
	// 查询苏所有权限
	@Select(" select * from sys_permission ")
	List<Permission> findAllPermission();
}
注意:User类必须实现UserDetail接口
package com.mayikt.entity;

import java.util.ArrayList;
import java.util.Collection;
import java.util.Date;
import java.util.List;

import org.springframework.security.core.GrantedAuthority;
import org.springframework.security.core.userdetails.UserDetails;

import lombok.Data;

// 用户信息表  @Data:插件的get/set方法
@Data
public class User implements UserDetails {

	private Integer id;
	private String username;
	private String realname;
	private String password;
	private Date createDate;
	private Date lastLoginTime;
	private boolean enabled;
	private boolean accountNonExpired;
	private boolean accountNonLocked;
	private boolean credentialsNonExpired;
	// 用户所有权限
	private List<GrantedAuthority> authorities = new ArrayList<GrantedAuthority>();

	public Collection<? extends GrantedAuthority> getAuthorities() {

		return authorities;
	}
}
package com.mayikt.entity;

import lombok.Data;

// 角色信息表
@Data
public class Role {
	private Integer id;
	private String roleName;
	private String roleDesc;
}
package com.mayikt.entity;

import lombok.Data;

@Data
public class Permission {
	private Integer id;
	// 权限名称
	private String permName;
	// 权限标识
	private String permTag;
	// 请求url
	private String url;
}
重点:将用户的权限查询改为动态查询数据库(之前是代码里写死的)
注意:下边新建的类实现了UserDetailsService 接口,其中,验证密码是否正确不需要我们自己做,SpringSecurity框架帮我们去验证了
package com.mayikt.security;

import java.util.ArrayList;
import java.util.List;
import org.springframework.beans.factory.annotation.Autowired;
import org.springframework.security.core.GrantedAuthority;
import org.springframework.security.core.authority.SimpleGrantedAuthority;
import org.springframework.security.core.userdetails.UserDetails;
import org.springframework.security.core.userdetails.UserDetailsService;
import org.springframework.security.core.userdetails.UsernameNotFoundException;
import org.springframework.stereotype.Component;
import com.mayikt.entity.Permission;
import com.mayikt.entity.User;
import com.mayikt.mapper.UserMapper;


@Component
public class MyUserDetailService implements UserDetailsService {
	@Autowired
	private UserMapper userMapper;

	// 查询用户信息
	public UserDetails loadUserByUsername(String username) throws UsernameNotFoundException {
		// 1、根据用户名查询用户信息
		User user = userMapper.findByUsername(username);
		// 2、底层会根据用户名查询用户信息,验证密码是否正确

        //3、给用户设置权限
        List<Permission> listPermission = userMapper.findPermissionByUsername(username);
		for (Permission permission : listPermission) {
			authorities.add(new SimpleGrantedAuthority(permission.getPermTag()));
		}
		// 设置用户权限
		user.setAuthorities(authorities);


		return user;
	}
}
改造之前写的用户权限校验的类的这个方法:
@Autowired
private MyUserDetailService  myUserDetailsService;

protected void configure(AuthenticationManagerBuilder auth) throws Exception {
//		// 添加admin账号
//		auth.inMemoryAuthentication().withUser("admin").password("123456").
//		authorities("showOrder","addOrder","updateOrder","deleteOrder");
//		// 添加userAdd账号
//		auth.inMemoryAuthentication().withUser("userAdd").password("123456").authorities("showOrder","addOrder");
//		// 如果想实现动态账号与数据库关联 在该地方改为查询数据库
		auth.userDetailsService(myUserDetailsService);
	}
使用MD5对密码进行加密(MD5是单项加密,记得需要撒盐,不然容易被暴力破解)
新建加密工具类:
package com.mayikt.utils;

import java.security.MessageDigest;

public class MD5Util {
    //盐
	private static final String SALT = "mayikt";

	public static String encode(String password) {
		password = password + SALT;
		MessageDigest md5 = null;
		try {
			md5 = MessageDigest.getInstance("MD5");
		} catch (Exception e) {
			throw new RuntimeException(e);
		}
		char[] charArray = password.toCharArray();
		byte[] byteArray = new byte[charArray.length];

		for (int i = 0; i < charArray.length; i++)
			byteArray[i] = (byte) charArray[i];
		byte[] md5Bytes = md5.digest(byteArray);
		StringBuffer hexValue = new StringBuffer();
		for (int i = 0; i < md5Bytes.length; i++) {
			int val = ((int) md5Bytes[i]) & 0xff;
			if (val < 16) {
				hexValue.append("0");
			}

			hexValue.append(Integer.toHexString(val));
		}
		return hexValue.toString();
	}

	public static void main(String[] args) {
	    //输出的是123456加密后的值
		System.out.println(MD5Util.encode("123456"));
	}
}
对用户密码加密(对SecurityConfig类的这个方法进行改造):
	auth.userDetailsService(myUserDetailsService).passwordEncoder(new PasswordEncoder() {
		    //验证密码 rawPassword:表单提交的密码(未加密)  encodedPassword:数据库里的密码(已加密)
			public boolean matches(CharSequence rawPassword, String encodedPassword) {
			    //将表单提交的密码进行加密
			    String rawPass= MD5Util.encode((String)rawPassword);
			    //将表单提交的密码加密后,与数据库的密码比对,一致的话返回true,即认证成功
			    boolean result = rawPass.equals(encodedPassword);
				return result;
			}
			// 对表单提交来的密码进行加密
			public String encode(CharSequence rawPassword) {
				return MD5Util.encode((String)rawPassword);
			}
		});
拦截请求资源做成动态的
之前是写死的:
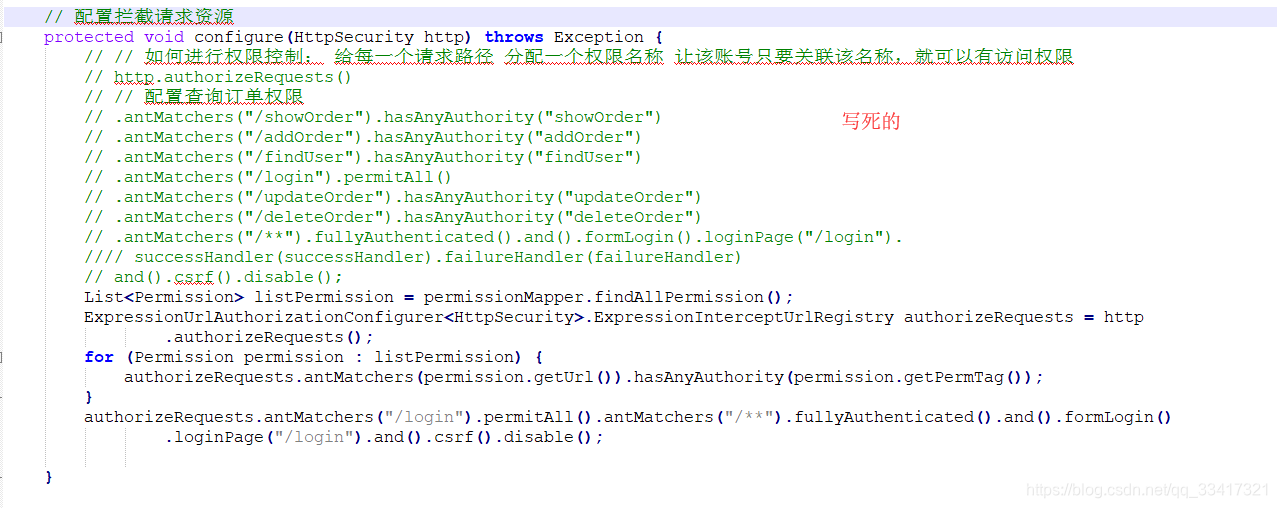
动态的:
    @Autowired
	private PermissionMapper permissionMapper;
	@Autowired
	private MyUserDetailService myUserDetailService;


	// 配置拦截请求资源
	protected void configure(HttpSecurity http) throws Exception {
		ExpressionUrlAuthorizationConfigurer<HttpSecurity>.ExpressionInterceptUrlRegistry authorizeRequests = http
				.authorizeRequests();

		// 查询数据库获取权限列表
		List<Permission> listPermission = permissionMapper.findAllPermission();
		for (Permission permission : listPermission) {
            //设置权限
			authorizeRequests.antMatchers(permission.getUrl()).hasAuthority(permission.getPermTag());
		}
		authorizeRequests.antMatchers("/login").permitAll().antMatchers("/**").fullyAuthenticated().and().formLogin()
				.loginPage("/login").successHandler(successHandler).failureHandler(failureHandler).and().csrf()
				.disable();
	}
八、微服务开放平台(Oauth2.0)接口原理
什么是开放平台
在一些大型互联网公司,随着公司的业务发展逐渐庞大,需要和外部合伙伙伴进行合作,需要将公司的接口开放给外部其他合伙伙伴进行调用。
比如腾讯的QQ互联网、微信开放平台、蚂蚁金服开放平台 、微博开放平台,比如实现功能QQ联合登陆、微信扫码登陆。
还有就是在大型集团公司中,分为总公司,和旗下多个分公司,总公司与分公司相互通讯也可以采用开放平台形式对接口进行授权。
什么是Oauth2.0认证授权协议
OAuth: OAuth(开放授权)是一个开放标准,允许用户授权第三方网站访问他们存储在另外的服务提供者上的信息,而不需要将用户名和密码提供给第三方网站或分享他们数据的所有内容。
QQ登录OAuth2.0:对于用户相关的OpenAPI(例如获取用户信息,动态同步,照片,日志,分享等),为了保护用户数据的安全和隐私,第三方网站访问用户数据前都需要显式的向用户征求授权。
QQ登录OAuth2.0采用OAuth2.0标准协议来进行用户身份验证和获取用户授权,相对于之前的OAuth1.0协议,其认证流程更简单和安全。
常用开放平台
QQ互联网开放平台(第三方登录使用QQ登录)
http://wiki.connect.qq.com/%E5%87%86%E5%A4%87%E5%B7%A5%E4%BD%9C_oauth2-0
Oauth2.0认证授权协议涉及到的几个概念
- appId:商户号 (QQ为我们生成的值,永久不变)
- appKey:商户秘钥 (会变化的)
- 授权码Code:通过授权码获取accessToken
- accessToken:调用接口权限 访问令牌
- 回调地址:授权成功后,重定向的地址
- openId:开放平台生产的唯一ID(对外公开的)
QQ联合登录流程
我们通过了解QQ联合登录,来学习项目里应该如何提供接口给第三方登录;
- 生成授权CODE链接 获取授权码
- 使用获取到的授权码,获取对应的accessToken
- 使用accessToken获取用户的openId
- 使用openId获取用户相关信息
生成授权CODE链接
点击下边的QQ图标时生成的连接
例如:
https://graph.qq.com/oauth2.0/authorize?response_type=code&client_id=101462456&state=888&redirect_uri=http://mayikt.s1.natapp.cc/qqLoginBack
QQ平台要求URL需要的参数:
使用获取到的授权码去获取对应的accessToken
例如:
https://graph.qq.com/oauth2.0/token?grant_type=authorization_code&client_id=101462456&client_secret=4488033be77331e7cdcaed8ceadc10d5&code=E91DF5B0E2455A6B2AF25CD9FA1C7582&
redirect_uri=http://mayikt.s1.natapp.cc/qqLoginBack
使用accessToken获取用户openid
https://graph.qq.com/oauth2.0/me?access_token=B2FD1997D149313F16C93D91C75AC75E
使用openid获取用户信息
https://graph.qq.com/user/get_user_info?access_token=B2FD1997D149313F16C93D91C75AC75E&oauth_consumer_key=101462456&openid=4B1717CBBFE1E900D2A1482C4A18B3BD
Oauth2.0流程总结
OAuth认证和授权的过程如下:
- 用户访问第三方网站网站,想对用户存放在服务商的某些资源进行操作。
- 第三方网站向服务商请求一个临时令牌。
- 服务商验证第三方网站的身份后,授予一个临时令牌。
- 第三方网站获得临时令牌后,将用户导向至服务商的授权页面请求用户授权,然后这个过程中将临时令牌和第三方网站的返回地址发送给服务商。
- 用户在服务商的授权页面上输入自己的用户名和密码,授权第三方网站访问所相应的资源。
- 授权成功后,服务商将用户导向第三方网站的返回地址。
- 第三方网站根据临时令牌从服务商那里获取访问令牌。
- 服务商根据令牌和用户的授权情况授予第三方网站访问令牌。
- 第三方网站使用获取到的访问令牌访问存放在服务商的对应的用户资源。
九、搭建SpringCloud Oauth2.0
SpringCloud Oauth2作用:
管理微服务中的开放接口,对接口进行授权认证,使用协议就是SpringCloud Oauth2.0;
在Spring Cloud需要使用oauth2来实现多个微服务的统一认证授权,通过向OAUTH服务发送某个类型的grant type进行集中认证和授权,从而获得access_token,而这个token是受其他微服务信任的,我们在后续的访问可以通过access_token来进行,从而实现了微服务的统一认证授权。
客户端根据约定的ClientID、ClientSecret、Scope来从Access Token URL地址获取AccessToken,并经过AuthURL认证,用得到的AccessToken来访问其他资源接口。
Spring Cloud oauth2 需要依赖Spring security
OAuth2四种授权方式
- 授权码模式(authorization code)用在客户端与服务端应用之间授权
- 简化模式(implicit)用在移动app或者web app(这些app是在用户的设备上的,如
在手机上调起微信来进行认证授权) - 密码模式(resource owner password credentials)应用直接都是受信任的(都是由一家公司开发的)
- 客户端模式(client credentials)用在应用API访问
Oauth2角色划分
5. Resource Server:被授权访问的资源
6. Authotization Server:OAUTH2认证授权中心
7. Resource Owner: 用户
8. Client:使用API的客户端(如Android 、IOS、web app)
SpringCloud Oauth2.0原理图:
SpringBoot2.0以上版本的OAuth2.0环境搭建
新建两个项目
- oauth2-server:OAUTH2认证授权中心服务
- order_service: 普通微服务,验证授权服务
oauth2-server认证授权中心服务
密码模式:
依赖
<parent>
		<groupId>org.springframework.boot</groupId>
		<artifactId>spring-boot-starter-parent</artifactId>
		<version>2.0.1.RELEASE</version>
</parent>
<!-- 管理依赖 -->
<dependencyManagement>
	<dependencies>
		<dependency>
			<groupId>org.springframework.cloud</groupId>
			<artifactId>spring-cloud-dependencies</artifactId>
			<version>Finchley.M7</version>
			<type>pom</type>
			<scope>import</scope>
		</dependency>
	</dependencies>
</dependencyManagement>
<dependencies>
	<!-- SpringBoot整合Web组件 -->
	<dependency>
		<groupId>org.springframework.boot</groupId>
		<artifactId>spring-boot-starter-web</artifactId>
	</dependency>
	<dependency>
		<groupId>org.projectlombok</groupId>
		<artifactId>lombok</artifactId>
	</dependency>

	<!-- springboot整合freemarker -->
	<dependency>
		<groupId>org.springframework.boot</groupId>
		<artifactId>spring-boot-starter-freemarker</artifactId>
	</dependency>

	<!-->spring-boot 整合security -->
	<dependency>
		<groupId>org.springframework.boot</groupId>
		<artifactId>spring-boot-starter-security</artifactId>
	</dependency>
	<!-- spring-cloud-starter-oauth2 -->
	<dependency>
		<groupId>org.springframework.cloud</groupId>
		<artifactId>spring-cloud-starter-oauth2</artifactId>
	</dependency>


</dependencies>
<!-- 注意: 这里必须要添加, 否者各种依赖有问题 -->
<repositories>
	<repository>
		<id>spring-milestones</id>
		<name>Spring Milestones</name>
		<url>https://repo.spring.io/libs-milestone</url>
		<snapshots>
			<enabled>false</enabled>
		</snapshots>
	</repository>
</repositories>
创建配置信息
// 配置授权中心配置信息
@Configuration
@EnableAuthorizationServer // 开启认证授权中心
public class AuthorizationServerConfig extends AuthorizationServerConfigurerAdapter {
	// accessToken有效期
	private int accessTokenValiditySeconds = 7200; // 两小时

	// 添加商户信息
	public void configure(ClientDetailsServiceConfigurer clients) throws Exception {
		// withClient appid申请获取appId和appKey(这里先写死)
		clients.inMemory().withClient("client_1").secret(passwordEncoder().encode("123456"))
				.authorizedGrantTypes("password","client_credentials","refresh_token").scopes("all").accessTokenValiditySeconds(accessTokenValiditySeconds);
	}

	// 设置token类型
	public void configure(AuthorizationServerEndpointsConfigurer endpoints) {
		endpoints.authenticationManager(authenticationManager()).allowedTokenEndpointRequestMethods(HttpMethod.GET,
				HttpMethod.POST);
	}

	@Override
	public void configure(AuthorizationServerSecurityConfigurer oauthServer) {
		// 允许表单认证
		oauthServer.allowFormAuthenticationForClients();
		// 允许check_token访问
		oauthServer.checkTokenAccess("permitAll()");
	}

	@Bean
	AuthenticationManager authenticationManager() {
		AuthenticationManager authenticationManager = new AuthenticationManager() {

			public Authentication authenticate(Authentication authentication) throws AuthenticationException {
				return daoAuhthenticationProvider().authenticate(authentication);
			}
		};
		return authenticationManager;
	}

	@Bean
	public AuthenticationProvider daoAuhthenticationProvider() {
		DaoAuthenticationProvider daoAuthenticationProvider = new DaoAuthenticationProvider();
		daoAuthenticationProvider.setUserDetailsService(userDetailsService());
		daoAuthenticationProvider.setHideUserNotFoundExceptions(false);
		daoAuthenticationProvider.setPasswordEncoder(passwordEncoder());
		return daoAuthenticationProvider;
	}

	// 设置添加用户信息,正常应该从数据库中读取
	@Bean
	UserDetailsService userDetailsService() {
		InMemoryUserDetailsManager userDetailsService = new InMemoryUserDetailsManager();
		userDetailsService.createUser(User.withUsername("user_1").password(passwordEncoder().encode("123456"))
				.authorities("ROLE_USER").build());
		userDetailsService.createUser(User.withUsername("user_2").password(passwordEncoder().encode("1234567"))
				.authorities("ROLE_USER").build());
		return userDetailsService;
	}

	@Bean
	PasswordEncoder passwordEncoder() {
		// 加密方式
		PasswordEncoder passwordEncoder = new BCryptPasswordEncoder();
		return passwordEncoder;
	}
}
public void configure(AuthorizationServerEndpointsConfigurer endpoints) {
		endpoints.authenticationManager(authenticationManager()).allowedTokenEndpointRequestMethods(HttpMethod.GET,
				HttpMethod.POST);

		endpoints.authenticationManager(authenticationManager());
		endpoints.userDetailsService(userDetailsService());
	}
授权码模式:
需要添加Security权限:
@Component
public class SecurityConfig extends WebSecurityConfigurerAdapter {

	// 授权中心管理器
	@Bean
	@Override
	public AuthenticationManager authenticationManagerBean() throws Exception {
		AuthenticationManager manager = super.authenticationManagerBean();
		return manager;
	}

	@Bean
	public PasswordEncoder passwordEncoder() {
		return new BCryptPasswordEncoder();
	}

	// 拦截所有请求,使用httpBasic方式登陆
	@Override
	protected void configure(HttpSecurity http) throws Exception {

		http.authorizeRequests().antMatchers("/**").fullyAuthenticated().and().httpBasic();
	}
}
启动授权服务
@SpringBootApplication
public class AppOauth2 {
	public static void main(String[] args) {
		SpringApplication.run(AppOauth2.class, args);
	}
}
访问:
http://localhost:8080/oauth/authorize?response_type=code&client_id=client_1&redirect_uri=http://www.mayikt.com
资源服务端
要访问资源服务器受保护的资源需要携带令牌(从授权服务器获得)
客户端往往同时也是一个资源服务器,各个服务之间的通信(访问需要权限的资源)时需携带访问令牌;
资源服务器通过 @EnableResourceServer 注解来开启一个 OAuth2AuthenticationProcessingFilter 类型的过滤器
通过继承 ResourceServerConfigurerAdapter 类来配置资源服务器
新建项目order_service
maven
<parent>
		<groupId>org.springframework.boot</groupId>
		<artifactId>spring-boot-starter-parent</artifactId>
		<version>2.0.1.RELEASE</version>
	</parent>
	<!-- 管理依赖 -->
	<dependencyManagement>
		<dependencies>
			<dependency>
				<groupId>org.springframework.cloud</groupId>
				<artifactId>spring-cloud-dependencies</artifactId>
				<version>Finchley.M7</version>
				<type>pom</type>
				<scope>import</scope>
			</dependency>
		</dependencies>
	</dependencyManagement>
	<dependencies>
		<!-- SpringBoot整合Web组件 -->
		<dependency>
			<groupId>org.springframework.boot</groupId>
			<artifactId>spring-boot-starter-web</artifactId>
		</dependency>
		<dependency>
			<groupId>org.projectlombok</groupId>
			<artifactId>lombok</artifactId>
		</dependency>

		<!-- springboot整合freemarker -->
		<dependency>
			<groupId>org.springframework.boot</groupId>
			<artifactId>spring-boot-starter-freemarker</artifactId>
		</dependency>

		<!-->spring-boot 整合security -->
		<dependency>
			<groupId>org.springframework.boot</groupId>
			<artifactId>spring-boot-starter-security</artifactId>
		</dependency>
		<dependency>
			<groupId>org.springframework.cloud</groupId>
			<artifactId>spring-cloud-starter-oauth2</artifactId>
		</dependency>


	</dependencies>
	<!-- 注意: 这里必须要添加, 否者各种依赖有问题 -->
	<repositories>
		<repository>
			<id>spring-milestones</id>
			<name>Spring Milestones</name>
			<url>https://repo.spring.io/libs-milestone</url>
			<snapshots>
				<enabled>false</enabled>
			</snapshots>
		</repository>
	</repositories>
application.yml
server:
  port: 8081


logging:
  level:
    org.springframework.security: DEBUG

security:
  oauth2:
    resource:
      ####从认证授权中心上验证token
      tokenInfoUri: http://localhost:8080/oauth/check_token
      preferTokenInfo: true
    client:
      accessTokenUri: http://localhost:8080/oauth/token
      userAuthorizationUri: http://localhost:8080/oauth/authorize
      ###appid
      clientId: client_1
      ###appSecret
      clientSecret: 123456
资源拦截配置
@Configuration
@EnableResourceServer
public class ResourceServerConfiguration extends ResourceServerConfigurerAdapter {

	@Override
	public void configure(HttpSecurity http) throws Exception {
		// 对 api/order 请求进行拦截
		http.authorizeRequests().antMatchers("/api/order/**").authenticated();
	}
}
资源服务请求
@RestController
@RequestMapping("/api/order")
public class OrderController {

	@RequestMapping("/addOrder")
	public String addOrder() {
		return "addOrder";
	}
}
启动:
@SpringBootApplication
@EnableOAuth2Sso
public class AppOrder {

	public static void main(String[] args) {
		SpringApplication.run(AppOrder.class, args);
	}
}
将应用信息改为数据库存储
官方推荐SQL:
https://github.com/spring-projects/spring-security-oauth/blob/master/spring-security-oauth2/src/test/resources/schema.sql
-用于使用HSQL的测试中
创建 表 oauth_client_details(
  client_id VARCHAR(256)主 键,
  resource_ids VARCHAR(256),
  client_secret VARCHAR(256),
  范围VARCHAR(256),
  Authorized_grant_types VARCHAR(256),
  web_server_redirect_uri VARCHAR(256),
  权限VARCHAR(256),
  access_token_validity INTEGER,
  refresh_token_validity INTEGER,
  additional_information VARCHAR(4096),
  自动批准VARCHAR(256)
);

创建 表 oauth_client_token(
  token_id VARCHAR(256),
  令牌LONGVARBINARY,
  authentication_id VARCHAR(256)PRIMARY  KEY,
  user_name  VARCHAR(256),
  client_id VARCHAR(256)
);

创建 表 oauth_access_token(
  token_id VARCHAR(256),
  令牌LONGVARBINARY,
  authentication_id VARCHAR(256)PRIMARY  KEY,
  user_name  VARCHAR(256),
  client_id VARCHAR(256),
  身份验证 LONGVARBINARY,
  refresh_token VARCHAR(256)
);

创建 表 oauth_refresh_token(
  token_id VARCHAR(256),
  令牌LONGVARBINARY,
  认证 LONGVARBINARY
);

创建 表 oauth_code(
  代码VARCHAR(256),身份验证 LONGVARBINARY
);

创建 表 oauth_approvals(
	userId VARCHAR(256),
	clientId VARCHAR(256),
	范围VARCHAR(256),
	状态 VARCHAR(10),
	在TIMESTAMP到期,
	lastModifiedAt TIMESTAMP
);


-定制的oauth_client_details表
创建 表 ClientDetails(
  appId VARCHAR(256)主 键,
  resourceIds VARCHAR(256),
  appSecret VARCHAR(256),
  范围VARCHAR(256),
  grantTypes VARCHAR(256),
  redirectUrl VARCHAR(256),
  权限VARCHAR(256),
  access_token_validity INTEGER,
  refresh_token_validity INTEGER,
  additionalInformation VARCHAR(4096),
  autoApproveScopes VARCHAR(256)
);
修改认证授权中心
<dependency>
	<groupId>org.springframework.boot</groupId>
	<artifactId>spring-boot-starter-jdbc</artifactId>
</dependency>

<dependency>
	<groupId>mysql</groupId>
	<artifactId>mysql-connector-java</artifactId>
</dependency>
application.yml
spring:
  datasource:
    hikari:
      connection-test-query: SELECT 1
      minimum-idle: 1
      maximum-pool-size: 5
      pool-name: dbcp1
    driver-class-name: com.mysql.jdbc.Driver
    url: jdbc:mysql://localhost:3306/alan-oauth?autoReconnect=true&useSSL=false
    username: root
    password: root
修改配置文件类
// 配置授权中心信息
@Configuration
@EnableAuthorizationServer // 开启认证授权中心
public class AuthorizationServerConfig extends AuthorizationServerConfigurerAdapter {

	@Autowired
	@Qualifier("authenticationManagerBean")
	private AuthenticationManager authenticationManager;

	@Autowired
	@Qualifier("dataSource")
	private DataSource dataSource;

	// @Autowired
	// private UserDetailsService userDetailsService;

	@Bean
	public TokenStore tokenStore() {
		// return new InMemoryTokenStore(); //使用内存中的 token store
		return new JdbcTokenStore(dataSource); /// 使用Jdbctoken store
	}

	@Override
	public void configure(ClientDetailsServiceConfigurer clients) throws Exception {

		// 添加授权用户
		clients.jdbc(dataSource);
//		.withClient("client_1").secret(new BCryptPasswordEncoder().encode("123456"))
//		.authorizedGrantTypes("password", "refresh_token", "authorization_code")// 允许授权范围
//		.redirectUris("http://www.mayikt.com").authorities("ROLE_ADMIN", "ROLE_USER")// 客户端可以使用的权限
//		.scopes("all").accessTokenValiditySeconds(7200).refreshTokenValiditySeconds(7200);
	}

	@Override
	public void configure(AuthorizationServerEndpointsConfigurer endpoints) throws Exception {
		endpoints.tokenStore(tokenStore()).authenticationManager(authenticationManager)
				.userDetailsService(userDetailsService());// 必须设置
															// UserDetailsService
															// 否则刷新token 时会报错
	}

	@Bean
	UserDetailsService userDetailsService() {
		InMemoryUserDetailsManager userDetailsService = new InMemoryUserDetailsManager();
		userDetailsService.createUser(User.withUsername("user_1").password(new BCryptPasswordEncoder().encode("123456"))
				.authorities("ROLE_USER").build());
		userDetailsService.createUser(User.withUsername("user_2")
				.password(new BCryptPasswordEncoder().encode("1234567")).authorities("ROLE_USER").build());
		return userDetailsService;
	}

	@Override
	public void configure(AuthorizationServerSecurityConfigurer security) throws Exception {
		security.tokenKeyAccess("permitAll()").checkTokenAccess("isAuthenticated()")
				.allowFormAuthenticationForClients();// 允许表单登录
	}
}
