深入理解NIO系列分为四个部分
- 第一个部分也就是本节为NIO的简单使用(我很少写这种新手教程,所以如果你是复习还好,应该不难理解这篇,但如果你真的是入门而且不常阅读这种文字教程可能会看不懂,我的锅,别担心,建议找点简单的视频教程什么的先看看)
- 第二个部分为Tomcat中对NIO的应用(待更新)(本篇虽然讲Tomcat源码,但是主要讲其中NIO的部分,其他部分请移步)
- 第三个部分为NIO原理及部分源码的解析(待更新)
- 第四个部分为剖析NIO的底层epoll的实现原理(待更新)
从BIO到NIO
无论是BIO还是NIO,其实都算是一种IO模型,都是基于socket的编程,
而socket又分为两种:文件型和网络型(OS的知识,Linux的进程通讯就是socket实现的)
文件型可以简单说成是本机的通讯,也就是本地进程间的通讯(我们访问localhost应该算一个)
网络型的话就是Client-Server了,例如浏览器访问其他服务器上的网页这种。
而聊天室属于既可以在本机开两个窗口聊天,也可以和互联网上的其他主机进行聊天的那种。
所以接下来我们讲的无论是BIO还是NIO,都可以当做一个聊天室这样子去理解会简单些。
BIO模型
首先我们先看一下BIO的网络模型


可以看到,BIO属于来一个新的连接,我们就新开一个线程来处理这个连接,之后的操作全部由那个线程来完成的那种。
那么,这个模式下的性能瓶颈在哪里呢?
- 首先,每次来一个连接都开一个新的线程这肯定是不合适的。当活跃连接数在几十几百的时候当然是可以这样做的,但如果活跃连接数是几万几十万的时候,这么多线程明显就不行了。每个线程都需要一部分内存,内存会被迅速消耗,同时,线程切换的开销非常大。
- 其次,假如一个用户只是登录了聊天室,之后便不再做任何操作,而这个线程却一直在那里循环等待用户发送消息,等待write(),这显然是非常耗费资源的。
因此人们便提出了NIO
NIO模型
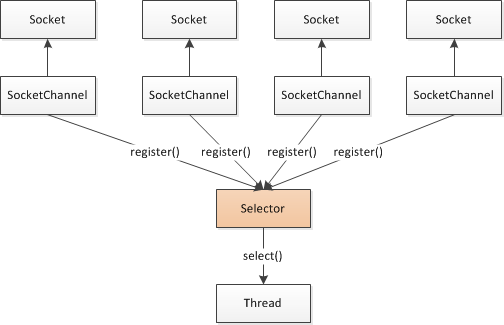
非阻塞 IO 的核心在于使用一个 Selector 来管理多个通道,可以是 SocketChannel,也可以是 ServerSocketChannel,将各个通道注册到 Selector 上,指定监听的事件。
之后可以只用一个线程来轮询这个 Selector,看看上面是否有通道是准备好的,当通道准备好可读或可写,然后才去开始真正的读写,这样速度就很快了。我们就完全没有必要给每个通道都起一个线程。
简单例子介绍NIO的使用
这里只给出服务端的实现,代码不难,建议贴到ide里面好好过一遍,也方便后续阅读。
/**
 * NIO服务器端
 */
public class NioServer {

    private void start() throws IOException {
        // 1. 创建Selector
        Selector selector = Selector.open();

        // 2. 通过ServerSocketChannel创建channel通道
        ServerSocketChannel serverSocketChannel = ServerSocketChannel.open();

        // 3. 为channel通道绑定监听端口
        serverSocketChannel.bind(new InetSocketAddress(8000));

        // 4. 设置channel为非阻塞模式
        serverSocketChannel.configureBlocking(false);

        // 5. 将channel注册到selector上,监听连接事件
        serverSocketChannel.register(selector, SelectionKey.OP_ACCEPT);
        System.out.println("服务器启动成功!");

        // 6. 循环等待新接入的连接
        for (;;) {
            // 获取可用channel数量
            int readyChannels = selector.select();

            if (readyChannels == 0) continue;

            // 获取可用channel的集合
            Set<SelectionKey> selectionKeys = selector.selectedKeys();

            Iterator iterator = selectionKeys.iterator();

            while (iterator.hasNext()) {
                // selectionKey实例
                SelectionKey selectionKey = (SelectionKey) iterator.next();

                iterator.remove();

                // 如果是 接入事件
                if (selectionKey.isAcceptable()) {
                    acceptHandler(serverSocketChannel, selector);
                }

                // 如果是 可读事件
                if (selectionKey.isReadable()) {
                    readHandler(selectionKey, selector);
                }
            }
        }
    }

    /**
     * 接入事件处理器
     */
    private void acceptHandler(ServerSocketChannel serverSocketChannel,
                               Selector selector)
            throws IOException {
        // 如果要是接入事件,创建socketChannel
        SocketChannel socketChannel = serverSocketChannel.accept();

        // 将socketChannel设置为非阻塞工作模式
        socketChannel.configureBlocking(false);

        // 将channel注册到selector上,监听 可读事件
        socketChannel.register(selector, SelectionKey.OP_READ);

        // 回复客户端提示信息
        socketChannel.write(Charset.forName("UTF-8")
                .encode("你与聊天室里其他人都不是朋友关系,请注意隐私安全"));
    }

    /**
     * 可读事件处理器
     */
    private void readHandler(SelectionKey selectionKey, Selector selector)
            throws IOException {
        // 要从 selectionKey 中获取到已经就绪的channel
        SocketChannel socketChannel = (SocketChannel) selectionKey.channel();

        // 创建buffer
        ByteBuffer byteBuffer = ByteBuffer.allocate(1024);

        // 循环读取客户端请求信息
        String request = "";
        while (socketChannel.read(byteBuffer) > 0) {

            // 切换buffer为读模式
            byteBuffer.flip();

            // 读取buffer中的内容
            request += Charset.forName("UTF-8").decode(byteBuffer);
        }

        // 将channel再次注册到selector上,监听他的可读事件
        socketChannel.register(selector, SelectionKey.OP_READ);

        // 将客户端发送的请求信息 广播给其他客户端
        if (request.length() > 0) {
            // 广播给其他客户端
            broadCast(selector, socketChannel, request);
        }
    }

    /**
     * 广播给其他客户端
     */
    private void broadCast(Selector selector,
                           SocketChannel sourceChannel, String request) {
        // 获取到所有已接入的客户端channel
        Set<SelectionKey> selectionKeySet = selector.keys();

        // 循环向所有channel广播信息
        selectionKeySet.forEach(selectionKey -> {
            Channel targetChannel = selectionKey.channel();

            // 剔除发消息的客户端
            if (targetChannel instanceof SocketChannel
                    && targetChannel != sourceChannel) {
                try {
                    // 将信息发送到targetChannel客户端
                    ((SocketChannel) targetChannel).write(
                            Charset.forName("UTF-8").encode(request));
                } catch (IOException e) {
                    e.printStackTrace();
                }
            }
        });
    }
}
和上面的代码一模一样,但是这个有行号,方便阅读:
  1 /**
  2  * NIO服务器端
  3  */
  4 public class NioServer {
  5
  6     private void start() throws IOException {
  7         // 1. 创建Selector
  8         Selector selector = Selector.open();
  9
 10         // 2. 通过ServerSocketChannel创建channel通道
 11         ServerSocketChannel serverSocketChannel = ServerSocketChannel.open();
 12
 13         // 3. 为channel通道绑定监听端口
 14         serverSocketChannel.bind(new InetSocketAddress(8000));
 15
 16         // 4. 设置channel为非阻塞模式
 17         serverSocketChannel.configureBlocking(false);
 18
 19         // 5. 将channel注册到selector上,监听连接事件
 20         serverSocketChannel.register(selector, SelectionKey.OP_ACCEPT);
 21         System.out.println("服务器启动成功!");
 22
 23         // 6. 循环等待新接入的连接
 24         for (;;) {
 25             // 获取可用channel数量
 26             int readyChannels = selector.select();
 27
 28             if (readyChannels == 0) continue;
 29
 30             // 获取可用channel的集合
 31             Set<SelectionKey> selectionKeys = selector.selectedKeys();
 32
 33             Iterator iterator = selectionKeys.iterator();
 34
 35             while (iterator.hasNext()) {
 36                 // selectionKey实例
 37                 SelectionKey selectionKey = (SelectionKey) iterator.next();
 38
 39                 iterator.remove();
 40
 41                 // 如果是 接入事件
 42                 if (selectionKey.isAcceptable()) {
 43                     acceptHandler(serverSocketChannel, selector);
 44                 }
 45
 46                 // 如果是 可读事件
 47                 if (selectionKey.isReadable()) {
 48                     readHandler(selectionKey, selector);
 49                 }
 50             }
 51         }
 52     }
 53
 54     /**
 55      * 接入事件处理器
 56      */
 57     private void acceptHandler(ServerSocketChannel serverSocketChannel,
 58                                Selector selector)
 59             throws IOException {
 60         // 如果要是接入事件,创建socketChannel
 61         SocketChannel socketChannel = serverSocketChannel.accept();
 62
 63         // 将socketChannel设置为非阻塞工作模式
 64         socketChannel.configureBlocking(false);
 65
 66         // 将channel注册到selector上,监听 可读事件
 67         socketChannel.register(selector, SelectionKey.OP_READ);
 68
 69         // 回复客户端提示信息
 70         socketChannel.write(Charset.forName("UTF-8")
 71                 .encode("你与聊天室里其他人都不是朋友关系,请注意隐私安全"));
 72     }
 73
 74     /**
 75      * 可读事件处理器
 76      */
 77     private void readHandler(SelectionKey selectionKey, Selector selector)
 78             throws IOException {
 79         // 要从 selectionKey 中获取到已经就绪的channel
 80         SocketChannel socketChannel = (SocketChannel) selectionKey.channel();
 81
 82         // 创建buffer
 83         ByteBuffer byteBuffer = ByteBuffer.allocate(1024);
 84
 85         // 循环读取客户端请求信息
 86         String request = "";
 87         while (socketChannel.read(byteBuffer) > 0) {
 88
 89             // 切换buffer为读模式
 90             byteBuffer.flip();
 91
 92             // 读取buffer中的内容
 93             request += Charset.forName("UTF-8").decode(byteBuffer);
 94         }
 95
 96         // 将channel再次注册到selector上,监听他的可读事件
 97         socketChannel.register(selector, SelectionKey.OP_READ);
 98
 99         // 将客户端发送的请求信息 广播给其他客户端
100         if (request.length() > 0) {
101             // 广播给其他客户端
102             broadCast(selector, socketChannel, request);
103         }
104     }
105
106     /**
107      * 广播给其他客户端
108      */
109     private void broadCast(Selector selector,
110                            SocketChannel sourceChannel, String request) {
111         // 获取到所有已接入的客户端channel
112         Set<SelectionKey> selectionKeySet = selector.keys();
113
114         // 循环向所有channel广播信息
115         selectionKeySet.forEach(selectionKey -> {
116             Channel targetChannel = selectionKey.channel();
117
118             // 剔除发消息的客户端
119             if (targetChannel instanceof SocketChannel
120                     && targetChannel != sourceChannel) {
121                 try {
122                     // 将信息发送到targetChannel客户端
123                     ((SocketChannel) targetChannel).write(
124                             Charset.forName("UTF-8").encode(request));
125                 } catch (IOException e) {
126                     e.printStackTrace();
127                 }
128             }
129         });
130     }
131 }
NIO的三大组件
通过1.2的NIO部分的那张图和2.0的代码,你应该大致知道NIO的其中两大组件:Selector和Channel
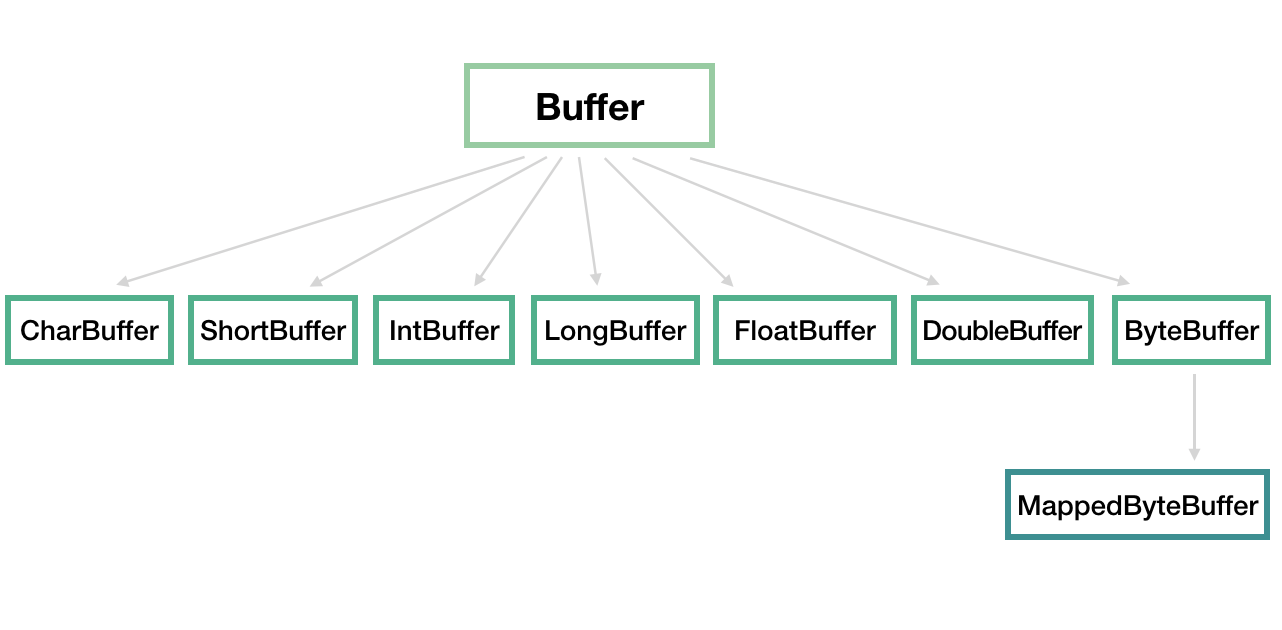
这里这张图随手也把第三大组件Buffer也给了,接下来我们就先来聊一下这个Buffer
Buffer组件
首先看一眼Buffer种类(大同小异,大同小异)
接下来讲一下它的参数:
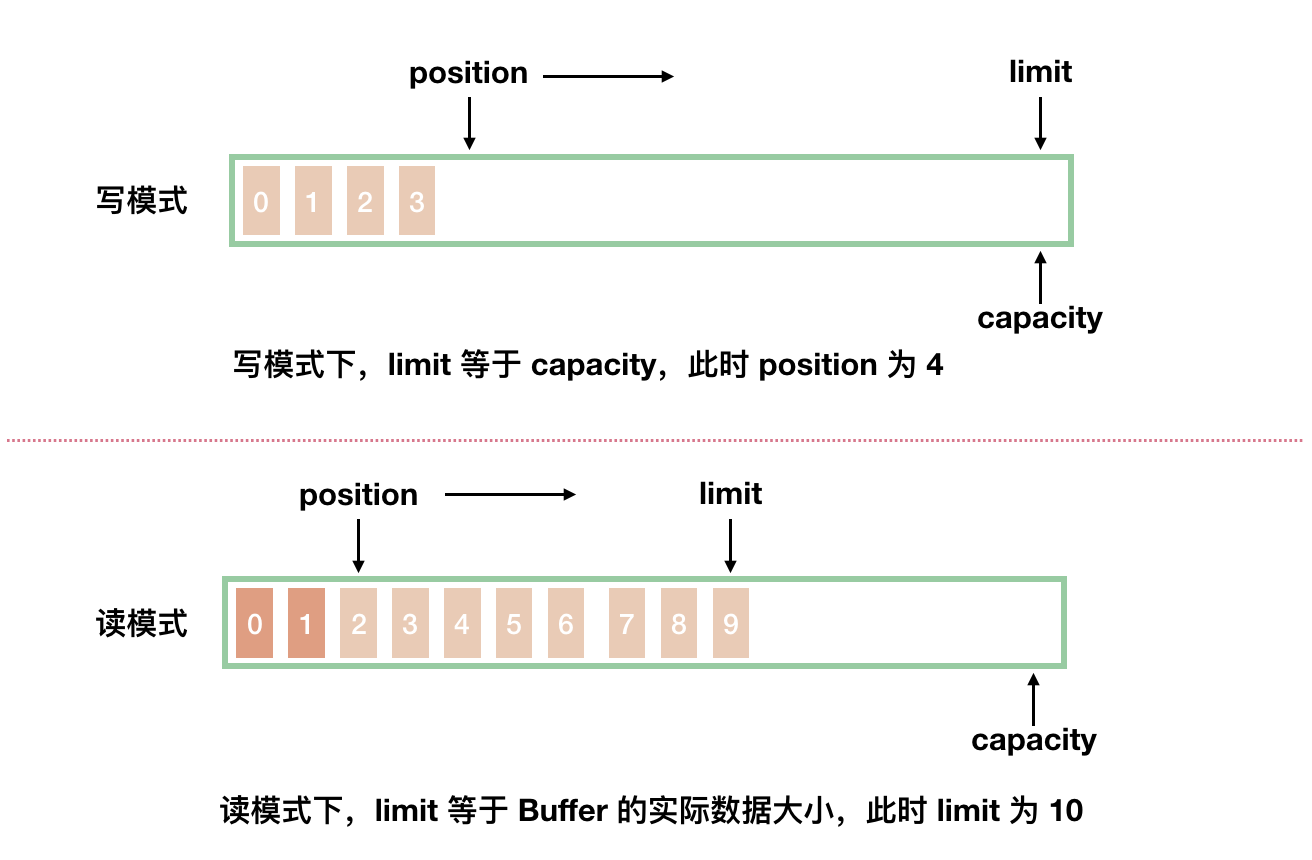
- capacity,它代表这个缓冲区的容量,一旦设定就不可以更改。比如 capacity 为 1024 的 IntBuffer,代表其一次可以存放 1024 个 int 类型的值。一旦 Buffer 的容量达到 capacity,需要清空 Buffer,才能重新写入值。
- position 的初始值是 0,每往 Buffer 中写入一个值,position 就自动加 1,代表下一次的写入位置。读操作的时候也是类似的,每读一个值,position 就自动加 1。
- 从写操作模式到读操作模式切换的时候(flip),position 都会归零,这样就可以从头开始读写了。
- Limit:写操作模式下,limit 代表的是最大能写入的数据,这个时候 limit 等于 capacity。写结束后,切换到读模式,此时的 limit 等于 Buffer 中实际的数据大小,因为 Buffer 不一定被写满了。
看一下刚刚例子中对Buffer的使用(82~94行):
// 创建buffer
ByteBuffer byteBuffer = ByteBuffer.allocate(1024);

// 循环读取客户端请求信息
String request = "";
while (socketChannel.read(byteBuffer) > 0) {

    // 切换buffer为读模式
    byteBuffer.flip();

    // 读取buffer中的内容
    request += Charset.forName("UTF-8").decode(byteBuffer);
}
其中的flip方法,其实也就是设置了一下 position 和 limit 值罢了。
public final Buffer flip() {
    limit = position; // 将 limit 设置为实际写入的数据数量
    position = 0; // 重置 position 为 0
    mark = -1; // mark 之后再说
    return this;
}
其他的read和write方法也不过是对三个参数的操作和读取写入buffer数组的综合而已,这里就不一一分析(大同小异,大同小异)
其它的方法我也就不介绍了,要用的时候自己去查api就是了。
Channel组件

- FileChannel:文件通道,用于文件的读和写
- DatagramChannel:用于 UDP 连接的接收和发送
- SocketChannel:把它理解为 TCP 连接通道,简单理解就是 TCP 客户端
- ServerSocketChannel:TCP 对应的服务端,用于监听某个端口进来的请求
Channel 经常翻译为通道,类似 IO 中的流,用于读取和写入。它与前面介绍的 Buffer 打交道,读操作的时候将 Channel 中的数据填充到 Buffer 中,而写操作时将 Buffer 中的数据写入到 Channel 中。
这里是例子中对ServerSocketChannel的应用(10~17行)
// 2. 通过ServerSocketChannel创建channel通道
ServerSocketChannel serverSocketChannel = ServerSocketChannel.open();

// 3. 为channel通道绑定监听端口
serverSocketChannel.bind(new InetSocketAddress(8000));

// 4. 设置channel为非阻塞模式
serverSocketChannel.configureBlocking(false);
还有就是对SocketChannel的应用(60~64行)
// 如果要是接入事件,创建socketChannel
SocketChannel socketChannel = serverSocketChannel.accept();

// 将socketChannel设置为非阻塞工作模式
socketChannel.configureBlocking(false);
到这里,我们应该能理解 SocketChannel 了,它不仅仅是 TCP 客户端,它代表的是一个网络通道,可读可写。
而ServerSocketChannel 不和 Buffer 打交道了,因为它并不实际处理数据,它一旦接收到请求后,实例化 SocketChannel,之后在这个连接通道上的数据传递它就不管了,因为它需要继续监听端口,等待下一个连接。
Selector组件
那么,整出Channel后该怎么办呢?当然是把它注册到Selector上了。
我们先整一个Selector出来(7~8行):
// 1. 创建Selector
Selector selector = Selector.open();
然后把ServerSocketChannel注册上去(16~21行):
// 4. 设置channel为非阻塞模式
serverSocketChannel.configureBlocking(false);

// 5. 将channel注册到selector上,监听连接事件
serverSocketChannel.register(selector, SelectionKey.OP_ACCEPT);
System.out.println("服务器启动成功!");
这里可以看到注册的另一个参数 SelectionKey.OP_ACCEPT :
register 方法的第二个 int 型参数(使用二进制的标记位)用于表明需要监听哪些感兴趣的事件,共以下四种事件:
-
SelectionKey.OP_READ 对应 00000001,通道中有数据可以进行读取
-
SelectionKey.OP_WRITE 对应 00000100,可以往通道中写入数据
-
SelectionKey.OP_CONNECT 对应 00001000,成功建立 TCP 连接
-
SelectionKey.OP_ACCEPT 对应 00010000,接受 TCP 连接
SocketChannel 同理:
// 如果要是接入事件,创建socketChannel
SocketChannel socketChannel = serverSocketChannel.accept();

// 将socketChannel设置为非阻塞工作模式
socketChannel.configureBlocking(false);

// 将channel注册到selector上,监听 可读事件
socketChannel.register(selector, SelectionKey.OP_READ);
接下来就是循环检测selector中有没有准备好的channel了(23~31行):
// 6. 循环等待新接入的连接
for (;;) {
    // 获取可用channel数量
    int readyChannels = selector.select();

    if (readyChannels == 0) continue;

    // 获取可用channel的集合
    Set<SelectionKey> selectionKeys = selector.selectedKeys();
这里只提一下select()方法
调用此方法,会将上次 select 之后的准备好的 channel 对应的 SelectionKey 复制到 selected set 中。如果没有任何通道准备好,这个方法会阻塞,直到至少有一个通道准备好。

参考资料:
https://javadoop.com/post/java-nio 参考组件部分