docker默认使用bridge模式,通过网桥连接到宿主机,而容器内部的ip则从网桥所在的ip段取未用的ip。这样做一个不方便的地方在于容器内部的ip不是固定的,想要连接容器时只能通过映射到宿主机的端口,因而有很多项目使用overlay来为docker提供网络的配置,比如Pipework、Flannel、Kubernetes、Weave、opencontrail等。
想要使用overlay来为docker配置网络,需要首先了解下docker的网络模式:
一、Docker的四种网络模式
Docker在创建容器时有四种网络模式,bridge为默认不需要用--net去指定,其他三种模式需要在创建容器时使用--net去指定。
- bridge模式,使用--net=bridge指定,默认设置。
- none模式,使用--net=none指定。
- host模式,使用--net=host指定。
- container模式,使用--net=container:容器名称或ID指定。(如:--net=container:30b668ccb630)
bridge模式:docker网络隔离基于网络命名空间<Network Namespace>,在物理机上创建docker容器时会为每一个docker容器分配网络命名空间,并且把容器IP桥接到物理机的虚拟网桥上。
none模式:此模式下创建容器是不会为容器配置任何网络参数的,如:容器网卡、IP、通信路由等,全部需要自己去配置。
host模式:此模式创建的容器没有自己独立的网络命名空间,是和物理机共享一个Network Namespace,并且共享物理机的所有端口与IP,并且这个模式认为是不安全的。
container模式:此模式和host模式很类似,只是此模式创建容器共享的是其他容器的IP和端口而不是物理机,此模式容器自身是不会配置网络和端口,创建此模式容器进去后,你会发现里边的IP是你所指定的那个容器IP并且端口也是共享的,而且其它还是互相隔离的,如进程等。
二、Docker配置自己的网桥
例子一、
1)、自定义新网桥
|
1
2
3
4
5
6
7
8
9
10
11
12
13
14
15
16
17
18
19
20
21
22
23
24
25
26
27
28
29
30
31
32
33
34
35
36
37
38
39
40
41
42
43
44
45
46
47
48
49
50
51
52
53
54
55
|
root@Docker:~
# dpkg -l | grep bridge* #查看是否有安装brctl命令包
ii bridge-utils 1.5-6Ubuntu2 amd64 Utilities
for
configuring the Linux Ethernet bridge
root@Docker:~
# apt-get install bridge-utils #安装brctl命令包
root@Docker:~
# docker -v #docker版本
Docker version 1.5.0, build a8a31ef
root@Docker:~
# ps -ef | grep docker #正在运行
root 6834 1 0 16:28 ? 00:00:00
/usr/bin/docker
-d
root@Docker:~
# service docker stop #停止
root@Docker:~
# ifconfig | grep docker0 #docker默认网桥
docker0 Link encap:以太网 硬件地址 56:84:7a:fe:97:99
root@Docker:~
# ifconfig docker0 down #停止docker默认网桥
root@Docker:~
# brctl show #查看物理机上有哪些网桥
root@Docker:~
# brctl delbr docker0 #删除docker默认网桥
root@Docker:~
# brctl addbr docker_new0 #自定义网桥
root@Docker:~
# ifconfig docker_new0 192.168.6.1 netmask 255.255.255.0 #给自定义网桥指定IP和子网
root@Docker:~
# ifconfig | grep docker_new0 #查看发现自定义网桥已经启动
docker_new0 Link encap:以太网 硬件地址 0a:5b:26:48:
dc
:04
inet 地址:192.168.6.1 广播:192.168.6.255 掩码:255.255.255.0
root@Docker:~
# echo 'DOCKER_OPTS="-b=docker_new0"' >> /etc/default/docker #指定网桥写入docker配置文件
root@Docker:~
# service docker start #启动docker
root@Docker:~
# ps -ef | grep docker #成功启动,并且成功加载了docker_new0
root 21345 1 0 18:44 ? 00:00:00
/usr/bin/docker
-d -b=docker_new0
root@Docker:~
# brctl show #查看当前网桥下是否有容器连接
bridge name bridge
id
STP enabled interfaces
docker_new0 8000.fa3ce276c3b9 no
root@Docker:~
# docker run -itd CentOS:centos6 /bin/bash #创建容器测试
root@Docker:~
# docker attach 7f8ff622237f #进入容器
[root@7f8ff622237f /]
# ifconfig eth0 | grep addr #容器IP已经和自定义网桥一个网段,该容器IP为DHCP自动分配,不属于指定固定IP
eth0 Link encap:Ethernet HWaddr 02:42:C0:A8:06:02
inet addr:192.168.6.2 Bcast:0.0.0.0 Mask:255.255.255.0
inet6 addr: fe80::42:c0ff:fea8:602
/64
Scope:Link
root@Docker:~
# brctl show #该网桥上已经连接着一个网络设备了
bridge name bridge
id
STP enabled interfaces
docker_new0 8000.fa3ce276c3b9 no veth17f560a
|
注:veth设备是成双成对出现的,一端是容器内部命名eth0,一端是加入到网桥并命名的veth17f560a(通常命名为veth*),他们组成了一个数据传输通道,一端进一端出,veth设备连接了两个网络设备 并实现了数据通信。
|
1
2
3
4
5
6
7
8
9
10
11
12
13
14
15
16
17
18
19
20
21
22
23
24
25
26
27
28
29
30
31
32
33
34
35
36
37
38
39
40
41
42
43
44
45
46
47
48
49
50
|
root@Docker:~
# wget https://github.com/jpetazzo/pipework/archive/master.zip #下载 pipework
root@Docker:~
# unzip master.zip #解压
root@Docker:~
# cp pipework-master/pipework /usr/bin/ #拷贝pipework到 /usr/bin/下
root@Docker:~
# chmod +x /usr/bin/pipework #赋予该命令执行权限
root@Docker:~
# pipework docker_new0 -i eth1 $(docker run -itd -p 9197:80 centos:centos6 /bin/bash) 192.168.6.27/[email protected] #创建容器,并指定固定IP
格式:pipework 网桥名 -i 指定在那块网卡上配置 <容器名or容器ID> 指定容器内IP/子网@网关 注:容器内网关就是物理机网桥的IP
root@Docker:~
# docker attach 2966430e2dbe #进入新容器
[root@2966430e2dbe /]
# ifconfig #容器内IP为指定的IP 192.168.6.27
eth0 Link encap:Ethernet HWaddr 02:42:C0:A8:06:05
inet addr:192.168.6.7 Bcast:0.0.0.0 Mask:255.255.255.0
#docker_new0网桥创建容器时DHCP分配的IP
eth1 Link encap:Ethernet HWaddr 82:DB:F7:A3:33:92
inet addr:192.168.6.27 Bcast:0.0.0.0 Mask:255.255.255.0
#pipework指定的固定IP,网桥还是docker_new0
[root@2966430e2dbe /]
# route -n #查看路由路径
Kernel IP routing table
Destination Gateway Genmask Flags Metric Ref Use Iface
0.0.0.0 192.168.6.1 0.0.0.0 UG 0 0 0 eth0
192.168.6.0 0.0.0.0 255.255.255.0 U 0 0 0 eth0
192.168.6.0 0.0.0.0 255.255.255.0 U 0 0 0 eth1
[root@2966430e2dbe /]
# ping www.linuxidc.com #测试网络
PING www.linuxidc.com (119.75.218.70) 56(84) bytes of data.
64 bytes from 119.75.218.70: icmp_seq=1 ttl=127
time
=3.98 ms
64 bytes from 119.75.218.70: icmp_seq=2 ttl=127
time
=2.98 ms
[root@2966430e2dbe /]
# netstat -anptu | grep 80 #容器内80端口已经开启
tcp 0 0 :::80 :::* LISTEN -
root@Docker:~
# telnet 192.168.6.27 80 #物理机上测试指定的IP是否和映射的端口等通信正常
Trying 192.168.6.27...
Connected to 192.168.6.27.
Escape character is
'^]'
.
root@Docker:~
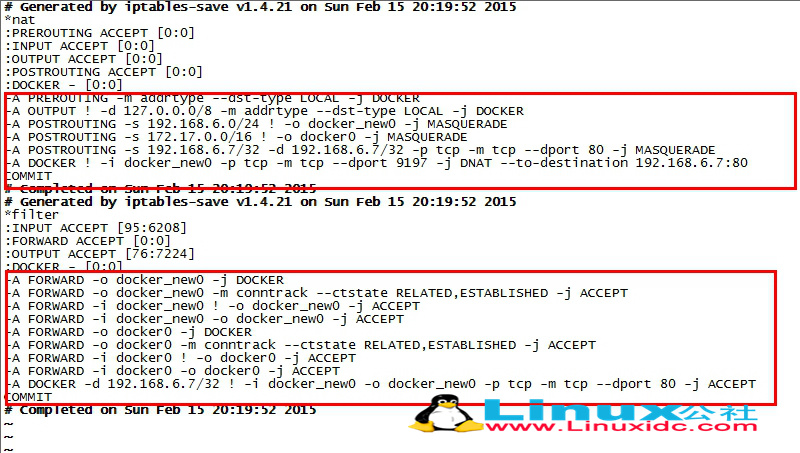
# iptables-save > iptables-rules #拷贝防火墙规则到本地文件
root@Docker:~
# vi iptables-rules #打开规则文件查看你会发现你物理机的防火墙自动添加了很多条规则,这个是容器到网桥到本地网卡到公网的地址转换通信规则<br>
|
例子二:
首先,配置一个用于创建container interface的网桥,可以使用ovs,也可以使用Linux bridge,以Linux bridge为例:
|
1
2
3
4
5
6
|
br_name=docker
brctl addbr $br_name
ip addr add 192.168.33.2
/24
dev $br_name
ip addr del 192.168.33.2
/24
dev em1
ip link
set
$br_name up
brctl addif $br_name eth0
|
接着,可以启动容器了,注意用--net=none方式启动:
|
1
2
3
4
|
# start new container
hostname
=
'docker.test.com'
cid=$(docker run -d -i -h $
hostname
--net=none -t centos)
pid=$(docker inspect -f
'{{.State.Pid}}'
$cid)
|
下面,为该容器配置网络namespace,并设置固定ip:
|
1
2
3
4
5
6
7
8
9
10
11
12
13
14
15
|
# set up netns
mkdir
-p
/var/run/netns
ln
-s
/proc/
$pid
/ns/net
/var/run/netns/
$pid
# set up bridge
ip link add q$pid
type
veth peer name r$pid
brctl addif $br_name q$pid
ip link
set
q$pid up
# set up docker interface
fixed_ip=
'192.168.33.3/24'
gateway=
'192.168.33.1'
ip link
set
r$pid netns $pid
ip netns
exec
$pid ip link
set
dev r$pid name eth0
ip netns
exec
$pid ip link
set
eth0 up
ip netns
exec
$pid ip addr add $fixed_ip dev eth0
ip netns
exec
$pid ip route add default via 192.168.33.1
|
这样,容器的网络就配置好了,如果容器内部开启了sshd服务,通过192.168.33.3就可以直接ssh连接到容器,非常方便。上面的步骤比较长,可以借助pipework来为容器设置固定ip(除了设置IP,还封装了配置网关、macvlan、vlan、dhcp等功能):
pipework docker0 be8365e3b2834 10.88.88.8/24
那么,当容器需要删除的时候,怎么清理网络呢,其实也很简单:
|
1
2
3
4
5
|
# stop and delete container
docker stop $cid
docker
rm
$cid
# delete docker's net namespace (also delete veth pair)
ip netns delete $pid
|
更多docker网络的配置,可以参考官方手册。
感谢阅读,希望能帮助到大家,谢谢大家对本站的支持!