做IOS开发的都知道,IOS提供了一个具有动态开关效果的UISwitch组件,这个组件很好用效果相对来说也很绚丽,当我们去点击开关的时候有动画效果,但遗憾的是Android上并没有给我们提供类似的组件(听说在Android4.0的版本上提供了具有动态效果的开关组件,不过我还没有去看文档),如果我们想实现类似的效果那该怎么办了呢?看来又得去自定义了。
公司的产品最近一直在做升级,主要做的就是把界面做的更绚丽更美观给用户更好的体验(唉,顾客是上帝......),其中的设置功能中就有开关按钮,原来的开关做的是两幅图片,通过点击图片来给开关设置不同的状态图片,但是这种效果很死板和程序的整体风格不太协调,于是就想着实现类似于IOS中的开关效果。
拿着笔在图纸上画了画,我实现的原理也是采用了两幅图片,一个整体的背景图:

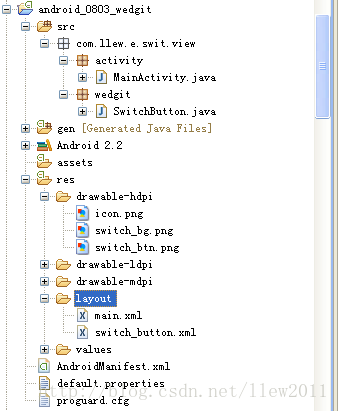
好了,老规矩来看一下项目结构吧:
工程中switch_button.xml文件就是对应的SwitchButton的布局文件,内容不需要解释,你一看就懂
<?xml version="1.0" encoding="utf-8"?>
<LinearLayout
	xmlns:android="http://schemas.android.com/apk/res/android"
	android:id="@+id/switch_parent"
	android:layout_width="wrap_content"
	android:layout_height="wrap_content"
	android:background="@drawable/switch_bg">

	<ImageView
		android:id="@+id/switch_button"
		android:layout_width="wrap_content"
		android:layout_height="wrap_content"
		android:src="@drawable/switch_btn" />

</LinearLayout>
其中自定义开关组件就是都在wedgit包下的SwitchButton,那么赶紧来看一下SwitchButton的代码吧
public class SwitchButton extends LinearLayout {

	/**
	 * 开关图片
	 */
	private LinearLayout switchParent;
	/**
	 * 滑块图片
	 */
	private ImageView switchButton;
	/**
	 * 按钮状态,默认关闭
	 */
	private boolean isOn = false;
	/**
	 * 滑块需要滑动的距离
	 */
	private int scrollDistance;
	/**
	 * 开关按钮监听器
	 */
	private SwitchChangedListner listner;

	public SwitchButton(Context context) {
		super(context);
		initWedgits(context);
	}

	public SwitchButton(Context context, AttributeSet attrs) {
		super(context, attrs);
		initWedgits(context);
	}

	/**
	 * 初始化组件
	 *
	 * @param context
	 *            上下文环境
	 */
	private void initWedgits(Context context) {
		try {
			View view = LayoutInflater.from(context).inflate(
					R.layout.switch_button, this);
			switchParent = (LinearLayout) view.findViewById(R.id.switch_parent);
			switchButton = (ImageView) view.findViewById(R.id.switch_button);
			addListeners();
		} catch (Exception e) {
			e.printStackTrace();
		}
	}

	/**
	 * 添加事件监听器
	 */
	private void addListeners() {
		try {
			switchParent.setOnClickListener(new OnClickListener() {
				@Override
				public void onClick(View v) {
					isOn = !isOn;
					scrollSwitch();
					if (null != listner) {
						// 开关开发或者关闭的回调方法
						listner.switchChanged(getId(), isOn);
					}
				}
			});
		} catch (Exception e) {
			e.printStackTrace();
		}
	}

	/**
	 * 滑动开关
	 */
	private void scrollSwitch() {
		// 获取滑块需要滑动的距离,滑动距离等于父组建的宽度减去滑块的宽度
		scrollDistance = switchParent.getWidth() - switchButton.getWidth();
		// 初始化滑动事件
		Animation animation = null;
		if (isOn) {
			animation = new TranslateAnimation(0, scrollDistance, 0, 0);
		} else {
			animation = new TranslateAnimation(scrollDistance, 0, 0, 0);
		}
		// 设置滑动时间
		animation.setDuration(200);
		// 滑动之后保持状态
		animation.setFillAfter(true);
		// 开始滑动
		switchButton.startAnimation(animation);
	}

	/**
	 * 获取开关状态
	 *
	 * @return 【true:打开】【false:关闭】
	 */
	public boolean isOn() {
		return isOn;
	}

	/**
	 * 设置开关状态
	 *
	 * @param isOn
	 *            开关状态【true:打开】【false:关闭】
	 */
	public void setOn(boolean isOn) {
		if (this.isOn == isOn) {
			return;
		}
		this.isOn = isOn;
		post(new Runnable() {
			@Override
			public void run() {
				scrollSwitch();
			}
		});
	}

	/**
	 * 设置开关状态监听器
	 *
	 * @param listner
	 *            开关状态监听器
	 */
	public void setOnSwitchListner(SwitchChangedListner listner) {
		this.listner = listner;
	}

	/**
	 * 开关状态监听器
	 *
	 * @author llew
	 *
	 */
	public interface SwitchChangedListner {
		/**
		 * 开关状态改变
		 *
		 * @param viewId
		 *            当前开关ID
		 * @param isOn
		 *            开关是否打开【true:打开】【false:关闭】
		 */
		public void switchChanged(Integer viewId, boolean isOn);
	}
}
SwitchButton的实现也很简单,首先是初始化组件initWedgits(),然后添加事件监听器addListeners(),在监听器中做逻辑判断,代码都有注释,就不再详细说明了
那么到了最后,我们来看看MainActivity中对SwitchButton的用法吧
public class MainActivity extends Activity {

	private SwitchButton switchButton;

    /** Called when the activity is first created. */
    @Override
    public void onCreate(Bundle savedInstanceState) {
        super.onCreate(savedInstanceState);
        setContentView(R.layout.main);
        initWedgits();
    }

    /**
     * 初始化各组件
     */
	private void initWedgits() {
		try {
			switchButton = (SwitchButton) findViewById(R.id.switchButton);
			// switchButton.setOn(false);
			switchButton.setOn(true);
			addListeners();
		} catch (Exception e) {
			e.printStackTrace();
		}
	}

	/**
	 * 添加事件监听器
	 */
	private void addListeners() {
		try {
			switchButton.setOnSwitchListner(new SwitchChangedListner() {
				@Override
				public void switchChanged(Integer viewId, boolean isOn) {
					if(isOn) {
						Toast.makeText(getApplicationContext(), "开关打开了", Toast.LENGTH_LONG).show();
					} else {
						Toast.makeText(getApplicationContext(), "开关关闭了", Toast.LENGTH_LONG).show();
					}
				}
			});
		} catch (Exception e) {
			e.printStackTrace();
		}
	}
}
好了,代码都贴完了,接下来看看运行效果吧,(*^__^*) 嘻嘻……
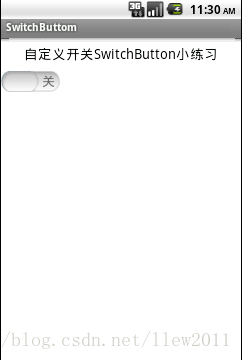
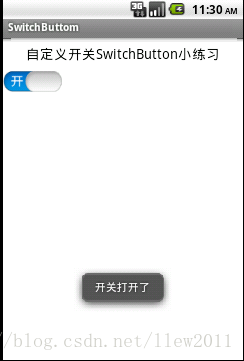
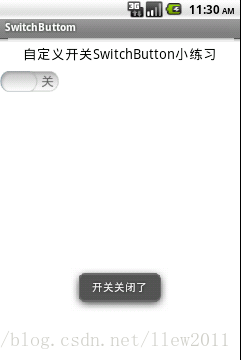
很遗憾的是,木有动画效果,呜呜~~~~(>_<)~~~~ ,先这样吧,呵呵
好了,基本上自定义开关组件到这里就讲完了,如有不足,请指正
感谢您的观看
