一对一发送
1、配置pom包,主要是添加spring-boot-starter-amqp的支持
        <dependency>
            <groupId>org.springframework.boot</groupId>
            <artifactId>spring-boot-starter-amqp</artifactId>
        </dependency>
2、配置文件application.properties,配置rabbitmq的安装地址、端口以及账户信息
        spring.rabbitmq.host=127.0.0.1
        spring.rabbitmq.port=5672
        spring.rabbitmq.username=guest
        spring.rabbitmq.password=guest
3、队列配置
@Configuration
public class RabbitConfig {

    @Bean
    public Queue Queue() {
        return new Queue("hello");
    }

}
4、消息发送者
@Component
public class HelloSender {
    @Autowired
    private AmqpTemplate rabbitTemplate;

    public void send(int i) {
        String context = "hello " + new Date()+"***********"+i;
        System.out.println("Sender1 : " + context);
        this.rabbitTemplate.convertAndSend("hello", context);
    }

}
5、接收者
@Component
@RabbitListener(queues = "hello")
public class HelloReceiver {

    @RabbitHandler
    public void process(String hello) {
        System.out.println("Receiver1  : " + hello);
    }

}
6、测试
    @Test
    public void hello() throws Exception {
        helloSender1.send(1);
    }
注意,发送者和接收者的queue name必须一致,不然不能接收
一对多发送
对上面的代码进行了小改造,接收端注册了两个Receiver,Receiver1和Receiver2,发送端加入参数计数,接收端打印接收到的参数,下面是测试代码,发送一百条消息,来观察两个接收端的执行效果:
     @Test
    public void oneToMany() throws Exception {
        for (int i=0;i<100;i++){
            helloSender1.send(i);
        }
    }
结果:
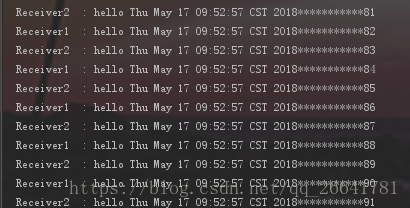
结论:一个发送者,N个接受者,经过测试会均匀的将消息发送到N个接收者中。
多对多发送
复制了一份发送者,在一百个循环中相互交替发送:
    @Test
    public void manyToMany() throws Exception {
        for (int i=0;i<100;i++){
            helloSender1.send(i);
            helloSender2.send(i);
        }
    }
结果:
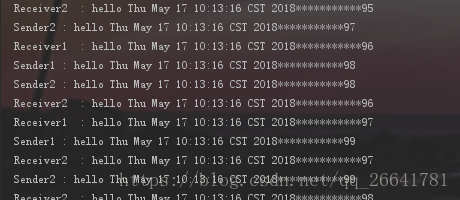
结论:和一对多一样,接收端仍然会均匀接收到消息。
高级应用
对象的支持
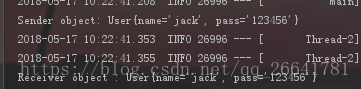
springboot以及完美的支持对象的发送和接收,不需要格外的配置。
    //发送者
    public void send(User user) {
        System.out.println("Sender object: " + user.toString());
        this.rabbitTemplate.convertAndSend("object", user);
    }
    ...
    //接收者
    @RabbitHandler
    public void process(User user) {
        System.out.println("Receiver object : " + user);
    }
test:
    @Test
    public void sendOject() throws Exception {
        User user=new User();
        user.setName("jack");
        user.setPass("123456");
        sender.send(user);
    }
结果如下:
Topic Exchange
topic 是RabbitMQ中最灵活的一种方式,可以根据routing_key自由的绑定不同的队列
首先对topic规则配置,这里使用两个队列来测试。
@Configuration
public class TopicRabbitConfig {

    final static String message = "topic.message";
    final static String messages = "topic.messages";

    @Bean
    public Queue queueMessage() {
        return new Queue(TopicRabbitConfig.message);
    }

    @Bean
    public Queue queueMessages() {
        return new Queue(TopicRabbitConfig.messages);
    }

    @Bean
    TopicExchange exchange() {
        return new TopicExchange("exchange");
    }

    @Bean
    Binding bindingExchangeMessage(Queue queueMessage, TopicExchange exchange) {
        return BindingBuilder.bind(queueMessage).to(exchange).with("topic.message");
    }

    @Bean
    Binding bindingExchangeMessages(Queue queueMessages, TopicExchange exchange) {
        return BindingBuilder.bind(queueMessages).to(exchange).with("topic.#");
    }
}
发送send1会匹配到topic.#和topic.message 两个Receiver都可以收到消息,发送send2只有topic.#可以匹配所有只有Receiver2监听到消息
Fanout Exchange
Fanout 就是我们熟悉的广播模式或者订阅模式,给Fanout交换机发送消息,绑定了这个交换机的所有队列都收到这个消息。
Fanout 相关配置:
@Configuration
public class FanoutRabbitConfig {
@Bean
public Queue AMessage() {
return new Queue("fanout.A");
}
@Bean
public Queue BMessage() {
return new Queue("fanout.B");
}
@Bean
public Queue CMessage() {
return new Queue("fanout.C");
}
@Bean
FanoutExchange fanoutExchange() {
return new FanoutExchange("fanoutExchange");
}
//A、B、C三个队列绑定到Fanout交换机上面
@Bean
Binding bindingExchangeA(Queue AMessage, FanoutExchange fanoutExchange) {
return BindingBuilder.bind(AMessage).to(fanoutExchange);
}
@Bean
Binding bindingExchangeB(Queue BMessage, FanoutExchange fanoutExchange) {
return BindingBuilder.bind(BMessage).to(fanoutExchange);
}
@Bean
Binding bindingExchangeC(Queue CMessage, FanoutExchange fanoutExchange) {
return BindingBuilder.bind(CMessage).to(fanoutExchange);
}
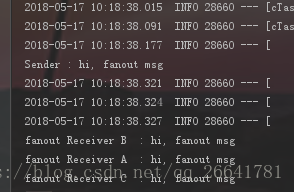
}使用了A、B、C三个队列绑定到Fanout交换机上面,发送端的routing_key写任何字符都会被忽略:
    @Autowired
    private AmqpTemplate rabbitTemplate;

    public void send() {
        String context = "hi, fanout msg ";
        System.out.println("Sender : " + context);
        this.rabbitTemplate.convertAndSend("fanoutExchange","", context);
    }