pytest模块的使用
pytest是第三方测试框架,是基于unittest的扩展框架,比unittest更简洁,更高效。安装pytest模块使用pip install pytest即可。安装好之后,到cmd中输入pytest --version检查是否安装成功。
pytest运行方法
想要用pytest运行,首先要import pytest
比如创建一个demo.py文件,内容为:
import pytest         # 导入包

def test_sucess():   # 定义第一个测试用例,assert 0表示断言失败

    print("test sucess")

    assert 0

def test_fail():  # 定义第二个测试用例,没有assert,默认成功

    print("test fail")

if __name__ == "__main__":

#定义一个列表,列表内容为测试文件名,也可以为元组,表示需要运行的文件为demo.py

test_list = ['demo.py']

# 用pytest模块的main()方法,参数为上面定义好的列表或者元组。

pytest.main(test_list)

# pytest.main(['-s','demo.py'])  # 也可以这样写,这样写和上面那样写会运行结果会有所不同,可以自己试试看。
运行出来的结果是:
demo.py F.
F:表示测试失败
.表示测试成功
也可以在cmd下面运行,先进入需要测试的文件夹路径下,输入命令:
pytest -s demo.py
这里要提醒一点,pytest必须遵循以下规则:
1、测试文件名必须以“test_”开头或者以”_test”结尾
2、测试方法必须以“test_”开头
3、测试类命名以Test开头
那么执行“pytest -s demo.py”这句话的时候,python就会自动去寻找test_开头或者结尾的函数来执行。
setup()方法teardown()方法
setup()方法和teardown()方法是两个特殊方法,setup()是在每一个编写的测试用例执行前必然会执行的方法,teardown()方法是在每个测试用例执行后执行的方法。
比如上面的两个测试用例,修改为:
class TestLogin:

    def setup(self):

        print("setup")

    def teardown(self):

        print("teardown")


    def test_sucess(self):

        print("test sucess")

    def test_fail(self):

        print("test fail")
上面这段代码,定义了一个测试类,有两个测试脚本test_sucess和test_fail,并且还增加了 setup()和teardown()方法,此时去终端执行pytest -s demo.py,运行结果为:
setup # setup方法打印出来的
test sucess #第一个测试用例打印出来的
.teardown #前面的点表示测试用例test_sucess执行成功,teardown是teardown
方法打印出来的
setup # 执行第二个测试用例的时候,会再次执行setup方法和teardown方法
test fail
.teardown
setup_class()、teardown_class()方法
如果理解了上面讲解的setup和teardown方法,那么setup_class和teardown_class方法也容易理解,这两个方法是针对测试类的,是每一个类执行前后必须执行的方法。
class TestLogin:

    def setup_class(self):

        print("setup_class")

    def teardown_class(self):

        print("teardown_class")


    def setup(self):

        print("setup")

    def teardown(self):

        print("teardown")


    def test_sucess(self):

        print("test sucess")

    def test_fail(self):

        print("test fail")
运行结果为:
setup_class # 类运行时先运行的方法
setup
test sucess
.teardown
setup
test fail
.teardown
teardown_class # 类中的方法都运行结束后,再运行的方法
一般情况下,比如setup_class()方法内,可以放连接手机的代码,对应的teardown_class方法就可以写退出driver的代码。也可以写的setup里面,根据自己的需求来定,写到setup中可能会更保险,写case的时候也会更简单,只是效率低了些。
pytest配置文件
pytest运行时可以有一个配置文件,名字为pytest.ini,并且这个配置文件名字必须这么写,一般放到测试项目目录中。
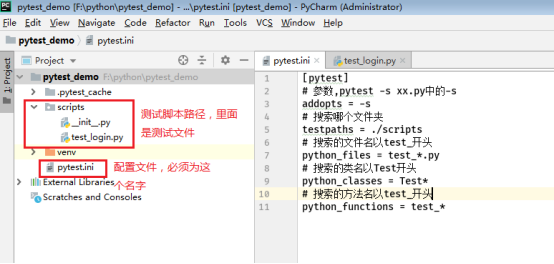
pytest.ini的内容为:
[pytest]
# 参数
addopts = -s
# 搜索哪个文件夹
testpaths = ./scripts
# 搜索的文件名以test_开头
python_files = test_*.py
# 搜索的类名以Test开头
python_classes = Test*
# 搜索的方法名以test_开头
python_functions = test_*
有了这个配置文件,就等同于告诉了python要运行哪个文件夹下的哪些文件。到cmd中运行的时候,进入到你自己的项目路径,不需要写参数,直接输入pytest就可以,就会按照你的配置文件来运行该运行的用例。
pytest常用插件
生成测试报告
pytest-html
安装方式: pip install pytest-html
安装成功后,运行的方式,有两种,第一种:
在终端从pytest改成pytest --html=report/report.html
意思是创建一个文件夹为report,在report文件夹中创建一个html文件,该文件里面存的就是运行的测试用例结果
如图:

第二种运行方式:
修改pytest.ini配置文件:
addopts = -s --html=report/report.html
然后在终端依旧输入pytest运行,出来的结果是一样的,推荐第二种方式,更简单。
addopts还有很多其他参数,后面还会有讲到一些
__pycache__错误:如果是报这个错误,可能是在拷贝东西的时候出错误的,一般把文件夹中的__pycache__这个文件夹删掉就好,这个是一个自动生成的编译文件,在编译的时候发现已经有这个文件了,就会报错。
pytest控制函数执行顺序
安装插件:pip install pytest-ordering
这个插件的意义在于,如果你不想让你的case按照从上往下的顺序执行,就可以通过这个控件来控制一下。
具体用法如下:
import pytest       # 注意导包

class TestLogin:


    @pytest.mark.run(order=0)

    def test_sucess(self):     # 定义的第一个case,上面有一个装饰器

        print("test sucess1")


    @pytest.mark.run(order=2)

    def test_sucess2(self):

        print("test sucess2")


        def test_fail(self):

        print("test fail3")


    @pytest.mark.run(order=1)

    def test_sucess4(self):

        print("test sucess4")
这里的装饰器:@pytest.mark.run(order=n)
用法是固定的用法,就是上面这样写,唯一变化的是order的值n,n可以为负数、正数、0,包括小数,执行顺序和order的值有关系,可以自己试验一下,order的值为0的时候是首先执行的用例,其次执行正数(由小到大的顺序),再其次执行没有此装饰器做标记的,最后执行order为负数的(由小到大的顺序)。
数字如果写的一样的话,就按照从上到下的顺序了。
失败重试
首先也安装插件:pip install pytest-rerunfailures
用法一:命令行输入命令:pytest --reruns n
n是重试的次数
比如:pytest --reruns 2,即失败后再重试两次,总共执行三次。
用法二,修改配置文件:
addopts = -s --html=report/report.html --reruns 3
修改完配置文件,直接命令行输入pytest运行即可。
失败重试的含义:assert 0或者assert False,都是return False的意思,失败重试的意思就是遇到return False,就重跑这个case,直到跑完n次或者直到这个case返回了Ture就停止尝试。
pytest高级用法
跳过测试函数
有些测试用例本在某种条件下不希望执行测试,那么就可以使用跳过测试函数:
skipif(condition,reason=None)
condition:跳过的条件,条件返回True的时候就跳过这个case。参数必须写
reason:跳过的原因,内容可以不写,参数必须有。
使用方法:
@pytest.mark.skipif(condition,reason=None)
比如:
@pytest.mark.skipif(True, reason='')
def test_sucess4(self):
print("test sucess4")
这样执行的结果就会跳过这个case,控制台输出的是一个s,s表示跳过用例没有执行。
结果:
scripts\test_login.py
test sucess2.
test sucess1.
s
test sucess4.
标记为预期失败的函数
标记为预期失败的意思就是这个case失败了才是对的,我们期望它是失败的。
xfail(condition,reason=None)
condition:这里如果返回True,意思就是希望是预期失败的,False表示预期成功。
reason:原因,内容可以不写,参数必须有。
使用方法:
@pytest.mark.xfail(condition,reason=None)
示例代码:
class TestLogin:
# 预期失败,结果成功
@pytest.mark.xfail(True, reason='') # 这里返回True表示预期失败
def test_sucess1(self):
print("test sucess1")
assert True # 结果返回True 这应该是一个失败的用例
# 预期失败,结果失败
@pytest.mark.xfail(True, reason='')
def test_sucess2(self):
print("test sucess2")
assert False
# 预期成功,结果失败
@pytest.mark.xfail(False, reason='') # False表示预期成果
def test_fail(self):
print('test fail')
assert False
# 预期成功,结果成功
@pytest.mark.xfail(False, reason='')
def test_sucess4(self):
print("test sucess4")
assert True
上面有四个用例,这四个用例,预期失败结果失败,或者预期成功结果成功,就算用例成功。其他都失败,运行出来的结果为:
XPassed XFailed Failed Passed
上面的用例,从运行结果的颜色上面来看,红色表示失败,绿色成功,橙色就是预期失败结果失败的。预期和结果是不一样的,就会失败。
另外可以看到结果的前面有的有一个X,X表示这是一个预期失败的用例。
函数数据参数化
这点非常重要。
方便测试函数获取测试数据,
方法:parametrize(argnames,argvalues,indirect=Flase,ids=None,scope=None)
常用参数:
argnames:参数名
argvalues:参数值,类型必须为list,参数只有一个时,格式为[value1,value2,value3...];参数有多个时,格式为[(参数1值,参数2值...),(参数1值,参数2值...)...]
使用方法:
@pytest.mark.parametrize(argnames,argvalues)
例如,一个参数的时候:
@pytest.mark.parametrize('search_values', ['wlan', '蓝牙', '1'])
多个参数的时候:
@pytest.mark.parametrize(('username','password'),[(‘zhangsan’,’mima1’),(‘lisi’,‘mima2’)]) # 注意这里第一个参数是元组
参数有几个,测试用例就运行几次。
下面这个代码示例,是进入到设置页面,点击放大镜,依次搜索’wlan’,’蓝牙’,’1’:
import time

import pytest

from appium import webdriver


class TestSearch:

    # 连接手机,进入到设置页面

    def setup(self):

        server = r'http://localhost:4723/wd/hub'  # Appium Server, 端口默认为4723

        desired_capabilities = {

            'platformName': 'Android',

            'deviceName': '127.0.0.1:62001',  # 需替换成你的deviceName

            'platformVersion': '5.1.1',

            'appPackage': 'com.android.settings',

            'appActivity': '.Settings'

        }

        self.driver = webdriver.Remote(server, desired_capabilities)


# 参数化方法,注意参数名和下面用到的参数名一致

    @pytest.mark.parametrize('search_values', ['wlan', '蓝牙', '1'])

    def test_search(self, search_values):   # 参数名,和上面的参数化方法中的一致

        # 点击放大镜按钮

        self.driver.find_element_by_id('com.android.settings:id/search').click()

        time.sleep(2)

        # 输入搜索内容

        self.driver.find_element_by_id('android:id/search_src_text').

        send_keys(search_values)

        print('search %s success' % search_values)

        assert 1
还有多个参数的情况,比如说测试登录,需要输入用户名和密码两个参数,下面的代码示例是在通讯录添加姓名和电话号码:
  # 连接手机,进入到通讯录页面

    def setup(self):

        server = r'http://localhost:4723/wd/hub'  # Appium Server, 端口默认为4723

        desired_capabilities = {

            'platformName': 'Android',

            'deviceName': '127.0.0.1:62001',  # 需替换成你的deviceName

            'platformVersion': '5.1.1',

            'appPackage': 'com.android.contacts',

            'appActivity': '.activities.PeopleActivity'

        }

        self.driver = webdriver.Remote(server, desired_capabilities)

    @pytest.mark.parametrize(('username', 'tel'), [('zhangsan', '123'), ('lisi', '456')])

    def test_add_tel(self, username, tel):

        # 进入手机通讯录页面,点击新增联系人

        self.driver.find_element_by_id('com.android.contacts:id/floating_action_button').click()

        time.sleep(2)

        # 我的手机添加通讯录的时候会有一个弹框提示,所以有下面这句

        self.driver.find_element_by_xpath("//*[contains(@text, '本地')]").click()

        time.sleep(2)

        # 输入姓名

        self.driver.find_element_by_xpath("//*[contains(@text, '姓名')]").send_keys(username)

        # 输入电话

        self.driver.find_element_by_xpath("//*[contains(@text, '电话')]").send_keys(tel)

        # 点击返回

        self.driver.keyevent(4)
pytest-fixture用法详解
fixture简介
fixture的目的是提供一个固定基线,在该基线上测试可以可靠地和重复地执行。fixture提供了区别于传统单元测试(setup/teardown)有显著改进:
- 有独立的命名,并通过声明它们从测试函数、模块、类或整个项目中的使用来激活。
- 按模块化的方式实现,每个fixture都可以互相调用。
- fixture的范围从简单的单元扩展到复杂的功能测试,允许根据配置和组件选项对fixture和测试用例进行参数化,或者跨函数function、类class、模块module或整个测试会话sessio范围。
fixture用途
1.做测试前后的初始化设置,如测试数据准备,链接数据库,打开浏览器等这些操作都可以使用fixture来实现
2.测试用例的前置条件可以使用fixture实现
3.支持经典的xunit fixture ,像unittest使用的setup和teardown
4.fixture可以实现unittest不能实现的功能,比如unittest中的测试用例和测试用例之间是无法传递参数和数据的,但是fixture却可以解决这个问题
fixture()方法
定义一个fixture,和定义普通函数差不多,只是多了一个装饰器@pytest.fixture(),并且fixture命名不要以test_开头,尽量和用例区别开。fixture是可以有返回值的,如果没return,默认返回None。用例调用fixture的返回值,直接就是把fixture的函数名称当成变量名称
fixture(scope='function',params=None,autouse=False,ids=None,name=None):
scope:有四个级别参数"function"(默认),"class","module","session"
params:一个可选的参数列表,它将导致多个参数调用fixture功能和所有测试使用它。
autouse:如果True,则为所有测试用例不需要传参也会调用这个fixture。如果为False则需要显示的调用fixture。
ids:每个字符串id的列表,每个字符串对应于params这样他们就是测试ID的一部分。如果没有提供ID它们将从params自动生成
name:fixture的名称。这默认为装饰函数的名称。如果fixture在定义它的统一模块中使用,夹具的功能名称将被请求夹具的功能arg遮蔽,解决这个问题的一种方法时将装饰函数命令"fixture_<fixturename>"然后使用"@pytest.fixture(name='<fixturename>')"。
scope为默认值function:
它的作用范围是每个测试用例来之前运行一次,销毁代码在测试用例之后运行。
示例:
import pytest


@pytest.fixture()

def test1():

    a = 'su'

    print('\ntest1方法传出a')

    return a


@pytest.fixture(scope='function')

def test2():

    b = '男'

    print('\ntest2方法传出b')

    return b


class TestFixture:


    def test_3(self, test1):

        name = 'su'

        print('找到name')

        assert test1 == name


    def test_4(self, test2):

        sex = '男'

        print('找到sex')

        assert test2 == sex


执行的结果为:

test1方法传出a

找到name

.

test2方法传出b

找到sex

.
scope="class"

fixture为class级别的时候,如果一个class里面有多个用例,都调用了此fixture,那么此fixture只在此class里所有用例开始前执行一次。

示例:
@pytest.fixture(scope='class')

def test1():

    b = '男'

    print('传出了%s, 且只在class里所有用例开始前执行一次!!!' % b)

    return b


class TestCase:

    def test_3(self, test1):

        name = 'su'

        print('找到name')

        assert test1 == name


    def test_4(self, test1):

        sex = '男'

        print('找到sex')

        assert test1 == sex
执行结果为:
传出了男, 且只在class里所有用例开始前执行一次!!!
找到name
F
找到sex
scope="module"
在当前.py脚本里面所有用例开始前只执行一次
@pytest.fixture(scope='module')
scope="session"
fixture为session级别是可以跨.py模块调用的,也就是当我们有多个.py文件的用例的时候,如果多个用例只需调用一次fixture,那就可以设置为scope="session",并且写到conftest.py文件里。
conftest.py文件名称是固定的,pytest会自动识别该文件。放到项目的根目录下就可以全局调用了,如果放到某个package下,那就在该package内有效。
fixture自动使用autouse=True
当用例很多的时候,每次都传fixture这个参数,会很麻烦。fixture里面有个参数autouse,默认是False没开启的,可以设置为True开启自动使用fixture功能,这样用例就不用每次都去传参了
autouse设置为True,自动调用fixture功能
@pytest.fixture(scope='module', autouse=True)

def test1():

print('\n开始执行module')


@pytest.fixture(scope='class', autouse=True)

def test2():

print('\n开始执行class')


@pytest.fixture(scope='function', autouse=True)

def test3():

print('\n开始执行function')


# 上面定义fixture的时候设置了autouse=True,那么使用的时候就不需要传参了,该调用的时候自动会调用

def test_a():

    print('---用例a执行---')

def test_d():

    print('---用例d执行---')


class TestCase:

    def test_b(self):

        print('---用例b执行---')

    def test_c(self):

        print('---用例c执行---')
fixture嵌套使用
这里还有需要注意的是,fixture可以嵌套使用,如果你想在一个fixture执行前先执行另一个fixture:
order = []

@pytest.fixture

def f1(f3):                       # 这里f3这个fixture传到f1这个fixture中

    order.append("f1")


@pytest.fixture()

def f3():

    order.append("f3")


def test_1(f1):   # 参数为f1,调用f1的时候会先执行f1的参数f3

    print(order)

    assert order == ["f3", "f1"]


执行结果:

['f3', 'f1']
fixture参数化
需要使用params参数进行参数化,然后通过request.param取出
例如,如果只有一个参数:
@pytest.fixture(params=['男', '女'])    #将一个list给params参数

def fix(request):      # request参数必须这样写

    return request.param    # reques.param会依次将params里面的值返回去


def test_9(fix):

    print(fix)


运行结果:

男

.

女

.
如果有多个参数:
li = [{'name':'zhangsan', 'pwd':'mima1'},{'name':'lisi', 'pwd':'mima2'}


@pytest.fixture(params=li)

def fix(request):

    return request.param

def test_9(fix):

    print(fix['name'])

    print(fix['pwd'])
fixture使用方式
第一种方式:
就是像上面用到的那样,当成参数传入到测试用例方法中。或者结合autouse=True的方式
第二种方式:
使用装饰器@pytest.mark.usefixtures()修饰需要运行的用例
示例:
@pytest.fixture()

def test1():

    print('\n开始执行function')


@pytest.mark.usefixtures('test1')

def test_a():

    print('---用例a执行---')


@pytest.mark.usefixtures('test1')

class TestCase:

    def test_b(self):

        print('---用例b执行---')

    def test_c(self):

        print('---用例c执行---')


执行结果为:

开始执行function

---用例a执行---

.

开始执行function

---用例b执行---

.

开始执行function

---用例c执行---

.
也可以叠加使用,在上面那段代码基础上加入tese2,然后使用的时候写两个装饰器:
@pytest.fixture()

def test2():

    print('\n开始执行function2')


@pytest.mark.usefixtures('test1')

@pytest.mark.usefixtures('test2')

def test_a():

print('---用例a执行---')
usefixtures与传fixture区别
如果fixture有返回值,那么usefixture就无法获取到返回值,这个是装饰器usefixture与用例直接传fixture参数的区别。
当fixture需要用到return出来的参数时,只能使用参数名称直接当参数传入的方式,不需要用到return出来的参数时,两种方式都可以。
fixture做后置处理
在pytest中我们有teardown之类的后置处理,fixture也可以支持相关操作,通过yield关键字来实现。
比如示例:
@pytest.fixture(scope='module', autouse=True)

def test1():

    print('\n开始执行module')

    yield test1

# 因为scope='module',所以这个后置处理在该py模块执行完后再执行,所以执行结果是在最后打印了这句话

    print('\ntest1的后置处理')


@pytest.fixture(scope='class', autouse=True)

def test2():

    print('\n开始执行class')

    yield test2

# scope='class',所以在每次类运行后执行

    print('\ntest2的后置处理')


@pytest.fixture(scope='function', autouse=True)

def test3():

    print('\n开始执行function')

    yield test3

# scope='function',所以在每个方法执行完毕后执行

    print('\ntest3的后置处理')


def test_a():

    print('---用例a执行---')


class TestCase:

    def test_b(self):

        print('---用例b执行---')


    def test_c(self):

        print('---用例c执行---')


执行结果:

开始执行module

开始执行class

开始执行function

---用例a执行---

.

test3的后置处理

test2的后置处理

开始执行class

开始执行function

---用例b执行---

.

test3的后置处理

开始执行function

---用例c执行---

.

test3的后置处理

test2的后置处理

test1的后置处理
示例二:
打开火狐浏览器,百度首页搜索pytest,检查是否搜索成功示例:
import pytest

from selenium import webdriver

import time


@pytest.fixture()

def fixtureFunc():

    '''实现浏览器的打开和关闭'''

    driver = webdriver.Firefox()

    # 类似return driver,将driver返回给调用者,不同的是被掉函数执行时遇到yield会停止执行,接着执行调用处的函数,调用处的函数执行完后会继续执行yield关键后面的代码

    yield driver

    driver.quit()


def test_search(fixtureFunc):

    '''访问百度首页,搜索pytest字符串是否在页面源码中'''

    driver = fixtureFunc

    driver.get('http://www.baidu.com')

    driver.find_element_by_id('kw').send_keys('pytest')

    driver.find_element_by_id('su').click()

    time.sleep(3)

    source = driver.page_source

    assert 'pytest' in source


if __name__ == '__main__':

    pytest.main(['-s', 'test_fixture_yield.py'])