首先使用maven创建一个工程,随便一个java工程即可

在环境中加入依赖
    <parent>
        <groupId>org.springframework.boot</groupId>
        <artifactId>spring-boot-starter-parent</artifactId>
        <version>2.0.1.RELEASE</version>
    </parent>
    <dependencies>
        <dependency>
            <groupId>org.springframework.boot</groupId>
            <artifactId>spring-boot-starter-web</artifactId>
        </dependency>
    </dependencies>
建立Controller类
package controller;

import org.springframework.boot.SpringApplication;
import org.springframework.boot.autoconfigure.SpringBootApplication;
import org.springframework.web.bind.annotation.RequestMapping;
import org.springframework.web.bind.annotation.RestController;

@RestController
@SpringBootApplication
public class HelloController {

    @RequestMapping("/hello")
    public String helo(){
        return "hello world";
    }

    public static void main(String[] args){
        SpringApplication.run(HelloController.class, args);
    }
}
可以直接运行main方法,这样就可以直接在浏览器访问http://localhost:8080/hello,就可以看到响应内容hello world;spring约定大于配置,springboot会提供默认配置,我们可以使用配置项来替代默认配置springboot只有一个配置文件.properties或.yml,这个好死后与我们在recourses文件加一个application.yml文件
server:
  port: 8081
  servlet:
    context-path: /api
这个时候访问接口就会变成:http://localhost:8081/api/hello
接下来看一下springboot的启动文件
启动文件中的注解:@SpringBootApplication,如果不加这个,项目是无法启动的,我们看一下源码
@Target(ElementType.TYPE)
@Retention(RetentionPolicy.RUNTIME)
@Documented
@Inherited
@SpringBootConfiguration
@EnableAutoConfiguration
@ComponentScan(excludeFilters = { @Filter(type = FilterType.CUSTOM, classes = TypeExcludeFilter.class),
        @Filter(type = FilterType.CUSTOM, classes = AutoConfigurationExcludeFilter.class) })
public @interface SpringBootApplication {
}
我们看住支撑这个项目启动的主要有是三个注解
@SpringBootConfiguration 表示Spring 播哦他的配置注解
@EnableAutoConfiguration 表示自动配置
@ComponentScan 表示Spring Boot扫描Bean的规则,扫描那些包
也就是说,我们更换为下属代码,也是可以正常运行的
//@SpringBootApplication
@SpringBootConfiguration
@EnableAutoConfiguration
@ComponentScan
public class DemoApplication {

    public static void main(String[] args) {
        SpringApplication.run(DemoApplication.class, args);
    }

}
接下来看一下注解@Value,他的作用就是我们在application中定义的属性,这个注解就可以帮助我们提取出来,实现解耦,看一下这个代码,这样在访问/hello接口时,就可以收到这个应用运行的端口号
@RestController
@SpringBootApplication
public class HelloController {

    @Value("${server.port}")
    String port;

    @RequestMapping("/hello")
    public String hello(){
        return port;
    }
}
接下来看一下@SpringBootConfiguration一般的用法,我们首先新建一个拦截器
/**
 * 拦截器
 */
public class ApiInterceptor implements HandlerInterceptor {
    @Override
    public boolean preHandle(HttpServletRequest request, HttpServletResponse response, Object handler)
            throws Exception {
        System.out.println("来到拦截器");
        return true;
    }

    @Override
    public void postHandle(HttpServletRequest request, HttpServletResponse response, Object handler,
                            @Nullable ModelAndView modelAndView) throws Exception {
    }

    @Override
    public void afterCompletion(HttpServletRequest request, HttpServletResponse response, Object handler,
                                 @Nullable Exception ex) throws Exception {
    }
}
我们在搞springMVc时,是将这个类写入SpringMvc的 配置文件,拿在SpringBoot中,我们将其加入其配置
/**
 * 将拦截器注册到springboot中
 */
@SpringBootConfiguration
public class WebConfig extends WebMvcConfigurationSupport {
    @Override
    protected void addInterceptors(InterceptorRegistry registry) {
        super.addInterceptors(registry);
        // 注册我们写的拦截器
        registry.addInterceptor(new ApiInterceptor());
    }
}
这样在代码运行的时候,就可以看到拦截器其作用了
接下来,看一下异常处理,我们使用spring的aop思想,切入点就是有RequestMapping的方法
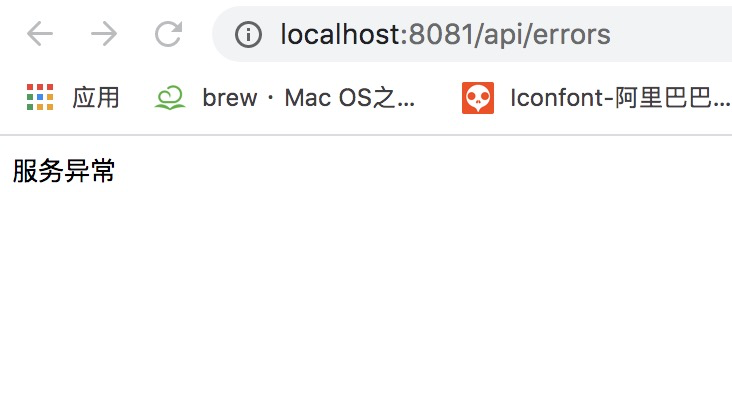
package com.example.demo.exception;

import org.aspectj.lang.annotation.AfterThrowing;
import org.aspectj.lang.annotation.Aspect;

import org.aspectj.lang.annotation.Pointcut;
import org.springframework.stereotype.Component;
import org.springframework.web.context.request.RequestContextHolder;
import org.springframework.web.context.request.ServletRequestAttributes;

import javax.servlet.http.HttpServletResponse;
import java.io.IOException;
import java.io.PrintWriter;


@Aspect
@Component
public class WebExceptionAspect {

    // 凡事注解了@RequestMapping的方法都会拦截
    @Pointcut("@annotation(org.springframework.web.bind.annotation.RequestMapping)")
    private void webPoint(){}

    @AfterThrowing(pointcut = "webPoint()", throwing = "e")
    public void handleThrowing(Exception e){
        e.printStackTrace();
        // 调用写内容到浏览器
        writeContent("服务异常");

    }

    // 将内容输出到浏览器中
    private void writeContent(String content){
        HttpServletResponse response = ((ServletRequestAttributes)RequestContextHolder.getRequestAttributes()).getResponse();
        response.reset();
        response.setCharacterEncoding("UTF-8");
        response.setHeader("Content-Type", "text/plain;charset=UTF-8");
        response.setHeader("icop-content-type", "exception");
        PrintWriter writer = null;
        try{
            writer = response.getWriter();
        }catch (IOException e){
            e.printStackTrace();
        }

        writer.print(content);
        writer.flush();
        writer.close();
    }
}
在控制层模拟出错
@RequestMapping("/errors")
    public String errors(){
        // 手动模拟异常
        System.out.println(1/0);
        return "error";
    }
我们可以看到访问这个接口,收到的信息时服务异常