刚刚实现了Vue+Vuex的自动登录功能,在实现的时候遇到了一些问题,这里记录一下:
一、对于vuex的简单理解:
可以参考这个:https://zhuanlan.zhihu.com/p/24357762、https://segmentfault.com/a/1190000009404727
还有官网文档:https://vuex.vuejs.org/zh/guide/getters.html
差不多理解就是,vuex里面,用state来存储数据,在mutations里面写保存数据的函数,并且提供给外部调用,在getters中写获取数据的函数,在actions里面写获取数据后、写入数据前的处理过程。
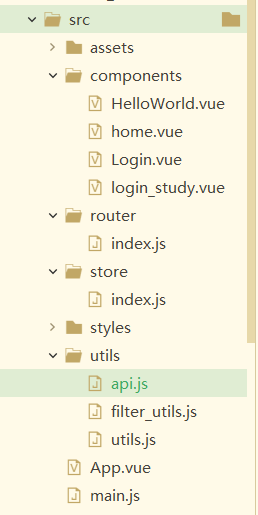
二、在看网上很多示例的时候,代码写得挺好的,但是没有总的项目目录,一个函数一个函数的写,却又不知道要放在哪里,就感觉很别扭,所以我先把项目目录列出来:因为只用到了src下的,其他的按新建项目的就好
①:上一章的前后端分离里面,数据传递确实做到了,但是在Login.vue里面写的,很多重复的内容完全可以重用,所以这次干脆提出一个api来,专门用来传递数据。
另外,此次使用的是aoxis,本身就已经封装好很多了。


import axios from 'axios'

let base = 'http://127.0.0.1:8090';
export const postRequest = (url, params) => {
  return axios({
    method: 'post',
    url: `${base}${url}`,
    data: params,
    transformRequest: [function (data) {
      // Do whatever you want to transform the data
      let ret = ''
      for (let it in data) {
        ret += encodeURIComponent(it) + '=' + encodeURIComponent(data[it]) + '&'
      }
      return ret
    }],
    headers: {
      'Content-Type': 'application/x-www-form-urlencoded'
    }
  });
}
base的路径,按照自己服务器的端口进行修改。
②:现在先在store里,定义好数据和方法(就相当于数据库):store/index.js
import Vue from 'vue';
import Vuex from 'vuex';
Vue.use(Vuex);

const store = new Vuex.Store({

  state: {
    // 存储token
    Authorization: localStorage.getItem('Authorization') ? localStorage.getItem('Authorization') : ''
  },

  mutations: {
    // 修改token,并将token存入localStorage
    changeLogin (state, user) {
      // alert(user.Authorization);
      state.Authorization = user.Authorization;
      localStorage.setItem('Authorization', user.Authorization);
    }
  }
});

export default store;
这里state里面就是存储的数据,这里就是存储用户的token,下面mutations,写了一个修改token的方法,这个方法将token写入localStorage,而且保存到自己的state中。
③:定义好了数据和方法以后,自动登录就是要在用户访问页面的时候,自动检查有没有token,token对不对:
// The Vue build version to load with the `import` command
// (runtime-only or standalone) has been set in webpack.base.conf with an alias.
import Vue from 'vue'
import App from './App'
import router from './router'
import ElementUI from 'element-ui'
import VueResource from 'vue-resource'
import 'element-ui/lib/theme-chalk/index.css'
// import './styles/element-variables.scss'
import './styles/font-awesome-4.7.0/css/font-awesome.min.css'
import './utils/filter_utils.js'
import store from './store'
import axios from 'axios'

Vue.use(ElementUI)
// Vue.use(VueResource)
Vue.config.productionTip = false
// Vue.http.options.emulateJSON = true
/* eslint-disable no-new */


new Vue({
  el: '#app',
  router,
  store:store,
  components: { App },
  template: '<App/>'
})


axios.interceptors.request.use(
  config => {
    if (localStorage.getItem('Authorization')) {
      config.headers.Authorization = localStorage.getItem('Authorization');
    }
    return config;
  },
  error => {
    return Promise.reject(error);
  });
在这里面,有两个需要注意的:
第一个就是,因为定义了store,所以在常规的main之外,还在Vue里面多加了一个store,否则的话,在使用的使用就相当于与没有注册,查找不到,经常有如下错误:
Cannot read property 'commit' of undefined
第二个就是下面的拦截器:因为只是对全局的访问都配置,所以直接就在全局中写了,而且前面是axios.interceptors.request.xx,前面的axios就表示了是全局的。
如果要对某个方法来使用,应该先创建一个axios,然后假设这个变量名为xx,则使用xx.interceptors来执行,后面用request或者response来表示是请求数据还是响应数据。
更详细的可以看https://www.jianshu.com/p/646ed4edf51f
④:在router/index.js中,也就是路由里面,也需要添加内容:
import Vue from 'vue'
import Router from 'vue-router'
import HelloWorld from '@/components/HelloWorld'
import login from '@/components/login.vue'
import home from '@/components/home.vue'
import logo from '@/components/HelloWorld.vue'
Vue.use(Router);


const router = new Router({
  mode:'history',
  routes:[
  {
    path:'/login',
      name:'登录',
    component:login,
  },
  {
    path:'/',
    name:'主页',
    component:logo,
  }
]
});

router.beforeEach((to,from,next)=>{
  if(to.path ==='/login'){
    next();
  }else {
    let token = localStorage.getItem('Authorization');
    if(token ===null || token ===''){
      next('/login');
    }else {
      // alert(localStorage.getItem("Authorization"));
      next();
    }
  }
});

export default router;
第一点就是将router加上mode:'history',这个也不知道为啥,反正我写的时候,没有这个就不管什么页面都跳转到首页,怎么调都不管用,加上这一句话就好了。
第二个就是定义了一个beforeEach的函数,这个可以检测来的请求路径、去的请求路径,加上token检测,可以让用户如果没有登录就自动跳转到登录界面。
⑤:再写登录页面:
<template>
  <el-form :rules="rules" class="login-container" label-position="left"
           label-width="0px" v-loading="loading">
    <h3 class="login_title">系统登录</h3>
    <el-form-item prop="account">
      <el-input type="text" v-model="loginForm.username" auto-complete="off" placeholder="账号"></el-input>
    </el-form-item>
    <el-form-item prop="checkPass">
      <el-input type="password" v-model="loginForm.password" auto-complete="off" placeholder="密码"></el-input>
    </el-form-item>
    <el-checkbox class="login_remember" v-model="checked" label-position="left">记住密码</el-checkbox>
    <el-form-item style="width: 100%">
      <el-button type="primary" @click.native.prevent="submitClick" style="width: 100%">登录</el-button>
    </el-form-item>
  </el-form>
</template>
<script>
  import {postRequest} from '../utils/api'
  import {putRequest} from '../utils/api'
  import { mapMutations } from 'vuex';
  export default{
    data(){
      return {
        rules: {
          account: [{required: true, message: '请输入用户名', trigger: 'blur'}],
          checkPass: [{required: true, message: '请输入密码', trigger: 'blur'}]
        },
        checked: true,
        loginForm: {
          username: '11',
          password: '123'
        },
        loading: false
      }
    },
    methods: {
      ...mapMutations(['changeLogin']),
      submitClick: function () {
        var _this = this;
        this.loading = true;
        postRequest('/login', {
          username: this.loginForm.username,
          password: this.loginForm.password
        }).then(resp=> {
          _this.loading = false;
          if (resp.status == 200) {
            //成功
            var json = resp.data;
            if (json.status == 'success') {

              _this.userToken = 123;
              // localStorage.setItem('Authorization',_this.userToken);
              _this.changeLogin({Authorization:_this.userToken});
              _this.$router.replace({path: '/'});
            } else {
              _this.$alert('登录失败!', '失败!');
            }
          } else {
            //失败
            _this.$alert('登录失败!', '失败!');
          }
        }, resp=> {
          _this.loading = false;
          _this.$alert('找不到服务器⊙﹏⊙∥!', '失败!');
        });
      }
    }
  }
</script>
<style>
  .login-container {
    border-radius: 15px;
    background-clip: padding-box;
    margin: 180px auto;
    width: 350px;
    padding: 35px 35px 15px 35px;
    background: #fff;
    border: 1px solid #eaeaea;
    box-shadow: 0 0 25px #cac6c6;
  }

  .login_title {
    margin: 0px auto 40px auto;
    text-align: center;
    color: #505458;
  }

  .login_remember {
    margin: 0px 0px 35px 0px;
    text-align: left;
  }
</style>
这里一定不要忘了引入函数
⑥在这里我们可以看到,返回的是json数据,对应后台可以:先创建一个Bean,用来专门返回响应内容:
package com.example.Bean;


public class RespBean {
    private String status;
    private String msg;

    public RespBean() {
    }

    public RespBean(String status, String msg) {

        this.status = status;
        this.msg = msg;
    }

    public String getStatus() {
        return status;
    }

    public void setStatus(String status) {
        this.status = status;
    }

    public String getMsg() {
        return msg;
    }

    public void setMsg(String msg) {
        this.msg = msg;
    }
}
而在controller中,直接调用即可:
package com.example.Controller;

import com.example.Bean.RespBean;
import org.springframework.stereotype.Controller;
import org.springframework.ui.Model;
import org.springframework.web.bind.annotation.CrossOrigin;
import org.springframework.web.bind.annotation.RequestMapping;
import org.springframework.web.bind.annotation.RequestParam;
import org.springframework.web.bind.annotation.RestController;

@RestController
public class TestController {

    @CrossOrigin(origins = "*")
    @RequestMapping("/login")
    public RespBean login(
            @RequestParam(value = "username", required = false) String username,
            @RequestParam(value = "password",required = false) String password,
            Model model
    ){
        System.out.println("用户名为"+username);
        System.out.println("密码为"+password);
        if (username.equals("11")){
            return new RespBean("success","登录成功");
        }else{
            return new RespBean("fail","登录失败");
        }
    }
}