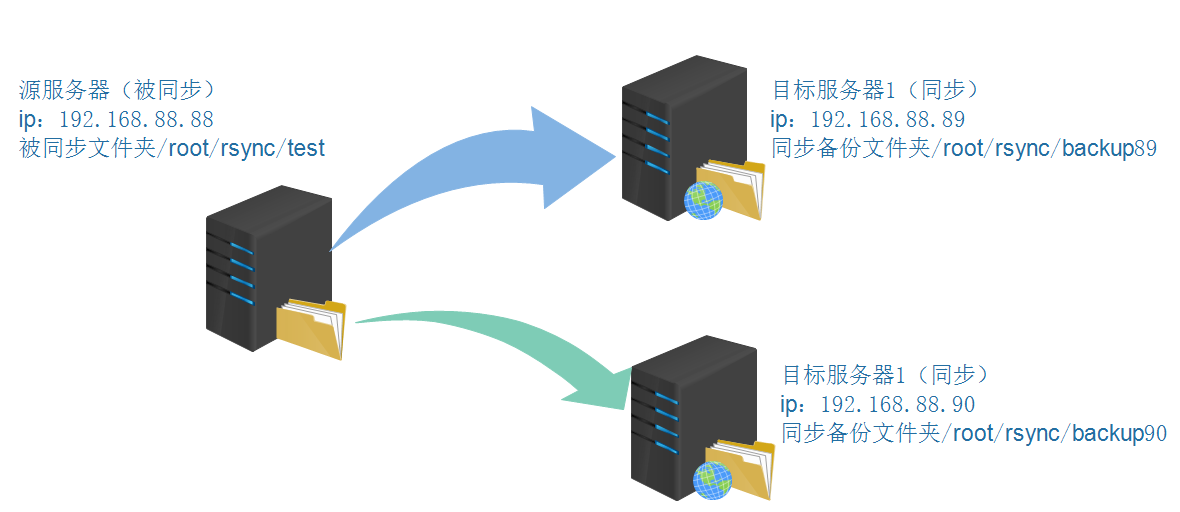
本次采用三台centos7服务器进行同步演示.
结构图如下
提示:三台服务器都先允许873端口的防火墙配置
[root@localhost rsync]# iptables -I INPUT -p tcp --dport 873 -j ACCEPT
一、源服务器配置
1、安装rsync
[root@localhost rsync-3.1.3]# cd /root/package/rsync-3.1.3/
[root@localhost rsync-3.1.3]# ./configure --prefix=/usr/rsync
[root@localhost rsync-3.1.3]#make
[root@localhost rsync-3.1.3]# make install
#在安装的bin目录下能找到rsync文件说明就安装成功,如下
[root@localhost bin]# cd /usr/rsync/bin
[root@localhost bin]# ll
-rwxr-xr-x. 1 root root 1680856 Mar  2 10:39 rsync
2、安装inotify
a,首先确认内核是否支持安装inotify,Linux内核低于2.6.13版本不支持安装。
[root@localhost~]# uname -r
2.6.32-573.el6.x86_64
b,确认 /proc/sys/fs/inotify/ 目录下是否有以下三个文件,存在才支持安装。
[root@localhost~]# ls -l /proc/sys/fs/inotify/
-rw-r--r-- 1 root root 0 1月 21 13:03 max_queued_events
-rw-r--r-- 1 root root 0 1月 21 13:03 max_user_instances
-rw-r--r-- 1 root root 0 1月 21 13:03 max_user_watches
c,开始安装
[root@localhost bin]# cd /root/package/inotify-tools-3.14/
[root@localhost inotify-tools-3.14]# ./configure  --prefix=/usr/inotify
[root@localhost inotify-tools-3.14]#make
[root@localhost inotify-tools-3.14]#make install
#在安装路径bin目录下能找到notifywait和inotifywatch文件即标志inotify安装成功,如下:
[root@localhost bin]# cd /usr/inotify/bin
[root@localhost bin]# ll
-rwxr-xr-x. 1 root root 60728 Mar  2 11:21 inotifywait
-rwxr-xr-x. 1 root root 55096 Mar  2 11:21 inotifywatch
3、配置密码文件
该密码文件用于源与目标服务器同步文件时认证匹配,此次实验88源服务器与89目标服务器密码为host89,88源服务器与90目标服务器密码为host90。
[root@localhost /]# echo "host89" >/root/rsync/rsync1.passwd #当然也可直接vi rsync1.passwd
[root@localhost /]# echo "host90" >/root/rsync/rsync2.passwd #当然也可直接vi rsync2.passwd
同时要将上述两个密码文件权限设置为600,否则认证错误
[root@localhost rsync]# chmod 600 rsync1.passwd
4、配置inotify监控+rsync同步shell脚本(合二为一)
vim /root/rsync/rsync1.sh
#!/bin/bash
host1=192.168.88.89
host2=192.168.88.90
src=/root/rsync/test/
des90=host90
des89=host89 user1=h89 user2=h90 /usr/inotify/bin/inotifywait -mrq --timefmt '%d/%m/%y %H:%M' --format '%T %w%f %e' -e modif y,delete,create,attrib $src | while read files do /usr/rsync/bin/rsync -vzrtopg --delete --progress --password-file=/root/rsync/rsync1.passwd $src $user1@$host1::$des89 /usr/rsync/bin/rsync -vzrtopg --delete --progress --password-file=/root/rsync/rsync2.passwd $src $user2@$host2::$des90 echo "${files} was rsynced" >>/tmp/rsync.log 2>&1 done
说明:/usr/inotify/bin/inotifywait -mrq --timefmt '%d/%m/%y %H:%M' --format '%T %w%f %e' -e modify,delete,create,attrib $src 此句为inotify对src目录的监控,如果有修改、删除、创建、文件属性更改等操作文件事件发生,则上报监控
/usr/rsync/bin/rsync -vzrtopg --delete --progress --password-file=/root/rsync/rsync1.passwd $src $user1@$host1::$des89 #上报监控完成后rsync进行同步,本条是同步到用户名为h89,ip为192.168.88.89,模块为host89的服务器上,密码使用rsync1.passwd认证
/usr/rsync/bin/rsync -vzrtopg --delete --progress --password-file=/root/rsync/rsync2.passwd $src $user2@$host2::$des90 #上报监控完成后rsync进行同步,本条是同步到用户名为h90,ip为192.168.88.90,模块为host90的服务器上,密码使用rsync2.passwd认证
另外别忘记给监控shell脚本764权限
[root@localhost rsync]# chmod 764 rsync1.sh
至此,源服务器设置完成(主要是shell命令的配置),接下来配置目标服务器。二、配置目标服务(192.168.88.89)
1、安装rsync与inotify
[root@localhost rsync-3.1.3]# cd /root/package/rsync-3.1.3/
[root@localhost rsync-3.1.3]# ./configure --prefix=/usr/rsync
[root@localhost rsync-3.1.3]#make
[root@localhost rsync-3.1.3]# make install
[root@localhost bin]# cd /root/package/inotify-tools-3.14/
[root@localhost inotify-tools-3.14]# ./configure  --prefix=/usr/inotify
[root@localhost inotify-tools-3.14]#make
[root@localhost inotify-tools-3.14]#make install
2、配置密码与conf文件
[root@localhost bin]# echo "h89:host89" >/root/rsync/rsync1.passwd
[root@localhost bin]# chmod 600 rsync1.passwd
[root@localhost rsync]# cd /root/rsync
[root@localhost rsync]# vim rsync1.conf
uid = root
gid = root
use chroot = no
max connections = 10
strict modes = yes
pid file = /var/run/rsyncd.pid
lock file = /var/run/rsync.lock
log file = /var/log/rsyncd.log
[host89]
path = /root/rsync/backup89/
comment = web file
ignore errors
read only = no
write only = no
hosts allow = 192.168.88.88
hosts deny = *
list = false
uid = root
gid = root
auth users = h89
secrets file = /root/rsync/rsync1.passwd
说明与注意:此处认证用户必须是和源服务器一致h89 ,另外认证模块也必须相同,源服务器认证模块为des89=host89,那么目标服务器认证模块也必须是host89。.89为目标服务器密码必须是用户名:密码,这点和源服务器密码有区别。
3、至此192.168.88.89目标服务器配置完成
三、配置目标服务(192.168.88.90)
类似于89服务器配置
1、安装rsync与inotify
[root@localhost rsync-3.1.3]# cd /root/package/rsync-3.1.3/
[root@localhost rsync-3.1.3]# ./configure --prefix=/usr/rsync
[root@localhost rsync-3.1.3]#make
[root@localhost rsync-3.1.3]# make install
[root@localhost bin]# cd /root/package/inotify-tools-3.14/
[root@localhost inotify-tools-3.14]# ./configure  --prefix=/usr/inotify
[root@localhost inotify-tools-3.14]#make
[root@localhost inotify-tools-3.14]#make install
2、配置密码与conf文件
[root@localhost bin]# echo "h90:host90" >/root/rsync/rsync1.passwd
[root@localhost bin]# chmod 600 rsync1.passwd
[root@localhost rsync]# cd /root/rsync
[root@localhost rsync]# vim rsync1.conf
uid = root
gid = root
use chroot = no
max connections = 10
strict modes = yes
pid file = /var/run/rsyncd.pid lock file = /var/run/rsync.lock log file = /var/log/rsyncd.log [host90] path = /root/rsync/backup90/ comment = web file ignore errors read only = no write only = no hosts allow = 192.168.88.88 hosts deny = * list = false uid = root gid = root auth users = h90 secrets file = /root/rsync/rsync1.passwd
说明与注意:此处认证用户必须是和源服务器一致h90 ,另外认证模块也必须相同,源服务器认证模块为des90=host90,那么目标服务器认证模块也必须是host90。.90为目标服务器密码必须是用户名:密码,这点和源服务器密码有区别。
3、至此192.168.88.90目标服务器配置完成
四、启动配置
源服务器启动:[root@localhost rsync]# sh /root/rsync/rsync1.sh &
目标服务器启动:[root@localhost rsync]# /usr/rsync/bin/rsync --daemon --config=/root/rsync/rsync1.conf
在源服务器的/root/rsync/test路径下创建或修改删除文件都将实时同步到另外两台目标服务器。
五、配置过程中troubleshooting
问题1、报错 failed to connect to X.X.X.X:Connection refused(111)
rsync: failed to connect to 192.168.88.90 (192.168.88.90): Connection refused (111)
rsync error: error in socket IO (code 10) at clientserver.c(127) [sender=3.1.3]
1、对方没开机\网络断\或者是对端rsync服务没开
解决开机或打开服务/usr/rsync/bin/rsync --daemon --config=/root/rsync/rsync1.conf
2、873端口没开-->iptables -I INPUT -p tcp --dport 873 -j ACCEPT
问题2、报错@ERROR: auth failed on module web
分析:可能是密码错误,要求源服务器(被同步服务器)密码文件内容为passwod,但目标服务器密码文件必须为用户名:密码,例如源设置为user=kilixi,密码文件内容为rsyncpwd;那么目标服务器密码文件内容必须为kilixi:rsyncpwd
问题3、报错@ERROR: Unknown module 'xxx'
rsync error: error starting client-server protocol (code 5) at main.c(1503) [sender=3.0.6]
分析:这种报错有可能是.sh配置错误或者.conf文件配置错误
处理:自行检查配置是否有问题
重要-->:报这种错误还有可能的原因是如果已经运行了rsync程序,但修改了.sh或.conf文件中内容,那么会出现进程被占用导致的程序运行失败,即修改后的程序并未在进程中运行,这时候就需要彻底杀死所有关于rsync的进程,同时重启源服务器和目标服务器的rsync进程
解决方法:
杀死包含某个关键字的进程 如下杀死包含“rsync”关键字的进程
ps -ef |grep rsync|grep -v grep|cut -c 9-15|xargs kill -9
查看包含某个关键字的进程
ps -ef |grep rsync
六、Tips
1、本次配置是单向的,只能是源-->目标的同步,反向不同步。要配置双向同步可以在目标服务器上配置shell脚本(.sh配置),在源目标服务器配置.conf文件。
2、对于一对多的同步,必须注意ip地址、模块名称、认证用户名、密码等一一对应,否则可能找不到错误在哪。
3、开始一直被问题3、报错@ERROR: Unknown module 'xxx'的报错卡了很久,后面发现是进程占用问题(配置没问题,但就是一直报模块错误),需要使用ps -ef |grep rsync|grep -v grep|cut -c 9-15|xargs kill -9 ,然后再重启开启rsync。