rsync通过服务同步

-
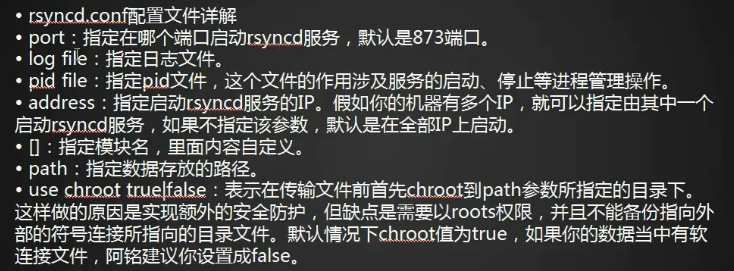
编辑配置文件/etc/rsyncd.conf
port=873
log file=/var/log/rsync.log
pid file=/var/run/rsyncd.pid
address=192.168.244.128 //本机ip
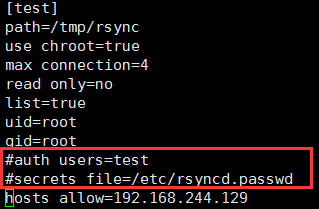
[test] //模块名
path=/tmp/rsync //路径
use chroot=true //true 代表不能同步其他目录 false 代表可以同步其他目录
max connection=4
read only=no
list=true
uid=root
gid=root
auth users=test
secrets file=/etc/rsyncd.passwd
hosts allow=192.168.244.129 //指定连通的机器,多个ip用空格分开,也可1/25
-
rsync --daemon启动服务
-
语法:rsync -av 1.txt 【服务所在机器ip】::【模块名】/1_dest.txt

报错,可尝试查看网络是否有问题,或者端口是否通
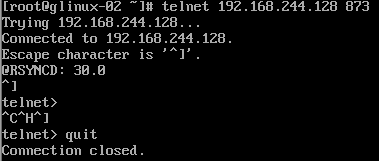
telnet 192.168.244.128 873 检查873端口(如未安装telnet 先安装)
![]()
发现端口有问题,可以先停掉firewalld,在测试端口是否通,成功~
systemctl stop firewalld
退出telnet 打“]” quit
运行同步命令rsync -av 1.txt 192.168.244.128::test/1_dest.txt (test是模块名字)
[root@glinux-02 ~]# rsync -av 1.txt 192.168.244.128::test
Password:
@ERROR: auth failed on module test
rsync error: error starting client-server protocol (code 5) at main.c(1516) [sender=3.0.9]
提示输入密码,可以修改配置文件,将如下两行注释掉。
再次执行同步命令,成功~
[root@glinux-02 ~]# rsync -av 1.txt 192.168.244.128::test/1_dest.txt
sending incremental file list
1.txt

sent 65 bytes  received 27 bytes  184.00 bytes/sec
total size is 0  speedup is 0.00
更换端口
- 更改配置文件 port=8730
- killall rsync 杀掉进程
- 重启服务 rsync daemon
- rsync -acLP --port 8730 ip::test/ /tmp/test 加上--port
配置文件中list =true 表示可以列出该服务有多少模块,false 不能列出
用法:rsync --port 873 192.168.198.128::
[root@g_linux02 ~]# rsync --port 873 192.168.198.128::
ben
设置用户密码,
auth users=test //用户名
secrets file=/etc/rsyncd.passwd //密码文件
编辑密码文件 vi /etc/rsyncd.passwd------------添加test:123456
更改密码文件权限为600
再执行rsync --port 873 [email protected]::ip 输入密码才能同步
如果不想输入密码,可以在客户端增加一个密码文件,如:/etc/rsync_passwd.txt
密码文件中写入密码123456,更改密码文件权限为600
运行rsync --port 873 --passwd-file=/etc/rsync_passwd.txt [email protected]::ip
linux系统日志
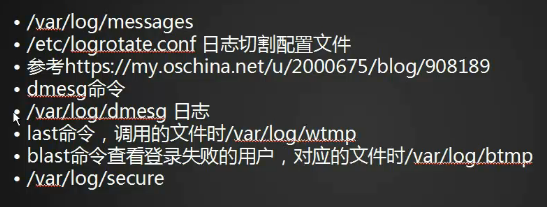
/var/log/messages 系统总日志
/etc/logrotate.conf日志切割配置文件,会将日志切割成4份,
[root@glinux-01 ~]# cat /etc/logrotate.conf
# see "man logrotate" for details
# rotate log files weekly
weekly   每星期切割

# keep 4 weeks worth of backlogs
rotate 4   切割4星期

# create new (empty) log files after rotating old ones
create 覆盖旧文件

# use date as a suffix of the rotated file
dateext  日期

# uncomment this if you want your log files compressed
#compress 是否压缩

# RPM packages drop log rotation information into this directory
include /etc/logrotate.d 配置文件

# no packages own wtmp and btmp -- we'll rotate them here
/var/log/wtmp {
    monthly
    create 0664 root utmp
	minsize 1M
    rotate 1
}

/var/log/btmp {
    missingok
    monthly
    create 0600 root utmp
    rotate 1
}

# system-specific logs may be also be configured here.
[root@glinux-01 ~]# ls /var/log/message*
/var/log/messages           /var/log/messages-20180311  /var/log/messages-20180326
/var/log/messages-20180304  /var/log/messages-20180318
dmesg 查看硬件日志文件
dmesg -c清空,重启后会在加载。日志存在内存中。
/var/log/dmesg系统启动的日志
last 正确的登录历史-------last 调用的文件是/var/log/wtmp
[root@glinux-01 ~]# last
root     pts/0        192.168.244.1    Thu Mar 29 19:14   still logged in
root     tty1                          Wed Mar 28 21:43   still logged in
root     pts/0        192.168.244.1    Wed Mar 28 21:43 - 22:25  (00:42)
root     pts/0        192.168.244.1    Wed Mar 28 19:53 - 21:43  (01:49)
root     pts/0        192.168.244.1    Tue Mar 27 19:52 - 22:25  (02:33)
root     pts/1        192.168.244.1    Mon Mar 26 19:37 - 20:21 (1+00:44)
lastb 登录失败的历史 -------调用的文件是 /var/log/btmp
[root@glinux-01 ~]# lastb

btmp begins Sun Mar 18 19:15:09 2018
安全日志 /var/log/secure (比如登录密码输错等信息会写入这个日志)
screen工具(虚拟终端)

应用场景:比如我一个脚本要执行一天一夜,那我为了防止ssh远程连接出现异常中断(比如网络原因),解决方法1:丢到后台nohup command & (但这种方法没法实时查看输出信息)
方法2:使用虚拟终端
- screen (exit退出)
- ctrl +a 再加d 退出终端,但任务在后台执行
- screen -ls 查看虚拟终端列表
- screen -r id进入指定终端
[root@glinux-01 ~]# screen
[detached from 10491.pts-0.glinux-01]
[root@glinux-01 ~]# screen -ls
There is a screen on:
	10491.pts-0.glinux-01	(Detached)
1 Socket in /var/run/screen/S-root.

[root@glinux-01 ~]# screen -r 10491
- screen -S "自定义终端名"
- screen -r "自定义终端名" 进入终端名