树莓派实现服务器(外网访问)
·
获取域名(内网穿透)
好文请先阅读
https://blog.csdn.net/Mind_programmonkey/article/details/80285596
获取域名
- 简而言之就是树莓派(及所在网域)没有公网IP,必须先委托代理商做一个映射,在树莓派上道代理商客户端实时告知代理服务器自己的IP,代理服务器(相当于DNS服务器)将域名转换为树莓派IP再告知访问者浏览器
- 获取方法 ngrok https://www.ngrok.cc/ (免费内网穿透)
- 注册->申请隧道->http、tcp 都行
- 验证用户名,密码可填可不填(填上相当于私有)
- 树莓派上安装客户端 https://www.ngrok.cc/download.html 选 Linux ARM版本
解压,不需要安装 - 参考 https://www.sunnyos.com/article-show-67.html
此后我们获得一个隧道 ID

运行代理的客户端程序
- 树莓派终端中运行以下命令
cd /home/pi/Dowmloads/linux_arm #进入客户端文件夹
ls  # ls查看sunny文件
./sunny clientid 隧道id #执行命令
- 出现以下界面就表示内网穿透好了,保持运行
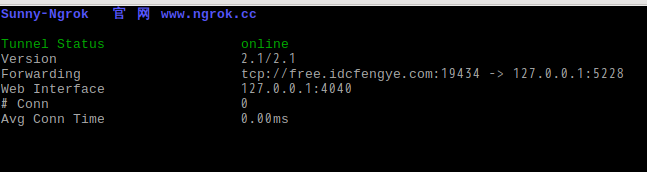
如图,表示隧道把 free.idcfengye.com(对应一个公网IP)的19434 端口(如果是http的话就是80端口)映射到127.0.0.1(一个特殊的IP,代表本机)的5228端口。此后,在外网请 free.idcfengye.com:19434 相当于请求本机的 5228 端口 了。
提示:
setsid /home/pi/Dowmloads/linux_arm/sunny clientid 隧道id &#可以后台启动内网穿透
本地搭建一个网页
https://www.cnblogs.com/xiangzhuo/p/9473812.html
我们可以请求到本地的端口了,要想在外网浏览器请求到树莓派的网页,还需要在树莓派上运行网页代理。比如 nginx
apt-get install nginx #安装nginx
/etc/init.d/nginx start #启动nginx
nginx 默认监听80 端口,可以在内网上用浏览器访问 树莓派IP 就能看到nginx 的默认网页,则说明nginx安装成功。
下面我们修改nginx的设置,监听我们预先设置的端口(如5228)并导向我们设定的网页。不管你用什么编辑器,比如我喜欢leafpad:
leafpad /etc/nginx/sites-available/default #修改配置文件:


server {
	listen   xxxx; ## 改监听端口号如5228
	root /usr/share/nginx/www; ##默认网页的根目录位置
	index index.html index.htm;

	# Make site accessible from http://localhost/
	server_name localhost;

	location / {
		# First attempt to serve request as file, then
		# as directory, then fall back to displaying a 404.
		  try_files $uri $uri/ /index.html;
		# Uncomment to enable naxsi on this location
		# include /etc/nginx/naxsi.rules
	}
我们可以就方便直接改index.html
/usr/share/nginx/www/index.html #编辑网页
比如:
<html>
<meta http-equiv="Content-Type" content="text/html ;charset= utf-8">
<head>
<title>Welcome to your name home!</title>
</head>
<body bgcolor="white" text="black">
<center><h1>THIS IS your name WEBSITE!</h1></center>
<img src="yourname.png" id="your name">
</body>
</html>
在当前目录下放好图片 yourname.png
然后访问 free.idcfengye.com:端口号 就可以啦(提示:浏览器默认访问80端口,如果想要直接访问网址,就申请一个 http 类型的隧道) ~~

树莓派实现代理服务器(V*N)
假如我们想在家里下载学校内网的资源,就需要一个代理服务器在学校内网运行,将tcp请求转发到外网。类似于科学上网的服务器在境外工作,将tcp请求通过合法的网络连接转发到国内。我们用shadowscoks实现这个代理功能。
https://github.com/shadowsocks/shadowsocks/wiki/Shadowsocks-使用说明
apt-get install python-pip #安装
pip install shadowsocks
配置
https://github.com/shadowsocks/shadowsocks/wiki/Configuration-via-Config-File
在服务端(也就是树莓派啦)
新建文件 /etc/shadowsocks.json
{
    "server":"my_server_ip",
    "server_port":8388,
    "local_address": "127.0.0.1",
    "local_port":1080,
    "password":"mypassword",
    "timeout":300,
    "method":"aes-256-cfb",
    "fast_open": false
}
注意:
如果是通过隧道连接外网的话:
| 项目 | Value |
|---|---|
| my_server_ip | 填127.0.0.1 |
| server_port | 填tcp 隧道端口,如5228 |
| local_address | 不管 |
| local_port | 不管 |
| password | 自定义,服务器密码 |
| timeout | 默认即可 |
| method | 默认即可,客户端需保持一致 |
| fast_open | true,可能降低延迟 |
运行
ssserver -c /etc/shadowsocks.json #要在前台运行
ssserver -c /etc/shadowsocks.json -d start#要在后台运行
ssserver -c /etc/shadowsocks.json -d stop
在客户端,如win PC上,下载客户端shadowsocks

打开客户端shadowsocks,全局代理,访问图书馆~~美滋滋

配置为启动脚本
配置为启动脚本,方便开机启动
创建/usr/ss.sh
#!/bin/sh
setsid /home/pi/Dowmloads/linux_arm/sunny clientid 隧道id &#启动内网穿透
ssserver -c /etc/ssserver.json -d restart & #启动ss-server
在exit 0 前添加
/usr/./ss.sh
systemctl start rc-local.service #测试,不能有错误
systemctl status rc-local.service
reboot 重启测试
