1.JavaWeb使用百度API实现人脸识别
本篇博客使用的环境是SSM+Maven+JSP实现人脸识别登录,适合于JavaWeb的开发(其他语言也可以作为参考),我会从注册百度云账号,前台如何调用摄像头,到分析图片进行详细的解说。
代码方面分别通过两个部分来实现
1.前台摄像头调用使用Ajax将图片转换为Base64格式到SSM后台
2.再调用百度提供的接口对图片进行分析
3.最终的效果就是输入账号在对人脸进行识别登录,并提供两个版本的Demo一个是SSM+Maven还有个Servlet导入即可使用
1.首先第一步就是需要注册一个百度云的账号网站网址在这个:https://cloud.baidu.com/注册的过程就不一一的描述了
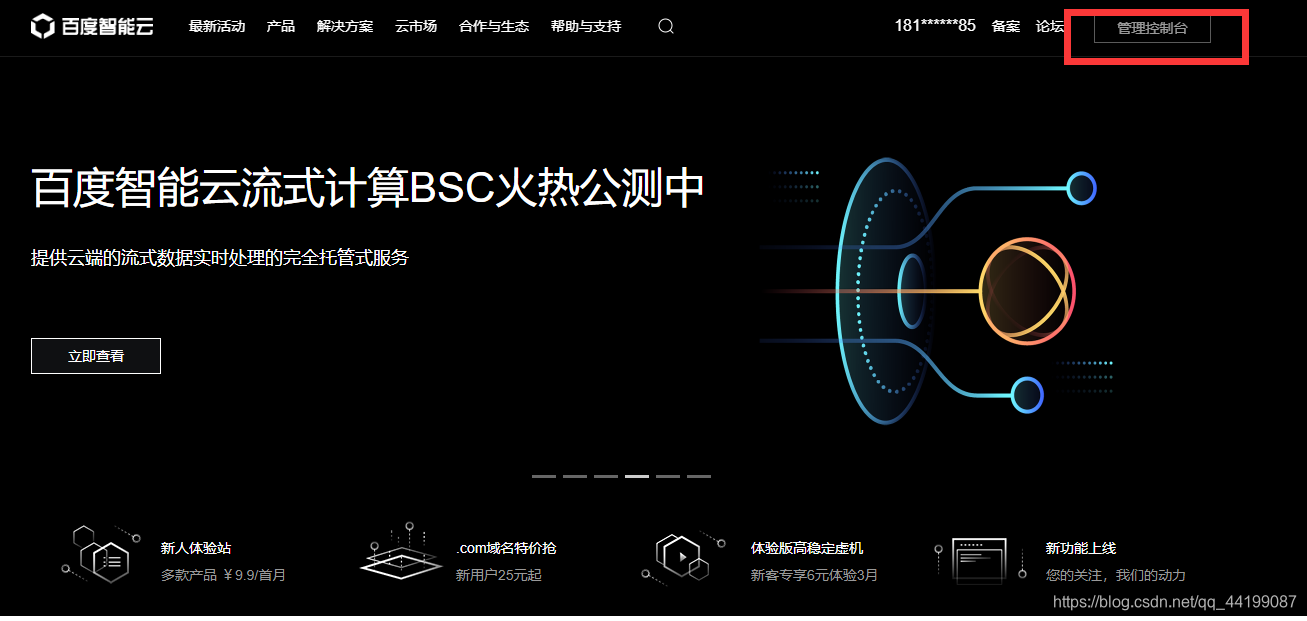
2.注册完后点开右上角的管理控制台
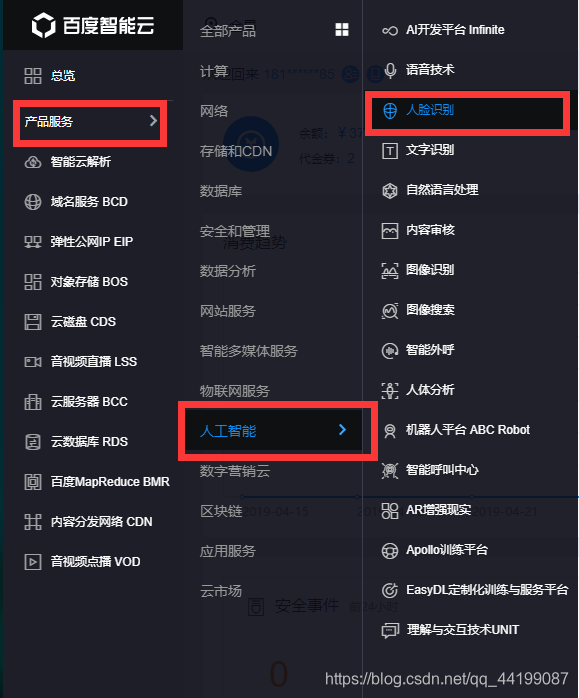
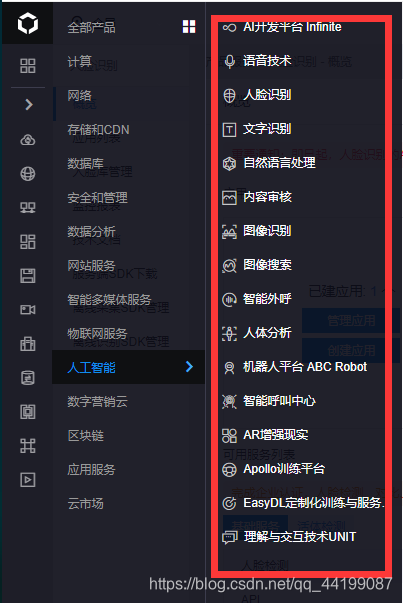
 3.点击左上角产品服务>人工智能>人脸识别
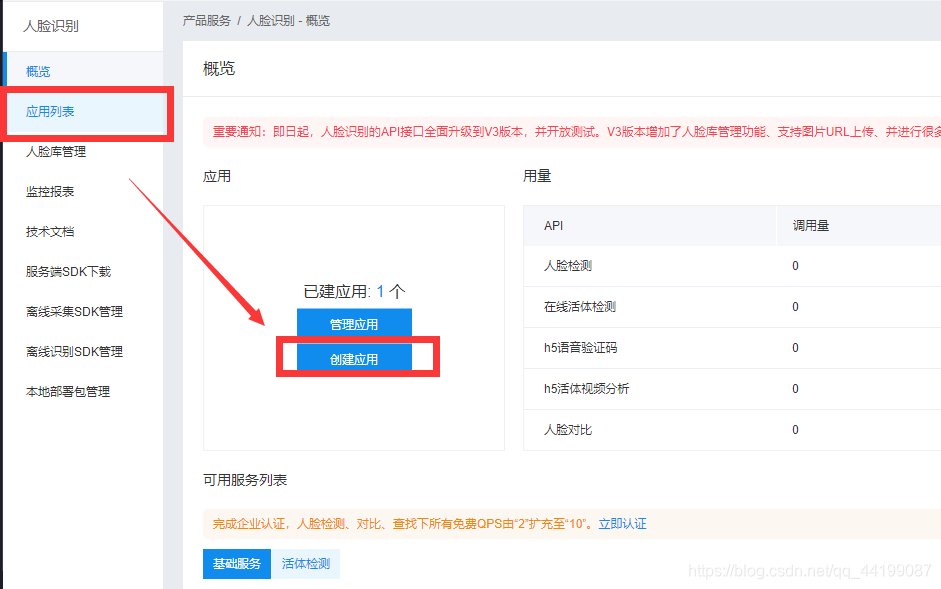
4.概览>点击创建应用
5.输入创建应用的信息
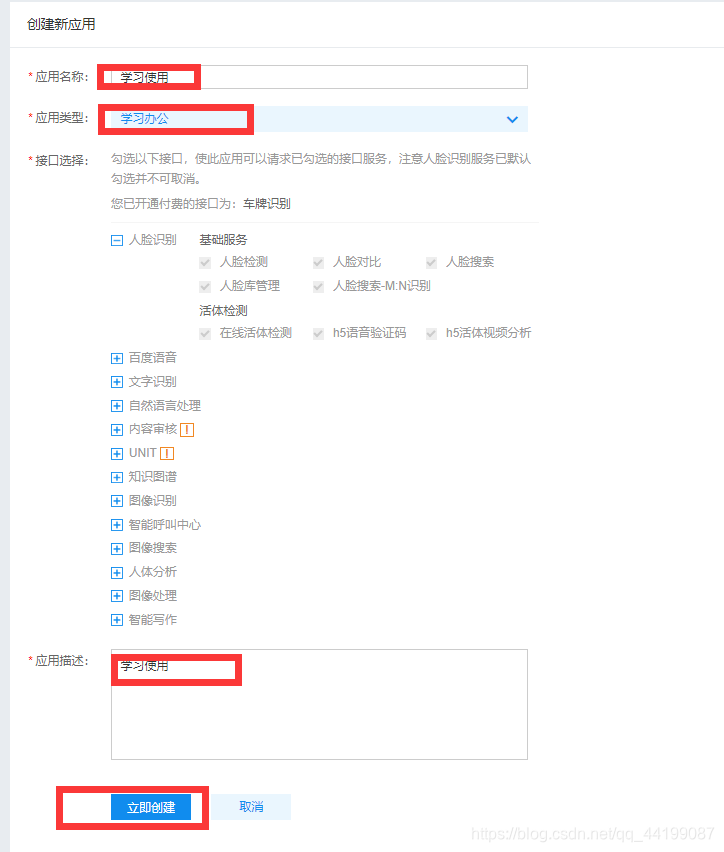
6.创建成功后就有了最重要的三个参数

7.点击技术文档>选择java v3 里面有人脸识别接口的所有方法使用方法,怎样入参,返回的参数实例,以及实例代码,做到这一步需要先将此文档详细的读一遍再进行后续的操作。

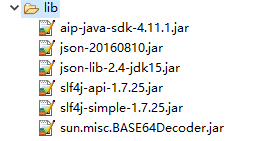
8.下载所需要的jar包,下面是maven项目的 pom文件,和jar包下载的网盘路径
		<dependency>
			<groupId>com.baidu.aip</groupId>
			<artifactId>java-sdk</artifactId>
			<version>4.3.2</version>
		</dependency>
		<!-- https://mvnrepository.com/artifact/com.baidu.aip/java-sdk -->
		<dependency>
		    <groupId>com.baidu.aip</groupId>
		    <artifactId>java-sdk</artifactId>
		    <version>4.11.0</version>
		</dependency>
链接:https://pan.baidu.com/s/1bqWT-AceA9zlR0DUaSqQfQ 提取码:lyr8
9.做好准备工作后就可以开始搭建我们的项目了
我搭建的项目后台是SSM框架+Maven作为依赖管理,项目搭建完成后首先将人脸识别所需要的jar包导入,因为部分jar包比较特殊在Maven官网没有找到我们的相关的pom文件,所以直接将jar导入到lib目录。导入jar包后需要准备好jQuery.js,本文使用的是jquery-2.1.1.js.
10.新建一个jsp页面,导入js后全选贴上代码,记得修改js的路径
<%@ page language="java" contentType="text/html; charset=UTF-8"
	pageEncoding="UTF-8"%>
<%@ taglib prefix="c" uri="http://java.sun.com/jsp/jstl/core"%>
<!DOCTYPE html PUBLIC "-//W3C//DTD HTML 4.01 Transitional//EN" "http://www.w3.org/TR/html4/loose.dtd">
<html>
<head>
<meta http-equiv="Content-Type" content="text/html; charset=UTF-8">
<script type="text/javascript" src="${pageContext.request.contextPath}/js/jquery-2.1.1.js"></script>
</head>
<body>
	<p align="center">
		<button id="open">开启摄像头</button>
		<button id="close">关闭摄像头</button>
		<button id="CatchCode">拍照</button>
	</p>
	<div align="center" style="float: left;">
		<video id="video" width="800px" height="800px" autoplay></video>
		<canvas hidden="hidden" id="canvas" width="626" height="800"></canvas>
	</div>
</body>
<script type="text/javascript">
var video;//视频流对象
var context;//绘制对象
var canvas;//画布对象
$(function() {
	var flag = false;
	//开启摄像头
	$("#open").click(function() {
		//判断摄像头是否打开
		if (!flag) {
			//调用摄像头初始化
			open();
			flag = true;
		}
	});
	//关闭摄像头
	$("#close").click(function() {
		//判断摄像头是否打开
		if (flag) {
			video.srcObject.getTracks()[0].stop();
			flag = false;
		}
	});
	//拍照
	$("#CatchCode").click(function() {
		if (flag) {
			context.drawImage(video, 0, 0, 330, 250);
			CatchCode();
		} else
			alert("请先开启摄像头!");
	});
});
//将当前图像传输到后台
function CatchCode() {
	//获取图像
	var img = getBase64();
	//Ajax将Base64字符串传输到后台处理
	$.ajax({
		type : "POST",
		async : false,
		url : "/Parking/parking/bodyAnalysis",
		data : {
			img : img
		},
		dataType : "JSON",
		success : function(data) {
			//返回的结果
		}
	});
};
//开启摄像头
function open() {
	//获取摄像头对象
	canvas = document.getElementById("canvas");
	context = canvas.getContext("2d");
	//获取视频流
	video = document.getElementById("video");
	var videoObj = {
		"video" : true
	}, errBack = function(error) {
		console.log("Video capture error: ", error.code);
	};
	context.drawImage(video, 0, 0, 330, 250);
	//初始化摄像头参数
	if (navigator.getUserMedia || navigator.webkitGetUserMedia
			|| navigator.mozGetUserMedia) {
		navigator.getUserMedia = navigator.getUserMedia
				|| navigator.webkitGetUserMedia
				|| navigator.mozGetUserMedia;
		navigator.getUserMedia(videoObj, function(stream) {
			video.srcObject = stream;
			video.play();
		}, errBack);
	}
}
//将摄像头拍取的图片转换为Base64格式字符串
function getBase64() {
	//获取当前图像并转换为Base64的字符串
	var imgSrc = canvas.toDataURL("image/png");
	//截取字符串
	return imgSrc.substring(22);
};
</script>
</html>
11.贴上代码后直运行复制地址到谷歌运行(部分浏览器不能使用摄像头),点击开启摄像头成功开启摄像头(笔记本前置摄像头)
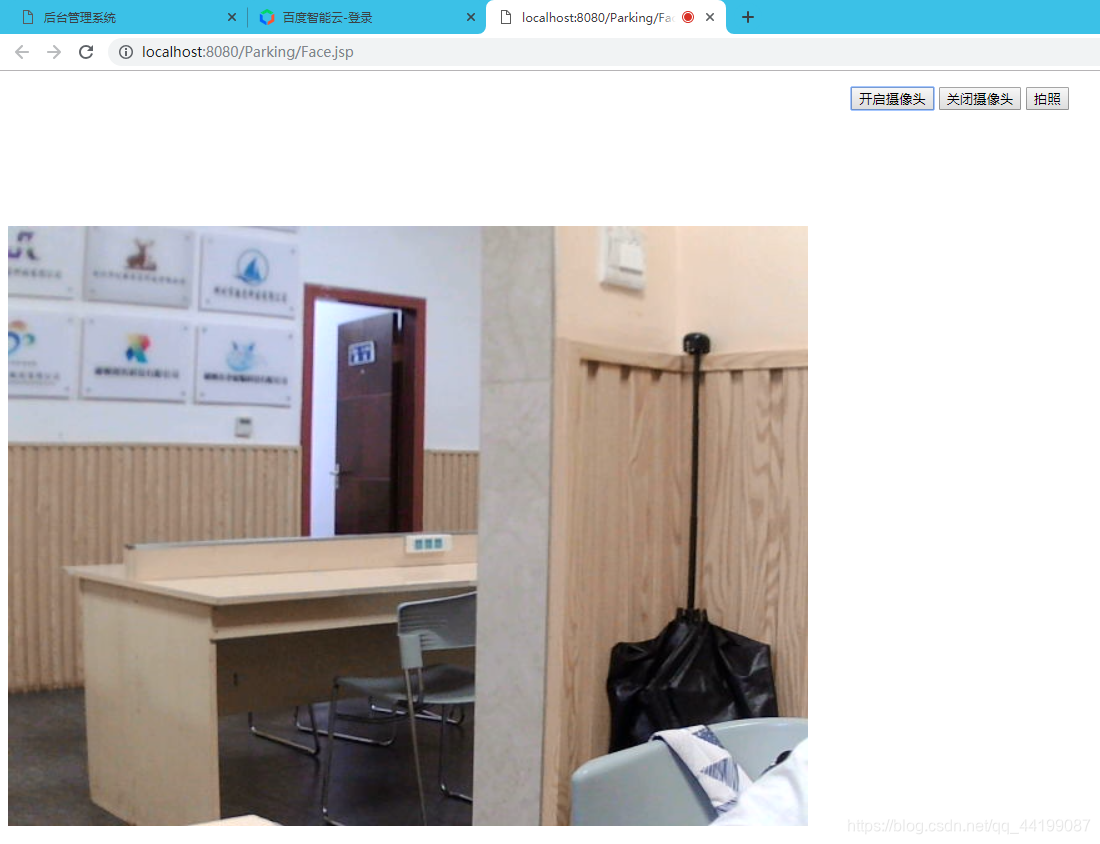
12.具体的实现方式看注释即可代码中写的算是比较详细了(注意:如果将项目部署到服务器中的话如果请求协议是http而不是https的话因为安全问题摄像头将无法打开)成功调用摄像头后就开始写后台代码了首先将人脸识别的工具类复制到项目中。
注:将类复制到项目后还需要将AppID ,APIKey ,SecretKey 修改成自己的,在之前创建人脸实例的时候已经有了。
package cn.smbms.util;

import java.io.ByteArrayOutputStream;
import java.io.File;
import java.io.FileInputStream;
import java.io.IOException;
import java.io.InputStream;
import java.util.ArrayList;
import java.util.HashMap;
import org.json.JSONObject;
import com.baidu.aip.face.AipFace;
import com.baidu.aip.face.FaceVerifyRequest;
import com.baidu.aip.face.MatchRequest;
import com.baidu.aip.util.Base64Util;

//import Decoder.BASE64Decoder;

public class FaceSpot {

	//private static final BASE64Decoder decoder = new BASE64Decoder();
	//需要修改为自己的
	private static final String AppID = "#########";
	private static final String APIKey = "#########";
	private static final String SecretKey = "#########";

	static AipFace client = null;
	static {
		client = new AipFace(AppID, APIKey, SecretKey);
		// 可选:设置网络连接参数
		client.setConnectionTimeoutInMillis(2000);
		client.setSocketTimeoutInMillis(60000);
	}

	public static void main(String[] args) throws IOException {
		//BASE64Decoder decoder = new BASE64Decoder();
		String file1 = "F:/3.png";
		byte[] img2 = FileToByte(new File(file1));
		System.out.println(searchFace(img2, "EasyBuy","22"));
	}

	/**
	 * 人脸检测
	 *
	 * @return
	 * @throws IOException
	 */
	public static String detectFace(File file, String max_face_num) {
		try {
			return detectFace(FileToByte(file), max_face_num);
		} catch (IOException e) {
			e.printStackTrace();
		}
		return null;
	}

	/**
	 * 人脸检测
	 *
	 * @return
	 * @throws IOException
	 */
	public static String detectFace(byte[] arg0, String max_face_num) {
		try {

			HashMap<String, String> options = new HashMap<String, String>();
			options.put("face_field",
					"age,beauty,expression,faceshape,gender,glasses,race,qualities");
			options.put("max_face_num", "2");
			options.put("face_type", "LIVE");

			// 图片数据
			String imgStr = Base64Util.encode(arg0);
			String imageType = "BASE64";
			JSONObject res = client.detect(imgStr, imageType, options);
			// System.out.println(res.toString(2));
			return res.toString();
		} catch (Exception e) {
			e.printStackTrace();
		}
		return null;
	}

	/**
	 * 人脸比对
	 *
	 * @param file1
	 * @param file2
	 * @return
	 */
	public static String matchFace(File file1, File file2) {
		try {
			return matchFace(FileToByte(file1), FileToByte(file2));
		} catch (IOException e) {
			e.printStackTrace();
		}
		return null;
	}

	/**
	 * 人脸比对
	 *
	 * @param arg0
	 *            人脸1
	 * @param arg1
	 *            人脸2
	 * @return
	 */
	public static String matchFace(byte[] arg0, byte[] arg1) {
		String imgStr1 = Base64Util.encode(arg0);
		String imgStr2 = Base64Util.encode(arg1);
		MatchRequest req1 = new MatchRequest(imgStr1, "BASE64");
		MatchRequest req2 = new MatchRequest(imgStr2, "BASE64");
		ArrayList<MatchRequest> requests = new ArrayList<MatchRequest>();
		requests.add(req1);
		requests.add(req2);
		JSONObject res = client.match(requests);
		return res.toString();
	}

	/**
	 * 人脸搜索
	 *
	 * @param file
	 * @param groupIdList
	 * @param userId
	 * @return
	 */
	public static String searchFace(File file, String groupIdList, String userId) {
		try {
			return searchFace(FileToByte(file), groupIdList, userId);
		} catch (IOException e) {

			e.printStackTrace();
		}
		return null;
	}

	/**
	 * 人脸搜索
	 *
	 * @param arg0
	 * @param groupIdList
	 * @return
	 */
	public static String searchFace(byte[] arg0, String groupIdList,
			String userId) {
		String imgStr = Base64Util.encode(arg0);
		String imageType = "BASE64";
		HashMap<String, String> options = new HashMap<String, String>();
		options.put("quality_control", "NORMAL");
		options.put("liveness_control", "LOW");
		if (userId != null) {
			options.put("user_id", userId);
		}
		options.put("max_user_num", "1");
		JSONObject res = client.search(imgStr, imageType, groupIdList, options);
		return res.toString(2);
	}

	/**
	 * 增加用户
	 *
	 * @param file
	 * @param userInfo
	 * @param userId
	 * @param groupId
	 * @return
	 */
	public static String addUser(File file, String userInfo, String userId,
			String groupId) {
		try {
			return addUser(FileToByte(file), userInfo, userId, groupId);
		} catch (IOException e) {

			e.printStackTrace();
		}
		return null;
	}

	/**
	 * 增加用户
	 *
	 * @param arg0
	 * @param userInfo
	 * @param userId
	 * @param groupId
	 * @return
	 */
	public static String addUser(byte[] arg0, String userInfo, String userId,String groupId) {
		String imgStr = Base64Util.encode(arg0);
		String imageType = "BASE64";
		HashMap<String, String> options = new HashMap<String, String>();
		options.put("user_info", userInfo);
		options.put("quality_control", "NORMAL");
		options.put("liveness_control", "LOW");

		JSONObject res = client.addUser(imgStr, imageType, groupId, userId,options);
		return res.toString(2);
	}

	public static String updateUser(File file, String userInfo, String userId,
			String groupId) {
		try {
			return updateUser(FileToByte(file), userInfo, userId, groupId);
		} catch (IOException e) {
			e.printStackTrace();
		}
		return null;
	}

	/**
	 * 更新用户
	 *
	 * @param arg0
	 * @param userInfo
	 * @param userId
	 * @param groupId
	 * @return
	 */
	public static String updateUser(byte[] arg0, String userInfo,
			String userId, String groupId) {
		String imgStr = Base64Util.encode(arg0);
		String imageType = "BASE64";
		HashMap<String, String> options = new HashMap<String, String>();
		if (userInfo != null) {
			options.put("user_info", userInfo);
		}
		options.put("quality_control", "NORMAL");
		options.put("liveness_control", "LOW");

		JSONObject res = client.updateUser(imgStr, imageType, groupId, userId,
				options);
		return res.toString(2);
	}

	/**
	 * 删除用户人脸信息
	 *
	 * @param userId
	 * @param groupId
	 * @param faceToken
	 * @return
	 */
	public static String deleteUserFace(String userId, String groupId,
			String faceToken) {
		HashMap<String, String> options = new HashMap<String, String>();
		// 人脸删除
		JSONObject res = client.faceDelete(userId, groupId, faceToken, options);
		return res.toString();
	}

	/**
	 * 查询用户信息
	 *
	 * @param userId
	 * @param groupId
	 * @return
	 */
	public static String searchUserInfo(String userId, String groupId) {
		HashMap<String, String> options = new HashMap<String, String>();
		// 用户信息查询
		JSONObject res = client.getUser(userId, groupId, options);
		return res.toString(2);
	}

	/**
	 * 获取用户人脸列表
	 *
	 * @param userId
	 * @param groupId
	 * @return
	 */
	public static String getUserFaceList(String userId, String groupId) {
		HashMap<String, String> options = new HashMap<String, String>();
		// 获取用户人脸列表
		JSONObject res = client.faceGetlist(userId, groupId, options);
		return res.toString(2);
	}

	/**
	 * 获取一组用户
	 *
	 * @param groupId
	 * @param returnNum
	 * @return
	 */
	public static String getGroupUsers(String groupId, String returnNum) {
		HashMap<String, String> options = new HashMap<String, String>();
		options.put("start", "0");
		if (returnNum != null) {
			options.put("length", returnNum);
		}
		// 获取用户列表
		JSONObject res = client.getGroupUsers(groupId, options);
		return res.toString(2);
	}

	/**
	 * 组用户复制
	 *
	 * @param userId
	 * @param srcGroupId
	 * @param dstGroupId
	 * @return
	 */
	public static String userCopy(String userId, String srcGroupId,
			String dstGroupId) {
		HashMap<String, String> options = new HashMap<String, String>();
		options.put("src_group_id", srcGroupId);
		options.put("dst_group_id", dstGroupId);
		// 复制用户
		JSONObject res = client.userCopy(userId, options);
		return res.toString(2);
	}

	/**
	 * 删除用户
	 *
	 * @param userId
	 * @param groupId
	 * @return
	 */
	public static String deleteUser(String userId, String groupId) {
		HashMap<String, String> options = new HashMap<String, String>();
		// 人脸删除
		JSONObject res = client.deleteUser(groupId, userId, options);
		return res.toString();
	}

	/**
	 * 增加组信息
	 *
	 * @param groupId
	 * @return
	 */
	public static String addGroup(String groupId) {
		HashMap<String, String> options = new HashMap<String, String>();
		// 创建用户组
		JSONObject res = client.groupAdd(groupId, options);
		return res.toString();
	}

	/**
	 * 删除
	 *
	 * @param groupId
	 * @return
	 */
	public static String deleteGroup(String groupId) {
		HashMap<String, String> options = new HashMap<String, String>();
		// 创建用户组
		JSONObject res = client.groupDelete(groupId, options);
		return res.toString();
	}

	/**
	 * 获取组列表
	 *
	 * @param length
	 * @return
	 */
	public static String getGroupList(String length) {
		HashMap<String, String> options = new HashMap<String, String>();
		options.put("start", "0");
		options.put("length", length);
		// 组列表查询
		JSONObject res = client.getGroupList(options);
		return res.toString();
	}

	/**
	 * 活体检测
	 *
	 * @param arg0
	 * @return
	 */
	public static String faceverify(byte[] arg0) {
		String imgStr = Base64Util.encode(arg0);
		String imageType = "BASE64";
		FaceVerifyRequest req = new FaceVerifyRequest(imgStr, imageType);
		ArrayList<FaceVerifyRequest> list = new ArrayList<FaceVerifyRequest>();
		list.add(req);
		JSONObject res = client.faceverify(list);
		return res.toString();
	}

	public static byte[] FileToByte(File file) throws IOException {
		// 将数据转为流
		@SuppressWarnings("resource")
		InputStream content = new FileInputStream(file);
		ByteArrayOutputStream swapStream = new ByteArrayOutputStream();
		byte[] buff = new byte[100];
		int rc = 0;
		while ((rc = content.read(buff, 0, 100)) > 0) {
			swapStream.write(buff, 0, rc);
		}
		// 获得二进制数组
		return swapStream.toByteArray();
	}

}
package cn.smbms.util;

/**
 * Base64 工具类
 */
public class Base64Util {
    private static final char last2byte = (char) Integer.parseInt("00000011", 2);
    private static final char last4byte = (char) Integer.parseInt("00001111", 2);
    private static final char last6byte = (char) Integer.parseInt("00111111", 2);
    private static final char lead6byte = (char) Integer.parseInt("11111100", 2);
    private static final char lead4byte = (char) Integer.parseInt("11110000", 2);
    private static final char lead2byte = (char) Integer.parseInt("11000000", 2);
    private static final char[] encodeTable = new char[]{'A', 'B', 'C', 'D', 'E', 'F', 'G', 'H', 'I', 'J', 'K', 'L', 'M', 'N', 'O', 'P', 'Q', 'R', 'S', 'T', 'U', 'V', 'W', 'X', 'Y', 'Z', 'a', 'b', 'c', 'd', 'e', 'f', 'g', 'h', 'i', 'j', 'k', 'l', 'm', 'n', 'o', 'p', 'q', 'r', 's', 't', 'u', 'v', 'w', 'x', 'y', 'z', '0', '1', '2', '3', '4', '5', '6', '7', '8', '9', '+', '/'};

    public Base64Util() {}

    public static String encode(byte[] from) {
        StringBuilder to = new StringBuilder((int) ((double) from.length * 1.34D) + 3);
        int num = 0;
        char currentByte = 0;
        int i;
        for (i = 0; i < from.length; ++i) {
            for (num %= 8; num < 8; num += 6) {
                switch (num) {
                    case 0:
                        currentByte = (char) (from[i] & lead6byte);
                        currentByte = (char) (currentByte >>> 2);
                    case 1:
                    case 3:
                    case 5:
                    default:
                        break;
                    case 2:
                        currentByte = (char) (from[i] & last6byte);
                        break;
                    case 4:
                        currentByte = (char) (from[i] & last4byte);
                        currentByte = (char) (currentByte << 2);
                        if (i + 1 < from.length) {
                            currentByte = (char) (currentByte | (from[i + 1] & lead2byte) >>> 6);
                        }
                        break;
                    case 6:
                        currentByte = (char) (from[i] & last2byte);
                        currentByte = (char) (currentByte << 4);
                        if (i + 1 < from.length) {
                            currentByte = (char) (currentByte | (from[i + 1] & lead4byte) >>> 4);
                        }
                }

                to.append(encodeTable[currentByte]);
            }
        }

        if (to.length() % 4 != 0) {
            for (i = 4 - to.length() % 4; i > 0; --i) {
                to.append("=");
            }
        }

        return to.toString();
    }
}
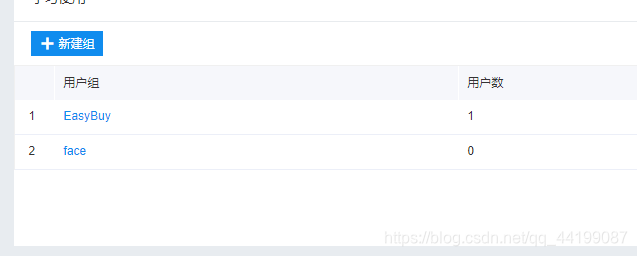
13.后台类准备好后我们再次回到我们的百度云中新建人脸库
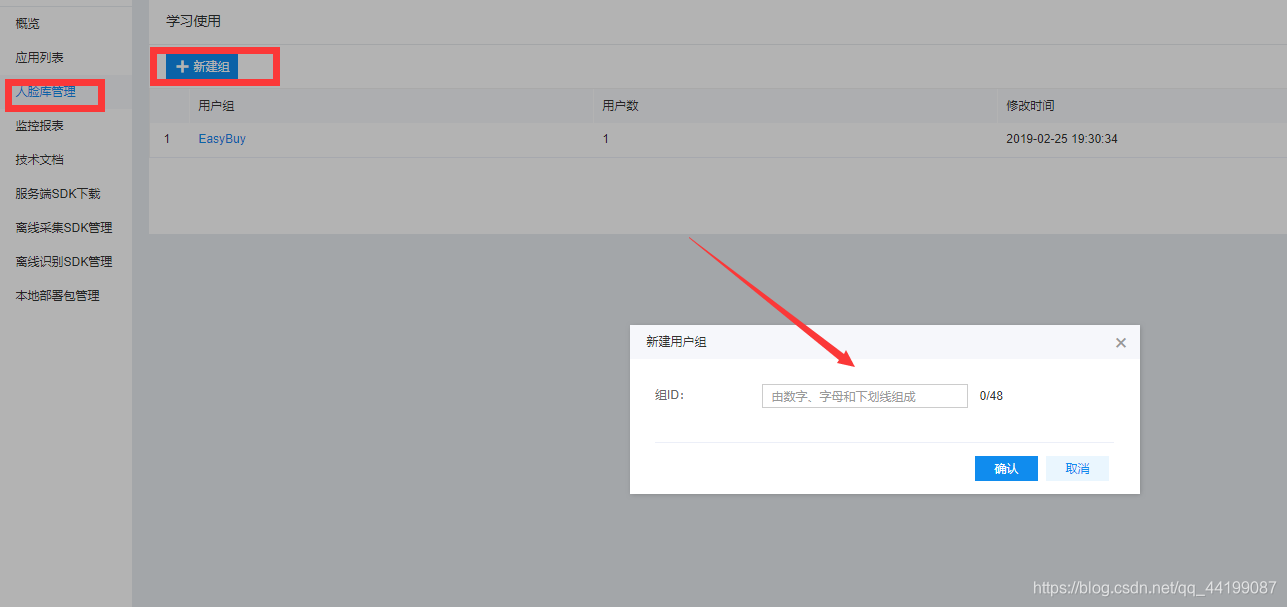
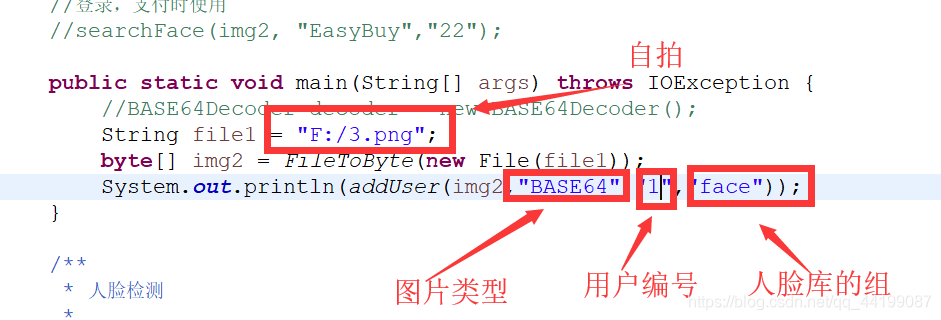
14.新建完成之后回到项目之中,在FaceSpot类中新建main方法测试注册人脸,注意参数顺序
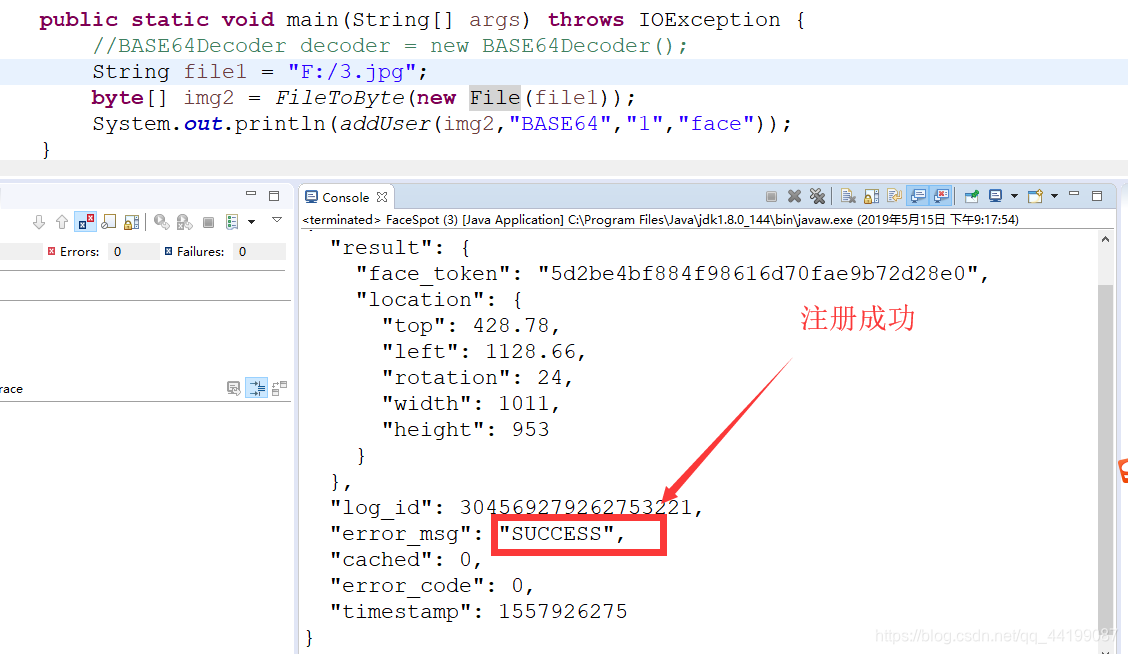
15.运行main方法测试成功
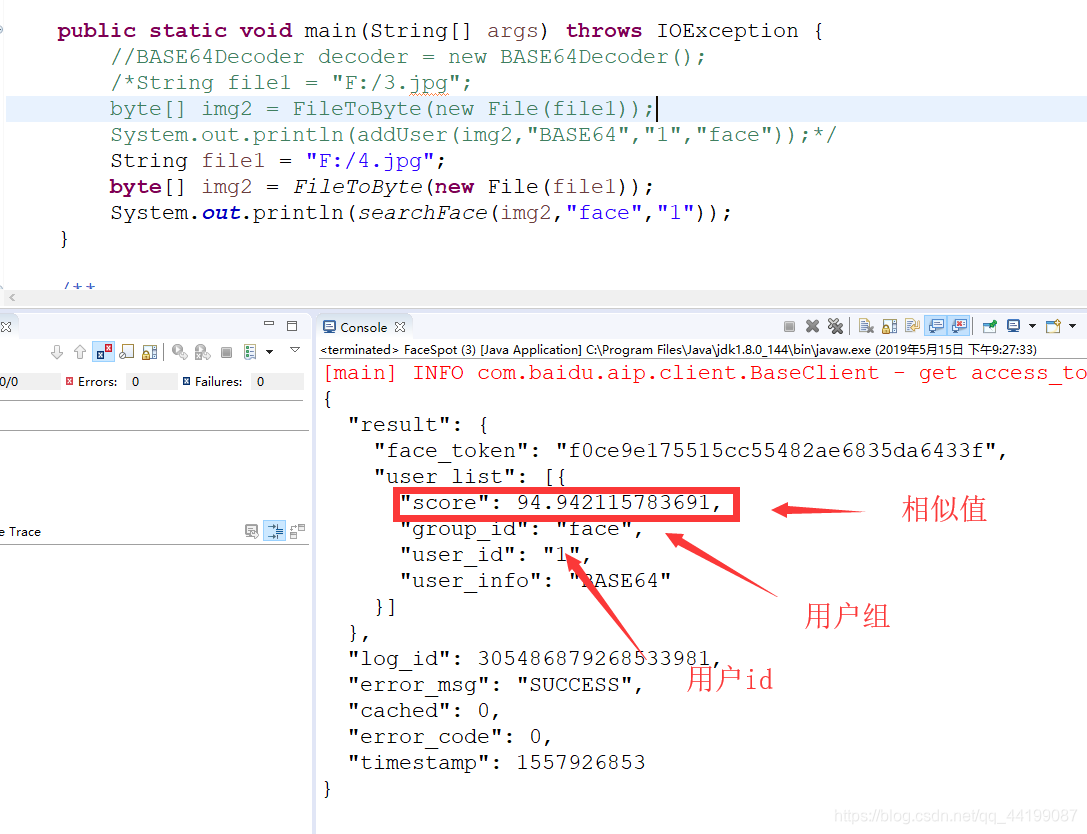
16.测试人脸比对方法实现人脸识别登录的关键步骤,再存入一张图片进行对比,同一个小姐姐不同的照片
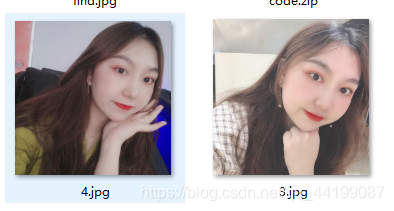
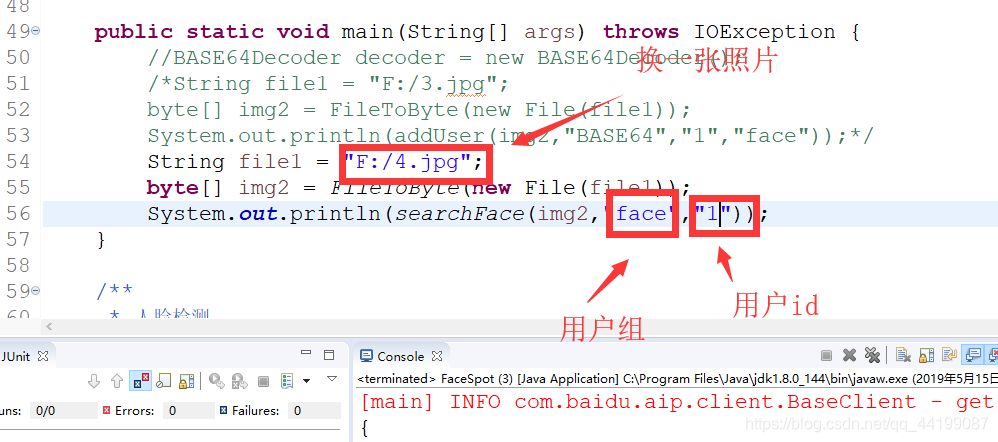
17.运行测试成功,两种图片中的人脸对比相似度达到94%,识别成功
18.后台测试成功以后我们就可以写控制层了,通过前台传输的图片进行对比识别了,首先重载一个传入图片参数为Base64的字符串的人脸搜索方法
	//Base64参数
	public static JSONObject searchFace(String imgStr, String groupIdList,
			String userId) {
		String imageType = "BASE64";
		HashMap<String, String> options = new HashMap<String, String>();
		options.put("quality_control", "NORMAL");
		options.put("liveness_control", "LOW");
		if (userId != null) {
			options.put("user_id", userId);
		}
		options.put("max_user_num", "1");
		JSONObject res = client.search(imgStr, imageType, groupIdList, options);
		System.out.println(res.toString(2));
		return res;
	}
19.新建一个Controller控制类(使用Servlet效果一样),先做一个简单的传入图片后台进行识别,再将识别结果返回到视图之中(因为之前对比的小姐姐不在我身边,所以又注册了自己的人脸,记得修改用户id)
@Controller
@RequestMapping("/faceLogin")
public class FaceLogin {

	@RequestMapping("/searchFace")
	@ResponseBody
	public String searchFace(String img) {
		JSONObject js = FaceSpot.searchFace(img, "face", "2");
		System.out.println(js.toString(2));
		return js.toString();
	}

}
20.后台完成后我们转到前台,修改Ajax的路径
//将当前图像传输到后台
function CatchCode() {
	//获取图像
	var img = getBase64();
	//Ajax将Base64字符串传输到后台处理
	$.ajax({
		type : "POST",
		url : "/Parking/faceLogin/searchFace",
		data : {
			img : img
		},
		dataType : "JSON",
		success : function(data) {
			//返回的结果
			alert(JSON.stringify(data));
		},
		error : function(q, w, e) {
			alert(q + w + e);
		}
	});
};
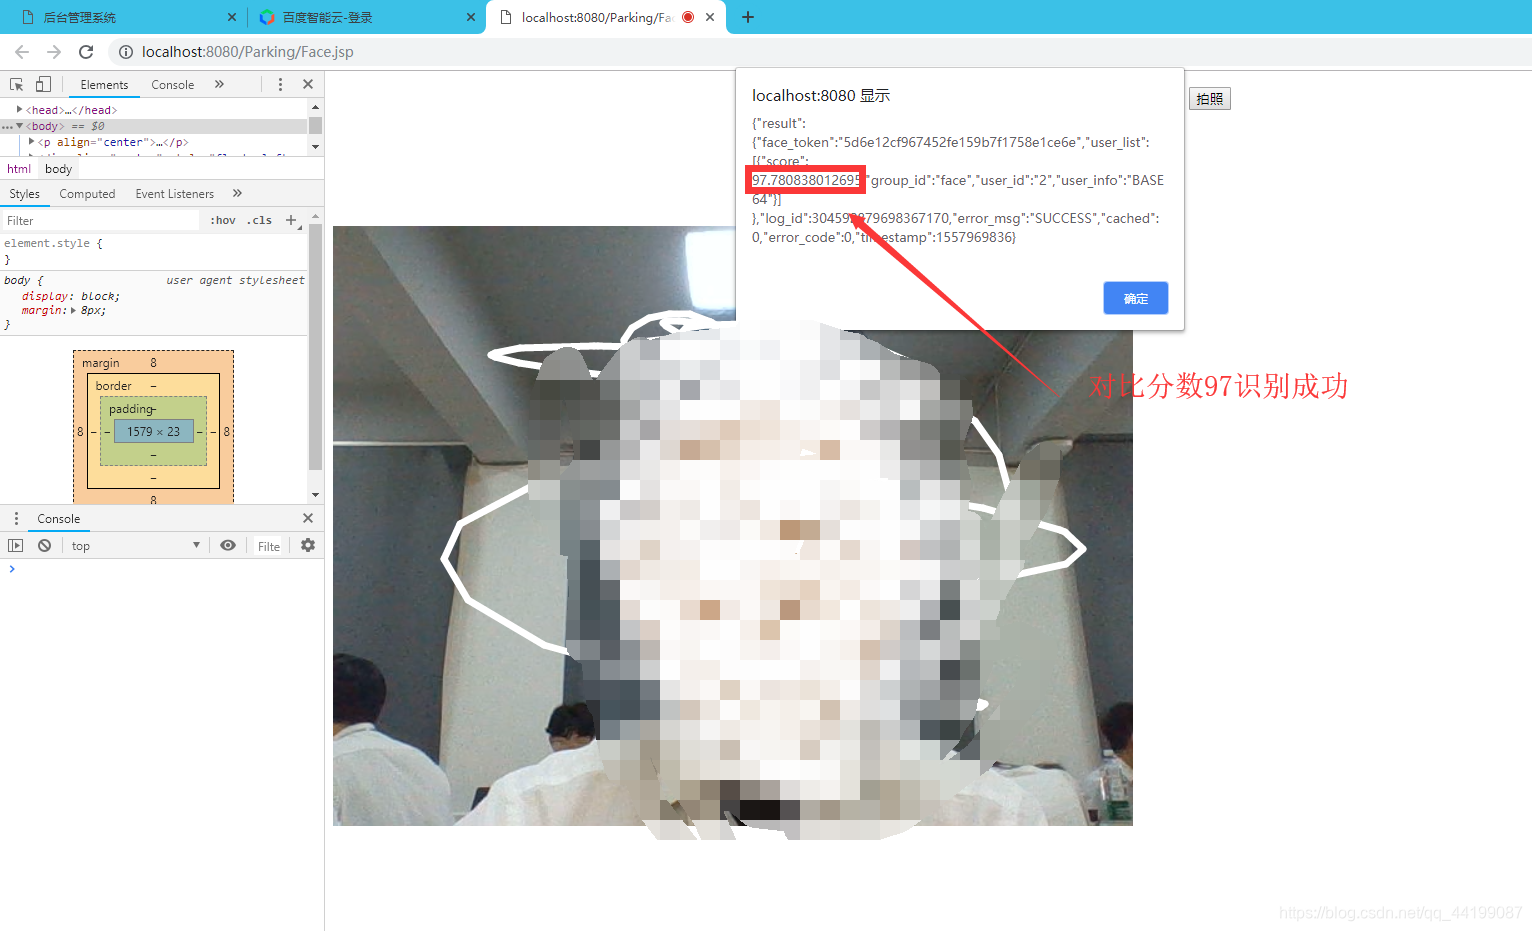
21.开始测试,返回结果测试成功,对比人脸分数97分在这一步其实已经识别成功了接下来就是将对比分数读出来进行判断,当分数达到一定程度那么就通过验证登录成功
22.修改ajax请求
//将当前图像传输到后台
function CatchCode() {
//获取图像
var img = getBase64();
//Ajax将Base64字符串传输到后台处理
$.ajax({
type : "POST",
url : "/Parking/faceLogin/searchFace",
data : {
img : img
},
dataType : "JSON",
success : function(data) {
//返回的结果
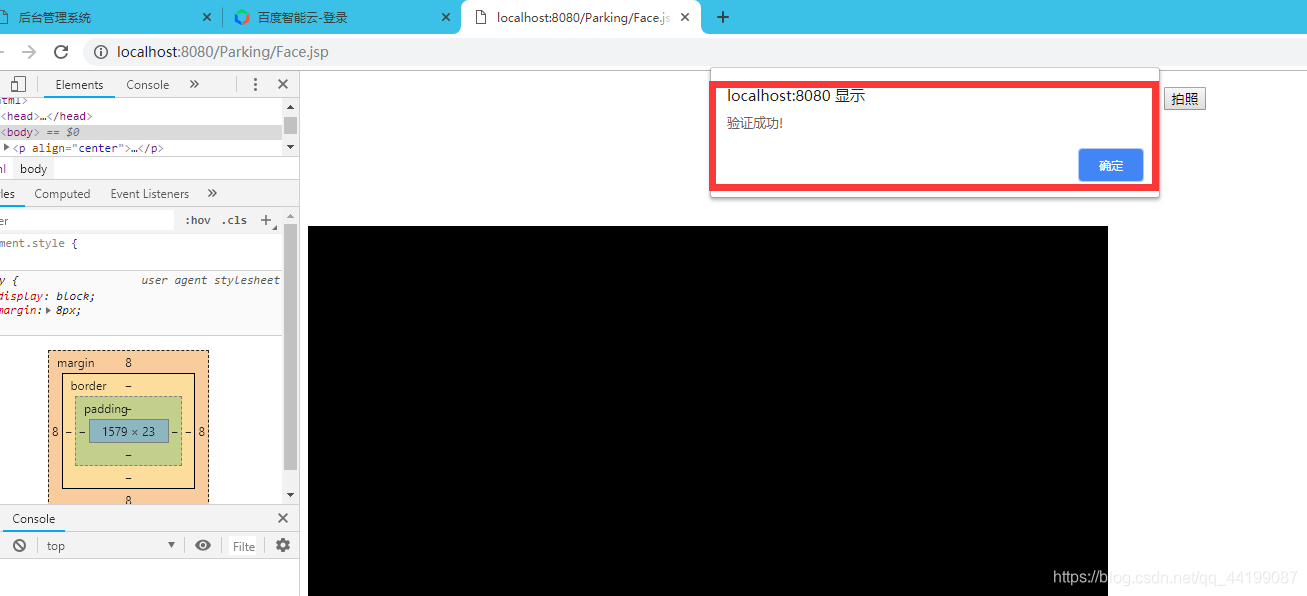
//取出对比结果的返回分数,如果分数90以上就判断识别成功了
if(parseInt(data.result.user_list[0].score) > 90) {
//关闭摄像头
video.srcObject.getTracks()[0].stop();
//提醒用户识别成功
alert("验证成功!");
//验证成功跳转页面
//window.location.href="";
}
},
error : function(q, w, e) {
alert(q + w + e);
}
});
};
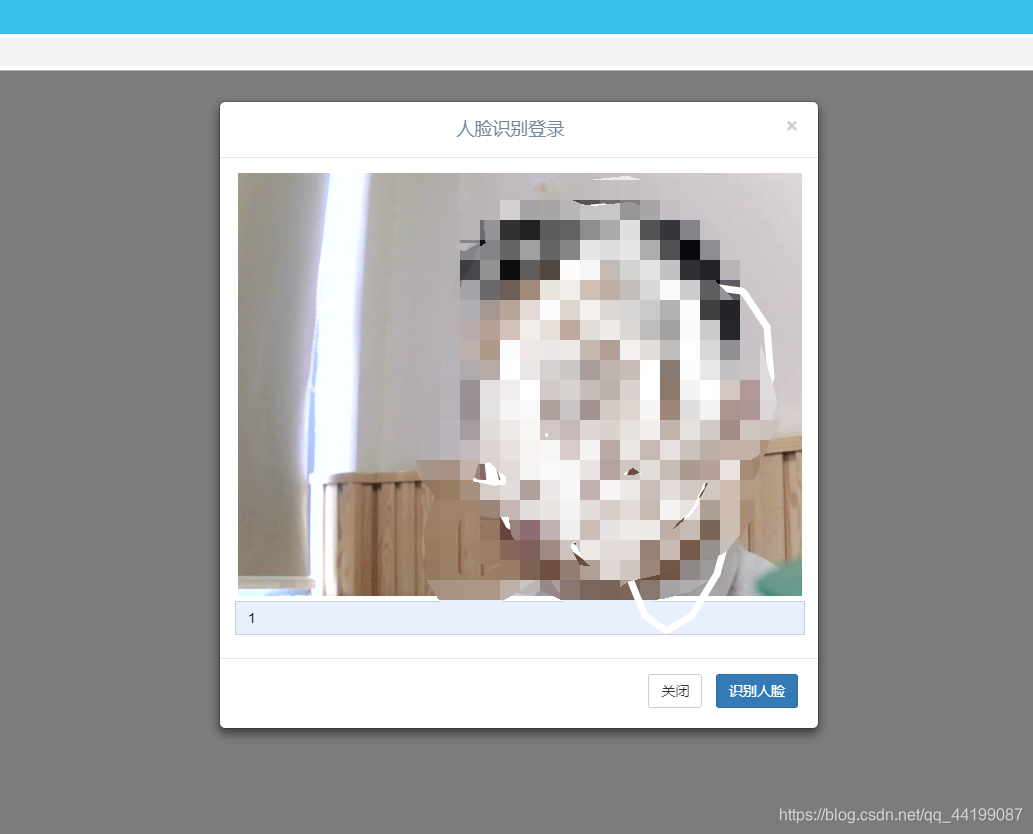
23.验证成功
24.在这个阶段了整个流程就已经全部跑通了,这个Demo只需要修改AppID,APIKey ,SecretKey 就能直接运行了。
public class FaceSpot {

	//private static final BASE64Decoder decoder = new BASE64Decoder();
	private static final String AppID = "#####################";
	private static final String APIKey = "#####################";
	private static final String SecretKey =  "#####################";

	static AipFace client = null;
	static {
		client = new AipFace(AppID, APIKey, SecretKey);
		// 可选:设置网络连接参数
		client.setConnectionTimeoutInMillis(2000);
		client.setSocketTimeoutInMillis(60000);
	}
总结:本篇博客主要就是讲解了如何调用百度云提供的人脸识别接口,以及调用笔记本前置摄像头(台式usb摄像头也可以使用)进行人脸识别操作。实现了人脸对比一个功能以后就可以根据百度云提供的文档去实现其他的功能,同理百度云提供的其他的人工智能接口也可以对比的使用了。在使用百度云相关的接口如果出现了问题也可以加我qq:815369891一起讨论
项目Demo,更新了Servlet版本直接导入无需Maven即可使用
链接:https://pan.baidu.com/s/1rMSRa_GIoYvK0kpoGBaHkw
提取码:kzeq
复制这段内容后打开百度网盘手机App,操作更方便哦
