文章目录
1,centos 6/7单用户模式:(启动条目+ 按e键 )修改grub引导参数
单用户模式使用场景: 忘记密码,系统启动异常(网络配置错误,磁盘挂载异常)
1.1, grub命令行:(启动条目+ 按c键) 手动启动linux系统
在系统启动界面,选择要启动的条目: 按c键,进入grub命令行
手动输入以下命令,和在上面的某个条目上回车是一样的效果(自动读取/boot/grub/grub.conf写好的指令)

1.2, cent6:单用户模式
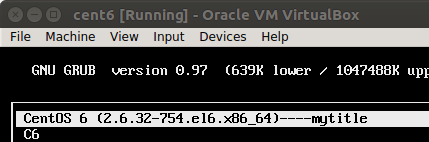
选中要启动的条目,按e键编辑启动参数:
#centos6(开机bootloader读取配置文件: /etc/grub.cfg)
[root@c6 ~]# ll /etc/grub.conf
lrwxrwxrwx. 1 root root 22 1月 2 08:07 /etc/grub.conf -> ../boot/grub/grub.conf
[root@c6 ~]# cat /etc/grub.conf
default=0 #默认启动第一个title
timeout=5
#password --md5 $1$Wkpmj0$qB1eLWsjrK10O/WbjqemC0 ##编辑时,需密码验证
title CentOS 6 (2.6.32-754.el6.x86_64)----mytitle
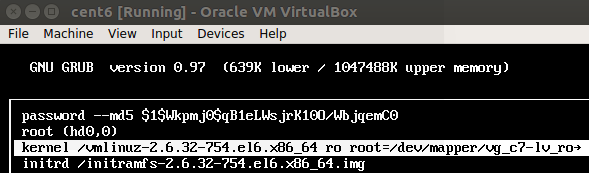
password --md5 $1$Wkpmj0$qB1eLWsjrK10O/WbjqemC0 ##运行时,需密码验证
root (hd0,0)
kernel /vmlinuz-2.6.32-754.el6.x86_64 ro root=/dev/mapper/vg_c7-lv_root rd_NO_LUKS KEYBOARDTYPE=pc KEYTABLE=us LANG=en_US.UTF-8 rd_NO_MD rd_LVM_LV=vg_c7/lv_swap SYSFONT=latarcyrheb-sun16 crashkernel=auto rd_LVM_LV=vg_c7/lv_root rd_NO_DM rhgb
initrd /initramfs-2.6.32-754.el6.x86_64.img
title C6
root (hd0,0)
....
...
选择kernel 所在的行,按e编辑
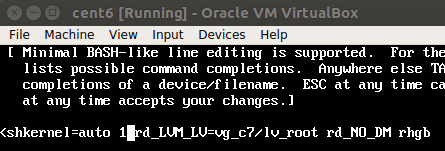
 出现编辑界面后,会出现下图: 在行首的kernel=auto 后面加个1或s或S, 然后回车,此时又会重新出现上图,按b以启动系统,便进入了但用户模式, 可以修改root密码
1.3, cent7:单用户模式
#centos7 (开机bootloader读取配置文件: /etc/grub2.cfg)
[root@localhost ~]# ll /etc/grub2.cfg
lrwxrwxrwx. 1 root root 22 1月   2 08:53 /etc/grub2.cfg -> ../boot/grub2/grub.cfg

###有如下内容:(加载内核文件)
linux16 /boot/vmlinuz-3.10.0-957.el7.x86_64 root=UUID=45a1cc49-306b-43a1-988a-f7d312fbf293 ro crashkernel=auto rhgb quiet LANG=en_US.UTF-8
        initrd16 /boot/initramfs-3.10.0-957.el7.x86_64.img

--->修改方式: 开机启动时,(在timeout超时时间内)选择需要启动的某内核, 按 e 编辑配置: (在最后两行,改动上面的内容为)
ro : 改成rw
LANG=en_US.UTF-8后面追加内容: init=/bin/bash
最后,按Ctrl x保存,回到启动加载bootloader页面,回车或按b进入系统启动

--> 进入系统后:可以修改root密码了
bash-4.2#  echo  123 | passwd root --stdin

##重新配置selinux: 扫描整个文件系统并重新打标签,最后加载正常的登陆窗口
bash-4.2# touch /.autorelabel
bash-4.2# exec /sbin/init
##等待使用新密码,重新登陆
2,linux安装过程(运行anaconda安装程序):(启动条目+ 按Tab键)自定义grub命令参数
2.1, Centos6.iso 安装光盘的内容
wang@wang-pc:~$ sudo mount ~/Downloads/iso/CentOS-6.10-x86_64-bin-DVD1.iso /var/www/html/cent6/
mount: /dev/loop2 is write-protected, mounting read-only
wang@wang-pc:~$ ls /var/www/html/cent6/ -l
total 566
-r--r--r-- 2 root root     14 6月  29  2018 CentOS_BuildTag
dr-xr-xr-x 3 root root   2048 6月  30  2018 EFI
-r--r--r-- 2 root root    212 11月 27  2013 EULA
-r--r--r-- 2 root root  18009 11月 27  2013 GPL
dr-xr-xr-x 3 root root   2048 6月  30  2018 images
dr-xr-xr-x 2 root root   2048 6月  30  2018 isolinux
dr-xr-xr-x 2 root root 536576 6月  30  2018 Packages
-r--r--r-- 2 root root   1363 6月  29  2018 RELEASE-NOTES-en-US.html
dr-xr-xr-x 2 root root   4096 6月  30  2018 repodata
-r--r--r-- 2 root root   1706 11月 27  2013 RPM-GPG-KEY-CentOS-6
-r--r--r-- 2 root root   1730 11月 27  2013 RPM-GPG-KEY-CentOS-Debug-6
-r--r--r-- 2 root root   1730 11月 27  2013 RPM-GPG-KEY-CentOS-Security-6
-r--r--r-- 2 root root   1734 11月 27  2013 RPM-GPG-KEY-CentOS-Testing-6
-r--r--r-- 1 root root   3380 6月  30  2018 TRANS.TBL
2.2, 安装过程
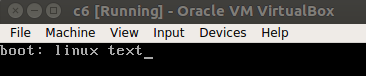
按Esc键进入boot命令行,可以手动修改安装选项

比如追加内核启动参数:linux text (使用文本安装界面)
(使用kickstart文件自动安装: linux ip=192.168.56.5 netmask=24 ks=http://192.168.56.1/ks7.cfg)

2.2.1, 启动条目
- 每个启动条目:按Tab键编辑, Esc键退出编辑
启动条目所定义的grub命令(kernel )的参数: 按Tab键查看
Install or upgrade an existing system  --> vmlinuz initrd= initrd.img
Install system with basic  video driver--> vmlinuz initrd= initrd.img nomodeset
Rescue installed system -->				   vmlinuz initrd= initrd.img rescue
Boot from local driver -->                 .localboot 0xffff
Memory test -->                            memtest
- Install 条目的实际工作内容:
- 加载内核(grub 指令1): kernel vmlinuz
- 传递内核参数(grub 指令2): initrd=initrd.img
2.2.2, 安装过程的执行步骤
#####安装过程的执行步骤:#####
stage1: boot.cat (MBR) --->  (定位真正的启动程序目录/isolinux/, 开始stage2)

wang@wang-pc:~$ ls /var/www/html/cent6/isolinux/
boot.cat  grub.conf   isolinux.bin  memtest     TRANS.TBL     vmlinuz
boot.msg  initrd.img  isolinux.cfg  splash.jpg  vesamenu.c32

#####安装过程的执行步骤:#####
stage2: isolinux.bin -->加载配置文件( isolinux.cfg):

wang@wang-pc:~$ cat  /var/www/html/cent6/isolinux/isolinux.cfg
default vesamenu.c32
#prompt 1
timeout 600
display boot.msg
menu background splash.jpg
menu title Welcome to CentOS 6.10!
menu color border 0 #ffffffff #00000000
...
label linux
  menu label ^Install or upgrade an existing system
  menu default
  kernel vmlinuz
  append initrd=initrd.img
label vesa
  menu label Install system with ^basic video driver
  kernel vmlinuz
  append initrd=initrd.img nomodeset
label rescue
  menu label ^Rescue installed system
  kernel vmlinuz
  append initrd=initrd.img rescue
label local
  menu label Boot from ^local drive
  localboot 0xffff
label memtest86
  menu label ^Memory test
  kernel memtest
  append -
3, 自定义ks文件,iso镜像
- 生成md5加密密码
wang@wang-pc:~$ openssl  rand -hex 4
a888ae98

wang@wang-pc:~$ openssl  passwd -1 -salt `openssl  rand -hex 4` 123456
$1$cd1798fb$XGKuJIpqIYhOzZcM8OJO11
3.1, 使用system-config-kickstart配置ks文件
安装图形化配置工具:yum -y install system-config-kickstart
运行启动命令: system-config-kickstart
下面是centos6.10 desktop版安装的ks文件
wang@wang-pc:~/ks/enc$ cat /var/www/html/ks/ks6.cfg
firewall --disabled
install
# Use network installation
url --url="http://192.168.56.1/centos/6/"
#repo --name="CentOS" --baseurl=cdrom:sr0 --cost=100

# Root password
rootpw --iscrypted $1$cd1798fb$XGKuJIpqIYhOzZcM8OJO11 #root密码:123456
# System authorization information
auth  --useshadow  --passalgo=sha512
# Use graphical install
graphical

# System keyboard
keyboard us
# System language
lang en_US
# SELinux configuration
selinux --disabled
# Do not configure the X Window System
skipx
# Installation logging level
logging --level=info
# Reboot after installation
poweroff

# System timezone
timezone  Asia/Shanghai
# Network information
network  --bootproto=dhcp --device=eth0 --onboot=on
# System bootloader configuration
bootloader --append="crashkernel=auto rhgb quiet" --location=mbr --driveorder="sda"
# Partition clearing information
clearpart --all
# Disk partitioning information
part /boot --fstype="ext4" --size=200
part / --fstype="ext4" --size=5120
part swap --fstype="swap" --size=1024

%packages
@base
@core
@debugging
@directory-client
@java-platform
@network-file-system-client
@print-client
@server-policy
@workstation-policy
certmonger
device-mapper-persistent-data
genisoimage
krb5-workstation
mtools
oddjob
pam_krb5
pax
python-dmidecode
samba-winbind
sgpio
wodim

%end
3.2, 验证此ks文件
用到了远程的centos镜像,需要搭建一个本地镜像仓库: 把本地的iso镜像挂载到一个目录,复制此目录到web服务器下面就行了
| 角色 | ip |
|---|---|
| Centos镜像下载服务器 | http://192.168.56.1/centos/6 |
| ks文件下载服务器 | http://192.168.56.1/ks/ks6.cfg |
| cent6虚拟机 | eth0网卡: dhcp (192.168.56.0/24) |
wang@wang-pc:~$ mkdir abc
wang@wang-pc:~$ sudo mount Downloads/iso/CentOS-6.10-x86_64-bin-DVD1.iso abc/
mount: /dev/loop3 is write-protected, mounting read-only
wang@wang-pc:~$ ll abc/
total 575
dr-xr-xr-x  7 root root   4096 6月  30  2018 ./
drwxr-xr-x 39 wang wang   4096 1月   5 03:16 ../
-r--r--r--  2 root root     14 6月  29  2018 CentOS_BuildTag
-r--r--r--  1 root root     32 6月  30  2018 .discinfo
dr-xr-xr-x  3 root root   2048 6月  30  2018 EFI/
-r--r--r--  2 root root    212 11月 27  2013 EULA
-r--r--r--  2 root root  18009 11月 27  2013 GPL
dr-xr-xr-x  3 root root   2048 6月  30  2018 images/
dr-xr-xr-x  2 root root   2048 6月  30  2018 isolinux/
dr-xr-xr-x  2 root root 536576 6月  30  2018 Packages/
-r--r--r--  2 root root   1363 6月  29  2018 RELEASE-NOTES-en-US.html
dr-xr-xr-x  2 root root   4096 6月  30  2018 repodata/
-r--r--r--  2 root root   1706 11月 27  2013 RPM-GPG-KEY-CentOS-6
-r--r--r--  2 root root   1730 11月 27  2013 RPM-GPG-KEY-CentOS-Debug-6
-r--r--r--  2 root root   1730 11月 27  2013 RPM-GPG-KEY-CentOS-Security-6
-r--r--r--  2 root root   1734 11月 27  2013 RPM-GPG-KEY-CentOS-Testing-6
-r--r--r--  1 root root   3380 6月  30  2018 TRANS.TBL
-r--r--r--  1 root root    339 6月  30  2018 .treeinfo

wang@wang-pc:~$ sudo cp -r abc/* /var/www/html/centos/6/
wang@wang-pc:~$ sudo cp ks6.cfg /var/www/html/ks/
- 新建一台centos6虚拟机, 设置eth0和下载服务器同一网段
- 虚拟机:加载CentOS-6.10-x86_64-bin-DVD1.iso,借用这个打开安装界面
- 到选择安装条目时,按Esc键,在boot命令行中输入: linux network=dhcp http://192.168.56.1/ks/ks6.cfg, 回车
- 如果正常安装,说明没有ks文件没有问题
3.3, 自定义安装镜像:boot.iso
wang@wang-pc:~$ mkdir myboot
wang@wang-pc:~$ cp -r /var/www/html/centos/6/isolinux/ -r myboot
wang@wang-pc:~$ ls myboot
isolinux

wang@wang-pc:~$ ls myboot/isolinux/
boot.cat  boot.msg  grub.conf  initrd.img  isolinux.bin  isolinux.cfg  memtest  splash.jpg  TRANS.TBL  vesamenu.c32  vmlinuz
wang@wang-pc:~$ ls myboot/isolinux/ -l
total 44780
-r--r--r-- 1 wang wang     2048 1月   5 03:26 boot.cat
-r--r--r-- 1 wang wang       84 1月   5 03:26 boot.msg
-r--r--r-- 1 wang wang      321 1月   5 03:26 grub.conf
-r--r--r-- 1 wang wang 40991898 1月   5 03:26 initrd.img
-r--r--r-- 1 wang wang    24576 1月   5 03:26 isolinux.bin
-r--r--r-- 1 wang wang      924 1月   5 03:26 isolinux.cfg
-r--r--r-- 1 wang wang   183012 1月   5 03:26 memtest
-r--r--r-- 1 wang wang   151230 1月   5 03:26 splash.jpg
-r--r--r-- 1 wang wang     2215 1月   5 03:26 TRANS.TBL
-r--r--r-- 1 wang wang   163728 1月   5 03:26 vesamenu.c32
-r-xr-xr-x 1 wang wang  4315504 1月   5 03:26 vmlinuz
wang@wang-pc:~$ chmod +w myboot/isolinux/isolinux.cfg
wang@wang-pc:~$ vi myboot/isolinux/isolinux.cfg
#在第一个label的append initrd=initrd.img 后面追加内容:network=dhcp ks=http://192.168.56.1/ks/ks6.cfg

##打包镜像:boot.iso
mkisofs -R -J -T -v --no-emul-boot --boot-load-size 4 --boot-info-table \
-V "centos6 boot" -c isolinux/boot.cat -b isolinux/isolinux.bin -o ~/boot.iso myboot/

##使用目标镜像文件:~/boot.iso
#把新建的虚拟机镜像改为此boot.iso,启动虚拟机开始安装
4, 模拟微型linux系统
| 步骤 | 说明 |
|---|---|
| 主机挂载新硬盘 : /dev/sdb:13G | 充当新的虚拟机系统盘 |
| 格式化分区/dev/sdb | sdb1: 300M, ext4, boot分区 |
| 格式化分区/dev/sdb | sdb2: 10G, ext4, 根分区 |
| 格式化分区/dev/sdb | sdb3: 2G, swap分区 |

##格式化分区好了/dev/sdb硬盘后, 开始填充系统开机需要的文件
#1, 在新的硬盘上安装grub分区
[root@localhost mnt]# mkdir /mnt/boot
[root@localhost mnt]# mount /dev/sdb1 /mnt/boot
[root@localhost mnt]# grub-install --root-directory=/mnt/ /dev/sdb
Probing devices to guess BIOS drives. This may take a long time.
Installation finished. No error reported.
This is the contents of the device map /mnt//boot/grub/device.map.
Check if this is correct or not. If any of the lines is incorrect,
fix it and re-run the script `grub-install'.
(fd0)	/dev/fd0
(hd0)	/dev/sda
(hd1)	/dev/sdb
[root@localhost mnt]# ls boot/grub/
device.map     iso9660_stage1_5   stage1           xfs_stage1_5
e2fs_stage1_5  jfs_stage1_5       stage2
fat_stage1_5   minix_stage1_5     ufs2_stage1_5
ffs_stage1_5   reiserfs_stage1_5  vstafs_stage1_5

#2, 复制内核文件
[root@localhost mnt]# cd boot/
[root@localhost boot]# ls
grub
[root@localhost boot]# cp /boot/vmlinuz-2.6.32-754.el6.x86_64  vmlinuz
[root@localhost boot]# cp /boot/initramfs-2.6.32-754.el6.x86_64.img initramfs.img
[root@localhost boot]# cp /boot/grub/grub.conf  grub/
[root@localhost boot]# vi grub/grub.conf
#删掉注释,修改文件内容为:
default=0
timeout=10
title centos-mini-sh test linux
	root (hd0,0)
	kernel /vmlinuz ro root=/dev/sda2 selinux=0 init=/bin/bash
	initrd /initramfs.img

#3, 填充根目录可执行文件:
[root@localhost sysroot]# cp /bin/ls bin/
[root@localhost sysroot]# cp /bin/bash bin/
[root@localhost sysroot]# ldd  /bin/bash
	linux-vdso.so.1 =>  (0x00007ffcc832f000)
	libtinfo.so.5 => /lib64/libtinfo.so.5 (0x00007ff433ae5000)
	libdl.so.2 => /lib64/libdl.so.2 (0x00007ff4338e1000)
	libc.so.6 => /lib64/libc.so.6 (0x00007ff43354c000)
	/lib64/ld-linux-x86-64.so.2 (0x000055ce683d6000)
#把每个/bin/bash运行的依赖库文件(/lib64/xxx),复制到sysroot/lib64/下面

[root@localhost sysroot]# cp /bin/ls bin/
[root@localhost sysroot]# ldd /bin/ls
	linux-vdso.so.1 =>  (0x00007fffdf5d6000)
	libselinux.so.1 => /lib64/libselinux.so.1 (0x0000003512200000)
	librt.so.1 => /lib64/librt.so.1 (0x0000003511600000)
	libcap.so.2 => /lib64/libcap.so.2 (0x0000003515e00000)
	libacl.so.1 => /lib64/libacl.so.1 (0x0000003517e00000)
	libc.so.6 => /lib64/libc.so.6 (0x0000003510e00000)
	libdl.so.2 => /lib64/libdl.so.2 (0x0000003510a00000)
	/lib64/ld-linux-x86-64.so.2 (0x000055e2329cc000)
	libpthread.so.0 => /lib64/libpthread.so.0 (0x0000003511200000)
	libattr.so.1 => /lib64/libattr.so.1 (0x0000003515a00000)
#把每个/bin/bash运行的依赖库文件(/lib64/xxx),复制到sysroot/lib64/下面

#4, 文件复制完后,可以测试/bin/bash, /bin/ls命令是否运行正常
[root@localhost sysroot]# chroot .
bash-4.1# ls
bin   dev  home  lib64	     media  mnt  opt   root  selinux  sys  usr
boot  etc  lib	 lost+found  misc   net  proc  sbin  srv      tmp  var
bash-4.1# exit
exit
[root@localhost sysroot]#

#5, 同步磁盘数据,并拆除/dev/sdb这块磁盘
[root@localhost sysroot]# sync
[root@localhost sysroot]# poweroff

#6, 新建一个虚拟机,选择磁盘时,就选已存在的那块磁盘,开机启动它,看是否正常运行

