从零开始开发一个属于你自己的Inteij Idea的插件
公众号

大家可以直接微信扫描上面的二维码关注我的公众号,然后回复20200305 里面就会给到源代码的下载地址同时会附上相应的视频教程,并定期的与大家分享相关的技术文章。
前言
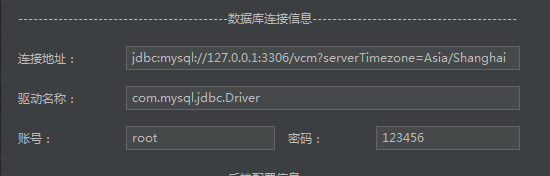
工欲善其事必先利其器,磨刀不误砍柴工,一个好的插件可以为我们节约大量的开发时间,因此我们在编程的过程中,要学会创造工具,这样我们才可以有更多的工具来帮助我们快速的完成我们手头上的工作,作为开发人员我们常用的开发工具有intellij IDEA、eclipse等,那这篇文章将教大家如何从零开始编写一个属于自己的intellij IDEA的插件,那么此处我们的demo版本的插件需要实现的一个效果就是连接数据库,最终的页面效果如下:
创建工程
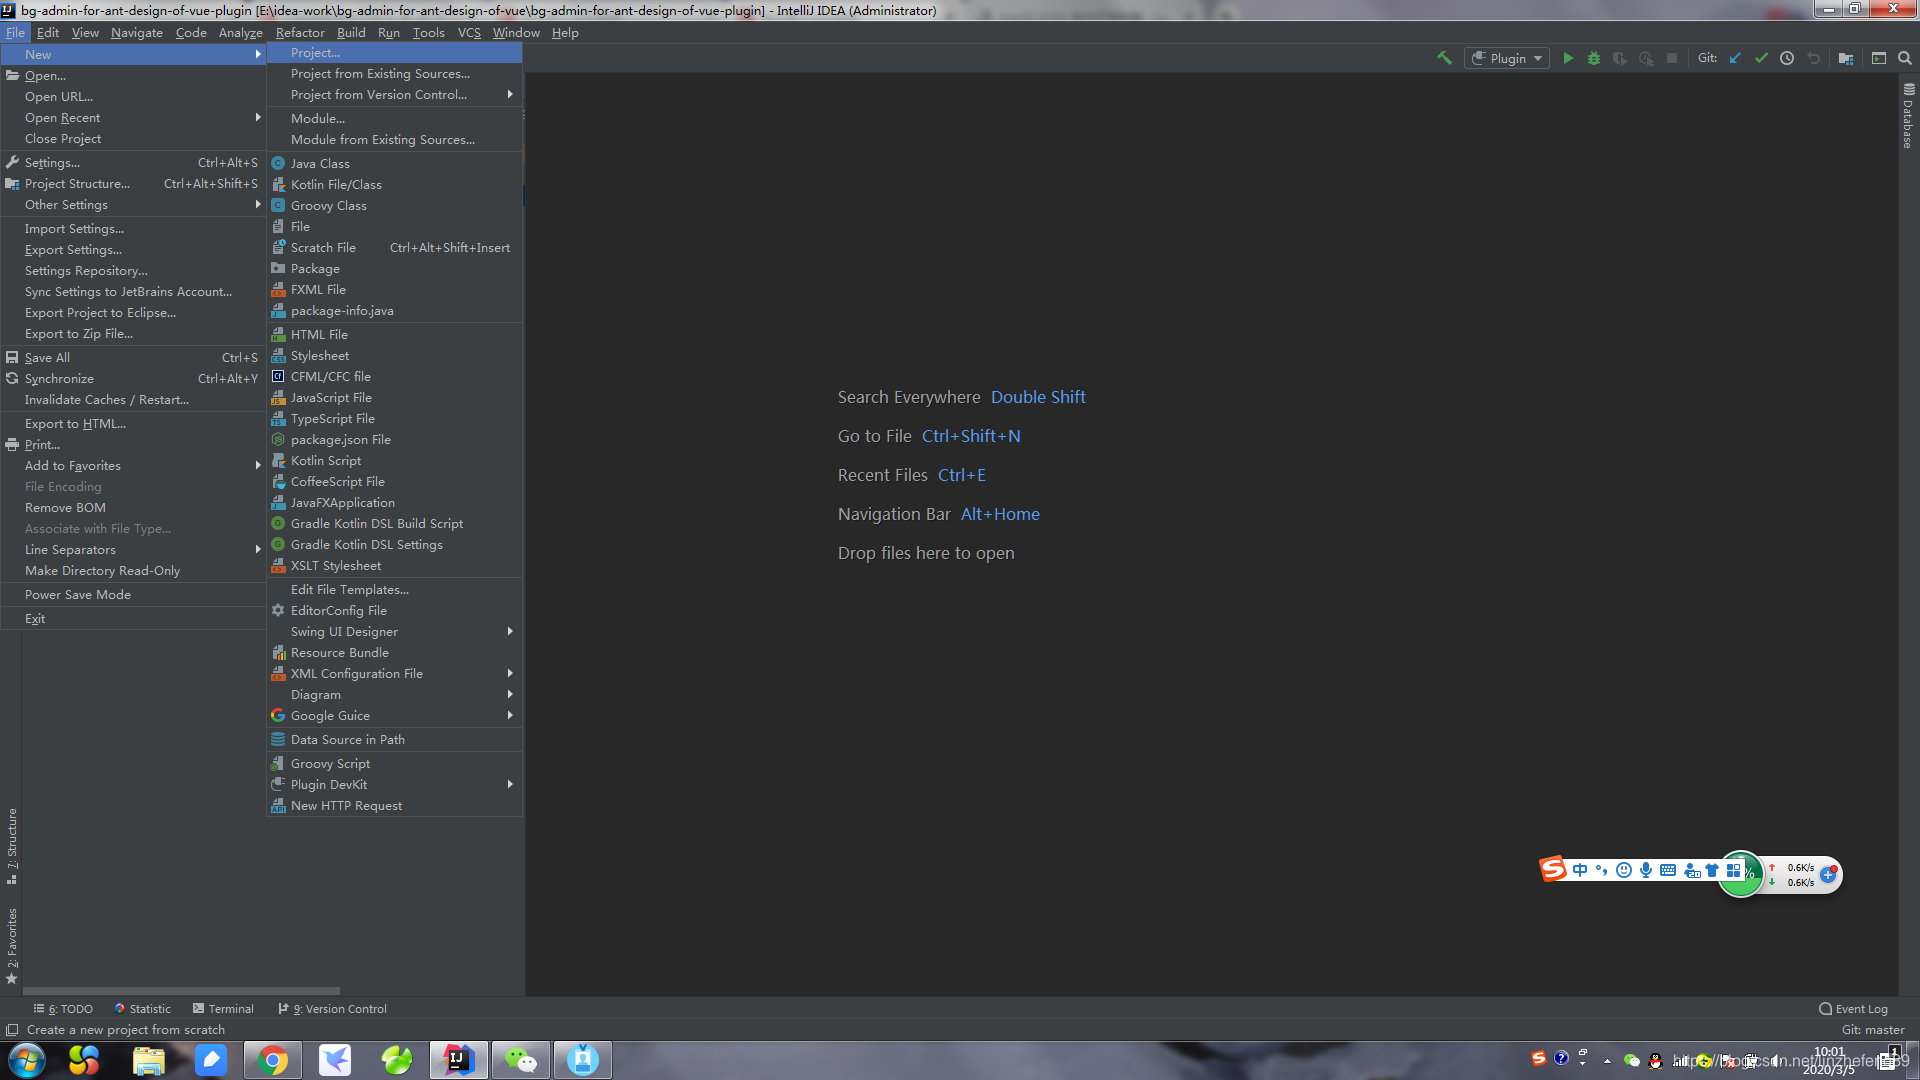
直接打开的我们的开发工具File=>New=>Project
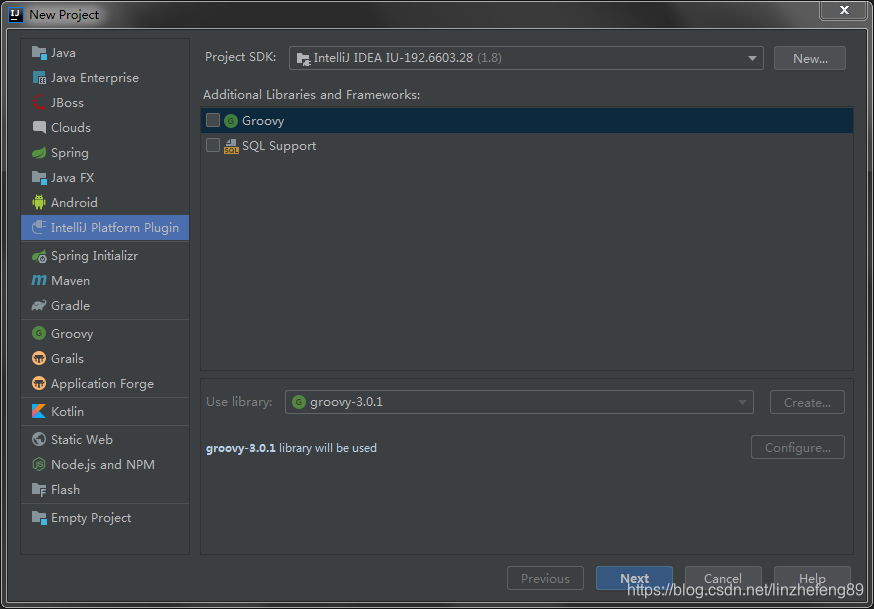
接着我们选Intellij PlatForm Plugin,切记这里的Project SDK 一定要选Intellij IDEA的SDK,如果这边大家没有这个SDK,大家就直接点击旁边的New按钮来创建我们的SDK【SDK所在的路径就是我们安装Intellij IDEA所在的位置】。
接着我们就填写我们当前插件工程的名字。
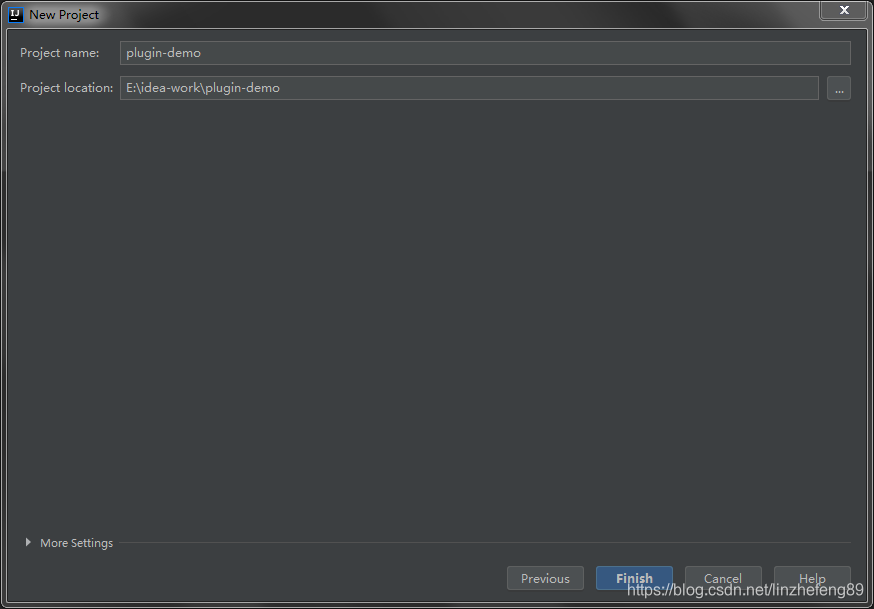
到此处我们就完成了我们的插件的工程的插件。
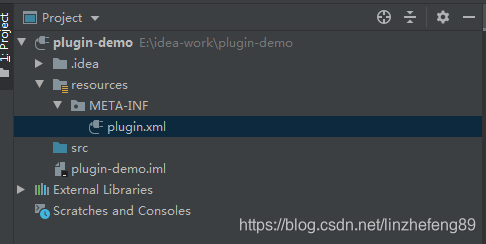
plugin.xml就是我们插件的核心文件:
<idea-plugin>
  <id>com.plugin.demo</id>
  <name>PluginDemo</name>
  <version>1.0</version>
  <vendor email="[email protected]" url="http://www.deeplearn.com">林泽锋</vendor>

  <description>
    你的插件的描述不能少于40个字,你的插件的描述不能少于40个字,你的插件的描述不能少于40个字
  </description>

  <change-notes>
    版本的信息描述不能少于40个字,版本的信息描述不能少于40个字,版本的信息描述不能少于40个字
  </change-notes>

  <!-- please see http://www.jetbrains.org/intellij/sdk/docs/basics/getting_started/build_number_ranges.html for description -->
  <idea-version since-build="173.0"/>

  <!-- please see http://www.jetbrains.org/intellij/sdk/docs/basics/getting_started/plugin_compatibility.html
       on how to target different products -->
  <!-- uncomment to enable plugin in all products
  <depends>com.intellij.modules.lang</depends>
  -->

  <extensions defaultExtensionNs="com.intellij">
    <!-- Add your extensions here -->
  </extensions>

  <actions>
    <!-- Add your actions here -->
  </actions>

</idea-plugin>
创建Action
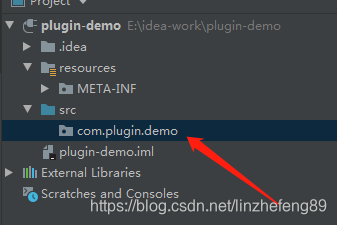
首先我们需要在我们的src目录底下创建一个com.plugin.demo的包如下所示:
接着我们右键con.plugin.demo=》New=>Plugin DevKit=>Action
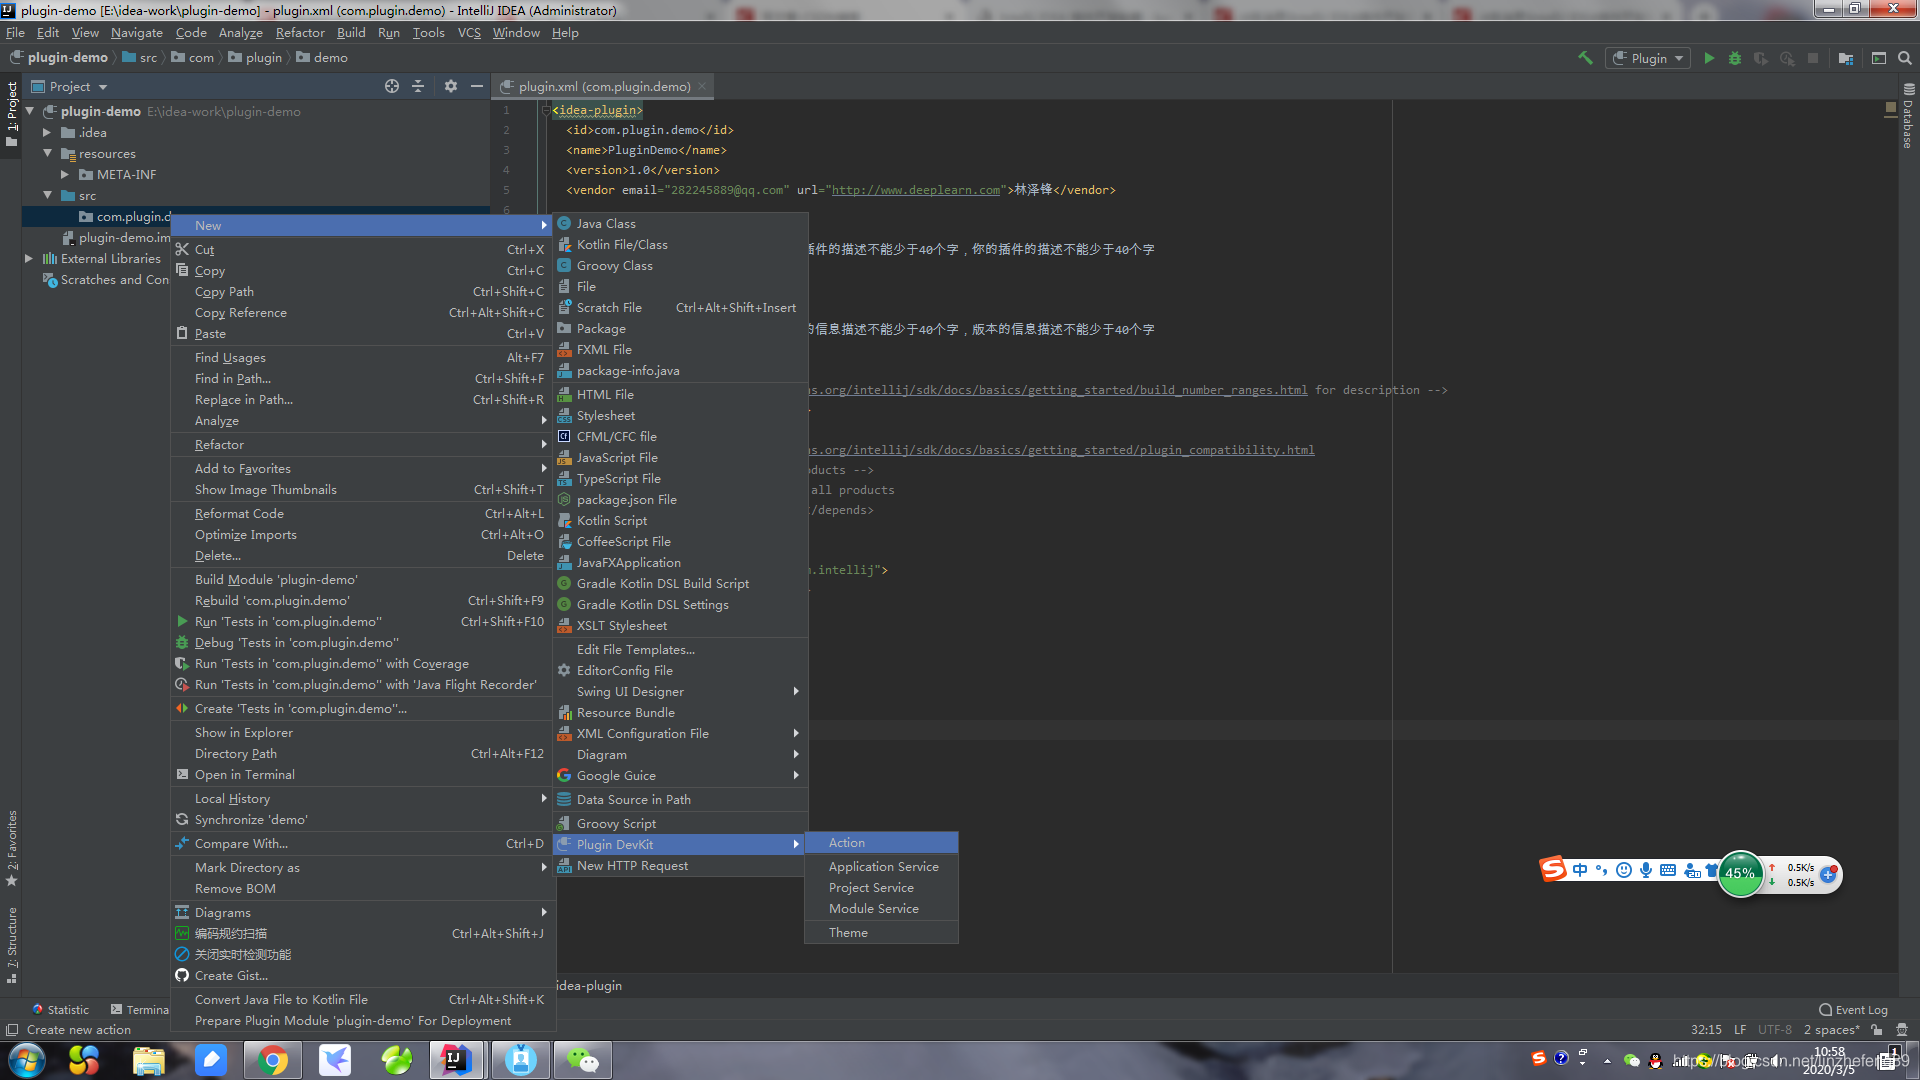
接着显示如下的页面:
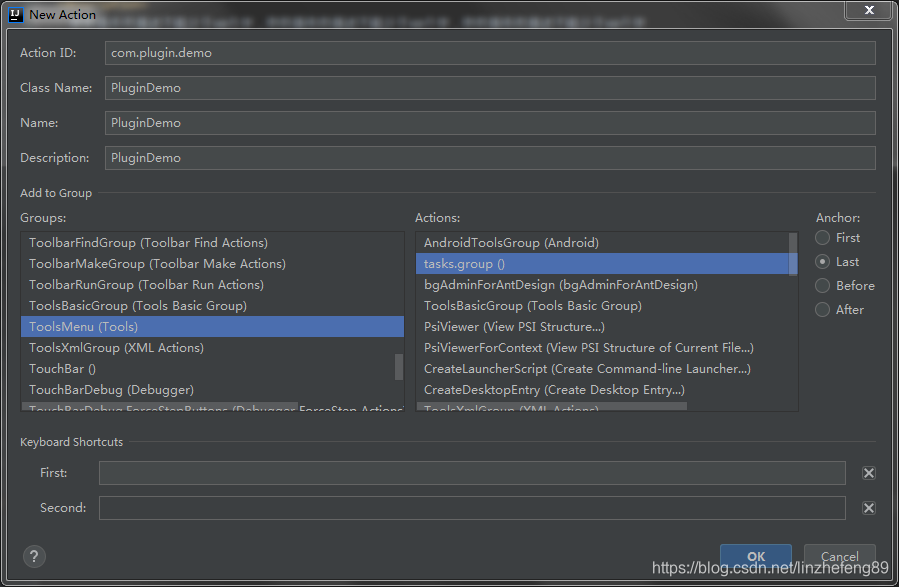
Action ID:唯一性,建议就直接取自己包的名称
Class Name: 类名
Name: 插件名称
Description:插件描述,只能写英文,用中文会导致插件无法安装。
AddToGroup: 当前的action需要添加到我们具体的那个菜单栏目中。
到此处我们就完成了我们action的创建了,这时候我们需要验证下我们的插件是否可以正常的使用了,那我们打开我们的PluginDemo.java进行代码改造如下所示:
package com.plugin.demo;

import com.intellij.openapi.actionSystem.AnAction;
import com.intellij.openapi.actionSystem.AnActionEvent;

public class PluginDemo extends AnAction {

    @Override
    public void actionPerformed(AnActionEvent e) {
        System.out.println("-------------------");
    }
}
最后启动我们的插件,验证我们的插件是否生效了。

我们可以看到我们的插件这边已经有BgAdminDemo这个插件了,我们点击这个按钮的时候回发现我们的控制台会打印出我们前面在action里面编写的输出。
编写布局工具类
Intellij IDEA的页面实现实际上是基于java的swing,因此需要大家若是需要在上面开发各类复杂的插件,那么就需要大家去熟悉下我们的swing开发,有兴趣的可以自己去深入的学习,那么我们开始编写我们的布局工具类【LayoutUtil.java】代码如下:
/**
 * @author linzf
 * @since 2020/3/3
 * 类描述:
 */
public class LayoutUtil {

    /**
     * label的一列默认宽度
     */
    private static Integer labelOneColsWidth = 100;

    /**
     * text的一列默认宽度
     */
    private static Integer textOneColsWidth = 400;

    /**
     * label的两列的第一列默认宽度
     */
    private static Integer labelTwoFirstColsWidth = 100;

    /**
     * text的两列的第一列默认宽度
     */
    private static Integer textTwoFirstColsWidth = 155;

    /**
     * label的两列的第二列默认宽度
     */
    private static Integer labelTwoSecondColsWidth = 80;

    /**
     * text的两列的第二列默认宽度
     */
    private static Integer textTwoSecondColsWidth = 150;

    /**
     * 行的默认高度
     */
    private static Integer height = 30;

    /**
     * 功能描述: 创建一个描述性的标题
     * @param title 标题名称
     * @param jLabelWidth 标题宽度
     * @return 返回一个jPanel
     */
    public static JPanel createLabel(String title, Integer jLabelWidth) {
        JLabel jLabel = new JLabel();
        jLabel.setText(title);
        JPanel jPanel = new JPanel();
        jPanel.setLayout(new FlowLayout(FlowLayout.LEFT));
        jLabel.setPreferredSize(new Dimension(jLabelWidth, height));
        jPanel.add(jLabel);
        return jPanel;
    }


    /**
     * 功能描述: 创建两列的jPanel
     *
     * @param jLabelOne      列一的label
     * @param jTextFieldOne  列一的text
     * @param jLabelOneWidth 列一的label宽度
     * @param jTextOneWidth  列一的text的宽度
     * @param jLabelTwo      列二的label
     * @param jTextFieldTwo  列二的text
     * @param jLabelTwoWidth 列二的label宽度
     * @param jTextTwoWidth  列二的text宽度
     * @return jPanel对象
     */
    public static JPanel createTwoColsJPanel(JLabel jLabelOne, JTextField jTextFieldOne, Integer jLabelOneWidth, Integer jTextOneWidth,
                                             JLabel jLabelTwo, JTextField jTextFieldTwo, Integer jLabelTwoWidth, Integer jTextTwoWidth) {
        JPanel jPanel = new JPanel();
        jPanel.setLayout(new GridLayout(1, 2));

        JPanel jPanelColOne = new JPanel();
        jPanelColOne.setLayout(new FlowLayout(FlowLayout.LEFT));
        jLabelOne.setPreferredSize(new Dimension(jLabelOneWidth, height));
        jPanelColOne.add(jLabelOne);
        jTextFieldOne.setPreferredSize(new Dimension(jTextOneWidth, height));
        jPanelColOne.add(jTextFieldOne);
        jPanel.add(jPanelColOne);

        JPanel jPanelColTwo = new JPanel();
        jPanelColTwo.setLayout(new FlowLayout(FlowLayout.LEFT));
        jLabelTwo.setPreferredSize(new Dimension(jLabelTwoWidth, height));
        jPanelColTwo.add(jLabelTwo);
        jTextFieldTwo.setPreferredSize(new Dimension(jTextTwoWidth, height));
        jPanelColTwo.add(jTextFieldTwo);
        jPanel.add(jPanelColTwo);
        return jPanel;
    }

    /**
     * 功能描述: 创建两列的jPanel
     *
     * @param jLabelOne     列一的label
     * @param jTextFieldOne 列一的text
     * @param jLabelTwo     列二的label
     * @param jTextFieldTwo 列二的text
     * @return jPanel对象
     */
    public static JPanel createTwoColsJPanel(JLabel jLabelOne, JTextField jTextFieldOne, JLabel jLabelTwo, JTextField jTextFieldTwo) {
        return createTwoColsJPanel(jLabelOne, jTextFieldOne, labelTwoFirstColsWidth, textTwoFirstColsWidth, jLabelTwo, jTextFieldTwo, labelTwoSecondColsWidth, textTwoSecondColsWidth);
    }

    /**
     * 功能描述: 创建一个一列JPanel
     *
     * @param jLabel      label对象
     * @param jTextField  text对象
     * @param jLabelWidth 自定义的label宽度
     * @param jTextWidth  自定义的text宽度
     * @return 返回一个JPanel对象
     */
    public static JPanel createOneColsJPanel(JLabel jLabel, JTextField jTextField, Integer jLabelWidth, Integer jTextWidth) {
        JPanel jPanel = new JPanel();
        jPanel.setLayout(new FlowLayout(FlowLayout.LEFT));
        jLabel.setPreferredSize(new Dimension(jLabelWidth, height));
        jPanel.add(jLabel);
        jTextField.setPreferredSize(new Dimension(jTextWidth, height));
        jPanel.add(jTextField);
        return jPanel;
    }

    /**
     * 功能描述: 创建一个一列JPanel
     *
     * @param jLabel     label对象
     * @param jTextField text对象
     * @return 返回一个JPanel对象
     */
    public static JPanel createOneColsJPanel(JLabel jLabel, JTextField jTextField) {
        return createOneColsJPanel(jLabel, jTextField, labelOneColsWidth, textOneColsWidth);
    }

}
定义实体类
在前言部分的我放置了一张效果图了,这张效果图就是我们需要事先设计好的实体【PluginDemoModule.java】代码如下:
public class PluginDemoModule {

    public PluginDemoModule(){
        super();
    }

    public PluginDemoModule(String jdbcUrl, String driverClassName, String userName, String password) {
        this.jdbcUrl = jdbcUrl;
        this.driverClassName = driverClassName;
        this.userName = userName;
        this.password = password;
    }

    /**
     * 数据库连接地址
     */
    private String jdbcUrl;

    /**
     * 驱动名称
     */
    private String driverClassName;

    /**
     * 数据库账号
     */
    private String userName;

    /**
     * 数据库密码
     */
    private String password;

    // 此处省略了set和get方法
}
编写进度条的实现
我们的插件在进行一项耗时的任务的时候,我们希望给告知到使用插件的人员我们正在运行我们的插件,因此我们需要开发一个进度条来告知使用插件的人员我们的插件正在为你工作,我们就开始编写我们的进度条的实现【PluginDemoProcess】:
/**
 * @author linzf
 * @since 2020/3/5
 * 类描述:
 */
public class PluginDemoProcess extends Task.Backgroundable {

    private PluginDemoModule pluginDemoModule;

    private Project project;

    public PluginDemoProcess(@Nullable Project project, @Nls(capitalization = Nls.Capitalization.Title) @NotNull String title, PluginDemoModule pluginDemoModule) {
        super(project, title);
        this.pluginDemoModule = pluginDemoModule;
        this.project = project;
    }

    @Override
    public void run(@NotNull ProgressIndicator progressIndicator) {
        // 设置进度条为模糊进度条
        progressIndicator.setIndeterminate(true);
        try {
            // 这里就是我们需要模拟执行我们相关的业务逻辑的部分,此处就使线程睡眠3秒作为模拟
            Thread.sleep(3000);
        } catch (InterruptedException e) {
            e.printStackTrace();
        }
        // 关闭进度条
        progressIndicator.setIndeterminate(false);
        // 设置进度条为百分百
        progressIndicator.setFraction(1.0);
        //
        progressIndicator.setText("插件执行结束");
        // 在状态栏提示信息【代码生成完成】
        StatusBar statusBar = WindowManager.getInstance().getStatusBar(project);
        JBPopupFactory.getInstance()
                .createHtmlTextBalloonBuilder("插件执行结束", MessageType.INFO, null)
                .setFadeoutTime(7500)
                .createBalloon()
                .show(RelativePoint.getCenterOf(statusBar.getComponent()), Balloon.Position.atRight);
        // 弹出模态框显示以下的消息
        SwingUtilities.invokeLater(new Runnable() {
            @Override
            public void run() {
                Messages.showMessageDialog("插件执行结束", "提示", null);
            }
        });
    }
}
编写表单布局页面
我们接着依着我们前言部分来实现我们的表单的布局的页面【PluginDemoLayout】代码如下:
/**
 * @author linzf
 * @since 2020/3/5
 * 类描述:
 */
public class PluginDemoLayout {

    private JPanel center = new JPanel();

    private JPanel south = new JPanel();

    public static PropertiesComponent propertiesComponent;

    public static Project project;

    /**
     * 数据库的连接信息
     */
    private JLabel jdbcUrl = new JLabel("连接地址:");
    private JTextField jdbcUrlContent = new JTextField();

    /**
     * 数据库的驱动名称
     */
    private JLabel driverClassName = new JLabel("驱动名称:");
    private JTextField driverClassNameContent = new JTextField();

    /**
     * 数据库的账号
     */
    private JLabel userName = new JLabel("账号:");
    private JTextField userNameContent = new JTextField();

    /**
     * 数据库的密码
     */
    private JLabel password = new JLabel("密码:");
    private JTextField passwordContent = new JTextField();

    /**
     * 功能描述: 生成需要提交的部分的代码
     *
     * @return 返回表单的的panel
     */
    public JPanel initCenter() {
        center.setLayout(new GridLayout(13, 2));

        center.add(LayoutUtil.createLabel("------------------------------------------数据库连接信息-----------------------------------------", 500));

        // 添加数据库连接的地址的配置
        jdbcUrlContent.setText(StringUtil.getString(propertiesComponent.getValue("jdbcUrl"), "jdbcUrl"));
        center.add(LayoutUtil.createOneColsJPanel(jdbcUrl, jdbcUrlContent));

        // 添加数据库驱动的配置
        driverClassNameContent.setText(StringUtil.getString(propertiesComponent.getValue("driverClassName"), "driverClassName"));
        center.add(LayoutUtil.createOneColsJPanel(driverClassName, driverClassNameContent));

        // 添加数据库的账号和密码的配置
        userNameContent.setText(StringUtil.getString(propertiesComponent.getValue("userName"), "userName"));
        passwordContent.setText(StringUtil.getString(propertiesComponent.getValue("password"), "password"));
        center.add(LayoutUtil.createTwoColsJPanel(userName, userNameContent, password, passwordContent));
        return center;
    }

    /**
     * 功能描述: 生成按钮部分代码
     *
     * @return 返回按钮部分的的panel
     */
    public JPanel initSouth() {

        //定义表单的提交按钮,放置到IDEA会话框的底部位置

        JButton submit = new JButton("测试插件");
        //水平居中
        submit.setHorizontalAlignment(SwingConstants.CENTER);
        //垂直居中
        submit.setVerticalAlignment(SwingConstants.CENTER);
        south.add(submit);

        //按钮事件绑定
        submit.addActionListener(e -> {
            //获取到jdbcUrl
            String jdbcUrl = jdbcUrlContent.getText();
            propertiesComponent.setValue("jdbcUrl", jdbcUrl);
            String driverClassName = driverClassNameContent.getText();
            propertiesComponent.setValue("driverClassName", driverClassName);
            String userName = userNameContent.getText();
            propertiesComponent.setValue("userName", userName);
            String password = passwordContent.getText();
            propertiesComponent.setValue("password", password);
            // 关闭当前的页面
            PluginDemo.pluginDemoForm.close(-1);
            // 调用进度条中的逻辑
            ProgressManager.getInstance().run(new PluginDemoProcess(project, "插件执行中",
                    new PluginDemoModule(jdbcUrl,driverClassName,userName,password)));
         });

        return south;
    }


}
编写我们的表单页面
接着我们编写我们的表单页面,由于我们是弹出框进行输入的因此我们需要继承DialogWrapper这个类,表单页面【PluginDemoForm.java】代码如下:
public class PluginDemoForm extends DialogWrapper {

    private PluginDemoLayout pluginDemoLayout = new PluginDemoLayout();

    public PluginDemoForm(@Nullable Project project) {
        super(project);
        setTitle("代码快速生成插件配置页面");
        PluginDemoLayout.propertiesComponent = PropertiesComponent.getInstance(project);
        PluginDemoLayout.project = project;
        init();
    }

    @Override
    protected JComponent createSouthPanel() {
        return pluginDemoLayout.initSouth();
    }

    @Override
    protected JComponent createCenterPanel() {
        return pluginDemoLayout.initCenter();
    }
}
改造PluginDemo代码
public class PluginDemo extends AnAction {

    public static PluginDemoForm pluginDemoForm;

    @Override
    public void actionPerformed(@NotNull AnActionEvent e) {
        Project project = e.getData(PlatformDataKeys.PROJECT);
        PluginDemo.pluginDemoForm = new PluginDemoForm(project);
        PluginDemo.pluginDemoForm.setResizable(false);
        PluginDemo.pluginDemoForm.show();
    }
}
验证结果
上面我们已经完成了我们的插件的编写,然后我们可以开始验证我们的插件了,效果如下:

然后我们点击生成代码的按钮,我们会看到开发工具底下的进度条效果:

引入相应maven的依赖
我们开发的时候难免需要用到一些第三方的maven依赖,我们的这个例子是基于mysql的因此我们就引入第三方的mysql数据库的依赖File=>Project Structure=>Libraries=>+=>From Maven如下所示找到我们的数据库驱动的依赖。

搜索完成以后找到我们需要的版本点击ok就可以成功引入我们的相关maven依赖了。
编写数据库连接工具类
/**
 * @author linzf
 * @since 2020/3/5
 * 类描述:
 */
public class JdbcUtil {

    /**
     * 获取连接
     * @param driverClassName 驱动名称
     * @param username        账号
     * @param password        密码
     * @param url             地址
     * @return 返回数据库连接
     */
    public static Connection getConnection(String driverClassName, String username, String password, String url) {
        try {
            Class.forName(driverClassName);
            Properties properties = new Properties();
            properties.put("user", username);
            properties.put("password", password);
            //想要获取数据库结构中的注释,这个值是重点
            properties.put("remarksReporting", "true");
            return DriverManager.getConnection(url, properties);
        } catch (Exception e) {
            e.printStackTrace();
        }
        return null;
    }

}
验证是否生效
在我们的PluginDemoProcess的run代码中添加以下的代码片段
// 设置进度条为模糊进度条
        progressIndicator.setIndeterminate(true);

        Connection connection = JdbcUtil.getConnection(pluginDemoModule.getDriverClassName(),pluginDemoModule.getUserName(),pluginDemoModule.getPassword(),pluginDemoModule.getJdbcUrl());
        System.out.println("connection===>" + connection);
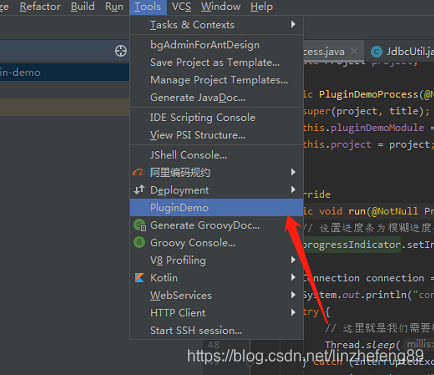
直接打开我们前面编写的工具,然后我们直接点击按钮,我们可以看到我们的控制台有以下的输出,则说明已经生效了。

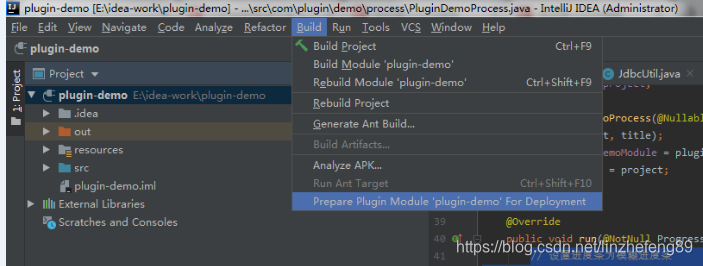
发布插件
发布插件直接Build=>Prepare Plugin Module ‘plugin-demo’ for Deploment
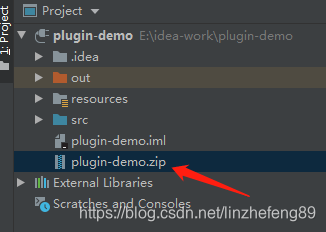
执行完成以后我们会在我们的工程目录底下看到这个插件了:
安装插件
我们插件已经开发完成了,那这时候我们需要开始安装我们的插件了,File=>Setting=>Plugins
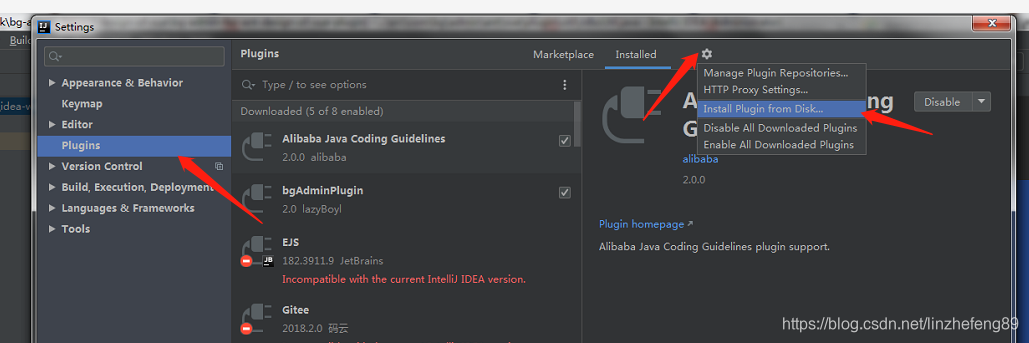
然后找到我们签名的插件的目录直接安装,安装完成以后重启我们的开发工具,这时候大家就可以看到我们的插件可以正常使用了。