本次项目主要是使用Qt平台编写图像处理程序,用到了opencv库。本文主要讲解怎么在Qt平台中添加opencv库,以及使用opencv库的注意事项,通过opencv库实现图像的直方图分析,形态学处理,线性滤波和非线性滤波,图像二值化,边缘提取以及轮廓分析,人脸检测,使用多线程批量处理图片加快处理速度等。
若想要编译好的opencv库,请查看咸鱼,链接:
目录

第四:打包成exe文件时,对于程序调用的dll文件以及需要外部载入文件的打包
1.Qt工程中添加opencv库
本项目所用平台为:win10系统,Qtcreater4.8.0,Qt5.12.0,vs2015,opencv2.4.6
第一步:下载opencv并编译,将编译好的文件放在某个固定路径下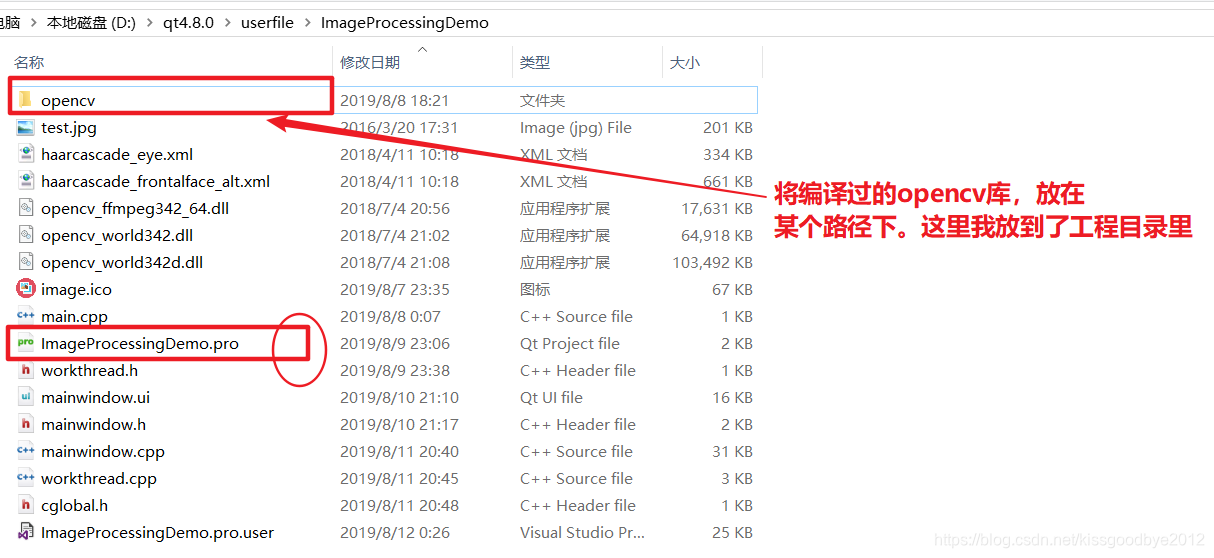
编译好的文件中,最重要的内容就是:


版本对应关系如下:

第二步:新建Qt工程,并在pro文件中添加对opencv库的引用
若你的opencv版本不是2.4.6,可以照着下图的代码进行修改。

第三步:opencv库的使用

第四步:将opencv库的dll文件放到系统调用目录

注意,很多时候运行程序失败都是这个原因。调用opencv库必须使用dll文件,因此必须让你的程序能够找到这个dll。
2.使用opencv库实现人脸识别
这里的人脸识别使用的是级联分类器haarcascades,在机器学习算法中,通过对多个弱分类器的叠加可以实现一个强分类器。使用级联分类器,识别速度快,识别准确率也较高,非常适合于物体识别。本文用到的级联分类器是由opencv官方训练好的一个用于人脸识别的级联分类器,可以分别识别人的眼睛和鼻子以及其他人脸部位,分类器由一个xml文件保存,使用时导入即可。
首先,将图片灰度化,再直方图均衡化,增强图片对比度;
然后,载入用到的级联分类器模型;
最后,使用载入的分类器进行人脸(或者其他部位)识别,识别到的所有人脸(或者其他部位),都会被一个正方形框住。这些正方形组成一个数组,正方形有位置和面积大小,通过人为设置判断标准,可以将人脸可靠的检测出来。
Mat faceimage=img.clone();//深层拷贝
        Mat image_gray;

        cvtColor(faceimage, image_gray, CV_BGR2GRAY);   //转为灰度图
        equalizeHist(image_gray, image_gray);       //直发图均化,增强对比度方便处理

        CascadeClassifier eye_Classifier;            //载入分类器
        CascadeClassifier face_cascade;              //载入分类器

        //加载分类训练器,OpenCV官方文档的xml文档,可以直接调用
        QString aFile = QDir::currentPath() + "/haarcascade_eye.xml";
        QString path = QDir::toNativeSeparators(aFile);
        string eyefile = path.toStdString();

        if (!eye_Classifier.load(eyefile))    //把xml文档复制到了当前项目的路径下
        {
            qDebug() << "导入haarcascade_eye.xml时出错 !" << endl;
            return;
        }

        QString aFile2 = QDir::currentPath() + "/haarcascade_frontalface_alt.xml";
        QString path2 = QDir::toNativeSeparators(aFile2);
        string facefile = path2.toStdString();
        if (!face_cascade.load(facefile))    //把xml文档复制到了当前项目的路径下
        {
            qDebug() << "导入haarcascade_frontalface_alt.xml时出错 !" << endl;
            return;
        }

        vector<Rect> faces, eyes;
        face_cascade.detectMultiScale(image_gray, faces, 1.2, 5, 0, Size(30, 30));

        if (faces.size()>0) {
            for (size_t i = 0; i<faces.size(); i++) {
                rectangle(faceimage, Point(faces[i].x, faces[i].y), Point(faces[i].x + faces[i].width, faces[i].y + faces[i].height), Scalar(0, 0, 255), 10, 8);
            }
        }

        processedimg=faceimage.clone();
        cvtColor(processedimg,processedimg,CV_RGB2BGR);//Mat的图片是BGR格式,需要先转换为RGB格式
        //在窗口控件中显示图片
        QImage Qtemp2 = QImage((const unsigned char*)(faceimage.data), faceimage.cols, faceimage.rows,faceimage.cols*faceimage.channels(), QImage::Format_RGB888);
        QPixmap pixmap2 = QPixmap::fromImage(Qtemp2);
        int with = ui->showimage->width();
        int height = ui->showimage->height();
        QPixmap fitpixmap2 = pixmap2.scaled(with, height, Qt::KeepAspectRatio, Qt::SmoothTransformation);  // 按比例缩放

        ui->showimage->setPixmap(fitpixmap2);
        ui->showimage->show();
3.图像的直方图分析
一张彩色图像的直方图分析包括:R分量,G分量,B分量和灰色分量的直方图分析
第一:各个分量的直方图分析
将一副图像的各个分量通道进行分离,然后进行直方图分析
        Mat histimg;

        vector<Mat> rgb_channel;
        split(img, rgb_channel);//将一幅多通道的图像的各个通道分离。
        Mat R=rgb_channel[2];
        histimg=getHistograph(R);

        processedimg=histimg;
        //在窗口控件中显示图片
        QImage Qtemp2 = QImage((const unsigned char*)(histimg.data), histimg.cols, histimg.rows, histimg.cols*histimg.channels(),QImage::Format_Grayscale8);
        QPixmap pixmap2 = QPixmap::fromImage(Qtemp2);
        int with = ui->showimage->width();
        int height = ui->showimage->height();
        QPixmap fitpixmap2 = pixmap2.scaled(with, height, Qt::KeepAspectRatio, Qt::SmoothTransformation);  // 按比例缩放

        ui->showimage->setPixmap(fitpixmap2);
        ui->showimage->show();
第二:灰度直方图分析
灰度直方图分析就是将图片转换为灰度图,然后进行直方图分析
Mat hsv;
        //定义灰度图像,转成灰度图
        cvtColor(img,hsv,COLOR_BGR2GRAY);
        //直方图图像
        Mat hist=getHistograph(hsv);

        processedimg=hist;
        //在窗口控件中显示图片
        QImage Qtemp2 = QImage((const unsigned char*)(hist.data), hist.cols, hist.rows, hist.cols*hist.channels(),QImage::Format_Grayscale8);
        QPixmap pixmap2 = QPixmap::fromImage(Qtemp2);
        int with = ui->showimage->width();
        int height = ui->showimage->height();
        QPixmap fitpixmap2 = pixmap2.scaled(with, height, Qt::KeepAspectRatio, Qt::SmoothTransformation);  // 按比例缩放

        ui->showimage->setPixmap(fitpixmap2);
        ui->showimage->show();
第三:直方图分析的普遍算法
//直方图提取算法
Mat getHistograph(const Mat grayImage)
{
    //定义求直方图的通道数目,从0开始索引
    int channels[]={0};
    //定义直方图的在每一维上的大小,例如灰度图直方图的横坐标是图像的灰度值,就一维,bin的个数
    //如果直方图图像横坐标bin个数为x,纵坐标bin个数为y,则channels[]={1,2}其直方图应该为三维的,Z轴是每个bin上统计的数目
    const int histSize[]={256};
    //每一维bin的变化范围
    float range[]={0,256};

    //所有bin的变化范围,个数跟channels应该跟channels一致
    const float* ranges[]={range};

    //定义直方图,这里求的是直方图数据
    Mat hist;
    //opencv中计算直方图的函数,hist大小为256*1,每行存储的统计的该行对应的灰度值的个数
    calcHist(&grayImage,1,channels,Mat(),hist,1,histSize,ranges,true,false);//cv中是cvCalcHist

    //找出直方图统计的个数的最大值,用来作为直方图纵坐标的高
    double maxValue=0;
    //找矩阵中最大最小值及对应索引的函数
    minMaxLoc(hist,0,&maxValue,0,0);
    //最大值取整
    int rows=cvRound(maxValue);
    //定义直方图图像,直方图纵坐标的高作为行数,列数为256(灰度值的个数)
    //因为是直方图的图像,所以以黑白两色为区分,白色为直方图的图像
    Mat histImage=Mat::zeros(rows,256,CV_8UC1);

    //直方图图像表示
    for(int i=0;i<256;i++)
    {
        //取每个bin的数目
        int temp=(int)(hist.at<float>(i,0));
        //如果bin数目为0,则说明图像上没有该灰度值,则整列为黑色
        //如果图像上有该灰度值,则将该列对应个数的像素设为白色
        if(temp)
        {
            //由于图像坐标是以左上角为原点,所以要进行变换,使直方图图像以左下角为坐标原点
            histImage.col(i).rowRange(Range(rows-temp,rows))=255;
        }
    }
    //由于直方图图像列高可能很高,因此进行图像对列要进行对应的缩减,使直方图图像更直观
    Mat resizeImage;
    resize(histImage,resizeImage,Size(256,256));
    return resizeImage;
}
4.图像的形态学处理--腐蚀和膨胀操作
腐蚀和膨胀操作关键点是:内核参数的选取,这个是人为确定的。
腐蚀操作如下:
//获取内核形状和尺寸
        int m_KernelValue=1;
        Mat element = getStructuringElement(MORPH_RECT, Size(m_KernelValue * 2 + 1, m_KernelValue * 2 + 1), Point(m_KernelValue, m_KernelValue));

        //腐蚀操作
        Mat m_dstImage;
        erode(img, m_dstImage, element);

        processedimg=m_dstImage.clone();
        cvtColor(processedimg,processedimg,CV_RGB2BGR);//Mat的图片是BGR格式,需要先转换为RGB格式
        //在窗口控件中显示图片
        QImage Qtemp2 = QImage((const unsigned char*)(m_dstImage.data), m_dstImage.cols, m_dstImage.rows, m_dstImage.cols*m_dstImage.channels(),QImage::Format_RGB888);
        QPixmap pixmap2 = QPixmap::fromImage(Qtemp2);
        int with = ui->showimage->width();
        int height = ui->showimage->height();
        QPixmap fitpixmap2 = pixmap2.scaled(with, height, Qt::KeepAspectRatio, Qt::SmoothTransformation);  // 按比例缩放

        ui->showimage->setPixmap(fitpixmap2);
        ui->showimage->show();
膨胀操作如下:
//获取内核形状和尺寸
        int m_KernelValue=1;
        Mat element = getStructuringElement(MORPH_RECT, Size(m_KernelValue * 2 + 1, m_KernelValue * 2 + 1), Point(m_KernelValue, m_KernelValue));

        //膨胀操作
        Mat m_dstImage;
        dilate(img, m_dstImage, element);

        processedimg=m_dstImage.clone();
        cvtColor(processedimg,processedimg,CV_RGB2BGR);//Mat的图片是BGR格式,需要先转换为RGB格式
        //在窗口控件中显示图片
        QImage Qtemp2 = QImage((const unsigned char*)(m_dstImage.data), m_dstImage.cols, m_dstImage.rows,m_dstImage.cols*m_dstImage.channels(), QImage::Format_RGB888);
        QPixmap pixmap2 = QPixmap::fromImage(Qtemp2);
        int with = ui->showimage->width();
        int height = ui->showimage->height();
        QPixmap fitpixmap2 = pixmap2.scaled(with, height, Qt::KeepAspectRatio, Qt::SmoothTransformation);  // 按比例缩放

        ui->showimage->setPixmap(fitpixmap2);
        ui->showimage->show();
5.图像的线性滤波和非线性滤波
这里介绍图像的线性滤波:方框滤波,均值滤波和高斯滤波。以及图像的非线性滤波:中值滤波和双边滤波
方框滤波:滤波操作非常简单,重要的是滤波函数内的参数人为选取
//进行滤波操作
        Mat out;
        boxFilter(img, out, -1, Size(3, 3));

        //显示
        processedimg=out.clone();
        cvtColor(processedimg,processedimg,CV_RGB2BGR);//Mat的图片是BGR格式,需要先转换为RGB格式

        //在窗口控件中显示图片
        QImage Qtemp2 = QImage((const unsigned char*)(out.data), out.cols, out.rows,out.cols*out.channels(), QImage::Format_RGB888);
        QPixmap pixmap2 = QPixmap::fromImage(Qtemp2);
        int with = ui->showimage->width();
        int height = ui->showimage->height();
        QPixmap fitpixmap2 = pixmap2.scaled(with, height, Qt::KeepAspectRatio, Qt::SmoothTransformation);  // 按比例缩放

        ui->showimage->setPixmap(fitpixmap2);
        ui->showimage->show();
均值滤波:
//进行滤波操作
        Mat out;
        blur(img,out,Size(7,7));

        processedimg=out.clone();
        cvtColor(processedimg,processedimg,CV_RGB2BGR);//Mat的图片是BGR格式,需要先转换为RGB格式
        //在窗口控件中显示图片
        QImage Qtemp2 = QImage((const unsigned char*)(out.data), out.cols, out.rows, out.cols*out.channels(),QImage::Format_RGB888);
        QPixmap pixmap2 = QPixmap::fromImage(Qtemp2);
        int with = ui->showimage->width();
        int height = ui->showimage->height();
        QPixmap fitpixmap2 = pixmap2.scaled(with, height, Qt::KeepAspectRatio, Qt::SmoothTransformation);  // 按比例缩放

        ui->showimage->setPixmap(fitpixmap2);
        ui->showimage->show();
高斯滤波:
//进行滤波操作
        Mat out;
        GaussianBlur(img,out,Size(3,3),0,0);

        processedimg=out.clone();
        cvtColor(processedimg,processedimg,CV_RGB2BGR);//Mat的图片是BGR格式,需要先转换为RGB格式
        //在窗口控件中显示图片
        QImage Qtemp2 = QImage((const unsigned char*)(out.data), out.cols, out.rows, out.cols*out.channels(),QImage::Format_RGB888);
        QPixmap pixmap2 = QPixmap::fromImage(Qtemp2);
        int with = ui->showimage->width();
        int height = ui->showimage->height();
        QPixmap fitpixmap2 = pixmap2.scaled(with, height, Qt::KeepAspectRatio, Qt::SmoothTransformation);  // 按比例缩放

        ui->showimage->setPixmap(fitpixmap2);
        ui->showimage->show();
中值滤波:
//进行中值滤波操作
        Mat out;
        medianBlur (img, out, 7);//输入,输出,7通道。其中参数3:孔径的线性尺寸,必须大于1.、必须为奇数,越大,滤布越强。

        processedimg=out.clone();
        cvtColor(processedimg,processedimg,CV_RGB2BGR);//Mat的图片是BGR格式,需要先转换为RGB格式
        //在窗口控件中显示图片
        QImage Qtemp2 = QImage((const unsigned char*)(out.data), out.cols, out.rows,out.cols*out.channels(), QImage::Format_RGB888);
        QPixmap pixmap2 = QPixmap::fromImage(Qtemp2);
        int with = ui->showimage->width();
        int height = ui->showimage->height();
        QPixmap fitpixmap2 = pixmap2.scaled(with, height, Qt::KeepAspectRatio, Qt::SmoothTransformation);  // 按比例缩放

        ui->showimage->setPixmap(fitpixmap2);
        ui->showimage->show();
双边滤波:
//进行中值滤波操作
        Mat out;
        //双边滤波操作
        bilateralFilter(img, out, 25, 25 * 2, 25 / 2);

        processedimg=out.clone();
        cvtColor(processedimg,processedimg,CV_RGB2BGR);//Mat的图片是BGR格式,需要先转换为RGB格式
        //在窗口控件中显示图片
        QImage Qtemp2 = QImage((const unsigned char*)(out.data), out.cols, out.rows,out.cols*out.channels(), QImage::Format_RGB888);
        QPixmap pixmap2 = QPixmap::fromImage(Qtemp2);
        int with = ui->showimage->width();
        int height = ui->showimage->height();
        QPixmap fitpixmap2 = pixmap2.scaled(with, height, Qt::KeepAspectRatio, Qt::SmoothTransformation);  // 按比例缩放

        ui->showimage->setPixmap(fitpixmap2);
        ui->showimage->show();
6.图像的二值化,边缘提取以及轮廓分析
图像的二值化需要先将彩色图转换为灰度图,由于灰度范围是0-256,因此二值化处理时的值不能越过这个范围。
图像边缘提取算法有:sobel算子,Laplacian算子,Canny算子。
轮廓分析使用findContours函数,找到的轮廓是有面积值的,可以据此进行轮廓筛选。
图像的二值化:
Mat biImage;
        cvtColor(img, biImage, CV_BGR2GRAY);//彩色图转换为灰度图
        cv::threshold(biImage,biImage,threshold,255, CV_THRESH_BINARY);//二值化处理

        processedimg=biImage;//方便放大显示二值化处理后的图片
        //在窗口控件中显示图片
        QImage Qtemp2 = QImage((const unsigned char*)(biImage.data), biImage.cols, biImage.rows,biImage.cols*biImage.channels(),QImage::Format_Indexed8);
        QPixmap pixmap2 = QPixmap::fromImage(Qtemp2);
        int with = ui->showimage->width();
        int height = ui->showimage->height();
        QPixmap fitpixmap2 = pixmap2.scaled(with, height, Qt::KeepAspectRatio, Qt::SmoothTransformation);  // 按比例缩放

        ui->showimage->setPixmap(fitpixmap2);
        ui->showimage->show();
sobel算子边缘提取:
Mat hsv,edgeImg;
        //定义灰度图像,转成灰度图
        cvtColor(img,hsv,COLOR_BGR2GRAY);
        //Sobel边缘检测
        Mat x_edgeImg, y_edgeImg;
        Mat abs_x_edgeImg, abs_y_edgeImg;

        /*****先对x方向进行边缘检测********/
        //因为Sobel求出来的结果有正负,8位无符号表示不全,故用16位有符号表示
        Sobel(hsv,x_edgeImg, CV_16S, 1, 0, 3, 1, 1, BORDER_DEFAULT);
        convertScaleAbs(x_edgeImg, abs_x_edgeImg);//将16位有符号转化为8位无符号

        /*****再对y方向进行边缘检测********/
        Sobel(hsv, y_edgeImg, CV_16S, 0, 1, 3, 1, 1, BORDER_DEFAULT);
        convertScaleAbs(y_edgeImg, abs_y_edgeImg);

        addWeighted(abs_x_edgeImg, 0.5, abs_y_edgeImg, 0.5, 0, edgeImg);

        processedimg=edgeImg;
        //在窗口控件中显示图片
        QImage Qtemp2 = QImage((const unsigned char*)(edgeImg.data), edgeImg.cols, edgeImg.rows, edgeImg.cols*edgeImg.channels(),QImage::Format_Grayscale8);
        QPixmap pixmap2 = QPixmap::fromImage(Qtemp2);
        int with = ui->showimage->width();
        int height = ui->showimage->height();
        QPixmap fitpixmap2 = pixmap2.scaled(with, height, Qt::KeepAspectRatio, Qt::SmoothTransformation);  // 按比例缩放

        ui->showimage->setPixmap(fitpixmap2);
        ui->showimage->show();
Laplacian算子边缘提取: Mat hsv,edgeImg;
//定义灰度图像,转成灰度图
cvtColor(img,hsv,COLOR_BGR2GRAY);
//Laplacian边缘检测
Mat lapImg;
Laplacian(hsv, lapImg, CV_16S, 5, 1, 0, BORDER_DEFAULT);
convertScaleAbs(lapImg, edgeImg);
processedimg=edgeImg;
//在窗口控件中显示图片
QImage Qtemp2 = QImage((const unsigned char*)(edgeImg.data), edgeImg.cols, edgeImg.rows, edgeImg.cols*edgeImg.channels(),QImage::Format_Grayscale8);
QPixmap pixmap2 = QPixmap::fromImage(Qtemp2);
int with = ui->showimage->width();
int height = ui->showimage->height();
QPixmap fitpixmap2 = pixmap2.scaled(with, height, Qt::KeepAspectRatio, Qt::SmoothTransformation); // 按比例缩放
ui->showimage->setPixmap(fitpixmap2);
ui->showimage->show();Canny算子边缘提取:Mat hsv,edgeImg;
//定义灰度图像,转成灰度图
cvtColor(img,hsv,COLOR_BGR2GRAY);
//Canny边缘检测
Canny(hsv, edgeImg, 30, 80);
processedimg=edgeImg;
//在窗口控件中显示图片
QImage Qtemp2 = QImage((const unsigned char*)(edgeImg.data), edgeImg.cols, edgeImg.rows, edgeImg.cols*edgeImg.channels(),QImage::Format_Grayscale8);
QPixmap pixmap2 = QPixmap::fromImage(Qtemp2);
int with = ui->showimage->width();
int height = ui->showimage->height();
QPixmap fitpixmap2 = pixmap2.scaled(with, height, Qt::KeepAspectRatio, Qt::SmoothTransformation); // 按比例缩放
ui->showimage->setPixmap(fitpixmap2);
ui->showimage->show();轮廓分析:
contoursize数组中contoursize[i]就是轮廓i的面积。Mat hsv;
//定义灰度图像,转成灰度图
cvtColor(img,hsv,COLOR_BGR2GRAY);
Mat contImg = Mat ::zeros(hsv.size(),CV_8UC3);//定义三通道轮廓提取图像
Mat binImg;
cv::threshold(hsv, binImg, 127, 255, THRESH_OTSU);//大津法进行图像二值化
vector<vector<Point>> contours;
vector<Vec4i> hierarchy;
//查找轮廓
findContours(binImg, contours, hierarchy, CV_RETR_CCOMP, CV_CHAIN_APPROX_NONE);
//绘制查找到的轮廓
drawContours(contImg, contours, -1, Scalar(0,255,0));
contoursize.clear();
contoursize.resize(1);//重置轮廓面积变量的大小
// qDebug()<<contours.size();
for(int i=0;i<contours.size();i++)
{
ui->contour->addItem(QString::number(i+1));
double temp=contourArea(contours[i]);
contoursize.push_back(temp);
}
ui->num->setText(QString::number(contours.size()));
ui->size->setText(QString::number(contourArea(contours[0])));
processedimg=contImg;
//在窗口控件中显示图片
QImage Qtemp2 = QImage((const unsigned char*)(contImg.data), contImg.cols, contImg.rows, contImg.cols*contImg.channels(),QImage::Format_RGB888);
QPixmap pixmap2 = QPixmap::fromImage(Qtemp2);
int with = ui->showimage->width();
int height = ui->showimage->height();
QPixmap fitpixmap2 = pixmap2.scaled(with, height, Qt::KeepAspectRatio, Qt::SmoothTransformation); // 按比例缩放
ui->showimage->setPixmap(fitpixmap2);
ui->showimage->show();7.使用多线程批量处理图片,加快图片处理速度
我们知道,将图片从硬盘中读取是一个费时的操作,远远高于图片处理的耗时。因此通过多线程的方式,我们就可以在处理图片的同时,导入后续图片到内存中。需要注意的是,需要采用线程锁的方式,避免多个线程处理同一张图片。
第一:获取图片所在文件夹中所有图片的名称以及总的图片数量值;
第二:对已经在处理中的图片编号进行计数,使用线程锁避免该计数值被多个线程同时改变。
第三,由于线程锁机制,每个线程都会顺序分配一张其可以处理的图片编号,只需对该图片进行处理。
第四,加入判断语句,当正在处理的图片编号达到或超过总的图片数量值时,结束当前线程。
void WorkThread::dataprocessing(void)
{
    while(1)
    {
        //线程一进入先判断是否图像已经处理完毕,如果完毕记录从开始至该线程结束所用的时间
        if(currentimagenum>=allImageNameList.count())
        {
            overtime=codetime.elapsed()/1000.0;
            emit time_over();//发送批量处理图片花费的时间到主UI所在的线程进行显示
            //结束当前线程
            this->terminate();
            this->wait();
            break;
        }

        //给需要保护的变量currentimagenum加锁,防止多线程时对同一图片进行处理
        QMutex mutex;
        mutex.lock();

        int num=currentimagenum;
        currentimagenum++;
        mutex.unlock();

        //载入需要处理的图片
        QString filename=imageprocessing_filename+"/"+(allImageNameList[num]);
        Mat img;
        std::string srcpath = filename.toLocal8Bit().toStdString(); //解决中文路径问题
        img = cv::imread(srcpath);//加载并图片,延时2后自动关闭窗口

        Mat biImage;
        //  转换为灰度图
        if (img.channels() == 4) {
            cv::cvtColor(img, biImage, CV_BGRA2GRAY);
        } else if (img.channels() == 3) {
            cv::cvtColor(img, biImage, CV_BGR2GRAY);
        } else if(img.channels() == 2) {
            cv::cvtColor(img,biImage,CV_BGR5652GRAY);
        } else if(img.channels() == 1) {// 单通道的图片直接就不需要处理

        } else { // 负数,说明图有问题 直接返回

        }

        //保存处理后的图片
        QImage Qtemp2 = QImage((const unsigned char*)(biImage.data), biImage.cols, biImage.rows,biImage.cols*biImage.channels(),QImage::Format_Grayscale8);
        QString savefile=imageprocessing_filename;
        savefile.append("/output/");
        QDir *photo = new QDir;
        if(!photo->exists(savefile))
        {
            //创建output文件夹
            photo->mkdir(savefile);
        }
        savefile.append(QString::number(num)+".jpg");
        QString path = QDir::toNativeSeparators(savefile);//将路径转换为当前系统所定义的路径
        Qtemp2.save(path,"JPG", 100);

        savefile.clear();
        filename.clear();
    }
}
8.使用opencv库的注意事项
第一:图片格式转换
1.opencv库处理的图片格式是BGR格式的,当Qt窗口需要显示时要转换为RGB格式,否则会有运行问题。

2.彩色图片一般选用RGB888格式,灰色图片一般选用Indexed8格式
![]()

3.同理,当需要使用opencv库处理图片时,需要将原本是RGB格式的图片转换为BGR格式。

第二:图片的拷贝
图片的强制拷贝使用clone函数,避免对拷贝图片处理时影响原图片。

第三:在Qt窗口中显示处理后的图片
使用Qlabel控件作为图片显示的载体。
再将Mat格式的图片转换为QImage格式。
最后将QImage转换为QPixmap进行缩放显示。

注意:Mat格式的图片转换为QImage格式时,对于灰度图和彩色图是不同的。通过channels()函数进行区分。

![]()
第四:打包成exe文件时,对于程序调用的dll文件以及需要外部载入文件的打包
将dll文件直接放在打包目录里。
需要外部载入的文件,通过相对路径进行调用,打包时同样放在打包目录里。
这样这些文件都会包含在打包的exe文件中,不会造成缺少文件的情况。
第五:点击窗口上的图片,会弹出一个放大版的图片
只需要在Qlabel控件上覆盖一个按钮控件,按钮控件设为透明。则可以通过响应按钮点击事件弹出一个放大的图片。
