2019-8-7
文中内容参考自博客:爱情大数据 | 你的专属微信聊天记录统计
- 前言:
准备在七夕那天给女朋友准备一份小礼物
就是把在一起之后的所有微信聊天记录生成一份词云
前期准备
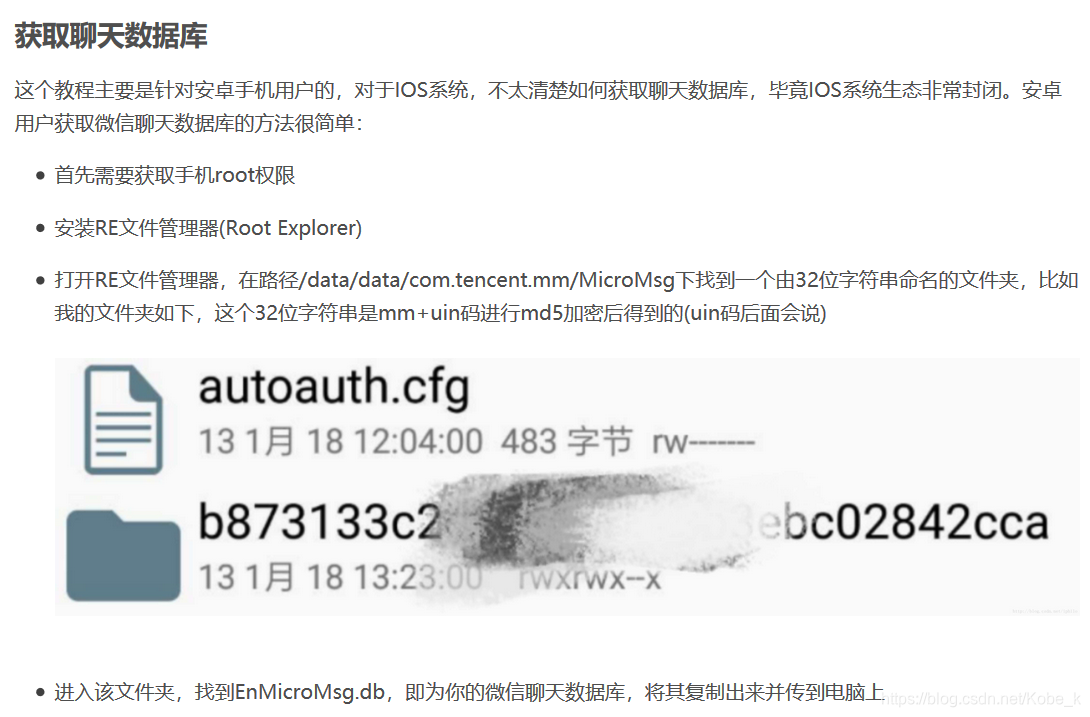
- 一台已经Root过的安卓系统手机
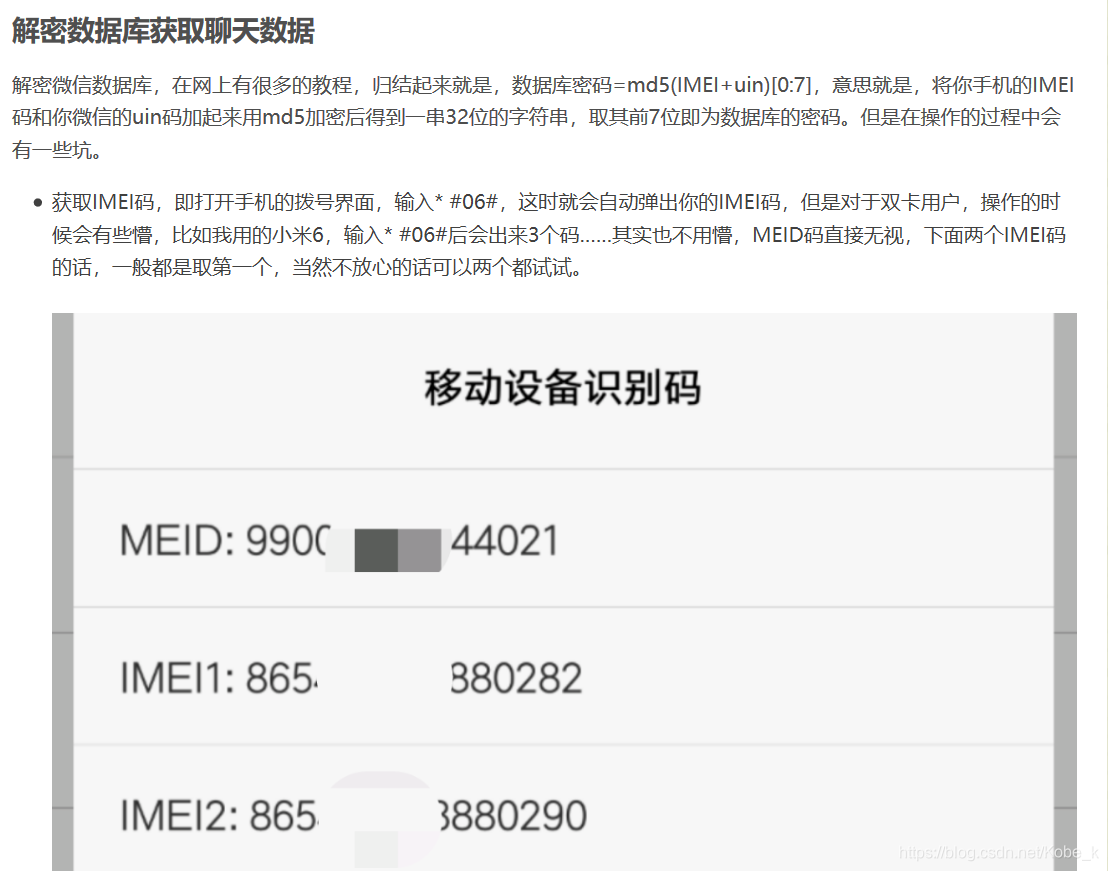
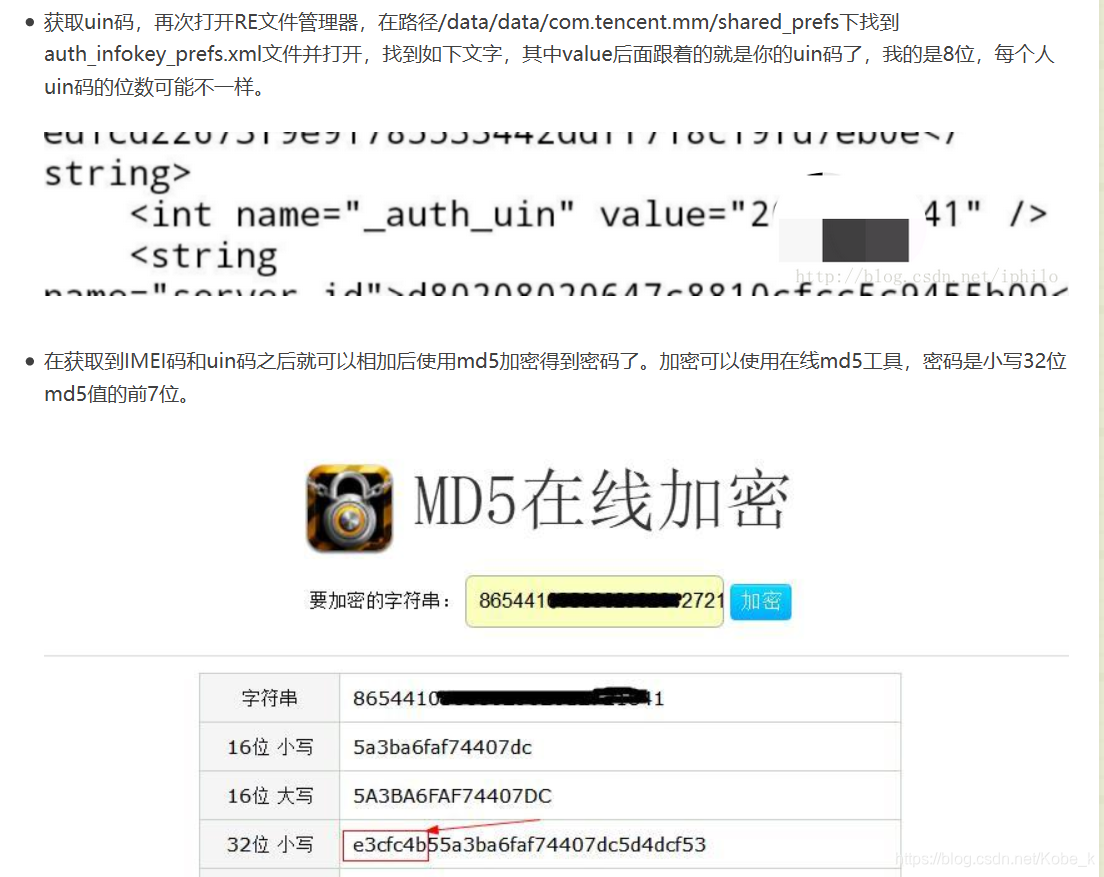
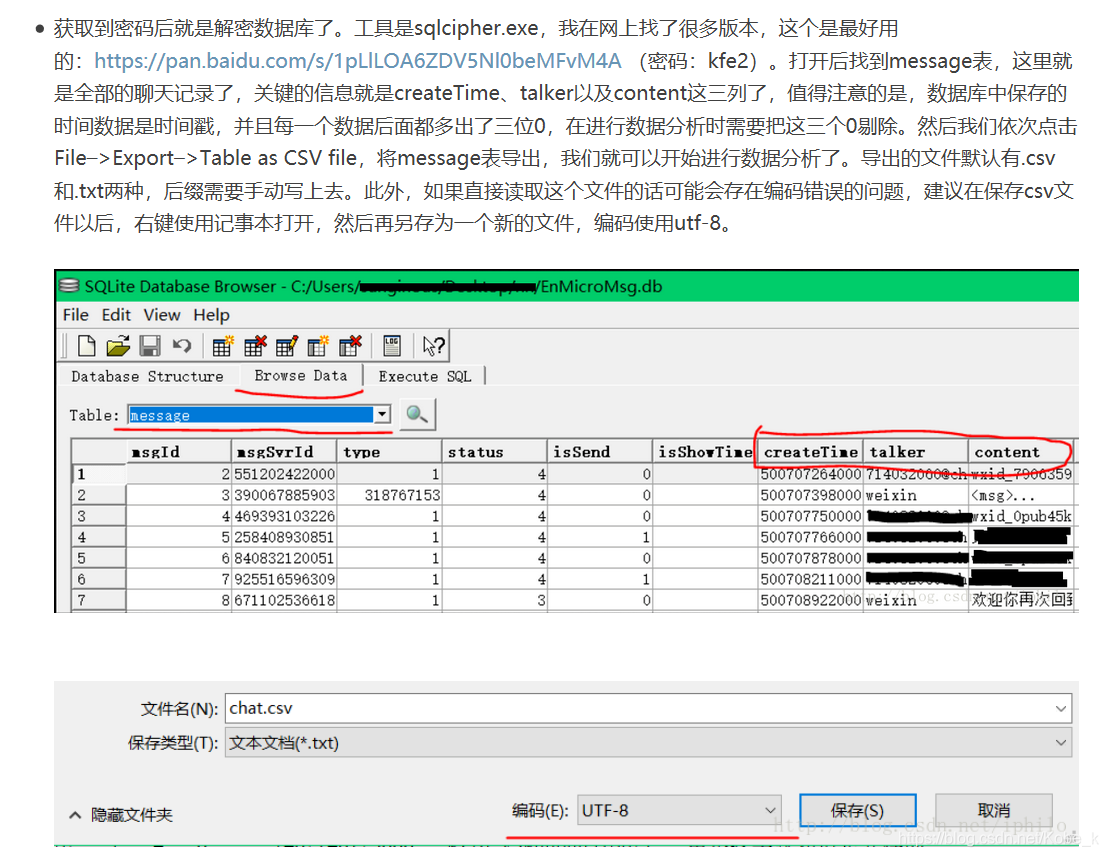
- 软件:sqlcipher.exe (电脑);RE文件管理器(手机)
数据文件准备
生成可操作字符串/列表
- 使用pandas读取csv文件里的数据,我们需要的数据在6、7、8三列:
chat = pd.read_csv('chat.csv', sep=',', usecols=[6,7,8])
- 然后定义两个list,分别用来存储聊天记录的时间和内容,定义变量myGirl,赋值为想要提取出来的联系人的微信号:
  chat_file = 'chat.csv'
  myGirl = 'wxid_XXXXXXX'

  ''' 读取原数据 '''
  chat = pd.read_csv(chat_file, sep=',', usecols=[6, 7, 8])
  chat_time = []
  chat_content = []
  chat_all = []
  for i in range(len(chat) - 1):
      content = chat[i:i + 1]
      if content['talker'].values[0] == myGirl:
          t = content['createTime'].values[0] // 1000
          c = content['content'].values[0]
          chat_time.append(t)
          chat_content.append(c)
          chat_all.append([t, c])
  chat_all = sorted(chat_all, key=itemgetter(0))  # 以第一维为索引排序
  result = re.compile(r"[\u4e00-\u9fa5]+").findall(" ".join(chat_content))  #使用正则表达式提取中文
  chat_record = " ".join(result)
- 这时chat_time和chat_content里就存储着你和女(男)朋友所有的聊天数据了。接下来需要定义一个函数to_hour()将时间戳转换为24h进制,然后用列表推导式批量进行转换:
  ''' 转换时间格式 '''
  def to_hour(t):
      struct_time = time.localtime(t)
      hour = round((struct_time[3] + struct_time[4] / 60), 2)
      return hour
  hour_set = [to_hour(i) for i in chat_time]
聊天时段分布图
- 聊天时段的分布可以使用seaborn绘制核密度图,非常简洁,一句话搞定,当然如果想让图片好看些的话还需要做额外的配置:
  import seaborn as sns
  from matplotlib.font_manager import *#如果想在图上显示中文,需导入这个包
  myfont = FontProperties(fname=r'C:\Windows\Fonts\MSYH.TTC',size=22)#标题字体样式
  myfont2 = FontProperties(fname=r'C:\Windows\Fonts\MSYH.TTC',size=18)#横纵坐标字体样式
  sns.set_style('darkgrid')#设置图片为深色背景且有网格线
  sns.distplot(hour_set, 24, color='lightcoral')
  plt.xticks(np.arange(0, 25, 1.0), fontsize=15)
  plt.yticks(fontsize=15)
  plt.title('聊天时间分布', fontproperties=myfont)
  plt.xlabel('时间段', fontproperties=myfont2)
  plt.ylabel('聊天时间分布', fontproperties=myfont2)
  fig = plt.gcf()
  fig.set_size_inches(15,8)
  fig.savefig('chat_time.png',dpi=100)
  plt.show()
- 亦可使用ECharts,一个开源JS插件:首先我们需要在Python中统计hour_set里不同时间段的聊天记录条数,时间段可以任意划分,然后打开ECharts官网,找到官方实例中的雷达图,将统计出的各时间段聊天数据直接替换进左侧代码就可以了:
	option = {
	    title: {
	        text: '聊天时间段',
	        textStyle: {
	            color: '#000',
	            fontSize: 20
	        }
	    },
	    //toolbox配置项可以在网页上直接生成下载图片的按钮而不用截图
	    toolbox: {
	      show: true,
	      feature: {
	        saveAsImage: {
	            show:true,
	            excludeComponents :['toolbox'],
	            pixelRatio: 2
	        }
	      }
	    },
	    tooltip: {},
	    radar: {
	        // shape: 'circle',
	        name: {
	            textStyle: {
	                color: '#fff',
	                backgroundColor: '#999',
	                borderRadius: 3,
	                padding: [3, 5]
	           }
	        },
	        indicator: [
	        //max值也需要修改,可以用最大的数值向上取整当最大数
	           { name: '凌晨2点至6点', max: 400},
	           { name: '6点至10点次', max: 400},
	           { name: '10点至14点', max: 400},
	           { name: '14点至18点', max: 400},
	           { name: '18点至22点', max: 400},
	           { name: '22点至次日凌晨2点', max: 400}
	        ]
	    },
	    series: [{
	        name: '聊天时间段',
	        type: 'radar',
	        // areaStyle: {normal: {}},
	        data : [
	            {
	                value : [63, 141, 250, 213, 263, 390], //替换数据即可
	                name : '聊天时段'
	            }
	        ]
	    }]
	};

消息记录词云生成
- 同样用 python 语言进行词云的生成
import imageio
import wordcloud
import jieba
from scipy.misc import imread
import jieba.analyse as analyse

# -------文本分词--------
mask = imageio.imread("shape.jpg")
ls = jieba.lcut(chat_record)  #精简模式
words = ["过滤词汇", "根据实际生成的图片将一些词汇过滤掉"]
#替换过滤词汇
for i in range(len(ls)):
    if ls[i] in words:
        ls[i] = " "
    else:
        continue
txt = "/".join(ls) #将ls列表转换成为字符串,每个词用 / 分隔
# -------生成词云图--------
w = wordcloud.WordCloud(font_path="msyh.ttc",
                        width=1024, height=800, background_color="white",
                        mask=mask)
w.generate(txt)
w.to_file("honey.png")
- 这样两幅图都能生成好了
全部代码
import imageio
import pandas as pd
import time
import seaborn as sns
import matplotlib.pyplot as plt
import numpy as np
import re
from operator import itemgetter
import wordcloud
import jieba
from matplotlib.font_manager import *  # 如果想在图上显示中文,需导入这个包

chat_file = 'chat.csv'
myGirl = 'wxid_xxxxxxxxxxxxx'

''' 读取原数据 '''
chat = pd.read_csv(chat_file, sep=',', usecols=[6, 7, 8])
chat_time = []
chat_content = []
chat_all = []
for i in range(len(chat) - 1):
    content = chat[i:i + 1]
    if content['talker'].values[0] == myGirl:
        t = content['createTime'].values[0] // 1000
        c = content['content'].values[0]
        chat_time.append(t)
        chat_content.append(c)
        chat_all.append([t, c])
chat_all = sorted(chat_all, key=itemgetter(0))  # 以第一维为索引排序
result = re.compile(r"[\u4e00-\u9fa5]+").findall(" ".join(chat_content))  #使用正则表达式提取中文
chat_record = " ".join(result)

''' 转换时间格式 '''
def to_hour(t):
    struct_time = time.localtime(t)
    hour = round((struct_time[3] + struct_time[4] / 60), 2)
    return hour

hour_set = [to_hour(i) for i in chat_time]
'''消息所处时间段统计'''
print('\n.......................\n开始画图\n.......................')
myfont = FontProperties(fname=r'C:\Windows\Fonts\MSYH.TTC', size=22)  # 标题字体样式
myfont2 = FontProperties(fname=r'C:\Windows\Fonts\MSYH.TTC', size=18)  # 横纵坐标字体样式
sns.set_style('darkgrid')  # 设置图片为深色背景且有网格线
sns.distplot(hour_set, 24, color='lightcoral')
plt.xticks(np.arange(0, 25, 1.0), fontsize=15)
plt.yticks(fontsize=15)
plt.title('聊天时间分布', fontproperties=myfont)
plt.xlabel('时间段', fontproperties=myfont2)
plt.ylabel('聊天时间分布', fontproperties=myfont2)
fig = plt.gcf()
fig.set_size_inches(15, 8)
fig.savefig('chat_time.png', dpi=100)
plt.show()
print('\n.......................\n画图结束\n.......................')

''' 聊天时段分布 '''
print('\n.......................\n开始聊天时段统计\n.......................')
time_slice = [0, 0, 0, 0, 0, 0]
deep_night = []
for i in range(len(hour_set)):
    if hour_set[i] >= 2 and hour_set[i] < 6:
        time_slice[0] += 1
        deep_night.append([chat_time[i], chat_content[i]])
    elif hour_set[i] >= 6 and hour_set[i] < 10:
        time_slice[1] += 1
    elif hour_set[i] >= 10 and hour_set[i] < 14:
        time_slice[2] += 1
    elif hour_set[i] >= 14 and hour_set[i] < 18:
        time_slice[3] += 1
    elif hour_set[i] >= 18 and hour_set[i] < 22:
        time_slice[4] += 1
    else:
        time_slice[5] += 1
labels = ['凌晨2点至6点', '6点至10点', '10点至14点',
          '14点至18点', '18点至22点', '22点至次日凌晨2点']
time_distribution = {
    labels[0]: time_slice[0],
    labels[1]: time_slice[1],
    labels[2]: time_slice[2],
    labels[3]: time_slice[3],
    labels[4]: time_slice[4],
    labels[5]: time_slice[5]
}
print(time_distribution)


''' 聊天记录词云生成 '''
print('\n..........\n开始生成词云\n............\n')
mask = imageio.imread("heart.png")
ls = jieba.lcut(chat_record)
words = ["什么", "这么", "那个", "不是", "这个", "然后", "现在"]
for i in range(len(ls)):
    if ls[i] in words:
        ls[i] = " "
    else:
        continue
txt = "/".join(ls)
w = wordcloud.WordCloud(font_path="msyh.ttc",
                        width=1024, height=800, background_color="white",
                        mask=mask)
w.generate(txt)
w.to_file("chat.png")
print('\n..........\n消息记录词云图生成完毕\n............\n')
