Deep Convolutional Generative Adversarial Networks
we introduced the basic ideas behind how GANs work. We showed that they can draw samples from some simple, easy-to-sample distribution, like a uniform or normal distribution, and transform them into samples that appear to match the distribution of some dataset. And while our example of matching a 2D Gaussian distribution got the point across, it is not especially exciting.我们介绍了GAN的工作原理。我们证明了他们可以从一些简单,易于采样的分布(如均匀分布或正态分布)中抽取样本,并将它们转换为看起来与某些数据集的分布相匹配的样本。尽管我们提出的匹配2D高斯分布的例子很明确,但这并不是特别令人兴奋。
In this section, we will demonstrate how you can use GANs to generate photorealistic images. We will be basing our models on the deep convolutional GANs (DCGAN) introduced in :cite:Radford.Metz.Chintala.2015. We will borrow the convolutional architecture that have proven so successful for discriminative computer vision problems and show how via GANs, they can be leveraged to generate photorealistic images.在本节中,我们将演示如何使用GAN生成逼真的图像。我们将基于在:cite:Radford.Metz.Chintala.2015中引入的深度卷积GAN(DCGAN)建立模型。我们将借鉴已证明在区分计算机视觉问题上如此成功的卷积架构,并展示如何通过GAN来利用它们来生成逼真的图像。
import matplotlib.pyplot as plt
from torch.utils.data import DataLoader
from torch import nn
import numpy as np
from torch.autograd import Variable
import torch
from torchvision.datasets import ImageFolder
from torchvision.transforms import transforms
import zipfile
cuda = True if torch.cuda.is_available() else False
print(cuda)
True
The Pokemon Dataset
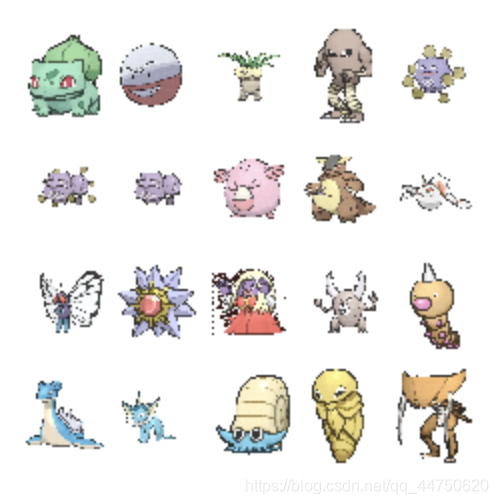
The dataset we will use is a collection of Pokemon sprites obtained from pokemondb. First download, extract and load this dataset.我们将使用的数据集是从pokemondb获得的Pokemon精灵的集合。首先下载,提取并加载此数据集。
We resize each image into 64 × 64. The ToTensor transformation will project the pixel value into [0,1], while our generator will use the tanh function to obtain outputs in [-1,1]. Therefore we normalize the data with 0.5 mean and 0.5 standard deviation to match the value range.我们将每个图像的大小调整为64×64。ToTensor变换会将像素值投影到[0,1],而我们的生成器将使用tanh函数获得[-1,1]中的输出。因此,我们用0.5的平均值和0.5的标准差对数据进行归一化以匹配值范围。
data_dir='/home/kesci/input/pokemon8600/'
batch_size=256
transform=transforms.Compose([
    transforms.Resize((64,64)),
    transforms.ToTensor(),
    transforms.Normalize((0.5,0.5,0.5),(0.5,0.5,0.5))
])
pokemon=ImageFolder(data_dir+'pokemon',transform)
data_iter=DataLoader(pokemon,batch_size=batch_size,shuffle=True)
Let’s visualize the first 20 images.让我们可视化前20张图像。
fig=plt.figure(figsize=(4,4))
imgs=data_iter.dataset.imgs
for i in range(20):
    img = plt.imread(imgs[i*150][0])
    plt.subplot(4,5,i+1)
    plt.imshow(img)
    plt.axis('off')
plt.show()
The Generator生成器
The generator needs to map the noise variable z ∈ Rd, a length-d vector, to a RGB image with width and height to be 64 × 64 . In :numref:sec_fcn we introduced the fully convolutional network that uses transposed convolution layer (refer to :numref:sec_transposed_conv) to enlarge input size. The basic block of the generator contains a transposed convolution layer followed by the batch normalization and ReLU activation.生成器需要将噪声变量z∈R ^ d ^(长度为d的矢量)映射到宽度和高度为64×64的RGB图像。在:numref:sec_fcn中,我们介绍了使用转置卷积层的完全卷积网络(请参阅:numref:sec_transposed_conv)来扩大输入大小。生成器的基本块包含一个转置的卷积层,然后进行批量归一化和ReLU激活。
class G_block(nn.Module):
    def __init__(self, in_channels, out_channels, kernel_size=4,strides=2, padding=1):
        super(G_block,self).__init__()
        self.conv2d_trans=nn.ConvTranspose2d(in_channels, out_channels, kernel_size=kernel_size,
                                             stride=strides, padding=padding, bias=False)
        self.batch_norm=nn.BatchNorm2d(out_channels,0.8)
        self.activation=nn.ReLU()
    def forward(self,x):
        return self.activation(self.batch_norm(self.conv2d_trans(x)))
In default, the transposed convolution layer uses a kh=kw=4 kernel, a sh=sw=2 strides, and a ph=pw=1 padding. With a input shape of nh’
× nw’=16 × 16, the generator block will double input’s width and height.默认情况下,转置的卷积层使用kh= kw= 4内核,sh= sw= 2步幅和ph= pw= 1填充。输入形状为nh’×nw’ = 16×16,生成器块将输入的宽度和高度加倍。

Tensor=torch.cuda.FloatTensor
x=Variable(Tensor(np.zeros((2,3,16,16))))
g_blk=G_block(3,20)
g_blk.cuda()
print(g_blk(x).shape)
torch.Size([2, 20, 32, 32])
If changing the transposed convolution layer to a 4×4 kernel, 1×1 strides and zero padding. With a input size of 1×1, the output will have its width and height increased by 3 respectively.如果将转置的卷积层更改为4×4内核,则1×1跨度和零填充。输入大小为1×1时,输出的宽度和高度将分别增加3。
x=Variable(Tensor(np.zeros((2,3,1,1))))
g_blk=G_block(3,20,strides=1,padding=0)
g_blk.cuda()
print(g_blk(x).shape)
torch.Size([2, 20, 4, 4])
The generator consists of four basic blocks that increase input’s both width and height from 1 to 32. At the same time, it first projects the latent variable into 64 × 8 channels, and then halve the channels each time. At last, a transposed convolution layer is used to generate the output. It further doubles the width and height to match the desired 64 × 64 shape, and reduces the channel size to 3. The tanh activation function is applied to project output values into the (-1,1) range.生成器由四个基本块组成,这些块将输入的宽度和高度从1增加到32。同时,它首先将潜变量投影到64×8通道中,然后每次将通道减半。最后,转置的卷积层用于生成输出。它进一步加倍了宽度和高度,以匹配所需的64×64形状,并将通道大小减小到3。tanh激活功能应用于将输出值投影到(-1,1)范围内。
class net_G(nn.Module):
    def __init__(self,in_channels):
        super(net_G,self).__init__()

        n_G=64
        self.model=nn.Sequential(
            G_block(in_channels,n_G*8,strides=1,padding=0),
            G_block(n_G*8,n_G*4),
            G_block(n_G*4,n_G*2),
            G_block(n_G*2,n_G),
            nn.ConvTranspose2d(
                n_G,3,kernel_size=4,stride=2,padding=1,bias=False
            ),
            nn.Tanh()
        )
    def forward(self,x):
        x=self.model(x)
        return x


def weights_init_normal(m):
    classname = m.__class__.__name__
    if classname.find("Conv") != -1:
        torch.nn.init.normal_(m.weight.data, mean=0, std=0.02)
    elif classname.find("BatchNorm2d") != -1:
        torch.nn.init.normal_(m.weight.data, mean=1.0, std=0.02)
        torch.nn.init.constant_(m.bias.data, 0.0)
Generate a 100 dimensional latent variable to verify the generator’s output shape.生成一个100维的潜在变量,以验证生成器的输出形状。
x=Variable(Tensor(np.zeros((1,100,1,1))))
generator=net_G(100)
generator.cuda()
generator.apply(weights_init_normal)
print(generator(x).shape)
torch.Size([1, 3, 64, 64])
Discriminator鉴别器/分类器
The discriminator is a normal convolutional network network except that it uses a leaky ReLU as its activation function. Given α ∈ [0,1], its definition is鉴别器是普通的卷积网络,只是它使用泄漏的ReLU作为其激活功能。给定α∈[0,1],其定义为
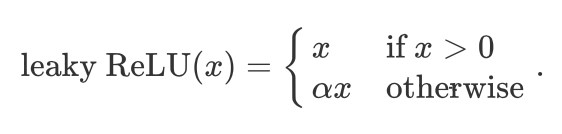
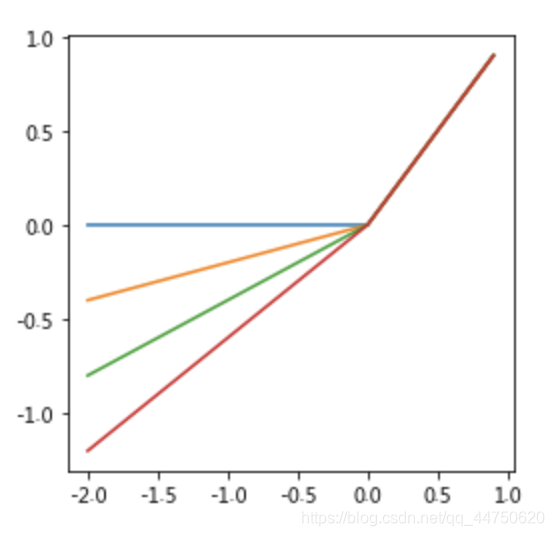
As it can be seen, it is normal ReLU if α = 0 , and an identity function if α = 1. For α ∈ (0,1), leaky ReLU is a nonlinear function that give a non-zero output for a negative input. It aims to fix the “dying ReLU” problem that a neuron might always output a negative value and therefore cannot make any progress since the gradient of ReLU is 0.可以看出,如果α= 0,则是正常ReLU;如果α= 1,则是恒等函数。对于α∈(0,1),泄漏ReLU是一个非线性函数,为负输入提供非零输出。它旨在解决“垂死的ReLU”问题,因为神经元可能总是输出负值,因此由于ReLU的梯度为0,因此无法取得任何进展。
alphas = [0, 0.2, 0.4, .6]
x = np.arange(-2, 1, 0.1)
Y = [nn.LeakyReLU(alpha)(Tensor(x)).cpu().numpy()for alpha in alphas]
plt.figure(figsize=(4,4))
for y in Y:
    plt.plot(x,y)
plt.show()
The basic block of the discriminator is a convolution layer followed by a batch normalization layer and a leaky ReLU activation. The hyper-parameters of the convolution layer are similar to the transpose convolution layer in the generator block.鉴别器的基本模块是卷积层,然后是批处理归一化层和泄漏的ReLU激活。卷积层的超参数类似于生成器块中的转置卷积层。
class D_block(nn.Module):
    def __init__(self,in_channels,out_channels,kernel_size=4,strides=2,
                 padding=1,alpha=0.2):
        super(D_block,self).__init__()
        self.conv2d=nn.Conv2d(in_channels,out_channels,kernel_size,strides,padding,bias=False)
        self.batch_norm=nn.BatchNorm2d(out_channels,0.8)
        self.activation=nn.LeakyReLU(alpha)
    def forward(self,X):
        return self.activation(self.batch_norm(self.conv2d(X)))
A basic block with default settings will halve the width and height of the inputs, as we demonstrated in :numref:sec_padding. For example, given a input shape nh=nw=16, with a kernel shape kh=kw=4, a stride shape sh=sw=2, and a padding shape ph=pw=1, the output shape will be:如我们在:numref:sec_padding中所演示的,具有默认设置的基本块将使输入的宽度和高度减半。例如,假设输入形状为nh= nw= 16,内核形状为kh= kw= 4,则步幅形状sh= sw= 2,并且填充形状为ph= pw= 1,则输出形状为:

x = Variable(Tensor(np.zeros((2, 3, 16, 16))))
d_blk = D_block(3,20)
d_blk.cuda()
print(d_blk(x).shape)
torch.Size([2, 20, 8, 8])
The discriminator is a mirror of the generator.鉴别器是生成器的一面镜子。
class net_D(nn.Module):
    def __init__(self,in_channels):
        super(net_D,self).__init__()
        n_D=64
        self.model=nn.Sequential(
            D_block(in_channels,n_D),
            D_block(n_D,n_D*2),
            D_block(n_D*2,n_D*4),
            D_block(n_D*4,n_D*8)
        )
        self.conv=nn.Conv2d(n_D*8,1,kernel_size=4,bias=False)
        self.activation=nn.Sigmoid()
        # self._initialize_weights()
    def forward(self,x):
        x=self.model(x)
        x=self.conv(x)
        x=self.activation(x)
        return x
It uses a convolution layer with output channel as the last layer to obtain a single prediction value.它使用卷积层和输出通道作为最后一层来获得单个预测值。
x = Variable(Tensor(np.zeros((1, 3, 64, 64))))
discriminator=net_D(3)
discriminator.cuda()
discriminator.apply(weights_init_normal)
print(discriminator(x).shape)
torch.Size([1, 1, 1, 1])
Training
Compared to the basic GAN in :numref:sec_basic_gan, we use the same learning rate for both generator and discriminator since they are similar to each other. In addition, we change β1 in Adam (:numref:sec_adam) from 0.9 to 0.5 . It decreases the smoothness of the momentum, the exponentially weighted moving average of past gradients, to take care of the rapid changing gradients because the generator and the discriminator fight with each other. Besides, the random generated noise Z, is a 4-D tensor and we are using GPU to accelerate the computation.与:numref:sec_basic_gan中的基本GAN相比,生成器和鉴别器使用相同的学习率,因为它们彼此相似。另外,我们将Adam(:numref:sec_adam)中的β1从0.9更改为0.5。它会降低动量的平滑度(过去梯度的指数加权移动平均值),以照顾快速变化的梯度,因为生成器和鉴别器会相互竞争。此外,随机产生的噪声Z是一个4维张量,我们使用GPU来加速计算。
def update_D(X,Z,net_D,net_G,loss,trainer_D):
    batch_size=X.shape[0]
    Tensor=torch.cuda.FloatTensor
    ones=Variable(Tensor(np.ones(batch_size,)),requires_grad=False).view(batch_size,1)
    zeros = Variable(Tensor(np.zeros(batch_size,)),requires_grad=False).view(batch_size,1)
    real_Y=net_D(X).view(batch_size,-1)
    fake_X=net_G(Z)
    fake_Y=net_D(fake_X).view(batch_size,-1)
    loss_D=(loss(real_Y,ones)+loss(fake_Y,zeros))/2
    loss_D.backward()
    trainer_D.step()
    return float(loss_D.sum())

def update_G(Z,net_D,net_G,loss,trainer_G):
    batch_size=Z.shape[0]
    Tensor=torch.cuda.FloatTensor
    ones=Variable(Tensor(np.ones((batch_size,))),requires_grad=False).view(batch_size,1)
    fake_X=net_G(Z)
    fake_Y=net_D(fake_X).view(batch_size,-1)
    loss_G=loss(fake_Y,ones)
    loss_G.backward()
    trainer_G.step()
    return float(loss_G.sum())


def train(net_D,net_G,data_iter,num_epochs,lr,latent_dim):
    loss=nn.BCELoss()
    Tensor=torch.cuda.FloatTensor
    trainer_D=torch.optim.Adam(net_D.parameters(),lr=lr,betas=(0.5,0.999))
    trainer_G=torch.optim.Adam(net_G.parameters(),lr=lr,betas=(0.5,0.999))
    plt.figure(figsize=(7,4))
    d_loss_point=[]
    g_loss_point=[]
    d_loss=0
    g_loss=0
    for epoch in range(1,num_epochs+1):
        d_loss_sum=0
        g_loss_sum=0
        batch=0
        for X in data_iter:
            X=X[:][0]
            batch+=1
            X=Variable(X.type(Tensor))
            batch_size=X.shape[0]
            Z=Variable(Tensor(np.random.normal(0,1,(batch_size,latent_dim,1,1))))

            trainer_D.zero_grad()
            d_loss = update_D(X, Z, net_D, net_G, loss, trainer_D)
            d_loss_sum+=d_loss
            trainer_G.zero_grad()
            g_loss = update_G(Z, net_D, net_G, loss, trainer_G)
            g_loss_sum+=g_loss

        d_loss_point.append(d_loss_sum/batch)
        g_loss_point.append(g_loss_sum/batch)
        print(
            "[Epoch %d/%d]  [D loss: %f] [G loss: %f]"
            % (epoch, num_epochs,  d_loss_sum/batch_size,  g_loss_sum/batch_size)
        )


    plt.ylabel('Loss', fontdict={ 'size': 14})
    plt.xlabel('epoch', fontdict={ 'size': 14})
    plt.xticks(range(0,num_epochs+1,3))
    plt.plot(range(1,num_epochs+1),d_loss_point,color='orange',label='discriminator')
    plt.plot(range(1,num_epochs+1),g_loss_point,color='blue',label='generator')
    plt.legend()
    plt.show()
    print(d_loss,g_loss)

    Z = Variable(Tensor(np.random.normal(0, 1, size=(21, latent_dim, 1, 1))),requires_grad=False)
    fake_x = generator(Z)
    fake_x=fake_x.cpu().detach().numpy()
    plt.figure(figsize=(14,6))
    for i in range(21):
        im=np.transpose(fake_x[i])
        plt.subplot(3,7,i+1)
        plt.imshow(im)
    plt.show()
Now let’s train the model.
if __name__ == '__main__':
    lr,latent_dim,num_epochs=0.005,100,50
    train(discriminator,generator,data_iter,num_epochs,lr,latent_dim)
Summary
- DCGAN architecture has four convolutional layers for the Discriminator and four “fractionally-strided” convolutional layers for the Generator.DCGAN体系结构具有四个用于鉴别器的卷积层和四个用于生成器的“小跨度”卷积层。
- The Discriminator is a 4-layer strided convolutions with batch normalization (except its input layer) and leaky ReLU activations.鉴别器是一个具有批归一化(输入层除外)和泄漏性ReLU激活的4层跨卷积。
- Leaky ReLU is a nonlinear function that give a non-zero output for a negative input. It aims to fix the “dying ReLU” problem and helps the gradients flow easier through the architecture.泄漏的ReLU是一个非线性函数,为负输入提供非零输出。它旨在解决“垂死的ReLU”问题,并帮助渐变在整个体系结构中更轻松地流动。
