目录
概述
本文分别讲述了spring与springboot是怎么整合mybatis与druid数据源的?如果你只是想实现其中一种,那你就不要把他们的配置过程搞混了。
1、mybatis
MyBatis 本是apache的一个开源项目iBatis, 2010年这个项目由apache software foundation 迁移到了google code,并且改名为MyBatis 。2013年11月迁移到Github。
MyBatis 是一款优秀的持久层框架,它支持定制化 SQL、存储过程以及高级映射。MyBatis 避免了几乎所有的 JDBC 代码和手动设置参数以及获取结果集。MyBatis 可以使用简单的 XML 或注解来配置和映射原生信息,将接口和 Java 的 POJOs(Plain Ordinary Java Object,普通的 Java对象)映射成数据库中的记录。
在国内以及韩国等地mybatis的普及率还是很高的。所以mybatis是绝对值得学习的。
2、druid
Druid提供了一个高效、功能强大、可扩展性好的数据库连接池,druid还有自己的数据访问监听系统,你的系统数据调用实时状况你都一通过druid来查看。
@
壹:spring整合
在整合mybatis之前,我们首先需要明确的是,我们需要哪些文件分别拿来干嘛的。
- 1、pom.xml
-- maven用于引入依赖的 - 2、jdbc.properties
-- 配置mybatis的数据源 3、mybatis-config.xml
-- 配置mybatis参数一:文件结构
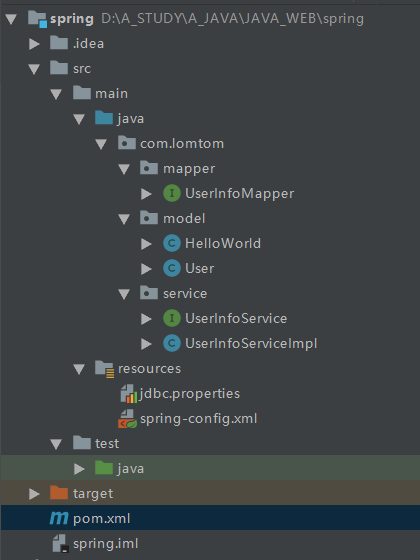
我们可以看淡我的整个的项目结构就是这样的,这里使用的是maven管理项目,直接建立
maven项目即可,不懂maven的安装与配置的可以见我另一篇博文maven的安装与配置,配置好后,直接在新建项目里选择maven即可。
注:我的mybatis-config.xml直接就是放在spring-config.xml,归根到地,他们都是spring的配置文件,只是命名不同而已。
二:配置文件
1、pom.xml
pom.xml文件,有了这个文件之后,我们不需要像以前一样去找jar包,找到还不一定兼容,maven项目里,你直接在你的pom.xml文件里写相关依赖,他就会自动导入,jar包也会自动下载好,下面就是我们整合mybatis所需要的的相关依赖。
<!--        数据库  start-->
        <!--        引入jdbc与mysql依赖-->
        <!-- https://mvnrepository.com/artifact/org.springframework/spring-jdbc -->
        <dependency>
            <groupId>org.springframework</groupId>
            <artifactId>spring-jdbc</artifactId>
            <version>5.1.5.RELEASE</version>
        </dependency>

        <dependency>
            <groupId>mysql</groupId>
            <artifactId>mysql-connector-java</artifactId>
            <version>5.0.8</version>
        </dependency>
        <!--引入druid数据源-->
        <!-- https://mvnrepository.com/artifact/com.alibaba/druid -->
        <dependency>
            <groupId>com.alibaba</groupId>
            <artifactId>druid</artifactId>
            <version>1.1.8</version>
        </dependency>
        <!--        mybatis-->
        <!-- https://mvnrepository.com/artifact/org.mybatis/mybatis -->
        <dependency>
            <groupId>org.mybatis</groupId>
            <artifactId>mybatis</artifactId>
            <version>3.4.6</version>
        </dependency>
        <!-- spring整合mybatis -->
        <dependency>
            <groupId>org.mybatis</groupId>
            <artifactId>mybatis-spring</artifactId>
            <version>1.3.0</version>
        </dependency>
<!--        数据库 end-->
2、jdbc.properties
这个文件主要用于存放我们mybatis连接的数据库参数,依次为驱动、url、用户名、密码参数,你只需要换成你自己的就好了,设置好之后,我们需要下一个配置文件来加载。
jdbc.driverClassName=com.mysql.jdbc.Driver
jdbc.url=jdbc:mysql://localhost:3306/world?characterEncoding=UTF-8
jdbc.username=root
jdbc.password=qwer1234
3、mybatis-config.xml
这时,你会疑问,咦,上面的文件结构图中没有这个文件啊?
我的mybatis-config.xml直接就是放在spring-config.xml,归根到地,他们都是spring的配置文件,只是命名不同而已。当然,也可以单独配置一个,只需要在启动的时候加载他就可以了。
整合druid数据源,就在这个文件里配置即可。
  <!-- 这个是加载下面的mapper与service注入到容器中,这样你才能使用,注意你自己的包名-->
    <context:annotation-config/>
    <context:component-scan base-package="com.lomtom"/>

    <!-- 配置 读取properties文件 jdbc.properties -->
    <context:property-placeholder location="classpath:jdbc.properties" />
<!--        <bean id="propertyConfigurer" class="org.springframework.beans.factory.config.PropertyPlaceholderConfigurer">-->
<!--            <property name="location" value="classpath:jdbc.properties"/>-->
<!--        </bean>-->

    <!-- 配置 数据源 整合druid-->
    <bean id="dataSource" class="com.alibaba.druid.pool.DruidDataSource">
        <property name="driverClassName" value="${jdbc.driverClassName}" />
        <property name="url" value="${jdbc.url}" />
        <property name="username" value="${jdbc.username}" />
        <property name="password" value="${jdbc.password}" />
    </bean>

<!--    spring和MyBatis完美整合,不需要mybatis的配置映射文件 -->
    <bean id="sqlSessionFactory" class="org.mybatis.spring.SqlSessionFactoryBean">
        <property name="dataSource" ref="dataSource"/>
        <property name="mapperLocations" value="classpath:com/lomtom/mapper/*.java"/>
    </bean>


    <!-- DAO接口所在包名,Spring会自动查找其下的类 -->
    <bean class="org.mybatis.spring.mapper.MapperScannerConfigurer">
        <property name="basePackage" value="com.lomtom.mapper" />
        <property name="sqlSessionFactoryBeanName" value="sqlSessionFactory"/>
    </bean>
二:java代码
1、mapper
在mybatis里,支持两种写法,一种是注解版,一种是xml版,这里推荐使用注解版。
mybatis我使用的是注解版,注解版简单。如果使用xml版,需要配置maven的静态资源访问。
package com.lomtom.mapper;

import com.lomtom.model.User;
import org.apache.ibatis.annotations.*;

/**
 * User: lomtom
 * Date: 2020/3/2
 * Time: 16:45
 */
@Mapper
public interface UserInfoMapper {
    @Select("select * from user where username = #{username} and password = #{password}")
    User login(@Param("username") String username,@Param("password") String password);
}
2、service
一般来说,我们为了规范,还是建一个service层。这里是实现service接口,你还需要自己写UserInfoService接口,加上login();函数即可,不是很难,就不板述了。
package com.lomtom.service;

import com.lomtom.mapper.UserInfoMapper;
import org.springframework.beans.factory.annotation.Autowired;
import org.springframework.stereotype.Service;

/**
 * User: lomtom
 * Date: 2020/3/2
 * Time: 17:21
 */
@Service
public class UserInfoServiceImpl implements UserInfoService {

    @Autowired
    UserInfoMapper userInfoMapper;

    @Override
    public boolean login(String username, String password) {
        return userInfoMapper.login(username, password) != null;
    }
}
3、测试
我使用的是spring测试单元测试的,需要在pom.xml引入JUNIT依赖,当然,你也可以直接写一个main函数调用。
最后的结果就不展示了,他无非就是一句登陆成功,或者登陆失败。
import com.lomtom.model.HelloWorld;
import com.lomtom.service.UserInfoService;
import org.junit.Before;
import org.junit.Test;
import org.springframework.beans.factory.annotation.Autowired;
import org.springframework.context.ApplicationContext;
import org.springframework.context.support.ClassPathXmlApplicationContext;

/**
 * User: lomtom
 * Date: 2020/3/2
 * Time: 19:45
 */

//测试类
public class test {

    private ApplicationContext context;
    @Before
    public void setUp() throws Exception {
//        加载配置文件
        context = new ClassPathXmlApplicationContext("spring-config.xml");
    }

    @Test
    public void Test2(){
        UserInfoService userInfoService =  context.getBean(UserInfoService.class);
        boolean flag = userInfoService.login("admin","123456");
        if (flag){
            System.out.println("登录成功。。。。");
        }
        else{
            System.out.println("登陆失败。。。");
        }
    }
}贰:springboot整合
相对于spring,springboot的整合就简单的多,因为在springboot里,很多都是自动配置的,相当于就是对spring的再一次封装,所以在springboot里,很多东西就变得简单很多。
相比spring,我们不需要配置麻烦的spring配置xml文件,只需要在application.yml文件中配置即可。当然,pom.xml时maven所需要的,所以他也是必不可少的。
建立项目的时候,选择spring initializr就可以快速建立一个springboot项目,当然如果你想自己配置,那我也是无法阻拦的。
1、pom.xml
springboot与spring引入mybatis所需依赖,是不同的,所以你最好还是复制这里的,这里我也是吸取了教训的。哈哈哈
 <!--        引入jdbc与mysql依赖-->
        <dependency>
            <groupId>org.springframework.boot</groupId>
            <artifactId>spring-boot-starter-jdbc</artifactId>
        </dependency>
        <dependency>
            <groupId>mysql</groupId>
            <artifactId>mysql-connector-java</artifactId>
        </dependency>
        <!--引入druid数据源-->
        <!-- https://mvnrepository.com/artifact/com.alibaba/druid -->
        <dependency>
            <groupId>com.alibaba</groupId>
            <artifactId>druid</artifactId>
            <version>1.1.8</version>
        </dependency>

        <!--日志打印-->
        <dependency>
            <groupId>log4j</groupId>
            <artifactId>log4j</artifactId>
            <version>1.2.17</version>
        </dependency>

        <!--        mybatis-->
        <dependency>
            <groupId>org.mybatis.spring.boot</groupId>
            <artifactId>mybatis-spring-boot-starter</artifactId>
            <version>1.3.1</version>
        </dependency>
2、application.yml(resources下)
与spring不同的是,在springboot里,不需要建很多的配置文件,你所有的配置参数全部卸载这里面即可。
在springboot里面,配置文件有两种,一种是properties,另一种是yml,两种语法有点不同,不过都可以作为springboot的配置文件,
spring:
    datasource:
        username: root
        password: qwer1234
        url: jdbc:mysql://localhost:3306/world?serverTimezone=UTC&characterEncoding=utf-8
        #    不写driver-class-name则自动分配
        #    driver-class-name: com.mysql.cj.jdbc.Driver
        #    配置druid数据源
        type: com.alibaba.druid.pool.DruidDataSource
mybatis:
  #注解版与xml版不能共同使用
  ##  指定全局配置的路径(xml版配置)
  #  config-location: classpath::mybatis/mybatis-config.xml
  ##  指定sql映射文件的位置(xml版配置)
  #  mapper-locations: classpath:mybatis/mapper/*.xml
  configuration:
    #    开启驼峰命名法
    map-underscore-to-camel-case: true
logging:
  #  开启com.lomtom.blog.mapper包下所有的日志(在调用时)
  level:
    com.lomtom.myblog1.mapper: debug
3、druid配置
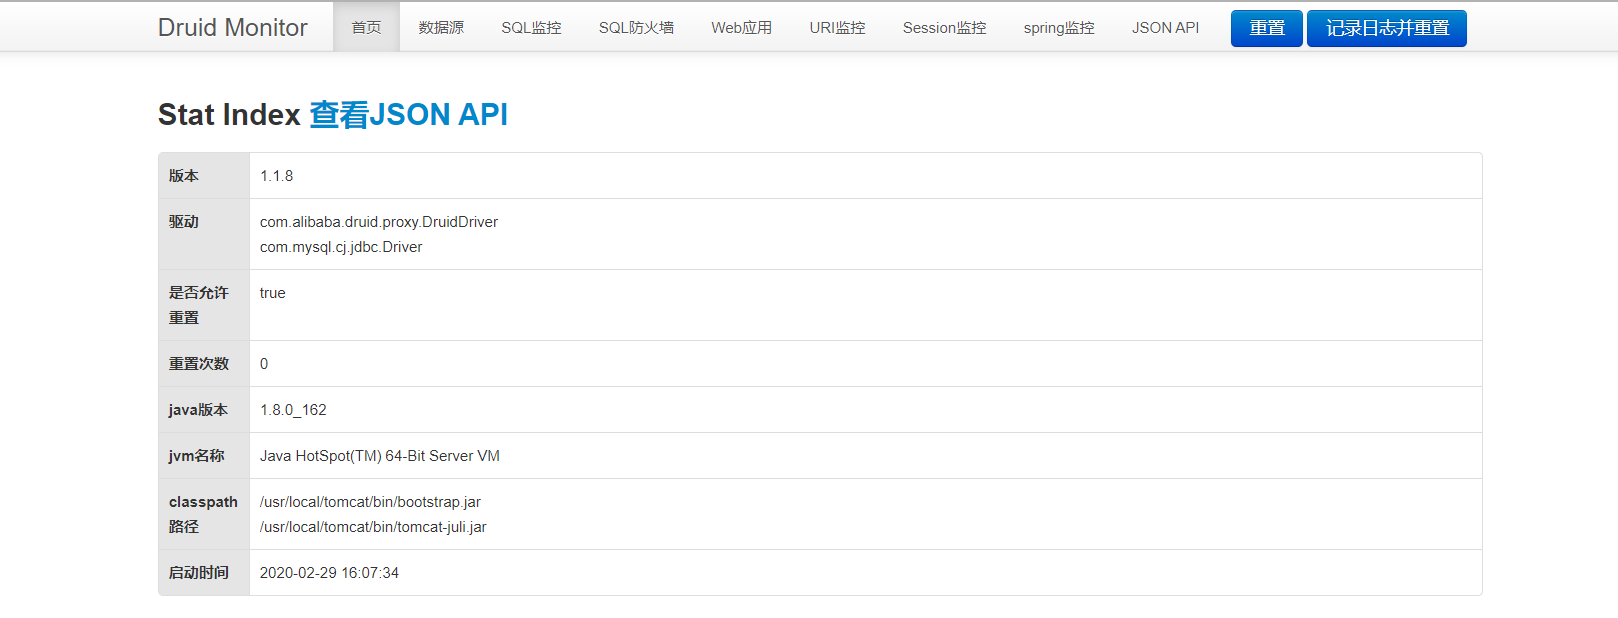
虽然说在springboot里面配置数据源,但是如果我们想要通过网页端访问的话,需要配置以下内容,我们就可以通过访问druid的来查看web的数据状态。
访问地址:http://localhost:8080/druid,然后输入账号密码就可以访问。
package com.lomtom.myblog1.config;

import com.alibaba.druid.pool.DruidDataSource;
import com.alibaba.druid.support.http.StatViewServlet;
import com.alibaba.druid.support.http.WebStatFilter;
import org.springframework.boot.context.properties.ConfigurationProperties;
import org.springframework.boot.web.servlet.FilterRegistrationBean;
import org.springframework.boot.web.servlet.ServletRegistrationBean;
import org.springframework.context.annotation.Bean;
import org.springframework.context.annotation.Configuration;

import javax.sql.DataSource;
import java.util.Arrays;
import java.util.HashMap;
import java.util.Map;

/**
 * User: lomtom
 * Date: 2020/1/4
 * Time: 21:09
 */

@Configuration
public class DruidConfig {


    @ConfigurationProperties(prefix = "spring.datasource")
    @Bean
    public DataSource druid(){
        return new DruidDataSource();
    }

    //设置druid监控
    //1、设置管理后台的servlet
    @Bean
    public ServletRegistrationBean statViewServlet(){
        ServletRegistrationBean registrationBean = new ServletRegistrationBean(new StatViewServlet(), "/druid/*");
        Map<String,String> initParams=new HashMap<>();
        initParams.put("loginUsername","admin");
        initParams.put("loginPassword","admin");
        initParams.put("allow","");
//        initParams.put("deny","");

        registrationBean.setInitParameters(initParams);
        return  registrationBean;
    }
    //2、设置web的监控filter
    @Bean
    public FilterRegistrationBean webStatFilter(){
        FilterRegistrationBean registrationBean = new FilterRegistrationBean();
        registrationBean.setFilter(new WebStatFilter());
        Map<String,String> initParams=new HashMap<>();
        initParams.put("exclusion","*.js,*.css,/druid/*");

        registrationBean.setInitParameters(initParams);
        //添加过滤规则
        registrationBean.setUrlPatterns(Arrays.asList("/*"));
        return  registrationBean;
    }
}访问http://localhost:端口名/druid
4、mapper
在spring里面,还要配置文件进行包扫面,而在springboot里面直接加@Mapper注解即可,springboot会自动注册的。然后直接调用即可。
import com.lomtom.myblog1.entity.User;
import org.apache.ibatis.annotations.*;

import java.util.List;

/**
 * User: lomtom
 * Date: 2020/1/30
 * Time: 17:49
 */

/**
 * 用户的mapper类
 */
@Mapper
public interface UserMapper {

    @Select("select * from user where userName=#{username} or email=#{username}")
    User getUserByUsername(String username);
}
5、测试
在spring boot里,在启动的时候不需要手动配置加载文件,所有的一切,他都会自动配置完成,你只管调用就可以了。
当然,最后的结果就不展示了,他无非就是一句登陆成功,或者登陆失败。
package com.lomtom.myblog1;

import com.lomtom.myblog1.mapper.UserMapper;
import org.junit.jupiter.api.Test;
import org.springframework.beans.factory.annotation.Autowired;
import org.springframework.boot.test.context.SpringBootTest;

@SpringBootTest
class Myblog1ApplicationTests {


    @Autowired
    UserMapper userMapper;

    @Test
    void contextLoads() {
        boolean flag = userMapper.login("admin","123456");
        if (flag){
            System.out.println("登录成功。。。。");
        }
        else{
            System.out.println("登陆失败。。。");
        }
    }
}
作者有话
本文主要介绍了spring与springboot分别怎么整合mybatis的,相信你看了之后,如果你还是初学者,那么问题是免不了的,但是谁不是这么过来的呢,你唯一能做的就是发现问题-找到问题-解决问题,当然,如果你在配置过程中有问题,笔者还是很乐意为你解答的。
而谈及spring与spring boot,spring boot就是spring的拓展,他主要消除了spring复杂繁多的xml配置文件,实现极大程度的自动化配置,所以看到我们在整合mybatis时,配置变得相当简单,当然,最为笔者的建议,你要是会spring boot,一定要明白他其中的自动配置原理,然后再去回顾spring时,你就会惊讶的发现,哦~,原来他是这样的。很多东西就会豁然开朗。