
The author of this article is Huang Haowen
Amazon Cloud Technology Senior Developer Evangelist
In the previous article , we sorted out the theoretical basis behind large model parameter efficient fine-tuning (PEFT) and QLoRA quantification technology. Compared to standard 16-bit model fine-tuning, QLoRA reduces memory usage for large model fine-tuning without performance trade-offs. After exploring the basic theory, we will start to practice.
In this article, we will explore using Amazon SageMaker Studio to quickly and efficiently fine-tune large language models in an interactive environment. We will use the principles of QLoRA and 4-bits bitsandbtyes quantification techniques to fine-tune the Falcon-40B model using Hugging Face PEFT on Amazon SageMaker Studio.
Overview of practical methods
Amazon SageMaker provides two options for launching fully managed notebooks for exploring data and building machine learning (ML) models.
The first option is Amazon SageMaker Studio. This is a fully integrated machine learning development environment (IDE). Users can quickly launch notebooks in Amazon SageMaker Studio, scale up or down the underlying computing resources without interrupting work, and even co-edit and edit notebooks in real time. cooperation. Users can perform all machine learning development steps from a single management panel in Amazon SageMaker Studio, including: building, training, debugging, tracking, deploying, and monitoring models.
The second option is an Amazon SageMaker Notebook instance. This is a fully managed ML computing instance that runs notebooks in the cloud. This method can help users better control notebook configurations.
In this example we will use Amazon SageMaker Studio . There are two main reasons for this choice:
You can take advantage of SageMaker Studio's managed TensorBoard experiment tracking and Hugging Face Transformer's support for TensorBoard;
Amazon SageMaker Studio's Amazon EFS capacity eliminates the need to pre-provision EBS volume sizes. This is helpful in practice given the larger model weights in LLM.
If you want to choose the second option, that's also possible. The example code will also work for notebook instances using the conda_pytorch_p310 kernel.
In addition, please close the notebook instance after using it in Amazon SageMaker Studio to avoid unnecessary additional charges. At the end of this article, there is sample code for deleting and cleaning resources for reference.
The main reference documents for this article come from the following official blog of Amazon Cloud Technology. In order to clarify the details, this article adds more chapters to expand the analysis and code comparison explanation:
https://aws.amazon.com/cn/blogs/machine-learning/interactively-fine-tune-falcon-40b-and-other-llms-on-amazon-sagemaker-studio-notebooks-using-qlora/
Disassembly analysis of model fine-tuning process
1. Start the Amazon SageMaker JumpStart environment
The complete sample code for this experiment can be found at:
https://github.com/aws-samples/amazon-sagemaker-generativeai/blob/main/studio-notebook-fine-tuning/falcon-40b-qlora-finetune-summarize.ipynb
The notebook of the sample code was tested in Amazon SageMaker Studio, the kernel is Python 3 (Data Science 3.0), and the instance is an ml.g5.12xlarge instance.
2. Install the libraries required for model fine-tuning
First, install the required libraries, including the Hugging Face library, and then restart the kernel.
%pip install -q -U torch==2.0.1 bitsandbytes==0.40.2
%pip install -q -U transformers==4.31.0 peft==0.4.0 accelerate==0.21.0
%pip install -q -U datasets py7zr einops tensorboardX


# Add installed cuda runtime to path for bitsandbytes
import os
import nvidia


cuda_install_dir = '/'.join(nvidia.__file__.split('/')[:-1]) + '/cuda_runtime/lib/'
os.environ['LD_LIBRARY_PATH'] =  cuda_install_dir


print("cuda_install_dir: ",cuda_install_dir)
Swipe left to see more
The cuda_install_dir path of my own environment is shown in the following output:

3. Tokenizer of input text and quantification of large models
To train the model, we need to convert the input text into a token ID, which can be done by Hugging Face Transformers Tokenizer. In addition to QLoRA, we will also use the 4-bit precision method of bitsandbytes to quantize the LLM into 4 bits, and follow the method described in the QLoRA paper introduced in the previous article to connect the LoRA adapter to the quantized LLM.
import torch
from transformers import AutoTokenizer, AutoModelForCausalLM, BitsAndBytesConfig


model_id = "tiiuae/falcon-40b"
bnb_config = BitsAndBytesConfig(
    load_in_4bit=True,
    bnb_4bit_use_double_quant=True,
    bnb_4bit_quant_type="nf4",
    bnb_4bit_compute_dtype=torch.bfloat16
)


tokenizer = AutoTokenizer.from_pretrained(model_id)


# Falcon requires you to allow remote code execution. This is because the model uses a new architecture that is not part of transformers yet.
# The code is provided by the model authors in the repo.
model = AutoModelForCausalLM.from_pretrained(model_id, trust_remote_code=True, quantization_config=bnb_config, device_map="auto")
Swipe left to see more

The process of quantizing this Falcon 40B LLM to 4-bit accuracy takes about 5 minutes according to my own actual measurement. As shown in FIG.
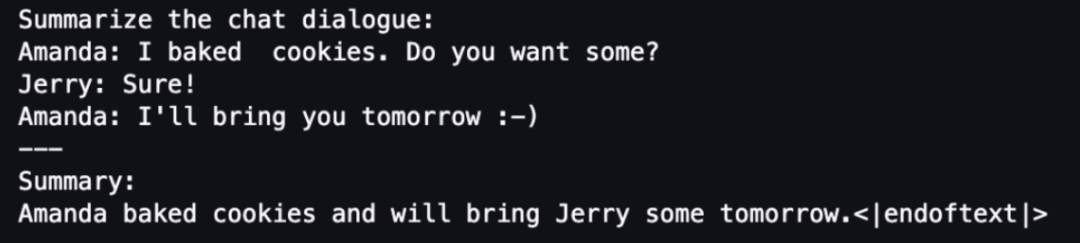
In addition, we also need to set a special mark that represents the end of the sentence. The "|endoftext|" output in the figure below is a special mark that represents the end of the sentence. For details on the settings of Tokenizer, please refer to the Tokenizer class documentation.
"Tokenizer Class Description Document"
https://huggingface.co/docs/transformers/main_classes/tokenizer
# Set the Falcon tokenizer
tokenizer.pad_token = tokenizer.eos_token
print("tokenizer.pad_token: ", tokenizer.pad_token)
Swipe left to see more
The output is shown below:

4. Prepare the model for the LoRA fine-tuning training method
Next it is time to prepare the model for PEFT work.
from peft import prepare_model_for_kbit_training


model.gradient_checkpointing_enable()
model = prepare_model_for_kbit_training(model)
print("model: ", model)
Swipe left to see more
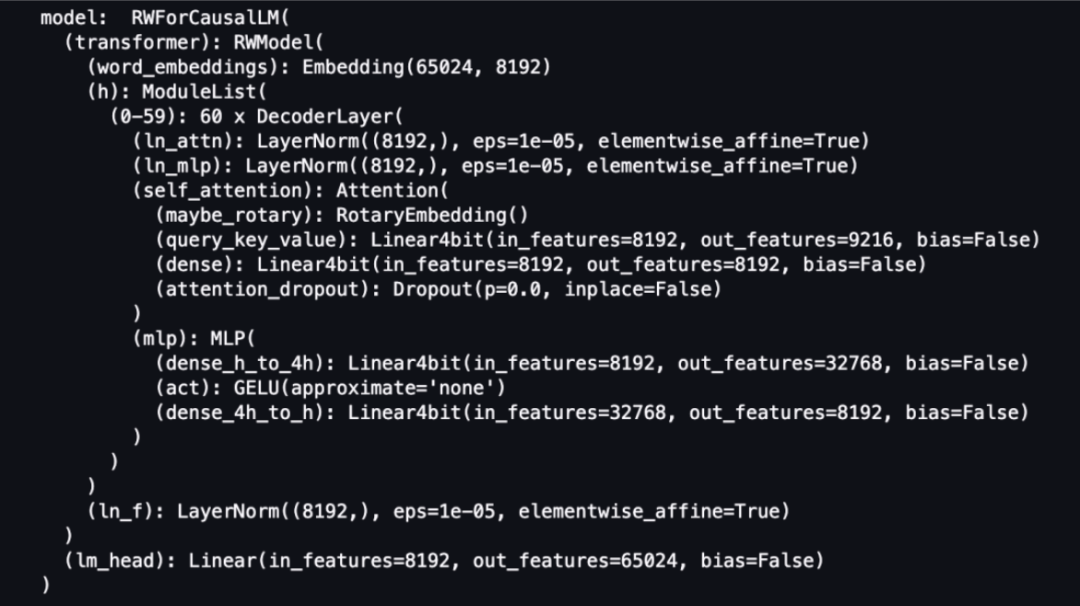
Define a function that prints trainable parameters in the model:
def print_trainable_parameters(model):
    """
    Prints the number of trainable parameters in the model.
    """
    trainable_params = 0
    all_param = 0
    for _, param in model.named_parameters():
        all_param += param.numel()
        if param.requires_grad:
            trainable_params += param.numel()
    print(
        f"trainable params: {trainable_params} || all params: {all_param} || trainable%: {100 * trainable_params / all_param}"
    )
Swipe left to see more
Use PEFT to prepare the model and LoRA parameter configuration details for the LoRA fine-tuning training method:
model, preprocess = clip.load("ViT-B/32")
model.cuda().eval()
input_resolution = model.visual.input_resolution
context_length = model.context_length
vocab_size = model.vocab_size
Swipe left to see more
Pay attention to the last line of the output, which is the number of training parameters:

As can be seen from the above output, the number of all parameters is more than 20.9 billion, and the number of trainable parameters is 55 million, accounting for only 0.26% of all parameters. Due to the significant reduction in training parameters, the expected training time will also be greatly shortened.
5. Load the dataset for fine-tuning the model
To load the samsum dataset, we use the load_dataset () method from the Hugging Face dataset library.
《together》
https://huggingface.co/datasets/samsum
from datasets import load_dataset


# Load dataset from the hub
dataset = load_dataset("samsum")


print(f"Train dataset size: {len(dataset['train'])}")
print(f"Test dataset size: {len(dataset['test'])}")
Swipe left to see more
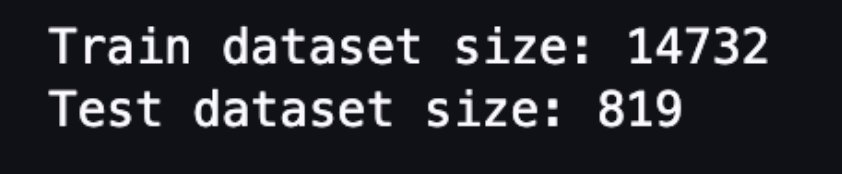
As can be seen from the above output, this data set is not large. There are 14732 pieces of training data and 819 pieces of test data.
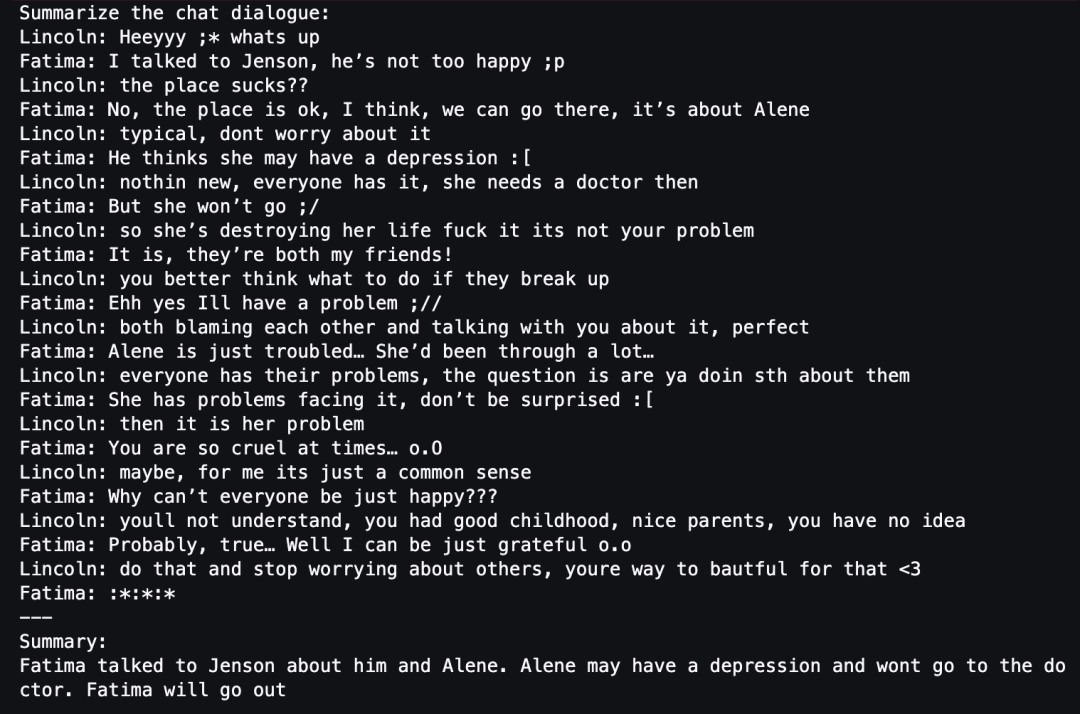
Next, we need to create a prompt word template and load the data set using random samples for summary testing.
from random import randint


# custom instruct prompt start
prompt_template = f"Summarize the chat dialogue:\n{

    {dialogue}}\n---\nSummary:\n{

    {summary}}{

    {eos_token}}"


# template dataset to add prompt to each sample
def template_dataset(sample):
    sample["text"] = prompt_template.format(dialogue=sample["dialogue"],
                                       summary=sample["summary"],
                                       eos_token=tokenizer.eos_token)
    return sample


# apply prompt template per sample
train_dataset = dataset["train"].map(template_dataset, remove_columns=list(dataset["train"].features))


print(train_dataset[randint(0, len(dataset))]["text"])
Swipe left to see more
A sample output of the prompt word template is shown in the figure below.
The following code applies the prompt word template to each sample:
# apply prompt template per sample
test_dataset = dataset["test"].map(template_dataset, remove_columns=list(dataset["test"].features))
Swipe left to see more
Tokenize and chunk the data set:
# tokenize and chunk dataset
lm_train_dataset = train_dataset.map(
    lambda sample: tokenizer(sample["text"]), batched=True, batch_size=24, remove_columns=list(train_dataset.features)
)


lm_test_dataset = test_dataset.map(
    lambda sample: tokenizer(sample["text"]), batched=True, remove_columns=list(test_dataset.features)
)


# Print total number of samples
print(f"Total number of train samples: {len(lm_train_dataset)}")
Swipe left to see more

In order to complete the task of real-time monitoring, we first need to record various indicators of the training process, for example: use an S3 bucket to store the records. Therefore, we also need to create an S3 bucket for this experiment to facilitate us to completely record various indicators during training to TensorBoard:
# bucket = <YOUR-S3-BUCKET>
bucket = "llm-demo-xxxxxx"
log_bucket = f"s3://{bucket}/falcon-40b-qlora-finetune"
log_bucket
Swipe left to see more
If you try to print the output of log_bucket, it will look like this, which defines an S3 bucket:
's3://llm-demo-xxxxxx/falcon-40b-qlora-finetune'Swipe left to see more
6. Recording of fine-tuning training process indicators
The model will then be fine-tuned using the Hugging Face Trainer class, defining the hyperparameters to be used. We also created a DataCollator to populate our inputs and labels. In addition, because you need to consider monitoring the model fine-tuning training process, you can request Hugging Face Transformer to record the fine-tuning training logs to TensorBoard by defining the parameter logging_dir and setting report_to="tensorboard".
import transformers


# We set num_train_epochs=1 simply to run a demonstration


trainer = transformers.Trainer(
    model=model,
    train_dataset=lm_train_dataset,
    eval_dataset=lm_test_dataset,
    args=transformers.TrainingArguments(
        per_device_train_batch_size=8,
        per_device_eval_batch_size=8,
        logging_dir=log_bucket,
        logging_steps=2,
        num_train_epochs=1,
        learning_rate=2e-4,
        bf16=True,
        save_strategy = "no",
        output_dir="outputs",
        report_to="tensorboard",
    ),
    data_collator=transformers.DataCollatorForLanguageModeling(tokenizer, mlm=False),
)
model.config.use_cache = False  # silence the warnings. Please re-enable for inference!


print("model:", model)
Swipe left to see more
After completing the above configuration, you can officially start fine-tuning training. The startup code is simple and looks like this:
# Start training
trainer.train()
Teardown analysis of model fine-tuning monitoring
1. Monitor GPU usage in real time
After the previous settings are completed, we can monitor the fine-tuning process in real time. To monitor GPU usage in real time, we can run the nvidia-smi command directly from the kernel's container. To launch a terminal running on an image container, simply select the terminal icon at the top of your notebook.

We can use the Linux watch command to run nvidia-smi repeatedly every half second:
watch -n 0.5 nvidia-smiSwipe left to see more
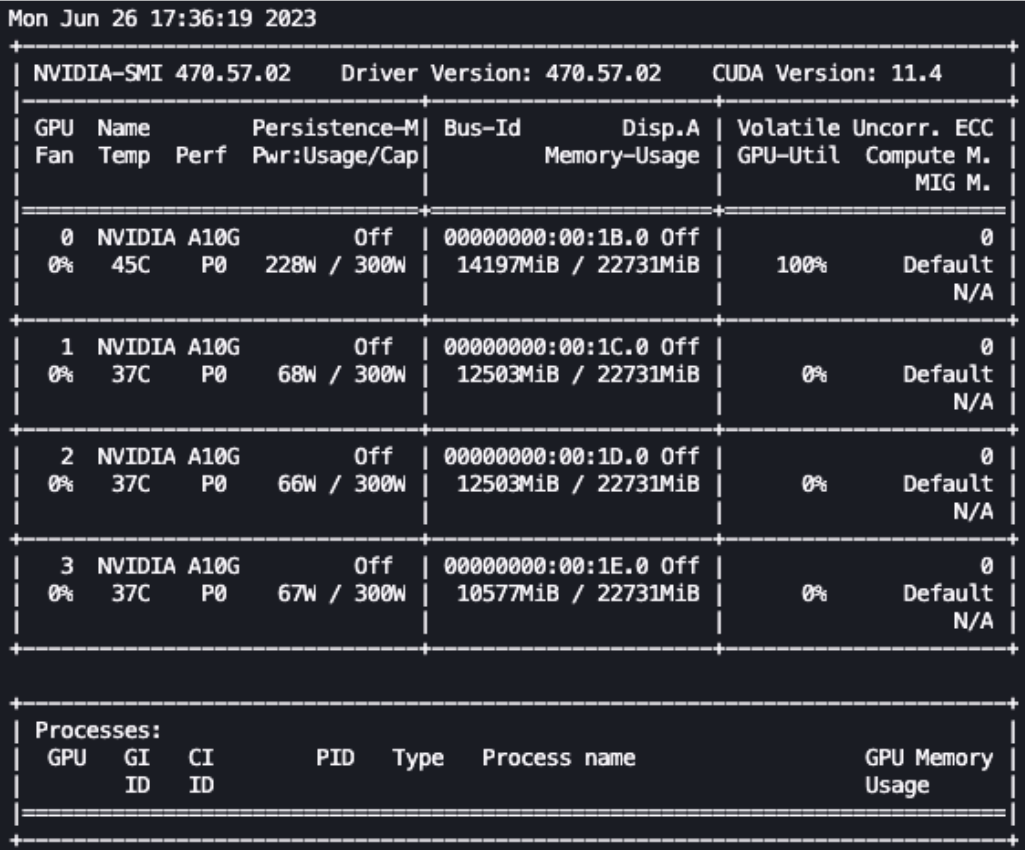
In the animation above, we can see that the model weights are distributed across 4 GPUs. As the layers are processed serially, the computational load is distributed among these GPUs.
2. Real-time monitoring of training indicators for model fine-tuning
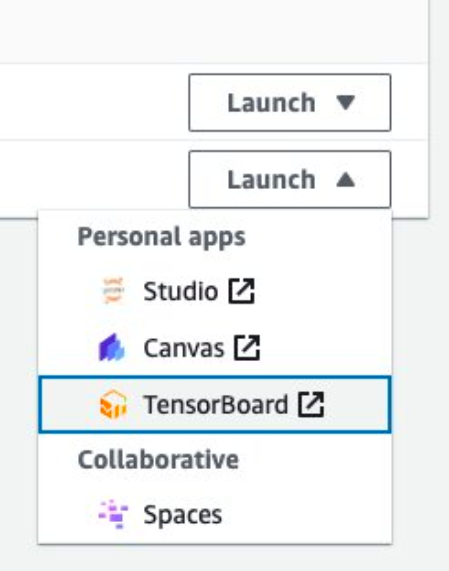
In order to monitor the training indicators during the model fine-tuning process, we will write the TensorBoard logs to the S3 bucket that has been configured previously. TensorBoard for SageMaker Studio domain users can be launched from the SageMaker console, as shown in the screenshot below:
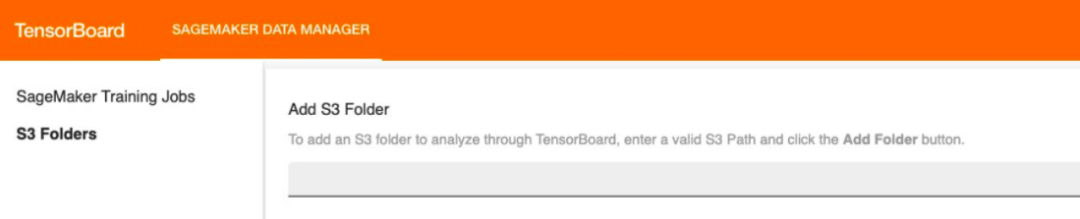
After TensorBoard is loaded, you can specify Hugging Face transformer to write the training log to the specified S3 bucket to view training and evaluation indicators, as shown in the figure below.
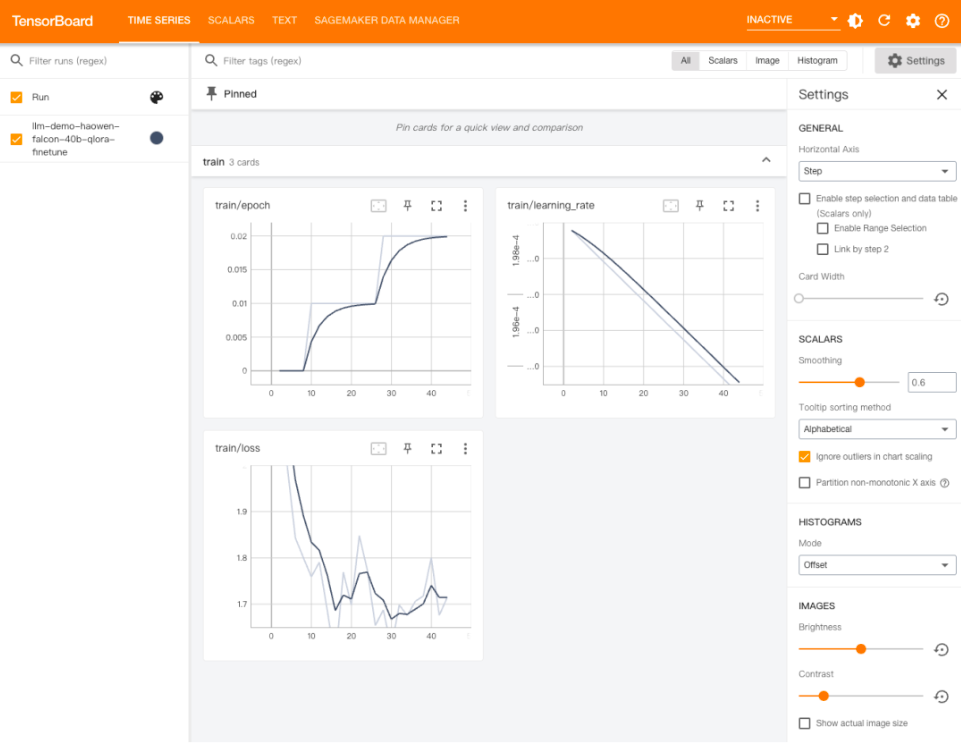
After the above configuration is completed, you can use the "Time Series" menu of TensorBoard to monitor the changes of various indicators during the fine-tuning model training process with the training time, including: epoch, learning rate, loss function )etc.
Evaluation and generation results after model fine-tuning
After the model completes fine-tuning training, we can systematically evaluate the fine-tuned large model or directly generate results. Since the evaluation of the model is another grand topic, this article will temporarily skip this topic and leave it to a later topic. After this article, we will mainly focus on the result generation examples of the fine-tuned model.
First, load the previously split samsum test data set and try to use random samples for LLM summary testing:
# Load dataset from the hub
test_dataset = load_dataset("samsum", split="test")


# select a random test sample
sample = test_dataset[randint(0, len(test_dataset))]


# format sample
prompt_template = f"Summarize the chat dialogue:\n{

    {dialogue}}\n---\nSummary:\n"


test_sample = prompt_template.format(dialogue=sample["dialogue"])


print(test_sample)
Swipe left to see more

Next, tokenize the input data:
input_ids = tokenizer(test_sample, return_tensors="pt").input_idsSwipe left to see more
Pass the tokenized input data to the fine-tuned LLM and obtain the output result of the LLM summary:
#set the tokens for the summary evaluation
tokens_for_summary = 30
output_tokens = input_ids.shape[1] + tokens_for_summary


outputs = model.generate(inputs=input_ids, do_sample=True, max_length=output_tokens)
gen_text = tokenizer.batch_decode(outputs)[0]
print(gen_text)
Swipe left to see more
Interested students can compare the summary results of LLM output before and after model fine-tuning to compare whether the fine-tuned model has improved in accuracy and completeness.
If you are satisfied with the performance of the model, you can save the model, as shown in the following code:
trainer.save_model("path_to_save")Swipe left to see more
Or deploy the model to a dedicated SageMaker endpoint. For documentation on deploying endpoints, please refer to:
https://aws.amazon.com/blogs/machine-learning/deploy-falcon-40b-with-large-model-inference-dlcs-on-amazon-sagemaker/
Deletion and cleanup of resources
After the experiment is completed, please remember to delete and clean up the resources to avoid unnecessary additional costs. The resources that need to be cleaned are divided into three parts, as follows:
1) Close the SageMaker Studio instance
https://docs.aws.amazon.com/sagemaker/latest/dg/notebooks-run-and-manage-shut-down.html
2) Close your TensorBoard application
https://docs.aws.amazon.com/sagemaker/latest/dg/tensorboard-on-sagemaker.html#debugger-htb-delete-app
3) Clear the Hugging Face cache directory. The reference command is as follows:
rm -R ~/.cache/huggingface/hubSwipe left to see more
Summarize
In this article, we explore using Amazon SageMaker Studio to quickly and efficiently fine-tune the Falcon 40B large language model in an interactive environment. We used the bitsandbtyes quantification technology principles of QLoRA and 4-bits to fine-tune the Falcon-40B model using Hugging Face PEFT on Amazon SageMaker Studio.
As the twelfth article of "Generative AI New World", this article has unknowingly accompanied readers who love the field of generative AI from early spring to midsummer. As we gradually learn more about generative AI knowledge, the content of subsequent articles in this series will expand into more in-depth professional fields.
The current plan has three general directions:
1) In-depth code practice direction. For example, use code to fully explain the working principle of the Diffusion model, or the complete architecture of the Transformer, etc.;
2) Model deployment and training optimization direction. For example, try to interpret the latest progress in different model optimization directions such as LMI, DeepSpeed, Accelerate, FlashAttention, etc.;
3) Model quantification practice direction. For example, GPTQ, bitsandbtyes and other cutting-edge model quantification principles and practices. Stay tuned.

Please continue to follow the "Amazon Cloud Developer" WeChat official account to learn more about technology sharing and cloud development trends for developers!
The author of this article

Huang Haowen
Senior developer evangelist at Amazon Cloud Technology, focusing on AI/ML, Data Science, etc. He has more than 20 years of experience in architecture design, technology and entrepreneurial management in industries such as telecommunications, mobile Internet and cloud computing. He has worked for Microsoft, Sun Microsystems, China Telecom and other companies, focusing on providing services to corporate customers such as games, e-commerce, media and advertising. Solution consulting services such as AI/ML, data analysis and enterprise digital transformation.

The star will not get lost and development will be faster!
After following, remember to star "Amazon Cloud Developer"

I heard, click the 4 buttons below
You won’t encounter bugs!
