10.7.2. Preparations
Set ip information
nmcli con add ifname ens33 con-name ens33 type ethernet ipv4.method manual \
ipv4.address 192.158.46.150/24 ipv4.gateway 192.168.46.1
Note
nmcli modified ip I'm using, of course, human modification.
10.7.3. Ansible configuration
10.7.3.1. Ansible installation
[root@localhost ~]# yum install ansible
10.7.3.2. Adding Host
Need to add the following to / etc / ansible / hosts file.
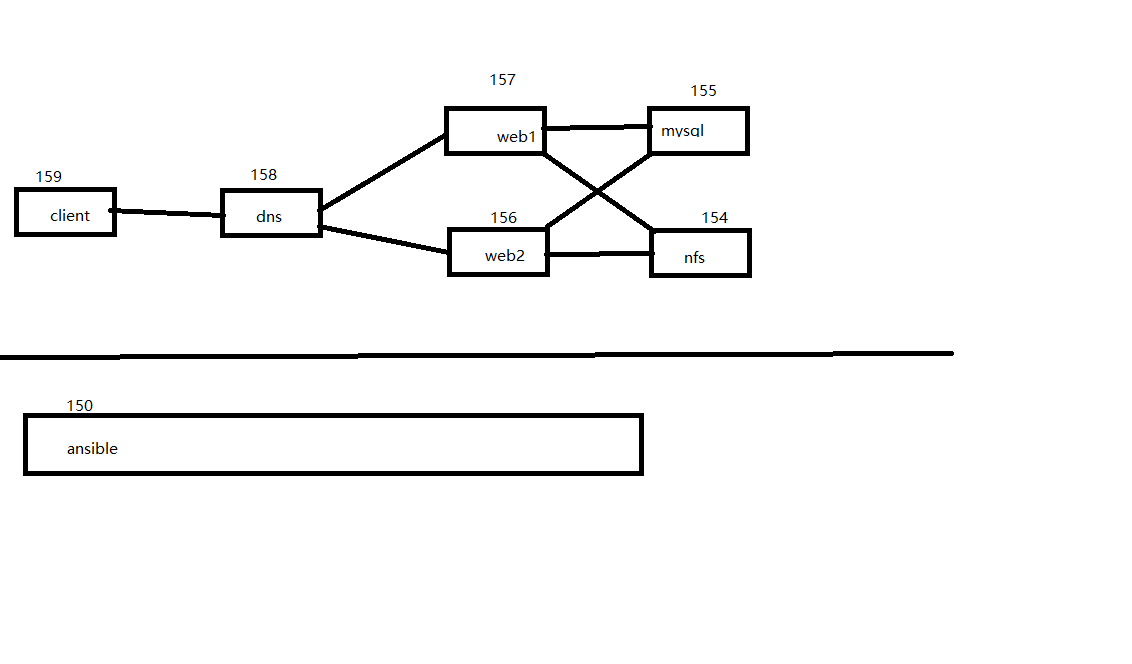
[client]
192.168.46.159
[dns]
192.168.46.158
[web]
192.168.46.157
192.168.46.156
[db]
192.168.46.155
[Nfs]
192.168.46.154
[self]
192.168.46.150
10.7.3.3. Configuring password-free login
Here I have to write a script that automatically password-free login script before, refer to my blog
[root@localhost ~]# cat hosts.txt
192.168.46.150 root oracle
192.168.46.151 root oracle
192.168.46.152 root oracle
192.168.46.153 root oracle
192.168.46.154 root oracle
192.168.46.155 root oracle
192.168.46.156 root oracle
192.168.46.157 root oracle
192.168.46.158 root oracle
192.168.46.159 root oracle
192.168.46.160 root oracle
[root@localhost ~]# cat mima.sh
#!/bin/bash
#================================================
#FileName :expect_ssh.sh
#Author :zhaojiedi
#Description:
#DateTime :2018-01-05 08:26:06
#Version :V1.0
#Other :
#================================================
host_username_password_file=hosts.txt
# install expect
rpm -q expect &>/dev/null || yum install -yq expect &>/dev/null
# create id_rsa.pub file
pubkey=~/.ssh/id_rsa.pub
if [ ! -e "$pubkey" ] ; then
ssh-keygen -P "" -t rsa -f ~/.ssh/id_rsa
be
while read host username password ; do
con=${username}"@"${host}
echo $password
expect <<EOF
set timeout 20
spawn ssh-copy-id $con
expect {
"yes/no" { send "yes\n" ; exp_continue }
"password:" { send "${password}\n"; exp_continue }
}
EOF
done < $host_username_password_file
# The next script to automatically copy the public key work
[root@localhost ~]# bash mima.sh
# Test case
[root@localhost ~]# ssh 192.168.46.151 'ip a show ens33'
10.7.3.4. Set the host name (optional)
I have here the whole machine is just cloned virtual machine, in order to facilitate the management set down the host name to prevent misuse.
# Create a script to set the hostname
[root@localhost ~]# vim set_hostname.sh
[root@localhost ~]# cat set_hostname.sh
#!/bin/bash
echo "start"
hostname
name=centos-$(ip a show ens33 |grep 'inet.*ens33' | sed -r -n 's@.*\.([0-9]{1,3})/.*@\1@p').linuxpanda.tech
echo $name
hostnamectl set-hostname $name
echo "end"
[root@centos-localhost ~]# ansible all -m script -a '/root/set_hostname.sh'
The script also set ip ansible host.
10.7.3.5. Firewall and selinux closed
# Turn off the firewall
[root@centos-150 ~]# ansible all -m service -a 'name=firewalld enabled=no'
[root@centos-150 ~]# ansible all -m service -a 'name=firewalld state=stopped'
[root@centos-150 ~]# ansible all -m shell -a 'sed -i -r 's@SELINUX=.*@SELINUX=disabled@' /etc/sysconfig/selinux'
[root@centos-150 ~]# ansible all -m shell -a 'setenforce 0'
Note
If the original selinux is disabled, will be reported using setenforce 0 errors, do not ignore it.
10.7.4. Dns host settings
10.7.4.1. Dns configuration
[root@centos-158 ~]# yum install bind bind-utils
[root@centos-158 ~]# vim /etc/named.conf
# Comment below 5 lines
// listen-on port 53 { 127.0.0.1; };
// listen-on-v6 port 53 { ::1; };
// allow-query { localhost; };
// dnssec-enable yes;
// dnssec-validation yes;
[root@centos-158 ~]# vim /etc/named.rfc1912.zones
Semicolon # add the following note after
zone "linuxpanda.tech" IN {
type master;
file "linuxpanda.tech.zone";
};
[root@centos-158 ~]# cd /var/named/
[root@centos-158 named]# cp -a named.localhost linuxpanda.tech.zone
[root@centos-158 named]# vim linuxpanda.tech.zone
[root@centos-158 named]# cat linuxpanda.tech.zone
$TTL 1D
@ IN SOA ns1 admin (
0 ; serial
1D ; refresh
1H ; retry
1W ; expire
3H ) ; minimum
NS ns1
ns1 A 192.168.46.158
A web 192.168.46.157
A web 192.168.46.156
www CNAME web
10.7.4.2. Dns test the machine
[root@centos-158 named]# dig www.linuxpanda.tech @localhost
; <<>> DiG 9.9.4-RedHat-9.9.4-51.el7_4.2 <<>> www.linuxpanda.tech @localhost
;; global options: +cmd
;; Got answer:
;; ->>HEADER<<- opcode: QUERY, status: NOERROR, id: 57957
;; flags: qr aa rd ra; QUERY: 1, ANSWER: 3, AUTHORITY: 1, ADDITIONAL: 2
;; OPT PSEUDOSECTION:
; EDNS: version: 0, flags:; udp: 4096
;; QUESTION SECTION:
;www.linuxpanda.tech. IN A
;; ANSWER SECTION:
www.linuxpanda.tech. 86400 IN CNAME web.linuxpanda.tech.
web.linuxpanda.tech. 86400 IN A 192.168.46.156
web.linuxpanda.tech. 86400 IN A 192.168.46.157
;; AUTHORITY SECTION:
linuxpanda.tech. 86400 IN NS ns1.linuxpanda.tech.
;; ADDITIONAL SECTION:
ns1.linuxpanda.tech. 86400 IN A 192.168.46.158
;; Query time: 0 msec
;; SERVER: 127.0.0.1#53(127.0.0.1)
;; WHEN: Sun Feb 18 21:05:05 CST 2018
;; MSG SIZE rcvd: 132
10.7.5. Client host test
# Modify the client's dns to point to our own dns host
[root@centos-159 ~]# nmcli con modify ens33 ipv4.dns 192.168.46.158
# Restart the network, or reload
[root@centos-159 ~]# service network restart
# Ping at our web host to see if it can resolve the two ip 157,156
[root@centos-159 ~]# ping www.linuxpanda.tech
PING web.linuxpanda.tech (192.168.46.157) 56(84) bytes of data.
64 bytes from 192.168.46.157 (192.168.46.157): icmp_seq=1 ttl=64 time=0.330 ms
64 bytes from 192.168.46.157 (192.168.46.157): icmp_seq=2 ttl=64 time=0.255 ms
64 bytes from 192.168.46.157 (192.168.46.157): icmp_seq=3 ttl=64 time=0.292 ms
[root@centos-159 ~]# ping www.linuxpanda.tech
PING web.linuxpanda.tech (192.168.46.156) 56(84) bytes of data.
64 bytes from 192.168.46.156 (192.168.46.156): icmp_seq=1 ttl=64 time=0.421 ms
Note
ping command to test a bit unprofessional, require multiple tests to two addresses appear, there is not installed dig tool, after all clients.
10.7.6. Nfs Host Configuration
10.7.6.1. Adding users
[root@centos-154 ~]# groupadd -g 48 apache
[root@centos-154 ~]# useradd -u 48 -g 48 apache
[root@centos-154 ~]# id apache
uid=48(apache) gid=48(apache) groups=48(apache)
10.7.6.2. Modify permission
[root@centos-154 ~]# chown -R apache.apache /data/html
10.7.6.3. Sharing out
[root@centos-154 ~]# yum install nfs-utils
[root@centos-154 ~]# vim /etc/exports
[root@centos-154 ~]# cat /etc/exports
/ Data / html 192.168.46.156 (PC all_squash, anonuid = apache, anongid = apache)
/ Data / html 192.168.46.156 (PC all_squash, anonuid = apache, anongid = apache)
[root@centos-154 ~]# systemctl restart nfsd
[root@centos-154 ~]# exportfs -v
/data/html 192.168.46.156(rw,sync,wdelay,hide,no_subtree_check,anonuid=48,anongid=48,sec=sys,secure,root_squash,all_squash)
/data/html 192.168.46.157(rw,sync,wdelay,hide,no_subtree_check,anonuid=48,anongid=48,sec=sys,secure,root_squash,all_squash)
10.7.7. Mysql Host Configuration
10.7.7.1. Installing the software
[root@centos-155 ~]# yum install mariadb-server mariadb
10.7.7.2. Start Service
[root@centos-155 ~]# systemctl start mariadb
[root@centos-155 ~]# netstat -tunlp |grep 3306
tcp 0 0 0.0.0.0:3306 0.0.0.0:* LISTEN 13680/mysqld
10.7.7.3. Adding application users
[root@centos-155 ~]# mysql -u root -p
Enter password:
Welcome to the MariaDB monitor. Commands end with ; or \g.
Your MariaDB connection id is 10
Server version: 5.5.56-MariaDB MariaDB Server
Copyright (c) 2000, 2017, Oracle, MariaDB Corporation Ab and others.
Type 'help;' or '\h' for help. Type '\c' to clear the current input statement.
MariaDB [(none)]> create database web ;
Query OK, 1 row affected (0.00 sec)
MariaDB [(none)]> grant all on web.* to web@'192.168.46.%' identified by 'oracle';
Query OK, 0 rows affected (0.05 sec)
10.7.7.4. Security Initialization
[root@centos-155 ~]# mysql_secure_installation
10.7.8. Web Host Configuration
Here are two hosts.
10.7.8.1. Installing the software
# Installation
[root@centos-150 ~]# ansible web -m yum -a 'name=httpd,php-fpm,php-mysql,mod_fcgid state=installed'
# Start Service
[root@centos-150 ~]# ansible web -m service -a 'name=httpd state=started'
[root@centos-150 ~]# ansible web -m service -a 'name=php-fpm state=started'
10.7.8.2. Mount directory
# Install the necessary mount related software
[root@centos-156 httpd]# yum install nfs-utils cifs-utils
# Start rpc service
[root@centos-156 httpd]# systemctl restart rpcbind
# View Export situation of remote
[root@centos-156 httpd]# showmount -e 192.168.46.154
Export list for 192.168.46.154:
/data/html 192.168.46.157,192.168.46.156
# Mount
[root@centos-156 httpd]# mount 192.168.46.154:/data/html /var/www/html
# Automatically mount
[root@centos-156 httpd]# tail -n 1 /etc/mtab
192.168.46.154:/data/html /var/www/html nfs4 rw,relatime,vers=4.1,rsize=65536,wsize=65536,namlen=255,hard,proto=tcp,port=0,timeo=600,retrans=2,sec=sys,clientaddr=192.168.46.156,local_lock=none,addr=192.168.46.154 0 0
[root@centos-156 httpd]# tail -n 1 /etc/mtab >> /etc/fstab
# View the sample pages
[root@centos-156 httpd]# cat /var/www/html/index.html
hellow world
10.7.8.3. Configuration httpd
This section requires two machines have to do it again.
# Php download a sample of the page
[root@centos-156 httpd]# wget download.linuxpanda.tech/lamp/index.php.sample -O /var/www/html/index.php
# Edit the next page php sample database connection user and password
[root@centos-156 httpd]# vim /var/www/html/index.php
[root@centos-156 httpd]# cat /var/www/html/index.php
<?php
$mysqli=new mysqli("192.168.46.155","web","oracle");
if(mysqli_connect_errno()){
echo "fail";
$mysqli=null;
exit;
}
echo "success";
$mysqli->close();
?>
# Fcgi editor
[root@centos-156 conf.d]# vim fcgid.conf
Add the following line # 3
DirectoryIndex index.php
ProxyRequests Off
ProxyPassMatch ^/(.*\.php)$ fcgi://127.0.0.1:9000/var/www/html/$1
# Network Service Restart
[root@centos-156 conf.d]# service httpd restart
10.7.8.4. The machine test
This section requires two machines have to do it again.
[root@centos-156 conf.d]# curl localhost/index.php
Success
10.7.9. Client testing
[root@centos-159 ~]# curl http://www.linuxpanda.tech/index.php
Success
# 156 of the web stopped
[root@centos-159 ~]# curl http://www.linuxpanda.tech/index.php
Success
# 157 of web then stopped
[root@centos-159 ~]# curl http://www.linuxpanda.tech/index.php
curl: (7) Failed connect to www.linuxpanda.tech:80; Connection refused
10.7.10 Summary
This work looks very simple, but doing it is still encountered some trouble.
Areas for improvement:
dns resolution too unstable, if web1 stopped, dns also possible to resolve this stopped the host, it will lead web can not access.
Examples of mysql later learned from a master can consider perfect.
lamp is not used under acceleration xcache
This exercise is to use yum to install the lamp environment, consider using the compiler installation method.
Nfs share data, in essence, is a disk of data, consider using rsync instead of nfs.
Data files can be placed on the consideration raid, to provide file access performance