可以并发多个线程,每条线程并行执行不同的任务。
多线程是多任务的一种特别的形式,但多线程使用了更小的资源开销。
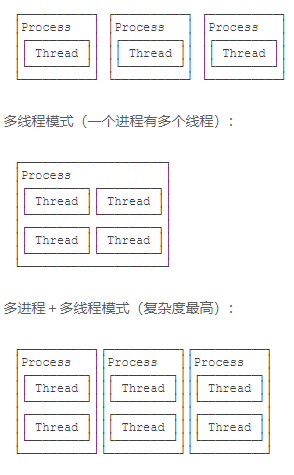
这里定义和线程相关的另一个术语 - 进程:一个进程包括由操作系统分配的内存空间,包含一个或多个线程。一个线程不能独立的存在,它必须是进程的一部分。一个进程一直运行,直到所有的非守护线程都结束运行后才能结束。
多线程能满足程序员编写高效率的程序来达到充分利用 CPU 的目的。
进程和线程的关系就是:一个进程可以包含一个或多个线程,但至少会有一个线程。
创建新线程
Java语言内置了多线程支持。当Java程序启动的时候,实际上是启动了一个JVM进程,然后,JVM启动主线程来执行main()方法。在main()方法中,又可以启动其他线程。
Java 提供了三种创建线程的方法:
- 通过实现 Runnable 接口;
- 通过继承 Thread 类本身;
- 通过 Callable 和 Future 创建线程。
通过实现 Runnable 接口来创建线程
创建一个线程,最简单的方法是创建一个实现 Runnable 接口的类。
为了实现 Runnable,一个类只需要执行一个方法调用 run(),声明如下:
public void run()
你可以重写该方法,重要的是理解的 run() 可以调用其他方法,使用其他类,并声明变量,就像主线程一样。
在创建一个实现 Runnable 接口的类之后,你可以在类中实例化一个线程对象。
Thread 定义了几个构造方法,下面的这个是我们经常使用的:
Thread(Runnable threadOb,String threadName);
这里,threadOb 是一个实现 Runnable 接口的类的实例,并且 threadName 指定新线程的名字。
新线程创建之后,你调用它的 start() 方法它才会运行。
void start();
下面是一个创建线程并开始让它执行的实例:
class RunnableDemo implements Runnable {
   private Thread t;
   private String threadName;

   RunnableDemo( String name) {
      threadName = name;
      System.out.println("Creating " +  threadName );
   }

   public void run() {
      System.out.println("Running " +  threadName );
      try {
         for(int i = 4; i > 0; i--) {
            System.out.println("Thread: " + threadName + ", " + i);
            // 让线程睡眠一会
            Thread.sleep(50);
         }
      }catch (InterruptedException e) {
         System.out.println("Thread " +  threadName + " interrupted.");
      }
      System.out.println("Thread " +  threadName + " exiting.");
   }

   public void start () {
      System.out.println("Starting " +  threadName );
      if (t == null) {
         t = new Thread (this, threadName);
         t.start ();
      }
   }
}

public class TestThread {

   public static void main(String args[]) {
      RunnableDemo R1 = new RunnableDemo( "Thread-1");
      R1.start();

      RunnableDemo R2 = new RunnableDemo( "Thread-2");
      R2.start();
   }
}
编译以上程序运行结果如下:

Creating Thread-1
Starting Thread-1
Creating Thread-2
Starting Thread-2
Running Thread-1
Thread: Thread-1, 4
Running Thread-2
Thread: Thread-2, 4
Thread: Thread-1, 3
Thread: Thread-2, 3
Thread: Thread-1, 2
Thread: Thread-2, 2
Thread: Thread-1, 1
Thread: Thread-2, 1
Thread Thread-1 exiting.
Thread Thread-2 exiting.
通过继承Thread来创建线程
创建一个线程的第二种方法是创建一个新的类,该类继承 Thread 类,然后创建一个该类的实例。
继承类必须重写 run() 方法,该方法是新线程的入口点。它也必须调用 start() 方法才能执行。
该方法尽管被列为一种多线程实现方式,但是本质上也是实现了 Runnable 接口的一个实例。
class ThreadDemo extends Thread {
   private Thread t;
   private String threadName;

   ThreadDemo( String name) {
      threadName = name;
      System.out.println("Creating " +  threadName );
   }

   public void run() {
      System.out.println("Running " +  threadName );
      try {
         for(int i = 4; i > 0; i--) {
            System.out.println("Thread: " + threadName + ", " + i);
            // 让线程睡眠一会
            Thread.sleep(50);
         }
      }catch (InterruptedException e) {
         System.out.println("Thread " +  threadName + " interrupted.");
      }
      System.out.println("Thread " +  threadName + " exiting.");
   }

   public void start () {
      System.out.println("Starting " +  threadName );
      if (t == null) {
         t = new Thread (this, threadName);
         t.start ();
      }
   }
}

public class TestThread {

   public static void main(String args[]) {
      ThreadDemo T1 = new ThreadDemo( "Thread-1");
      T1.start();

      ThreadDemo T2 = new ThreadDemo( "Thread-2");
      T2.start();
   }
}

编译以上程序运行结果如下:

Creating Thread-1
Starting Thread-1
Creating Thread-2
Starting Thread-2
Running Thread-1
Thread: Thread-1, 4
Running Thread-2
Thread: Thread-2, 4
Thread: Thread-1, 3
Thread: Thread-2, 3
Thread: Thread-1, 2
Thread: Thread-2, 2
Thread: Thread-1, 1
Thread: Thread-2, 1
Thread Thread-1 exiting.
Thread Thread-2 exiting.
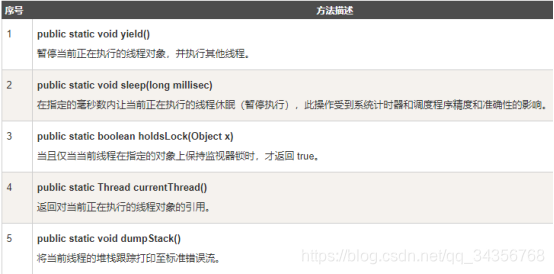
Thread 方法
下表列出了Thread类的一些重要方法:
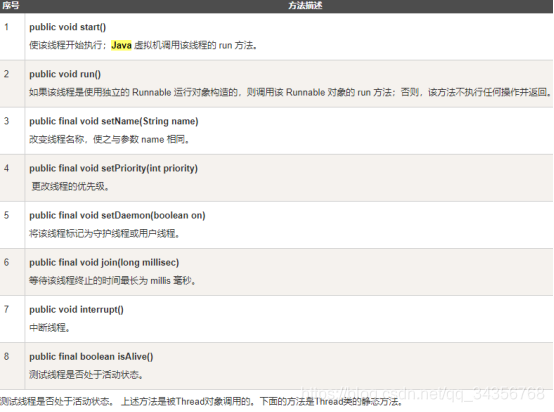
测试线程是否处于活动状态。 上述方法是被Thread对象调用的。下面的方法是Thread类的静态方法。
如下的ThreadClassDemo 程序演示了Thread类的一些方法:
DisplayMessage.java 文件代码:
// 文件名 : DisplayMessage.java
// 通过实现 Runnable 接口创建线程
public class DisplayMessage implements Runnable {
   private String message;

   public DisplayMessage(String message) {
      this.message = message;
   }

   public void run() {
      while(true) {
         System.out.println(message);
      }
   }
}

GuessANumber.java 文件代码:
// 文件名 : GuessANumber.java
// 通过继承 Thread 类创建线程

public class GuessANumber extends Thread {
   private int number;
   public GuessANumber(int number) {
      this.number = number;
   }

   public void run() {
      int counter = 0;
      int guess = 0;
      do {
         guess = (int) (Math.random() * 100 + 1);
         System.out.println(this.getName() + " guesses " + guess);
         counter++;
      } while(guess != number);
      System.out.println("** Correct!" + this.getName() + "in" + counter + "guesses.**");
   }
}

ThreadClassDemo.java 文件代码:
// 文件名 : ThreadClassDemo.java
public class ThreadClassDemo {

   public static void main(String [] args) {
      Runnable hello = new DisplayMessage("Hello");
      Thread thread1 = new Thread(hello);
      thread1.setDaemon(true);
      thread1.setName("hello");
      System.out.println("Starting hello thread...");
      thread1.start();

      Runnable bye = new DisplayMessage("Goodbye");
      Thread thread2 = new Thread(bye);
      thread2.setPriority(Thread.MIN_PRIORITY);
      thread2.setDaemon(true);
      System.out.println("Starting goodbye thread...");
      thread2.start();

      System.out.println("Starting thread3...");
      Thread thread3 = new GuessANumber(27);
      thread3.start();
      try {
         thread3.join();
      }catch(InterruptedException e) {
         System.out.println("Thread interrupted.");
      }
      System.out.println("Starting thread4...");
      Thread thread4 = new GuessANumber(75);

      thread4.start();
      System.out.println("main() is ending...");
   }
}

运行结果如下,每一次运行的结果都不一样。

Starting hello thread...
Starting goodbye thread...
Hello
Hello
Hello
Hello
Hello
Hello
Goodbye
Goodbye
Goodbye
Goodbye
Goodbye
.......
通过 Callable 和 Future 创建线程
-
创建 Callable 接口的实现类,并实现 call() 方法,该 call() 方法将作为线程执行体,并且有返回值。
-
创建 Callable 实现类的实例,使用 FutureTask 类来包装 Callable 对象,该 FutureTask 对象封装了该 Callable 对象的 call() 方法的返回值。
-
使用 FutureTask 对象作为 Thread 对象的 target 创建并启动新线程。
-
调用 FutureTask 对象的 get() 方法来获得子线程执行结束后的返回值。
扫描二维码关注公众号,回复: 10797273 查看本文章
实例
public class CallableThreadTest implements Callable<Integer> {
    public static void main(String[] args)
    {
        CallableThreadTest ctt = new CallableThreadTest();
        FutureTask<Integer> ft = new FutureTask<>(ctt);
        for(int i = 0;i < 100;i++)
        {
            System.out.println(Thread.currentThread().getName()+" 的循环变量i的值"+i);
            if(i==20)
            {
                new Thread(ft,"有返回值的线程").start();
            }
        }
        try
        {
            System.out.println("子线程的返回值:"+ft.get());
        } catch (InterruptedException e)
        {
            e.printStackTrace();
        } catch (ExecutionException e)
        {
            e.printStackTrace();
        }

    }
    @Override
    public Integer call() throws Exception
    {
        int i = 0;
        for(;i<100;i++)
        {
            System.out.println(Thread.currentThread().getName()+" "+i);
        }
        return i;
    }
}
对比
- 采用实现 Runnable、Callable 接口的方式创建多线程时,线程类只是实现了 Runnable 接口或 Callable 接口,还可以继承其他类。
- 使用继承 Thread 类的方式创建多线程时,编写简单,如果需要访问当前线程,则无需使用 Thread.currentThread() 方法,直接使用 this 即可获得当前线程。
有效利用多线程的关键是理解程序是并发执行而不是串行执行的。例如:程序中有两个子系统需要并发执行,这时候就需要利用多线程编程。
通过对多线程的使用,可以编写出非常高效的程序。不过请注意,如果你创建太多的线程,程序执行的效率实际上是降低了,而不是提升了。
请记住,上下文的切换开销也很重要,如果你创建了太多的线程,CPU 花费在上下文的切换的时间将多于执行程序的时间!
