感谢:
《Android进阶解密 - 第四章》
今天开始学习四大组件的启动工作。从Activity开始。之前有写过,但是那是基于Andorid7.0的源码,7.0和8.0的最大的区别就是7.0没有使用AIDL,其通信类用 ActivityManagerNative,而8.0用了AIDL后,将AMN封装了起来。
Activity的启动分为两种:
- 根Activity的启动
按下桌面的程序快捷图标,启动应用程序的第一个Activity的过程,因此根Activity的启动过程也可以理解为应用程序的启动过程。 - 普通Activity的启动
程序内从一个Activity打开另外一个Activity的过程的启动。
一般情况下我们说的Activity的启动就是指第一种:根Activity的启动。所以我们就来分析根Activity的启动流程。
根Activity启动的过程很复杂,总体可以分为三个部分:
- Launcher请求AMS的过程
- AMS到ApplicationThread的调用过程
- ActivityThread启动Activity
注意,该篇学习之前,要弄懂的知识:
- 系统的启动流程
按下电源键后,一个Android系统是怎么启动的。
主要涉及到 Init进程、Zygote、SystemServer、Launcher的知识概念 - 应用程序进程的启动过程
一个应用程序所在进程是怎么创建出来的。就是 Zygote的Socket启动一个死循环来等待AMS发来启动一个应用程序进程的请求
主要涉及到 ActivityManagerService(即AMS)、创建Binder线程池、创建消息循环的概念
网上有很多介绍上面东西的资料,最好跟着重点的源码过一遍,不然下面的内容也不知道在说什么。
下面的源码基于 Android8.0
1.Lanuncher请求AMS的过程
我们知道Launcher是Android系统的第一个应用程序,它会读取 PakgesManagerService来获取当前系统装了哪些应用,并把这些应用程序的快捷图标展示在桌面上。
我们通过点击应用的快捷图标,就会通过Launcher请求AMS来启动该应用。我们来看看第一个大步骤的时序图:
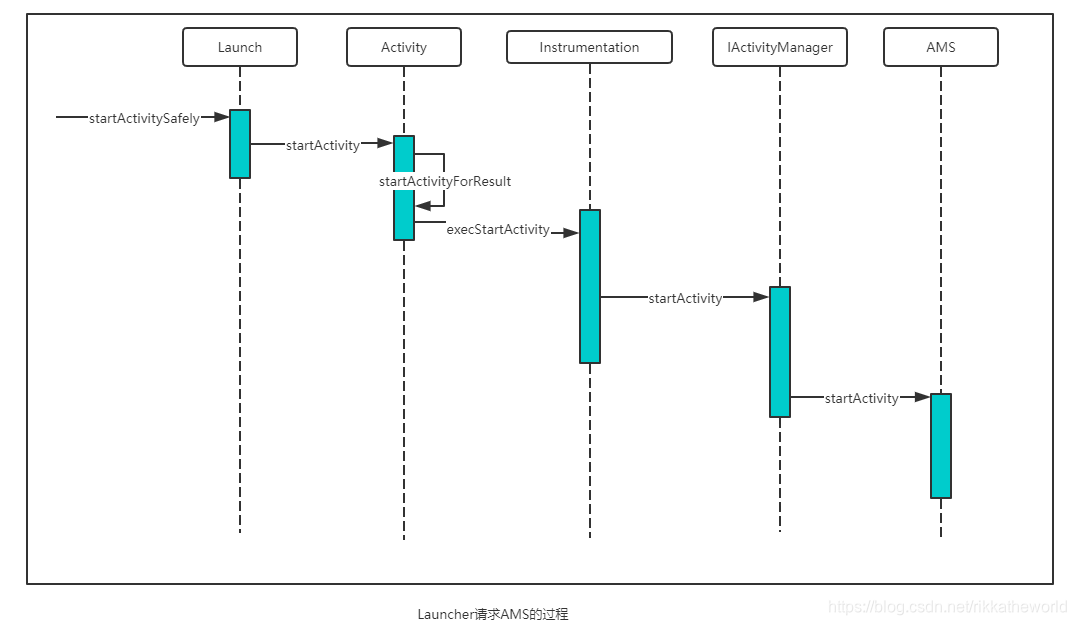
阅读源码的正确方式就是先看一遍时序图,再读一遍重点源码,再回来看一遍时序图。
在我们点击应用程序的快捷图标时,就会调用Launcher的 startActivitySafely(),我们来看看这个方法的代码:
// launcher3/Launcher.java
public boolean startActivitySafely(View v, Intent intent, ItemInfo item) {
        ...
        // 1
        intent.addFlags(Intent.FLAG_ACTIVITY_NEW_TASK);
        if (v != null) {
            intent.setSourceBounds(getViewBounds(v));
        }
        try {
            if (Utilities.ATLEAST_MARSHMALLOW
                    && (item instanceof ShortcutInfo)
                    && (item.itemType == Favorites.ITEM_TYPE_SHORTCUT
                     || item.itemType == Favorites.ITEM_TYPE_DEEP_SHORTCUT)
                    && !((ShortcutInfo) item).isPromise()) {
                // Shortcuts need some special checks due to legacy reasons.
                startShortcutIntentSafely(intent, optsBundle, item);
            } else if (user == null || user.equals(Process.myUserHandle())) {
                // 2
                startActivity(intent, optsBundle);
            }
            ...
        } catch (ActivityNotFoundException|SecurityException e) {
          ...
        }
        return false;
    }
注释1:创建一个intent后把intent的Flag置为 FLAG_ACTIVITY_NEW_TASK,这个flag表示这个Activity会在新的任务栈中启动(像singleTask模式那样)。
一般来说,往下走,代码一般都会走到注释2的分支去。
注释2:传入intent,执行startAcivity()。这个方法在Activity.java类中实现,我们来看看其代码:
// Activity.java
    @Override
    public void startActivity(Intent intent, @Nullable Bundle options) {
        if (options != null) {
            startActivityForResult(intent, -1, options);
        } else {
            startActivityForResult(intent, -1);
        }
    }
都是走到 startActivityForResult()中去,其中第一个参数为在Launcher中创建的Intent,第二个参数-1表示Launcher不需要知道Activity启动的结果。也就是说Lancher只管发请求,之后怎么样就再也不处理了。我们来看看 startActivityForResult()的代码:
// Acitvity.java
 public void startActivityForResult(@RequiresPermission Intent intent, int requestCode,
            @Nullable Bundle options) {
        // 1
        if (mParent == null) {
            options = transferSpringboardActivityOptions(options);
            Instrumentation.ActivityResult ar =
                mInstrumentation.execStartActivity(
                    this, mMainThread.getApplicationThread(), mToken, this,
                    intent, requestCode, options);
             ...
        } else {
           ...
        }
    }
注释1:如果mParent==null 则往下走execStartActivity()
mParent是当前Activity的父类,因为根Activity还没有创建出来,所以mParent就是null。
接着调用 Instrumentation类的 execStartActivity(),传入参数:this(上下文)、但前应用主线程、token、this(上下文)、Launcher来的intent、requstCode(-1,表示无需知道后面的结果)、携带参数bundle。
接着我们来看看 Instrumentation这个类的启动Activity的方法:
public ActivityResult execStartActivity(
        Context who, IBinder contextThread, IBinder token, String target,
        Intent intent, int requestCode, Bundle options) {
        ...
        try {
            intent.migrateExtraStreamToClipData();
            intent.prepareToLeaveProcess(who);
            int result = ActivityManager.getService()
                .startActivity(whoThread, who.getBasePackageName(), intent,
                        intent.resolveTypeIfNeeded(who.getContentResolver()), //1
                        token, target, requestCode, 0, null, options);
            checkStartActivityResult(result, intent);         //2
        } catch (RemoteException e) {
            throw new RuntimeException("Failure from system", e);
        }
        return null;
    }
在 try{}中,先修改一下intent的内容。
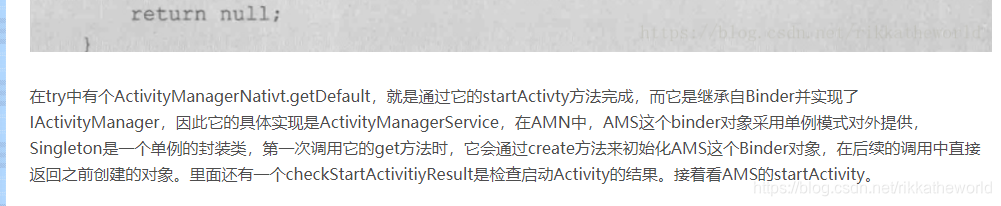
其次在注释1中:调用 ActivityManager.getService().startActivity()一套组合拳。
这条代码先从 ActivityManager.getService()获取AMS在Client端的代理对象。也就是说,它会返回个可以看做是 AMS的对象。
然后调用其 startActivity(),也就是调用 ASM.startActivity()。
我们先不进入到AMS的startActivity去,而是看看这个 AMS是怎么来的。
在Android8.0之前,是通过 ActivityManagerNative.getDefaul()来获取AMS的代理对象的,现在这个逻辑放到了 ActivityManager中而不是 ActivityManagerNative中,在我之前做的笔记《Android艺术探索》这本书里面,用的是7.0的代码,可以看下面:
我们来看看getServcie的代码:
// AcitvityManager.java
public static IActivityManager getService() {
      return IActivityManagerSingleton.get();
}
这个方法返回一个IActivityManager的对选哪个,有了解AIDL或代理模式的应该就能立马知道 IActivityManager是ActivityManagerService在客户端的代理类!
我们来看看 IActivityManagerSingleton的get():
// ActivityManager.java
  private static final Singleton<IActivityManager> IActivityManagerSingleton =
            new Singleton<IActivityManager>() {
                @Override
                protected IActivityManager create() {
                    //1
                    final IBinder b = ServiceManager.getService(Context.ACTIVITY_SERVICE);
                    //2
                    final IActivityManager am = IActivityManager.Stub.asInterface(b);
                    return am;
                }
            };
注释1:从 ServiceManager得到一个IBinder,也就是 “IBinder类型的AMS”
注释2:将IBinder通过 asInterface()转换成一个 IActivityManager对象,通过get()可以得到这个对象。
上面是 AIDL的做法,用 进程间通信完成的从 客户端层到 服务端层的实现。8.0之前并不是AIDL的做法。至于AIDL的用法、原理网上已经有n多的blog去学习了。这里不再赘述。
至此,第一阶段结束,execStartActivity方法最终会调用到 ActivityManagerService.startActivity()。
这部分其实特别好理解。
2.AMS到ApplicationThread的调用过程
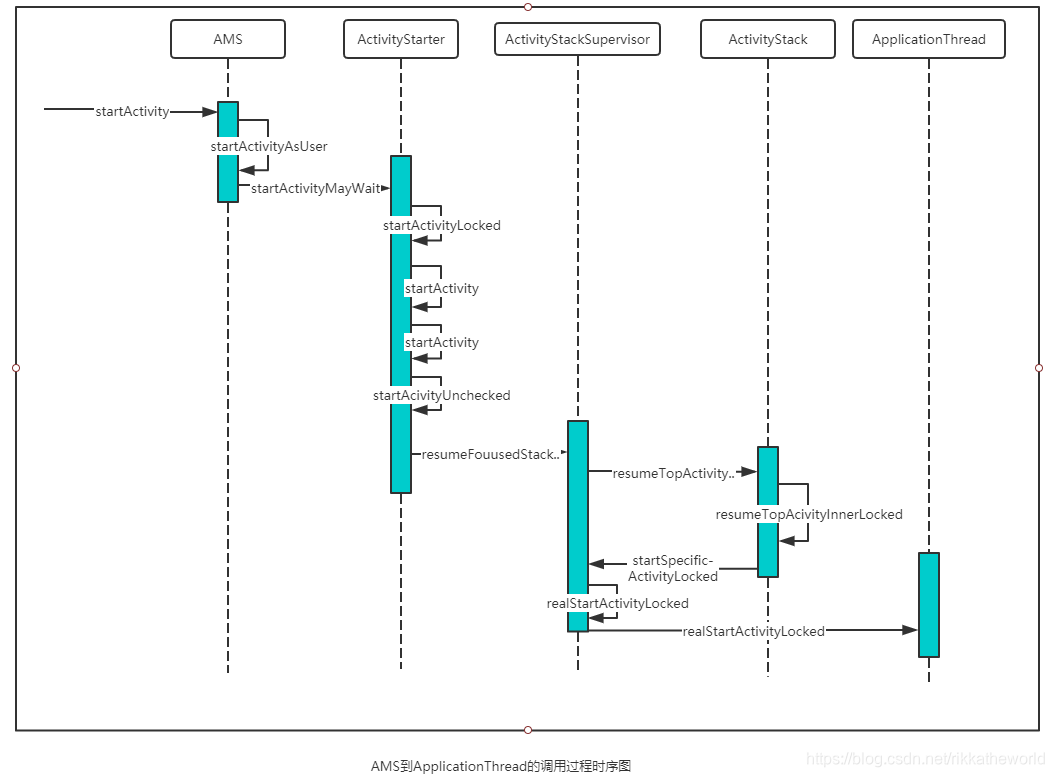
可以看到,从AMS到ApplicaitonThread的过程就有些复杂了,图中会经过 ActivityStarter、ActivityStackSupervisor、ActivityStack这样的类。
我们先来看看最初始的 ActivityMangerService的startAcitivty方法:
// ActivityManagerService.java
    @Override
    public final int startActivity(IApplicationThread caller, String callingPackage,
            Intent intent, String resolvedType, IBinder resultTo, String resultWho, int requestCode,
            int startFlags, ProfilerInfo profilerInfo, Bundle bOptions) {
        return startActivityAsUser(caller, callingPackage, intent, resolvedType, resultTo,
                resultWho, requestCode, startFlags, profilerInfo, bOptions,
                UserHandle.getCallingUserId());
    }
调用自己的 startActivityAsUser(),可以看到在参数的对比上,后者多了一个 getCallingUserId(),顾名思义,这个方法可以获取到调用者的UserId,AMS就是根据这个UserId来确定调用者的权限的:
   @Override
    public final int startActivityAsUser(IApplicationThread caller, String callingPackage,
            Intent intent, String resolvedType, IBinder resultTo, String resultWho, int requestCode,
            int startFlags, ProfilerInfo profilerInfo, Bundle bOptions, int userId) {
        //1
        enforceNotIsolatedCaller("startActivity");
        //2
        userId = mUserController.handleIncomingUser(Binder.getCallingPid(), Binder.getCallingUid(),
                userId, false, ALLOW_FULL_ONLY, "startActivity", null);
        //3
        return mActivityStarter.startActivityMayWait(caller, -1, callingPackage, intent,
                resolvedType, null, null, resultTo, resultWho, requestCode, startFlags,
                profilerInfo, null, null, bOptions, false, userId, null, null,
                "startActivityAsUser");
    }
每行代码都很重要:
注释1:判断调用者进程是否被隔离(是否可用),如果被隔离则抛出异常。
注释2:检查调用者是否有权限,是根据传进来的 userId进行判断的。如果没有权限也会抛出异常
注释3:调用 ActivityStarter.startActivityMayWait()。
这里需要注意的是倒数第二个参数 TaskRecord,代表启动Activity所在的栈,最后一个参数reason,代表启动Activity的理由,我们来看看以下 startActivityMayWait():
// ActivityStarter.java
 final int startActivityMayWait(IApplicationThread caller, int callingUid,
            String callingPackage, Intent intent, ... int userId,
            IActivityContainer iContainer, TaskRecord inTask, String reason) {
            ...
            int res = startActivityLocked(caller, intent, ephemeralIntent, resolvedType,
                    aInfo, rInfo, voiceSession, voiceInteractor..., container,
                    inTask, reason);
                    ...
            return res;
        }
    }
ActivityStarter 是Android7.0中新加入的类,它是加载Activity的控制类。
这个类的作用是根据传入的数据来吧Intent转换成Activity的。在这个方法里面,调用到了 startActivityLocked(),这个方法是通向后面启动Activity的方法,我们来看一下其源码:
// ActivityStarter.java
int startActivityLocked(IApplicationThread caller, Intent intent, Intent ephemeralIntent,
            String resolvedType, ActivityInfo aInfo, ResolveInfo rInfo,
            IVoiceInteractionSession voiceSession, IVoiceInteractor voiceInteractor,
            IBinder resultTo, String resultWho, int requestCode, int callingPid, int callingUid,
            String callingPackage, int realCallingPid, int realCallingUid, int startFlags,
            ActivityOptions options, boolean ignoreTargetSecurity, boolean componentSpecified,
            ActivityRecord[] outActivity, ActivityStackSupervisor.ActivityContainer container,
            TaskRecord inTask, String reason) {

        if (TextUtils.isEmpty(reason)) {
            throw new IllegalArgumentException("Need to specify a reason.");
        }
        mLastStartReason = reason;
        mLastStartActivityTimeMs = System.currentTimeMillis();
        mLastStartActivityRecord[0] = null;

        mLastStartActivityResult = startActivity(caller, intent, ephemeralIntent, resolvedType,
                aInfo, rInfo, voiceSession, voiceInteractor, resultTo, resultWho, requestCode,
                callingPid, callingUid, callingPackage, realCallingPid, realCallingUid, startFlags,
                options, ignoreTargetSecurity, componentSpecified, mLastStartActivityRecord,
                container, inTask);
                ...
        return mLastStartActivityResult;
    }
这个方法就是处理了一下为什么要创建Activity的Reason这个String。然后调用了 startActivity(),我们往下看:
private int startActivity(IApplicationThread caller...) {
        int err = ActivityManager.START_SUCCESS;
        final Bundle verificationBundle
                = options != null ? options.popAppVerificationBundle() : null;
        ProcessRecord callerApp = null;
        //1
         if (caller != null) {
            //2
            callerApp = mService.getRecordForAppLocked(caller);
            if (callerApp != null) {
                callingPid = callerApp.pid;
                callingUid = callerApp.info.uid;
            } else {
                Slog.w(TAG, "Unable to find app for caller " + caller
                        + " (pid=" + callingPid + ") when starting: "
                        + intent.toString());
                err = ActivityManager.START_PERMISSION_DENIED;
            }
        }
        ...
        //3 这里创建即将要启动的Activity的描述类ActivityRecord。
        ActivityRecord r = new ActivityRecord(mService, callerApp, callingPid, callingUid,
                callingPackage, intent, resolvedType, aInfo, mService.getGlobalConfiguration(),
                resultRecord, resultWho, requestCode, componentSpecified, voiceSession != null,
                mSupervisor, container, options, sourceRecord);
        if (outActivity != null) {
            outActivity[0] = r;
        }
        ...
        //4
        return startActivity(r, sourceRecord, voiceSession, voiceInteractor, startFlags, true,
                options, inTask, outActivity);
}
注释1:判断IApplicationThread类型的caller是否为null,这个caller是方法调用一路传过来的,指向 Launcher所在应用程序进程的 ApplicationThread对象。
注释2:调用AMS的 getRecordForAppLocked()方得到一个 代表Launcher进程的 ProcessRecord类的实例callerApp。ProcessRecord用来描述一个应用程序进程。
注释3:同样的 ActivityRecord用来描述一个 Activity的所有信息。创建一个新的赋给r,然后r作为 outActivity第一个数据。
outActivity是 ActivityRecord[]类型的数据。
注释4:把这个方法里面得出的所有参数,传到重载方法 startActivity()中:
// ActivityStarter.java
   private int startActivity(final ActivityRecord r, ActivityRecord sourceRecord,
            IVoiceInteractionSession voiceSession, IVoiceInteractor voiceInteractor,
            int startFlags, boolean doResume, ActivityOptions options, TaskRecord inTask,
            ActivityRecord[] outActivity) {
        int result = START_CANCELED;
        try {
            mService.mWindowManager.deferSurfaceLayout();
            //调用startActivityUnchecked
            result = startActivityUnchecked(r, sourceRecord, voiceSession, voiceInteractor,
                    startFlags, doResume, options, inTask, outActivity);
        }
        ...
        return result;
    }
这里返回 startActivityUnchecked()这个函数:
// ActivityStarter
private int startActivityUnchecked(final ActivityRecord r, ActivityRecord sourceRecord,
            IVoiceInteractionSession voiceSession, IVoiceInteractor voiceInteractor,
            int startFlags, boolean doResume, ActivityOptions options, TaskRecord inTask,
            ActivityRecord[] outActivity) {
        ...
        //1
        if (mStartActivity.resultTo == null && mInTask == null && !mAddingToTask
                && (mLaunchFlags & FLAG_ACTIVITY_NEW_TASK) != 0) {
            newTask = true;
            //2 创建新的TaskRecord
            result = setTaskFromReuseOrCreateNewTask(
                    taskToAffiliate, preferredLaunchStackId, topStack);
        } else if (mSourceRecord != null) {
            result = setTaskFromSourceRecord();
        } else if (mInTask != null) {
            result = setTaskFromInTask();
        } else {
            setTaskToCurrentTopOrCreateNewTask();
        }
        ...
        if (mDoResume) {
            final ActivityRecord topTaskActivity =
                    mStartActivity.getTask().topRunningActivityLocked();
            if (!mTargetStack.isFocusable()
                    || (topTaskActivity != null && topTaskActivity.mTaskOverlay
                    && mStartActivity != topTaskActivity)) {
                ...
            } else {
                if (mTargetStack.isFocusable() && !mSupervisor.isFocusedStack(mTargetStack)) {
                    mTargetStack.moveToFront("startActivityUnchecked");
                }
                //3
                mSupervisor.resumeFocusedStackTopActivityLocked(mTargetStack, mStartActivity,
                        mOptions);
            }
        }
        ...
startActivityUnchecked() 它的作用主要是处理与 栈管理相关的逻辑。所以这个方法就是我们新的Activity所处的栈的管理方法了。
注释1:由于我们传入进来的Intent的FLAG是有 FLAG_ACTIVITY_NEW_TASK这个属性的,所以能通过if
注释2:通过 setTaskFromReuseOrCreateNewTask,它会创建出一个 TaskRecord,前面说过,它用来描述一个任务栈,也是Activity最直观的表现类,之所以这么说,是因为任务栈是一个假象的模型,他实际并不存在,所以这个方法相当于创建了一个任务栈出来。
注释3:调用ActivityStackSupervisor.resumeFocusedStackTopActivityLocked(),这个方法从ActivityStarter深入到了ActivityStackSupervisor,是往下走的一个方法。
我们来看看这个方法:
// ActivityStackSupervisor
boolean resumeFocusedStackTopActivityLocked(
            ActivityStack targetStack, ActivityRecord target, ActivityOptions targetOptions) {
        if (targetStack != null && isFocusedStack(targetStack)) {
            return targetStack.resumeTopActivityUncheckedLocked(target, targetOptions);
        }
        //1
        final ActivityRecord r = mFocusedStack.topRunningActivityLocked();
        //2
        if (r == null || r.state != RESUMED) {
            //3
            mFocusedStack.resumeTopActivityUncheckedLocked(null, null);
        } else if (r.state == RESUMED) {
            mFocusedStack.executeAppTransition(targetOptions);
        }
        return false;
    }
注释1:调用ActivityStack.topRunningActivityLocked()获取要启动的Activity所在栈的栈顶的不是处于停止状态的ActivityRecord
注释2:判断这个 ActivityRecord 是否为空或者要启动的Activity是不是 RESUMED状态,由于我们是创建根Activity,所以这个 r 是空的。所以它会调用注释3的代码
注释3:调用 ActivityStack.resumeTopActivityUncheckedLocked,这个方法名虽然长,但是我们可以知道它大概的意思就是 启动一个栈顶Activity。我们来看看这个方法:
// ActivityStack
boolean resumeTopActivityUncheckedLocked(ActivityRecord prev, ActivityOptions options) {
        ...
        boolean result = false;
        try {
            mStackSupervisor.inResumeTopActivity = true;
            //1
            result = resumeTopActivityInnerLocked(prev, options);
        } finally {
            mStackSupervisor.inResumeTopActivity = false;
        }
        mStackSupervisor.checkReadyForSleepLocked();
        return result;
    }
注释1:上面的代码在 try-catch里面,调用了 resumeTopActivityInnerLocked()去置result。
我们来看看这个方法:
// ActivityStack
private boolean resumeTopActivityInnerLocked(ActivityRecord prev, ActivityOptions options) {
     ...
         mStackSupervisor.startSpecificActivityLocked(next, true, true);
     }
     ..
}
因为这个方法代码非常多,所以我们来看它调用比较关键的代码就可以了,即调用了 ActivitySupervisor.startSpecificActivityLocked
回到了 ActivitySupervisor中,我们来看看这段代码:
// ActivitySupervisor
 void startSpecificActivityLocked(ActivityRecord r,
            boolean andResume, boolean checkConfig) {
        // 1
        ProcessRecord app = mService.getProcessRecordLocked(r.processName,
                r.info.applicationInfo.uid, true);
        r.getStack().setLaunchTime(r);
        if (app != null && app.thread != null) {
            try {
                ...
                //2
                realStartActivityLocked(r, app, andResume, checkConfig);
                return;
            }
            ...
        }

        mService.startProcessLocked(r.processName, r.info.applicationInfo, true, 0,
                "activity", r.intent.getComponent(), false, false, true);
    }
注释1:获取即将启动的Activity所在应用程序的进程。开篇说过需要知道应用程序进程是怎么启动的。因为一个应用程序要启动,最先要做的就是把这个应用程序的进程给启动。 ProcessRecord就是描述一个应用进程的类。它由 AMS来管理。
注释2:由于进程已经启动了所以不为null,就会调用 realStartActivityLocked()。
// ActivityStackSupervisor
final boolean realStartActivityLocked(ActivityRecord r, ProcessRecord app,
            boolean andResume, boolean checkConfig) throws RemoteException {
            ...
            app.thread.scheduleLaunchActivity(new Intent(r.intent), r.appToken,
                    System.identityHashCode(r), r.info,
                    mergedConfiguration.getGlobalConfiguration(),
                    mergedConfiguration.getOverrideConfiguration(), r.compat,
                    r.launchedFromPackage, task.voiceInteractor, app.repProcState, r.icicle,
                    r.persistentState, results, newIntents, !andResume,
                    mService.isNextTransitionForward(), profilerInfo);
            ...
            return true;
}
这个方法也非常的长,比较关键的就是这句.
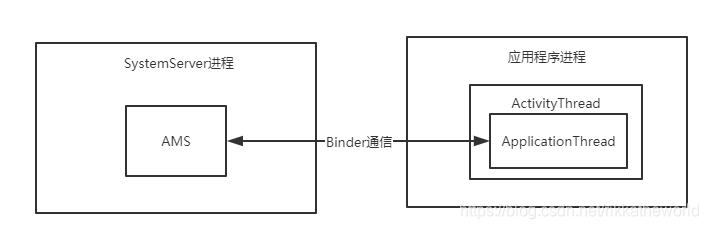
app.thread 指的是 IApplicationThread,它的实现是ActivityThread的内部类 ApplicationThread,其中ApplicationThread继承了 IApplicationThread.Stub。也就是这里又使用了一次AIDL。
app是ProcessRecord,即应用程序所在的进程。
因此这段代码就是要在 目标应用程序进程启动Activity。
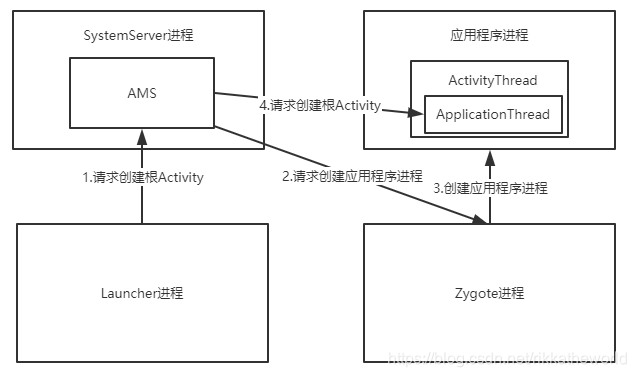
当前代码逻辑运行在 AMS所在的进程(即Server端/SystemServer进程)中,通过ApplicationThread来与应用程序进程进行Binder通信,换句话说,ApplicationThread是AMS和应用程序进程间的桥梁。他们的关系如下:
到这里,代码从AMS到了应用程序所在的进程中了。这也到了我们启动流程最后的一部分。
3. ActivityThread启动Activity的过程
我们先来看看ActivityThread启动Activity的时序图:
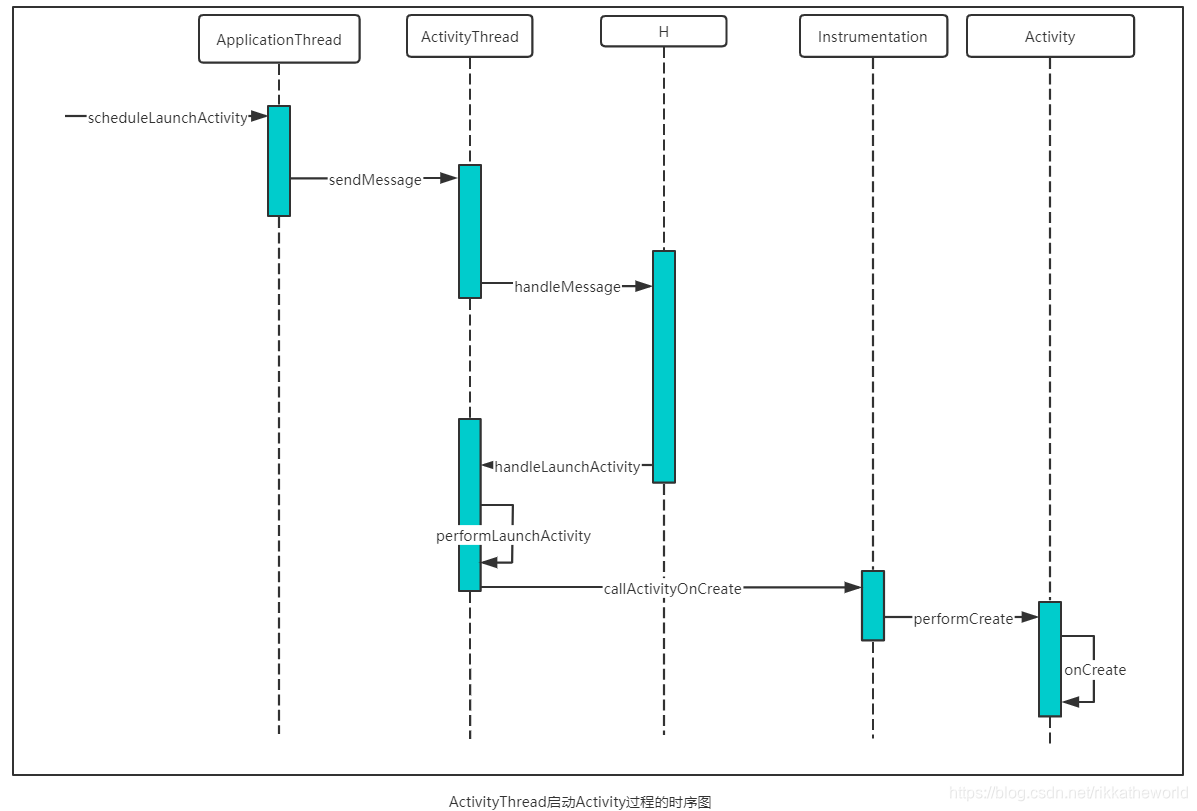
我们先从入口 ApplicationThread.scheduleLaunchActivity(),其中 ApplicaitonThread是ActivityThread的内部类。
在应用程序进程的创建中,进程创建后会运行这个进程的主线程Thread实例,即 ActivityThread,它管理当前应用程序的主线程。
// ActivityThread.java
        @Override
        public final void scheduleLaunchActivity(Intent intent, IBinder token, int ident,
                ActivityInfo info, Configuration curConfig, Configuration overrideConfig,
                CompatibilityInfo compatInfo, String referrer, IVoiceInteractor voiceInteractor,
                int procState, Bundle state, PersistableBundle persistentState,
                List<ResultInfo> pendingResults, List<ReferrerIntent> pendingNewIntents,
                boolean notResumed, boolean isForward, ProfilerInfo profilerInfo) {

            updateProcessState(procState, false);
            ActivityClientRecord r = new ActivityClientRecord();
            r.token = token;
            r.ident = ident;
            r.intent = intent;
            ...
            updatePendingConfiguration(curConfig);
            sendMessage(H.LAUNCH_ACTIVITY, r);
        }
这个方法把要启动的 Activity封装成一个 ActivityClientRecord,然后通过 sendMessage()向H类发送类型为 H.LAUNCH_ACTIVITY的消息,这个封装好的对象给带上。来看看我们非常熟悉的sendMessage()吧:
// AcitivtyThread
final H mH = new H();

private void sendMessage(int what, Object obj, int arg1, int arg2, boolean async) {
        ...
        Message msg = Message.obtain();
        msg.what = what;
        msg.obj = obj;
        msg.arg1 = arg1;
        msg.arg2 = arg2;
        if (async) {
            msg.setAsynchronous(true);
        }
        mH.sendMessage(msg);
    }
这里的mh是 H 的实例,在应用程序进程的启动中,这个 H 是随着进程的启动而创建,它是 ActivityThread的内部类,并且继承自Handler,是应用程序进程中主线程的消息管理类。
为什么明明都到了应用程序的进程中了,还要在这个时候使用到Handler呢?是因为 ApplicationThread作为一个桥梁Binder,它的逻辑是运行在Binder线程池中的,因为接下来的流程要切到主线程中,所以就要通过Handler来实现一个线程的切换。
我们来看看 H类的实现:
//ActivityThread
        private class H extends Handler {
           //1
           public static final int LAUNCH_ACTIVITY         = 100;
           ...
           public void handleMessage(Message msg) {
            switch (msg.what) {
                case LAUNCH_ACTIVITY: {
                    Trace.traceBegin(Trace.TRACE_TAG_ACTIVITY_MANAGER, "activityStart");
                    //2
                    final ActivityClientRecord r = (ActivityClientRecord) msg.obj;
                    //3
                    r.packageInfo = getPackageInfoNoCheck(
                            r.activityInfo.applicationInfo, r.compatInfo);
                    //4
                    handleLaunchActivity(r, null, "LAUNCH_ACTIVITY");
                    Trace.traceEnd(Trace.TRACE_TAG_ACTIVITY_MANAGER);
                } break;
            ...
          }
首先 H 继承了Handler,它实现了 sendMessage() 、 handleMessage()等方法
注释1:定义了 LAUNCH_ACTIVITY 消息字段,然后在 handleMessage()中处理。代码走下来就一定会走到这个case中
注释2:从消息message中拿出里面 ActivityClientRecord,即封装好的 Activity信息。
注释3:通过 getPackageInfoNoCheck()来获得 LoadedApk 类型的对象,并赋值给 ActivityClientRecord的 packageInfo 属性。
应用程序进程要启动Activity时需要将Activity所属的APK加载进来,而 LoadedApk 就是用来描述已加载的 APK文件的。
注释3:调用 handleLaunchActivity(),我们来看看其代码:
// ActivityThread.java
 private void handleLaunchActivity(ActivityClientRecord r, Intent customIntent, String reason) {
        ...
        WindowManagerGlobal.initialize();
        //1
        Activity a = performLaunchActivity(r, customIntent);

        if (a != null) {
            r.createdConfig = new Configuration(mConfiguration);
            reportSizeConfigurations(r);
            Bundle oldState = r.state;
            //2
            handleResumeActivity(r.token, false, r.isForward,
                    !r.activity.mFinished && !r.startsNotResumed, r.lastProcessedSeq, reason);

            if (!r.activity.mFinished && r.startsNotResumed) {
                performPauseActivityIfNeeded(r, reason);
                if (r.isPreHoneycomb()) {
                    r.state = oldState;
                }
            }
        } else {
            try {
                //停止Activity的启动
                ActivityManager.getService()
                    .finishActivity(r.token, Activity.RESULT_CANCELED, null,
                            Activity.DONT_FINISH_TASK_WITH_ACTIVITY);
            } catch (RemoteException ex) {
                throw ex.rethrowFromSystemServer();
            }
        }
    }
注释1:performLaunchActivity()可以说是主线程的第一个关键方法,它的作用是启动Activity,如果成功启动则会返回一个Activity实例。
注释2:handleResumeActivity()用来将 Activity的状态设置成 Resume。
如果该Activity为null,通知AMS终止行动。下面来看看 performLaunchActivity()
// ActivityThread
   private Activity performLaunchActivity(ActivityClientRecord r, Intent customIntent) {
        ...
        //1 获取 Actiivty的 ActivityInfo类
        ActivityInfo aInfo = r.activityInfo;
        if (r.packageInfo == null) {
            //2 获取APK文件描述类 LoadedApk
            r.packageInfo = getPackageInfo(aInfo.applicationInfo, r.compatInfo,
                    Context.CONTEXT_INCLUDE_CODE);
        }
        //3
        ComponentName component = r.intent.getComponent();
        ....
        //4
        ContextImpl appContext = createBaseContextForActivity(r);
        Activity activity = null;
        try {
            java.lang.ClassLoader cl = appContext.getClassLoader();
            //5
            activity = mInstrumentation.newActivity(
                    cl, component.getClassName(), r.intent);
            ...
        } catch (Exception e) {
            ...
        }
        try {
            //6
            Application app = r.packageInfo.makeApplication(false, mInstrumentation);
            ...
            if (activity != null) {
                //7
                activity.attach(appContext, this, getInstrumentation(), r.token,
                        r.ident, app, r.intent, r.activityInfo, title, r.parent,
                        r.embeddedID, r.lastNonConfigurationInstances, config,
                        r.referrer, r.voiceInteractor, window, r.configCallback);

                ...
                if (r.isPersistable()) {
                    //8
                    mInstrumentation.callActivityOnCreate(activity, r.state, r.persistentState);
                }
                ...
    }
这个方法做的事情有点多,它的目标是通给给定的一个 Activity描述类 -> Activity实例,我们来分析每个注释
注释1:获取ActivityInfo,它用于存储代码以及 AndroidManifest设置的该Acitivty和Receiver等节点信息,比如我们熟知的 launchMode
注释2:获取LoadedApk,前面也做过,这里如果没有就再做一次
注释3:获取要启动Activity的 ComponentName类,这个类保存了 Activity的包名和类名
注释4:创建要启动Activity的上下文环境ContextImpl
注释5:根据ComponentName中存储的Activity类名,用 类加载器来创建该Activity的实例。
注释6:创建Application,makeApplication()内部会调用Application的 onCreate()
注释7:调用Activity的 attach(),这个方法用来初始化一个 Activity。在 attach() 中会创建 Window(PhoneWindow)对象并与 Activity自身进行关联。
注释8:调用 Instrumentation.callActivityOnCreate()
我们来看看这个方法:
// Instrumentation.java
public void callActivityOnCreate(Activity activity, Bundle icicle,
            PersistableBundle persistentState) {
        prePerformCreate(activity);
        //1
        activity.performCreate(icicle, persistentState);
        postPerformCreate(activity);
    }
注释1调用了performCreate(),我们来看下这个方法:
// Activity.java
final void performCreate(Bundle icicle, PersistableBundle persistentState) {
        restoreHasCurrentPermissionRequest(icicle);
        onCreate(icicle, persistentState);
        mActivityTransitionState.readState(icicle);
        performCreateCommon();
    }
这段代码中,调用了 Activity.onCreate()。这个方法就是我们写的Acitivty的 super.onCreate 方法了。
至此,Activity启动的流程就结束了。这个方法走完后,就会通过一开始ActivityThread的 handleResumeActivity()走Activity的 onResume了。
4. Activity启动流程总结
应用程序启动流程的代码量极大。涉及到的类也很多。这里我们需要整个流程归纳一下。也就是和上面一样,根据进程的角度把它分成了三个步骤。
应用程序的启动涉及了四个主要的进程:
- Launcher进程
即桌面。通过点击桌面上应用程序快捷图标,通知AMS要打开应用程序 - AMS所在的 SystemServer进程
AMS请求Zygote创建应用程序进程 - Zygote进程
接收到AMS的通知后通过fork()自身来创建应用程序进程。
接着AMS开始构建Activity的信息并传给应用程序进程 - 应用程序进程
在主线程ActivityThread来构建一个Activity并调用其 onCreate()
下面copy一份皇叔的图来便于理解:
如果以这个角度去理解,那么读源码会更加轻松一些。
