文章目录
Spark内核解析(一) Spark向Yarn提交应用(源码解析)
执行脚本提交任务
实际是启动一个SparkSubmit的JVM进程
- 提交应用的脚本如下:
bin/spark-submit \
--class org.apache.spark.examples.SparkPi \
--master yarn \	// 默认client
--deploy-mode cluster \
./examples/jars/spark-examples_2.12-2.4.5.jar \
10
- 我们打开bin目录下的spark-submit文件,看看做了啥:
exec "${SPARK_HOME}"/bin/spark-class org.apache.spark.deploy.SparkSubmit "$@"
- 可以看见执行了bin/spark-class脚本,最终形成了如下指令:
exec ${JAVA_HOME}/bin/java org.apache.spark.deploy.SparkSubmit
- 用bin/java启动的类,就会启动相应的JVM进程,所以我们去看看SparkSubmit的main方法
  override def main(args: Array[String]): Unit = {
    val submit = new SparkSubmit() {
      self =>
      override def doSubmit(args: Array[String]): Unit = {
        try {
          super.doSubmit(args)
        } catch {
          case e: SparkUserAppException =>
            exitFn(e.exitCode)
        }
      }
    }
    submit.doSubmit(args)
  }
执行提交操作
- 代码有删减,只看关键部分。我们点击submit.doSubmit(args)进入到super.doSubmit(args),可以看到:
  def doSubmit(args: Array[String]): Unit = {
    val appArgs = parseArguments(args)

    appArgs.action match {
      case SparkSubmitAction.SUBMIT => submit(appArgs, uninitLog)
      case SparkSubmitAction.KILL => kill(appArgs)
      case SparkSubmitAction.REQUEST_STATUS => requestStatus(appArgs)
      case SparkSubmitAction.PRINT_VERSION => printVersion()
    }
  }
解析参数
- 进入parseArguments(args),可以看到返回了SparkSubmitArguments的实例对象:
protected def parseArguments(args: Array[String]): SparkSubmitArguments = {
    new SparkSubmitArguments(args)
}
- Scala里面的主构造方法会被调用,以下代码会被执行:
var master: String = null
var deployMode: String = null
var mainClass: String = null
var action: SparkSubmitAction = null

// 解析一系列spark-submit命令行的选项
parse(args.asJava)
- 这里主要就是看parse(args.asJava)利用正则,匹配出key和value,然后交给handle(name, value)处理:
// SparkSubmitArguments.scala

  override protected def handle(opt: String, value: String): Boolean = {
    opt match {

      case MASTER =>
        master = value

      case CLASS =>
        mainClass = value

      case DEPLOY_MODE =>
        if (value != "client" && value != "cluster") {
          error("--deploy-mode must be either \"client\" or \"cluster\"")
        }
        deployMode = value
  }
- 可以看到,该方法将命令行参数进行了模式匹配:
--master yarn => master
--deploy-mode cluster => deployMode
--class SparkPI(WordCount) => mainClass
提交
- action = Option(action).getOrElse(SUBMIT),所以进入submit(appArgs, uninitLog):
  private def submit(args: SparkSubmitArguments, uninitLog: Boolean): Unit = {

    def doRunMain(): Unit = {
      if (args.proxyUser != null) {

      } else {
        runMain(args, uninitLog)
      }
    }

    if (args.isStandaloneCluster && args.useRest) {

    } else {
      doRunMain()
    }
  }
使用提交的参数,运行child class的main方法
- 因为是Yarn模式,所以会进入到doRunMain(),接着进入到runMain(args, uninitLog):
  private def runMain(args: SparkSubmitArguments, uninitLog: Boolean): Unit = {
    val (childArgs, childClasspath, sparkConf, childMainClass) = prepareSubmitEnvironment(args)

    Thread.currentThread.setContextClassLoader(loader)

    for (jar <- childClasspath) {
      addJarToClasspath(jar, loader)
    }

    var mainClass: Class[_] = null

    mainClass = Utils.classForName(childMainClass)

    val app: SparkApplication = if (classOf[SparkApplication].isAssignableFrom(mainClass)) {
      mainClass.newInstance().asInstanceOf[SparkApplication]
    } else {
      new JavaMainApplication(mainClass)
    }

    app.start(childArgs.toArray, sparkConf)
  }
准备提交环境
- prepareSubmitEnvironment方法很重要,返回参数也很重要,我们根据它的返回值(childArgs, childClasspath, sparkConf, childMainClass)往上搜索childMainClass可以看到:
cluster:
childMainClass = org.apache.spark.deploy.yarn.YarnClusterApplication

client:
childMainClass = mainClass
这里,我们主要想了解Yarn的cluster模式
- 设置类加载器,用于后面的反射
Thread.currentThread.setContextClassLoader(loader)
通过类名加载这个类
mainClass = Utils.classForName(childMainClass)
反射创建类的对象并进行类型转换
val app: SparkApplication = mainClass.newInstance().asInstanceOf[SparkApplication]
运行childMainClass的start方法
app.start(childArgs.toArray, sparkConf)
运行YarnClusterApplication
  override def start(args: Array[String], conf: SparkConf): Unit = {
    new Client(new ClientArguments(args), conf).run()
  }
封装参数
- new ClientArguments(args)封装参数,类似于SparkSubmit中的parseArguments(args),这里不再多说了
创建客户端对象
- 进入Client的主构造方法,可以看到一个重要的属性:
yarnClient = YarnClient.createYarnClient

  public static YarnClient createYarnClient() {
    YarnClient client = new YarnClientImpl();
    return client;
  }
- 在YarnClientImpl里可以看到一个重要的属性:
ApplicationClientProtocol rmClient
用于向RourceManager提交应用。
运行 - 提交应用
- 我们来看看run干了些啥
  def run(): Unit = {
    this.appId = submitApplication()
  }
- 只需要看submitApplication()方法,来提交应用到ResourceManager,运行ApplicationMaster。
  def submitApplication(): ApplicationId = {
    var appId: ApplicationId = null

    launcherBackend.connect()
    yarnClient.init(hadoopConf)
    yarnClient.start()

    // Get a new application from our RM
    val newApp = yarnClient.createApplication()
    val newAppResponse = newApp.getNewApplicationResponse()
    appId = newAppResponse.getApplicationId()

    // Set up the appropriate contexts to launch our AM
    // 设置合适的上下文环境来启动我们的AM
    val containerContext = createContainerLaunchContext(newAppResponse)
    val appContext = createApplicationSubmissionContext(newApp, containerContext)

    // Finally, submit and monitor the application
    yarnClient.submitApplication(appContext)
    launcherBackend.setAppId(appId.toString)
    reportLauncherState(SparkAppHandle.State.SUBMITTED)

    appId
  }
配置JVM的启动参数
- 这里主要看两个方法:createContainerLaunchContext和createApplicationSubmissionContext
- createContainerLaunchContext用来设置一个ContainerLaunchContext来启动我们的Application Master的container
- 为启动AM而设置启动环境,java options, and the command
val amContainer = Records.newRecord(classOf[ContainerLaunchContext])
amContainer.setLocalResources(localResources.asJava)
amContainer.setEnvironment(launchEnv.asJava)

amContainer.setCommands(printableCommands.asJava)
- 封装
val amClass =
  if (isClusterMode) {
    Utils.classForName("org.apache.spark.deploy.yarn.ApplicationMaster").getName
  } else {
    Utils.classForName("org.apache.spark.deploy.yarn.ExecutorLauncher").getName
  }

cluster:
command = bin/java org.apache.spark.deploy.yarn.ApplicationMaster

client:
command = bin/java org.apache.spark.deploy.yarn.ExecutorLauncher
向Yarn提交应用
- yarnClient.submitApplication(appContext)向Yarn提交应用。
- 调用rmClient.submitApplication(request);
运行ApplicationMaster
- 上面说过,bin/java会启动相应类的JVM进程,于是我们只需要看ApplicationMaster的main方法:
  def main(args: Array[String]): Unit = {
    SignalUtils.registerLogger(log)
    val amArgs = new ApplicationMasterArguments(args)
    master = new ApplicationMaster(amArgs)
    System.exit(master.run())
  }
- ApplicationMasterArguments也是封装参数用的,我们直接看master.run()
  final def run(): Int = {
    doAsUser {
      runImpl()
    }
    exitCode
  }
- 重点代码块如下:
if (isClusterMode) {
  runDriver()
} else {
  runExecutorLauncher()
}
- 我们是集群模式,所以AM启动还需要运行driver,所以点进去看runDriver()
  private def runDriver(): Unit = {
    userClassThread = startUserApplication()

    try {
      val sc = ThreadUtils.awaitResult(sparkContextPromise.future,
        Duration(totalWaitTime, TimeUnit.MILLISECONDS))
      if (sc != null) {
        rpcEnv = sc.env.rpcEnv

        val userConf = sc.getConf
        val host = userConf.get("spark.driver.host")
        val port = userConf.get("spark.driver.port").toInt
        registerAM(host, port, userConf, sc.ui.map(_.webUrl))

        val driverRef = rpcEnv.setupEndpointRef(
          RpcAddress(host, port),
          YarnSchedulerBackend.ENDPOINT_NAME)
        createAllocator(driverRef, userConf)
      } else {
        throw new IllegalStateException("User did not initialize spark context!")
      }
      resumeDriver()
      userClassThread.join()
    } catch {

    } finally {
      resumeDriver()
    }
  }
启动用户的应用
- 在单独的线程中,启动包含spark driver的用户类
private def startUserApplication(): Thread = {
    val mainMethod = userClassLoader.loadClass(args.userClass)
      .getMethod("main", classOf[Array[String]])

    val userThread = new Thread {
      override def run() {
        try {
          if (!Modifier.isStatic(mainMethod.getModifiers)) {
            logError(s"Could not find static main method in object ${args.userClass}")
            finish(FinalApplicationStatus.FAILED, ApplicationMaster.EXIT_EXCEPTION_USER_CLASS)
          } else {
            mainMethod.invoke(null, userArgs.toArray)
            finish(FinalApplicationStatus.SUCCEEDED, ApplicationMaster.EXIT_SUCCESS)
            logDebug("Done running user class")
          }
        } catch {

        } finally {
          sparkContextPromise.trySuccess(null)
        }
      }
    }
    userThread.setContextClassLoader(userClassLoader)
    userThread.setName("Driver")
    userThread.start()
    userThread
  }
- 反射加载类,获取类的main方法(–class SparkPI(WordCount))
val mainMethod = userClassLoader.loadClass(args.userClass) .getMethod("main", classOf[Array[String]])
- driver就是AM的一个线程
userThread = new Thread

userThread.setName("Driver")
userThread.start()
- 再执行main方法
mainMethod.invoke
线程阻塞,等待对象(SparkContext)的返回
val sc = ThreadUtils.awaitResult(sparkContextPromise.future, Duration(totalWaitTime, TimeUnit.MILLISECONDS))
注册AM
val userConf = sc.getConf
val host = userConf.get("spark.driver.host")
val port = userConf.get("spark.driver.port").toInt
registerAM(host, port, userConf, sc.ui.map(_.webUrl))
- 关注registerAM
  private def registerAM(
      host: String,
      port: Int,
      _sparkConf: SparkConf,
      uiAddress: Option[String]): Unit = {

     // client = doAsUser { new YarnRMClient() }
    client.register(host, port, yarnConf, _sparkConf, uiAddress, historyAddress)
    registered = true
  }
- 向RM注册AM
  def register(
      driverHost: String,
      driverPort: Int,
      conf: YarnConfiguration,
      sparkConf: SparkConf,
      uiAddress: Option[String],
      uiHistoryAddress: String): Unit = {
    amClient = AMRMClient.createAMRMClient()
    amClient.init(conf)
    amClient.start()

    synchronized {
      amClient.registerApplicationMaster(driverHost, driverPort, trackingUrl)
      registered = true
    }
  }
RPC通信,AM向RM申请资源
rpcEnv = sc.env.rpcEnv

val driverRef = rpcEnv.setupEndpointRef(
  RpcAddress(host, port),
  YarnSchedulerBackend.ENDPOINT_NAME)
createAllocator(driverRef, userConf)
- 申请资源的一系列操作
  private def createAllocator(driverRef: RpcEndpointRef, _sparkConf: SparkConf): Unit = {
    val appId = client.getAttemptId().getApplicationId().toString()
    val driverUrl = RpcEndpointAddress(driverRef.address.host, driverRef.address.port,
      CoarseGrainedSchedulerBackend.ENDPOINT_NAME).toString

    allocator = client.createAllocator(
      yarnConf,
      _sparkConf,
      driverUrl,
      driverRef,
      securityMgr,
      localResources)

    rpcEnv.setupEndpoint("YarnAM", new AMEndpoint(rpcEnv, driverRef))

    allocator.allocateResources()
  }
- 创建资源分配器
  def createAllocator(
      conf: YarnConfiguration,
      sparkConf: SparkConf,
      driverUrl: String,
      driverRef: RpcEndpointRef,
      securityMgr: SecurityManager,
      localResources: Map[String, LocalResource]): YarnAllocator = {
    require(registered, "Must register AM before creating allocator.")
    new YarnAllocator(driverUrl, driverRef, conf, sparkConf, amClient, getAttemptId(), securityMgr,
      localResources, new SparkRackResolver())
  }
- 分配资源
def allocateResources(): Unit = synchronized {

    val allocateResponse = amClient.allocate(progressIndicator)

    val allocatedContainers = allocateResponse.getAllocatedContainers()
    allocatorBlacklistTracker.setNumClusterNodes(allocateResponse.getNumClusterNodes)

    if (allocatedContainers.size > 0) {
      handleAllocatedContainers(allocatedContainers.asScala)
    }
  }
获取可用的资源列表
val allocateResponse = amClient.allocate(progressIndicator)

val allocatedContainers = allocateResponse.getAllocatedContainers()
处理可用的资源
handleAllocatedContainers(allocatedContainers.asScala)
- 进入到handleAllocatedContainers,可以看到几行重要的代码:
matchContainerToRequest

runAllocatedContainers(containersToUse)
- 所谓的处理,其实是优先位置的选择。
本地化级别:进程本地化,节点本地化,机架本地化,任意
- 计算和数据在同一个Executor中,称之进程本地化
- 计算和数据在同一个节点中,称之节点本地化
- 计算和数据在同一个机架中,称之机架本地化
- 运行在匹配后的资源中的executor,runAllocatedContainers(containersToUse)
  private def runAllocatedContainers(containersToUse: ArrayBuffer[Container]): Unit = {
    for (container <- containersToUse) {

      if (runningExecutors.size() < targetNumExecutors) {
        numExecutorsStarting.incrementAndGet()
        if (launchContainers) {
          launcherPool.execute(new Runnable {
            override def run(): Unit = {
              try {
                new ExecutorRunnable(
                  Some(container),
                  conf,
                  sparkConf,
                  driverUrl,
                  executorId,
                  executorHostname,
                  executorMemory,
                  executorCores,
                  appAttemptId.getApplicationId.toString,
                  securityMgr,
                  localResources
                ).run()
                updateInternalState()
              } catch {

              }
            }
          })
        } else {
          // For test only
          updateInternalState()
        }
      } else {

      }
    }
  }
- 一个container对应一个Executor
- 进入ExecutorRunnable可以看到两个重要的属性,用于和NodeManager交互
var rpc: YarnRPC = YarnRPC.create(conf)
var nmClient: NMClient = _
- run()方法 - 启动容器
  def run(): Unit = {
    logDebug("Starting Executor Container")
    nmClient = NMClient.createNMClient()
    nmClient.init(conf)
    nmClient.start()
    startContainer()
  }
- 与NodeManager连接上了,就可以启动容器了
def startContainer(): java.util.Map[String, ByteBuffer] = {
    val ctx = Records.newRecord(classOf[ContainerLaunchContext])
      .asInstanceOf[ContainerLaunchContext]
    val env = prepareEnvironment().asJava

    ctx.setLocalResources(localResources.asJava)
    ctx.setEnvironment(env)

    val commands = prepareCommand()

    ctx.setCommands(commands.asJava)

    // Send the start request to the ContainerManager
    try {
      nmClient.startContainer(container.get, ctx)
    } catch {

    }
  }
- 还是一样,发送指令,启动容器。具体封装指令的操作在prepareCommand:
command = bin/java org.apache.spark.executor.CoarseGrainedExecutorBackend
- 让NM启动容器,启动Executor
nmClient.startContainer(container.get, ctx)
CoarseGrainedExecutorBackend
- 还是一样,启动的JVM进程,看main方法:
  def main(args: Array[String]) {

    run(driverUrl, executorId, hostname, cores, appId, workerUrl, userClassPath)

  }
- 进入run方法:
  private def run(
      driverUrl: String,
      executorId: String,
      hostname: String,
      cores: Int,
      appId: String,
      workerUrl: Option[String],
      userClassPath: Seq[URL]) {

    SparkHadoopUtil.get.runAsSparkUser { () =>

      val env = SparkEnv.createExecutorEnv(
        driverConf, executorId, hostname, cores, cfg.ioEncryptionKey, isLocal = false)

      env.rpcEnv.setupEndpoint("Executor", new CoarseGrainedExecutorBackend(
        env.rpcEnv, driverUrl, executorId, hostname, cores, userClassPath, env))

      env.rpcEnv.awaitTermination()
    }
  }
- 设置终端Executor
NettyRpcEnv.scala

  override def setupEndpoint(name: String, endpoint: RpcEndpoint): RpcEndpointRef = {
    dispatcher.registerRpcEndpoint(name, endpoint)
  }
- 注册RPC终端
Dispatcher.scala

  def registerRpcEndpoint(name: String, endpoint: RpcEndpoint): NettyRpcEndpointRef = {
    val addr = RpcEndpointAddress(nettyEnv.address, name)
    val endpointRef = new NettyRpcEndpointRef(nettyEnv.conf, addr, nettyEnv)
    synchronized {
      if (stopped) {
        throw new IllegalStateException("RpcEnv has been stopped")
      }
      if (endpoints.putIfAbsent(name, new EndpointData(name, endpoint, endpointRef)) != null) {
        throw new IllegalArgumentException(s"There is already an RpcEndpoint called $name")
      }
      val data = endpoints.get(name)
      endpointRefs.put(data.endpoint, data.ref)
      receivers.offer(data)  // for the OnStart message
    }
    endpointRef
  }
- 看看new EndpointData的主构造方法
private class EndpointData(
      val name: String,
      val endpoint: RpcEndpoint,
      val ref: NettyRpcEndpointRef) {
    val inbox = new Inbox(ref, endpoint)
  }
- 再看看new Inbox的主构造方法
 // OnStart should be the first message to process
  inbox.synchronized {
    messages.add(OnStart)
  }
可以知道,在构建终端的时候,会给自己发送一个OnStart
- 反复检查数据,进行模式匹配,然后进行相应处理
  /**
   * Process stored messages.
   */
  def process(dispatcher: Dispatcher): Unit = {

    while (true) {
      safelyCall(endpoint) {
        message match {
          case RpcMessage(_sender, content, context) =>
              endpoint.receiveAndReply(context).applyOrElse[Any, Unit](content, { msg =>
                throw new SparkException(s"Unsupported message $message from ${_sender}")
              })

          case OnStart =>
            endpoint.onStart()
            if (!endpoint.isInstanceOf[ThreadSafeRpcEndpoint]) {
              inbox.synchronized {
                if (!stopped) {
                  enableConcurrent = true
                }
              }
            }

          case OnStop =>
            val activeThreads = inbox.synchronized { inbox.numActiveThreads }
            dispatcher.removeRpcEndpointRef(endpoint)
            endpoint.onStop()
        }
      }
    }
  }
- 接收到OnStart后,会调用CoarseGrainedExecutorBackend的onStart方法
  override def onStart() {

    rpcEnv.asyncSetupEndpointRefByURI(driverUrl).flatMap { ref =>
      // This is a very fast action so we can use "ThreadUtils.sameThread"
      driver = Some(ref)
      ref.ask[Boolean](RegisterExecutor(executorId, self, hostname, cores, extractLogUrls))
    }
  }
- Executor向Driver发送了RegisterExecutor请求,我们接着看Driver那段的接收:
  // DriverEndpoint

    override def receiveAndReply(context: RpcCallContext): PartialFunction[Any, Unit] = {

      case RegisterExecutor(executorId, executorRef, hostname, cores, logUrls) =>
        if (executorDataMap.contains(executorId)) {
          executorRef.send(RegisterExecutorFailed("Duplicate executor ID: " + executorId))
          context.reply(true)
        } else if (scheduler.nodeBlacklist.contains(hostname)) {
          executorRef.send(RegisterExecutorFailed(s"Executor is blacklisted: $executorId"))
          context.reply(true)
        } else {

          addressToExecutorId(executorAddress) = executorId
          totalCoreCount.addAndGet(cores)
          totalRegisteredExecutors.addAndGet(1)
          val data = new ExecutorData(executorRef, executorAddress, hostname,
            cores, cores, logUrls)

          executorRef.send(RegisteredExecutor)
          context.reply(true)
          listenerBus.post(
            SparkListenerExecutorAdded(System.currentTimeMillis(), executorId, data))
          makeOffers()
        }
    }
- 可以看到Driver向Executor发送RegisteredExecutor,再转到CoarseGrainedExecutorBackend:
override def receive: PartialFunction[Any, Unit] = {
    case RegisteredExecutor =>
      logInfo("Successfully registered with driver")
      try {
        executor = new Executor(executorId, hostname, env, userClassPath, isLocal = false)
      } catch {
        case NonFatal(e) =>
          exitExecutor(1, "Unable to create executor due to " + e.getMessage, e)
      }

    case LaunchTask(data) =>
      if (executor == null) {
        exitExecutor(1, "Received LaunchTask command but executor was null")
      } else {
        val taskDesc = TaskDescription.decode(data.value)
        logInfo("Got assigned task " + taskDesc.taskId)
        executor.launchTask(this, taskDesc)
      }
  }
- 模式匹配到RegisteredExecutor,调用executor = new Executor,进入主构造方法:
 // Start worker thread pool
  private val threadPool = {
    val threadFactory = new ThreadFactoryBuilder()
      .setDaemon(true)
      .setNameFormat("Executor task launch worker-%d")
      .setThreadFactory(new ThreadFactory {
        override def newThread(r: Runnable): Thread =
          new UninterruptibleThread(r, "unused") // thread name will be set by ThreadFactoryBuilder
      })
      .build()
    Executors.newCachedThreadPool(threadFactory).asInstanceOf[ThreadPoolExecutor]
  }
- 这里可以看出,Executor其实就是ExecutorBackend的一个计算对象,等待着任务的执行。
总结
通过上面的源码走下来,可能会有点晕,于是贴心的我附上了图形化
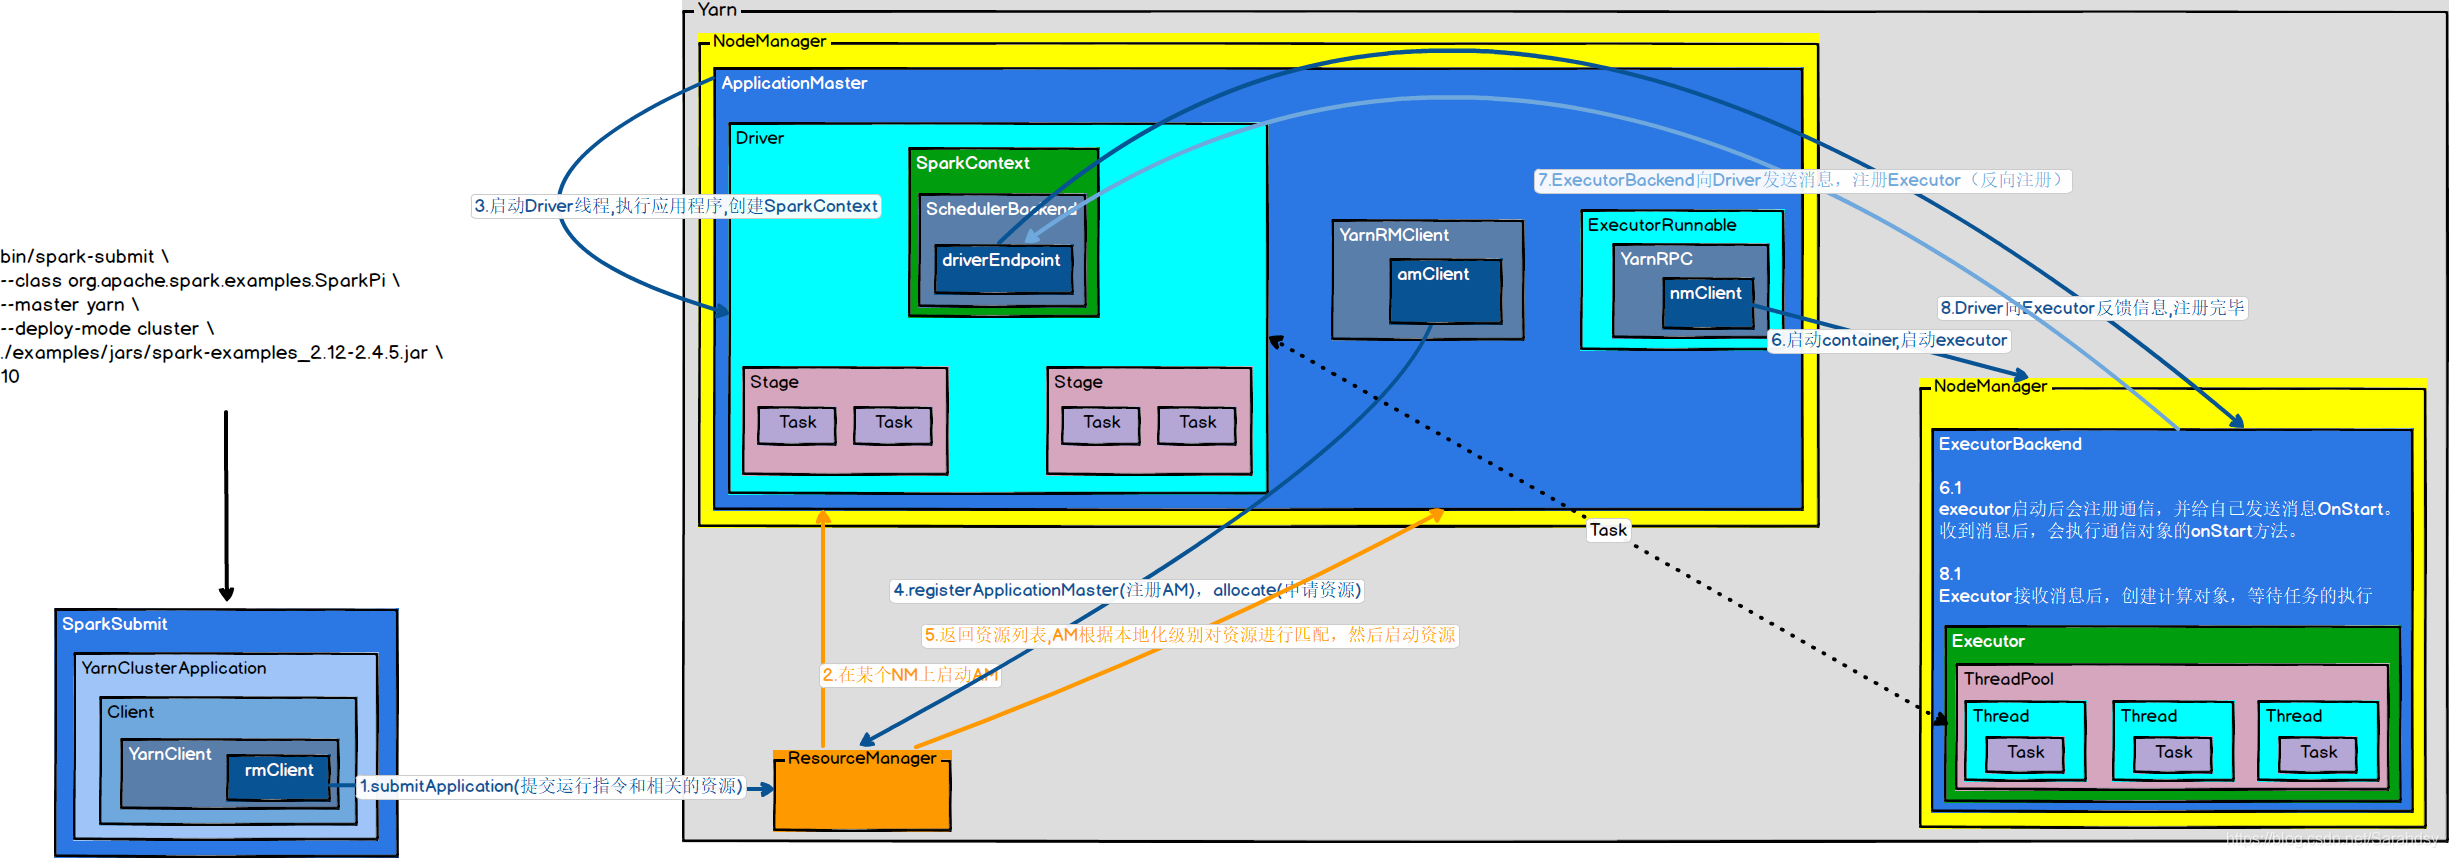
- 执行脚本提交任务,实际是启动一个SparkSubmit的JVM进程
- SparkSubmit类中的main方法反射调用YarnClusterApplication的main方法
- YarnClusterApplication创建Yarn客户端,然后向Yarn发送执行指令:bin/java org.apache.spark.deploy.yarn.ApplicationMaster
- Yarn框架收到指令后会在指定的NM中启动ApplicationMaster
- ApplicationMaster启动Driver线程,执行用户的作业
- AM向RM注册,申请资源
- 获取资源后,AM向NM发送指令:bin/java org.apache.spark.executor.CoarseGrainedExecutorBackend
- CoarseGrainedExecutorBackend进程会接收消息,跟Driver通信,注册已经启动的Executor;然后启动计算对象Executor等待接收任务
- Driver分配任务并监控任务的执行
好了,到这里,整个向Yarn提交应用的流程已经结束了。