*本篇文章已授权微信公众号 guolin_blog (郭霖)独家发布
前言
在上一篇Window机制探索中我们知道,ViewRootImpl在整个View体系中起着中流砥柱的作用,它是控件树正常运作的动力所在,并且有如下几个重要功能点。
- 连接
WindowManager和DecorView的纽带。 - 向
DecorView派发输入事件 - 完成View的绘制(
measure,layout,draw)。 - 负责与WMS交互通讯,调整窗口大小及布局。
ViewRootImpl
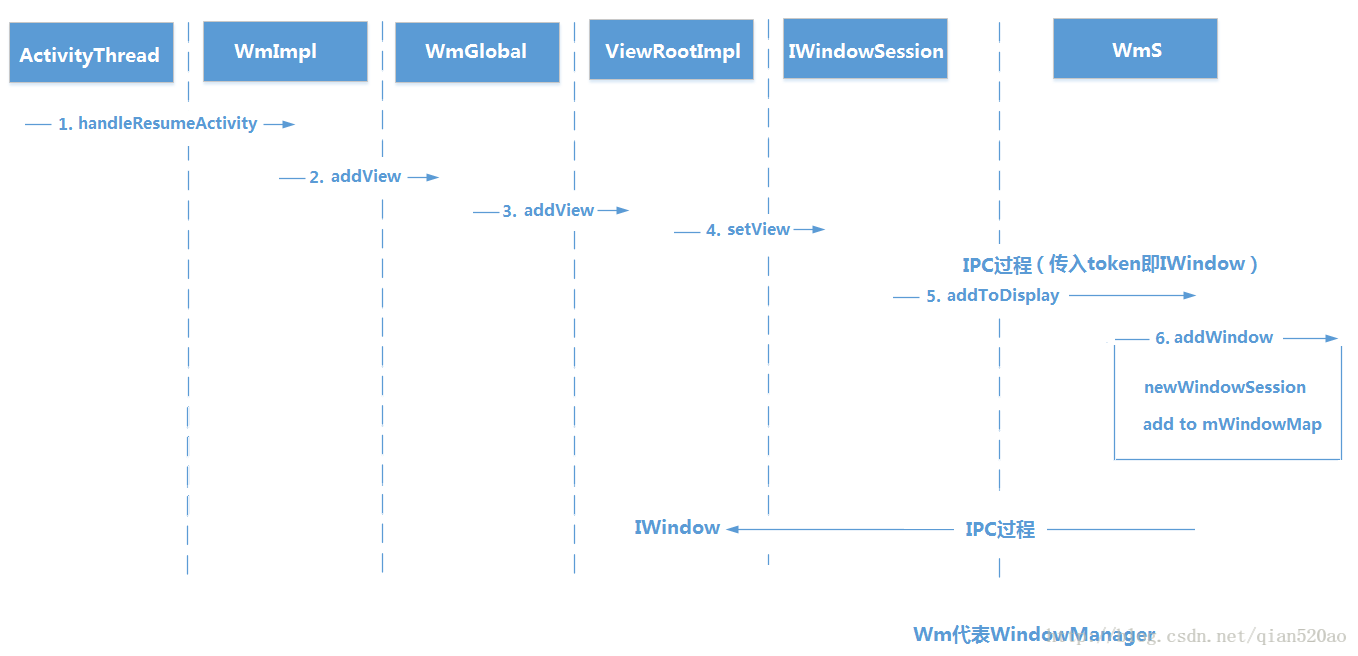
我们沿用Window机制探索中Window的添加流程图,我们所要分析的绘制机制,便从ViewRootImpl的setView()方法展开。
//ViewRootImpl


    public void setView(View view, WindowManager.LayoutParams attrs, View panelParentView) {
                // Schedule the first layout -before- adding to the window
                // manager, to make sure we do the relayout before receiving
                // any other events from the system.
                requestLayout();
    }


    @Override
    public void requestLayout() {
        if (!mHandlingLayoutInLayoutRequest) {
            checkThread();//检查是否在主线程
            mLayoutRequested = true;//mLayoutRequested 是否measure和layout布局。
            scheduleTraversals();
        }
    }


    void scheduleTraversals() {
        if (!mTraversalScheduled) {
            mTraversalScheduled = true;
            mTraversalBarrier = mHandler.getLooper().getQueue().postSyncBarrier();

            //post一个runnable处理-->mTraversalRunnable
            mChoreographer.postCallback(
                    Choreographer.CALLBACK_TRAVERSAL, mTraversalRunnable, null);
            ``````
        }
    }


    final class TraversalRunnable implements Runnable {
        @Override
        public void run() {
            doTraversal();
        }
    }
    final TraversalRunnable mTraversalRunnable = new TraversalRunnable();


    void doTraversal() {
            mHandler.getLooper().getQueue().removeSyncBarrier(mTraversalBarrier);

            performTraversals();//View的绘制流程正式开始。
    }
在scheduleTraversals方法中,通过mChoreographer发送一个runnable,在run()方法中去处理绘制流程。更多可以查看Android 屏幕刷新机制
performTraversals
ViewRootImpl在其创建过程中通过requestLayout()向主线程发送了一条触发遍历操作的消息,遍历操作是指performTraversals()方法。它是一个包罗万象的方法。ViewRootImpl中接收的各种变化,如来自WmS的窗口属性变化、来自控件树的尺寸变化及重绘请求等都引发performTraversals()的调用,并在其中完成处理。View类及其子类中的onMeasure()、onLayout()、onDraw()等回调也都是在performTraversals()的执行过程中直接或间接的引发。也正是如此,一次次的performTraversals()调用驱动着控件树有条不紊的工作,一旦此方法无法正常执行,整个控件树都将处于僵死状态。因此performTraversals()函数可以说是ViewRootImpl的心跳。
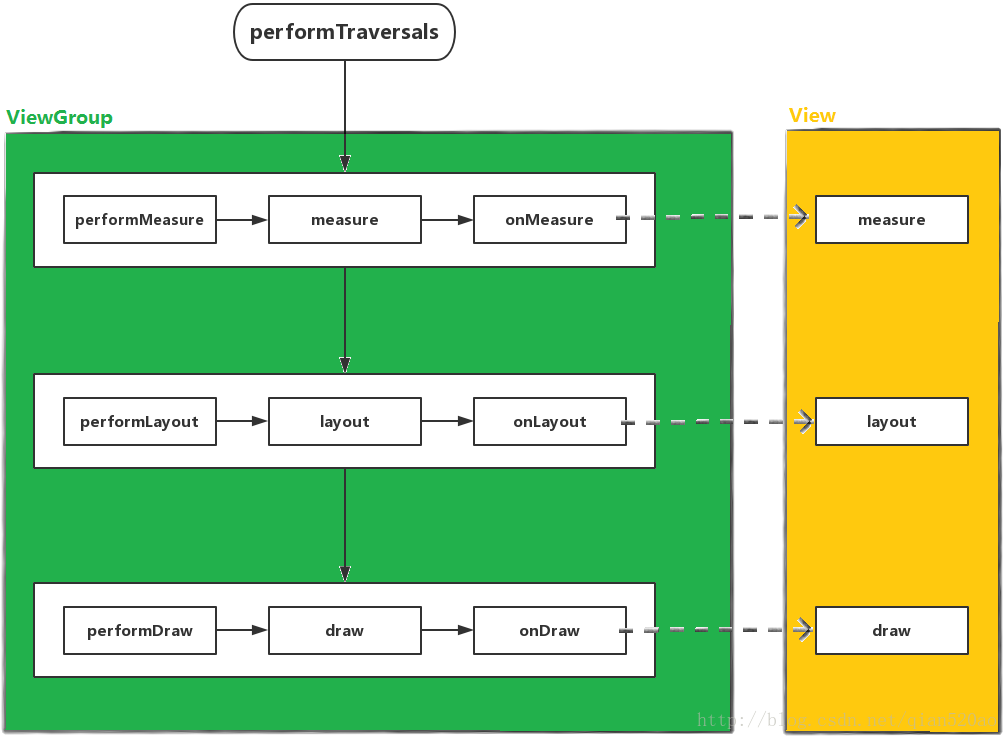
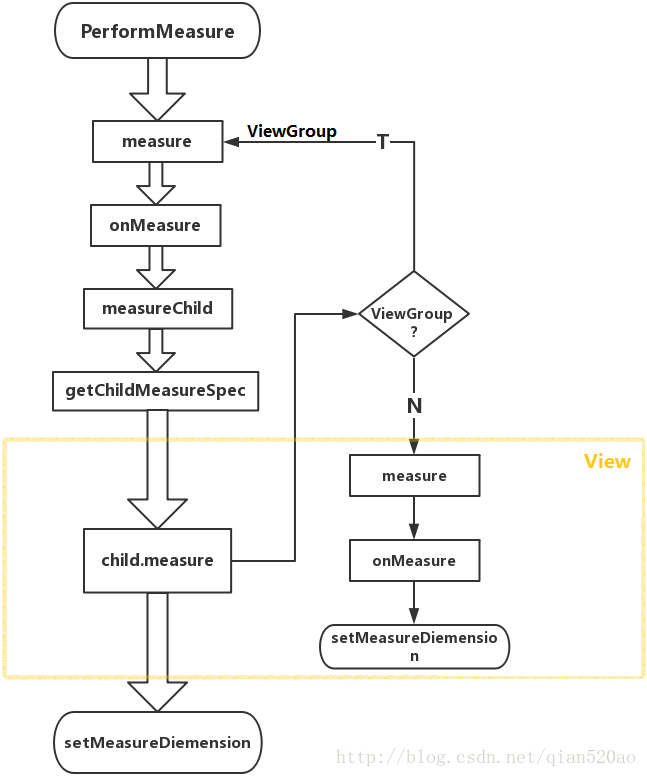
首先我们看一下performTraversals()首次绘制的大致流程,如上图所示:performTraversals()会一次调用performMeasure、performLayout、performDraw三个方法,这三个方法便是View绘制流程的精髓所在。
performMeasure: 会调用measure方法,在measure方法中又会调用onMeasure方法,在onMeasure方法中则会对所有的子元素进行measure过程,这个时候measure流程就从父容器传到子元素中了,这样就完成了一次measure过程。measure完成以后,可以通过getMeasuredWidth和getMeasureHeight方法来获取到View测量后的宽高。performLayout: 和performMeasure同理。Layout过程决定了View的四个顶点的坐标和实际View的宽高,完成以后,可以通过getTop/Bottom/Left/Right拿到View的四个顶点位置,并可以通过getWidth和getHeight方法来拿到View的最终宽高。performDraw: 和performMeasure同理,唯一不同的是,performDraw的传递过程是在draw方法中通过dispatchDraw来实现的。Draw过程则决定了View的显示,只有draw方法完成以后View的内容才能呈现在屏幕上。
我们知道,View的绘制流程是从顶级View也就是DecorView「ViewGroup」开始,一层一层从ViewGroup至子View遍历测绘,我们先纵观performTraversals()全局,认识View绘制的一个整体架构,后面我们会补充说明部分重要代码。如 : view.invalidate、view.requestLayout、view.post(runnable)等。
//ViewRootImpl


    private void performTraversals() {

            //调用performMeasure(childWidthMeasureSpec, childHeightMeasureSpec);
            measureHierarchy(host, lp, res,desiredWindowWidth, desiredWindowHeight);

            performLayout(lp, mWidth, mHeight);

            performDraw();
    }
measure
MeasureSpec
View的测量过程中,还需要理解MeasureSpec,MeasureSpec决定了一个View的尺寸规格,并且View的MeasureSpec受自身的LayoutParams(一般是xml布局中width和height)和父容器MeasureSpec的影响。
MeasureSpec代表一个32位的int值,高2位代表SpecMode,低30位代表SpecSize。
SpecMode: 测量模式,有UNSPECIFIED、 EXACTLY、AT_MOST三种。SpecSize: 在某种测量模式下的尺寸和大小。
SpecMode 有如下三种取值:
UNSPECIFIED : 父容器对子View的尺寸不作限制,通常用于系统内部。(listView和scrollView等)
EXACTLY : SpecSize 表示View的最终大小,因为父容器已经检测出View所需要的精确大小,它对应
LayoutParams中的match_parent和具体的数值这两种模式。AT_MOST : SpecSize 表示父容器的可用大小,View的大小不能大于这个值。它对应
LayoutParams中的wrap_content。
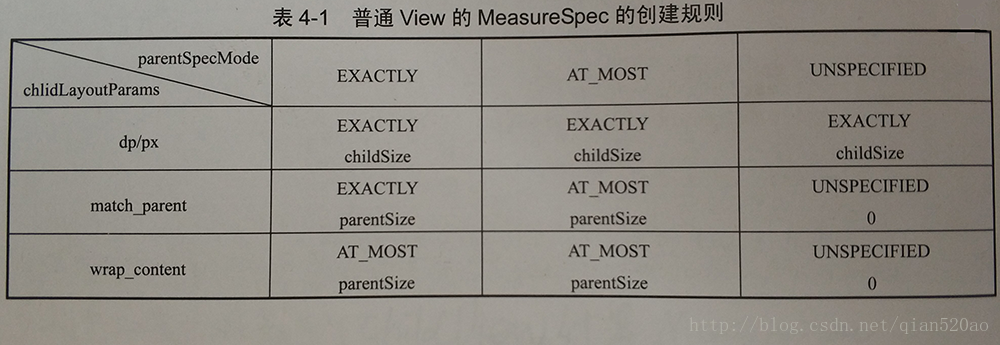
MeasureSpec和LayoutParams
对于普通View(DecorView略有不同),其MeasureSpec由父容器的MeasureSpec和自身的LayoutParams共同决定,MeasureSpec一旦确定后,onMeasure中就可以确定View的测量宽高。
那么针对不同父容器和View本身不同的LayoutParams,View就可以有多种MeasureSpec,我们从子View的角度来分析。
①View宽/高采用 固定宽高 的时候,不管父容器的
MeasureSpec是什么,View的MeasureSpec都是EXACTLY并且其大小遵循LayoutParams中的大小。②View宽/高采用 wrap_content 的时候 ,不管父容器的模式是EXACTLY还是AT_MOST,View的模式总是AT_MOST,并且大小不能超过父容器的剩余空间(SpecSize,可用大小)。
③View宽/高采用 match_parent 的时候 :
I 如果父容器的模式是EXACTLY,那么View也是EXACTLY并且其大小是父容器的剩余空间(SpecSize,最终大小);
II 如果父容器的模式是AT_MOST,那么View也是AT_MOST并且其大小不会超过父容器的剩余空间(SpecSize,可用大小)。
DecorView
有了上面的理论知识铺垫之后,我们来看一下DecorView的measure过程。
performTraversals
//ViewRootImpl


   private void performTraversals() {
        final View host = mView;

        int desiredWindowWidth;//decorView宽度
        int desiredWindowHeight;//decorView高度

        if (mFirst) {
            if (shouldUseDisplaySize(lp)) {
                //窗口的类型中有状态栏和,所以高度需要减去状态栏
                Point size = new Point();
                mDisplay.getRealSize(size);
                desiredWindowWidth = size.x;
                desiredWindowHeight = size.y;
            } else {
                //窗口的宽高即整个屏幕的宽高
                Configuration config = mContext.getResources().getConfiguration();
                desiredWindowWidth = dipToPx(config.screenWidthDp);
                desiredWindowHeight = dipToPx(config.screenHeightDp);
            }

            //在onCreate中view.post(runnable)和此方法有关
            host.dispatchAttachedToWindow(mAttachInfo, 0);
        }


        boolean layoutRequested = mLayoutRequested && (!mStopped || mReportNextDraw);
        if (layoutRequested) {
            ``````
            //创建了DecorView的MeasureSpec,并调用performMeasure
             measureHierarchy(host, lp, res,desiredWindowWidth, desiredWindowHeight);
}在ViewRootImpl中,我们如上分析一下主要代码,在measureHierarchy()方法中,创建了DecorView的MeasureSpec。
measureHierarchy
//ViewRootImpl
private boolean measureHierarchy(final View host, final WindowManager.LayoutParams lp,
final Resources res, final int desiredWindowWidth, final int desiredWindowHeight) {
int childWidthMeasureSpec;
int childHeightMeasureSpec;
boolean windowSizeMayChange = false;
boolean goodMeasure = false;
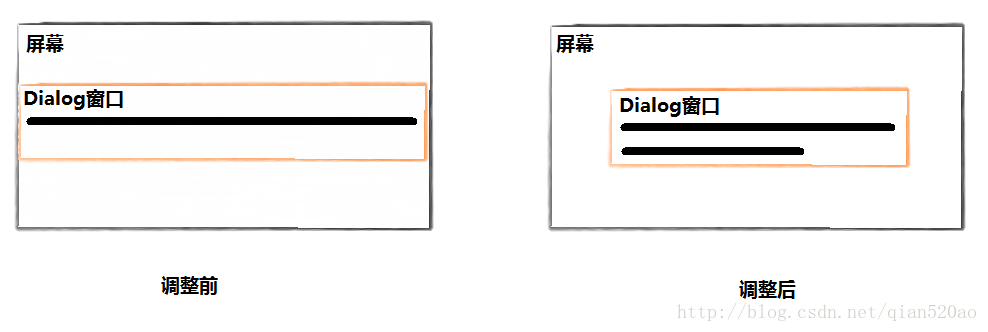
//针对设置WRAP_CONTENT的dialog,开始协商,缩小布局参数
if (lp.width == ViewGroup.LayoutParams.WRAP_CONTENT) {
// On large screens, we don't want to allow dialogs to just
// stretch to fill the entire width of the screen to display
// one line of text. First try doing the layout at a smaller
// size to see if it will fit.
int baseSize = 0;
if (mTmpValue.type == TypedValue.TYPE_DIMENSION) {
baseSize = (int)mTmpValue.getDimension(packageMetrics);
}
childWidthMeasureSpec = getRootMeasureSpec(baseSize, lp.width);
childHeightMeasureSpec = getRootMeasureSpec(desiredWindowHeight, lp.height);
performMeasure(childWidthMeasureSpec, childHeightMeasureSpec);
goodMeasure = true;
}
``````
if (!goodMeasure) {//DecorView,宽度基本都为match_parent
childWidthMeasureSpec = getRootMeasureSpec(desiredWindowWidth, lp.width);
childHeightMeasureSpec = getRootMeasureSpec(desiredWindowHeight, lp.height);
performMeasure(childWidthMeasureSpec, childHeightMeasureSpec);
if (mWidth != host.getMeasuredWidth() || mHeight != host.getMeasuredHeight()) {
windowSizeMayChange = true;
}
}
return windowSizeMayChange;
}
//创建measureSpec
private static int getRootMeasureSpec(int windowSize, int rootDimension) {
int measureSpec;
switch (rootDimension) {
case ViewGroup.LayoutParams.MATCH_PARENT:
// Window can't resize. Force root view to be windowSize.
measureSpec = MeasureSpec.makeMeasureSpec(windowSize, MeasureSpec.EXACTLY);
break;
case ViewGroup.LayoutParams.WRAP_CONTENT:
// Window can resize. Set max size for root view.
measureSpec = MeasureSpec.makeMeasureSpec(windowSize, MeasureSpec.AT_MOST);
break;
default:
// Window wants to be an exact size. Force root view to be that size.
measureSpec = MeasureSpec.makeMeasureSpec(rootDimension, MeasureSpec.EXACTLY);
break;
}
return measureSpec;
}
measureHierarchy()用于测量整个控件树,传入的参数desiredWindowWidth和desiredWindowHeight在前面方法中根据当前窗口的不同情况(状态栏)挑选而出,不过measureHierarchy()有自己的考量方法,让窗口布局更优雅,(针对wrap_content的dialog),所以设置了wrap_content的Dialog,有可能执行多次测量。(DecorView的xml布局中,宽高基本都为match_parent)
通过上述代码,DecorView的MeasureSpec的产生过程就很明确了,具体来说其遵守如下规则,根据它的LayoutParams中的宽高的参数来划分 : (与上面所说的MeasureSpec和LayoutParams同理)
LayoutParams.MATCH_PARENT : EXACTLY(精确模式),大小就是窗口的大小;
LayoutParams.WRAP_CONTENT : AT_MOST (最大模式),大小不确定,但是不能超过窗口的大小,暂定为窗口大小;
固定大小(写死的值) : EXACTLY(精确模式),大小就是当前写死的数值。
performMeasure
//ViewRootImpl -->measureHierarchy

    //该方法很简单,直接调用mView.measure()方法
    private void performMeasure(int childWidthMeasureSpec, int childHeightMeasureSpec) {

            mView.measure(childWidthMeasureSpec, childHeightMeasureSpec);

    }
在view.measure()的方法里,仅当给与的
MeasureSpec发生变化时,或要求强制重新布局时,才会进行测量。强制重新布局 : 控件树中的一个子控件内容发生变化时,需要重新测量和布局的情况,在这种情况下,这个子控件的父控件(以及父控件的父控件)所提供的
MeasureSpec必定与上次测量时的值相同,因而导致从ViewRootImpl到这个控件的路径上,父控件的measure()方法无法得到执行,进而导致子控件无法重新测量其布局和尺寸。解决途径 : 因此,当子控件因内容发生变化时,从子控件到父控件回溯到ViewRootImpl,并依次调用父控件的
requestLayout()方法。这个方法会在mPrivateFlags中加入标记PFLAG_FORCE_LAYOUT,从而使得这些父控件的measure()方法得以顺利执行,进而这个子控件有机会进行重新布局与测量。这便是强制重新布局的意义所在。
measure
//View

    //final类,子类不能重写该方法
    public final void measure(int widthMeasureSpec, int heightMeasureSpec) {

            ``````

            onMeasure(widthMeasureSpec, heightMeasureSpec);
    }


    //ViewGroup并没有重写该方法
    protected void onMeasure(int widthMeasureSpec, int heightMeasureSpec) {
        setMeasuredDimension(getDefaultSize(getSuggestedMinimumWidth(), widthMeasureSpec),
                getDefaultSize(getSuggestedMinimumHeight(), heightMeasureSpec));

}view.measure()方法其实没有实现任何测量的算法,它的作用在于判断是否需要引发onMeasure()的调用,并对onMeasure()行为的正确性进行检查。
onMeasure
ViewGroup是一个抽象类,并没有重写onMeasure()方法,就要具体实现类去实现该方法。因为我们的顶级View是DecorView,是一个FrameLayout,所以我们从FrameLayout开始继续我们的主线任务。
ViewGroup -> FrameLayout -> onMeasure()
//FrameLayout


    @Override
    protected void onMeasure(int widthMeasureSpec, int heightMeasureSpec) {
        int count = getChildCount();

        int maxHeight = 0;
        int maxWidth = 0;
        int childState = 0;

        for (int i = 0; i < count; i++) {
            final View child = getChildAt(i);

            //遍历子View,只要子View不是GONE便处理
            if (mMeasureAllChildren || child.getVisibility() != GONE) {

                //子View结合父View的MeasureSpec和自己的LayoutParams算出子View自己的MeasureSpec
                //如果当前child也是ViewGroup,也继续遍历它的子View
                //如果当前child是View,便根据这个MeasureSpec测量自己
                measureChildWithMargins(child, widthMeasureSpec, 0, heightMeasureSpec, 0);
               ``````
            }
        }

          ``````
        //父View等所有的子View测量结束之后,再来测量自己
        setMeasuredDimension(``````);

}我们知道ViewGroup的measure任务主要是测量所有的子View,测量完毕之后根据合适的宽高再测量自己。
在FrameLayout的onMeasure()方法中,会通过measureChildWithMargins()方法遍历子View,并且如果FrameLayout宽高的MeasureSpec是AT_MOST,那么FrameLayout计算自身宽高就会受到子View的影响,可能使用最大子View的宽高。
不同ViewGroup实现类有不同的测量方式,例如LinearLayout自身的高度可能是子View高度的累加。
measureChildWithMargins()方法为ViewGroup提供的方法,根据父View的MeasureSpec和子View的LayoutParams,算出子View自己的MeasureSpec。
//ViewGroup


    protected void measureChildWithMargins(View child,
            int parentWidthMeasureSpec, int widthUsed,
            int parentHeightMeasureSpec, int heightUsed) {
        final MarginLayoutParams lp = (MarginLayoutParams) child.getLayoutParams();

        final int childWidthMeasureSpec = getChildMeasureSpec(parentWidthMeasureSpec,
                mPaddingLeft + mPaddingRight + lp.leftMargin + lp.rightMargin
                        + widthUsed, lp.width);

        final int childHeightMeasureSpec = getChildMeasureSpec(parentHeightMeasureSpec,
                mPaddingTop + mPaddingBottom + lp.topMargin + lp.bottomMargin
                        + heightUsed, lp.height);

        child.measure(childWidthMeasureSpec, childHeightMeasureSpec);
    }
上述方法会对子元素进行measure,在调用子元素的measure方法之前会先通过
getChildMeasureSpec方法来得到子元素的MeasureSpec。显然子元素的MeasureSpec的创建与父容器的MeasureSpec和子元素本身的LayoutParams有关,此外还和View的margin和padding有关,如果对该理论知识印象不太深刻建议滑到上个段落 —- MeasureSpec ,再来看以下代码,事半功倍。
//ViewGroup


    //spec为父容器的MeasureSpec
    public static int getChildMeasureSpec(int spec, int padding, int childDimension) {
        int specMode = MeasureSpec.getMode(spec);//父容器的specMode
        int specSize = MeasureSpec.getSize(spec);//父容器的specSize

        int size = Math.max(0, specSize - padding);

        int resultSize = 0;
        int resultMode = 0;

        switch (specMode) {//根据父容器的specMode
        // Parent has imposed an exact size on us
        case MeasureSpec.EXACTLY:
            if (childDimension >= 0) {
                resultSize = childDimension;
                resultMode = MeasureSpec.EXACTLY;
            } else if (childDimension == LayoutParams.MATCH_PARENT) {
                // Child wants to be our size. So be it.
                resultSize = size;
                resultMode = MeasureSpec.EXACTLY;
            } else if (childDimension == LayoutParams.WRAP_CONTENT) {
                // Child wants to determine its own size. It can't be bigger than us.
                resultSize = size;
                resultMode = MeasureSpec.AT_MOST;
            }
            break;

        // Parent has imposed a maximum size on us
        case MeasureSpec.AT_MOST:
            if (childDimension >= 0) {
                // Child wants a specific size... so be it
                resultSize = childDimension;
                resultMode = MeasureSpec.EXACTLY;
            } else if (childDimension == LayoutParams.MATCH_PARENT) {
                // Child wants to be our size, but our size is not fixed.
                // Constrain child to not be bigger than us.
                resultSize = size;
                resultMode = MeasureSpec.AT_MOST;
            } else if (childDimension == LayoutParams.WRAP_CONTENT) {
                // Child wants to determine its own size. It can't be bigger than us.
                resultSize = size;
                resultMode = MeasureSpec.AT_MOST;
            }
            break;

        // Parent asked to see how big we want to be
        case MeasureSpec.UNSPECIFIED:
            if (childDimension >= 0) {
                // Child wants a specific size... let him have it
                resultSize = childDimension;
                resultMode = MeasureSpec.EXACTLY;
            } else if (childDimension == LayoutParams.MATCH_PARENT) {
                // Child wants to be our size... find out how big it should be
                resultSize = View.sUseZeroUnspecifiedMeasureSpec ? 0 : size;
                resultMode = MeasureSpec.UNSPECIFIED;
            } else if (childDimension == LayoutParams.WRAP_CONTENT) {
                // Child wants to determine its own size.... find out how big it should be
                resultSize = View.sUseZeroUnspecifiedMeasureSpec ? 0 : size;
                resultMode = MeasureSpec.UNSPECIFIED;
            }
            break;
        }
        //noinspection ResourceType
        return MeasureSpec.makeMeasureSpec(resultSize, resultMode);
    }
上述方法不难理解,它的主要作用是根据父容器的MeasureSpec同时结合View本身的LayoutParams来确定子元素的MeasureSpec。
View -> onMeasure
回顾一下上面的measure段落,因为具体实现的ViewGroup会重写onMeasure(),因为ViewGroup是一个抽象类,其测量过程的onMeasure()方法需要具体实现类去实现,这么做的原因在于不同的ViewGroup实现类有不同的布局特性,比如说FrameLayout,RelativeLayout,LinearLayout都有不同的布局特性,因此ViewGroup无法对onMeasure()做同一处理。
但是对于普通的View只需完成自身的测量工作即可,所以可以看到View的onMeasure方法很简洁。
//View

    //final类,子类不能重写该方法
    public final void measure(int widthMeasureSpec, int heightMeasureSpec) {

            ``````

            onMeasure(widthMeasureSpec, heightMeasureSpec);
    }


    //ViewGroup并没有重写该方法
    protected void onMeasure(int widthMeasureSpec, int heightMeasureSpec) {
        setMeasuredDimension(
        getDefaultSize(getSuggestedMinimumWidth(), widthMeasureSpec),
        getDefaultSize(getSuggestedMinimumHeight(), heightMeasureSpec));

    }


    public static int getDefaultSize(int size, int measureSpec) {
        int result = size;
        int specMode = MeasureSpec.getMode(measureSpec);
        int specSize = MeasureSpec.getSize(measureSpec);

        switch (specMode) {
        case MeasureSpec.UNSPECIFIED:
            result = size;
            break;
        case MeasureSpec.AT_MOST:
        case MeasureSpec.EXACTLY:
            result = specSize;
            break;
        }
        return result;
    }
从
getDefaultSize()方法的实现来看,对于AT_MOST和EXACTLY这两种情况View的宽高都由specSize决定,也就是说如果我们直接继承View的自定义控件需要重写onMeasure方法并设置wrap_content时自身的大小,否则在布局中使用wrap_content就相当于使用match_parent。
layout
子View具体layout的位置都是相对于父容器而言的,View的layout过程和measure同理,也是从顶级View开始,递归的完成整个空间树的布局操作。
经过前面的测量,控件树中的控件对于自己的尺寸显然已经了然于胸。而且父控件对于子控件的位置也有了眉目,所以经过测量过程后,布局阶段会把测量结果转化为控件的实际位置与尺寸。控件的实际位置与尺寸由View的mLeft,mTop,mRight,mBottom 等4个成员变量存储的坐标值来表示。
并且需要注意的是: View的mLeft,mTop,mRight,mBottom 这些坐标值是以父控件左上角为坐标原点进行计算的。倘若需要获取控件在窗口坐标系中的位置可以使用
View.GetLocationWindow()或者是View.getRawX()/Y()。
//ViewRootImpl


    private void performLayout(WindowManager.LayoutParams lp, int desiredWindowWidth,int desiredWindowHeight) {

        final View host = mView;

        host.layout(0, 0, host.getMeasuredWidth(), host.getMeasuredHeight());

    }
//ViewGroup
//尽管ViewGroup也重写了layout方法
//但是本质上还是会通过super.layout()调用View的layout()方法
@Override
public final void layout(int l, int t, int r, int b) {
if (!mSuppressLayout && (mTransition == null || !mTransition.isChangingLayout())) {
//如果无动画,或者动画未运行
super.layout(l, t, r, b);
} else {
//等待动画完成时再调用requestLayout()
mLayoutCalledWhileSuppressed = true;
}
}
//View
public void layout(int l, int t, int r, int b) {
int oldL = mLeft;
int oldT = mTop;
int oldB = mBottom;
int oldR = mRight;
//如果布局有变化,通过setFrame重新布局
boolean changed = isLayoutModeOptical(mParent) ?
setOpticalFrame(l, t, r, b) : setFrame(l, t, r, b);
if (changed || (mPrivateFlags & PFLAG_LAYOUT_REQUIRED) == PFLAG_LAYOUT_REQUIRED) {
//如果这是一个ViewGroup,还会遍历子View的layout()方法
//如果是普通View,通知具体实现类布局变更通知
onLayout(changed, l, t, r, b);
//清除PFLAG_LAYOUT_REQUIRED标记
mPrivateFlags &= ~PFLAG_LAYOUT_REQUIRED;
``````
//布局监听通知
}
//清除PFLAG_FORCE_LAYOUT标记
mPrivateFlags &= ~PFLAG_FORCE_LAYOUT;
}
通过代码可以看到尽管ViewGroup也重写了layout()方法,但是本质上还是会走View的layout()。
在View的layout()方法里,首先通过 setFrame()(setOpticalFrame()也走setFrame())将l、t、r、b分别设置到mLeft、mTop、mRight、和mBottom,这样就可以确定子View在父容器的位置了,上面也说过了,这些位置是相对父容器的。
然后调用onLayout()方法,使具体实现类接收到布局变更通知。如果此类是ViewGroup,还会遍历子View的layout()方法使其更新布局。如果调用的是onLayout()方法,这会导致子View无法调用setFrame(),从而无法更新控件坐标信息。
//View

    protected void onLayout(boolean changed, int l, int t, int r, int b) {}


//ViewGroup

    //abstract修饰,具体实现类必须重写该方法
    @Override
protected abstract void onLayout(boolean changed,int l, int t, int r, int b);对于普通View来说,onLayout()方法是一个空实现,主要是具体实现类重写该方法后能够接收到布局坐标更新信息。
对于ViewGroup来说,和measure一样,不同实现类有它不同的布局特性,在ViewGroup中onLayout()方法是abstract的,具体实现类必须重写该方法,以便接收布局坐标更新信息后,处理自己的子View的坐标信息。有兴趣的童鞋可以看FrameLayout或者LinearLayout的onLayout()方法。
小结
对比测量measure和布局layout两个过程有助于加深对它们的理解。(摘自《深入理解Android卷III》)
measure确定的是控件的尺寸,并在一定程度上确定了子控件的位置。而布局则是针对测量结果来实施,并最终确定子控件的位置。
measure结果对布局过程没有约束力。虽说子控件在
onMeasure()方法中计算出了自己应有的尺寸,但是由于layout()方法是由父控件调用,因此控件的位置尺寸的最终决定权掌握在父控件手中,测量结果仅仅只是一个参考。因为measure过程是后根遍历(DecorView最后
setMeasureDiemension()),所以子控件的测量结果影响父控件的测量结果。而Layout过程是先根遍历(
layout()一开始就调用setFrame()完成DecorView的布局),所以父控件的布局结果会影响子控件的布局结果。完成
performLayout()后,空间树的所有控件都已经确定了其最终位置,就剩下绘制了。
draw
我们先纯粹的看View的draw过程,因为这个过程相对上面measure和layout比较简单。
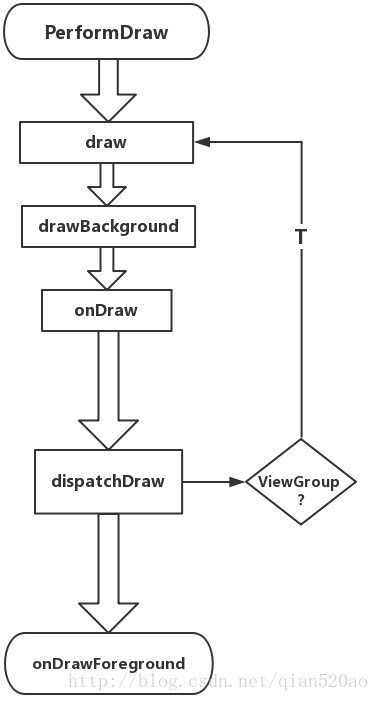
View的draw过程遵循如下几步 :
绘制背景drawBackground();
绘制自己onDraw();
如果是ViewGroup则绘制子View,dispatchDraw();
绘制装饰(滚动条)和前景,onDrawForeground();
//View


    public void draw(Canvas canvas) {
        final int privateFlags = mPrivateFlags;

        //检查是否是"实心(不透明)"控件。(后面有补充)
        final boolean dirtyOpaque = (privateFlags & PFLAG_DIRTY_MASK) == PFLAG_DIRTY_OPAQUE &&
                (mAttachInfo == null || !mAttachInfo.mIgnoreDirtyState);
        mPrivateFlags = (privateFlags & ~PFLAG_DIRTY_MASK) | PFLAG_DRAWN;

        /*
         * Draw traversal performs several drawing steps which must be executed
         * in the appropriate order:
         *
         *      1. Draw the background
         *      2. If necessary, save the canvas' layers to prepare for fading
         *      3. Draw view's content
         *      4. Draw children
         *      5. If necessary, draw the fading edges and restore layers
         *      6. Draw decorations (scrollbars for instance)
         */

        // Step 1, draw the background, if needed
        int saveCount;
        //非"实心"控件,将会绘制背景
        if (!dirtyOpaque) {
            drawBackground(canvas);
        }

        // skip step 2 & 5 if possible (common case)
        final int viewFlags = mViewFlags;
        boolean horizontalEdges = (viewFlags & FADING_EDGE_HORIZONTAL) != 0;
        boolean verticalEdges = (viewFlags & FADING_EDGE_VERTICAL) != 0;

        //如果控件不需要绘制渐变边界,则可以进入简便绘制流程
        if (!verticalEdges && !horizontalEdges) {
            // Step 3, draw the content
            if (!dirtyOpaque) onDraw(canvas);//非"实心",则绘制控件本身

            // Step 4, draw the children
            dispatchDraw(canvas);//如果当前不是ViewGroup,此方法则是空实现

            // Overlay is part of the content and draws beneath Foreground
            if (mOverlay != null && !mOverlay.isEmpty()) {
                mOverlay.getOverlayView().dispatchDraw(canvas);
            }

            // Step 6, draw decorations (foreground, scrollbars)
            onDrawForeground(canvas);//绘制装饰和前景

            // we're done...
            return;
        }

        ``````
    }
至此View的工作流程的大致整体已经描述完毕了,是否感觉意犹未尽,我们再补充2个知识点作为餐后甜点。
invalidate
我们知道invalidate()(在主线程)和postInvalidate()(可以在子线程)都是用于请求View重绘的方法,那么它是如何实现的呢?
invalidate()方法必须在主线程执行,而scheduleTraversals()引发的遍历也是在主线程执行。所以调用invalidate()方法并不会使得遍历立即开始,因为在调用invalidate()的方法执行完毕之前(准确的说是主线程的Looper处理完其他消息之前),主线程根本没有机会处理scheduleTraversals()所发出的消息。这种机制带来的好处是 : 在一个方法里可以连续调用多个控件的
invalidate()方法,而不用担心会由于多次重绘而产生的效率问题。另外多次调用
invalidate()方法会使得ViewRootImpl多次接收到设置脏区域的请求,ViewRootImpl会将这些脏区域累加到mDirty中,进而在随后的遍历中,一次性的完成所有脏区域的重绘。窗口第一次绘制时候,ViewRootImpl的
mFullRedrawNeeded成员将会被设置为true,也就是说mDirty所描述的区域将会扩大到整个窗口,进而实现完整重绘。
View的脏区域和”实心”控件
增加两个知识点,能够更好的理解View的重绘过程。
为了保证绘制的效率,控件树仅对需要重绘的区域进行绘制。这部分区域成为”脏区域”Dirty Area。
当一个控件的内容发生变化而需要重绘时,它会通过
View.invalidate()方法将其需要重绘的区域沿着控件树自下而上的交给ViewRootImpl,并保存在ViewRootImpl的mDirty成员中,最后通过scheduleTraversals()引发一次遍历,进而进行重绘工作,这样就可以保证仅位于mDirty所描述的区域得到重绘,避免了不必要的开销。View的
isOpaque()方法返回值表示此控件是否为”实心”的,所谓”实心”控件,是指在onDraw()方法中能够保证此控件的所有区域都会被其所绘制的内容完全覆盖。对于”实心”控件来说,背景和子元素(如果有的话)是被其onDraw()的内容完全遮住的,因此便可跳过遮挡内容的绘制工作从而提升效率。简单来说透过此控件所属的区域无法看到此控件下的内容,也就是既没有半透明也没有空缺的部分。因为自定义
ViewGroup控件默认是”实心”控件,所以默认不会调用drawBackground()和onDraw()方法,因为一旦ViewGroup的onDraw()方法,那么就会覆盖住它的子元素。但是我们仍然可以通过调用setWillNotDraw(false)和setBackground()方法来开启ViewGroup的onDraw()功能。
下面我们从View的invalidate方法,自下(View)而上(ViewRootImpl)的分析。
invalidate : 使无效; damage : 损毁;dirty : 脏;
View
//View


    public void invalidate() {
        invalidate(true);
    }

    void invalidate(boolean invalidateCache) {
        invalidateInternal(0, 0, mRight - mLeft, mBottom - mTop, invalidateCache, true);
    }

    void invalidateInternal(int l, int t, int r, int b, boolean invalidateCache,
            boolean fullInvalidate) {

        //如果VIew不可见,或者在动画中
        if (skipInvalidate()) {
            return;
        }

        //根据mPrivateFlags来标记是否重绘
        if ((mPrivateFlags & (PFLAG_DRAWN | PFLAG_HAS_BOUNDS)) == (PFLAG_DRAWN | PFLAG_HAS_BOUNDS)
                || (invalidateCache && (mPrivateFlags & PFLAG_DRAWING_CACHE_VALID) == PFLAG_DRAWING_CACHE_VALID)
                || (mPrivateFlags & PFLAG_INVALIDATED) != PFLAG_INVALIDATED
                || (fullInvalidate && isOpaque() != mLastIsOpaque)) {
            if (fullInvalidate) {//上面传入为true,表示需要全部重绘
                mLastIsOpaque = isOpaque();//
                mPrivateFlags &= ~PFLAG_DRAWN;//去除绘制完毕标记。
            }

            //添加标记,表示View正在绘制。PFLAG_DRAWN为绘制完毕。
            mPrivateFlags |= PFLAG_DIRTY;

            //清除缓存,表示由当前View发起的重绘。
            if (invalidateCache) {
                mPrivateFlags |= PFLAG_INVALIDATED;
                mPrivateFlags &= ~PFLAG_DRAWING_CACHE_VALID;
            }

            //把需要重绘的区域传递给父View
            final AttachInfo ai = mAttachInfo;
            final ViewParent p = mParent;
            if (p != null && ai != null && l < r && t < b) {
                final Rect damage = ai.mTmpInvalRect;
                //设置重绘区域(区域为当前View在父容器中的整个布局)
                damage.set(l, t, r, b);
                p.invalidateChild(this, damage);
            }
            ``````
        }
}上述代码中,会设置一系列的标记位到mPrivateFlags中,并且通过父容器的invalidateChild方法,将需要重绘的脏区域传给父容器。(ViewGroup和ViewRootImpl都继承了ViewParent类,该类中定义了子元素与父容器间的调用规范。)
ViewGroup
//ViewGroup


    @Override
    public final void invalidateChild(View child, final Rect dirty) {
        ViewParent parent = this;

        final AttachInfo attachInfo = mAttachInfo;
        if (attachInfo != null) {

                RectF boundingRect = attachInfo.mTmpTransformRect;
                boundingRect.set(dirty);

                ``````
               //父容器根据自身对子View的脏区域进行调整

                transformMatrix.mapRect(boundingRect);
                dirty.set((int) Math.floor(boundingRect.left),
                        (int) Math.floor(boundingRect.top),
                        (int) Math.ceil(boundingRect.right),
                        (int) Math.ceil(boundingRect.bottom));

            // 这里的do while方法,不断的去调用父类的invalidateChildInParent方法来传递重绘请求
            //直到调用到ViewRootImpl的invalidateChildInParent(责任链模式)
            do {
                View view = null;
                if (parent instanceof View) {
                    view = (View) parent;
                }

                if (drawAnimation) {
                    if (view != null) {
                        view.mPrivateFlags |= PFLAG_DRAW_ANIMATION;
                    } else if (parent instanceof ViewRootImpl) {
                        ((ViewRootImpl) parent).mIsAnimating = true;
                    }
                }

                //如果父类是"实心"的,那么设置它的mPrivateFlags标识
                // If the parent is dirty opaque or not dirty, mark it dirty with the opaque
                // flag coming from the child that initiated the invalidate
                if (view != null) {
                    if ((view.mViewFlags & FADING_EDGE_MASK) != 0 &&
                            view.getSolidColor() == 0) {
                        opaqueFlag = PFLAG_DIRTY;
                    }
                    if ((view.mPrivateFlags & PFLAG_DIRTY_MASK) != PFLAG_DIRTY) {
                        view.mPrivateFlags = (view.mPrivateFlags & ~PFLAG_DIRTY_MASK) | opaqueFlag;
                    }
                }

                //***往上递归调用父类的invalidateChildInParent***
                parent = parent.invalidateChildInParent(location, dirty);

                //设置父类的脏区域
                //父容器会把子View的脏区域转化为父容器中的坐标区域
                if (view != null) {
                    // Account for transform on current parent
                    Matrix m = view.getMatrix();
                    if (!m.isIdentity()) {
                        RectF boundingRect = attachInfo.mTmpTransformRect;
                        boundingRect.set(dirty);
                        m.mapRect(boundingRect);
                        dirty.set((int) Math.floor(boundingRect.left),
                                (int) Math.floor(boundingRect.top),
                                (int) Math.ceil(boundingRect.right),
                                (int) Math.ceil(boundingRect.bottom));
                    }
                }
            }
            while (parent != null);
        }
    }
ViewRootImpl
我们先验证一下最上层ViewParent为什么是ViewRootImpl
//ViewRootImpl


    public void setView(View view, WindowManager.LayoutParams attrs, View panelParentView) {

               view.assignParent(this);
    }


//View


    void assignParent(ViewParent parent) {
        if (mParent == null) {
            mParent = parent;
        } else if (parent == null) {
            mParent = null;
        } else {
            throw new RuntimeException("view " + this + " being added, but"
                    + " it already has a parent");
        }
    }
在ViewRootImpl的setView方法中,由于传入的View正是DecorView,所以最顶层的ViewParent即ViewRootImpl。另外ViewGroup在addView方法中,也会调用assignParent()方法,设定子元素的父容器为它本身。
由于最上层的ViewParent是ViewRootImpl,所以我们可以查看ViewRootImpl的invalidateChildInParent方法即可。
//ViewRootImpl


    @Override
    public ViewParent invalidateChildInParent(int[] location, Rect dirty) {
        //检查线程,这也是为什么invalidate一定要在主线程的原因
        checkThread();

        if (dirty == null) {
            invalidate();//有可能需要绘制整个窗口
            return null;
        } else if (dirty.isEmpty() && !mIsAnimating) {
            return null;
        }

        ``````

        invalidateRectOnScreen(dirty);

        return null;
    }


    //设置mDirty并执行View的工作流程
    private void invalidateRectOnScreen(Rect dirty) {
        final Rect localDirty = mDirty;
        if (!localDirty.isEmpty() && !localDirty.contains(dirty)) {
            mAttachInfo.mSetIgnoreDirtyState = true;
            mAttachInfo.mIgnoreDirtyState = true;
        }

        // Add the new dirty rect to the current one
        localDirty.union(dirty.left, dirty.top, dirty.right, dirty.bottom);
        //在这里,mDirty的区域就变为方法中的dirty,即要重绘的脏区域

        ``````
        if (!mWillDrawSoon && (intersected || mIsAnimating)) {
            scheduleTraversals();//执行View的工作流程
        }
}什么?执行invalidate()方法居然会引起scheduleTraversals()!
那么也就是说invalidate()会导致perforMeasure()、performLayout()、perforDraw()的调用了???
这个scheduleTraversals()很眼熟,我们一出场就在requestLayout()中见过,并且我们还说了mLayoutRequested用来表示是否measure和layout。
//ViewRootImpl


    @Override
    public void requestLayout() {
        if (!mHandlingLayoutInLayoutRequest) {
            checkThread();//检查是否在主线程
            mLayoutRequested = true;//mLayoutRequested 是否measure和layout布局。
            scheduleTraversals();
        }
    }


    private void performTraversals() {

        boolean layoutRequested = mLayoutRequested && (!mStopped || mReportNextDraw);
        if (layoutRequested) {
            measureHierarchy(```);//measure
        }


        final boolean didLayout = layoutRequested && (!mStopped || mReportNextDraw);
        if (didLayout) {
            performLayout(lp, mWidth, mHeight);//layout
        }


        boolean cancelDraw = mAttachInfo.mTreeObserver.dispatchOnPreDraw() || !isViewVisible;
        if (!cancelDraw && !newSurface) {
            performDraw();//draw
        }
} 因为我们invalidate的时候,并没有设置mLayoutRequested,所以放心,它只走performDraw()流程,并且在draw()流程中会清除mDirty区域。
并且只有设置了标识为的View才会调用draw方法进而调用onDraw(),减少开销。「源码工程师各方面的考虑肯定比一般人更周到,我们写的是代码,他们写的是艺术。」
requestLayout
看完了invalidate()流程之后,requestLayout()流程就比较好上手了。
我们在measure阶段提到过 :
在view.measure()的方法里,仅当给与的
MeasureSpec发生变化时,或要求强制重新布局时,才会进行测量。强制重新布局 : 控件树中的一个子控件内容发生变化时,需要重新测量和布局的情况,在这种情况下,这个子控件的父控件(以及父控件的父控件)所提供的
MeasureSpec必定与上次测量时的值相同,因而导致从ViewRootImpl到这个控件的路径上,父控件的measure()方法无法得到执行,进而导致子控件无法重新测量其布局和尺寸。(在父容器measure中遍历子元素)解决途径 : 因此,当子控件因内容发生变化时,从子控件到父控件回溯到ViewRootImpl,并依次调用父控件的
requestLayout()方法。这个方法会在mPrivateFlags中加入标记PFLAG_FORCE_LAYOUT,从而使得这些父控件的measure()方法得以顺利执行,进而这个子控件有机会进行重新布局与测量。这便是强制重新布局的意义所在。
下面我们看View的requestLayout()方法
//View

    @CallSuper
    public void requestLayout() {
        if (mMeasureCache != null) mMeasureCache.clear();

        ``````

        // 增加PFLAG_FORCE_LAYOUT标记,在measure时会校验此属性
        mPrivateFlags |= PFLAG_FORCE_LAYOUT;
        mPrivateFlags |= PFLAG_INVALIDATED;

        // 父类不为空&&父类没有请求重新布局(是否有PFLAG_FORCE_LAYOUT标志)
        //这样同一个父容器的多个子View同时调用requestLayout()就不会增加开销
        if (mParent != null && !mParent.isLayoutRequested()) {
            mParent.requestLayout();
        }

    }
因为上面说过了,最顶层的ViewParent是ViewRootImpl。
//ViewRootImpl

    @Override
    public void requestLayout() {
        if (!mHandlingLayoutInLayoutRequest) {
            checkThread();
            mLayoutRequested = true;
            scheduleTraversals();
        }
}同样,requestLayout()方法会调用scheduleTraversals();,因为设置了mLayoutRequested =true标识,所以在performTraversals()中调用performMeasure(),performLayout(),但是由于没有设置mDirty,所以不会走performDraw()流程。
但是,requestLayout()方法就一定不会导致onDraw()的调用吗?
在上面layout()方法中说道 :
在View的
layout()方法里,首先通过setFrame()(setOpticalFrame()也走setFrame())将l、t、r、b分别设置到mLeft、mTop、mRight、和mBottom,这样就可以确定子View在父容器的位置了,上面也说过了,这些位置是相对父容器的。
//View -->  layout()


    protected boolean setFrame(int left, int top, int right, int bottom) {
        boolean changed = false;


        if (mLeft != left || mRight != right || mTop != top || mBottom != bottom) {
            //布局坐标改变了
            changed = true;

            int oldWidth = mRight - mLeft;
            int oldHeight = mBottom - mTop;
            int newWidth = right - left;
            int newHeight = bottom - top;
            boolean sizeChanged = (newWidth != oldWidth) || (newHeight != oldHeight);

            // Invalidate our old position
            invalidate(sizeChanged);//调用invalidate重新绘制视图


            if (sizeChanged) {
                sizeChange(newWidth, newHeight, oldWidth, oldHeight);
            }

            ``````
        }
        return changed;
}看完代码我们就很清晰的知道,如果layout布局有变化,那么它也会调用invalidate()重绘自身。
下面再借用Idtk绘制的layout流程图
总结
至此,View的工作流程分析完毕,文章如果有错误或者不妥之处,还望评论提出。
理清整体流程对我们android的布局,绘制,自定义View,和分析bug都有一个提升。
有兴趣的还可以继续观看Android源码分析
参考
《Android开发艺术探索》
《深入理解Android》卷III