注意探针是有kubelet来启动的
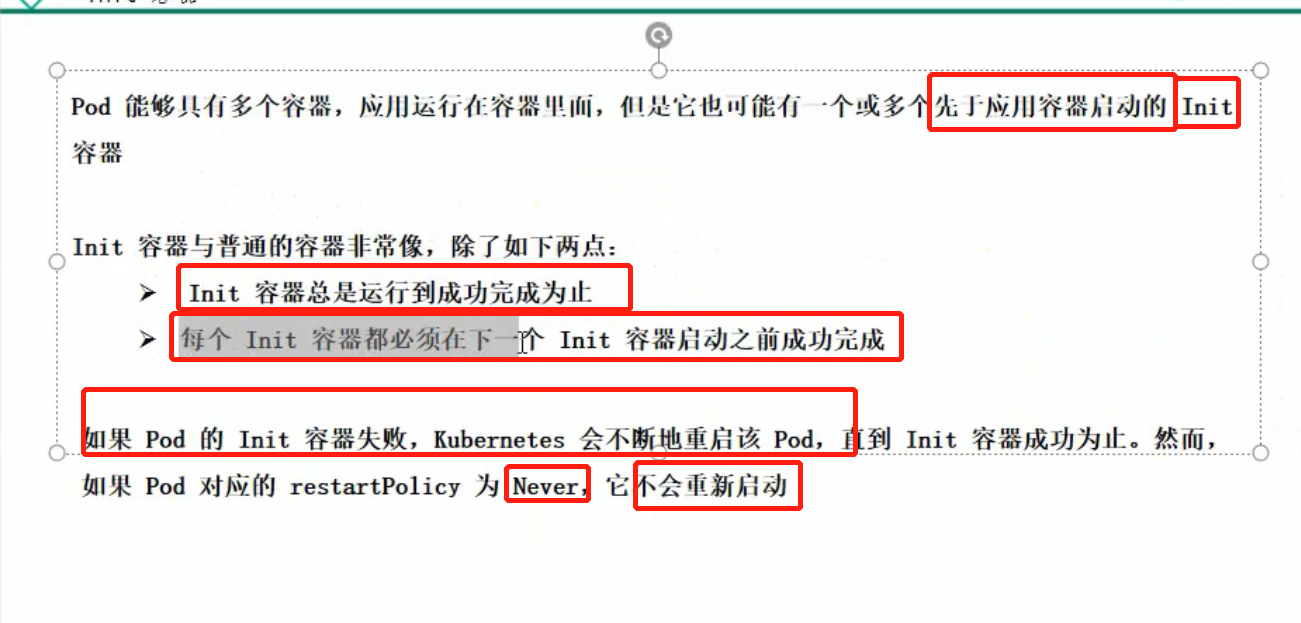
init container是在pod中启动的容器,先于主容器,当init c 启动成功后会删点,再去启动主容器
注意探针要比init C有优势,用的比较多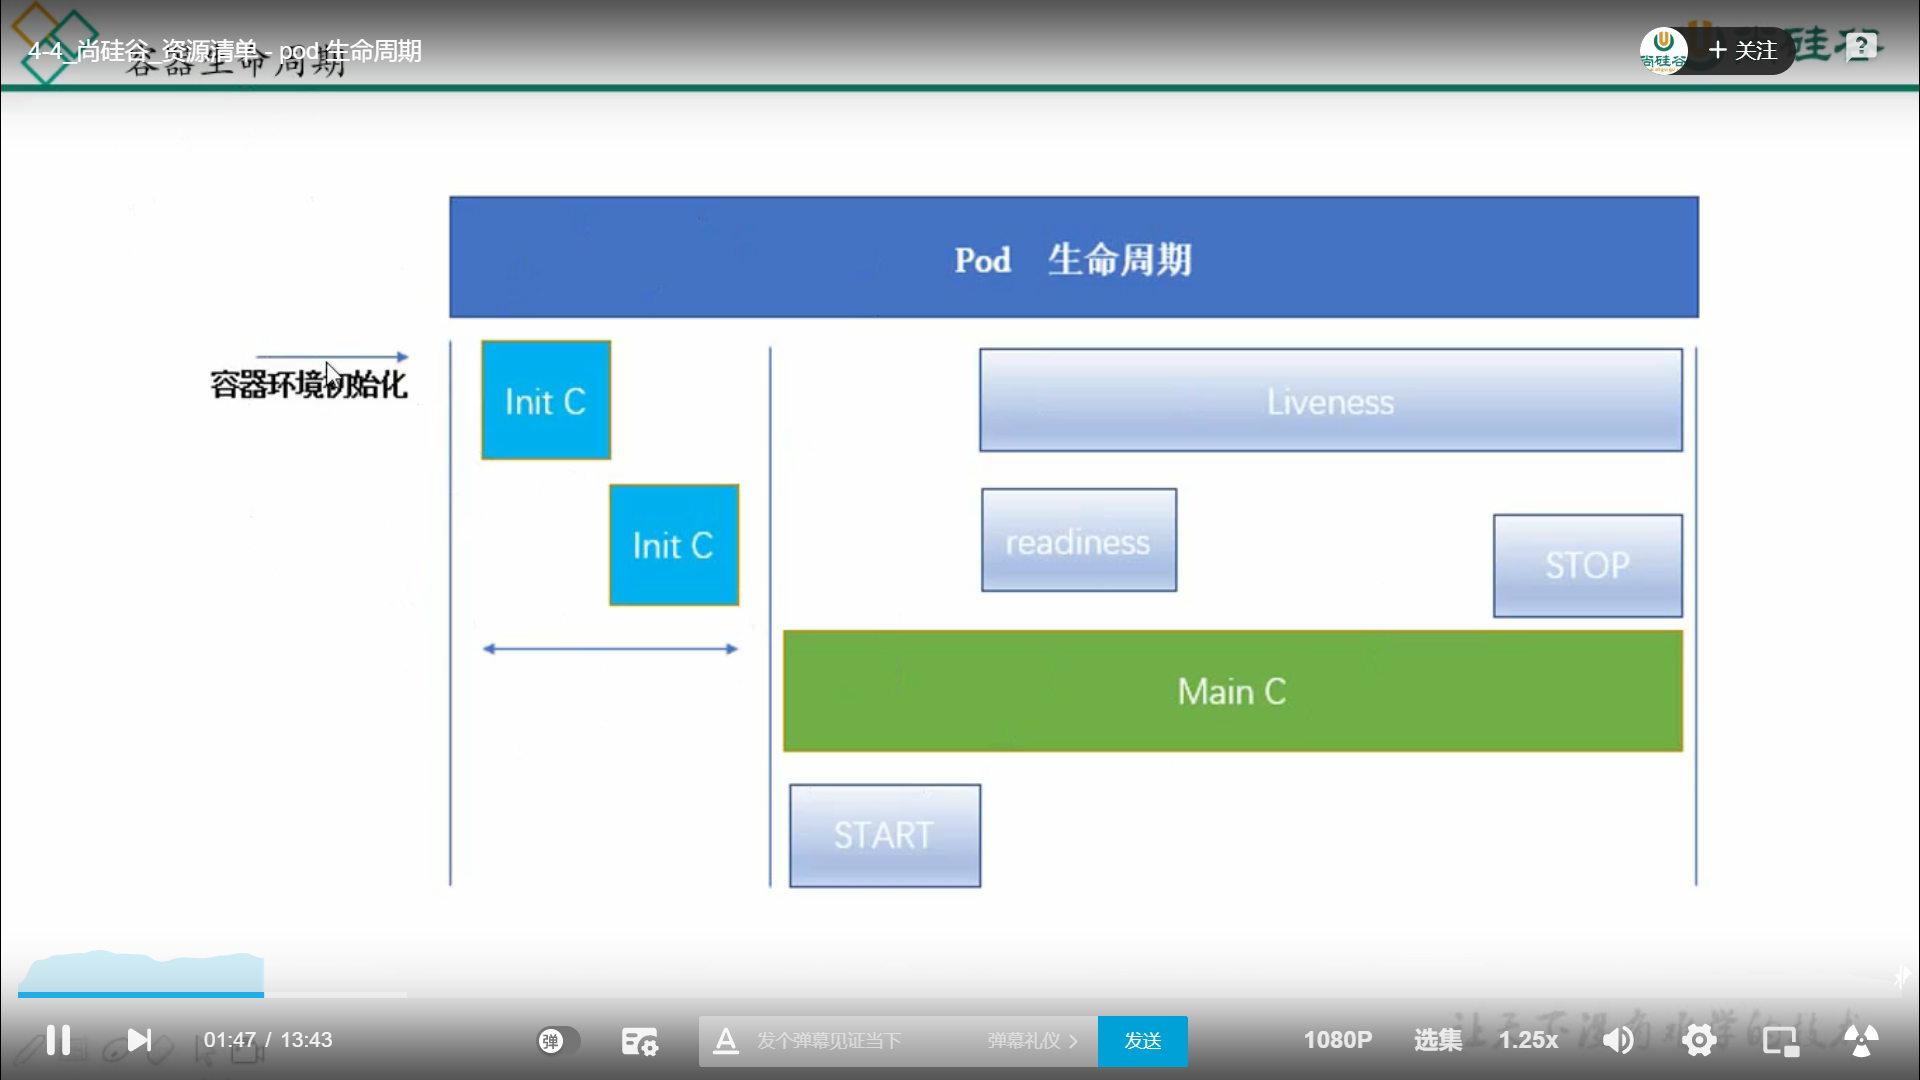
myapp.yaml
apiVersion: v1
kind: Pod
metadata:
  name: myapp-pod
  labels:
    app: myapp
spec:
  containers:
  - name: myapp-container
    image: busybox:1.28
    command: ['sh', '-c', 'echo The app is running! && sleep 3600']
  initContainers:
  - name: init-myservice
    image: busybox:1.28
    command: ['sh', '-c', "until nslookup myservice; do echo waiting for myservice; sleep 2; done"]
  - name: init-mydb
    image: busybox:1.28
    command: ['sh', '-c', "until nslookup mydb; do echo waiting for mydb; sleep 2; done"]
You can start this Pod by running:
kubectl apply -f myapp.yaml
pod/myapp-pod created
And check on its status with:
kubectl get -f myapp.yaml
NAME        READY     STATUS     RESTARTS   AGE
myapp-pod   0/1       Init:0/2   0          6m
or for more details:
kubectl describe -f myapp.yaml
Name:          myapp-pod
Namespace:     default
[...]
Labels:        app=myapp
Status:        Pending
[...]
Init Containers:
  init-myservice:
[...]
    State:         Running
[...]
  init-mydb:
[...]
    State:         Waiting
      Reason:      PodInitializing
    Ready:         False
[...]
Containers:
  myapp-container:
[...]
    State:         Waiting
      Reason:      PodInitializing
    Ready:         False
[...]
Events:
  FirstSeen    LastSeen    Count    From                      SubObjectPath                           Type          Reason        Message
  ---------    --------    -----    ----                      -------------                           --------      ------        -------
  16s          16s         1        {default-scheduler }                                              Normal        Scheduled     Successfully assigned myapp-pod to 172.17.4.201
  16s          16s         1        {kubelet 172.17.4.201}    spec.initContainers{init-myservice}     Normal        Pulling       pulling image "busybox"
  13s          13s         1        {kubelet 172.17.4.201}    spec.initContainers{init-myservice}     Normal        Pulled        Successfully pulled image "busybox"
  13s          13s         1        {kubelet 172.17.4.201}    spec.initContainers{init-myservice}     Normal        Created       Created container with docker id 5ced34a04634; Security:[seccomp=unconfined]
  13s          13s         1        {kubelet 172.17.4.201}    spec.initContainers{init-myservice}     Normal        Started       Started container with docker id 5ced34a04634
To see logs for the init containers in this Pod, run:
kubectl logs myapp-pod -c init-myservice # Inspect the first init container
kubectl logs myapp-pod -c init-mydb      # Inspect the second init container
At this point, those init containers will be waiting to discover Services named mydb and myservice.
Here's a configuration you can use to make those Services appear:
---
apiVersion: v1
kind: Service
metadata:
  name: myservice
spec:
  ports:
  - protocol: TCP
    port: 80
    targetPort: 9376
---
apiVersion: v1
kind: Service
metadata:
  name: mydb
spec:
  ports:
  - protocol: TCP
    port: 80
    targetPort: 9377
To create the mydb and myservice services:
kubectl apply -f services.yaml
service/myservice created
service/mydb created
You'll then see that those init containers complete, and that the myapp-pod Pod moves into the Running state:
kubectl get -f myapp.yaml
NAME        READY     STATUS    RESTARTS   AGE
myapp-pod   1/1       Running   0          9m
This simple example should provide some inspiration for you to create your own init containers. What's next contains a link to a more detailed example
可以查看init container 的log日志
[root@node1 data]#  kubectl logs myapp-pod  -c init-myservice
nslookup: can't resolve 'myservice'
Server:    10.1.0.10
Address 1: 10.1.0.10

waiting for myservice
nslookup: can't resolve 'myservice'
Server:    10.1.0.10
Address 1: 10.1.0.10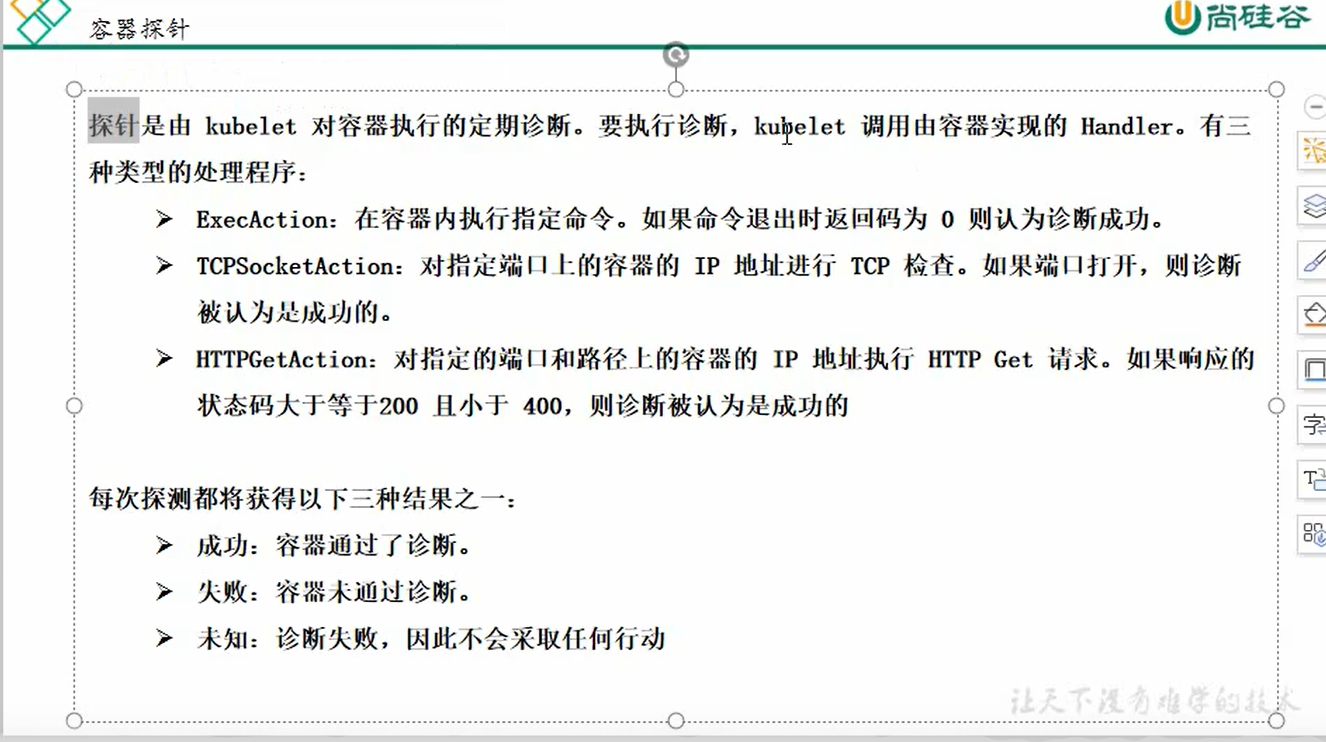
使用的例子
liveness.yaml
apiVersion: v1
kind: Pod
metadata:
  name: goproxy
  labels:
    app: goproxy
spec:
  containers:
  - name: goproxy
    image: nginx
    ports:
    - containerPort: 80  #容器使用的是80端口启动
    livenessProbe: #livenessprobe探测的是8080端口
      tcpSocket:
        port: 8080  #探测的是8080端口,这样永远也探测不到,所有pod容器要一直重启
      initialDelaySeconds: 5
      periodSeconds: 6
~
创建使用了存活检测探针的pod 并查看探针使用情况
[root@node1 data]# kubectl create -f liveness.yaml
[root@node1 data]# kubectl get pod
NAME      READY   STATUS    RESTARTS   AGE
goproxy   1/1     Running   0          72s
[root@node1 data]# kubectl get pod
NAME      READY   STATUS    RESTARTS   AGE
goproxy   1/1     Running   1          76s


[root@node1 data]# kubectl get pod
NAME      READY   STATUS             RESTARTS   AGE
goproxy   0/1     CrashLoopBackOff   6          5m32s

#####可以看到容器在一直重启,因为liveness探针探查tcp 8080端口未启动‘
’
Define a liveness command
Many applications running for long periods of time eventually transition to broken states, and cannot recover except by being restarted. Kubernetes provides liveness probes to detect and remedy such situations.
In this exercise, you create a Pod that runs a container based on the k8s.gcr.io/busybox image. Here is the configuration file for the Pod:
pods/probe/exec-liveness.yaml |
|---|
|
In the configuration file, you can see that the Pod has a single Container. The periodSeconds field specifies that the kubelet should perform a liveness probe every 5 seconds. The initialDelaySeconds field tells the kubelet that it should wait 5 seconds before performing the first probe. To perform a probe, the kubelet executes the command cat /tmp/healthy in the target container. If the command succeeds, it returns 0, and the kubelet considers the container to be alive and healthy. If the command returns a non-zero value, the kubelet kills the container and restarts it.
When the container starts, it executes this command:
/bin/sh -c "touch /tmp/healthy; sleep 30; rm -rf /tmp/healthy; sleep 600"
For the first 30 seconds of the container's life, there is a /tmp/healthy file. So during the first 30 seconds, the command cat /tmp/healthy returns a success code. After 30 seconds, cat /tmp/healthy returns a failure code.
Create the Pod:
kubectl apply -f https://k8s.io/examples/pods/probe/exec-liveness.yaml
Within 30 seconds, view the Pod events:
kubectl describe pod liveness-exec
The output indicates that no liveness probes have failed yet:
FirstSeen    LastSeen    Count   From            SubobjectPath           Type        Reason      Message
--------- --------    -----   ----            -------------           --------    ------      -------
24s       24s     1   {default-scheduler }                    Normal      Scheduled   Successfully assigned liveness-exec to worker0
23s       23s     1   {kubelet worker0}   spec.containers{liveness}   Normal      Pulling     pulling image "k8s.gcr.io/busybox"
23s       23s     1   {kubelet worker0}   spec.containers{liveness}   Normal      Pulled      Successfully pulled image "k8s.gcr.io/busybox"
23s       23s     1   {kubelet worker0}   spec.containers{liveness}   Normal      Created     Created container with docker id 86849c15382e; Security:[seccomp=unconfined]
23s       23s     1   {kubelet worker0}   spec.containers{liveness}   Normal      Started     Started container with docker id 86849c15382e
After 35 seconds, view the Pod events again:
kubectl describe pod liveness-exec
At the bottom of the output, there are messages indicating that the liveness probes have failed, and the containers have been killed and recreated.
FirstSeen LastSeen    Count   From            SubobjectPath           Type        Reason      Message
--------- --------    -----   ----            -------------           --------    ------      -------
37s       37s     1   {default-scheduler }                    Normal      Scheduled   Successfully assigned liveness-exec to worker0
36s       36s     1   {kubelet worker0}   spec.containers{liveness}   Normal      Pulling     pulling image "k8s.gcr.io/busybox"
36s       36s     1   {kubelet worker0}   spec.containers{liveness}   Normal      Pulled      Successfully pulled image "k8s.gcr.io/busybox"
36s       36s     1   {kubelet worker0}   spec.containers{liveness}   Normal      Created     Created container with docker id 86849c15382e; Security:[seccomp=unconfined]
36s       36s     1   {kubelet worker0}   spec.containers{liveness}   Normal      Started     Started container with docker id 86849c15382e
2s        2s      1   {kubelet worker0}   spec.containers{liveness}   Warning     Unhealthy   Liveness probe failed: cat: can't open '/tmp/healthy': No such file or directory
Wait another 30 seconds, and verify that the container has been restarted:
kubectl get pod liveness-exec
The output shows that RESTARTS has been incremented:
NAME            READY     STATUS    RESTARTS   AGE
liveness-exec   1/1       Running   1          1m
Define a liveness HTTP request
Another kind of liveness probe uses an HTTP GET request. Here is the configuration file for a Pod that runs a container based on the k8s.gcr.io/liveness image.
pods/probe/http-liveness.yaml |
|---|
|
In the configuration file, you can see that the Pod has a single container. The periodSeconds field specifies that the kubelet should perform a liveness probe every 3 seconds. The initialDelaySeconds field tells the kubelet that it should wait 3 seconds before performing the first probe. To perform a probe, the kubelet sends an HTTP GET request to the server that is running in the container and listening on port 8080. If the handler for the server's /healthz path returns a success code, the kubelet considers the container to be alive and healthy. If the handler returns a failure code, the kubelet kills the container and restarts it.
Any code greater than or equal to 200 and less than 400 indicates success. Any other code indicates failure.
You can see the source code for the server in server.go.
For the first 10 seconds that the container is alive, the /healthz handler returns a status of 200. After that, the handler returns a status of 500.
http.HandleFunc("/healthz", func(w http.ResponseWriter, r *http.Request) {
    duration := time.Now().Sub(started)
    if duration.Seconds() > 10 {
        w.WriteHeader(500)
        w.Write([]byte(fmt.Sprintf("error: %v", duration.Seconds())))
    } else {
        w.WriteHeader(200)
        w.Write([]byte("ok"))
    }
})
The kubelet starts performing health checks 3 seconds after the container starts. So the first couple of health checks will succeed. But after 10 seconds, the health checks will fail, and the kubelet will kill and restart the container.
To try the HTTP liveness check, create a Pod:
kubectl apply -f https://k8s.io/examples/pods/probe/http-liveness.yaml
After 10 seconds, view Pod events to verify that liveness probes have failed and the container has been restarted:
kubectl describe pod liveness-http
In releases prior to v1.13 (including v1.13), if the environment variable http_proxy (or HTTP_PROXY) is set on the node where a Pod is running, the HTTP liveness probe uses that proxy. In releases after v1.13, local HTTP proxy environment variable settings do not affect the HTTP liveness probe.
Define a TCP liveness probe
A third type of liveness probe uses a TCP socket. With this configuration, the kubelet will attempt to open a socket to your container on the specified port. If it can establish a connection, the container is considered healthy, if it can’t it is considered a failure.
pods/probe/tcp-liveness-readiness.yaml |
|---|
|
As you can see, configuration for a TCP check is quite similar to an HTTP check. This example uses both readiness and liveness probes. The kubelet will send the first readiness probe 5 seconds after the container starts. This will attempt to connect to the goproxy container on port 8080. If the probe succeeds, the Pod will be marked as ready. The kubelet will continue to run this check every 10 seconds.
In addition to the readiness probe, this configuration includes a liveness probe. The kubelet will run the first liveness probe 15 seconds after the container starts. Just like the readiness probe, this will attempt to connect to the goproxy container on port 8080. If the liveness probe fails, the container will be restarted.
To try the TCP liveness check, create a Pod:
kubectl apply -f https://k8s.io/examples/pods/probe/tcp-liveness-readiness.yaml
After 15 seconds, view Pod events to verify that liveness probes:
kubectl describe pod goproxy
Use a named port
You can use a named ContainerPort for HTTP or TCP liveness checks:
ports:
- name: liveness-port
  containerPort: 8080
  hostPort: 8080

livenessProbe:
  httpGet:
    path: /healthz
    port: liveness-port
Protect slow starting containers with startup probes
Sometimes, you have to deal with legacy applications that might require an additional startup time on their first initialization. In such cases, it can be tricky to set up liveness probe parameters without compromising the fast response to deadlocks that motivated such a probe. The trick is to set up a startup probe with the same command, HTTP or TCP check, with a failureThreshold * periodSeconds long enough to cover the worse case startup time.
So, the previous example would become:
ports:
- name: liveness-port
  containerPort: 8080
  hostPort: 8080

livenessProbe:
  httpGet:
    path: /healthz
    port: liveness-port
  failureThreshold: 1
  periodSeconds: 10

startupProbe:
  httpGet:
    path: /healthz
    port: liveness-port
  failureThreshold: 30
  periodSeconds: 10
Thanks to the startup probe, the application will have a maximum of 5 minutes (30 * 10 = 300s) to finish its startup. Once the startup probe has succeeded once, the liveness probe takes over to provide a fast response to container deadlocks. If the startup probe never succeeds, the container is killed after 300s and subject to the pod's restartPolicy.
Define readiness probes
Sometimes, applications are temporarily unable to serve traffic. For example, an application might need to load large data or configuration files during startup, or depend on external services after startup. In such cases, you don't want to kill the application, but you don’t want to send it requests either. Kubernetes provides readiness probes to detect and mitigate these situations. A pod with containers reporting that they are not ready does not receive traffic through Kubernetes Services.
Note: Readiness probes runs on the container during its whole lifecycle.
Readiness probes are configured similarly to liveness probes. The only difference is that you use the readinessProbe field instead of the livenessProbe field.
readinessProbe:
  exec:
    command:
    - cat
    - /tmp/healthy
  initialDelaySeconds: 5
  periodSeconds: 5
Configuration for HTTP and TCP readiness probes also remains identical to liveness probes.
Readiness and liveness probes can be used in parallel for the same container. Using both can ensure that traffic does not reach a container that is not ready for it, and that containers are restarted when they fail.
Configure Probes
Probes have a number of fields that you can use to more precisely control the behavior of liveness and readiness checks:
initialDelaySeconds: Number of seconds after the container has started before liveness or readiness probes are initiated. Defaults to 0 seconds. Minimum value is 0.periodSeconds: How often (in seconds) to perform the probe. Default to 10 seconds. Minimum value is 1.timeoutSeconds: Number of seconds after which the probe times out. Defaults to 1 second. Minimum value is 1.successThreshold: Minimum consecutive successes for the probe to be considered successful after having failed. Defaults to 1. Must be 1 for liveness. Minimum value is 1.failureThreshold: When a probe fails, Kubernetes will tryfailureThresholdtimes before giving up. Giving up in case of liveness probe means restarting the container. In case of readiness probe the Pod will be marked Unready. Defaults to 3. Minimum value is 1.
HTTP probes have additional fields that can be set on httpGet:
host: Host name to connect to, defaults to the pod IP. You probably want to set "Host" in httpHeaders instead.scheme: Scheme to use for connecting to the host (HTTP or HTTPS). Defaults to HTTP.path: Path to access on the HTTP server.httpHeaders: Custom headers to set in the request. HTTP allows repeated headers.port: Name or number of the port to access on the container. Number must be in the range 1 to 65535.
For an HTTP probe, the kubelet sends an HTTP request to the specified path and port to perform the check. The kubelet sends the probe to the pod’s IP address, unless the address is overridden by the optional host field in httpGet. If scheme field is set to HTTPS, the kubelet sends an HTTPS request skipping the certificate verification. In most scenarios, you do not want to set the host field. Here's one scenario where you would set it. Suppose the container listens on 127.0.0.1 and the Pod's hostNetwork field is true. Then host, under httpGet, should be set to 127.0.0.1. If your pod relies on virtual hosts, which is probably the more common case, you should not use host, but rather set the Host header in httpHeaders.
For a TCP probe, the kubelet makes the probe connection at the node, not in the pod, which means that you can not use a service name in the host parameter since the kubelet is unable to resolve it.