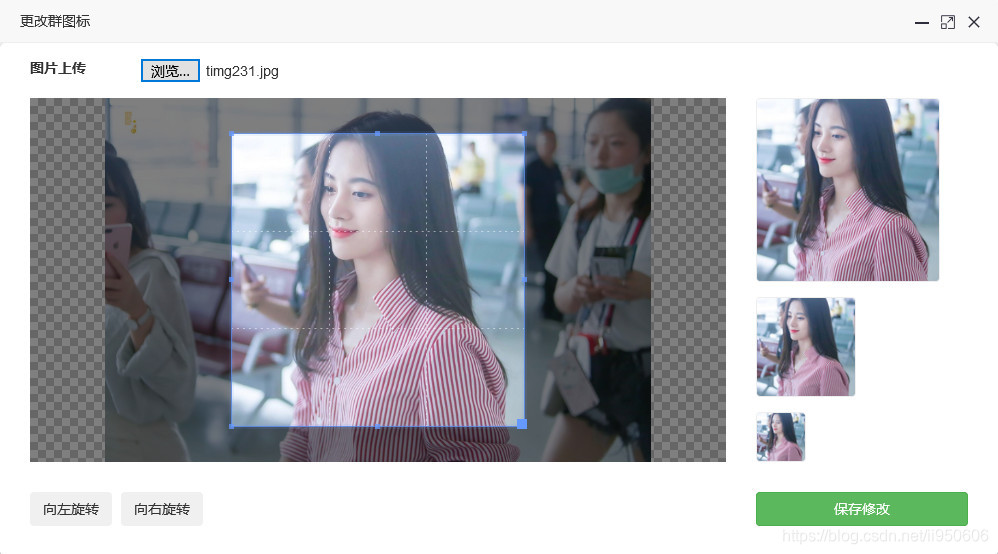
我们基于Croppe插件,实现HTML5裁剪图片并上传功能,完美整合到layim中,先来看看效果图
 直入主题,呈上教程
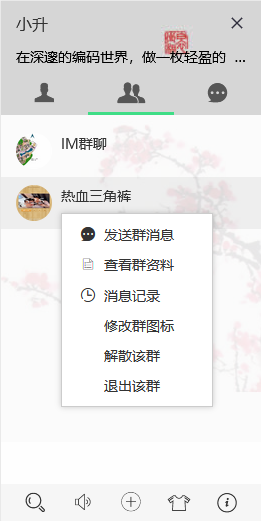
一. 添加右键菜单
绑定入口,添加右键菜单(如图),前几天已经整理,专机带你一程✈layim整合右键菜单
二. 绑定右击菜单点击事件
var $ = layui.jquery, active = {


	menuUpdate: function(){


	    /*修改群图标*/
		var groupId = $(this).parent().data('id');
		layer.open({


			type: 2,
			maxmin: !0,
			title: '更改群图标',
			area: ['998px', '556px'],
			shade: !1,
			offset: 'auto',
			skin: "layui-box",
			anim: 2,
			id: "layui-layim-chatlog",
			content: 'avatar.html?groupId='+groupId	// 更改群图标页面
		});
    }
};
$('body').on('click', '.layui-layer-tips li', function(e){


    var type = $(this).data('type');
    active[type] ? active[type].call(this) : '';
	// 清空所有右击弹框
    emptyTips();
});
三. 创建改群图标页面
附上源码,点击下载
3.1、插入css样式:
<link href="/cropper/css/cropper.min.css" rel="stylesheet" />
<link href="/cropper/css/sitelogo.css" rel="stylesheet" />
<link href="/cropper/css/bootstrap.min.css" rel="stylesheet" />
3.2、引用js插件:
<script src="/cropper/js/cropper.min.js" type="text/javascript"></script>
<script src="/cropper/js/sitelogo.js" type="text/javascript"></script>
<script src="/cropper/js/bootstrap.min.js" type="text/javascript"></script>
3.3、添加html代码:
<div id="avatar-modal" style="width:100%;">
	<div class="modal-content" style="border:none;">
		<form id="AvatarForm" class="avatar-form" enctype="multipart/form-data" method="post">
			<div class="modal-body">
				<div class="avatar-body">
					<div class="avatar-upload">
						<input id="groupId" name="groupId" value="${groupId }" type="hidden">
						<input class="avatar-src" id="avatar_src" name="avatar_src" type="hidden">
						<input class="avatar-data" id="avatar_data" name="avatar_data" type="hidden">
						<label for="avatarInput">图片上传</label>
						<input class="avatar-input" id="itemFile" name="itemFile" type="file">
					</div>
					<div class="row">
						<div class="col-md-9">
							<div class="avatar-wrapper"></div>
						</div>
						<div class="col-md-3">
							<div class="avatar-preview preview-lg"></div>
							<div class="avatar-preview preview-md"></div>
							<div class="avatar-preview preview-sm"></div>
						</div>
					</div>
					<div class="row avatar-btns">
						<div class="col-md-9">
							<div class="btn-group">
								<button class="btn" data-method="rotate" data-option="-90" type="button" title="Rotate -90 degrees"><i class="fa fa-undo"></i> 向左旋转</button>
							</div>
							<div class="btn-group">
								<button class="btn" data-method="rotate" data-option="90" type="button" title="Rotate 90 degrees"><i class="fa fa-repeat"></i> 向右旋转</button>
							</div>
						</div>
						<div class="col-md-3">
							<button class="btn btn-success btn-block avatar-save uploadAvatar" type="button"><i class="fa fa-save"></i> 保存修改</button>
						</div>
					</div>
				</div>
			</div>
		</form>
	</div>
</div>
3.4、绑定修改头像事件:
// 修改头像
$("body").delegate(".uploadAvatar","click",function() {


	var fileName = $("#itemFile").val();
	if(fileName==null){


		layer.msg('请选择上传的图片!');
       	return;
	}
	var index = fileName.lastIndexOf(".");
	var suffix = fileName.substring(index).toLowerCase();
	if(suffix!=".bmp"&&suffix!=".png"&&suffix!=".gif"&&suffix!=".jpg"&&suffix!=".jpeg"&&suffix!=".pic"){


		layer.msg('请选择图片!');
       	return;
	}

	var loading = layer.load(0, {

    shade: [0.2, '#fff']});
	var action = "chat/group/uploadAvatar";		// 服务器地址
	var form = new FormData(document.getElementById("AvatarForm"));
	$.ajax({


        url: action,
        type: "post",
        data: form,
        processData: false,
        contentType: false,
		dataType : 'json',
        success: function(msg){


        	layer.close(loading);
        	// 成功后的代码
        },
        error: function(e){


        	layer.close(loading);
        	layer.msg('操作失败,请稍后再试!');
        }
    });
});
3.5、清除缓存数据:
修改图标返回成功之后,我们需要更新缓存数据,防止再次引用该群组时图标没更新。
// 更新缓存
var cacheGroup = parent.layui.layim.cache().group;
$.each(cacheGroup, function (i, item) {


   	if(item && item.id==revertGroup.id) {


   		item.avatar = revertGroup.avatar;
   	}
});
parent.layui.layim.cache().group = cacheGroup;
3.5、修改主面板群组图标:
因为我们以open方式打开iframe窗体,所以要修改主面板群聊图标,必须获取父级页面才能找到聊天主面板的元素,我们F12可以看到,主面板每个群组的样式都是以layim-group开头加群组编号,因此我们修改群组头像就简单了。
// 修改主面板群聊图标
parent.$(".layim-list-group .layim-group'"+groupId+"'] img").attr('src',groupAvatar);
layer.msg("修改群图标成功!");
其中,groupId为群组的编号,groupAvatar为保存到服务器的图标地址。
3.6、关闭窗体:
最后,为了提高用户体验,我们需要自动关闭修改群组图标的窗体。那么问题来了,我们在哪里关闭,是在打开窗体的时候回调关闭呢,还是在修改图标成功后直接关闭。通过网上寻找资料,原来Layui内置了一个getFrameIndex方法,此方法一般用于在Iframe页关闭自身时用的,代码如下。
// 1秒后关闭本自身窗体
setTimeout(function(){


		// 先得到当前Iframe层的索引
		var index = parent.layer.getFrameIndex(window.name);
		// 再执行关闭
		parent.layer.close(index);
	},1000);
简单两行代码,就实现了我们一开始觉得无从下手的功能,有时候敢于面对,奇迹便会发生!
四. 服务器代码
4.1、图片旋转工具类:
package com.cn.unit.img;

import java.awt.Color;
import java.awt.Graphics2D;
import java.awt.geom.AffineTransform;
import java.awt.image.AffineTransformOp;
import java.awt.image.BufferedImage;
import java.io.File;

import javax.imageio.ImageIO;

/**
 * 图片旋转工具类
 * @author [email protected]
 * 2016-02-12
 */
public class ImageRotateUtil {


	// ===源图片路径名称如:D:\1.jpg
	private String srcpath;

	// ===剪切图片存放路径名称.如:D:\2.jpg
	private String subpath;

	// ===新图类型 只支持gif,jpg,png
	private String suffix;

	// ===旋转角度
	private int degree;

    public ImageRotateUtil(String srcpath, String subpath, String suffix, int degree) {


        this.srcpath = srcpath;
        this.subpath = subpath;
        this.suffix = suffix;
        this.degree = degree;
    }

	/**
     * 旋转
     */
    public void spin() throws Exception {


        int swidth = 0; // 旋转后的宽度
        int sheight = 0; // 旋转后的高度
        int x; // 原点横坐标
        int y; // 原点纵坐标

        File file = new File(srcpath);
        if (!file.isFile()) {


            throw new Exception("ImageDeal>>>" + file + " 不是一个图片文件!");
        }
        BufferedImage bi = ImageIO.read(file); // 读取该图片
        // 处理角度--确定旋转弧度
        degree = degree % 360;
        if (degree < 0)
            degree = 360 + degree;// 将角度转换到0-360度之间
        double theta = Math.toRadians(degree);// 将角度转为弧度

        // 确定旋转后的宽和高
        if (degree == 180 || degree == 0 || degree == 360) {


            swidth = bi.getWidth();
            sheight = bi.getHeight();
        } else if (degree == 90 || degree == 270) {


            sheight = bi.getWidth();
            swidth = bi.getHeight();
        } else {


            swidth = (int) (Math.sqrt(bi.getWidth() * bi.getWidth()
                    + bi.getHeight() * bi.getHeight()));
            sheight = (int) (Math.sqrt(bi.getWidth() * bi.getWidth()
                    + bi.getHeight() * bi.getHeight()));
        }

        x = (swidth / 2) - (bi.getWidth() / 2);// 确定原点坐标
        y = (sheight / 2) - (bi.getHeight() / 2);

        BufferedImage spinImage = new BufferedImage(swidth, sheight, bi.getType());
        // 设置图片背景颜色
        Graphics2D gs = (Graphics2D) spinImage.getGraphics();
        gs.setColor(Color.white);
        gs.fillRect(0, 0, swidth, sheight);// 以给定颜色绘制旋转后图片的背景

        AffineTransform at = new AffineTransform();
        at.rotate(theta, swidth / 2, sheight / 2);// 旋转图象
        at.translate(x, y);
        AffineTransformOp op = new AffineTransformOp(at, AffineTransformOp.TYPE_BICUBIC);
        spinImage = op.filter(bi, spinImage);
        File sf = new File(subpath);
        ImageIO.write(spinImage, suffix, sf); // 保存图片
    }

	public String getSrcpath() {


		return srcpath;
	}
	public void setSrcpath(String srcpath) {


		this.srcpath = srcpath;
	}
	public String getSubpath() {


		return subpath;
	}
	public void setSubpath(String subpath) {


		this.subpath = subpath;
	}
	public String getSuffix() {


		return suffix;
	}
	public void setSuffix(String suffix) {


		this.suffix = suffix;
	}
	public int getDegree() {


		return degree;
	}
	public void setDegree(int degree) {


		this.degree = degree;
	}
}
4.2、图片裁剪工具类:
package com.cn.unit.img;

import java.awt.Rectangle;
import java.awt.image.BufferedImage;
import java.io.File;
import java.io.FileInputStream;
import java.io.IOException;
import java.util.Iterator;

import javax.imageio.ImageIO;
import javax.imageio.ImageReadParam;
import javax.imageio.ImageReader;
import javax.imageio.stream.ImageInputStream;

/**
 * 图片裁剪工具类
 * @author [email protected]
 * 2016-02-12
 */
public class ImageOperateUtil {


	// ===源图片路径名称如:D:\1.jpg
	private String srcpath;
	// ===剪切图片存放路径名称.如:D:\2.jpg
	private String subpath;
	// ===剪切点x坐标
	private int x;
	// ===剪切点y坐标
	private int y;
	// ===剪切点宽度
	private int width;
	// ===剪切点高度
	private int height;

	public ImageOperateUtil() {

    };

	public ImageOperateUtil(String srcpath, String subpath, int x, int y, int width, int height) {


		// 判断图片高度宽度
		int[] exif = ImageExifUtil.getImgWH(srcpath);
		int w_ = exif[0];
		int h_ = exif[1];
		width = width >= w_ ? width : w_;
		height = height >= h_ ? height : h_;

		this.srcpath = srcpath;
		this.subpath = subpath;
		this.x = x;
		this.y = y;
		this.width = width;
		this.height = height;
	}

	/**
	 * 对图片裁剪,并把裁剪完蛋新图片保存 。
	 */
	public void cut() throws IOException {


		FileInputStream is = null;
		ImageInputStream iis = null;

		try {


			// 读取图片文件
			is = new FileInputStream(srcpath);

			/*
			 * 返回包含所有当前已注册 ImageReader 的 Iterator,这些 ImageReader 声称能够解码指定格式。
			 * 参数:formatName - 包含非正式格式名称 .(例如 "jpeg" 或 "tiff")等 。
			 */
			Iterator<ImageReader> it = ImageIO.getImageReadersByFormatName("jpg");
			ImageReader reader = it.next();
			// 获取图片流
			iis = ImageIO.createImageInputStream(is);

			/*
			 * <p>iis:读取源.true:只向前搜索 </p>.将它标记为 ‘只向前搜索'。
			 * 此设置意味着包含在输入源中的图像将只按顺序读取,可能允许 reader 避免缓存包含与以前已经读取的图像关联的数据的那些输入部分。
			 */
			reader.setInput(iis, true);

			/*
			 * <p>描述如何对流进行解码的类<p>.用于指定如何在输入时从 Java Image I/O
			 * 框架的上下文中的流转换一幅图像或一组图像。用于特定图像格式的插件 将从其 ImageReader 实现的
			 * getDefaultReadParam 方法中返回 ImageReadParam 的实例。
			 */
			ImageReadParam param = reader.getDefaultReadParam();

			/*
			 * 图片裁剪区域。Rectangle 指定了坐标空间中的一个区域,通过 Rectangle 对象
			 * 的左上顶点的坐标(x,y)、宽度和高度可以定义这个区域。
			 */
			Rectangle rect = new Rectangle(x, y, width, height);

			// 提供一个 BufferedImage,将其用作解码像素数据的目标。
			param.setSourceRegion(rect);

			/*
			 * 使用所提供的 ImageReadParam 读取通过索引 imageIndex 指定的对象,并将 它作为一个完整的
			 * BufferedImage 返回。
			 */
			BufferedImage bi = reader.read(0, param);

			// 保存新图片
			ImageIO.write(bi, "jpg", new File(subpath));
		} finally {


			if (is != null)
				is.close();
			if (iis != null)
				iis.close();
		}
	}

	public int getHeight() {


		return height;
	}
	public void setHeight(int height) {


		this.height = height;
	}
	public String getSrcpath() {


		return srcpath;
	}
	public void setSrcpath(String srcpath) {


		this.srcpath = srcpath;
	}
	public String getSubpath() {


		return subpath;
	}
	public void setSubpath(String subpath) {


		this.subpath = subpath;
	}
	public int getWidth() {


		return width;
	}
	public void setWidth(int width) {


		this.width = width;
	}
	public int getX() {


		return x;
	}
	public void setX(int x) {


		this.x = x;
	}
	public int getY() {


		return y;
	}
	public void setY(int y) {


		this.y = y;
	}
}
4.3、控制器方法:
/**
 * 修改图标
 */
@RequestMapping(value = "/uploadAvatar", method = RequestMethod.POST, produces = "text/html;charset=UTF-8")
   public @ResponseBody String uploadAvatar(@RequestParam("itemFile") MultipartFile itemFile,
   		@RequestParam("groupId") String groupId,
   		@RequestParam("avatar_src") String avatarSrc,
   		@RequestParam("avatar_data") String avatarData,
   		HttpServletRequest request, HttpServletResponse response) {


    //OPTIONS预请求缓存的有效时间 单位秒
    response.setHeader("Access-Control-Max-Age", "3600");
    //允许自定义的请求头,多个用逗号分隔
    response.setHeader("Access-Control-Allow-Headers", "content-type, x-requested-with");
    if (itemFile.isEmpty()) {


		return false;
    }
   	String avatar = null, suffix = null, fileName = null;
   	// 获取原文件名
   	String fileName = itemFile.getOriginalFilename();
   	// 获取文件后缀
   	String suffix = fileName.substring(fileName.lastIndexOf(".") + 1, fileName.length()).toLowerCase();
   	// 保存数据库文件地址
	String avatar = "ligentres/" + System.currentTimeMillis() + "." + suffix;
	// 系统根目录完整地址
	String rootPath = request.getSession().getServletContext().getRealPath("/");
    String tmpPath = rootPath + avatar;
    // 上传图标
    try {


        byte[] bytes = itemFile.getBytes();
        BufferedOutputStream stream = new BufferedOutputStream(new FileOutputStream(new File(tmpPath)));
        stream.write(bytes);
        stream.close();
    } catch (IOException e) {


		return false;
    }

    // {"x":246.64,"y":1356.90,"height":2048.05,"width":2048.05,"rotate":90}
   	log.info("创建群聊/修改图标:avatarData["+avatarData+"]");
    // 裁剪头像
    if(avatarData!=null){


        try {


        	JSONObject jsonObject = new JSONObject(avatarData);
            if(!jsonObject.isNull("x") && !jsonObject.isNull("y") && !jsonObject.isNull("width") && !jsonObject.isNull("height")){


        		Integer x = null, y = null, width = null, height = null, size;
    			if(!jsonObject.isNull("rotate")){


    				Integer rotate = jsonObject.getInt("rotate");
    				if(rotate.intValue() != 0){


    					ImageRotateUtil imageRotate = new ImageRotateUtil(tmpPath, tmpPath, suffix, rotate);
						imageRotate.spin();
    				}
    			}
    			x = jsonObject.getInt("x");
    			y = jsonObject.getInt("y");
    			width = jsonObject.getInt("width");
    			height = jsonObject.getInt("height");
    			size = width >= height ? width : height;
    			ImageOperateUtil operateImage = new ImageOperateUtil(tmpPath, tmpPath, x, y, size, size);
    			operateImage.cut();
    		}
        }catch (Exception e) {


        	log.error("修改图标:裁剪图片发生异常"+e);
		}
    }
    // 这里填写你的代码 保存数据库
    // --
	return true;
}
到这里,已经完美整合了修改群组图标功能,小生不才,若文章和代码有表述不当之处,还请不吝赐教。
赠人玫瑰手留余香,若对您有所帮助,来
点个赞呗!