前言
Spring 框架核心组件之一是 IOC,IOC 则管理 Bean 的创建和 Bean 之间的依赖注入,对于 Bean 的创建可以通过在 XML 里面使用 <bean/> 标签来配置,对于 Bean 之间的依赖可以使用构造方法注入、Set 方法注入在 XML 里面配置。但是使用这种方式会使 XML 变的比较臃肿庞大,并且还需要开发人员一个个的在 XML 里面配置 Bean 之间的依赖,这简直是一个灾难,还好 Spring 框架给我们提供了一系列的注解让开发人员从这个灾难中解脱出来,比如在一个类的成员变量上标注了一个简单的 @Autowired 注解就可以实现了 Bean 之间的自动依赖注入,在一个类上标注了一个简单的 @Component 注解就可以让一个 Bean 注入到 Spring 容器……而 Spring 框架是如何通过注解简化我们的工作量,实现这些功能的。本 Chat 就来解开这神秘的面纱。
本 Chat 主要内容如下:
- 我们经常使用 @Autowired,进行依赖注入,那么为何能够直接使用?它又是如何工作的?@Required 又是如何起到检查 XML 里面属性有没有被配置呢?
- Spring 框架是如何把标注 @Component 的 Bean 注入到容器?
- 我们经常使用的 @Configuration,@ComponentScan,@Import,@Bean 注解又是如何工作的?
- 我们经常使用 @PropertySource 引入配置文件,那么配置文件里面的配置是如何被注册到 Spring 环境里面的?
- 最后讲解如何通过自定义注解实现一个简单的树形文档生成。
注解 @Autowired、@Required 的工作原理
注解 Autowired 的简单使用
既然要研究多个 Bean 之间的依赖注入,那么就先创建两个 Bean,分别为 ServiceA 和 ServiceB。
ServiceA 代码如下:
| 1 2 3 4 5 6 7 8 9 10 11 12 |
public class ServiceA { public String getServiceName() { return serviceName; } public void setServiceName(String serviceName) { this.serviceName = serviceName; } private String serviceName; public void sayHello() { System.out.println("serviceA sayHello " + serviceName); } } |
ServiceB,代码如下:
| 1 2 3 4 5 6 7 8 9 10 11 12 13 14 15 16 17 18 |
import org.springframework.beans.factory.annotation.Autowired;
public class ServiceB {
@Autowired private ServiceA serviceA;
public ServiceA getServiceA() { return serviceA; } public void setServiceA(ServiceA serviceA) { this.serviceA = serviceA; }
public void sayHello() { serviceA.sayHello(); } } |
如上代码可知 ServiceB 内部使用注解 @Autowired 注入了 ServiceA 的实例。
然后使用下面 bean-test.xml 文件配置两个 Bean 的实例:
| 1 2 3 4 5 6 7 8 9 10 11 12 13 14 15 16 17 |
<?xml version="1.0" encoding="UTF-8"?> <beans xmlns="http://www.springframework.org/schema/beans" xmlns:xsi="http://www.w3.org/2001/XMLSchema-instance" xmlns:context="http://www.springframework.org/schema/context" xmlns:aop="http://www.springframework.org/schema/aop" xmlns:tx="http://www.springframework.org/schema/tx" xsi:schemaLocation=" http://www.springframework.org/schema/beans http://www.springframework.org/schema/beans/spring-beans-3.0.xsd http://www.springframework.org/schema/context http://www.springframework.org/schema/context/spring-context-3.0.xsd http://www.springframework.org/schema/tx http://www.springframework.org/schema/tx/spring-tx-3.0.xsd http://www.springframework.org/schema/beans http://www.springframework.org/schema/beans/spring-beans-2.5.xsd">
<bean id="serviceA" class="com.jiaduo.test.ServiceA"></bean> <bean id="serviceB" class="com.jiaduo.test.ServiceB"></bean>
</beans> |
最后测试类代码如下:
| 1 2 3 4 5 6 |
public class TestAuowired { public static void main(String[] arg) { ClassPathXmlApplicationContext cpxa = new ClassPathXmlApplicationContext("bean-test.xml"); cpxa.getBean("serviceB", ServiceB.class).sayHello(); } } |
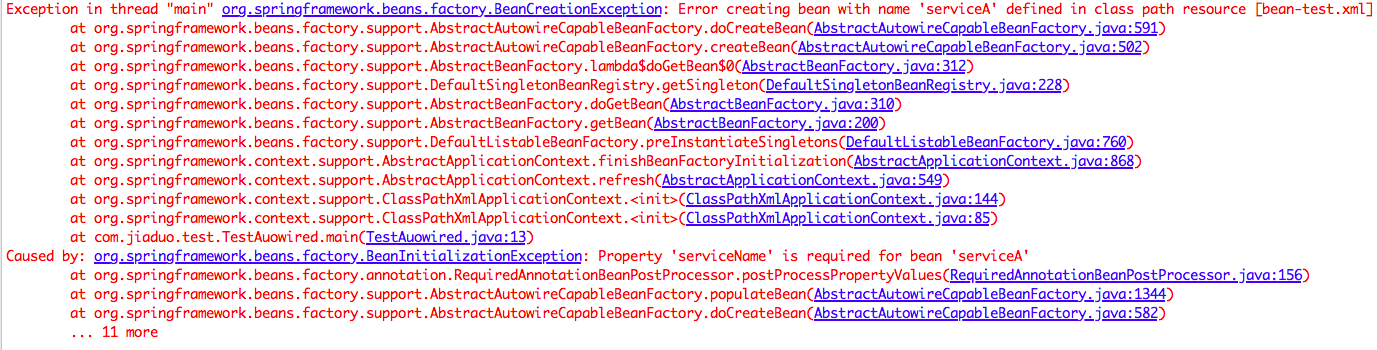
运行测试代码,我们期望输出 serviceA sayHello null,但是结果却是如下:
| 1 2 3 4 |
log4j:WARN See http://logging.apache.org/log4j/1.2/faq.html#noconfig for more info. Exception in thread "main" java.lang.NullPointerException at com.jiaduo.test.ServiceB.sayHello(ServiceB.java:11) at com.jiaduo.test.TestAuowired.main(TestAuowired.java:14) |
从异常结果知道,ServiceB 里面的 serviceA 对象为 null,也就是 XML 里面配置的 serviceA 对象并没有被注入到 ServiceB 实例内。其实要想使用 @Autowired 需要显示的注册对应的注解的处理器到 Spring 容器,具体是需要在 bean-test.xml 里面添加 <bean class="org.springframework.beans.factory.annotation.AutowiredAnnotationBeanPostProcessor" />,添加后在运行代码就会输出 serviceA sayHello null 了。
需要注意的是 @Autowired 除了可以标注在变量上,还可以标注在变量对应的 set 访问器上,比如下面代码1和代码2效果是一样。
代码1:
| 1 2 3 4 |
@Autowired public void setServiceA(ServiceA serviceA) { this.serviceA = serviceA; } |
代码2:
| 1 2 |
@Autowired private ServiceA serviceA; |
AutowiredAnnotationBeanPostProcessor 原理剖析
首先来了解下 AutowiredAnnotationBeanPostProcessor 的类图结构,如下图:
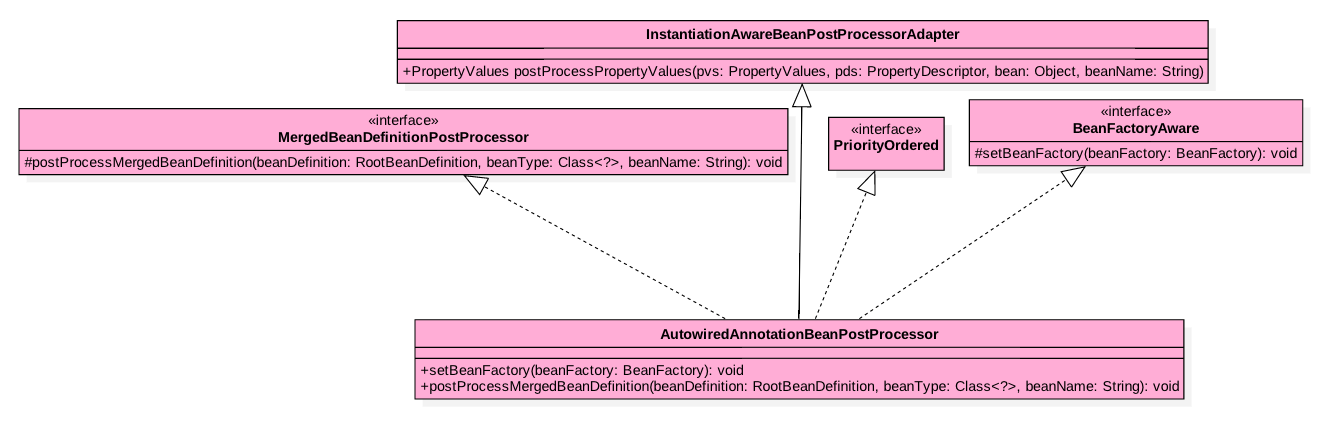
可知 AutowiredAnnotationBeanPostProcessor 直接或者间接实现了 Spring 框架的好多扩展接口:
- 实现了 BeanFactoryAware 接口,可以让 AutowiredAnnotationBeanPostProcessor 获取到当前 Spring 应用程序上下文管理的 BeanFactory,从而可以获取到 BeanFactory 里面所有的 Bean。
- 实现了 MergedBeanDefinitionPostProcessor 接口,可以让 AutowiredAnnotationBeanPostProcessor 对 BeanFactory 里面的 Bean 在被实例化前对 Bean 定义进行修改。
- 继承了 InstantiationAwareBeanPostProcessorAdapter,可以让 AutowiredAnnotationBeanPostProcessor 在 Bean 实例化后执行属性设置。
有关更多 Spring 框架扩展接口的知识可以参考:Spring 框架常用扩展接口揭秘。
OK,下面看看这些扩展接口在 AutowiredAnnotationBeanPostProcessor 中调用时机,以及在实现依赖注入时候充当了什么作用,AutowiredAnnotationBeanPostProcessor 的代码执行时序图如下:
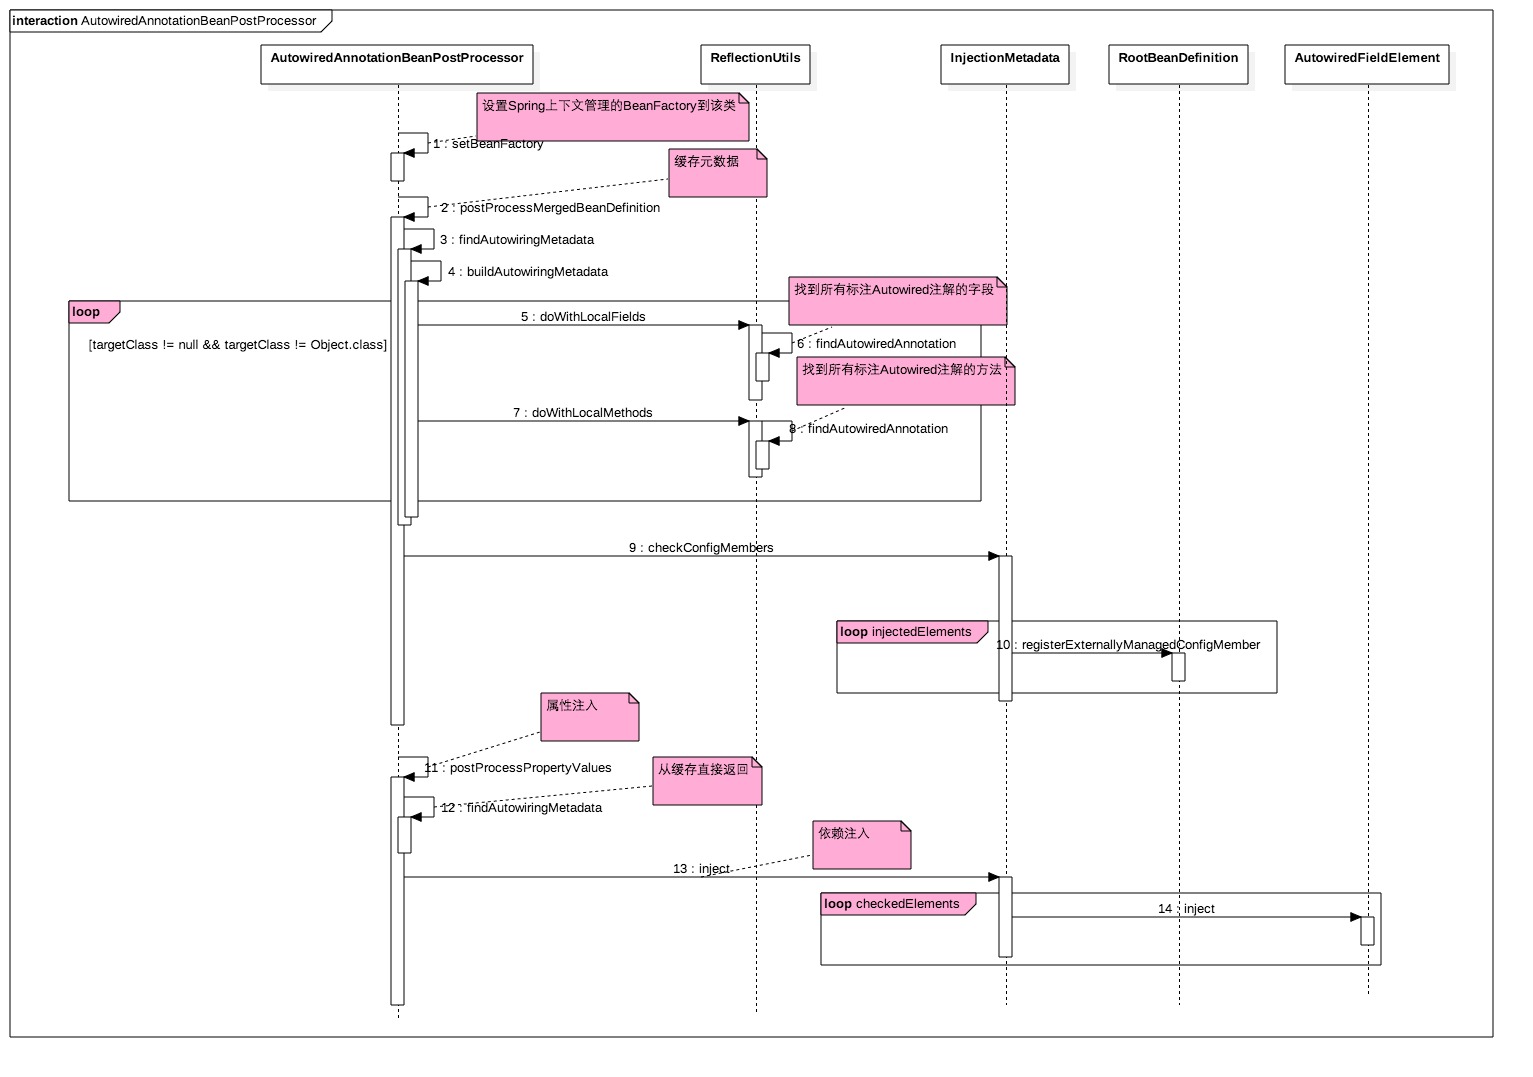
- 代码(1)Spring 框架会在创建 AutowiredAnnotationBeanPostProcessor 实例过程中调用 setBeanFactory 方法注入 Spring 应用程序上下文管理的 BeanFactory 到 AutowiredAnnotationBeanPostProcessor 中,所以 AutowiredAnnotationBeanPostProcessor 就可以操作 BeanFactory 里面的所有的 Bean 了。
- 代码(2)在 Spring 中每个 Bean 实例化前,Spring 框架都会调用 AutowiredAnnotationBeanPostProcessor 的 postProcessMergedBeanDefinition(RootBeanDefinition beanDefinition, Class<?> beanType, String beanName) 方法,用来对当前 Bean 的定义(beanDefinition)进行修改,这里主要通过 findAutowiringMetadata 方法找到当前 Bean 中标注 @Autowired 注解的属性变量和方法。
| 1 2 3 4 5 6 7 8 9 10 11 12 13 14 15 16 17 18 19 20 |
private InjectionMetadata findAutowiringMetadata(String beanName, Class<?> clazz, @Nullable PropertyValues pvs) { //根据当前bean信息生成缓存key String cacheKey = (StringUtils.hasLength(beanName) ? beanName : clazz.getName()); //缓存中是否存在当前bean的元数据 InjectionMetadata metadata = this.injectionMetadataCache.get(cacheKey); if (InjectionMetadata.needsRefresh(metadata, clazz)) { synchronized (this.injectionMetadataCache) { metadata = this.injectionMetadataCache.get(cacheKey); if (InjectionMetadata.needsRefresh(metadata, clazz)) { if (metadata != null) { metadata.clear(pvs); } //不存在则收集,并放入缓存 metadata = buildAutowiringMetadata(clazz); this.injectionMetadataCache.put(cacheKey, metadata); } } } return metadata; } |
这里是先通过 buildAutowiringMetadata 收集当前 Bean 中的注解信息,其中会先查找当前类里面的注解信息,对应在变量上标注 @Autowired 的变量会创建一个 AutowiredFieldElement 实例用来记录注解信息,对应在 set 方法上标注 @Autowired 的方法会创建一个 AutowiredMethodElement 对象来保存注解信息。然后会递归解析当前类的直接父类里面的注解,并把最远父类到当前类里面的注解信息依次存放到InjectionMetadata对象(内部使用集合保存所有方法和属性上的注解元素对象),然后缓存起来以便后面使用,这里的缓存实际是个并发 map:
| 1 |
private final Map<String, InjectionMetadata> injectionMetadataCache = new ConcurrentHashMap<>(256); |
- 代码(11)则是在对Spring的BeanFactory里面的bean实例化后初始化前调用 AutowiredAnnotationBeanPostProcessor 的 PropertyValues postProcessPropertyValues(PropertyValues pvs, PropertyDescriptor[] pds, Object bean, String beanName) 方法设置依赖注入对象;首先代码(12)获取当前 Bean 里面的依赖元数据信息,由于在步骤(2)时候已经收集到了缓存,所以这里是直接从缓存获取的;这里获取的就是步骤(2)缓存的 InjectionMetadata 对象;步骤(13)则逐个调用 InjectionMetadata 内部集合里面存放的属性和方法注解对象的 inject 方法,通过反射设置依赖的属性值和反射调用 set 方法设置属性值。
如果注解加到了变量上则会调用 AutowiredFieldElement 的 inject 方法用来通过反射设置属性值:
| 1 2 3 4 5 6 7 8 9 10 11 12 13 14 |
protected void inject(Object bean, @Nullable String beanName, @Nullable PropertyValues pvs) throws Throwable {
Field field = (Field) this.member; Object value; ... //解析依赖的bean value = beanFactory.resolveDependency(desc, beanName, autowiredBeanNames, typeConverter); ... //反射设置依赖属性值 if (value != null) { ReflectionUtils.makeAccessible(field); field.set(bean, value); } } |
如果注解加到了 set 方法上则调用 AutowiredMethodElement 的 inject 方法通过反射调用 set 方法设置依赖的变量值:
| 1 2 3 4 5 6 7 8 9 10 11 12 13 14 15 16 17 18 19 |
protected void inject(Object bean, @Nullable String beanName, @Nullable PropertyValues pvs) throws Throwable { ... Method method = (Method) this.member; Object[] arguments; ... //解析依赖的bean value = beanFactory.resolveDependency(desc, beanName, autowiredBeanNames, typeConverter); ... //反射设置调用set方法设置属性值 if (arguments != null) { try { ReflectionUtils.makeAccessible(method); method.invoke(bean, arguments); } catch (InvocationTargetException ex){ throw ex.getTargetException(); } } } |
这里需要注意的是 @Autowired 注解有一个布尔变量的 required 属性,用来决定在依赖注入时候是否检测依赖的 Bean 在 BeanFactory 里面是否存在,默认是 true,就是如果不存在就会抛出下面异常:org.springframework.beans.factory.NoSuchBeanDefinitionException 异常,这个读者可以把 bean-test.xml 里面的 serviceA 注入代码去掉测试下。
如果 required 设置为 false,则在依赖注入时候不去检查依赖的 Bean 是否存在,而是在你具体使用依赖的 Bean 时候才会抛出 NPE 异常:
| 1 2 3 |
Exception in thread "main" java.lang.NullPointerException at com.jiaduo.test.ServiceB.sayHello(ServiceB.java:19) at com.jiaduo.test.TestAuowired.main(TestAuowired.java:14) |
具体做检验的地方就是上代码的 resolveDependency 方法里面。
注:@Autowired 的使用简化了我们的开发,其原理是使用 AutowiredAnnotationBeanPostProcessor 类来实现,该类实现了 Spring 框架的一些扩展接口,通过实现 BeanFactoryAware 接口使其内部持有了 BeanFactory(可轻松的获取需要依赖的的 Bean);通过实现 MergedBeanDefinitionPostProcessor 扩展接口,在 BeanFactory 里面的每个 Bean 实例化前获取到每个 Bean 里面的 @Autowired 信息并缓存下来;通过实现 Spring 框架的 postProcessPropertyValues 扩展接口在 BeanFactory 里面的每个 Bean 实例后从缓存取出对应的注解信息,获取依赖对象,并通过反射设置到 Bean 属性里面。
注解 Required 的简单使用
“注解Autowired的简单使用”小节运行后结果会输出 serviceA sayHello null,其中 null 是因为没给 serviceA 里面的属性 serviceName 赋值的原因,在开发时候开发人员也会比较容易犯这个错误,而要等运行时使用该属性的时候才知道没有赋值。那么有没有办法在 Spring 框架进行 Bean 创建时候就进行检查某些必要的属性是否被设置了呢?
其实 @Required 就是做这个的,比如如果你想在 Spring 创建 ServiceA 时候就检查 serviceName 有没有被设置,你需要在 serviceName 的 set 方法上加入 @Required 注解:
| 1 2 3 4 |
@Required public void setServiceName(String serviceName) { this.serviceName = serviceName; } |
并且需要在 XML 里面添加下面配置,它是 @Required 注解的处理器:
| 1 |
<bean class="org.springframework.beans.factory.annotation.RequiredAnnotationBeanPostProcessor" /> |
加上这些后在运行代码会输出下面结果:
可见 Spring 在设置 ServiceA 的实例的属性时候会检查该属性是否被设置,如果没有则会抛出异常。
通过在 bean-test.xml 里面添加属性设置如下:
| 1 2 3 |
<bean id="serviceA" class="com.jiaduo.test.ServiceA"> <property name="serviceName" value="Service Name" /> </bean> |
然后在运行,输出结果如下:
| 1 |
serviceA sayHello Service Name |
RequiredAnnotationBeanPostProcessor 原理剖析
RequiredAnnotationBeanPostProcessor 类似 AutowiredAnnotationBeanPostProcessor 也是间接或者直接实现了 Spring 框架相同的接口。通过实现 BeanFactoryAware 接口内部持有了 BeanFactory(可轻松的获取需要依赖的Bean);通过实现 Spring 框架的 postProcessPropertyValues 扩展接口在 BeanFactory 里面的每个 Bean 实例后设置属性前,检查标注 @Required 的 set 访问器对应的属性是否被设置。
这个逻辑比较简单,直接看下 RequiredAnnotationBeanPostProcessor 的 postProcessPropertyValues 方法:
| 1 2 3 4 5 6 7 8 9 10 11 12 13 14 15 16 17 18 19 20 21 |
public PropertyValues postProcessPropertyValues( PropertyValues pvs, PropertyDescriptor[] pds, Object bean, String beanName) throws BeansException {
if (!this.validatedBeanNames.contains(beanName)) { if (!shouldSkip(this.beanFactory, beanName)) { List<String> invalidProperties = new ArrayList<>(); for (PropertyDescriptor pd : pds) { //判断属性的set方法是否标注了@Required注解,并且是否该属性没有被设置 if (isRequiredProperty(pd) && !pvs.contains(pd.getName())) { invalidProperties.add(pd.getName()); } } //如果发现属性的set方法标注了@Required注解,但是属性没有被设置,则抛出异常 if (!invalidProperties.isEmpty()) { throw new BeanInitializationException(buildExceptionMessage(invalidProperties, beanName)); } } this.validatedBeanNames.add(beanName); } return pvs; } |
其中 isRequiredProperty 作用是判断当前属性的 set 方法是否标注了 @Required 注解,代码如下:
| 1 2 3 4 |
protected boolean isRequiredProperty(PropertyDescriptor propertyDescriptor) { Method setter = propertyDescriptor.getWriteMethod(); return (setter != null && AnnotationUtils.getAnnotation(setter, getRequiredAnnotationType()) != null); } |
注:使用 @Autowired 和 @Required 时候需要注入对应的注解处理器,这很麻烦,所以 Spring 框架添加了一个 <context:annotation-config /> 标签,当你在 XML 里面引入这个标签后,就默认注入了 AutowiredAnnotationBeanPostProcessor 和 RequiredAnnotationBeanPostProcessor 。
注解 @Component 的工作原理
在第二节中,我们通过在 bean-test.xml 里面配置 <bean id="serviceA" class="com.jiaduo.test.ServiceA"></bean> 的方式注入 ServiceA 的一个实例;其实可以避免在 XML 里面使用 <bean/> 这种方式,可以直接在 ServiceA 类上标注 @Component 注解方式:
| 1 2 3 4 |
@Component("serviceA") public class ServiceA { ... } |
当一个类上标注 @Component 注解时候,Spring 框架会自动注册该类的一个实例到 Spring 容器,但是我们需要告诉 Spring 框架需要到去哪里查找标注该注解的类,所以需要在 bean-test.xml 里面配置如下:
| 1 |
<context:component-scan base-package="com.jiaduo.test" /> |
其中 base-package 就是告诉 Spring 框架要去查找哪些包下的标注 @Component 注解的类。
下面我们来研究下 Spring 框架是如何解析 <context:component-scan/> 标签并扫描标注 @Component 注解的 Bean 注册到 Spring 容器的。
首先看下解析 <context:component-scan/> 标签的 ComponentScanBeanDefinitionParser 类的时序图:
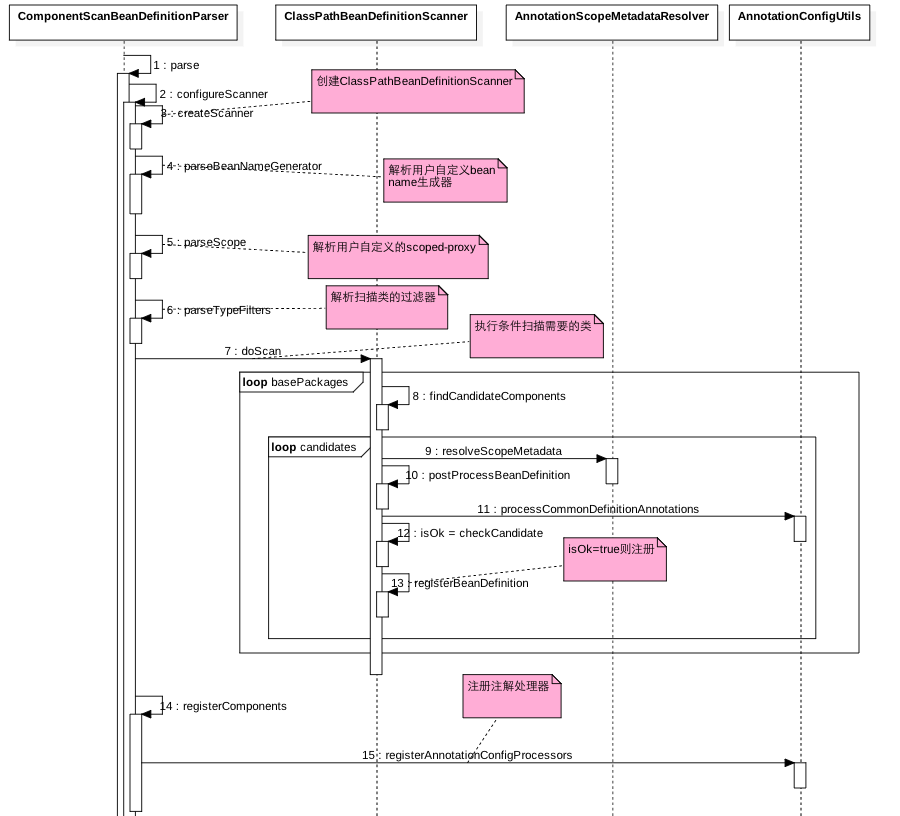
- 如上时序图步骤(3)创建了一个 ClassPathBeanDefinitionScanner 扫描器,代码如下:
| 1 2 3 4 |
protected ClassPathBeanDefinitionScanner createScanner(XmlReaderContext readerContext, boolean useDefaultFilters) { return new ClassPathBeanDefinitionScanner(readerContext.getRegistry(), useDefaultFilters, readerContext.getEnvironment(), readerContext.getResourceLoader()); } |
变量 useDefaultFilters 说明是否使用默认的 filters,所谓 filter 也就是过滤器,这里 ClassPathBeanDefinitionScanner 会扫描指定包路径里面的类,但是那些需要的类,就是通过 filter 进行过滤的,默认 useDefaultFilters 为 true,<context:component-scan base-package="com.jiaduo.test"/> 等价于 <context:component-scan base-package="com.jiaduo.test" use-default-filters="true"/>,会使用下面代码注册默认 filters:
| 1 2 3 4 5 6 7 8 9 10 11 12 13 14 15 16 17 18 |
protected void registerDefaultFilters() { //这里决定指定包路径下标注@Component注解的类是我们想要的 this.includeFilters.add(new AnnotationTypeFilter(Component.class)); ClassLoader cl = ClassPathScanningCandidateComponentProvider.class.getClassLoader(); try { this.includeFilters.add(new AnnotationTypeFilter( ((Class<? extends Annotation>) ClassUtils.forName("javax.annotation.ManagedBean", cl)), false)); } catch (ClassNotFoundException ex) { ... } try { this.includeFilters.add(new AnnotationTypeFilter( ((Class<? extends Annotation>) ClassUtils.forName("javax.inject.Named", cl)), false)); } catch (ClassNotFoundException ex) { ... } } |
- 步骤(4)解析用户自定义的 BeanNameGenerator 的实现类,用来给扫描的类起一个在 BeanFactory 里面的名字,配置如下:
| 1 |
<context:component-scan base-package="com.jiaduo.test" name-generator="com.my.name.generator.MyBeanNameGenerator"/> |
其中 name-generator 指定 BeanNameGenerator 的实现类的包路径+类名,内部会创建一个该类的实例。
- 步骤(5)主要用来设置是否对扫描类进行 scope-proxy,我们知道在 XML 里面配置 Bean 的时候可以指定 scop 属性来配置该 Bean 的作用域为 singleton、prototype、request、session等,对应后三者来说,Spring 的实现是对标注该作用域的 Bean 进行代理来实现的,而我们知道 Spring 代理为 JDK 代理和 CGLIB 代理(可以参考 :Spring 框架之 AOP 原理剖析),所以步骤(5)作用就是让用户通过 scoped-proxy 指定代理方式:<context:component-scan base-package="com.jiaduo.test" scoped-proxy="no"/>,这是默认方式不进行代理;scoped-proxy="interfaces" 标示对接口进行代理,也就是使用 JDK 动态代理;scoped-proxy="targetClass" 标示对目标对象进行代理,也就是使用 CGLIB 进行代理。
- 步骤(6)解析用户自定义过滤器,前面我们说了,默认下 use-default-filters=true,默认扫描之后只会注入标注 @Component 的元素;这里则允许用户自定义拦截器,设置需要注册扫描到的那些类和排除扫描到的那些类,如下配置:
| 1 2 3 4 5 6 7 8 |
<context:component-scan base-package="com.jiaduo.test" use-default-filters="false"> <context:include-filter type="annotation" expression="org.springframework.stereotype.Component" />
<context:exclude-filter type="annotation" expression="org.springframework.stereotype.Controller" /> </context:component-scan> |
需要注意的是,当使用子标签 <context:include-filter/> 和 <context:exclude-filter/> 自定义用户过滤器时候需要这样设置:use-default-filters="false" 才会生效。
- 代码(7)则执行具体扫描,其中 basePackages 是注解里面 base-package 解析后的包路径列表,我们在指定base-package时候可以通过,; \t\n中其中一个分隔符指定多个包路径,比如: <context:component-scan base-package="com.jiaduo.test;com.jiaduo.test1"/>。步骤(8)查找当前包路径下满足过滤器列表的候选bean,默认是查找所有标注了@Component注解的Bean。步骤(13)则注册满足条件的bean到Spring容器。
- 步骤(14)注册一些组元,比如步骤(15)默认情况下会注册的前面提到的 <context:annotation-config /> 标签实现的内容,你可以通过下面方式关闭该功能:
| 1 |
<context:component-scan base-package="com.jiaduo.test" annotation-config="false" /> |
注:当我们在 XML 里面配置 <context:component-scan/> 标签后,Spring 框架会根据标签内指定的包路径下查找指定过滤条件的 Bean,并可以根据标签内配置的 BeanNameGenerator 生成 Bean 的名称,根据标签内配置的 scope-proxy 属性配置 Bean 被代理的方式,根据子标签 <context:include-filter/>,<context:exclude-filter/> 配置自定义过滤条件。
注解 @Configuration、@ComponentScan、@Import、@PropertySource、@Bean工作原理
一个简单 Demo
《Spring 框架常用扩展接口揭秘》 讲到在 Spring 框架中,每个应用程序上下文(ApplicationContext)管理着一个 BeanFactory,应用程序上下文则是对 BeanFactory 和 Bean 的生命周期中的各个环节进行管理。
而应用程序上下文的子类除了有解析 XML 作为 Bean 来源的 ClassPathXmlApplicationContext,还有基于扫描注解类作为 Bean 来源的 AnnotationConfigApplicationContext,本节就结合 AnnotationConfigApplicationContext 应用程序上下文来讲解 @Configuration、@ComponentScan、@Import、@PropertySource、@Bean注解的使用与原理。
其中 ServiceA 和 ServiceB 代码修改如下:
| 1 2 3 4 5 6 7 8 9 10 11 12 13 14 15 16 17 18 19 20 21 22 23 24 25 26 27 28 29 30 31 |
public class ServiceB { public ServiceA getServiceA() { return serviceA; }
public void setServiceA(ServiceA serviceA) { this.serviceA = serviceA; } @Autowired private ServiceA serviceA;
public void sayHello() { serviceA.sayHello(); } } public class ServiceA {
public String getServiceName() { return serviceName; } public void setServiceName(String serviceName) { this.serviceName = serviceName; } //这里加了一个注解 @Value("${service.name}") private String serviceName;
public void sayHello() { System.out.println("serviceA sayHello " + serviceName); } } |
其中 ConfigBean 代码如下:
| 1 2 3 4 5 6 7 8 9 10 11 |
import org.springframework.context.annotation.Bean; import org.springframework.context.annotation.Configuration; import com.jiaduo.test.annotation.ServiceA; @Configuration public class ConfigBean {
@Bean public ServiceA serviceA() { return new ServiceA(); } } |
其中 ConfigBean2 代码如下:
| 1 2 3 4 5 6 7 8 9 10 11 12 13 14 |
import org.springframework.context.annotation.Bean; import org.springframework.context.annotation.Configuration; import org.springframework.context.annotation.Import; import com.jiaduo.test.annotation.ServiceA; import com.jiaduo.test.annotation.ServiceB;
@Configuration public class ConfigBean2 {
@Bean public ServiceB serviceB() { return new ServiceB(); } } |
配置文件 config.properties 内容如下:
| 1 |
service.name=Annotation Learn |
其中测试类 TestAnnotation 代码如下:
| 1 2 3 4 5 6 7 8 9 10 11 12 13 |
@Configuration//(1) @ComponentScan(basePackages = "com.jiaduo.test.annotation.config") // (2) @Import(com.jiaduo.test.annotation.sdk.config.ConfigBean2.class) // (3) @PropertySource(value={ "classpath:config.properties"})//(4) public class TestAnnotaion {
public static void main(String[] args) {
// (5) AnnotationConfigApplicationContext ctx = new AnnotationConfigApplicationContext(TestAnnotaion.class); ctx.getBean("serviceB", ServiceB.class).sayHello();// (6) } } |
运行 TestAnnotaion 的 main 方代码输出:serviceA sayHello Annotation Learn。
代码(5)创建一个 AnnotationConfigApplicationContext 类型的应用程序上下文,构造函数参数为 TestAnnotaion.class。
其内部会解析 TestAnnotaion 类上的 ComponentScan 注解,并扫描 basePackages 指定的包里面的所有标注 @Configuration 注解的类(这里会注入 ConfigBean 类到 Spring 容器),然后解析 ConfigBean 内部标注有 @Bean 的方法,把方法内创建的对象注入到 Spring 容器(这里是把 serviceA 注入到了 Spring 容器)。
然后会解析 TestAnnotaion 类上的 Import 注解,Import 注解作用是把标注 @Configuration 注解里面创建的 Bean 注入到 Spring 容器,这里是把 ConfigBean2 里面创建的 serviceB 注入到了 Spring 容器。
原理剖析
从 Demo 可知一切源于 AnnotationConfigApplicationContext,那么就从 AnnotationConfigApplicationContext 的构造函数开始,代码如下:
| 1 2 3 4 5 6 7 8 |
public AnnotationConfigApplicationContext(Class<?>... annotatedClasses) { //调用无参构造函数 this(); //注册含有注解的类 register(annotatedClasses); //刷新应用程序上下文 refresh(); } |
其调用时序图如下:
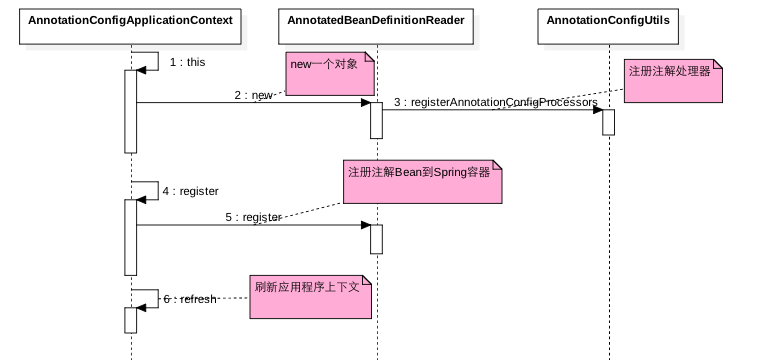
- 如上时序图步骤(1)调用了 AnnotationConfigApplicationContext 的无参构造函数,其内部创建了一个 AnnotatedBeanDefinitionReader 对象,该对象构造函数内部调用 AnnotationConfigUtil.registerAnnotationConfigProcessors 方法注册了注解处理器(其作用等价于在 XML 里面配置 <context:annotation-config />),其中就注册了 ConfigurationClassPostProcessor 处理器,该处理器就是专门用来处理 @Configuration 注解的,这个后面再讲。
- 步骤(4)则是注册 AnnotationConfigApplicationContext 构造函数里面传递的含有注解的类到 Spring 容器(这里是注册 TestAnnotaion 类到 Spring 容器)。
- 步骤(6)刷新应用程序上下文,使用注册的 ConfigurationClassPostProcessor 处理器解析 TestAnnotaion 上的注解,并注册相应的 Bean 到 Spring 容器。
下面主要来看下 ConfigurationClassPostProcessor 的处理时序图:
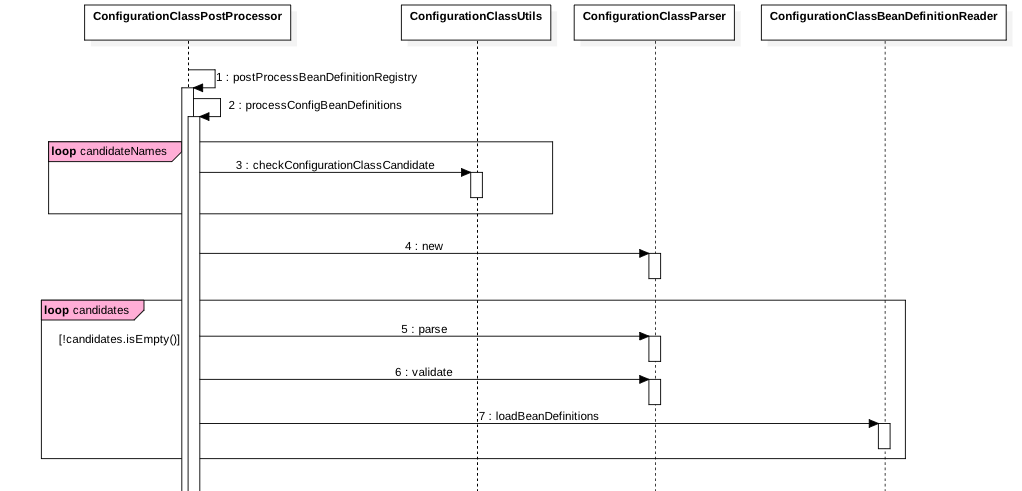
- ConfigurationClassPostProcessor 实现了 Spring 框架的 BeanDefinitionRegistryPostProcessor 接口所以具有 postProcessBeanDefinitionRegistry 方法 ,具体可以参考 :Spring 框架和 Tomcat 容器扩展接口揭秘。
- 其中步骤(2)遍历应用程序上下文中的 Bean 查找标注 @Configuration 的 Bean 定义,具体是使用 checkConfigurationClassCandidate 方法检测,代码如下:
| 1 2 3 4 5 6 7 8 9 10 11 12 13 14 15 16 |
public static boolean checkConfigurationClassCandidate(BeanDefinition beanDef, MetadataReaderFactory metadataReaderFactory) { ... //该类上是否标注了@Configuration注解 if (isFullConfigurationCandidate(metadata)) { beanDef.setAttribute(CONFIGURATION_CLASS_ATTRIBUTE, CONFIGURATION_CLASS_FULL); } //该类上是否标注了@Component,@ComponentScan,@Import注解 else if (isLiteConfigurationCandidate(metadata)) { beanDef.setAttribute(CONFIGURATION_CLASS_ATTRIBUTE, CONFIGURATION_CLASS_LITE); } else { return false; } ... return true; } |
可知只有类上标注 @Configuration、@Component、@ComponentScan、@Import 注解的 Bean 才是候选 Bean。
- 步骤(4)创建了一个 ConfigurationClassParser 对象,这个对象就是专门用来解析标注 @Configuration 注解的 Bean 的。这里首先调用 parse 方法对步骤(2)产生的候选 Bean 进行解析,本文例子是先对 TestAnnotaion 类解析,并会对 TestAnnotaion 上的 @ComponentScan 和 @Import 进行解析,解析出来的 Bean 可能又含有了 @Configuration 注解,那么把这些新的包含 @Configuration 的 Bean 作为候选 Bean 后然后调用 parse 方法,依次类推直到 parse 解析出来的 Bean 不在包含 @Configuration 注解。其中步骤(7)则是注册解析到的标注 @Import 的 Bean 和 @Bean 的 Bean 到 Spring 容器。
下面着重讲解下 ConfigurationClassParser 的 parse 方法:
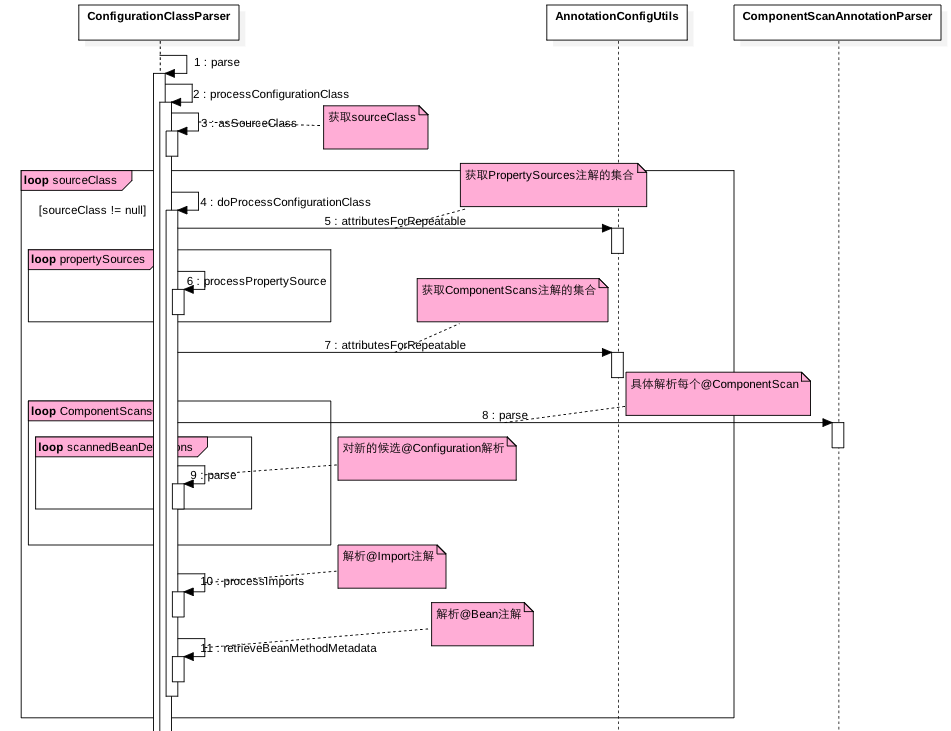
- 其中最外层循环是递归解析 configuration 类和它的超类中标注 @Configuration 的类,也就是解析完当前类,会设置 sourceClass=sourceClass.getSuperClass();
- 循环内步骤(5)、(6)是解析并处理所有标注 @PropertySources 注解的Bean,具体代码如下:
| 1 2 3 4 5 6 7 8 9 10 11 12 13 14 15 16 17 18 19 20 21 22 23 24 25 26 27 28 29 30 31 32 33 34 |
private void processPropertySource(AnnotationAttributes propertySource) throws IOException { ... //获取注解上的值 String[] locations = propertySource.getStringArray("value"); ...
for (String location : locations) { try { String resolvedLocation = this.environment.resolveRequiredPlaceholders(location); Resource resource = this.resourceLoader.getResource(resolvedLocation); //设置location里面的属性到Spring的环境environment addPropertySource(factory.createPropertySource(name, new EncodedResource(resource, encoding))); } catch (IllegalArgumentException | FileNotFoundException | UnknownHostException ex) { ... } } } private void addPropertySource(PropertySource<?> propertySource) { //获取Spring环境environment里面的属性集 String name = propertySource.getName(); MutablePropertySources propertySources = ((ConfigurableEnvironment) this.environment).getPropertySources();
... //添加注解@PropertySource里面的配置文件信息到Spring环境 if (this.propertySourceNames.isEmpty()) { propertySources.addLast(propertySource); } else { String firstProcessed = this.propertySourceNames.get(this.propertySourceNames.size() - 1); propertySources.addBefore(firstProcessed, propertySource); } this.propertySourceNames.add(name); } |
- 循环内步骤(7)、(8)是解析标注 @ComponentScan 的类,并注册扫描到的类到 Spring 容器,并且对扫描到含有 @Configuration 的类在进行解析,具体解析 @ComponentScan 的逻辑如下:
| 1 2 3 4 5 6 7 8 9 10 11 12 13 14 15 16 17 18 19 20 21 22 23 24 25 26 27 28 29 30 31 32 33 34 35 36 37 38 39 40 41 42 43 44 45 46 47 48 49 50 51 52 53 54 55 56 57 58 59 60 61 62 63 |
public Set<BeanDefinitionHolder> parse(AnnotationAttributes componentScan, final String declaringClass) { //创建一个扫描器 ClassPathBeanDefinitionScanner scanner = new ClassPathBeanDefinitionScanner(this.registry, componentScan.getBoolean("useDefaultFilters"), this.environment, this.resourceLoader);
//配置扫描器中bean的BeanNameGenerator Class<? extends BeanNameGenerator> generatorClass = componentScan.getClass("nameGenerator"); boolean useInheritedGenerator = (BeanNameGenerator.class == generatorClass); scanner.setBeanNameGenerator(useInheritedGenerator ? this.beanNameGenerator : BeanUtils.instantiateClass(generatorClass));
//设置scopedProxy ScopedProxyMode scopedProxyMode = componentScan.getEnum("scopedProxy"); if (scopedProxyMode != ScopedProxyMode.DEFAULT) { scanner.setScopedProxyMode(scopedProxyMode); } else { Class<? extends ScopeMetadataResolver> resolverClass = componentScan.getClass("scopeResolver"); scanner.setScopeMetadataResolver(BeanUtils.instantiateClass(resolverClass)); } //设置资源匹配模式 scanner.setResourcePattern(componentScan.getString("resourcePattern"));
//设置扫描器的过滤条件 for (AnnotationAttributes filter : componentScan.getAnnotationArray("includeFilters")) { for (TypeFilter typeFilter : typeFiltersFor(filter)) { scanner.addIncludeFilter(typeFilter); } } for (AnnotationAttributes filter : componentScan.getAnnotationArray("excludeFilters")) { for (TypeFilter typeFilter : typeFiltersFor(filter)) { scanner.addExcludeFilter(typeFilter); } } //是否延迟初始化 boolean lazyInit = componentScan.getBoolean("lazyInit"); if (lazyInit) { scanner.getBeanDefinitionDefaults().setLazyInit(true); } //解析扫描包路径 Set<String> basePackages = new LinkedHashSet<>(); String[] basePackagesArray = componentScan.getStringArray("basePackages"); for (String pkg : basePackagesArray) { String[] tokenized = StringUtils.tokenizeToStringArray(this.environment.resolvePlaceholders(pkg), ConfigurableApplicationContext.CONFIG_LOCATION_DELIMITERS); basePackages.addAll(Arrays.asList(tokenized)); } for (Class<?> clazz : componentScan.getClassArray("basePackageClasses")) { basePackages.add(ClassUtils.getPackageName(clazz)); } if (basePackages.isEmpty()) { basePackages.add(ClassUtils.getPackageName(declaringClass)); }
scanner.addExcludeFilter(new AbstractTypeHierarchyTraversingFilter(false, false) { @Override protected boolean matchClassName(String className) { return declaringClass.equals(className); } }); //执行扫描 return scanner.doScan(StringUtils.toStringArray(basePackages)); } |
其内部逻辑与 <context:component-scan/> 相似,这里不再累述了。
- 步骤(10)解析所有标注 @Import 的 Bean,具体注入到 Spring 容器实际是在 ConfigurationClassPostProcessor 的时序图的步骤(7),其中扫描 @Import 注解的递归代码如下:
| 1 2 3 4 5 6 7 8 9 10 11 12 13 14 15 16 17 18 19 20 |
private Set<SourceClass> getImports(SourceClass sourceClass) throws IOException { Set<SourceClass> imports = new LinkedHashSet<>(); Set<SourceClass> visited = new LinkedHashSet<>(); collectImports(sourceClass, imports, visited); return imports; }
private void collectImports(SourceClass sourceClass, Set<SourceClass> imports, Set<SourceClass> visited) throws IOException {
if (visited.add(sourceClass)) { for (SourceClass annotation : sourceClass.getAnnotations()) { String annName = annotation.getMetadata().getClassName(); if (!annName.startsWith("java") && !annName.equals(Import.class.getName())) { collectImports(annotation, imports, visited); } } imports.addAll(sourceClass.getAnnotationAttributes(Import.class.getName(), "value")); } } |
- 步骤(11)解析所有标注 @Bean 的方法,具体注入操作是在 ConfigurationClassPostProcessor 的时序图的步骤(7),解析 @Bean 的代码如下:
| 1 2 3 4 5 6 7 8 9 10 11 12 13 14 15 16 17 18 19 20 21 22 23 24 25 26 27 28 29 30 31 |
private Set<MethodMetadata> retrieveBeanMethodMetadata(SourceClass sourceClass) { AnnotationMetadata original = sourceClass.getMetadata(); //获取所有标注@Bean的方法元数据,这些方法返回顺序是任意的 Set<MethodMetadata> beanMethods = original.getAnnotatedMethods(Bean.class.getName()); if (beanMethods.size() > 1 && original instanceof StandardAnnotationMetadata) {
try { //使用asm读取字节码文件,并获取标注@Bean的方法到asmMethods,返回的方法的顺序和声明的一样 AnnotationMetadata asm = this.metadataReaderFactory.getMetadataReader(original.getClassName()).getAnnotationMetadata(); Set<MethodMetadata> asmMethods = asm.getAnnotatedMethods(Bean.class.getName()); if (asmMethods.size() >= beanMethods.size()) { Set<MethodMetadata> selectedMethods = new LinkedHashSet<>(asmMethods.size()); for (MethodMetadata asmMethod : asmMethods) { for (MethodMetadata beanMethod : beanMethods) { if (beanMethod.getMethodName().equals(asmMethod.getMethodName())) { selectedMethods.add(beanMethod); break; } } } if (selectedMethods.size() == beanMethods.size()) { beanMethods = selectedMethods; } } } catch (IOException ex) { } } return beanMethods; } |
注: ConfigurationClassPostProcessor 处理器是 Spring 框架处理本节这些注解的关键类,本节内容较为复杂,在解析注解使用运用了大量的循环嵌套和递归算法,代码研究起来还是有一定难度的,希望读者结合时序图慢慢理解。
基于自定义注解实现树形业务文档生成
自定义注解
当一个系统随着不断迭代的需求累加后,业务逻辑就会变得错综复杂,新人接手时候就会显得很吃力;一个办法是采用模块化思想,每个模块提供一个独立业务功能,分清业务边界,也就是使用领域模型;在领域模型中一个系统可以划分为若干模块,每个模块可以对应多个域,域与域之间通过对外暴露的唯一的 Service 进行通信,每个域下面有可能对于多个子域。
本节就通过在每个域与子域提供的服务上添加自定义注释,并收集这些注解来生成一个树形的文档来显示整个系统里面都有哪些域服务。
根据上面介绍,我们设计三类注解。
- 在模块类上面加的注解。
| 1 2 3 4 5 6 7 |
@Target({ ElementType.TYPE, ElementType.METHOD}) @Retention(RetentionPolicy.RUNTIME) @Documented public @interface ModuleAnnotation { String moduleName() default ""; String moduleDesc() default ""; } |
其中 moduleName 是模块的名字要保证应用唯一,moduleDesc 是当前模块的描述。
- 域服务类或者方法上面添加的注解。
| 1 2 3 4 5 6 7 8 9 10 11 |
@Target({ ElementType.TYPE, ElementType.METHOD}) @Retention(RetentionPolicy.RUNTIME) @Documented public @interface DomainAnnotation { String moduleName() default ""; String rootDomainName() default ""; String rootDomainDesc() default ""; String subDomainName() default ""; String subDomainDesc() default ""; String returnDesc() default "void"; } |
- 在域服务接口的参数上添加的注解,为了获取参数名字和描述使用。
| 1 2 3 4 5 6 7 8 |
@Target({ElementType.METHOD,}) @Retention(RetentionPolicy.RUNTIME) @Documented public @interface Param { String paramName() default ""; String paramType() default ""; String paramDesc() default ""; } |
其中 moduleName 说明当前域服务属于哪个模块;rootDomainName 和 rootDomainDesc 是根域服务名称和描述;subDomainName、subDomainDesc 为子域名称和描述,多个中间用英文逗号分隔;returnDesc 是返回值说明。
例如模块注解加在类上:
| 1 2 3 |
@ModuleAnnotation(moduleName="trialing",moduleDesc="庭审模块") public class moduleclass{ } |
域服务注解加在方法上,没有子域时候:
| 1 2 3 |
@DomainAnnotation(moduleName="trialing",rootDomainName="seaDomain",rootDomainDesc="纯语音庭审服务") public void m2New() { } |
域服务加载方法上,有子域时候:
| 1 2 3 4 5 6 7 8 9 10 11 |
@DomainAnnotation(moduleName="trialing",rootDomainName="videoDoamin",rootDomainDesc="视频庭审服务",subDomainName="speechDoamin,speechVideoDoamin") public String hello(@Param(paramName="type",paramDesc="案件类型")String type,@Param(paramName="num",paramDesc="案件个数")String num){ }
@DomainAnnotation(rootDomainName="speechDoamin",rootDomainDesc="语音识别服务") public String hello2(@Param(paramName="caseId",paramDesc="案号")Long caseId){ }
@DomainAnnotation(rootDomainName="speechVideoDoamin",rootDomainDesc="视频+语音识别服务") public String hello3(@Param(paramName="name",paramDesc="姓名")String name,@Param(paramName="address",paramDesc="地址")String address){ } |
如果我们能拿到所有类的注解信息,然后根据模块注解与域名注解的关联,就可以生成一个文档,类似下图:

如上图,树根为 application 说明当前是什么应用,它下面有两个 module 分别为证据模块和庭审模块;在证据模块下有两个域服务分别为质证服务和举证服务,并且有具体服务的函数签名;在庭审模块下有两个域服务分别为纯语音庭审服务和视频庭审服务;视频庭审服务下面有两个字域服务分泌为语音识别服务和视频+语音识别服务,并且有对应的服务的函数签名。
自定义注解的收集
本文选择实现 Spring 框架的 InstantiationAwareBeanPostProcessor 扩展接口来做自定义注解信息收集,该扩展的接口如下:
public Object postProcessBeforeInstantiation(Class<?> beanClass, String beanName) throws BeansException {
}
在 Spring 容器中每个 Bean 实例化前都会调用这个扩展接口,而该接口里面有 Bean 的 Class 对象,所以可以方便获取它方法和类上的注解信息。
有关 Spring 框架扩展接口可以参考 :Spring 框架常用扩展接口揭秘。
我们自定义 AnnotationInstantiationAwareBeanPostProcessor 类的 postProcessBeforeInstantiation 的实现为:
| 1 2 3 4 5 6 7 8 9 10 11 12 13 14 15 16 17 18 19 20 21 22 23 24 25 26 27 28 29 30 31 32 33 34 35 36 37 38 39 40 41 42 43 44 45 46 47 48 49 50 51 52 53 54 55 56 57 58 59 60 61 62 63 64 65 66 67 68 69 70 71 72 73 74 75 76 77 78 79 80 |
public Object postProcessBeforeInstantiation(Class<?> beanClass, String beanName) throws BeansException { if (!isOpenAnnotation) { return null; }
try { // 模块类注解收集 ModuleAnnotation moduleAnnotation = beanClass.getAnnotation(ModuleAnnotation.class); if (null != moduleAnnotation) { moudleAnnotationList.add(moduleAnnotation);
}
DomainAnnotation domainAnnotation = beanClass.getAnnotation(DomainAnnotation.class);
// 域服务类注解收集 if (null != domainAnnotation) { domainAnnotationList.add(domainAnnotation);
}
// 域服务方法注解收集 for (Method method : beanClass.getDeclaredMethods()) { domainAnnotation = method.getAnnotation(DomainAnnotation.class); if (null != domainAnnotation) { domainAnnotationList.add(domainAnnotation);
// 获取参数类型,名称,函数签名 getMethodInfoFromParam(method,domainAnnotation); }
} } catch (Exception e) {
System.out.println("----------------error:" + e.getLocalizedMessage()); }
return null; } private void getMethodInfoFromParam(Method method,DomainAnnotation domainAnnotation) { //参数上的注解的获取 Annotation[][] parameterAnnotations = method.getParameterAnnotations(); //保存参数名称 String[] parameterNames = new String[parameterAnnotations.length]; //参数类型 Class<?>[] parameterTypes = method.getParameterTypes(); int index = 0; //拼接函数签名 StringBuffer sb = new StringBuffer(); String methodName = method.getName(); String returnType = method.getReturnType().getName(); sb.append(returnType).append(" ").append(methodName).append("(");
Map<String, String> map = new HashMap<String, String>(); //获取方法的参数名字和参数描述保存到map for (Annotation[] parameterAnnotation : parameterAnnotations) { for (Annotation annotation : parameterAnnotation) { if (annotation instanceof Param) { Param param = (Param) annotation; String paramName = param.paramName(); String paramDesc = param.paramDesc(); sb.append(parameterTypes[index++].getName()).append(" ").append(paramName).append(",");
map.put(paramName, paramDesc); } } }
AnnotationInfo annotationInfo = new AnnotationInfo(); domainMethodMap.put(domainAnnotation, annotationInfo);
String str = sb.toString(); if (sb.toString().lastIndexOf(',') >= 0) { str = sb.substring(0, sb.length() - 1); } str = str + ")";
annotationInfo.setMethodSign(str); annotationInfo.setParamsDesc(map); } |
注解信息的打印
上一小节收集到了所有的注解,本节就简单介绍下如何打印出树形文档,代码如下:
| 1 2 3 4 5 6 7 8 9 10 11 12 13 14 15 16 17 18 19 20 21 22 23 24 25 26 27 28 29 30 31 32 |
public ActionResult generateDocument(ErrorContext context) { ActionResult result = new ActionResult(); //递归打印 printTree(); return result; } private void printTree() { //获取收集的注解信息 List<DomainAnnotation> domainList = AnnotationInstantiationAwareBeanPostProcessor.getDomainAnnotationList(); List<ModuleAnnotation> moudleList = AnnotationInstantiationAwareBeanPostProcessor.getMoudleAnnotationList(); //打印模块 System.out.println("application:onlinecourt"); for (ModuleAnnotation ma : moudleList) {
String moudleName = ma.moduleName(); String moudleDesc = ma.moduleDesc(); StringBuffer sb = new StringBuffer(); sb.append("-mouduleName:" + moudleName).append(",moudleDesc:" + moudleDesc); System.out.println(sb.toString()); //打印模块下的域服务 for (DomainAnnotation da : domainList) {
if (da.moduleName().equals(moudleName)) { // 打印当前域服务 printMethodInfo(da, 2, '-'); // 打印子域服务 generateSubDoamin(domainList, da.subDomainName(), 3); } } System.out.println(); } } |
本节使用简单的打印输出树形文档,其实既然已经获得了注解信息,我们可以根据需要比如生成 Markdown 文件,PDF,或者直接把数据扔给前端,前端按照需要格式渲染都可以。
总结
本文讲解了 Spring 框架中常用注解的原理实现,希望读者能参考本文对着源码自己 Debug 跟入一下,以便加深理解;另外目前比较火的微服务框架 SpringBoot 中提倡使用注解,不再建议使用 XML 配置,如果你对本文能够很好掌握,可以尝试去研究下 SpringBoot 里面一些注解原理。