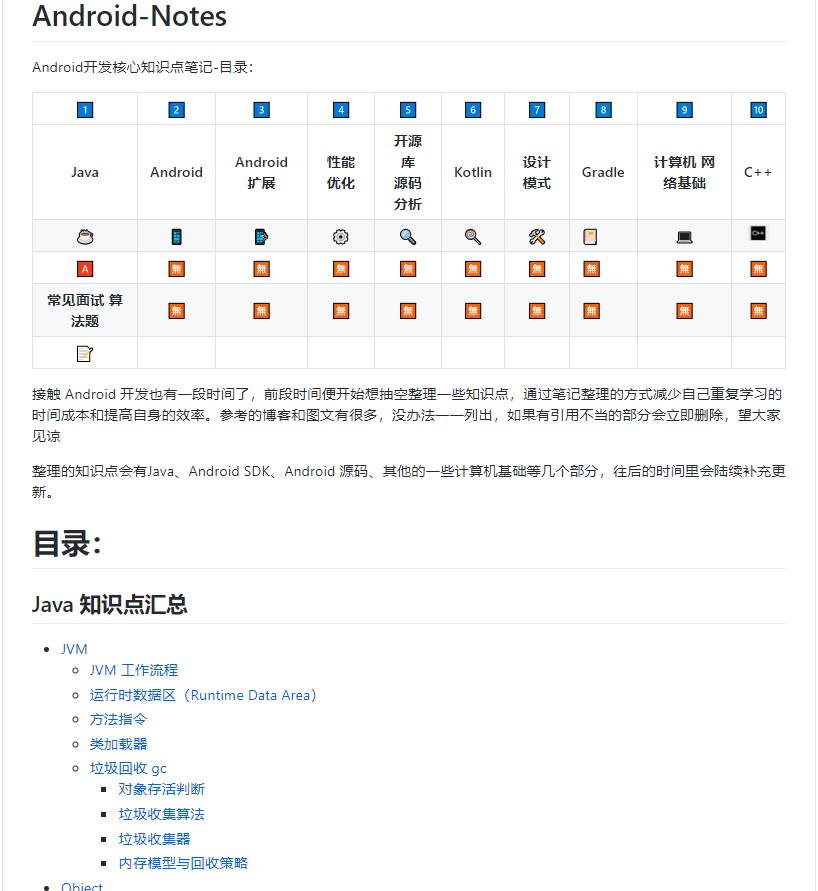
Android开发中,总会遇到这样和那样的需求。虽然官方已经给我们提供了丰富的ViewGroup和View的实现,但是总有没法满足需求的时候。这个时候我们该怎么办呢? 首先遇事不决可以先Google一下,看看有无现成的轮子。如果有轮子,那么恭喜,扒来改改就好啦。如果没有轮子,那能咋办,只能自己造轮子咯。其实使用轮子更多时候是追求稳定和节约时间,我们还是需要对轮子的原理有一定的了解的。
流式布局在Android开发中使用的场景应该还是比较多的,比如标签展示、搜索历史记录展示等等。这种样式的布局Android目前是没有原生的ViewGroup的,当然你要找轮子肯定也是很容易找到的,不过今天我还是想以自定义ViewGroup的方式来实现这么一个容器。
什么是ViewGroup
首先我们得弄清楚ViewGroup是什么,还有它的职责。

ViewGroup继承自View,并实现了ViewManager和ViewParent接口。按照官方的定义,ViewGroup是一个特别的View,它可以容纳其他的View,它实现了一系列添加和删除View的方法。同时ViewGroup还定义了LayoutParams,LayoutParams会影响View在ViewGroup的位置和大小相关属性。
ViewGroup也是个抽象类,需要我们重写onLayout方法,当然仅仅重写这么一个方法是不够的。ViewGroup本身只是实现了容纳View的能力,实现一个ViewGroup我们需要完成对自身的测量、对child的测量、child的布局等一系列的操作。
onMeasure
这是自定义View实现的一个非常重要的方法,不管我们是自定义View也好,还是自定义ViewGroup都需要实现它。这个方法来自于View,ViewGroup本身没有去处理这个方法。这个方法会传递两个参数,分别是widthMeasureSpec和heightMeasureSpec。这两个数值其实是个混合的信息,他们包含了具体的宽高数值和宽高的模式。这里需要说一下MeasureSpec。
MeasureSpec
MeasureSpec是View的内部类,他是父容器给孩子传递的布局信息的一个压缩体。上文提到的传递的数值,其实是通过MeasureSpec的makeMeasureSpec方法生成的:
public static class MeasureSpec {
        private static final int MODE_SHIFT = 30;
        private static final int MODE_MASK  = 0x3 << MODE_SHIFT;

        @IntDef({UNSPECIFIED, EXACTLY, AT_MOST})
        @Retention(RetentionPolicy.SOURCE)
        public @interface MeasureSpecMode {}

        public static final int UNSPECIFIED = 0 << MODE_SHIFT;
        public static final int EXACTLY     = 1 << MODE_SHIFT;
        public static final int AT_MOST     = 2 << MODE_SHIFT;

        public static int makeMeasureSpec(@IntRange(from = 0, to = (1 << MeasureSpec.MODE_SHIFT) - 1) int size,
                                          @MeasureSpecMode int mode) {
            if (sUseBrokenMakeMeasureSpec) {
                return size + mode;
            } else {
                return (size & ~MODE_MASK) | (mode & MODE_MASK);
            }
        }
  //...
其实MeasureSpec代表一个32位的int值,高2位表示SpecMode,低30位表示SpecSize,我们可以分别通过getMode和getSize获取对应的信息。表示什么信息算是搞清楚了,那么这些信息又是如何确认的呢?
在ViewGroup中有个getChildMeasureSpec方法,这个方法的实现基本可以解答我们的疑问
public static int getChildMeasureSpec(int spec, int padding, int childDimension) {
    int specMode = MeasureSpec.getMode(spec);
    int specSize = MeasureSpec.getSize(spec);
    int size = Math.max(0, specSize - padding);
    int resultSize = 0;
    int resultMode = 0;
    switch (specMode) {
    // Parent has imposed an exact size on us
    case MeasureSpec.EXACTLY:
        if (childDimension >= 0) {
            resultSize = childDimension;
            resultMode = MeasureSpec.EXACTLY;
        } else if (childDimension == LayoutParams.MATCH_PARENT) {
            // Child wants to be our size. So be it.
            resultSize = size;
            resultMode = MeasureSpec.EXACTLY;
        } else if (childDimension == LayoutParams.WRAP_CONTENT) {
            // Child wants to determine its own size. It can't be
            // bigger than us.
            resultSize = size;
            resultMode = MeasureSpec.AT_MOST;
        }
        break;
    // Parent has imposed a maximum size on us
    case MeasureSpec.AT_MOST:
        if (childDimension >= 0) {
            // Child wants a specific size... so be it
            resultSize = childDimension;
            resultMode = MeasureSpec.EXACTLY;
        } else if (childDimension == LayoutParams.MATCH_PARENT) {
            // Child wants to be our size, but our size is not fixed.
            // Constrain child to not be bigger than us.
            resultSize = size;
            resultMode = MeasureSpec.AT_MOST;
        } else if (childDimension == LayoutParams.WRAP_CONTENT) {
            // Child wants to determine its own size. It can't be
            // bigger than us.
            resultSize = size;
            resultMode = MeasureSpec.AT_MOST;
        }
        break;
    // Parent asked to see how big we want to be
    case MeasureSpec.UNSPECIFIED:
        if (childDimension >= 0) {
            // Child wants a specific size... let him have it
            resultSize = childDimension;
            resultMode = MeasureSpec.EXACTLY;
        } else if (childDimension == LayoutParams.MATCH_PARENT) {
            // Child wants to be our size... find out how big it should
            // be
            resultSize = View.sUseZeroUnspecifiedMeasureSpec ? 0 : size;
            resultMode = MeasureSpec.UNSPECIFIED;
        } else if (childDimension == LayoutParams.WRAP_CONTENT) {
            // Child wants to determine its own size.... find out how
            // big it should be
            resultSize = View.sUseZeroUnspecifiedMeasureSpec ? 0 : size;
            resultMode = MeasureSpec.UNSPECIFIED;
        }
        break;
    }
    //noinspection ResourceType
    return MeasureSpec.makeMeasureSpec(resultSize, resultMode);
}
代码长度还是有点长,但是逻辑并不复杂。spec参数为ViewGroup的相关信息,padding则为ViewGroup的leftPadding+rightPadding+childLeftMargin+childRightMargin+usedWidth,childDimension为child的LayoutParams中指定的宽高信息。
child的具体的MeasureSpec会受到父容器的影响,也和自身的布局信息有关,具体如下:
- 如果child的LayoutParams指定了固定的宽高,如100dp,则最终onMeasure被传递的size就是指定的宽高,mode则是MeasureSpec.EXACTLY
- 如果child的宽高信息为MATCH_PARENT,这时候传递的size通常为父容器的宽高,mode则会和父容器的mode保持一致。
- 如果child的宽高信息为WRAP_CONTENT,这时候传递的size也一样是父容器的宽高,如果父容器的mode是MeasureSpec.UNSPECIFIED,则传递的mode是MeasureSpec.UNSPECIFIED,否则为MeasureSpec.AT_MOST。
这个specMode,简单的来说EXACTLY就代表宽高信息是比较确认的,AT_MOST则是会告诉你一个最大宽度,实际宽度由你自己确认,UNSPECIFIED也是会告诉你一个父容器宽度,你也可以设置为任意高度。
onMeasure方法里应该做什么
上面说了一堆关于MeasureSpec的,现在再来说一下onMeasure方法里应该做什么。
如果是自定义View,我们需要根据父容器传递的MeasureSpec来确认自身的宽高。如果是MeasureMode是EXACTLY,则这个View的宽高就是传递过来的size,如果是AT_MOST和UNSPECIFIED,则需要我们自行处理了。在我们计算得到了一个想要的宽高信息后,需要调用setMeasuredDimension的方法来保存信息。
如果是自定义ViewGroup,那我们需要做的事情可能就要多一点了,首先我们也还是一样,需要确认ViewGroup自身的宽高信息,如果都是EXACTLY拿很好办,直接设置对应的size即可。如果想要支持WRAP_CONTENT,这时候可能就会比较麻烦一点了。首先我们得想好一点,这个ViewGroup是如何为child布局的。这很重要,因为不同的布局方式,child的排布不同,都会影响实际占用的空间。
还是以LinearLayout举例吧,LinearLayout支持横向排列和纵向排列,他们需要执行的测量逻辑都是不一样的。如果是纵向排列,则需要遍历child,测量child,并累加他们的高度和margin,最后还要加上自身高度,这样累加出来的数值就是WRAP_CONTENT下,自身应该占用的高度。如果是横向排列,则需要遍历和累加child,并累加他们的宽度和margin等,原理都是差不多的。
总结一下,onMeasure方法需要ViewGroup结合父容器传递的MeasureSpec,测量child,配合child的排布方式,确认自身的宽高。
onLayout
onLayout方法传递了5个参数,changed表示自身的位置或大小是否发生了改变,剩下的分别为left,top,right,bottom,决定了他在父容器的位置。这是一个相对坐标,起点并不是屏幕的左上角。
那在这个方法里我们应该做什么呢?如果是自定义View的时候,我们可以不用管这个方法。因为View本身没有容纳child的能力,如果是ViewGroup,这时候我们就需要为child执行布局操作了。我们需要遍历child,执行它们的layout方法。通过调用layout方法,我们可以传递left,top,right,bottom,确定child在ViewGroup中的位置。同样的,这也是一个相对坐标,是依赖于父容器的。
事实上,onLayout方法是在自身的layout方法被调用后调用的。Android整体的布局体系自上而下一层层的调用,传递布局信息,最终确认了各个View在屏幕上的位置。
onDraw
通常来说,自定义ViewGroup并不需要重写这个方法。这个方法用来做一些绘制操作,如果是自定义View,那我们则需要重写这个方法,实现一些绘制逻辑。
Padding和Margin
这两个概念还是要说一下,理解一下它们的作用和实现原理。
- Padding是相对于自身而言的,它影响了自身的绘制和child的布局,是
View自身的属性。如果需要让这个属性生效,在绘制和布局时候,我们需要基于这个属性的数值做一定的偏移,在测量的时候,我们也需要考虑它的数值,为最终测量结果添加上。 - Margin是相对于父容器而言的,它影响了
View在ViewGroup中的布局,它通常是由LayoutParams所定义的。有这个属性的时候,我们在测量时候需要考虑到它,并且累加上,在布局的时候,需要根据响应的属性,进行一定的偏移。
实现一个流式布局
道理都理清楚了,写代码就会简单很多了。流式布局大概的效果就是添加的VIew按一行或者一列有序排列,如果一行或者一列放不下了,则换到下一行排列。下面就简单实现一个流式布局来加深一下理解。
首先需要定义一个类,继承自ViewGroup:
public class FlowLayout extends ViewGroup {
    public FlowLayout(Context context) {
        this(context, null);
    }

    public FlowLayout(Context context, AttributeSet attrs) {
        super(context, attrs);
    }

    @Override
    protected void onMeasure(int widthMeasureSpec, int heightMeasureSpec) {
        super.onMeasure(widthMeasureSpec, heightMeasureSpec);
      //todo 实现测量逻辑
    }

    @Override
    protected void onLayout(boolean changed, int l, int t, int r, int b) {
			//todo 实现child的布局逻辑
    }
}
因为我们需要支持margin属性,所以我们还需要这样一个LayoutParams。ViewGroup中已经定义了这样一个MarginLayoutParams,我们创建一个内部类,继承此类实现:
public static class LayoutParams extends ViewGroup.MarginLayoutParams {
    public LayoutParams(Context c, AttributeSet attrs) {
        super(c, attrs);
    }

    public LayoutParams(int width, int height) {
        super(width, height);
    }

    public LayoutParams(ViewGroup.LayoutParams source) {
        super(source);
    }
}
复制代码
LayoutParams中还可以自己去定义一些个性化的布局参数,这里就简单处理了。同时我们还得注意以下几个方法:
/**
 * 直接调用 {@link #addView(View view)}的时候 用来生成默认的LayoutParams
 *
 * @return
 */
@Override
protected LayoutParams generateDefaultLayoutParams() {
    return new LayoutParams(-2, -2);
}

/**
 * {@link #addView(View child, ViewGroup.LayoutParams params)}时候,用来检查布局参数是否正确
 *
 * @param p
 * @return
 */
@Override
protected boolean checkLayoutParams(ViewGroup.LayoutParams p) {
    return p instanceof LayoutParams;
}

/**
 * 如果{@link #checkLayoutParams(ViewGroup.LayoutParams p)}返回false,会调用此方法生成LayoutParams
 *
 * @param p
 * @return
 */
@Override
protected LayoutParams generateLayoutParams(ViewGroup.LayoutParams p) {
    if (p == null) {
        return generateDefaultLayoutParams();
    }
    return new LayoutParams(p);
}

/**
* 如果xml中的child,会调用此方法生成布局参数
* @param attrs
* @return
*/
@Override
public ViewGroup.LayoutParams generateLayoutParams(AttributeSet attrs) {
    return new LayoutParams(getContext(), attrs);
}
注释我都写了,主要是用来用户addView时候的默认布局信息生成和检测,如果没处理好,可能会引起崩溃啥的。
接下来是测量方法:
@Override
protected void onMeasure(int widthMeasureSpec, int heightMeasureSpec) {
    Log.d(TAG, "onMeasure");
    int widthMode = MeasureSpec.getMode(widthMeasureSpec);
    int widthSize = MeasureSpec.getSize(widthMeasureSpec);
    int heightMode = MeasureSpec.getMode(heightMeasureSpec);
    int heightSize = MeasureSpec.getSize(heightMeasureSpec);
    if (widthMode == MeasureSpec.EXACTLY) {
        //横向宽度固定
        int lineMaxHeight = 0;//当前行最高的行高
        int currentLeft = getPaddingLeft();//当前child的起点left
        int currentTop = getPaddingTop();//当前child的起点top
      	//去除paddingLeft 和 paddingRight即为可用宽度
        int availableWidth = widthSize - getPaddingLeft() - getPaddingRight();
        for (int i = 0; i < getChildCount(); i++) {
            View child = getChildAt(i);
            if (child.getVisibility() == GONE) {//gone的child 不处理
                continue;
            }
            //测量child
            measureChildWithMargins(child, widthMeasureSpec, 0, heightMeasureSpec, 0);
            int decoratedWidth = getDecoratedWidth(child);
            int decoratedHeight = getDecoratedHeight(child);
            if (currentLeft + decoratedWidth > availableWidth) {
                //宽度超了 换行
                currentLeft = decoratedWidth + getPaddingLeft();
                currentTop += lineMaxHeight;//高度加上之前的最大高度
                lineMaxHeight = decoratedHeight;
            } else {
                //如果不需要换行 只记录当前的最大高度。
                currentLeft += decoratedWidth;
                lineMaxHeight = Math.max(lineMaxHeight, decoratedHeight);
            }
            if (i == getChildCount() - 1) {
                //最后一个元素了 我们需要累加高度
                currentTop += lineMaxHeight;
            }
        }
      	//保存宽高信息
        setMeasuredDimension(widthSize, currentTop + getPaddingBottom());
    } else if (heightMode == MeasureSpec.EXACTLY) {
        //todo 实现纵向固定的流式布局

    } else {
        //todo 实现宽高都固定的流式布局

    }
}
测量逻辑并不复杂,首先判断ViewGroup的宽高模式,这里实现了宽度固定的流式布局的处理逻辑。我们需要遍历所有的child,并调用测量方法确定他们的宽高。同时要注意的是child如果不可见则需要跳过。因为宽度是固定的,所以我们需要计算出自身的高度。getDecoratedWidth获取的是child自身的宽度与自身的左右的margin的和。遍历过程中依此排列child,如果一行排不下了,则执行换行逻辑,并累加高度,最后得出高度,保存。
@Override
protected void onLayout(boolean changed, int l, int t, int r, int b) {
    Log.d(TAG, "onLayout l :" + l + " t :" + t + " r :" + r + " b :" + b);
    int lineMaxHeight = 0;
    int currentLeft = getPaddingLeft();//当前child的起点left
    int currentTop = getPaddingTop();//当前child的起点top
    int availableWidth = getMeasuredWidth() - getPaddingLeft() - getPaddingRight();
    for (int i = 0; i < getChildCount(); i++) {
        View child = getChildAt(i);
        if (child.getVisibility() == GONE) {//gone的child 不处理
            continue;
        }
        int decoratedWidth = getDecoratedWidth(child);
        int decoratedHeight = getDecoratedHeight(child);
        LayoutParams layoutParams = (LayoutParams) child.getLayoutParams();
        int childLeft, childTop;
        if (currentLeft + decoratedWidth > availableWidth) {
            //宽度超了 换行
            currentLeft = decoratedWidth + getPaddingLeft();
            currentTop += lineMaxHeight;//高度加上之前的最大高度
            lineMaxHeight = decoratedHeight;
            childLeft = getPaddingLeft() + +layoutParams.leftMargin;
            childTop = currentTop + layoutParams.topMargin;
        } else {
            //如果不需要换行 只记录当前的最大高度。
            childLeft = currentLeft + layoutParams.leftMargin;
            childTop = currentTop + layoutParams.topMargin;
            currentLeft += decoratedWidth;
            lineMaxHeight = Math.max(lineMaxHeight, decoratedHeight);
        }
        child.layout(childLeft, childTop,
                childLeft + child.getMeasuredWidth(), childTop + child.getMeasuredHeight());
    }
}
onLayout方法里我也只是实现了宽度固定下的逻辑。逻辑和测量时候的思路一样,在测量的时候我们已经为每个child确认了自身的宽高,在这里我们就只需要调用layout方法为每个child执行布局逻辑即可。
最后上运行效果,因为是demo所以样式比较随意,不要在意这些细节(#.#)
自定义ViewGroup大致的流程就是这样了,如果还有什么困惑还不解可以留言,我会用心解答。
大家如果还想了解更多Android 相关的更多知识点,可以加入Android粉丝交流群:872206502 进行学习领取Android 进阶资料 。
加入粉丝裙的快速通道