目录
继续扩展应用,允许用户添加新的便笺。
为了让页面在添加新便笺时更新,最好将便笺存储在App 组件的状态中。导入useState函数,并使用它定义一个状态,这个状态用props传进来的初始便笺数组作为状态初始化。
import React, { useState } from 'react'
import Note from './components/Note'

const App = (props) => {
  const [notes, setNotes] = useState(props.notes)

  return (
    <div>
      <h1>Notes</h1>
      <ul>
        {notes.map(note =>
          <Note key={note.id} note={note} />
        )}
      </ul>
    </div>
  )
}

export default App
该组件使用 useState 函数来初始化状态,该状态用props传进来的note 数组作为初始状态,保存到notes中。
const App = (props) => {
  const [notes, setNotes] = useState(props.notes)

  // ...
}
如果从一个空的便笺列表开始,由于props不会被使用,可以从函数定义中省略 props 参数:
const App = () => {
  const [notes, setNotes] = useState([])

  // ...
}
接下来,在组件中添加一个 HTML 表单 ,用于添加新的便笺。
const App = (props) => {
  const [notes, setNotes] = useState(props.notes)

  const addNote = (event) => {
    event.preventDefault()
    console.log('button clicked', event.target)
  }

  return (
    <div>
      <h1>Notes</h1>
      <ul>
        {notes.map(note =>
          <Note key={note.id} note={note} />
        )}
      </ul>
      <form onSubmit={addNote}>
        <input />
        <button type="submit">save</button>
      </form>
       </div>
  )
}
我们已经将 addNote 函数作为事件处理函数添加到表单元素中,该元素将在单击 submit 按钮提交表单时被调用。
使用之前讨论的方法来定义事件处理 :
const addNote = (event) => {
  event.preventDefault()
  console.log('button clicked', event.target)
}
event 参数是触发对事件处理函数需要调用的event :
事件处理立即调用 event.preventDefault() 方法,它会阻止提交表单的默认操作。 因为默认操作会导致页面重新加载。
将event.target 中存储的事件的记录到控制台。

这里的target是我们在组件中定义的表单。
访问表单中input 元素中包含的数据有许多方法,第一种方法是使用受控组件。
添加一个名为 newNote 的新状态,用于存储用户提交的输入,将它设置为input 元素的value 属性:
const App = (props) => {
  const [notes, setNotes] = useState(props.notes)
  const [newNote, setNewNote] = useState(
    'a new note...'
  )

  const addNote = (event) => {
    event.preventDefault()
    console.log('button clicked', event.target)
  }

  return (
    <div>
      <h1>Notes</h1>
      <ul>
        {notes.map(note =>
          <Note key={note.id} note={note} />
        )}
      </ul>
      <form onSubmit={addNote}>
        <input value={newNote} />
        <button type="submit">save</button>
      </form>
    </div>
  )
}现在,占位符存储了newNote 状态初始值,展示在input元素中,但input 不能编辑输入文本。 而且控制台出现了一个警告,告诉我们可能哪里出错了:
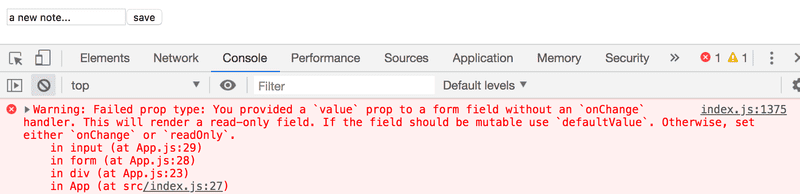
由于我们将App 组件的一部分状态指定为 input 元素的value 属性,因此App 组件现在控制 了input 元素的行为。
为了能够编辑 input 元素,需要注册一个事件处理 来同步对 input 所做的更改和组件的状态:
const App = (props) => {
  const [notes, setNotes] = useState(props.notes)
  const [newNote, setNewNote] = useState(
    'a new note...'
  )

  // ...

  const handleNoteChange = (event) => {
    console.log(event.target.value)
    setNewNote(event.target.value)
  }
  return (
    <div>
      <h1>Notes</h1>
      <ul>
        {notes.map(note =>
          <Note key={note.id} note={note} />
        )}
      </ul>
      <form onSubmit={addNote}>
        <input
          value={newNote}
          onChange={handleNoteChange}
        />
        <button type="submit">save</button>
      </form>
    </div>
  )
}我们现在已经为表单的input 元素的onChange 属性注册了一个事件处理函数:
<input
  value={newNote}
  onChange={handleNoteChange}
/>
每当 输入元素发生变化时,都会调用事件处理函数。 事件处理函数接收事件对象作为其 event 参数:
const handleNoteChange = (event) => {
  console.log(event.target.value)
  setNewNote(event.target.value)
}事件对象的target 属性现在对应于受控的input元素, event.target.value引用该元素的输入值。
注意,我们不需要像在onSubmit 事件处理中那样调用 event.preventDefault()方法。 这是因为与表单提交不同,输入更改上没有什么默认操作。
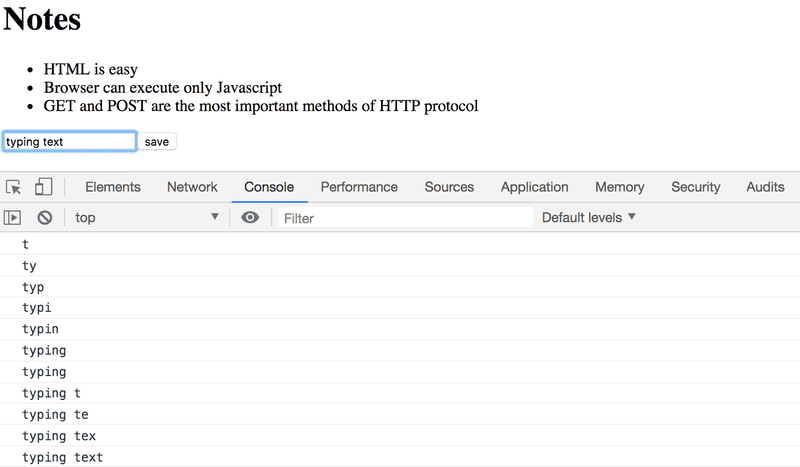
可以在控制台中查看是如何调用事件处理函数的:
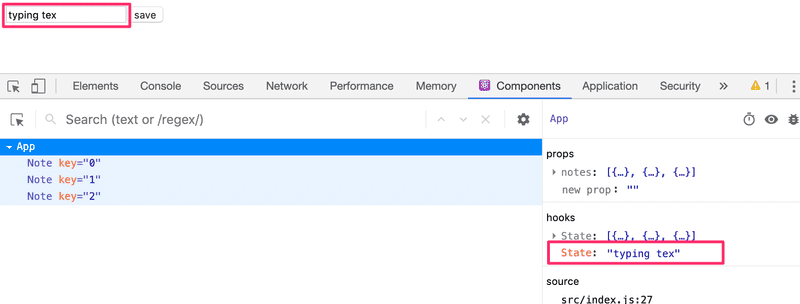
也可以直接从 React Devtools 选项卡查看状态的变化:
现在App 组件的 newNote 状态反映了输入的当前值,这意味着我们可以完成 addNote 函数来创建新的便笺:
const addNote = (event) => {
  event.preventDefault()
  const noteObject = {
    content: newNote,
    date: new Date().toISOString(),
    important: Math.random() < 0.5,
    id: notes.length + 1,
  }

  setNotes(notes.concat(noteObject))
  setNewNote('')
}首先,我们为名为noteObject 的便笺创建一个新对象,该对象将从组件的newNote状态接收其内容。 唯一标识符 id 是根据便笺的总数生成的。 此方法适用于因为便笺永远不会被删除。 在 Math.random() 命令的帮助下,便笺有50% 的可能被标记为重要。
使用数组的 concat 方法添加新便笺到便笺列表中:
setNotes(notes.concat(noteObject))该方法不会改变原始的 notes 状态数组,而是会创建数组的一个新副本,并将新项添加到尾部。 这很重要,因为我们绝不能在React中直接改变状态 !
事件处理还通过调用 newNote 状态的 setNewNote 函数重置受控input元素的值:
setNewNote('')Filtering Displayed Elements
【过滤显示的元素】
为应用添加一些新的功能,只查看重要的便笺。
在App 组件中添加一个状态,用于同步应该显示哪些便笺:
const App = (props) => {
  const [notes, setNotes] = useState(props.notes)
  const [newNote, setNewNote] = useState('')
  const [showAll, setShowAll] = useState(true)
  // ...
}
更改组件,存储要显示在 notesToShow 变量中的所有便笺的列表。 列表中的项取决于组件的状态:
import React, { useState } from 'react'
import Note from './components/Note'

const App = (props) => {
  const [notes, setNotes] = useState(props.notes)
  const [newNote, setNewNote] = useState('')
  const [showAll, setShowAll] = useState(true)

  // ...

  const notesToShow = showAll
    ? notes
    : notes.filter(note => note.important === true)

  return (
    <div>
      <h1>Notes</h1>
      <ul>
        {notesToShow.map(note =>
          <Note key={note.id} note={note} />
        )}
      </ul>
      // ...
    </div>
  )
}
notesToShow 变量的定义相当简洁:
const notesToShow = showAll
  ? notes
: notes.filter(note => note.important === true)该定义使用了条件运算符(三目运算符),这种运算符在许多其他编程语言中也存在。
操作符的功能如下:
const result = condition ? val1 : val2如果 condition 为真,则 result变量将设置为val1值。 如果 condition为 false,则result 变量将设置为 val2。
如果 showAll 的值为 false,那么将把 notesToShow 变量分配给一个只包含important属性为 true 的便笺的列表。 过滤是通过数组filter方法完成的:
notes.filter(note => note.important === true)比较运算符实际上是多余的,因为 note.important 的值要么是true,要么是false,这意味着我们可以简单地写为:
notes.filter(note => note.important)在 JavaScript 中,val1 == val2 并不能在所有情况下都像预期的那样工作,在比较中使用专门的val1 === val2更安全。 参考here 。
可以通过更改showAll状态的初始值来测试过滤功能。
接下来,添加一些功能,使用户能够从用户界面切换应用的 showAll状态:
import React, { useState } from 'react'
import Note from './components/Note'

const App = (props) => {
  const [notes, setNotes] = useState(props.notes)
  const [newNote, setNewNote] = useState('')
  const [showAll, setShowAll] = useState(true)

  // ...

  return (
    <div>
      <h1>Notes</h1>
      <div>
        <button onClick={() => setShowAll(!showAll)}>
          show {showAll ? 'important' : 'all' }
        </button>
      </div>
      <ul>
        {notesToShow.map(note =>
          <Note key={note.id} note={note} />
        )}
      </ul>
      // ...
    </div>
  )
}
显示便笺的方式(显示所有 还是 显示重要)由一个按钮控制。 按钮的事件处理程序非常简单,在按钮元素的属性中已经直接定义了。 事件处理程序将 showAll 的值从 true 转换为 false,反之亦然:
() => setShowAll(!showAll)按钮的文本取决于showAll状态的值:
show {showAll ? 'important' : 'all'}