windows下安装编译opencv4.2+opencv_contrib+dnn模块支持cuda加速
前言
OpenCV官方提供了windows可安装的版本,已经有编译好的dll,不过不包括opencv_contrib。如果想应用这部分算法,则需要自己编译opencv,将opencv_contrib编译到opencv中。
所需材料:
- opencv源代码
- opencv_contrib源代码
- cuda10.0
- cudnn
- cmake
- vs2015
- 通畅的网络(在编译配置过程中翻墙了,没有遇到网上下载出错的问题)
1. 下载源码与安装环境
1.1 下载 opencv 官方源码,
官方网站下载:https://opencv.org/releases/

1.2 下载opencv_contrib源码
opencv_contrib源码可以在GitHub上下载:https://github.com/opencv/opencv_contrib/releases

1.3 解压下载的源码包
解压后的源码包如下所示

1.4 安装cuda,cudnn
cuda10.0 下载地址:https://developer.nvidia.com/cuda-10.0-download-archive

cudnn下载地址:https://developer.nvidia.com/rdp/cudnn-download【下载需要登录账号】

2 使用CMake-Gui配置项目
2.1 配置源码路径
设置opencv官方源码目录和生成目录

2.2 配置编译平台
点击Configure,弹出对话框,选择编译工程的平台。我选的是64位的VS2015

2.3 修改配置项
第一次点击configure一般会出错,即很多项都是红色。
勾选OPENCV_DNN_CUDA

设置OPENCV_EXTRA_MODULES_PATH,即opencv_contrib源码包下的modules路径。

在BUILD下 勾选 BUILD_opencv_world,可以编译出opencv_world库,调用时直接使用该库。

2.4 再次点击configure
配置完成的没有问题的项,会变成白色,红色的项需要修改后,再次点击configure,直到变成全白。
2.5 生成OpenCV.sln vs 解决方案项目
等配置完成,没有错误后,点击generate,生成 vs 的 sln 项目

3 使用VS Studio编译opencv
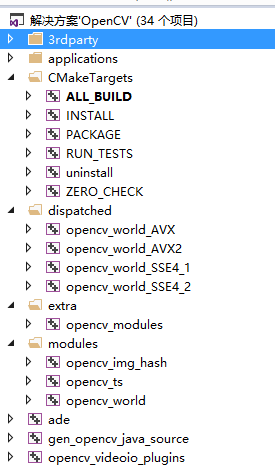
3.1 打开 OpenCV.sln

3.2 编译工程
选择Debug x64,点击生成->生成解决方案开始编译,这个过程比较漫长,需要耐心。同样更改成Release x64,可以生成Release版本的库。
错误集锦:
1. unsupported architectures from CUDA_ARCH_BIN option.
CMake Error at modules/dnn/CMakeLists.txt:99 (message):
	CUDA backend for DNN module requires CC 5.3 or higher. Please remove
	unsupported architectures from CUDA_ARCH_BIN option.
Call Stack (most recent call first):
	modules/world/CMakeLists.txt:13 (include)
	modules/world/CMakeLists.txt:32 (include_one_module)
解决方法:
只需将CUDA_ARCH_BIN中小于5.3的选项去掉
2. 文件download失败解决方法
文件下载失败和网络有关系,而且一旦失败就会有多个文件下载失败,下面以第一个下载失败文件为例,进行说明,日志如下

从上面可以看出,下载日志在保存在“E:\opencv4.2\opencv\sources\build\CMakeDownloadLog.txt”文件内,打开文件,搜索"ippicv", 第三行即为本文件信息

其中上面为本地缓存路径,下面为下载网址,直接复制网址到浏览器下载,如果浏览器也下载失败,可以尝试将地址复制到迅雷或者IDM中进行下载,
下载后保存到“E:/opencv4.2/opencv/sources/.cache/ippicv/”目录,删除目录内大小0KB的文件(如果有), 并按照d222685246896fe089f88b8858e4b2f-ippicv_2019_win_intel64_20180723_general.zip重命名

其它下载失败的文件可以用同样的方法进行处理。
3.“cv::dnn::cuda4dnn::csl::device::detail::getBlockDim” 错误

中文显示乱码,搜索微软C2912错误描述为:显式专用化“declaration”不是函数模板的专用化,无法特化非模板函数。
可以采用修改方法:
1) 删除错误行
cudnn.hpp文件,将报错行的decltype部分去掉
grid_stride_range.hpp 文件,同样方法修改
2) 修改错误行
对应错误代码位置为
(1)修改sources\modules\dnn\src\cuda\grid_stride_range.hpp文件
替换15-33行为:
using dim3_member_type = decltype(dim3::x);

template <int>  __device__ dim3_member_type getGridDim();
template <> inline __device__ dim3_member_type getGridDim<0>() {

     return gridDim.x; }
template <> inline __device__ dim3_member_type getGridDim<1>() {

     return gridDim.y; }
template <> inline __device__ dim3_member_type getGridDim<2>() {

     return gridDim.z; }

template <int> __device__ dim3_member_type getBlockDim();
template <> inline __device__ dim3_member_type getBlockDim<0>() {

     return blockDim.x; }
template <> inline __device__ dim3_member_type getBlockDim<1>() {

     return blockDim.y; }
template <> inline __device__ dim3_member_type getBlockDim<2>() {

     return blockDim.z; }

using uint3_member_type = decltype(uint3::x);

template <int> __device__ uint3_member_type getBlockIdx();
template <> inline __device__ uint3_member_type getBlockIdx<0>() {

     return blockIdx.x; }
template <> inline __device__ uint3_member_type getBlockIdx<1>() {

     return blockIdx.y; }
template <> inline __device__ uint3_member_type getBlockIdx<2>() {

     return blockIdx.z; }

template <int> __device__ uint3_member_type getThreadIdx();
template <> inline __device__ uint3_member_type getThreadIdx<0>() {

     return threadIdx.x; }
template <> inline __device__ uint3_member_type getThreadIdx<1>() {

     return threadIdx.y; }
template <> inline __device__ uint3_member_type getThreadIdx<2>() {

     return threadIdx.z; }
(2) 修改sources\modules\dnn\src\cuda4dnn\csl\cudnn\cudnn.hpp文件
替换40-42行为:
using cudnn_data_enum_type = decltype(CUDNN_DATA_FLOAT);
template <class> cudnn_data_enum_type get_data_type();
template <> inline cudnn_data_enum_type get_data_type<half>() {

     return CUDNN_DATA_HALF; }
template <> inline cudnn_data_enum_type get_data_type<float>() {

     return CUDNN_DATA_FLOAT; }
之后保存,重新编译即可成功。