写代码不易,请不要抄袭,谢谢,点个赞再走可好
谢谢大佬的无私奉献
下一篇是摄像头的实时美颜:
https://blog.csdn.net/qq_39097425/article/details/111047697
2020/12/8 待更新:
1.只针对脸部的优化
3.算法的优化
2.代码优化
Unity 双边滤波 这里有个坑 就是Opencv这个函数读取的图片是BGR通道的 而Unity是RGB,所以需要转换 还有就是尽量不要去复用Mat
Unity 代码 和 C++ 代码我都放后面了
Unity效果展示:
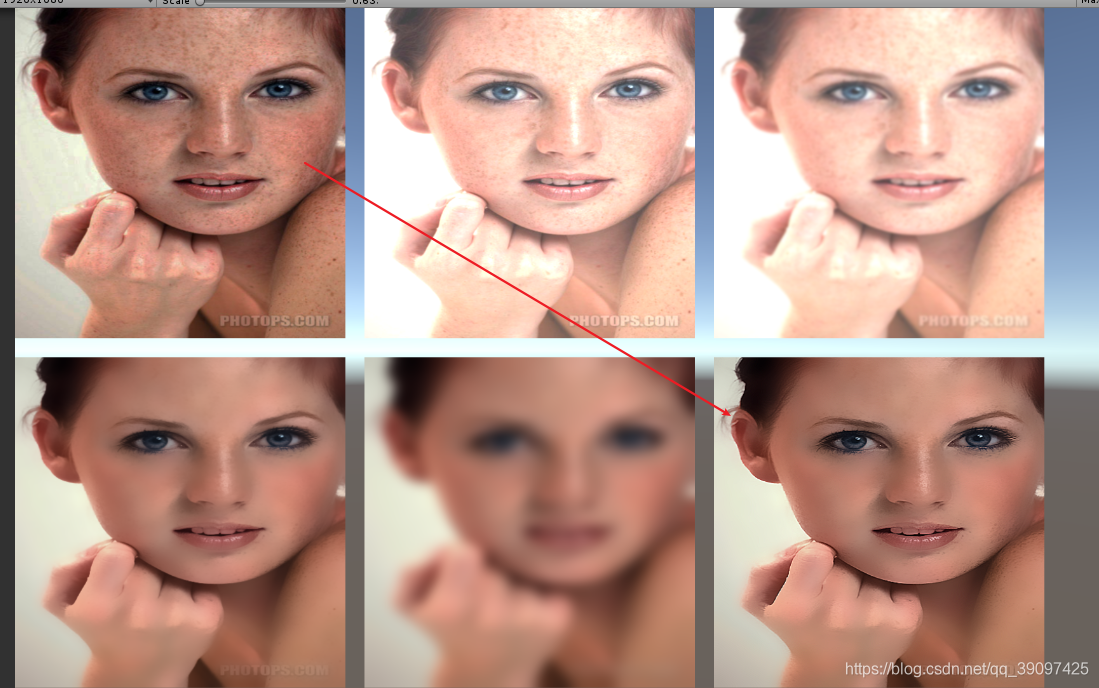
C++:
Unity 代码:
using OpenCVForUnity.CoreModule;
using OpenCVForUnity.ImgprocModule;
using OpenCVForUnity.UnityUtils;
using UnityEngine;
using UnityEngine.UI;

public class BeautFace : MonoBehaviour
{
    public RawImage srcRaw;

    public RawImage brightnessRaw;

    public RawImage GaussianBlurRaw;

    public RawImage bilateralFilterRaw;

    public RawImage dstRaw;

    public RawImage filter2DMatRaw;

    public int threadValue = 5;

    // 原图
    private Mat src;
    private int _iImageWidth;
    private int _iImageHeight;
    private void Start()
    {
        Texture2D imgTexture = Resources.Load("Girl") as Texture2D;
        _iImageWidth = imgTexture.width;
        _iImageHeight = imgTexture.height;

        src = new Mat(_iImageHeight, _iImageWidth, CvType.CV_8UC4);
        Utils.texture2DToMat(imgTexture, src);

        // 原图
        srcRaw.texture = imgTexture;

        //调亮
        Mat BrightnessMat = new Mat(_iImageHeight, _iImageWidth, CvType.CV_8UC4);
        BrightnessMat = src.clone();
        src.convertTo(BrightnessMat, -1, 1.1f, 68);
        Texture2D srctexture = new Texture2D(src.cols(), src.rows(), TextureFormat.RGBA32, false);
        Utils.fastMatToTexture2D(BrightnessMat, srctexture);
        brightnessRaw.texture = srctexture;

        // 高斯模糊
        Mat GaussianBlurMat = new Mat(_iImageHeight, _iImageWidth, CvType.CV_8UC4);
        GaussianBlurMat = BrightnessMat.clone();
        Size size = new Size(9, 9);
        Imgproc.GaussianBlur(GaussianBlurMat, GaussianBlurMat, size, 0, 0); // 高斯模糊,消除椒盐噪声
        Core.flip(GaussianBlurMat, GaussianBlurMat, 0);
        //Imgproc.medianBlur(src,src,15); // 高斯模糊,消除椒盐噪声
        Texture2D GaussianBlurRawtexture = new Texture2D(src.cols(), src.rows(), TextureFormat.RGBA32, false);
        Utils.fastMatToTexture2D(GaussianBlurMat, GaussianBlurRawtexture);
        GaussianBlurRaw.texture = GaussianBlurRawtexture;

        //双边滤波 这里有个坑 就是Opencv读取的图片是BGR通道的 而Unity是RGB,所以需要转换 还有就是尽量不要去复用Mat
        Mat BGRMat = new Mat(imgTexture.height, imgTexture.width, CvType.CV_8UC3);
        Imgproc.cvtColor(src, BGRMat, Imgproc.COLOR_RGB2BGR);
        Mat dstMat = new Mat(imgTexture.height, imgTexture.width, CvType.CV_8UC3);
        Mat bilateralFilterMat = new Mat(imgTexture.height, imgTexture.width, CvType.CV_8UC3);
        Imgproc.bilateralFilter(BGRMat, dstMat, 30, 75, 75);
        Imgproc.cvtColor(dstMat, bilateralFilterMat, Imgproc.COLOR_BGR2RGB);
        Texture2D bilateralFilterTexture = new Texture2D(bilateralFilterMat.cols(), bilateralFilterMat.rows(), TextureFormat.RGBA32, false);
        Utils.matToTexture2D(bilateralFilterMat, bilateralFilterTexture);
        bilateralFilterRaw.texture = bilateralFilterTexture;

        //图像增强,使用非锐化掩蔽(Unsharpening Mask)方案。
        Mat matFinal = new Mat(imgTexture.height, imgTexture.width, CvType.CV_8UC4);
        Imgproc.cvtColor(bilateralFilterMat, matFinal, Imgproc.COLOR_RGB2RGBA);

        Imgproc.GaussianBlur(matFinal, matFinal, new Size(0, 0), 9);
        Core.addWeighted(matFinal, 1.5, matFinal, -0.5, 0, matFinal);
        Core.flip(matFinal, matFinal, 0);
        Texture2D addWeightedTexture = new Texture2D(src.cols(), src.rows(), TextureFormat.RGBA32, false);
        Utils.fastMatToTexture2D(matFinal, addWeightedTexture);
        dstRaw.texture = addWeightedTexture;

        // 锐化
        Mat filter2DMat = new Mat(imgTexture.height, imgTexture.width, CvType.CV_8UC4);
        Imgproc.cvtColor(bilateralFilterMat, filter2DMat, Imgproc.COLOR_RGB2RGBA);
        Mat kernel = new Mat(3, 3, CvType.CV_32F, new Scalar(-1));
        kernel.put(0, 0, 0, -1, 0, -1, 5, -1, 0, -1, 0);
        //对图像srcMat和自定义核kernel做卷积,输出到dstMat
        Imgproc.filter2D(filter2DMat, filter2DMat, filter2DMat.depth(), kernel);
        Core.flip(filter2DMat, filter2DMat, 0);
        Texture2D filter2DMattexture = new Texture2D(filter2DMat.cols(), filter2DMat.rows(), TextureFormat.RGBA32, false);
        Utils.fastMatToTexture2D(filter2DMat, filter2DMattexture);
        filter2DMatRaw.texture = filter2DMattexture;


    }

    private int bilateralFilterVal = 30;  // 双边模糊系数
    public static Mat face2(Mat image)
    {
        Mat dst = new Mat();

        // int value1 = 3, value2 = 1; 磨皮程度与细节程度的确定
        int value1 = 30, value2 = 10;
        int dx = value1 * 5; // 双边滤波参数之一
        double fc = value1 * 12.5; // 双边滤波参数之一
        double p = 0.1f; // 透明度
        Mat temp1 = new Mat(), temp2 = new Mat(), temp3 = new Mat(), temp4 = new Mat();

        // 双边滤波
        Imgproc.bilateralFilter(image, temp1, dx, fc, fc);

        // temp2 = (temp1 - image + 128);
        Mat temp22 = new Mat();
        Core.subtract(temp1, image, temp22);
        // Core.subtract(temp22, new Scalar(128), temp2);
        Core.add(temp22, new Scalar(128, 128, 128, 128), temp2);
        // 高斯模糊
        Imgproc.GaussianBlur(temp2, temp3, new Size(2 * value2 - 1, 2 * value2 - 1), 0, 0);

        // temp4 = image + 2 * temp3 - 255;
        Mat temp44 = new Mat();
        temp3.convertTo(temp44, temp3.type(), 2, -255);
        Core.add(image, temp44, temp4);
        // dst = (image*(100 - p) + temp4*p) / 100;
        Core.addWeighted(image, p, temp4, 1 - p, 0.0, dst);

        Core.add(dst, new Scalar(10, 10, 10), dst);
        return dst;

    }

    // Opencv For Unity 调节图片亮度
    private Mat BrightnessMat(Mat matSelfPhoto, float alpha = 1.1f, int beta = 68)
    {
        Mat matBrightnessMat = new Mat();
        matBrightnessMat = matSelfPhoto.clone();
        matSelfPhoto.convertTo(matBrightnessMat, -1, alpha, beta);

        Texture2D srctexture = new Texture2D(matSelfPhoto.cols(), matSelfPhoto.rows(), TextureFormat.RGBA32, false);
        Utils.fastMatToTexture2D(matBrightnessMat, srctexture);
        brightnessRaw.texture = srctexture;
        return matBrightnessMat;


    }

    private void MatTo()
    {
        Texture2D imgTexture = Resources.Load("lena") as Texture2D;

        Mat imgMat = new Mat(imgTexture.height, imgTexture.width, CvType.CV_8UC4);

        Utils.texture2DToMat(imgTexture, imgMat);
        Debug.Log("imgMat.ToString() " + imgMat.ToString());

        Texture2D texture = new Texture2D(imgMat.cols(), imgMat.rows(), TextureFormat.RGBA32, false);

        Utils.matToTexture2D(imgMat, texture);
    }

}
C++ 代码:
#include <opencv2/opencv.hpp>
using namespace cv;
void whiteFace(Mat& matSelfPhoto,int alpha, int beta)
{
for (int y = 0; y < matSelfPhoto.rows; y++)
{
for (int x = 0; x < matSelfPhoto.cols; x++)
{
for (int c = 0; c < 3; c++)
{
matSelfPhoto.at<Vec3b>(y, x)[c] = saturate_cast<uchar>(alpha*(matSelfPhoto.at<Vec3b>(y, x)[c]) + beta);
}
}
}
}
void BeautyFace() {
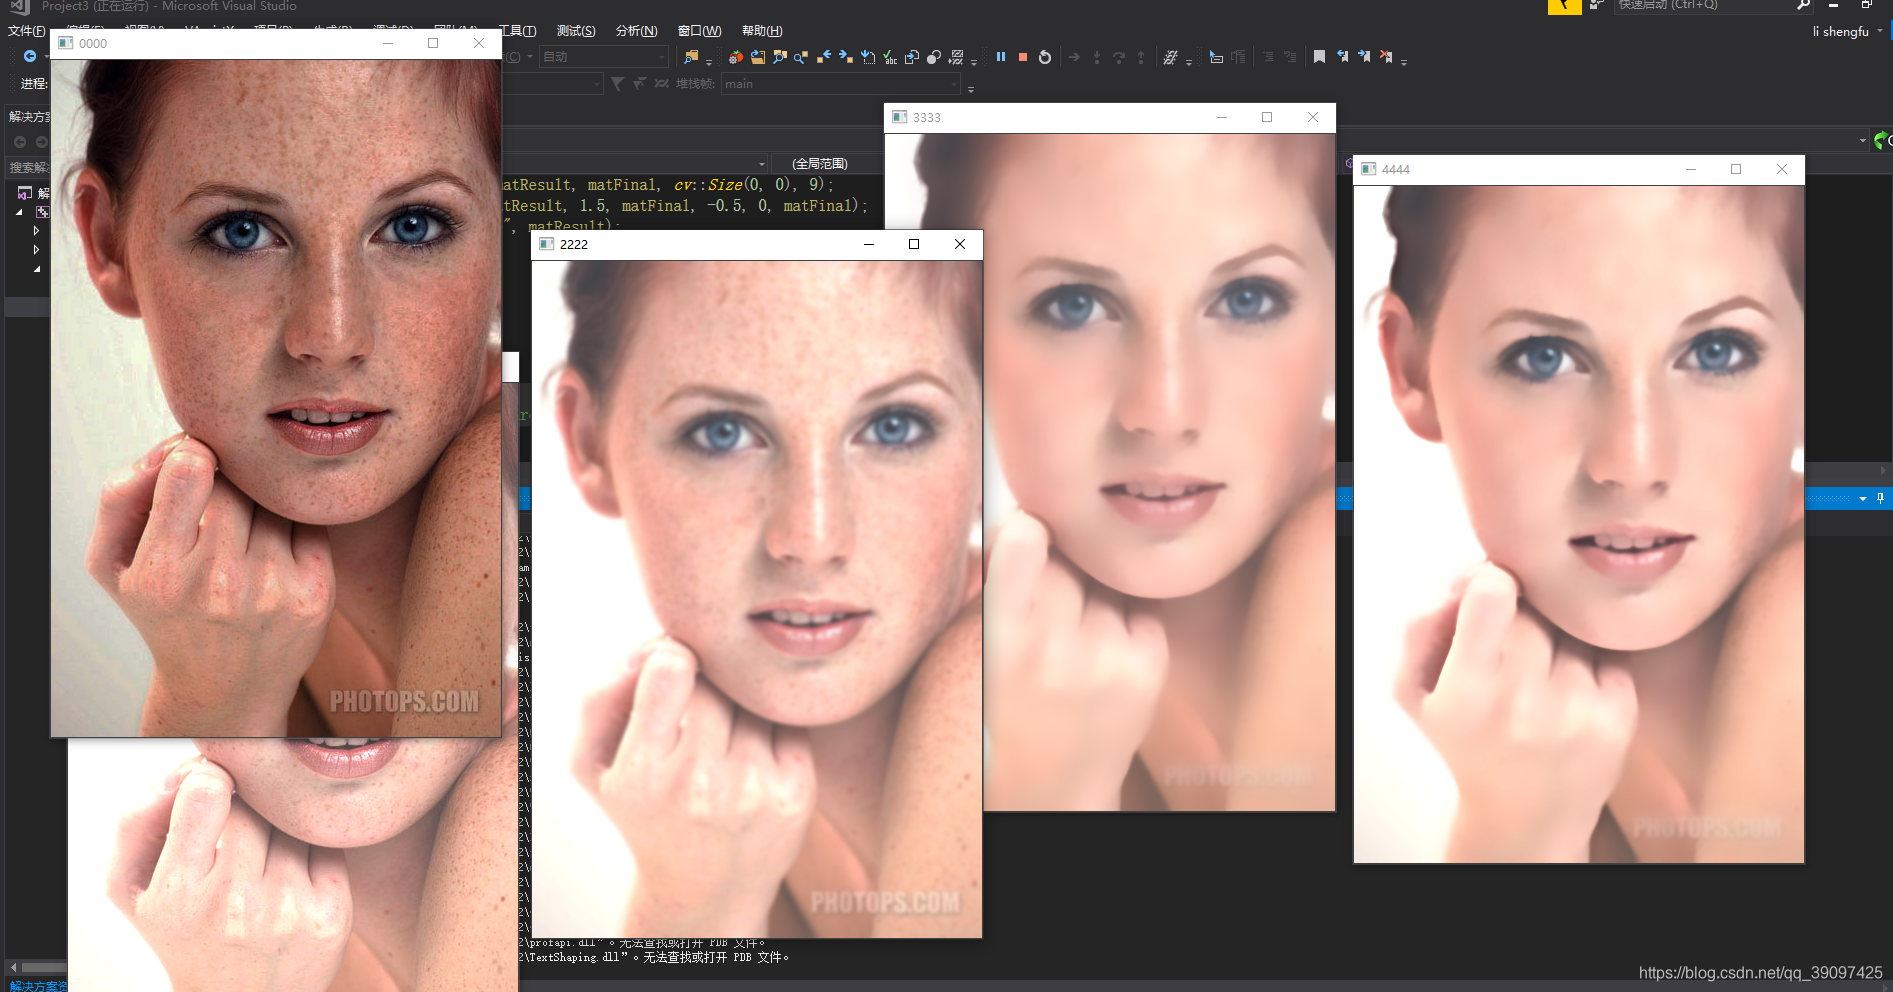
// 读入一张图片(游戏原画)
Mat matResult;
Mat src = imread("C:/Users/Administrator/Desktop/Girl.jpg");
int bilateralFilterVal = 30; // 双边模糊系数
imshow("0000", src);
whiteFace(src, 1.1, 68); // 调整对比度与亮度,参数2为对比度,参数3为亮度
imshow("1111", src);
GaussianBlur(src, src, Size(9, 9), 0, 0); // 高斯模糊,消除椒盐噪声
imshow("2222", src);
bilateralFilter(src, matResult, bilateralFilterVal, // 整体磨皮
bilateralFilterVal * 2, bilateralFilterVal / 2);
imshow("3333", matResult);
Mat matFinal;
// 图像增强,使用非锐化掩蔽(Unsharpening Mask)方案。
cv::GaussianBlur(matResult, matFinal, cv::Size(0, 0), 9);
cv::addWeighted(matResult, 1.5, matFinal, -0.5, 0, matFinal);
imshow("4444", matFinal);
imwrite("E:\\test\\result.png", matFinal);
waitKey(0);
}
void BeautyFace(Mat& src) {
// 读入一张图片(游戏原画)
Mat matResult;
int bilateralFilterVal = 30; // 双边模糊系数
whiteFace(src, 1.1, 68); // 调整对比度与亮度,参数2为对比度,参数3为亮度
GaussianBlur(src, src, Size(9, 9), 0, 0); // 高斯模糊,消除椒盐噪声
bilateralFilter(src, matResult, bilateralFilterVal, // 整体磨皮
bilateralFilterVal * 2, bilateralFilterVal / 2);
Mat matFinal;
// 图像增强,使用非锐化掩蔽(Unsharpening Mask)方案。
cv::GaussianBlur(matResult, matFinal, cv::Size(0, 0), 9);
cv::addWeighted(matResult, 1.5, matFinal, -0.5, 0, matFinal);
imshow("BeautyFace", matResult);
}
int main()
{
BeautyFace();
读取视频或摄像头
//VideoCapture capture(0);
//while (true)
//{
// Mat frame;
// capture >> frame;
// BeautyFace(frame);
// //imshow("读取视频", frame);
// waitKey(60); //延时30
//}
//return 0;
}