简介
IntBuffer 是 Int 的缓冲区类型
类的关系图如下:
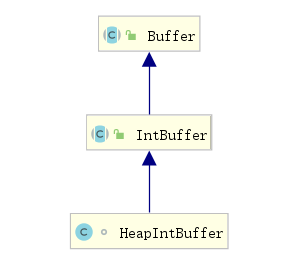
- Buffer:抽象类,一切Buffer相关的基类
- IntBuffer:抽象类,内部维护一个 int[ ] 的数组对象
- HeapIntBufferr:IntBuffer 的实现类,封装了对上一步 int[ ] 的操作方法
公共属性
    // Invariants: mark <= position <= limit <= capacity
    private int mark = -1;
    private int position = 0;
    private int limit;
    private int capacity;
初始化
示例:分配一个容量大小为5的 IntBuffer 对象
IntBuffer intBuffer = IntBuffer.allocate(5);
底层源码:
- 实际上调用的是 HeapIntBuffer 的构造函数
	//IntBuffer#allocate
    public static IntBuffer allocate(int capacity) {


        if (capacity < 0)
            throw new IllegalArgumentException();
        return new HeapIntBuffer(capacity, capacity);
    }
HeapIntBuffer 构造函数:
- 初始化 mark = -1,position = 0,limit = 5,capacity = 5
- 初始化 IntBuffer 自带的属性 offset = 0
- 初始化 int 数组大小为 5

添加数据
示例:添加数据1、 3、 5、 7、 9
        intBuffer.put(1);
        intBuffer.put(3);
        intBuffer.put(5);
        intBuffer.put(7);
        intBuffer.put(9);
put 源码:
	//HeapIntBuffer#put
    public IntBuffer put(int x) {


        hb[ix(nextPutIndex())] = x;
        return this;

    }
nextPutIndex:判断 position 超出 limit 大小就抛出异常,否则返回当前 position,并网上加1作为下次使用
	//Buffer#nextPutIndex
    final int nextPutIndex() {

                              // package-private
        if (position >= limit)
            throw new BufferOverflowException();
        return position++;
    }
ix 函数:实际就是 position 的值加上偏移量 offset(上一步已讲过,该值为0)
	//HeapIntBuffer#ix
    protected int ix(int i) {


        return i + offset;
    }
执行5次 put 操作之后,此时 position = 5,limit = 5
读取数据
注意:Buffer 类进行读操作,必须先调用 flip() 反转缓冲区
        intBuffer.flip();
        while (intBuffer.hasRemaining()){


            System.out.println(intBuffer.get());
        }
flip() 函数源码:
- 把 limit 的值设为当前 position 的值
- 把 position 的值设 0
    public final Buffer flip() {


        limit = position;
        position = 0;
        mark = -1;
        return this;
    }
- 效果如下图所示:反转后操作的就是已经 put() 的数据

hasRemaining() 判断是否还有值:
	//Buffer#hasRemaining
    public final boolean hasRemaining() {


        return position < limit;
    }
get() 获取当前数据:
- 取出当前 position 位置的数据,并对 position+1
    public int get() {


        return hb[ix(nextGetIndex())];
    }
问题来了:flip() 反转后,如果要继续对 IntBuffer 追加数据,该怎么办?
通过上面的示例图,可以看出来。如果要继续追加新数据,需要修改相关索引值:
- 把 position 设置为 limit 的值
- 把 limit 的值设置为 capacity 的值
附上一个完整的例子:
public class test {


    public static void main(String[] args) {


    	//初始化容量大小为5
        IntBuffer intBuffer = IntBuffer.allocate(5);
        //追加2个数据
        intBuffer.put(1);
        intBuffer.put(3);

		//反转置换
        intBuffer.flip();
        System.out.println(intBuffer.get());
        System.out.println(intBuffer.get());
        System.out.println("----------------------------");

		//重新设置position
        intBuffer.position(intBuffer.limit());
        intBuffer.limit(intBuffer.capacity());

		//继续追加数据
        intBuffer.put(20);
        intBuffer.put(21);
        intBuffer.put(22);

		//再次反转置换,然后全部输出
        intBuffer.flip();
        while (intBuffer.hasRemaining()){


            System.out.println(intBuffer.get());
        }
    }
}
输出结果:
1
3
----------------------------
1
3
20
21
22