- 第五阶段模块一 xxxx后台管理系统 后端开发
- 任务一 项目介绍与后台系统搭建
- 任务二 课程管理模块开发1
- 任务三 课程管理模块开发_02
- 第5阶段 模块一作业
- 第五阶段模块二
- 任务一 Vue.js
- 任务二 Vue-cli&ElementUI
- 任务三 前后端项目接口联调
- 任务四 项目上线部署发布
第五阶段模块一 xxxx后台管理系统 后端开发
任务一 项目介绍与后台系统搭建
1. 项目架构
1.1 项目介绍
拉钩教育后台管理系统,是提供给拉钩教育的相关业务人员使用的一个后台管理系统, 业务人员可以在这个后台管理系统中,对课程信息、讲师信息、 学员信息等数据进行维护.
为了巩固同学们对 web阶段的技术的理解,提高同学们综合运用技术的能力, 接下来会带领同学们去完成拉钩教育后台管理系统中的课程管理模块.

1.2 模块介绍
打开产品需求文档,我们一起去看一下课程管理模块中都包含哪些内容:
- 课程信息页面展示
- 课程营销信息配置
- 配置课时( 即课程内容管理)
1.3 前后端分离开发
1.3.1 前后端分离架构介绍
前后端分离已成为互联网项目开发的业界标准使用方式,将前端和后端的开发进行解耦。并且前后端分离会为以后的大型分布式架构、微服务架构、多端化服务(各种客户端,比如浏览器、车载终端、安卓、IOS等)打下坚实的基础。
前后端分离的核心思想就是前端HTML页面通过AJAX调用后端的API接口,并通过JSON数据进行交互。

1.3.2 接口文档
1.3.2.1 什么是接口文档?
在我们的项目中使用的是前后端分离开发方式,需要由前后端工程师共同定义接口,编写接口文档,之后大家都根据这个接口文档进行开发,到项目结束前都要一直进行接口文档的维护。
1.3.2.2 为什么要写接口文档?
- 项目开发过程中前后端工程师有一个统一的文件进行沟通交流,并行开发
- 项目维护中或者项目人员更迭,方便后期人员查看、维护
1.3.2.3 接口规范是什么?
一个接口的描述至少包括下面几项:
-
名称: findCourseList
-
描述: 根据条件查询课程信息
-
URL: http://localhost:8080/lagou_edu_home/course/
-
请求方式: GET
-
请求参数
methodName:"findCourseList"; -
响应结果
{
    "status": "0",
    "msg": "success"
}
1.3.3 前后端分离架构的优势
1.3.3.1 前后端耦合的开发方式
这种方式中 Java程序员又当爹又当妈,又搞前端,又搞后端。 正所谓术业有专攻,一个人如果什么都会,那么他肯定也什么都不精.
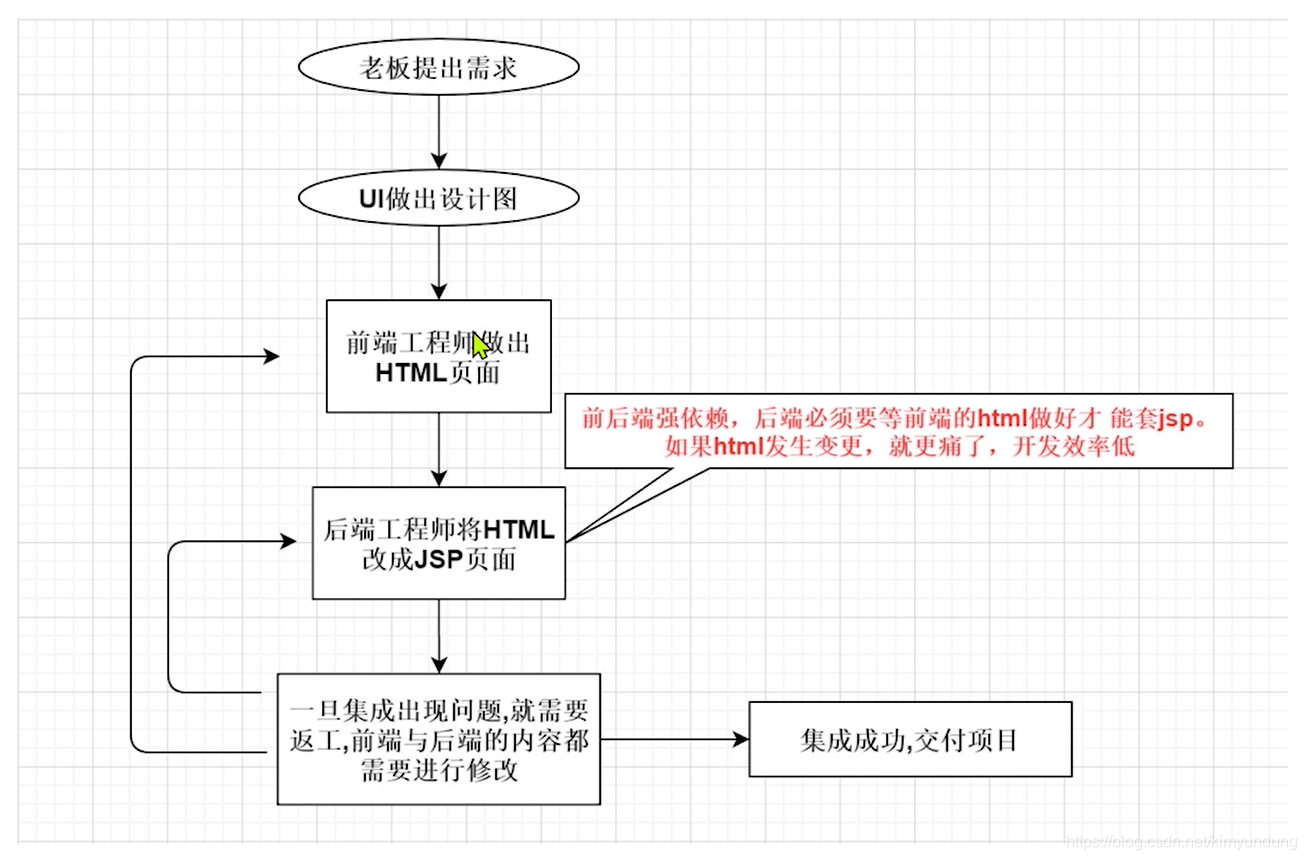
1.3.3.2 前后端耦合的缺陷 (以JSP为例)
- UI出好设计图之后,前端开发工程师只负责将设计图切成HTML,需要由Java开发工程师来将HTML套成JSP页面,修改问题的时候需要双方协同开发,效率低下。
- JSP页面必须要在支持Java的WEB服务器上运行(如Tomcat、Jetty等),无法使用Nginx等(官方宣称单实例HTTP并发高达5W),性能提升不上来。
- 第一次请求JSP,必须要在WEB服务器中编译成Servlet,第一次运行会较慢。 之后的每次请求JSP都是访问Servlet再用输出流输出的HTML页面,效率没有直接使用HTML高
1.3.3.3 前后端分离的开发方式

1.3.3.4 前后端分离的优势
- 前后端分离的模式下,如果发现Bug,可以快速定位是谁的问题,不会出现互相踢皮球的现象
- 前后端分离可以减少后端服务器的并发/负载压力。除了接口以外的其他所有HTTP请求全部转移到前端Nginx上,接口的请求则转发调用Tomcat.
- 前后端分离的模式下,即使后端服务器暂时超时或宕机了,前端页面也会正常访问,只不过数据刷不出来而已。
- 前后端分离会更加合理的分配团队的工作量,减轻后端团队的工作量,提高了性能和可扩展性。
1.4 技术选型
1.4.1 前端技术选型
| 前端技术 | 说明 |
|---|---|
| Vue.js | 是一套用于构建用户界面的渐进式JavaScript框架 |
| Element UI库 | element-ui 是饿了么前端出品的基于 Vue.js的 后台组件库, 方便程序员进行页面快速布局和构建 |
| node.js | 简单的说 Node.js 就是运行在服务端的 JavaScript 运行环境 . |
| axios | 对ajax的封装, 简单来说就是ajax技术实现了局部数据的刷新,axios实现了对ajax的封装, |
1.4.2 后端技术选型
| 后端技术 | 说明 |
|---|---|
| Web层 | a) Servlet:前端控制器 b) Filter:过滤器 c) BeanUtils:数据封装 |
| Service层 | a) 业务处理 |
| dao层 | a) Mysql:数据库 b) Druid:数据库连接池 c) DBUtils: 操作数据库 |
1.5 项目开发环境
- 开发工具
- 后端: IDEA 2019
- 前端: VS code
- 数据库: SQLYog
- 开发环境
- JDK 11
- Maven 3.6.3
- MySQL 5.7
2. Maven 项目管理工具
2.1 Maven介绍
2.1.1 什么是Maven
Maven是一个跨平台的项目管理工具。作为Apache组织的一个颇为成功的开源项目,其主要服务于基于Java平台的项目创建,依赖管理和项目信息管理。maven是Apache的顶级项目,解释为“专家,内行”,它是一个项目管理的工具,maven自身是纯java开发的,可以使用maven对java项目进行构建、依赖管理。
2.1.2 Maven的作用
- 依赖管理
- 依赖指的就是是 我们项目中需要使用的第三方Jar包, 一个大一点的工程往往需要几十上百个Jar包,按照我们之前的方式,每使用一种Jar,就需要导入到工程中,还要解决各种Jar冲突的问题.
- Maven可以对Jar包进行统一的管理,包括快速引入Jar包,以及对使用的 Jar包进行统一的版本控制
- 一键构建项目
- 之前我们创建项目,需要确定项目的目录结构,比如
src存放Java源码,resources存放配置文件,还要配置环境比如JDK的版本等等,如果有多个项目 那么就需要每次自己搞一套配置,十分麻烦 - Maven为我们提供了一个标准化的Java项目结构,我们可以通过Maven快速创建一个标准的Java项目.
- 之前我们创建项目,需要确定项目的目录结构,比如
2.2 Maven 的使用
2.2.1 Maven软件的下载
使用 Maven 管理工具,我们首先要到官网去下载它的安装软件。
http://maven.apache.org/download.cgi
目前最新版是 apache-maven-3.6.3 版本,在我们的软件文件夹中已经下载好了.
2.2.2 Maven软件的安装
Maven 下载后,将 Maven 解压到一个没有中文没有空格的路径下,比如:H:\software\maven 下面。 解压后目录结构如下:
- bin:存放了 maven 的命令
- boot:存放了一些 maven 本身的引导程序,如类加载器等
- conf:存放了 maven 的一些配置文件,如 setting.xml 文件
- lib:存放了 maven 本身运行所需的一些 jar 包
2.2.3 Maven环境变量配置
-
配置 MAVEN_HOME ,变量值就是你的 maven 安装的路径(bin 目录之前一级目录)
-
将MAVEN_HOME 添加到Path系统变量
2.2.4 Maven 软件版本测试
通过 mvn -v命令检查 maven 是否安装成功,看到 maven 的版本为 3.6.3 及 java 版本为 jdk-11 即为安装 成功。 打开命令行,输入 mvn –v命令,如下图:
2.3 Maven 仓库
- Maven中的仓库是用来存放maven构建的项目和各种依赖的(Jar包)。
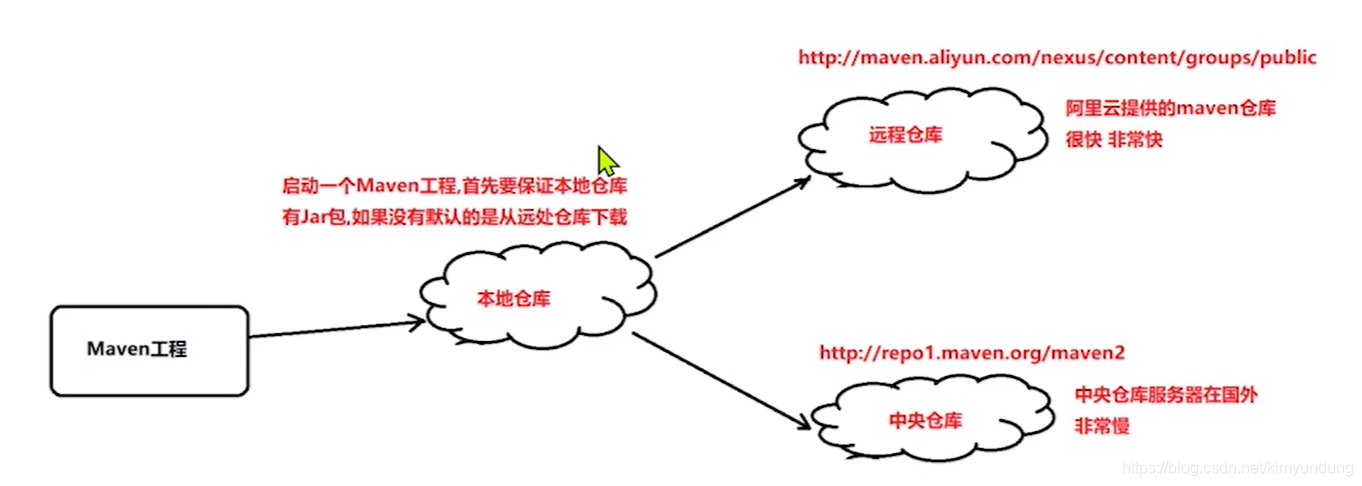
2.3.1 Maven的仓库分类
- 本地仓库: 位于自己计算机中的仓库, 用来存储从远程仓库或中央仓库下载的插件和 jar 包,
- 远程仓库: 需要联网才可以使用的仓库,阿里提供了一个免费的maven 远程仓库。
- 中央仓库: 在 maven 软件中内置一个远程仓库地址 http://repo1.maven.org/maven2 ,它是中 央仓库,服务于整个互联网,它是由 Maven 团队自己维护,里面存储了非常全的 jar 包,它包 含了世界上大部分流行的开源项目构件
2.3.2 Maven 本地仓库的配置
-
maven仓库默认是在 C盘 .m2 目录下,我们不要将仓库放在C盘,所以这里同学们要重新配置一下.
-
为了方便同学们的使用,老师为大家提供了一个本地仓库,将 “repository.rar”解压至自己的 电脑上,我解压在 H:\software\repository 目录下(注意最好放在没有中文及空格的目录下)。
-
在maven安装目录中,进入 conf文件夹, 可以看到一个 settings.xml 文件中, 我们在这个文件中, 进行本地仓库的配置
-
打开 settings.xml文件,进行如下配置如下:
  <!-- 配置本地仓库 -->
  <localRepository>C:\software\repository</localRepository>
2.3.3 配置阿里云远程仓库
Maven默认的远程仓库是在国外, 所以下载jar包时速度会非常慢, 这里推荐大家使用我大天朝的阿里云仓库
- 打开 settings.xml,找到 标签 , 下面的内容复制到 中 即可
<mirror>
    <id>alimaven</id>
    <name>aliyun maven</name>
    <url>
        http://maven.aliyun.com/nexus/content/groups/public/
    </url>
    <mirrorOf>central</mirrorOf>
</mirror>
2.4 创建Maven项目
2.4.1 IDEA中配置Maven
-
打开IDEA 创建一个新的project
-
起名为web_work
-
首先打开IDEA 选择File --> Settings --> 搜素maven,就会看到如下界面
-
修改默认配置配置
Maven home directory : C:\software\maven\apache-maven-3.6.3
User settings file : C:\software\maven\apache-maven-3.6.3\conf\settings.xml
Local repository : C:\software\repository
2.4.2 创建Maven工程
在IDEA中配置好maven后, 接下来我们使用maven去快速的去构建一个 JavaWeb项目
-
project创建好以后, 选择创建module
-
选中创建一个 maven 工程
-
点击 Next填写项目信息
File > New > Module > Maven > next
>
Name:
Location:
Artifact Coordinates > GroupId: com.lagou
>
finish -
创建好的工程,长这个样子

Maven目录说明:
src/main/java 		 —— 存放项目的.java 文件
src/main/resources 	 —— 存放项目资源文件,如数据库的配置文件
src/test/java 		—— 存放所有单元测试.java 文件,如 JUnit 测试类
target 			    —— 项目输出位置,编译后的class 文件会输出到此目录
pom.xml              ——maven 项目核心配置文件
2.4.3 Maven工程改造
当前创建的maven项目是一个 普通的Java项目,不是web项目,我们要进行一下改造
-
在main目录下创建一个webapp文件夹
-
选择 project Structure —> facets—> 点击+号 添加web —> 选择当前工程hello_maven

-
修改路径信息
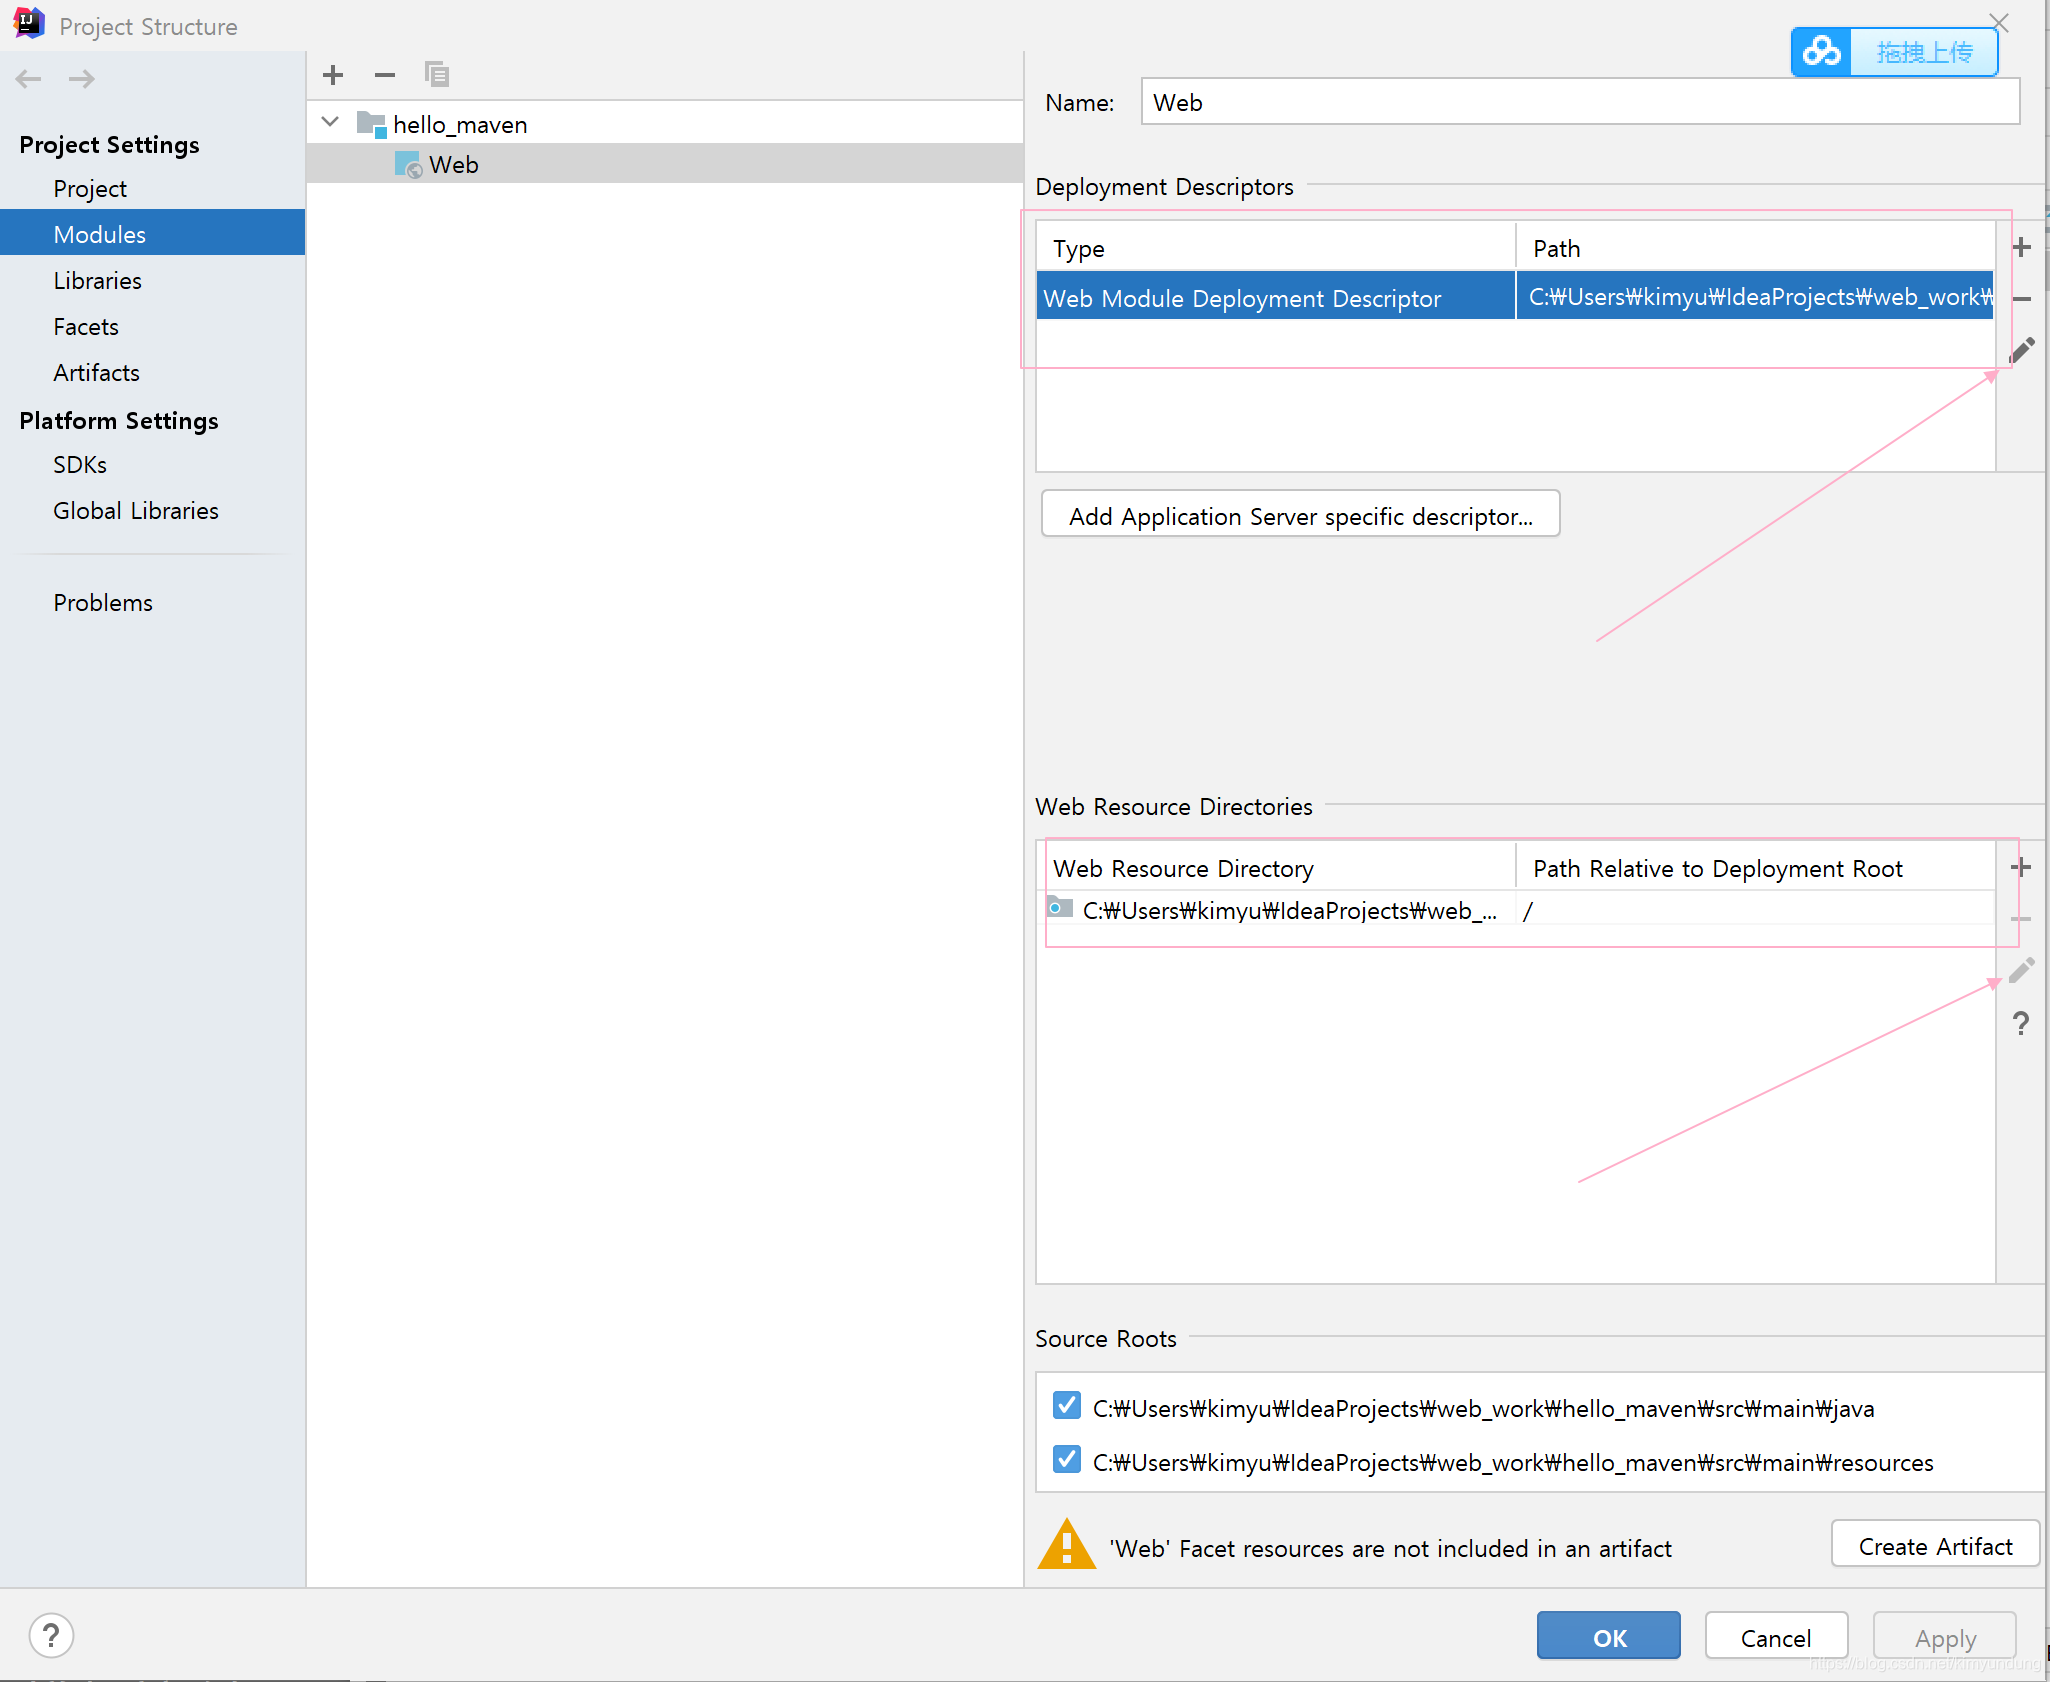
4)修改为 我们的 webapp目录
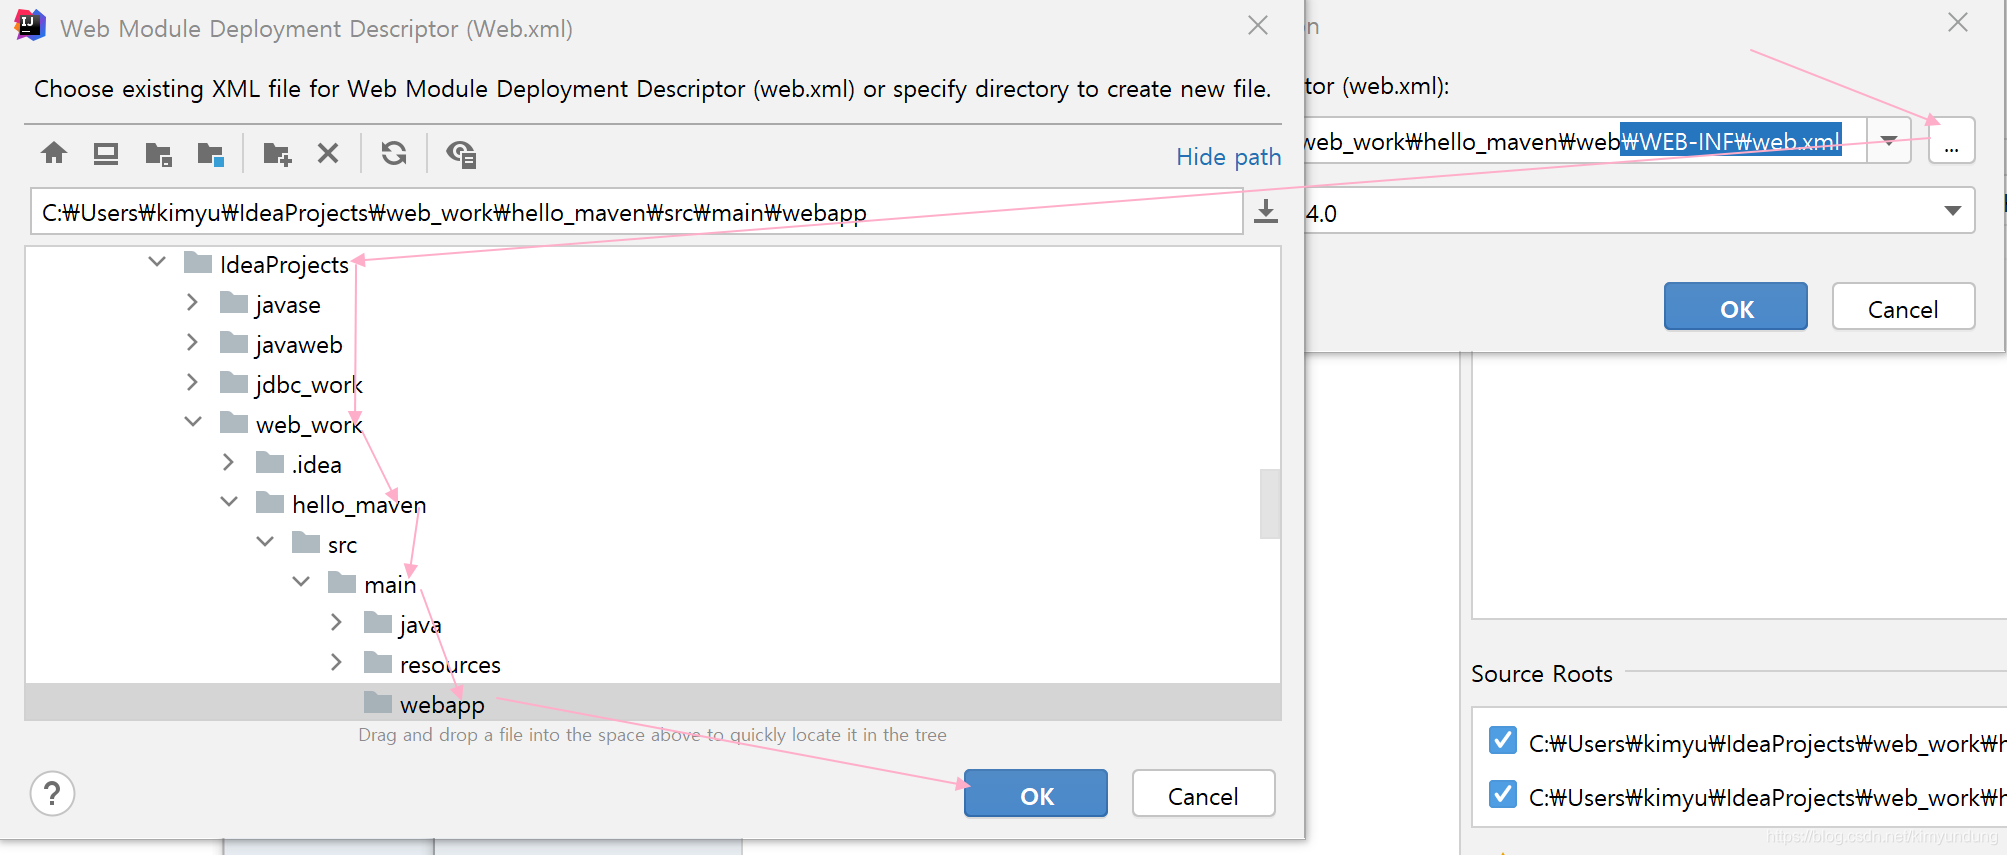


修改后

- 点击ok 后,项目就变为了web项目, 在webapp目录下再创建一个 index.jsp,就OK了
2.4.4 pom核心配置文件
一个 maven 工程都有一个 pom.xml 文件,通过 pom.xml 文件定义项目的信息、项目依赖、引入插件等等。
-
创建一个Servlet , 缺少jar包报错, 要解决问题,就是要将 servlet-api-xxx.jar 包放进来,作为 maven 工程应当添加 servlet的坐标,从而导入它的 jar
-
pom.xml 文件中引入依赖包的坐标
<?xml version="1.0" encoding="UTF-8"?>
<project xmlns="http://maven.apache.org/POM/4.0.0"
         xmlns:xsi="http://www.w3.org/2001/XMLSchema-instance"
         xsi:schemaLocation="http://maven.apache.org/POM/4.0.0 http://maven.apache.org/xsd/maven-4.0.0.xsd">
    <modelVersion>4.0.0</modelVersion>

    <groupId>com.lagou</groupId>
    <artifactId>hello_maven</artifactId>
    <version>1.0-SNAPSHOT</version>

    <!-- 引入依赖包的坐标 -->
    <dependencies>
        <dependency>                            <!-- dependency:依赖,每个依赖代表一个jar包 -->
            <groupId>javax.servlet</groupId>    <!-- groupId:组织或者公司的名称 -->
            <artifactId>servlet-api</artifactId><!-- artifactId:实际项目的名称 -->
            <version>3.1.0</version>            <!-- version:项目的版本 -->
        </dependency>
    </dependencies>

</project>
- 一个Maven工程就是由
groupId,artifactId和version作为唯一标识, 我们在引用其他第三方库的时候,也是通过这3个变量确定。
-
坐标的概念
- 在maven中坐标就是为了定位一个唯一确定的jar包。
- maven世界拥有大量构建,我们需要找一个用来唯一标识一个构建的统一规范,拥有了统一规范,就可以把查找工作交给机器
-
Maven坐标主要组成(GAV) - 确定一个jar在互联网位置
| 标签 | 含义 |
|---|---|
| groupId | 定义当前Maven组织名称,通常是公司名 |
| artifactId | 定义实际项目名称 |
| version | 定义当前项目的当前版本 |
| packaging | 打包类型 jar:执行 package 会打成 jar 包 war:执行 package 会打成 war 包 |
| dependency | 使用 <dependency>声明一个依赖后,Maven就会自动下载这个依赖包 |
- maven 的依赖管理, 是对项目所依赖的 jar 包进行统一管理。
| 标签 | 含义 |
|---|---|
| dependencies | 表示依赖关系 |
| dependency | 使用 <dependency>声明一个依赖后,Maven就会自动下载这个依赖包 |
<dependencies>
    <dependency>
        <groupId>javax.servlet</groupId>
        <artifactId>servlet-api</artifactId>
        <version>3.1.0</version>
    </dependency>
</dependencies>
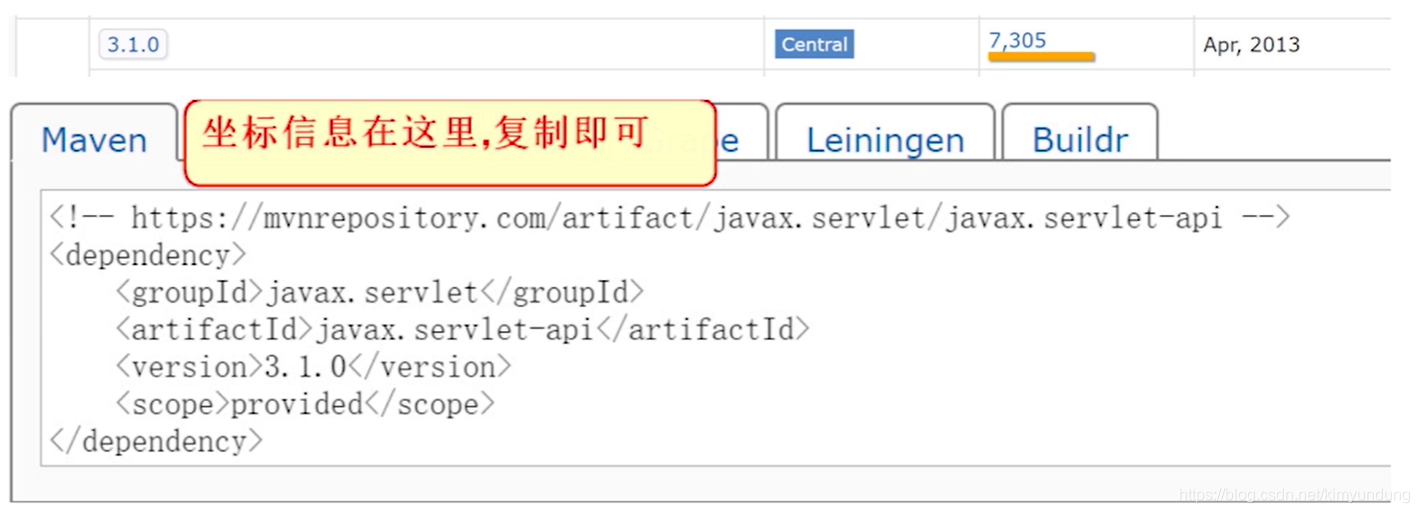
- 坐标的来源方式
添加依赖需要指定依赖 jar 包的坐标,但是很多情况我们是不知道 jar 包的的坐标,可以通过如下方 式查询:
从网站中搜索即可
5.1) 输入网址,进入网址 , 进行查询
https://mvnrepository.com/

5.2) 点击进入后,可以看到各个版本的信息,选择3.1.0
2.4.5 添加插件
- 添加编译插件, 设置 jdk 编译版本
本教程使用 jdk11,需要设置编译版本为 11,这里需要使用 maven 的插件来设置
在pom中加入如下配置:
	<!-- properties 是全局设置,可以设置整个maven项目的编译器 JDK版本 -->
    <properties>
        <project.build.sourceEncoding>UTF-8</project.build.sourceEncoding>
        <!-- 重点  -->
        <maven.compiler.source>11</maven.compiler.source>
        <maven.compiler.target>11</maven.compiler.target>
    </properties>

    <!-- 在build中 我们需要指定一下项目的JDK编译版本,maven默认使用1.5版本进行编译
    注意 build 与 dependencies是平级关系,标签不要写错位置  -->
    <build>
        <plugins>
        	<!-- maven 编译 插件 -->
            <plugin>
                <groupId>org.apache.maven.plugins</groupId>
                <artifactId>maven-compiler-plugin</artifactId>
                <version>3.8.1</version>
                <configuration>
                    <release>11</release>
                </configuration>
            </plugin>
        </plugins>
    </build>
2.4.6 运行Maven项目
- 完善项目代码
ServletDemo01
@WebServlet("/demo01")
public class ServletDemo01 extends HttpServlet {


    @Override
    protected void doGet(HttpServletRequest req, HttpServletResponse resp) throws ServletException, IOException {


        System.out.println("hello maven!!!!");
    }

    @Override
    protected void doPost(HttpServletRequest req, HttpServletResponse resp) throws ServletException, IOException {


        doGet(req, resp);
}
}
index.jsp
<%@ page contentType="text/html;charset=UTF-8" language="java" %>
<html>
<head>
    <title>Title</title>
</head>
<body>
    <h1>这是我的第一个maven工程!</h1>
</body>
</html>
error: java: error: release version 5 not supported
https://blog.csdn.net/qq_40672635/article/details/107164883
-
配置tomcat ,部署项目
-
运行项目, 默认访问 index.jsp
-
访问Servlet
http://localhost:8080/hello_maven/demo01
2.4.7 Maven的常用命令
- 一个maven项目生命周期
使用 maven 完成项目的构建,项目构建包括:清理、编译、测试、部署等过程,maven 将这些 过程规范为一个生命周期,如下所示是生命周期的各各阶段:

maven 通过执行一些简单命令即可实现上边生命周期的各个过程
| 命令 | 说明 |
|---|---|
| mvn compile | 完成编译操作 , 执行完毕后,会生成target目录,该目录中存放了编译后的字节码文件。 |
| mvn clean | 执行完毕后,会将target目录删除. |
| mvn test | 执行完毕后,会在target目录中生成三个文件夹: surefire、surefire-reports(测试报告)、test-classes(测试的字节码文件) |
| mvn package | 完成打包操作, 执行完毕后,会在target目录中生成一个文件,该文件可能是 jar、war |
| mvn install | 执行 mvn install命令,完成将打好的jar包安装到本地仓库的操作 , 执行完毕后,会在本地仓库中出现安装后的jar包,方便其他工程引用 |
-
idea中安装好maven后, 在界面左侧有一个maven视图, 里面有对应的命令插件,可以执行上面表格中的命令
-
工具栏介绍
1.根据pom.xml文件重新导入所有Maven项目和依赖,刷新
2.创建源码(重新编译)并更新目录
3.下载源码或文档
4.添加Maven项目
5.执行生命周期中的阶段,选中lifecycle选项中生命周期中的一个阶段(phase),才能点击执行。
6.运行Maven生命周期或插件
7.切换离线模式,就是关闭和远程仓库的链接,从本地仓库中获取,也不能将jar包提交到远程仓库
8.是否跳过测试,点击选中就可以跳过测试,在点击选择取消跳过测试
9.展示当前选中的maven项目jar包的依赖,并且可以直接在图形化依赖图上进行排除依赖操作
10.收起下面展开的视图
11.跳转到maven的Setting页面
2.4.8 依赖范围介绍
- A 依赖 B,需要在 A 的 pom.xml 文件中添加 B 的坐标,添加坐标时需要指定依赖范围,依赖范围包 括:
| 依赖范围 | 说明 |
|---|---|
| compile | 编译范围,指 A在编译时依赖 B,此范围为默认依赖范围。编译范围的依赖会用在 编译、测试、运行,由于运行时需要所以编译范围的依赖会被打包。 |
| provided | provided 依赖只有在当 JDK 或者一个容器已提供该依赖之后才使用, provided 依 赖在编译和测试时需要,在运行时不需要,比如:servlet api 被 tomcat 容器提供。 |
| runtime | runtime 依赖在运行和测试系统的时候需要,但在编译的时候不需要。比如:jdbc 的驱动包。由于运行时需要所以 runtime 范围的依赖会被打包。 |
| test | test 范围依赖 在编译和运行时都不需要,它们只有在测试编译和测试运行阶段可用, 比如:junit。由于运行时不需要所以test范围依赖不会被打包。 |
| system | system 范围依赖与 provided 类似,但是你必须显式的提供一个对于本地系统中 JAR 文件的路径,需要指定 systemPath 磁盘路径,system依赖不推荐使用。 |
- 项目中添加的坐标 ,并指定依赖范围
	<dependencies>
        <dependency>
            <!-- 项目名称 -->
            <groupId>javax.servlet</groupId>
            <!-- 模块名称 -->
            <artifactId>servlet-api</artifactId>
            <!-- 版本信息 -->
            <version>3.1.0</version>
        <!-- 依赖范围, 指定依赖范围是编译与测试时有效,运行时无效,运行时使用tomcat中的依赖,避免冲突 -->
            <scope>provided</scope>
        </dependency>

        <dependency>
            <groupId>javax.servlet.jsp</groupId>
            <artifactId>jsp-api</artifactId>
            <version>2.1.2</version>
            <scope>provided</scope>
        </dependency>

        <dependency>
            <groupId>junit</groupId>
            <artifactId>junit</artifactId>
            <version>4.13</version>

            <!-- 在测试时有效 -->
            <scope>test</scope>
        </dependency>
    </dependencies>
3. 后台系统搭建
3.1 课程管理模块功能分析
在本次的项目中,主要完成拉钩教育后台管理系统的 课程管理模块, 课程管理模块包含了添加课程,配置课程相关信息, 以及管理课程章节等功能,我们来一起看一下产品的原型图
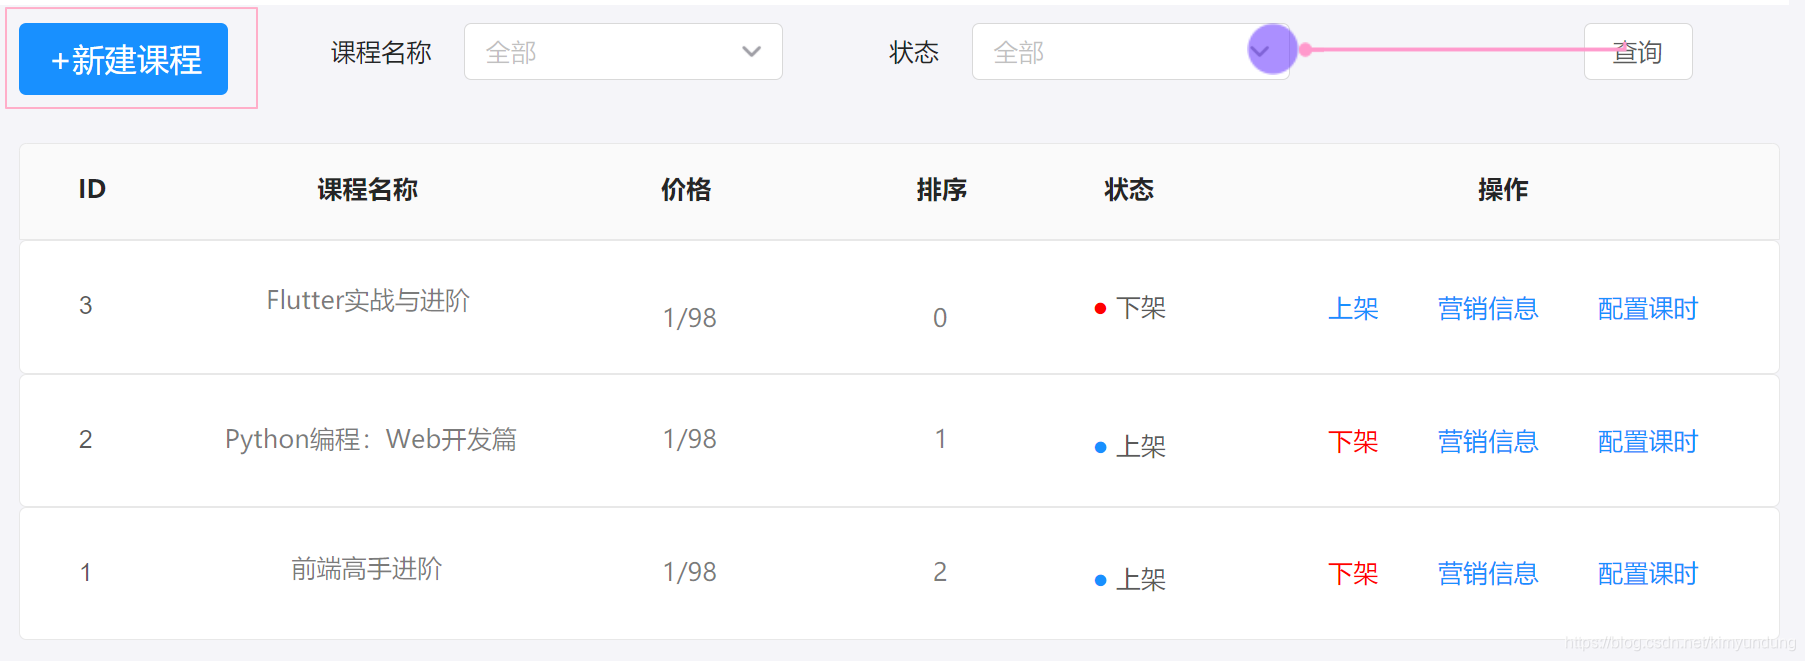
3.1.1 课程管理
- 实现以下功能:
- 展示课程列表
- 根据课程名和状态进行查询
- 新建课程
- 课程上架与下架
3.1.2 营销信息
- 营销信息,其实就是设置课程的详细信息
- 回显课程信息
- 修改课程信息,包含了图片上传
3.1.3 配置课时
- 配置课时指的是对课程下所属的章节与课时进行配置(一个课程对应多个章节,一个章节有多个课时)
- 以树形结构的下拉框形式, 展示课程对应的章节与课时信息
- 添加章节功能
- 修改章节功能
- 修改章节状态功能
3.2 课程管理模块表设计
3.2.1 创建数据库及表
在资料中找到 lagou_edu.sql,使用SQLYog 执行SQL脚本 ,导入数据库及表
3.2.2 表关系介绍
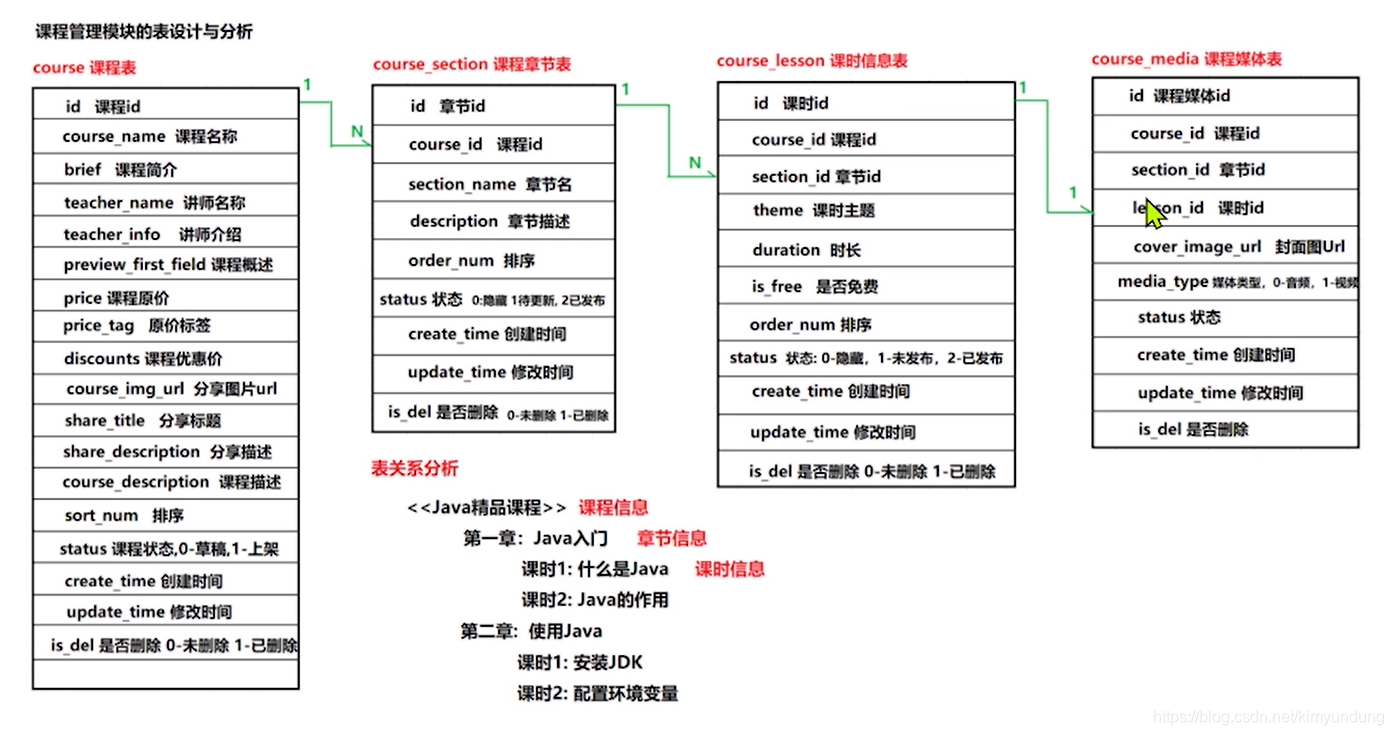
3.3 环境搭建
3.3.1 创建项目
使用Maven快速构建工程, 项目名为: lagou_edu_home
-
选择maven ,直接next
-
填写项目相关信息,创建maven项目
-
当前maven项目还不是 一个web项目,进行一下改造
详见 2.4.3 Maven工程改造
3.3.2 项目目录
[外链图片转存失败,源站可能有防盗链机制,建议将图片保存下来直接上传(img-7dM2zs05-1611223328941)(…\02_图片\69.jpg)]
3.3.3 导入pom.xml
<?xml version="1.0" encoding="UTF-8"?>
<project xmlns="http://maven.apache.org/POM/4.0.0"
         xmlns:xsi="http://www.w3.org/2001/XMLSchema-instance"
         xsi:schemaLocation="http://maven.apache.org/POM/4.0.0 http://maven.apache.org/xsd/maven-4.0.0.xsd">
    <modelVersion>4.0.0</modelVersion>

    <groupId>com.lagou</groupId>
    <artifactId>lagou_edu_home</artifactId>
    <version>1.0-SNAPSHOT</version>
    <packaging>war</packaging>

    <!-- properties 是全局设置,可以设置整个maven项目的编译器 JDK版本 -->
    <properties>
        <project.build.sourceEncoding>UTF-8</project.build.sourceEncoding>
        <maven.compiler.source>11</maven.compiler.source>
        <maven.compiler.target>11</maven.compiler.target>
    </properties>

    <dependencies>
        <!-- Servlet -->
        <dependency>
            <groupId>javax.servlet</groupId>
            <artifactId>servlet-api</artifactId>
            <version>3.1.0</version>
            <scope>provided</scope>
        </dependency>
        <dependency>
            <groupId>javax.servlet.jsp</groupId>
            <artifactId>jsp-api</artifactId>
            <version>2.2</version>
            <scope>provided</scope>
        </dependency>

        <dependency>
            <groupId>junit</groupId>
            <artifactId>junit</artifactId>
            <version>4.13</version>
            <scope>test</scope>
        </dependency>

        <!--    Beanutils    -->
        <dependency>
            <groupId>commons-beanutils</groupId>
            <artifactId>commons-beanutils</artifactId>
            <version>1.8.3</version>
        </dependency>

        <!--   DBUtils    -->
        <dependency>
            <groupId>commons-dbutils</groupId>
            <artifactId>commons-dbutils</artifactId>
            <version>1.6</version>
        </dependency>

        <dependency>
            <groupId>commons-logging</groupId>
            <artifactId>commons-logging</artifactId>
            <version>1.1.1</version>
        </dependency>


        <!-- 数据库相关 -->
        <dependency>
            <groupId>mysql</groupId>
            <artifactId>mysql-connector-java</artifactId>
            <version>5.1.37</version>
        </dependency>

        <dependency>
            <groupId>com.alibaba</groupId>
            <artifactId>druid</artifactId>
            <version>1.0.9</version>
        </dependency>

        <!--fastjson工具包 -->
        <dependency>
            <groupId>com.alibaba</groupId>
            <artifactId>fastjson</artifactId>
            <version>1.2.3</version>
        </dependency>

        <dependency>
            <groupId>com.colobu</groupId>
            <artifactId>fastjson-jaxrs-json-provider</artifactId>
            <version>0.3.1</version>
        </dependency>

        <!--  文件上传 -->
        <dependency>
            <groupId>commons-io</groupId>
            <artifactId>commons-io</artifactId>
            <version>1.4</version>
        </dependency>

        <dependency>
            <groupId>commons-fileupload</groupId>
            <artifactId>commons-fileupload</artifactId>
            <version>1.2.1</version>
        </dependency>

        <!--   Lombok  -->
        <dependency>
            <groupId>org.projectlombok</groupId>
            <artifactId>lombok</artifactId>
            <version>1.18.0</version>
            <scope>provided</scope>
        </dependency>

    </dependencies>

    <build>
        <plugins>

            <!--  maven编译插件 -->
            <plugin>
                <groupId>org.apache.maven.plugins</groupId>
                <artifactId>maven-compiler-plugin</artifactId>
                <version>3.8.1</version>
                <configuration>
                    <release>11</release>
                </configuration>
            </plugin>

        </plugins>
    </build>

</project>
3.3.4 导入工具类及配置文件
- 导入连接池工具类以及数据库配置文件
3.3.5 导入实体类
1) Lombok介绍
在项目中使用Lombok可以减少很多重复代码的书写。比如说getter/setter/toString等方法的编写。
2) IDEA中安装 lombok插件
打开IDEA的Setting –> 选择Plugins选项 –> 搜索lombok –> 点击安装 –> 安装完成重启IDEA
3) 添加依赖
在项目中添加Lombok依赖jar,在pom文件中添加如下部分
<dependency>
    <groupId>org.projectlombok</groupId>
    <artifactId>lombok</artifactId>
    <version>1.18.0</version>
    <scope>provided</scope>
</dependency>
4) Lombok常用注解
-
@Getter/@Setter: 作用类上,生成所有成员变量的getter/setter方法
-
@ToString : 作用于类,覆盖默认的toString()方法 ,可以通过of属性限定显示某些字段,通过exclude属性排除某些字段
-
@AllArgsConstructor:生成全参构造器
-
@NoArgsConstructor:生成无参构造器
-
@Data: 该注解使用在类上,该注解会提供
getter、setter、equals、hashCode、toString方法(编译的时候自动提供)。
5) 导入表对应的实体类
3.4 通用Servlet
3.4.1 需求分析
- 课程模块下有两个子模块:
-
- 课程模块
- 营销信息
- 配置课时(课程内容管理)
- 课程模块
每个模块下都有很多的功能, 比如课程模块 的 新建课程, 上架课程,下架课程,根据课程名查询等等功能 , 每一个功能都是一个Servlet.
- 问题: 一个功能就是一个Servlet, 那么一个项目下有海量的Servlet, 这种方式好吗 ?
- Servlet太多了,不好管理, 而且Servlet越多 服务器运行就越慢,资源消耗就越多.
3.4.2 Servlet对应模块
我们使用一个Servlet对应一个模块的方式进行开发
index.jsp
<%@ page contentType="text/html;charset=UTF-8" language="java" %>
<html>
  <head>
    <title>$Title$</title>
  </head>
  <body>
    <%--  一个模块对应一个Servlet  --%>
    <a href="${pageContext.request.contextPath}/test?methodName=addCourse">新建课程</a>
    <a href="${pageContext.request.contextPath}/test?methodName=findByName">根据课程名查询</a>
    <a href="${pageContext.request.contextPath}/test?methodName=findByStatus">根据状态查询</a>
  </body>
</html>
TestServlet
/**
 *  模拟课程模块 ,模块中有很多功能
 * */
@WebServlet("/test")
public class TestServlet extends HttpServlet {


    /**
     *  doGet()方法作为调度器 控制器,根据请求的功能不同,调用对应的方法
     *
     * */
    @Override
    protected void doGet(HttpServletRequest req, HttpServletResponse resp) throws ServletException, IOException {


        //1.获取参数
        //获取要调用的方法名
        String methodName = req.getParameter("methodName");

        //2.业务处理
        //判断 执行对应的方法
        if("addCourse".equals(methodName)){


            addCourse(req,resp);

        }else if("findByStatus".equals(methodName)){


            findByName(req,resp);

        }else if("findByStatus".equals(methodName)){


            findByStatus(req,resp);

        }else{


            System.out.println("访问的功能不存在!");
        }

    }

    @Override
    protected void doPost(HttpServletRequest req, HttpServletResponse resp) throws ServletException, IOException {


        doGet(req,resp);
    }


    /**
     *  2.模块对应的功能部分
     * */
    public void addCourse(HttpServletRequest req, HttpServletResponse resp){


        System.out.println("新建课程");
    }

    public void findByStatus(HttpServletRequest req, HttpServletResponse resp){


        System.out.println("根据状态查询");
    }

    public void findByName(HttpServletRequest req, HttpServletResponse resp){


        System.out.println("根据课程名称查询");
    }

}
3.4.3 提高代码的可维护行
我们可以使用反射去对代码进行优化, 提升代码的可维护性/可扩展性.
[外链图片转存失败,源站可能有防盗链机制,建议将图片保存下来直接上传(img-vBlGunwP-1611223328945)(…\02_图片\51.jpg)]
反射的知识回顾:
第一步:先获取请求携带的方法参数值
第二步:获取指定类的字节码对象
第三步:根据请求携带的方法参数值,再通过字节码对象获取指定的方法
第四步:最后执行指定的方法
/**
 *  模拟课程模块 ,模块中有很多功能
 * */
@WebServlet("/test")
public class TestServlet extends HttpServlet {


    /**
     *  doGet()方法作为调度器 控制器,根据请求的功能不同,调用对应的方法
     *
     * */
    @Override
    protected void doGet(HttpServletRequest req, HttpServletResponse resp) throws ServletException, IOException {


        try {


            //1.获取参数
            //获取要调用的方法名
            String methodName = req.getParameter("methodName");

            //2.业务处理
            if(methodName != null){


                //通过反射优化代码,提升代码的可维护性
                //1.获取字节码对象  this = TestServlet对象
                Class c = this.getClass();

                //2.根据传入的方法名, 获取对应方法对象,执行方法即可
                Method method = c.getMethod(methodName, HttpServletRequest.class, HttpServletResponse.class);

                //3.调用Method对象的 invoke()方法,执行对应的功能
                method.invoke(this,req,resp);
            }
        } catch (Exception e) {


            System.out.println("请求的功能不存在! !");
            e.printStackTrace();
        }

    }

    @Override
    protected void doPost(HttpServletRequest req, HttpServletResponse resp) throws ServletException, IOException {


        doGet(req,resp);
    }


    /**
     *  2.模块对应的功能部分
     * */
    public void addCourse(HttpServletRequest req, HttpServletResponse resp){


        System.out.println("新建课程");
    }

    public void findByStatus(HttpServletRequest req, HttpServletResponse resp){


        System.out.println("根据状态查询");
    }

    public void findByName(HttpServletRequest req, HttpServletResponse resp){


        System.out.println("根据课程名称查询");
    }
}
3.4.4 抽取通用的BaseServlet
当前代码依然存在问题:
每个Servlet都需要写一份相同的反射代码
解决方案:
将反射相关的代码抽取到一个类中 BaseServlet, 让BaseServlet去继承HTTPServlet
- BaseServlet
public class BaseServlet extends HttpServlet {


    @Override
    protected void doGet(HttpServletRequest req, HttpServletResponse resp) throws ServletException, IOException {


        try {


            //1.获取参数
            //获取要调用的方法名
            String methodName = req.getParameter("methodName");

            //2.业务处理
            if(methodName != null){


                //通过反射优化代码,提升代码的可维护性
                //1.获取字节码对象  this = TestServlet对象
                Class c = this.getClass();

                //2.根据传入的方法名, 获取对应方法对象,执行方法即可
                Method method = c.getMethod(methodName, HttpServletRequest.class, HttpServletResponse.class);

                //3.调用Method对象的 invoke()方法,执行对应的功能
                method.invoke(this,req,resp);
            }
        } catch (Exception e) {


            System.out.println("请求的功能不存在! !");
            e.printStackTrace();
        }
    }

    @Override
    protected void doPost(HttpServletRequest req, HttpServletResponse resp) throws ServletException, IOException {


        doGet(req,resp);
    }
}
- 修改 TestServlet,继承 BaseServlet
@WebServlet("/test")
public class TestServlet extends BaseServlet {


    /**
     *  在模块对应的Servlet中只保留 业务相关代码
     *  当有请求访问到 TestServlet时, 发现没有doGet和doPost方法,就回去父类中找,从而执行BaseServlet中的
     *  doGet方法
     * */
    public void addCourse(HttpServletRequest req, HttpServletResponse resp){


        System.out.println("新建课程");
    }

    public void findByStatus(HttpServletRequest req, HttpServletResponse resp){


        System.out.println("根据状态查询");
    }

    public void findByName(HttpServletRequest req, HttpServletResponse resp){


        System.out.println("根据课程名称查询");
    }
}
4. JSON
4.1 JSON简述
JSON(JavaScript Object Notation) JavaScript对象表示法(JSON源于JS)。
JSON(JavaScript Object Notation, JS 对象简谱) 是一种轻量级的数据交换格式。它基于 ECMAScript (欧洲计算机协会制定的js规范)的一个子集,采用完全独立于编程语言的文本格式来存储和表示数据。简洁和清晰的层次结构使得 JSON 成为理想的数据交换语言。 易于人阅读和编写,同时也易于机器解析和生成,并有效地提升网络传输效率。
JSON的特点:
- JSON 是一种轻量级的数据交换格式。
- JSON采用完全独立于语言的文本格式,就是说不同的编程语言JSON数据是一致的。
- JSON易于人阅读和编写,同时也易于机器解析和生成(一般用于提升网络传输速率)。
4.2 XML与JSON的区别
-
XML : 可扩展标记语言,是一种用于标记电子文件使其具有结构性的标记语言。
-
JSON: (JavaScript Object Notation, JS 对象简谱) 是一种轻量级的数据交换格式。
-
相同点:
- 它们都可以作为一种数据交换格式。
-
二者区别:
-
XML是重量级的,JSON是轻量级的,XML在传输过程中比较占带宽,JSON占带宽少,易于压缩。
-
XML和json都用在项目交互下,XML多用于做配置文件,JSON用于数据交互
-
JSON独立于编程语言存在,任何编程语言都可以去解析json
-
4.3 JSON语法格式
我们先来看一下JSON数据:
{
	"id": 110,
	"name": "李会长",
	"age": 24
}
语法注意:
- 外面由{}括起来
- 数据以"键:值"对的形式出现(其中键多以字符串形式出现,值可取字符串,数值,甚至其他json对象)
- 每两个"键:值"对以逗号分隔(最后一个"键:值"对省略逗号
- 参数值如果是string类型,就必须加引号,如果是数字类型,引号可加可不加
遵守上面4点,便可以形成一个json对象。
代码示例:
<!DOCTYPE html>
<html lang="en">
<head>
    <meta charset="UTF-8">
    <title>Title</title>
<script typet="text/javascript" src="http://libs.baidu.com/jquery/1.9.1/jquery.min.js"></script>

    <script>

        //自定义JSON数据格式 (Java中的对象)
        var person = {"name":"tom","sex":"女", "age":12};
        console.log(person);

        //数组格式
        var persons = {"person":[{"name":"tom","sex":"女", "age":12},{"name":"jack","sex":"男", "age":22}]};
        console.log(persons);

        var persons1 = {"person":[{"name":"tom","sex":"女","age":12},{"name":"jack","sex":"女","age":12}],
            "person1":[{"name":"tom1","sex":"女","age":12},{"name":"jack1","sex":"女","age":12}]}
        console.log(persons1);

        //集合
        var list = [{"name":"老五","sex":"女", "age":12},{"name":"会长","sex":"男", "age":12}];
        console.log(list);

    </script>
</head>
<body>

</body>
</html>
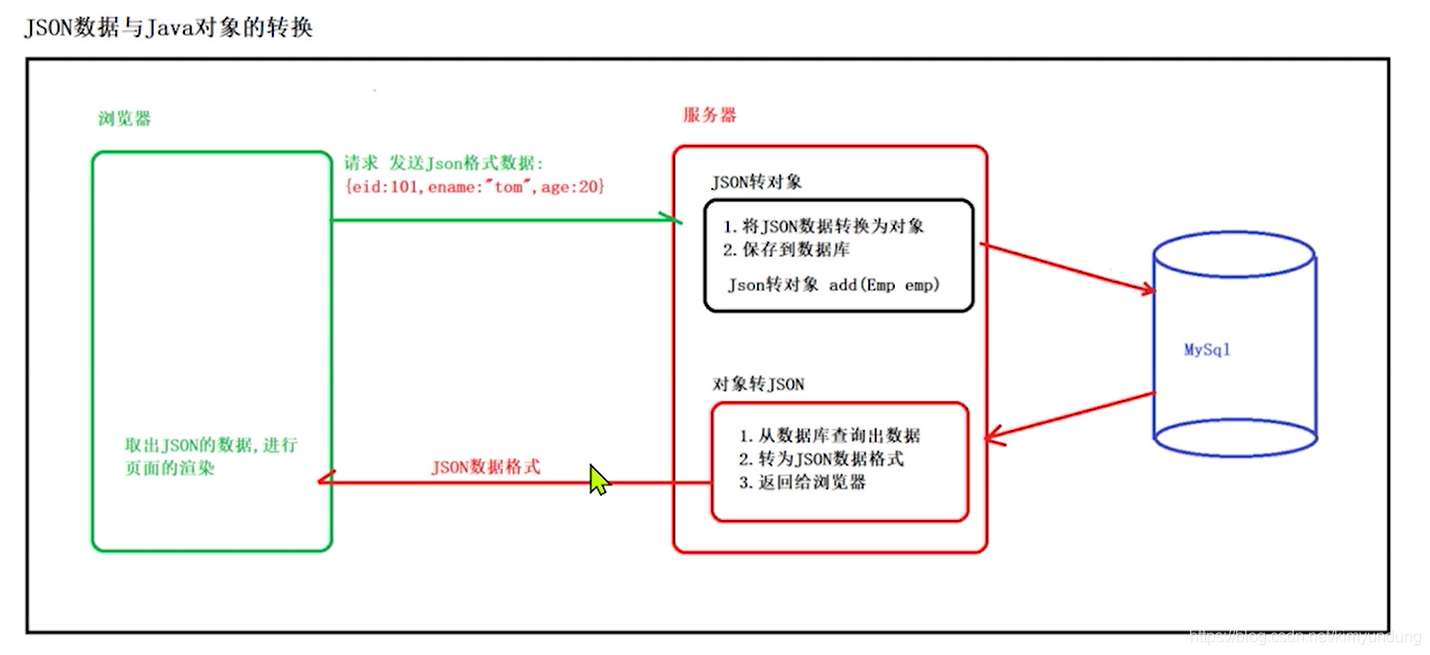
4.4 JSON数据的转换
目前, 前后端的ajax通讯几乎用的都是json格式的了,所以在开发的过程中,我们经常会涉及到JSON数据的转换
4.4.1 FastJson介绍
- Fastjson 是一个 Java 库,可以将 Java 对象转换为 JSON 格式,当然它也可以将 JSON 字符串转换为 Java 对象。
- FastJson特点如下:
- 能够支持将java bean序列化成JSON字符串,也能够将JSON字符串反序列化成Java bean。
- 顾名思义,FastJson操作JSON的速度是非常快的。
- 无其他包的依赖, 使用比较方便。
4.4.2 FastJson的使用
- 在Maven项目中使用FastJson库,需要提前在Maven的配置文件中添加此FastJson包的依赖
<dependency>
    <groupId>com.alibaba</groupId>
    <artifactId>fastjson</artifactId>
    <version>1.2.3</version>
</dependency>

<dependency>
    <groupId>com.colobu</groupId>
    <artifactId>fastjson-jaxrs-json-provider</artifactId>
    <version>0.3.1</version>
</dependency>
4.4.2 将 Java 对象转换为 JSON 格式
- 定义一个名为 Person 的 JavaBean类
@Data
@AllArgsConstructor
@NoArgsConstructor
public class Person {


    private String username;

    private int age;

    private String birthday;

 	get/set
}
- 可以使用 JSON.toJSONString() 将 Java 对象转换换为 JSON 对象:
public class TestFastJSON {


    //Java对象转JSON
    @Test
    public void javaBeanToJSON(){


        //创建Person对象
        Person p = new Person("码云",15, DateUtils.getDateFormart());

        //使用JSON对象的 toString方法将对象转换为JOSN数据
        String s = JSON.toJSONString(p);

        System.out.println(s); //{"age":15,"birthday":"2020-07-03 19:54:33","username":"码云"}
    }


    //List集合转Json
    @Test
    public void ListToJSON(){


        //创建Person对象
        Person p1 = new Person("码云",15, DateUtils.getDateFormart());
        Person p2 = new Person("虎子",13, DateUtils.getDateFormart());
        Person p3 = new Person("小斌",18, DateUtils.getDateFormart());

        List<Person> list = new ArrayList<>();

        Collections.addAll(list,p1,p2,p3);

        //使用JSON对象的 toString方法将对象转换为JOSN数据
        String s = JSON.toJSONString(list);

        System.out.println(s);
        /*
	        [
		        {"age":15,"birthday":"2020-07-03 19:59:05","username":"码云"},
		        {"age":13,"birthday":"2020-07-03 19:59:05","username":"虎子"},
		        {"age":18,"birthday":"2020-07-03 19:59:05","username":"小斌"}
	        ]
        */
    }
}
- Fastjson中的 @JSONField 注解
- 通过 @JSONField 我们可以自定义字段的名称进行输出,并控制字段的排序,还可以进行序列化标记。
- 指定name属性, 字段的名称
- 使用 ordinal属性, 指定字段的顺序
- 使用 serialize属性, 指定字段不序列化
@Data
public class Person {


    //自定义输出的名称, 并且进行输出排序
    @JSONField(name="USERNAME",ordinal = 1)
    private String username;

    @JSONField(name="AGE",ordinal = 2)
    private int age;

    //排除不需要序列化的字段
    @JSONField(serialize = false)
    private String birthday;

    public Person() {


    }

    public Person(String username, int age, String birthday) {


        this.username = username;
        this.age = age;
        this.birthday = birthday;
    }
}
    // Java对象转换为JSON
    @Test
    public void javaBeanToJSON(){


        // 1.创建Person对象
        Person person = new Person("小斌",25, DateUtils.getDateFormart());
        // 2.使用JSON对象 将person对象转换为JSON数据
        String jsonString = JSON.toJSONString(person);
        System.out.println(jsonString);

        //@JSONField(name="USERNAME")
        // @JSONField(name="AGE")
        //{"AGE":25,"USERNAME":"小斌","birthday":"2021-01-22 13:07:16"}
        // age -> AGE  username -> USERNAME

        //@JSONField(name="USERNAME",ordinal = 1)
        //@JSONField(name="AGE",ordinal = 2)
        //@JSONField(ordinal = 3)
        //{"USERNAME":"小斌","AGE":25,"birthday":"2021-01-22 13:11:08"}
        // ordinal作用:顺序

		//@JSONField(serialize = false)
		//指定字段不序列化
		//{"USERNAME":"小斌","AGE":25}
    }
4.4.3 JSON 字符串转换为 Java 对象和集合
- JSON.parseObject()
- 可以使用 JSON.parseObject() 将 JSON 字符串转换为 Java 对象。
- 注意反序列化时为对象时,必须要有默认无参的构造函数,否则会报异常
- JSON.parseArray()
- 可以使用 JSON.parseArray() 将 JSON 字符串转换为 集合对象。
    //JSON转对象
    @Test
    public void JSONToJavaBean(){


        String json = "{\"age\":25,\"birthday\":\"2021-01-22 12:57:45\",\"username\":\"小斌\"}";
        //使用JSON对象的parseObject方法,将json转换为对象
        Person person = JSON.parseObject(json, Person.class);
        System.out.println(person);
        //Person(username=小斌, age=25, birthday=2021-01-22 12:57:45)
    }

    //JSON转集合
    @Test
    public void JSONToList(){


        String json = "[{\"USERNAME\":\"小斌\",\"AGE\":25},{\"USERNAME\":\"小斌\",\"AGE\":25},{\"USERNAME\":\"小斌\",\"AGE\":25}]";
        //视同JSON对象的parseArray方法,将json转换为集合
        List<Person> list = JSON.parseArray(json, Person.class);
        System.out.println(list);
        /*
            [
                Person(username=小斌, age=25, birthday=null),
                Person(username=小斌, age=25, birthday=null),
                Person(username=小斌, age=25, birthday=null)
            ]
         */
    }
任务二 课程管理模块开发1
1. 开发流程
1.1 需求分析
1.2 数据库表分析
这里展示的是我们需要使用的部分表字段
1.3 实体类设计
根据数据库中的Course表,对应创建 Course.java
-
使用 @JSONField(ordinal = int类型的值) , 指定排序的值,生成JSON时会按照指定顺序进行排序
-
使用 @JSONField(serialize = false) ,排除不需要转换的字段,另外fastjson还会自动排除为空的字段
/**
* 课程类
* */
@Data
public class Course implements Serializable {
//使用 JSONField 设置ordinal的值,来对转换成的JSON数据进行排序
//课程ID
@JSONField(ordinal = 1)
private int id;
//课程名称
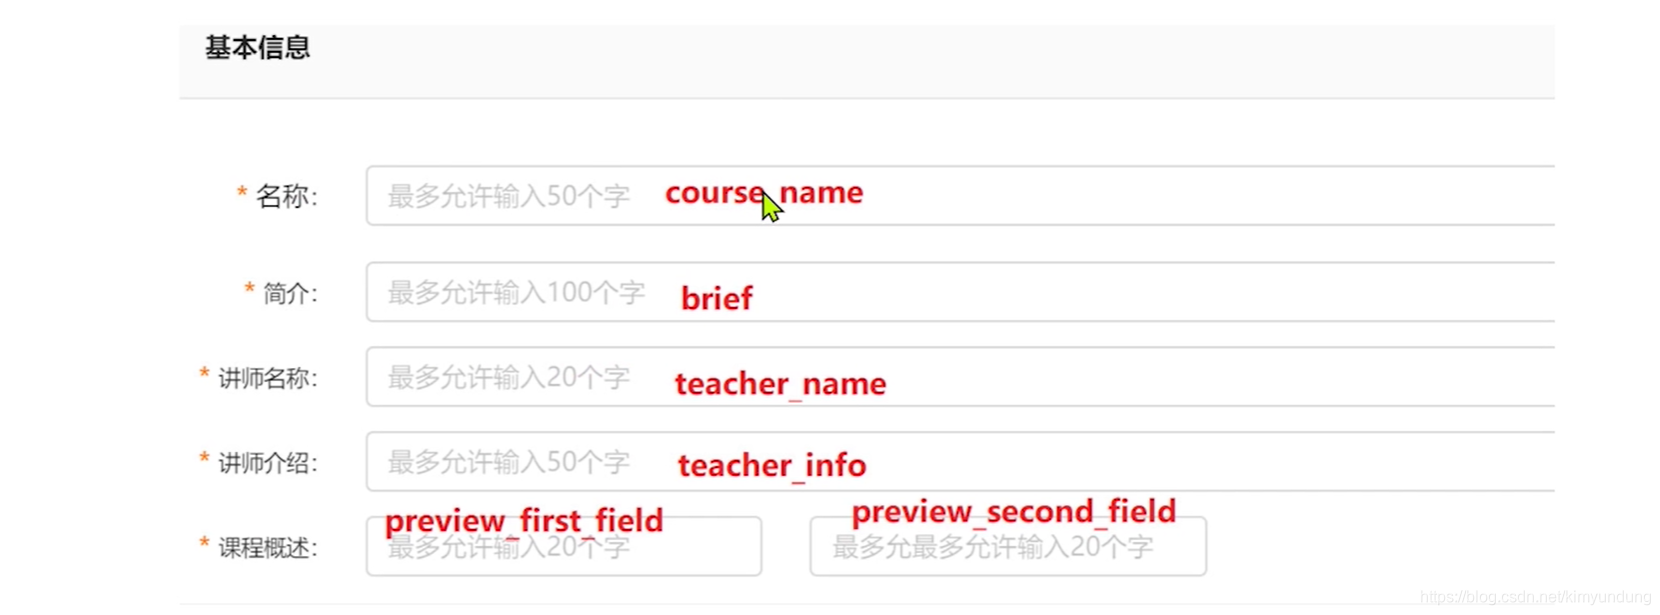
@JSONField(ordinal = 2)
private String course_name;
//课程介绍
@JSONField(ordinal = 3)
private String brief;
//讲师名称
@JSONField(ordinal = 4)
private String teacher_name;
//讲师介绍
@JSONField(ordinal = 5)
private String teacher_info;
//课程原价
@JSONField(ordinal = 6)
private double price;
//原价标签
@JSONField(ordinal = 7)
private String price_tag;
//课程优惠价
@JSONField(ordinal = 8)
private double discounts;
//课程概述
@JSONField(ordinal = 9)
private String preview_first_field;
//课程概述第二个字段
@JSONField(ordinal = 10)
private String preview_second_field;
//分享图片url
@JSONField(ordinal = 11)
private String course_img_url;
//分享标题
@JSONField(ordinal = 12)
private String share_title;
//分享描述
@JSONField(ordinal = 13)
private String share_description;
//课程描述
@JSONField(ordinal = 14)
private String course_description;
//排序
@JSONField(ordinal = 15)
private int sort_num;
//课程状态,0-草稿,1-上架
@JSONField(ordinal = 16)
private int status;
//创建时间
@JSONField(ordinal = 17)
private String create_time;
//修改时间
@JSONField(ordinal = 18)
private String update_time;
//是否删除
@JSONField(ordinal = 19)
private int isDel;
@JSONField(ordinal = 20)
private String share_image_title; //分享图title
//使用JSONField(serialize = false)排除不需要转换的字段
@JSONField(serialize = false)
private int total_course_time; //课时数
@JSONField(serialize = false)
private int sales; //显示销量
@JSONField(serialize = false)
private int actual_sales; //真实销量
@JSONField(serialize = false)
private int is_new; //是否新品
@JSONField(serialize = false)
private String is_new_des; //广告语
@JSONField(serialize = false)
private int last_operator_id; //最后操作者
@JSONField(serialize = false)
private int total_duration; //总时长
@JSONField(serialize = false)
private long course_type; //课程类型
@JSONField(serialize = false)
private String last_notice_time; //最后课程最近通知时间
@JSONField(serialize = false)
private long is_gray; //是否是灰度课程
@JSONField(serialize = false)
private long grade; //级别
}
1.4 Dao接口及实现类编写
/**
 * 课程模块 DAO层接口
 * */
public interface CourseDao {


}
/**
 * 课程模块 DAO层实现类
 * */
public class CourseDaoImpl implements CourseDao {


}
1.5 Service接口及实现类编写
/**
 *  课程模块 Service层 接口
 * */
public interface CourseService {


}
/**
 * 课程模块Service层 实现类
 * */
public class CourseServiceImpl implements CourseService {


}
1.6 CourseServlet编写
CourseServlet 要继承通用的BaseServlet.
@WebServlet(name="courseServlet",value="/course")
public class CourseServlet extends BaseServlet {


}
2. 功能一: 查询课程列表信息
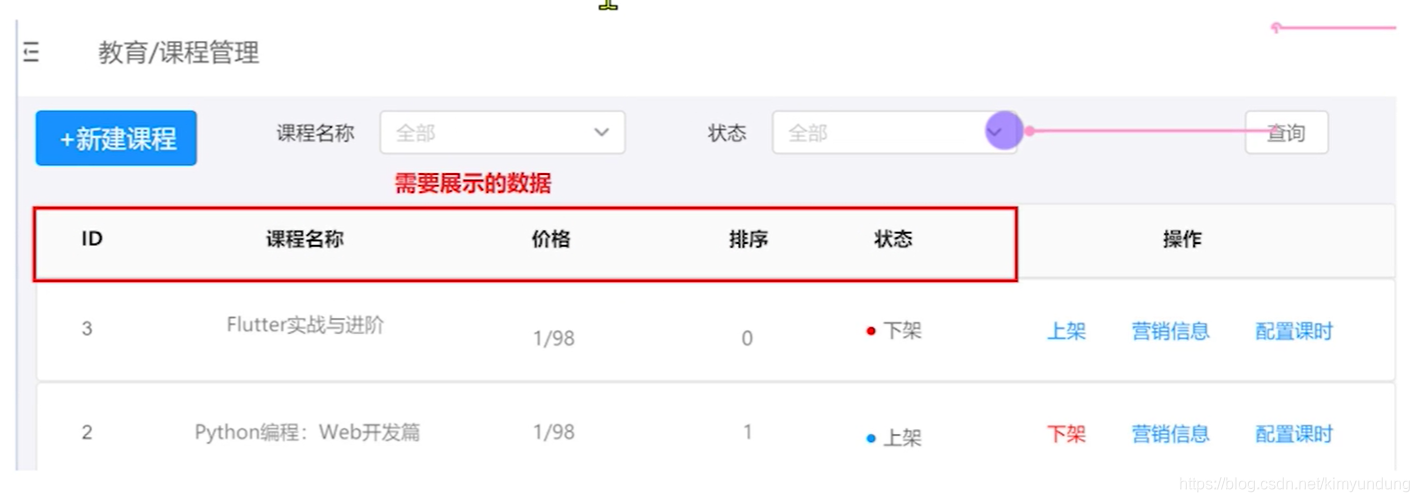
2.1 需求分析
页面分析,需要展示哪些数据
2.2 编写代码
2.2.1 Dao层编写
- 修改CourseDao,添加 findCourseList 方法
接口 CourseDao
    //查询课程列表信息
  	public List<Course> findCourseList();

实现类 CourseDaoImpl
	 @Override
    public List<Course> findCourseList() {


        try {


            //1.创建QueryRunner
            QueryRunner qr = new QueryRunner(DruidUtils.getDataSource());

            //2.编写SQL
       String sql = "SELECT id,course_name,price,sort_num,STATUS FROM course where id_del =  ?";

            //3.执行查询
          List<Course> courseList = qr.query(sql, new BeanListHandler<Course>(Course.class), 0);

            return courseList;

        } catch (SQLException e) {


            e.printStackTrace();
            return null;
        }
    }
逻辑删除
- 逻辑删除的本质是修改操作,所谓的逻辑删除其实并不是真正的删除,而是在表中将对应的是否删除标识,做修改操作。比如: 0是未删除,1是删除。在逻辑上数据是被删除的,但数据本身依然存在库中。
物理删除
- 物理删除就是真正的从数据库中做删除操作了。
2.2.2 Service层编写
修改CourseService 添加 findCourseList 方法
接口 CourseService
	public List<Course> findCourseList();

实现类 CourseServiceImpl
	//创建 CourseDao
    CourseDao courseDao = new CourseDaoImpl();

    @Override
    public List<Course> findCourseList() {


        //调用Dao 进行查询
        return courseDao.findCourseList();
    }
2.2.3 Servlet编写
2.2.3.1 接口开发规范
我们在做的是一个前后端分离项目、需要通过接口文档对接的项目. 所以开发过程中要仔细查看前端所需的api接口和参数字段
为了严格按照接口进行开发,提高效率,对请求及响应格式进行规范化。
| 开发规范 |
|---|
| 1、get 请求时,采用key/value格式请求,Servlet中可以使用 getParameter() 获取。 |
| 2、post请求时有三种数据格式 第一种: Json数据 ,jsonl类型的数据 Servlet中使用 fastjson进行解析 第二种: 提交form表单数据 第三种: 文件等多部件类型(multipart/form-data) |
| 3、响应结果统一格式为json |
为什么使用JSON?
数据格式比较简单, 易于读写, JSON格式能够直接为服务器端代码使用, 大大简化了服务器端和客户端的代码开发量, 但是完成的任务不变, 且易于维护
本项目使用的是 JSON解析工具为阿里巴巴的fastjson, maven工程导入下面的依赖即可.
<dependency>
    <groupId>com.alibaba</groupId>
    <artifactId>fastjson</artifactId>
    <version>1.1.37</version>
</dependency>

<dependency>
    <groupId>com.colobu</groupId>
    <artifactId>fastjson-jaxrs-json-provider</artifactId>
    <version>0.3.1</version>
</dependency>
2.2.3.2 接口文档
前端的开发基于服务端编写的接口,如果前端人员等待服务端人员将接口开发完毕再去开发前端内容这样做效率是 非常低下的,所以当接口定义完成,可以使用工具生成接口文档,前端人员查看接口文档即可进行前端开发,这样 前端和服务人员并行开发,大大提高了生产效率.

2.2.3.3 编写CourseServlet
在CourseServlet中添加 findCourseList方法
@WebServlet("/course")
public class CourseServlet extends BaseServlet {


    //查询课程信息列表
    public void findCourseList(HttpServletRequest request, HttpServletResponse response){


        try {


            //1.接收参数

            //2.业务处理
            CourseService cs = new CourseServiceImpl();
            List<Course> courseList = cs.findCourseList();

            //3.响应结果
            //SimplePropertyPreFilter 指定要转换的JSON字段
            SimplePropertyPreFilter filter = new SimplePropertyPreFilter(Course.class,
                    "id","course_name","price","sort_num","status");

            String result = JSON.toJSONString(courseList,filter);
            response.getWriter().print(result);

        } catch (IOException e) {


            e.printStackTrace();
        }
    }
}
2.3 Postman
2.3.1 postMan介绍
Postman是一款功能强大的http接口测试工具,使用postman可以完成http各种请求的功能测试。
官方地址:https://www.getpostman.com/
安装Postman
本教程使用,双击打开 Postman-win64-6.0.10-Setup.exe
2.3.2 Postman使用
-
新建一个Postman窗口
File > New Postman Window > -
窗口介绍
2.3.3 使用postman测试接口
- 发送请求到指定的
http://localhost:8080/lagou_edu_home/course?methodName=findCourseList
2.3.4 创建模块将请求分类
-
创建课程模块
-
选择 Save As 将请求保存到对应模块中
-
描述一下请求的相关信息
3. 功能二: 多条件查询课程信息
3.1 需求分析
- 根据课程名称和课程状态进行查询

- 要查询的字段
id, course_name,price, sort_num, STATUS
- 查询条件
is_del
course_name
statuts
3.2 根据条件查询课程信息
3.2.2 Dao层编写
- 因为是多条件查询,所以要注意多个参数情况下,SQL的编写
接口
	/**
     * 根据课程名称,课程状态 查询课程信息
     * */
    public List<Course> findByCourseNameAndStatus(String courseName, String status);

实现类
	/**
     * 根据课程名称,课程状态 查询课程信息
     * */
    //根据条件查询课程信息
    @Override
    public List<Course> findByCourseNameAndStatus(String courseName, String status) {


        try {


            //1.创建QueryRunner
            QueryRunner qr = new QueryRunner(DruidUtils.getDataSource());

            //2.编写SQL 当前的查询为多条件不定项查询
            //2.1 创建StringBuffer 对象,将SQL字符串 添加进缓冲区
            StringBuffer sb = new StringBuffer("SELECT id,course_name,price,sort_num,STATUS FROM course WHERE 1=1 and is_del = ? ");

            //2.2 创建list集合 保存参数
            List<Object> list = new ArrayList<>();
            list.add(0);

            //2.3 判断传入的参数是否为空
            if(courseName != null && courseName != ""){


                sb.append(" AND course_name LIKE ?");
                //like查询 需要拼接 %
                courseName = "%"+courseName+"%";
                //将条件放进list集合
                list.add(courseName);
            }

            if(status != null && status != ""){


                sb.append("AND STATUS = ?");
                //将status 转换为 int
                int i = Integer.parseInt(status);
                list.add(i);
            }

            //执行查询
            List<Course> courseList = qr.query(sb.toString(), new BeanListHandler<Course>(Course.class), list.toArray());

            //返回结果
            return courseList;
        } catch (SQLException e) {


            e.printStackTrace();
            return null;
        }
    }
3.2.3 Service层编写
CourseService 接口

    public List<Course> findByCourseNameAndStatus(String courseName, String status);

CourseServiceImpl 实现类

	@Override
    public List<Course> findByCourseNameAndStatus(String courseName, String status) {


        return courseDao.findByCourseNameOrStatus(courseName,status);
    }
3.2.4 Servlet编写
在CourseServlet中添加 findByCourseNameOrStatus方法
 //根据条件查询课程信息
    public void findByCourseNameOrStatus(HttpServletRequest request , HttpServletResponse response){


        try {


            //1.接收参数
            String courseName = request.getParameter("course_name");
            String status = request.getParameter("status");

            //2.业务处理
            CourseService cs = new CourseServiceImpl();
            List<Course> courseList = cs.findByCourseNameOrStatus(courseName, status);

            //3.返回结果 响应JSON格式数据
            //使用 SimplePropertyPreFilter,指定要转换为JSON的字段
            SimplePropertyPreFilter filter =
                    new SimplePropertyPreFilter(Course.class,"id","course_name","price","sort_num","status");

            String result = JSON.toJSONString(courseList, filter);
            response.getWriter().println(result);

        } catch (IOException e) {


            e.printStackTrace();
        }
    }
3.2.5 接口测试
- 请查阅接口文档,使用postman进行接口测试.
4. 功能三: 新建课程营销信息
4.1 需求分析
- 选择新建课程,对课程营销信息进行录入
4.1.1 基本信息
4.1.2 销售信息

4.1.3 分享信息

4.1.4 课程详情

4.2 Dao层编写
接口

    //保存课程营销信息
    public int saveCourseSalesInfo(Course course);

实现类

   	//保存课程营销信息
    @Override
    public int saveCourseSalesInfo(Course course) {


        try {


            //1.创建QueryRunner
            QueryRunner qr = new QueryRunner(DruidUtils.getDataSource());

            //2.编写SQL
            String sql = "INSERT INTO course(\n" +
                    "course_name,\n" +
                    "brief,\n" +
                    "teacher_name,\n" +
                    "teacher_info,\n" +
                    "preview_first_field,\n" +
                    "preview_second_field,\n" +
                    "discounts,\n" +
                    "price,\n" +
                    "price_tag,\n" +
                    "share_image_title,\n" +
                    "share_title,\n" +
                    "share_description,\n" +
                    "course_description,\n" +
                    "course_img_url,\n" +
                    "STATUS,\n" +
                    "create_time,\n" +
                    "update_time\n" +
                    ")VALUES(?,?,?,?,?,?,?,?,?,?,?,?,?,?,?,?,?);";

            //3.准备参数
            Object[] param = {

    course.getCourse_name(),course.getBrief(),course.getTeacher_name(),course.getTeacher_info(),
            course.getPreview_first_field(),course.getPreview_second_field(),course.getDiscounts(),course.getPrice(),
            course.getPrice_tag(),course.getShare_image_title(),course.getShare_title(),course.getShare_description(),
            course.getCourse_description(),course.getCourse_img_url(),course.getStatus(),course.getCreate_time(),course.getUpdate_time()};

            //4.执行插入操作
            int row = qr.update(sql, param);

            return row;
        } catch (SQLException e) {


            e.printStackTrace();
            return 0;
        }
    }
4.3 Dao层方法测试
 	//测试保存课程营销信息
    @Test
    public void testSaveCourseSalesInfo(){


        //1.创建course对象
        Course course = new Course();
        course.setCourse_name("爱情36计");
        course.setBrief("学会去找对象");
        course.setTeacher_name("药水哥");
        course.setTeacher_info("人人都是药水哥");
        course.setPreview_first_field("共10讲");
        course.setPreview_second_field("每周日更新");
        course.setDiscounts(88.88);
        course.setPrice(188.0);
        course.setPrice_tag("最新优惠价");
        course.setShare_image_title("哈哈哈");
        course.setShare_title("嘻嘻嘻");
        course.setShare_description("天天向上");
        course.setCourse_description("爱情36计,就像一场游戏");
        course.setCourse_img_url("https://www.xx.com/xxx.jpg");
        course.setStatus(1); //1 上架 ,0 下架
        String formart = DateUtils.getDateFormart();
        course.setCreate_time(formart);
        course.setUpdate_time(formart);

        int i = courseDao.saveCourseSalesInfo(course);
        System.out.println(i);
    }
4.4 Service层编写
1.编写枚举类,设置响应状态码
public enum StatusCode {


    SUCCESS(0,"success"),
    FAIL(1,"fail");

    //定义属性
    private int code;
    private String message;

    //定义构造
    StatusCode(int code, String message) {


        this.code = code;
        this.message = message;
    }

    //get/set
    public int getCode() {


        return code;
    }

    public void setCode(int code) {


        this.code = code;
    }

    public String getMessage() {


        return message;
    }

    public void setMessage(String message) {


        this.message = message;
    }

    //重写toString,将枚举对象转化为JSON
    @Override
    public String toString() {


        JSONObject object = new JSONObject();
        object.put("status",code);
        object.put("msg",message);
        return object.toString();
    }
}
- 编写Service
接口
    public String saveCourseSalesInfo(Course course);

实现类
	@Override
    public String saveCourseSalesInfo(Course course) {


        //1.补全课程信息
        String dateFormart = DateUtils.getDateFormart();
        course.setCreate_time(dateFormart);
        course.setUpdate_time(dateFormart);
        course.setStatus(0);

        //2.调用Dao进行插入
        int i = courseDao.saveCourseSalesInfo(course);
        if(i > 0){


            //保存成功
            String result = StatusCode.SUCCESS.toString();
            return result;

        }else{


            //保存失败
            String result = StatusCode.FAIL.toString();
            return result;
        }
    }
4.5 文件上传
4.5.1 图片上传分析
在添加课程营销信息的表单中,有一个图片上传项

4.5.2 文件上传介绍
文件上传的实质:文件的拷贝
- 文件上传:从本地将文件拷贝到服务器磁盘上
- 客户端: 需要编写文件上传表单
- 服务端: 需要编写代码接受上传的 文件
4.5.3 客户端编码
- 文件上传三要素:
- 1.表单提交方式: post (get方式提交有大小限制,post没有)
- 2.表单的enctype属性:必须设置为 multipart/form-data.
- enctype就是encodetype就是编码类型的意思.
- multipart/form-data是多部件文件上传 , 指表单数据有多部分构成,既有文本数据,又有文件等二进制数据的意思。
- 3.表单必须有文件上传项: **file **,必须要有name属性和值

注意: 默认情况下,表单的enctype的值是application/x-www-form-urlencoded,不能用于文件上传,只有使用了multipart/form-data,才能完整的传递文件数据
- 代码示例
<%@ page contentType="text/html;charset=UTF-8" language="java" %>
<html>
<head>
    <title>Title</title>
</head>
<body>
    <%--
        表单提交必须是POST ,
        表单的enctype属性:必须设置为   multipart/form-data.
        input的type类型必须指定为: file, 一定要有name属性
        --%>
    <form action="${pageContext.request.contextPath}/upload" method="post" enctype="multipart/form-data">
        <input type="file" name="upload">
        <br>
        <input type="text" name="name">
        <input type="text" name="password">
        <input type="submit" value="文件上传">
    </form>
</body>
</html>
4.5.4 服务端编码
服务端要接收文件上传的表单数据
1. 上传文件, 抓包分析
使用360浏览器进行抓包,谷歌浏览器不方便查看

2. 服务端获上传的文件
-
通过request获取请求体的内容
-
解析请求体 多部件上传的特点是,每个input都是一个表单项.
根据分隔符将请求中所有的内容,切割成数组,数组中的每一个元素 都是一个表单项
-
遍历数组,分清楚那个是普通的表单项, 哪个是 文件上传项
如何区分? 判断是否有 filename
-
获取到普通表单项中的内容,通过属性name获取
-
获取文件上传项内容
文件名: filname = aaa.txt
文件内容:
-
使用IO将文件内容,保存到服务器中
4.5.5 FileUpload工具类
1. 导入依赖
FileUpload包可以很容易地将文件上传到你的Web应用程序.
IOUtils封装了Java中io的常见操作,使用十分方便 ,需要下载 commons-io-1.4.jar 包
<dependency>
    <groupId>commons-io</groupId>
    <artifactId>commons-io</artifactId>
    <version>1.4</version>
</dependency>

<dependency>
    <groupId>commons-fileupload</groupId>
    <artifactId>commons-fileupload</artifactId>
    <version>1.2.1</version>
</dependency>
2. FileUpload 核心类介绍
| 类名 | 介绍 |
|---|---|
| DiskFileItemFactory | 磁盘文件项工厂, 读取文件时相关的配置,比如: 缓存的大小 , 临时目录的位置 |
| ServletFileUplaod | 文件上传的一个核心类 |
| FileItem | 代表每一个表单项 |
3. 文件上传的API的详解
- ServletFileUpload
| 方法 | 说明 |
|---|---|
| isMultipartContent(request); | 判断是否是一个文件上传的表单 |
| parseRequest(request); | 解析request获得表单项的集合 |
| setHeaderEncoding(“UTF-8”); | 设置上传的文件名的编码方式 |
- FileItem
| 方法 | 说明 |
|---|---|
| isFormField() | 判断是否是普通表单项 |
| getFieldName() | 获得表单的name属性值 |
| item.getString() | 获得表单的value值 |
| getName() | 获得上传文件的名称 |
| getInputStream() | 获得上传文件 |
| delete() | 删除临时文件 |
4. 文件上传后台代码编写
FileUpload使用步骤:
1、创建磁盘文件项工厂
2、创建文件上传的核心类
3、解析request—获得文件项集合
4、遍历文件项集合
5、判断普通表单项/文件上传项
@WebServlet("/upload")
public class FileUploadServlet extends HttpServlet {


    @Override
    protected void doGet(HttpServletRequest req, HttpServletResponse resp) throws ServletException, IOException {


        try {


            //1.创建磁盘文件项工厂
            DiskFileItemFactory factory = new DiskFileItemFactory();

            //2.创建文件上传核心类
            ServletFileUpload upload = new ServletFileUpload(factory);
            //2.1 设置上传文件名的编码
            upload.setHeaderEncoding("utf-8");
            //2.2 判断表单是否是文件上传表单
            boolean multipartContent = upload.isMultipartContent(req);
            //2.3 是文件上传表单
            if(multipartContent){


                //3. 解析request ,获取文件项集合
                List<FileItem> list = upload.parseRequest(req);

                if(list != null){


                    //4.遍历获取表单项
                    for (FileItem item : list) {


                        //5. 判断是不是一个普通表单项
                        boolean formField = item.isFormField();
                        if(formField){


                            //普通表单项, 当 enctype="multipart/form-data"时, request的getParameter()方法 无法获取参数
                            String fieldName = item.getFieldName();
                            String value = item.getString("utf-8");//设置编码
                            System.out.println(fieldName + "=" + value);
                        }else{


                            //文件上传项
                            //文件名
                            String fileName = item.getName();

                            //避免图片名重复 拼接UUID
                            String newFileName = UUIDUtils.getUUID()+"_"+ fileName;

                            //获取输入流
                            InputStream in = item.getInputStream();

                            //创建输出流 输出到H盘
                            FileOutputStream fos = new FileOutputStream("H:/upload/" +newFileName);

                            //使用工具类IOUtils,copy文件
                            IOUtils.copy(in,fos);

                            //关闭流
                            fos.close();
                            in.close();

                        }

                    }
                }
            }
        } catch (FileUploadException e) {


            e.printStackTrace();
        }

    }

    @Override
    protected void doPost(HttpServletRequest req, HttpServletResponse resp) throws ServletException, IOException {


        doGet(req, resp);
    }

}
4.5.6 将图片上传到tomcat服务器
1. 将项目部署到webapps
将部署方式改变为 war模式,把项目部署在tomcat的webapps下
- idea中部署项目两种方式
- war模式:将项目以war包的形式上传真实到服务器的webapps目录中;
- war exploded模式:仅仅是目录的映射,就相当于tomcat在项目源文件夹中启动一样;

2.在webapps中创建upload目录
upload目录专门用来保存上传过来的图片
3.修改代码,将图片上传到服务器
- 修改图片的输出路径
- 获取到项目的运行目录信息
- 截取到webapps的 目录路径
- 拼接输出路径,将图片保存到upload
@Override
    protected void doGet(HttpServletRequest req, HttpServletResponse resp) throws ServletException, IOException {


        try {


            //1.创建磁盘文件项工厂
            DiskFileItemFactory factory = new DiskFileItemFactory();

            //2.创建文件上传核心类
            ServletFileUpload upload = new ServletFileUpload(factory);
            //2.1 设置上传文件名的编码
            upload.setHeaderEncoding("utf-8");
            //2.2 判断表单是否是文件上传表单
            boolean multipartContent = upload.isMultipartContent(req);
            //2.3 是文件上传表单
            if(multipartContent){


                //3. 解析request ,获取文件项集合
                List<FileItem> list = upload.parseRequest(req);

                if(list != null){


                    //4.遍历获取表单项
                    for (FileItem item : list) {


                        //5. 判断是不是一个普通表单项
                        boolean formField = item.isFormField();
                        if(formField){


                            //普通表单项, 当 enctype="multipart/form-data"时, request的getParameter()方法 无法获取参数
                            String fieldName = item.getFieldName();
                            String value = item.getString("utf-8");//设置编码
                            System.out.println(fieldName + "=" + value);
                        }else{


                            //文件上传项
                            //文件名
                            String fileName = item.getName();
                            //避免图片名重复 拼接UUID
                            String newFileName = UUIDUtils.getUUID()+"_"+ fileName;

                            //获取上传文件的内容
                            InputStream in = item.getInputStream();

                            String path = this.getServletContext().getRealPath("/");

                            //获取到 webapps路径
                            String webappsPath = path.substring(0, path.indexOf("lagou_edu_home"));
                            OutputStream out = new FileOutputStream(webappsPath+"/upload/"+newFileName);
                            //拷贝文件到服务器
                            IOUtils.copy(in,out);

                            out.close();
                            in.close();
                        }

                    }
                }
            }
        } catch (FileUploadException e) {


            e.printStackTrace();
        }

    }
4. 页面加载图片
将tomcat作为图片服务器使用时,存储上传的图片后,如果想要图片可以访问,需要在idea中进行配置:
-
选择external source —> 找到webapps目录下的的upload文件夹
Edit Configurations > Deployment > + > external source —> 找到webapps目录下的的upload文件夹 -
上传一张图片到服务器
-
在项目内部页面加载图片
<img src="/upload/abbd99891af442a8a9cb65848744452e_qiyu.jpg">
- 也可以通过HTTP方式访问
http://localhost:8080/upload/abbd99891af442a8a9cb65848744452e_qiyu.jpg
4.6 BeanUtils工具类
- 介绍
BeanUtils 是 Apache commons组件的成员之一,主要用于简化JavaBean封装数据的操作。可以将一个表单提交的所有数据封装到JavaBean中。
- 导入依赖
<dependency>
    <groupId>commons-beanutils</groupId>
    <artifactId>commons-beanutils</artifactId>
    <version>1.8.3</version>
</dependency>
- BeanUtils 对象常用方法
| 方法 | 描述 |
|---|---|
| populate(Object bean, Map properties) | 将Map数据封装到指定Javabean中, 一般用于将表单的所有数据封装到javabean |
| setProperty(Object obj,String name,Object value) | 设置属性值 |
| getProperty(Object obj,String name) | 获得属性值 |
- BeanUtils 使用测试
public class TestBeanUtils {


    @Test
    public void test01() throws InvocationTargetException, IllegalAccessException, NoSuchMethodException {


        //1.创建course对象
        Course course = new Course();

        //2.创建Map
        Map<String,Object> map = new HashMap<>();

        //3.向map集合中添加数据, key要与course的属性名保持一致,value的数据类型与course的属性的类型保持一致
        map.put("id",1);
        map.put("course_name","大数据");
        map.put("brief","课程包含所有大数据流行的技术");
        map.put("teacher_name","周星星");
        map.put("teacher_info","非著名演员");

        //将map中的数据封装到 course中
        BeanUtils.populate(course,map);

        System.out.println(course.getId()+" " + course.getCourse_name() +" " +course.getBrief()
        +"   "+course.getTeacher_name()+" " +course.getTeacher_info());

        //设置属性 获取属性
        BeanUtils.setProperty(course,"price",100.0);

        String price = BeanUtils.getProperty(course, "price");

        System.out.println(price);
    }
}
4.7 Servlet编写
4.7.1 CourseSalesInfoServlet
创建CourseSalesInfoServlet类,继承HttpServlet , 完成保存课程营销信息操作.
因为上传的信息包含文件信息,无法直接通过request直接获取参数,所以不能继承BaseServlet
@WebServlet("/courseSalesInfo")
public class CourseSalesInfoServlet  extends HttpServlet {


    /**
     * 保存课程营销信息
     *      收集表单数据,封装到course对象中,将图片上传到tomcat服务器中
     * */
    @Override
    protected void doGet(HttpServletRequest req, HttpServletResponse resp) throws ServletException, IOException {


        try {


            //1.创建Course对象
            Course course = new Course();

            //2.创建Map集合,用来收集数据
            Map<String,Object> map = new HashMap<>();

            //3.创建磁盘工厂对象
            DiskFileItemFactory factory = new DiskFileItemFactory();

            //4.文件上传核心对象
            ServletFileUpload fileUpload = new ServletFileUpload(factory);

            //5.解析request对象,获取表单项集合
            List<FileItem> list = fileUpload.parseRequest(req);

            //6.遍历集合 判断哪些是普通的表单项,那些是文件表单项
            for (FileItem item : list) {


                boolean formField = item.isFormField();
                if(formField){


                    //是普通表单项,获取表单项中的数据,保存到map
                    String fieldName = item.getFieldName();
                    String value = item.getString("UTF-8");
                    System.out.println(fieldName +" " + value);
                    //使用map收集数据
                    map.put(fieldName,value);
                }else{


                    //文件上传项
                    //获取文件名
                    String fileName = item.getName();
                    String newFileName = UUIDUtils.getUUID()+"_"+fileName;

                    //获取输入流
                    InputStream in = item.getInputStream();

                    //获取webapps的目录路径
                    String realPath = this.getServletContext().getRealPath("/");
                    String wabappsPath = realPath.substring(0, realPath.indexOf("lagou_edu_home"));

                    //创建输出流
                    OutputStream out = new FileOutputStream(wabappsPath+"/upload/" + newFileName);

                    IOUtils.copy(in,out);
                    out.close();
                    in.close();

                    //将图片路径进行保存
                    map.put("course_img_url", Constants.LOCAL_URL+"/upload/" + newFileName);
                }
            }

            //使用BeanUtils 将map中的数据封装到course对象
            BeanUtils.populate(course,map);

            String dateFormart = DateUtils.getDateFormart();
            CourseService cs = new CourseServiceImpl();

            if(map.get("id") != null){


                //修改操作
                //补全信息
                course.setUpdate_time(dateFormart);//修改时间
                String result = cs.updateCourseSalesInfo(course);
                //响应结果
                resp.getWriter().print(result);

            }else{


                //新建操作
                //补全信息
                course.setCreate_time(dateFormart);//创建时间
                course.setUpdate_time(dateFormart);//修改时间
                course.setStatus(1); //上架
                String result = cs.saveCourseSalesInfo(course);
                //响应结果
                resp.getWriter().print(result);
            }

        } catch (Exception e) {


            e.printStackTrace();
        }

    }

    @Override
    protected void doPost(HttpServletRequest req, HttpServletResponse resp) throws ServletException, IOException {


        doGet(req, resp);
    }
}
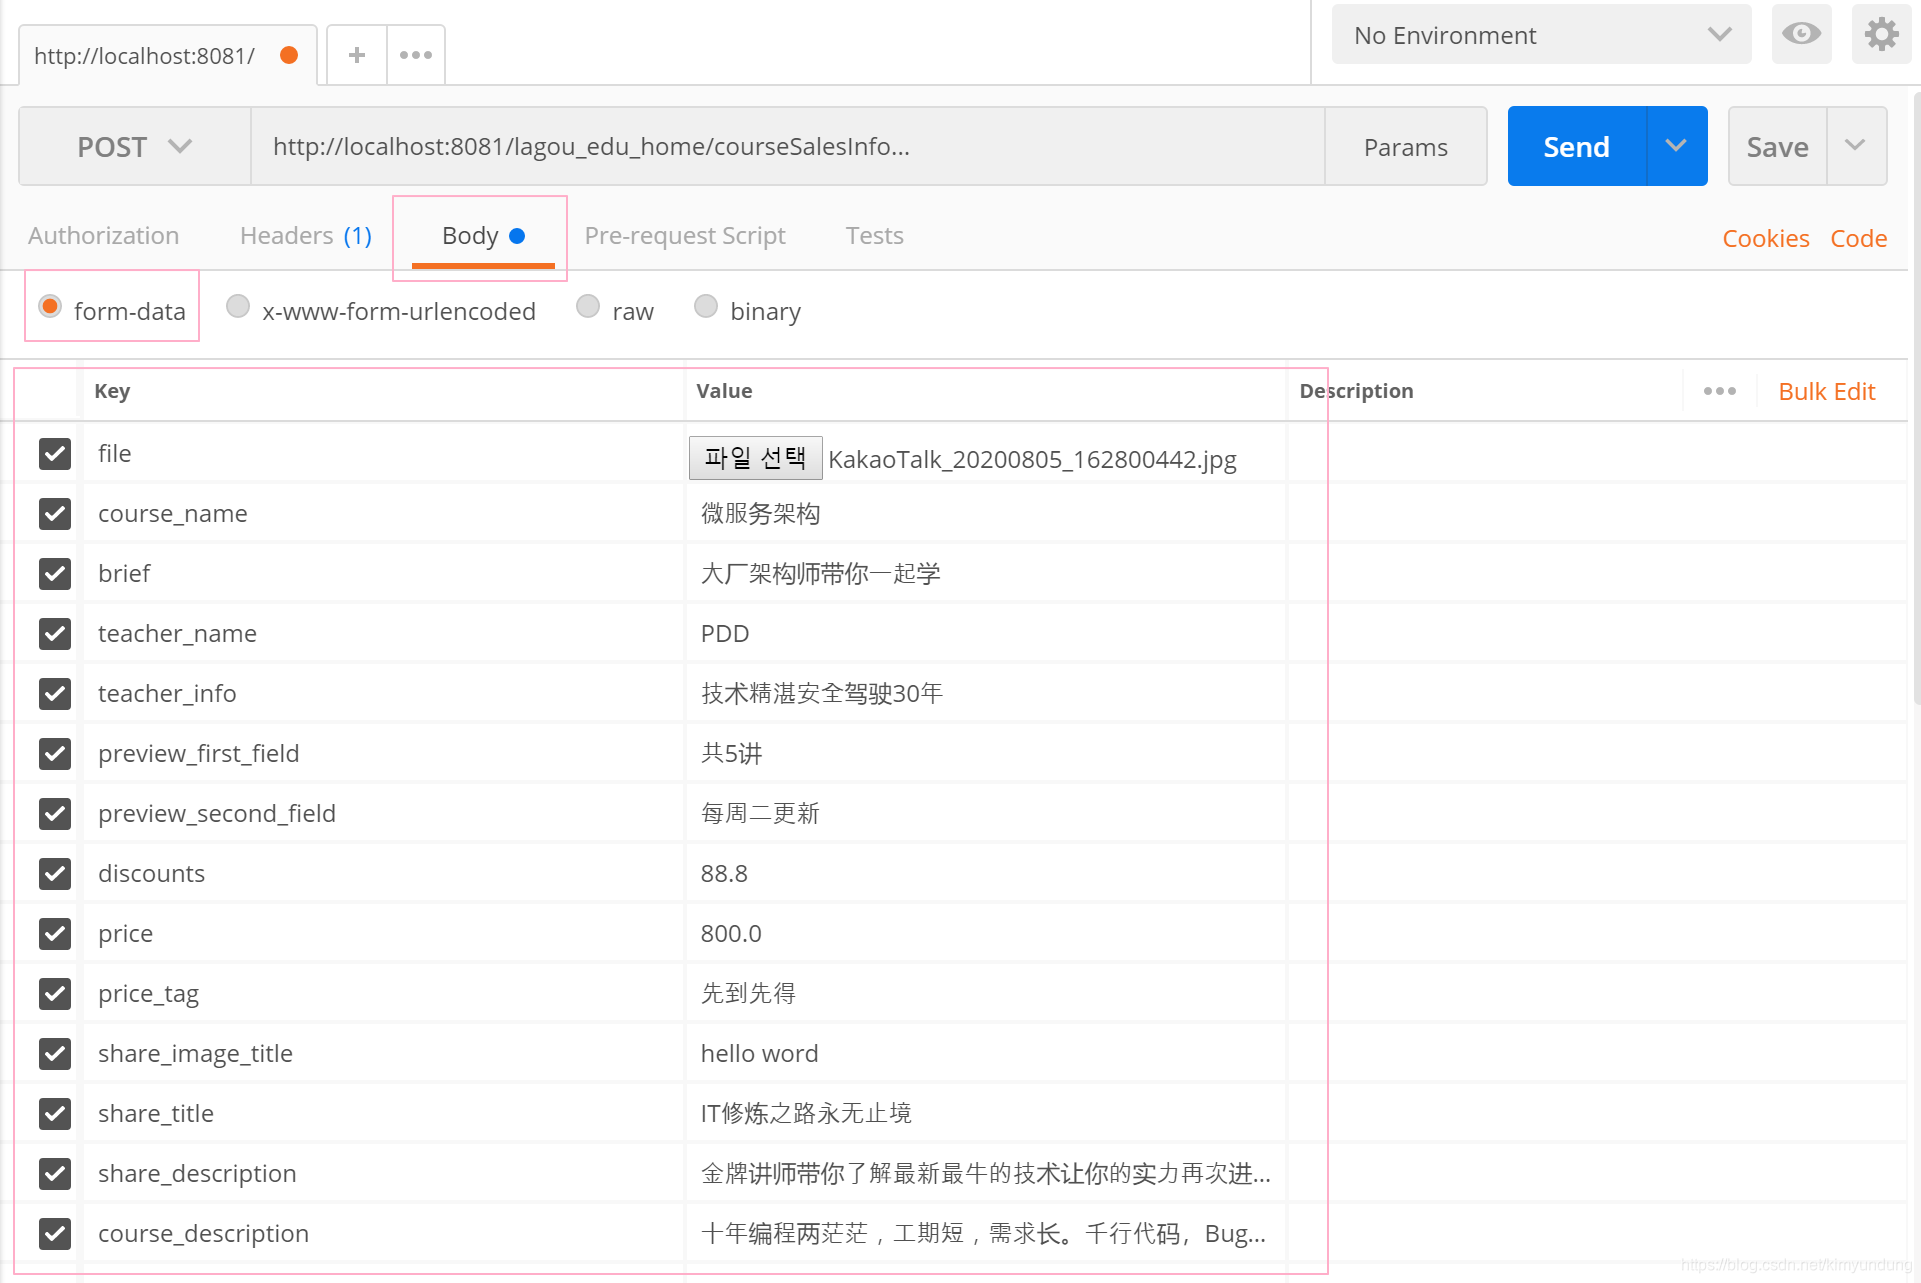
4.7.2 接口测试
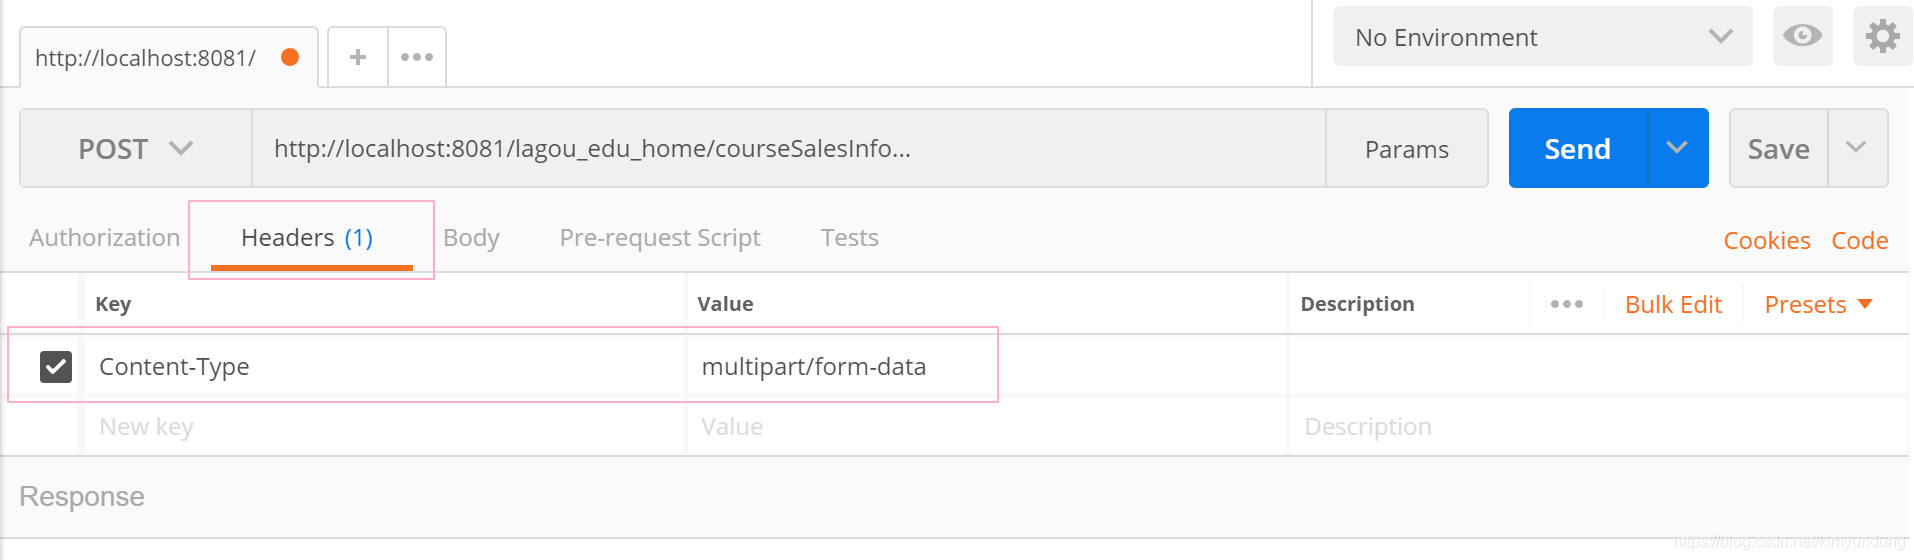
postman测试上传文件
- 接口地址填写正确
- 将请求方式设置为POST
- 需要上传文件, 设置Headers: “key”:“Content-Type”, “value”:"multipart/form-data"
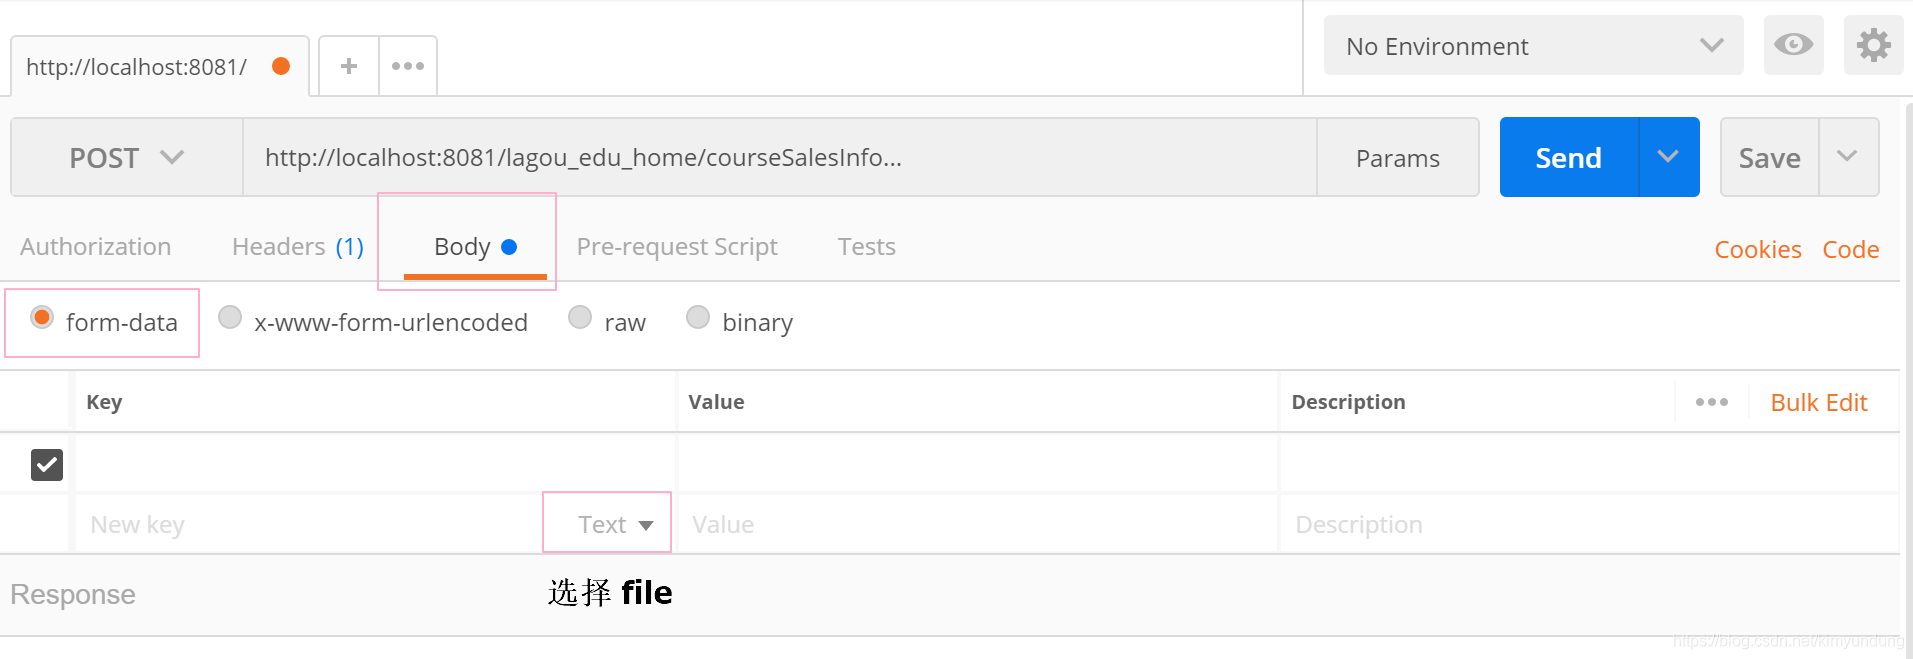
-
Body选择form-data
-
key 右侧下拉选择file;value 点击Select Files选择文件 , 按照接口文档,补全测试参数
4.7.3 保存图片URL优化
1.创建常量类
public final class Constants {


    //本地访问地址
    public static final String LOCAL_URL = "http://localhost:8080";
}
2.拼接图片URL
 //将图片路径进行保存
 map.put("course_img_url", Constants.LOCAL_URL+"/upload/" + newFileName);
5. 功能四: 修改课程营销信息
5.1 需求分析
营销信息其实就是课程相关的信息, 操作的依然是 course 表. 我们通过点击营销信息按钮,进入到对应的课程营销信息页面,对原有信息进行修改.

5.2 Dao层编写
- 通过上面的分析,首先要编写 根据课程ID查询课程信息,进行回显
接口
    //根据课程ID 查询课程信息
    public Course findCourseById(int id);

实现类
	//根据课程ID 查询课程营销信息
    @Override
    public Course findCourseById(int id) {


        try {


            QueryRunner qr = new QueryRunner(DruidUtils.getDataSource());

            String sql = "SELECT \n" +
                    "id,\n" +
                    "course_name,\n" +
                    "brief,\n" +
                    "teacher_name,\n" +
                    "teacher_info,\n" +
                    "preview_first_field,\n" +
                    "preview_second_field,\n" +
                    "discounts,\n" +
                    "price,\n" +
                    "price_tag,\n" +
                    "course_img_url,\n" +
                    "share_image_title,\n" +
                    "share_title,\n" +
                    "share_description,\n" +
                    "course_description,\n" +
                    "STATUS\n" +
                    "FROM course WHERE id = ?;";

            Course course = qr.query(sql, new BeanHandler<Course>(Course.class), id);
            return course;

        } catch (SQLException e) {


            e.printStackTrace();
            return null;
        }

    }
-- 根据ID查询课程信息SQL
SELECT
id,
course_name,
brief,
teacher_name,
teacher_info,
preview_first_field,
preview_second_field,
discounts,
price,
price_tag,
course_img_url,
share_image_title,
share_title,
share_description,
course_description,
STATUS
FROM course WHERE id = ?;
- 编写修改课程营销信息的方法,将修改写入数据库
接口
    //修改课程营销信息
    public int updateCourseSalesInfo(Course course);

实现类
    //修改课程营销信息
    @Override
    public int updateCourseSalesInfo(Course course) {


        try {


            QueryRunner qr = new QueryRunner(DruidUtils.getDataSource());

            String sql = "UPDATE course SET \n" +
                    "course_name = ?,\n" +
                    "brief = ?,\n" +
                    "teacher_name = ?,\n" +
                    "teacher_info = ?,\n" +
                    "preview_first_field = ?,\n" +
                    "preview_second_field = ?,\n" +
                    "discounts = ?,\n" +
                    "price = ?,\n" +
                    "price_tag = ?,\n" +
                    "share_image_title = ?,\n" +
                    "share_title = ?,\n" +
                    "share_description = ?,\n" +
                    "course_description = ?,\n" +
                    "course_img_url = ?,\n" +
                    "update_time = ?\n" +
                    "WHERE id = ?";

            Object[] param = {

    course.getCourse_name(),course.getBrief(),course.getTeacher_name(),course.getTeacher_info(),
            course.getPreview_first_field(),course.getPreview_second_field(),course.getDiscounts(),course.getPrice(),course.getPrice_tag(),
            course.getShare_image_title(),course.getShare_title(),course.getShare_description(),course.getCourse_description(),
            course.getCourse_img_url(),course.getUpdate_time(),course.getId()};

            int row  = qr.update(sql, param);
            return row;

        } catch (SQLException e) {


            e.printStackTrace();
            return 0;
        }

    }
修改课程
UPDATE course SET
course_name = ?,
brief = ?,
teacher_name = ?,
teacher_info = ?,
preview_first_field = ?,
preview_second_field = ?,
discounts = ?,
price = ?,
price_tag = ?,
share_image_title = ?,
share_title = ?,
share_description = ?,
course_description = ?,
course_img_url = ?,
update_time = ?
WHERE id = ?
- 测试
5.3 Service层编写
接口
	public Course findCourseById(int id);

实现类
 	@Override
    public Course findCourseById(int id) {


        return courseDao.findCourseById(id);
    }
接口
	public String updateCourseSalesInfo(Course course);

实现类
	 @Override
    public String updateCourseSalesInfo(Course course)  {


        //调用dao
        int i = courseDao.updateCourseSalesInfo(course);

        //根据插入是否成功,封装对应信息

        if(i > 0){


            //保存成功
            String result = StatusCode.SUCCESS.toString();
            return result;
        }else{


            //保存失败
            String result = StatusCode.FAIL.toString();
            return result;
        }

    }
5.4 Servlet编写
5.4.1 根据ID查询课程信息
5.4.1.1 CourseServlet
在CourseServlet中, 添加根据ID查询课程信息的功能
	/**
     * 根据课程ID查询课程营销信息
     * */
    public void findCourseById(HttpServletRequest request , HttpServletResponse response){


        try {


            //1.接收参数
            String id = request.getParameter("id");

            //2.业务处理
            CourseService cs = new CourseServiceImpl();
            Course course = cs.findCourseById(Integer.parseInt(id));

            //3.返回结果 响应JSON格式数据
            //使用 SimplePropertyPreFilter,指定要转换为JSON的字段
            SimplePropertyPreFilter filter = new SimplePropertyPreFilter(Course.class,"id","course_name","brief","teacher_name",
                    "teacher_info","preview_first_field","preview_second_field","discounts","price","price_tag","share_image_title","share_title","share_description","course_description");

            String result  = JSON.toJSONString(course, filter);
            response.getWriter().println(result);

        } catch (IOException e) {


            e.printStackTrace();
        }
    }
5.4.1.2 接口测试
详见接口文档
5.4.2 修改CourseSalesInfoServlet
5.4.2.1 需求分析
保存营销信息和修改营销信息,访问的是同一个接口,所以在CourseSalesInfoServlet中,我们需要进行一下判断
- 携带id 就是修改操作
- 未携带id就是新增操作
5.4.2.2 代码修改
@WebServlet("/courseSalesInfo")
public class CourseSalesInfoServlet extends HttpServlet {


    /**
     *  保存营销信息
     *      收集表单的数据 封装一个Course实体 将上传图片存到服务器磁盘上
     * */
    @Override
    protected void doGet(HttpServletRequest req, HttpServletResponse resp) throws ServletException, IOException {


        try {


            //1.获取参数,调用FIleUploadUtils,进行文件上传和参数的封装
            Map<String, Object> map = FileUploadUtil.upload(req);

            //2.使用BeanUtils 将map中的数据封装到 Course对象中
            Course course = new Course();
            BeanUtils.populate(course,map);

            //3.业务处理
            if(map.get("id") != null){


                //补全信息 修改时间
                course.setUpdate_time(DateUtils.getDateFormart());

                CourseService cs = new CourseServiceImpl();
                Map<String, String> message = cs.updateSalesInfo(course);

                //4.响应JSON数据
                String result = JSON.toJSONString(message);
                resp.getWriter().println(result);

            }else{


                //补全信息
                course.setCreate_time(DateUtils.getDateFormart());//创建时间
                course.setUpdate_time(DateUtils.getDateFormart());//修改时间
                course.setStatus(0);//状态

                //8.业务处理
                CourseService cs = new CourseServiceImpl();
                Map<String, String> message = cs.saveSalesInfo(course);

                //9.响应JSON数据
                String result = JSON.toJSONString(message);
                resp.getWriter().println(result);
            }

        } catch (Exception e) {


            e.printStackTrace();
        }

    }

    @Override
    protected void doPost(HttpServletRequest req, HttpServletResponse resp) throws ServletException, IOException {


        doGet(req, resp);
    }

}
5.4.2.3 接口测试
根据接口文档,进行测试
6. 功能五: 修改课程状态
6.1 需求分析
- 数据库中课程状态码为0或者1 ,课程状态,0-草稿(下架),1-上架

- 页面分析

6.2 DAO层编写
接口
	//修改课程状态
    int updateCourseStatus(Course course);

实现类
	//修改课程状态
    @Override
    public int updateCourseStatus(Course course) {


        try {


            QueryRunner qr = new QueryRunner(DruidUtils.getDataSource());

            String sql = "UPDATE course SET STATUS = ? ,update_time = ? WHERE id = ?";

            Object[] param = {

    course.getStatus(),course.getUpdate_time(),course.getId()};

            int row = qr.update(sql, param);

            return row;
        } catch (SQLException e) {


            e.printStackTrace();
            return 0;
        }
    }
6.3 Service层编写
接口
	public Map<String,Integer> updateCourseStatus(Course course);

实现类
 	@Override
    public Map<String, Integer> updateCourseStatus(Course course) {


        //调用dao
        int row = courseDao.updateCourseStatus(course);

        Map<String ,Integer> map = new HashMap<>();

        if(row > 0){


            if(course.getStatus() == 0){


                map.put("status",0);
            }else{


                map.put("status",1);
            }
        }

        return map;
    }
6.4 Servlet编写
在CourseServlet中, 添加updateCourseStatus方法
	//修改课程状态
    public void updateCourseStatus(HttpServletRequest request,HttpServletResponse response){


        try {


            //1.获取参数
            String id = request.getParameter("id");

            //2.业务处理
            CourseService cs = new CourseServiceImpl();

            //3.根据课程id 查询课程信息
            Course course = cs.findCourseById(Integer.parseInt(id));

            //4.判断课程信息状态,进行取反设置
            int status = course.getStatus();
            if(status == 0){


                //如果是0 设置为1
                course.setStatus(1);
            }else{


                course.setStatus(0);
            }

            //5.设置更新时间
            course.setUpdate_time(DateUtils.getDateFormart());

            //6.修改状态
            Map<String, Integer> map = cs.updateCourseStatus(course);

            //7.响应结果
            String result = JSON.toJSONString(map);

            response.getWriter().print(result);

        } catch (IOException e) {


            e.printStackTrace();
        }
    }
6.5 接口测试
查看接口文档,进行测试
任务三 课程管理模块开发_02
1.开发流程
1.1 需求分析
我们接下来开发的是,配置课时(课程内容管理)模块,主要是对课程内容进行管理

1.2 数据库表分析
1.3 实体类设计
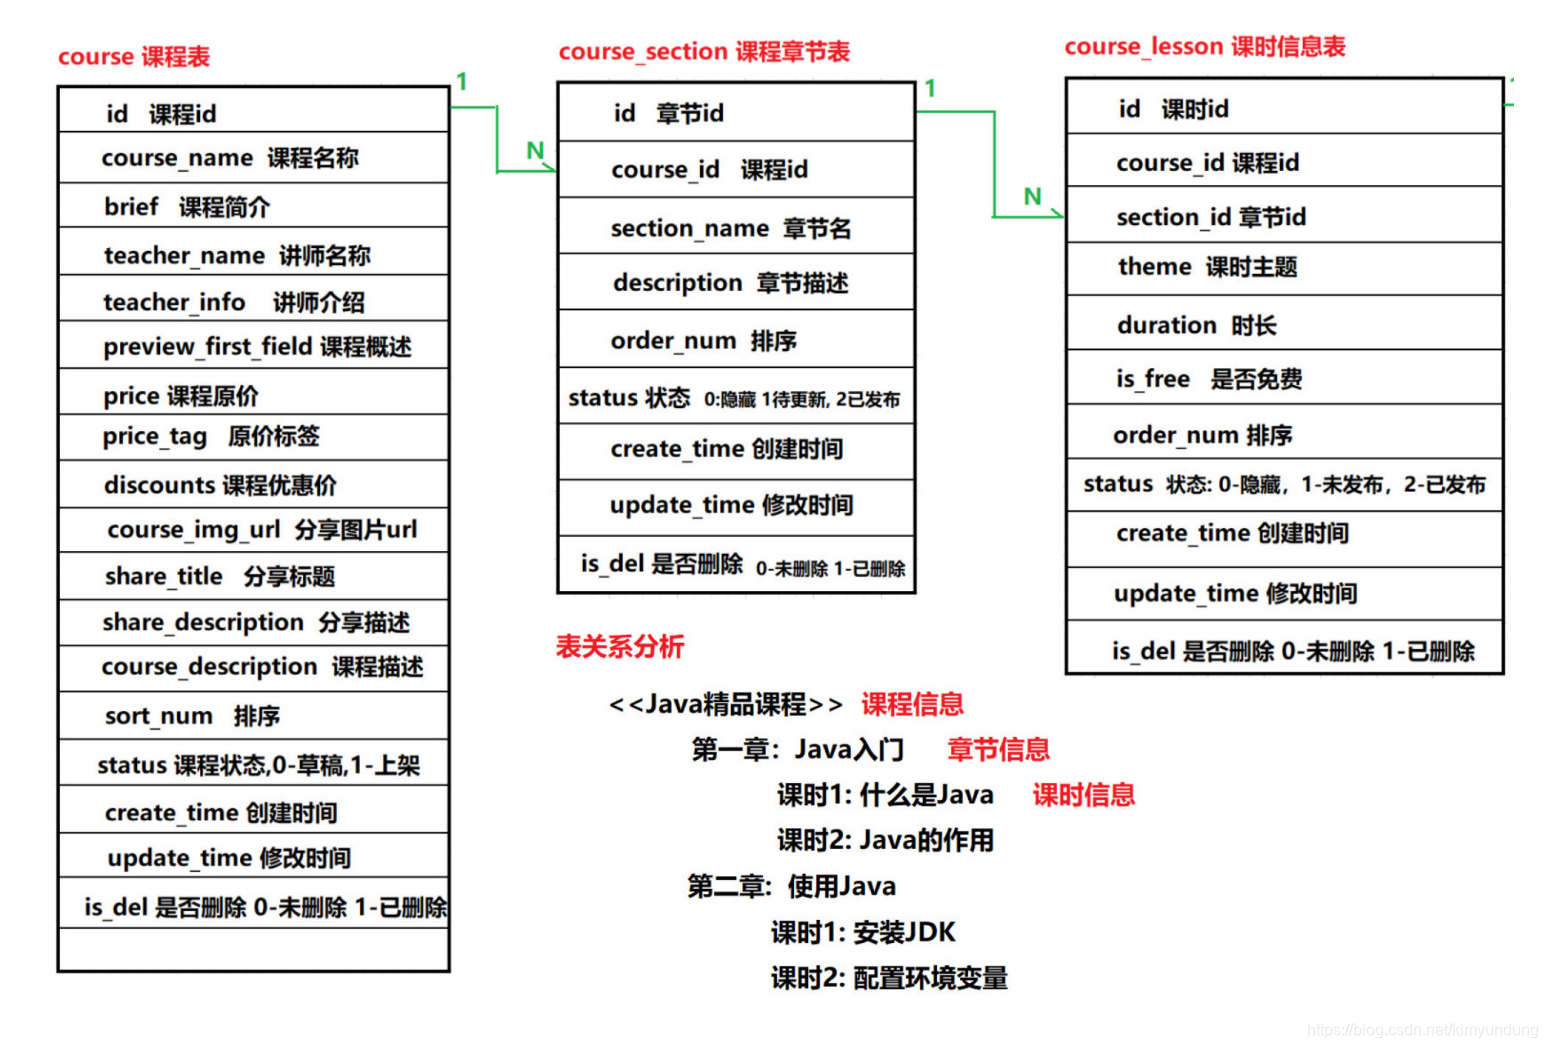
Course类 与Course_Section类 是一对多关系
在Course类中定义一个List集合,并指定List的泛型是Course_Section类型,表示 一个课程中可以包含多个章节.
Course类
//添加list集合 泛型是 Course_Section
List<Course_Section> sectionList = new ArrayList<>();
在 Course_Section 类中,定义一个Course类型的属性, 用来保存章节所对应的具体的课程信息
Course_Section 类
//添加一个Course类型的属性
private Course course;
- Course_Section 类 与 Course_Lesson 类是一对多关系
在Course_Section类中定义一个List集合,并指定List的泛型是 Course_Lesson类型,这样就可以表示一个章节中包含多个课时.
Course_Section类
//添加一个list集合 泛型是 Course_lesson
List<Course_Lesson> lessonList = new ArrayList<>();

Course_Lesson类
//添加一个Course_Section类型的属性
private Course_Section course_section;
1.4 Dao接口及实现类编写
/**
* 课程内容管理 DAO层接口
* */
public interface CourseContentDao {


}
/**
* 课程内容管理 DAO层实现类
* */
public class CourseContentDaoImpl implements CourseContentDao {


}
1.5 Service接口及实现类编写
/**
* 课程内容管理 Service层接口
* */
public interface CourseContentService {


}
/**
* 课程内容管理 Service层实现类
* */
public class CourseContentServiceImpl implements CourseContentService {


}
1.6 CourseContentServlet 编写
CourseContentServlet 继承 BaseServlet
@WebServlet("/courseContent")
public class CourseContentServlet extends BaseServlet {


}
2. 功能一: 展示课程内容
2.1 需求分析
分析: 要展示的内容是对应课程下的 章节与课时信息

- 我们先写一条查询语句: 查询ID为1 的课程的章节与课时信息
SELECT
cs.id '章节id',
cs.section_name '章节名称',
cl.id '课时id',
cl.theme '课时描述'
FROM course_section cs INNER JOIN course_lesson cl
ON cs.id = cl.section_id WHERE cs.course_id = ?
- 我们在程序中尽量避免使用连接查询,我们可以将上面的SQL进行拆分,每一条SQL对应一个功能
-- 根据课程ID查询章节相关的内容
SELECT
id,
course_id,
section_name,
description,
order_num
FROM course_section cs WHERE course_id = ? ;

-- 根据章节ID查询课时相关的内容
SELECT
id,
course_id,
section_id,
theme,
duration,
is_free,
order_nu
FROM course_lesson WHERE section_id = ?;
2.2 DAO层编写
编写两个方法:
接口
//根据课程ID查询课程相关信息
public List<Course_Section> findSectionAndLessonByCourseId(int courseId);
//根据章节ID 查询章节相关的课时信息
public List<Course_Lesson> findLessonBySectionId(int sectionId);

实现类
//根据课程ID查询课程相关信息
@Override
public List<Course_Section> findSectionAndLessonByCourseId(int courseId) {


	try {


		//1.创建QueryRunner
		QueryRunner qr = new QueryRunner(DruidUtils.getDataSource());
		//2.编写SQL
		String sql = "SELECT \n" +
					"id,\n" +
					"course_id,\n" +
					"section_name,\n" +
					"description,\n" +
					"order_num,\n" +
					"STATUS\n" +
					"FROM course_section WHERE course_id = ?";
		//3.执行查询
		List<Course_Section> sectionList = qr.query(sql, new BeanListHandler<Course_Section>(Course_Section.class), courseId);
		//4.根据章节ID查询课时信息
		for (Course_Section section : sectionList) {


			//调用方法 获取章节对应的课时
			List<Course_Lesson> lessonList =
			findLessonBySectionId(section.getId());
			//将课时数据封装到 章节对象中
			section.setLessonList(lessonList);
		}
		return sectionList;
	} catch (SQLException e) {


	e.printStackTrace();
	return null;
	}
}
//根据章节ID查询课时信息
@Override
public List<Course_Lesson> findLessonBySectionId(int sectionId) {


	try {


		QueryRunner qr = new QueryRunner(DruidUtils.getDataSource());
		String sql = "SELECT \n" +
					"id,\n" +
					"course_id,\n" +
					"section_id,\n" +
					"theme,\n" +
					"duration,\n" +
					"is_free,\n" +
					"order_num,\n" +
					"STATUS\n" +
					"FROM course_lesson WHERE section_id = ?";
		List<Course_Lesson> lessonList = qr.query(sql, new
		BeanListHandler<Course_Lesson>(Course_Lesson.class), sectionId);
		return lessonList;
	} catch (SQLException e) {


	e.printStackTrace();
	return null;
	}
}
DAO层测试
public class TestCourseContentDao {

    CourseContentDao contentDao = new CourseContentDaoImpl();
	//测试 查询对应课程下的章节与课时
	@Test
	public void testFindSectionAndLessonByCourseId(){

    List<Course_Section> list = contentDao.findSectionAndLessonByCourseId(59);
		for (Course_Section courseSection : list) {


			System.out.println(courseSection.getId()+" = "+courseSection.getSection_name());
			List<Course_Lesson> lessonList = courseSection.getLessonList();
			for (Course_Lesson lesson : lessonList) {


				System.out.println(lesson.getId()+" = "+lesson.getTheme()+" = " + lesson.getSection_id());
			}
		}
	}
}
2.3 Service层编写
接口
/**
* 课程内容管理 Service层接口
* */
public interface CourseContentService {


//根据课程id查询课程内容
public List<Course_Section> findSectionAndLessonByCourseId(int courseId);
}

实现类
/**
* 课程内容管理 Service层实现类
* */
public class CourseContentServiceImpl implements CourseContentService {

     CourseContentDao contentDao = new CourseContentDaoImpl();
	@Override
	public List<Course_Section> findSectionAndLessonByCourseId(int courseId) {


		List<Course_Section> sections =
		contentDao.findSectionAndLessonByCourseId(courseId);
		return sections;
	}
}
2.4 Servlet编写
CourseContentServlet中添加 findSectionAndLessonByCourseId 方法
@WebServlet("/courseContent")
public class CourseContentServlet extends BaseServlet {


	/**
	* 展示对应课程的章节与课时信息
	* */
	public void findSectionAndLessonByCourseId(HttpServletRequest request , HttpServletResponse response){


		try {


			//1.获取参数
			String course_id = request.getParameter("course_id");

			//2.业务处理
			CourseContentService contentService = new
			CourseContentServiceImpl();
			List<Course_Section> sectionList =
			contentService.findSectionAndLessonByCourseId(Integer.parseInt(course_id));

			//3.返回结果
			String result = JSON.toJSONString(sectionList);
			response.getWriter().println(result);
		} catch (IOException e) {


		e.printStackTrace();
		}
	}
}
2.5 接口测试
查看接口文档,进行测试
3. 功能二: 新建章节信息
3.1 需求分析
3.2 DAO层编写
接口
//添加章节时进行数据回显
public Course findCourseByCourseId(int courseId);
//保存章节信息
public int saveSection(Course_Section section);

实现类
/**
* 添加章节时进行数据回显
* */
@Override
public Course findCourseByCourseId(int courseId) {


	try {


		//1.创建QueryRunner
		QueryRunner qr = new QueryRunner(DruidUtils.getDataSource());
		//2.编写SQL
		String sql = "SELECT id,course_name FROM course WHERE id = ?";
		//3.执行查询
		Course course = qr.query(sql, new BeanHandler<Course>(Course.class),
		courseId);
		//4.返回结果
		return course;
	} catch (SQLException e) {


	e.printStackTrace();
	return null;
	}
}
@Override
public int saveSection(Course_Section section) {


	try {


		//1.创建QueryRunner
		QueryRunner qr = new QueryRunner(DruidUtils.getDataSource());
		//2.编写SQL
		String sql = "INSERT INTO
		course_section(course_id,section_name,description,order_num,STATUS,create_time,u
		pdate_time)\n" +
		"VALUES(?,?,?,?,?,?,?);";
		//3.准备参数
		Object[] param =
		{

    section.getCourse_id(),section.getSection_name(),section.getDescription(),
		section.getOrder_num(),section.getStatus(),section.getCreate_time(),section.get
		Update_time()};
		//4.执行插入
		int i = qr.update(sql, section.getCourse_id(), param);
		//4.返回结果
		return i;
	} catch (SQLException e) {


	e.printStackTrace();
	return 0;
	}
}
3.3 Service层编写
接口
public Course findCourseById(int courseId);
public String saveSection(Course_Section section);

实现类
@Override
public Course findCourseById(int courseId) {


Course course = contentDao.findCourseById(courseId);
return course;
}
@Override
public String saveSection(Course_Section section) {


	//1.补全章节信息
	section.setStatus(2); //状态,0:隐藏;1:待更新;2:已发布
	String date = DateUtils.getDateFormart();
	section.setCreate_time(date);
	section.setUpdate_time(date);
	//2.调用Dao进行插入
	int i = contentDao.saveSection(section);
	//3.根据插入是否成功,封装对应信息
	if(i > 0){


		//保存成功
		String result = StatusCode.SUCCESS.toString();
		return result;
	}else{


		//保存失败
		String result = StatusCode.FAIL.toString();
		return result;
	}
}
3.4 Servlet编写
CourseContentServlet中添加 findCourseById 方法
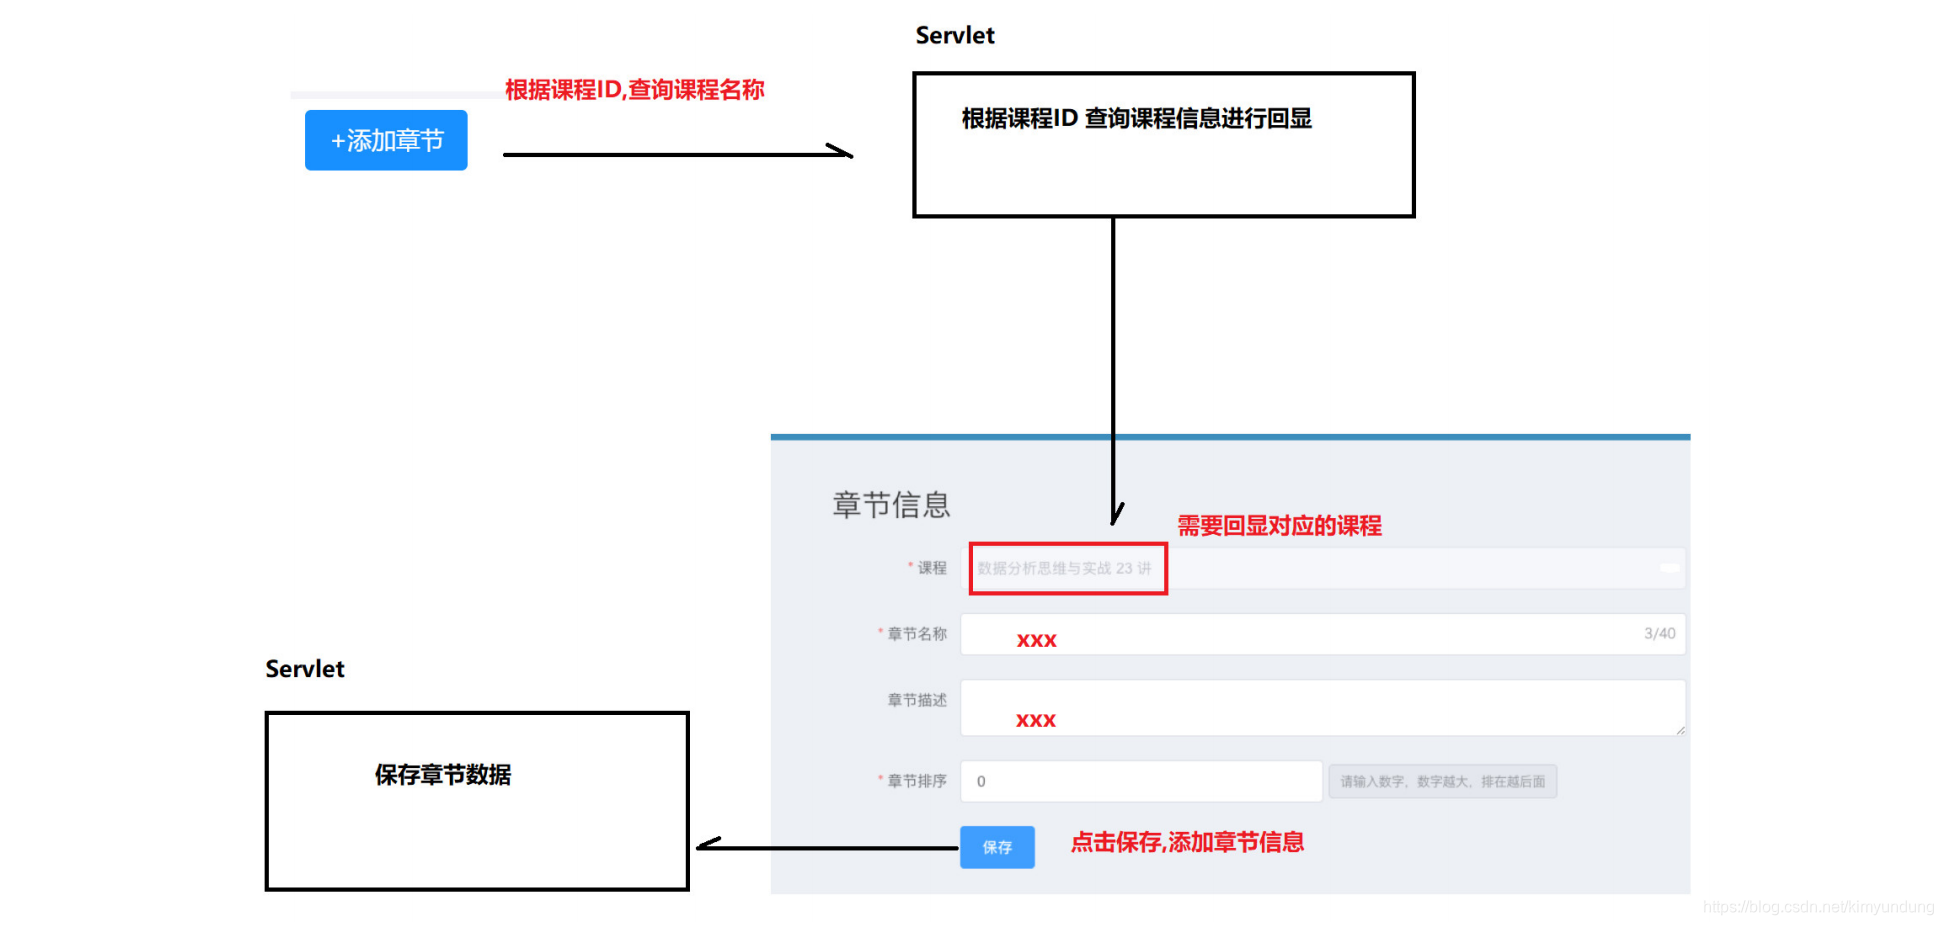
3.4.1 课程信息回显接口
//回显章节对应的课程信息
public void findCourseById(HttpServletRequest request , HttpServletResponse
response){


	try {


		//1.获取参数
		String courseId = request.getParameter("course_id");
		//2.业务处理
		CourseContentService contentService = new
		CourseContentServiceImpl();
		Course course =
		contentService.findCourseById(Integer.parseInt(courseId));
		//3.返回数据,将对象转换为JSON,只转换需要的字段
		SimplePropertyPreFilter filter = new
		SimplePropertyPreFilter(Course.class,"id","course_name");
		String result = JSON.toJSONString(course,filter);
		response.getWriter().println(result);
	} catch (Exception e) {


	e.printStackTrace();
	}
}
3.4.2 保存章节信息接口
1. POST请求方式介绍
POST 请求方法常用的三种数据提交格式
注意: 第二种JSON格式与第三种多部件上传,使用 getParameter() 方法都无法获取数据
| 格式 | 说明 |
|---|---|
| Content-Type : application/x-www-formurlencoded | 请求体中的数据会以普通表单形式(键值对)发送到后端。 |
| Content-Type : application/json ; charset=utf-8 | 请求体中的数据会以json字符串的形式发送到后端。 |
| Content-Type : multipart/form-data | 多部件上传既可以上传键值对 也可以上传文件。 |
2. 需求分析分析
根据接口文档描述: 前台传输的是JSON格式的数据, 使用getParameter() 方法无法获取参数
{
"methodName":"saveOrUpdateSection",
"course_id":19,
"section_name:"微服务架构",
"description":"跟着药水一起学习如何使用微服务",
"order_num ":0
}
3. 修改BaseServlet
如果请求参数是JSON格式的数, 我们可以通过 request.getReader() 这个方法,获取一个流对象来进行读取
- 在BaseServlet 中创建一个方法,用来获取JSON格式的数据
/**
* POST请求格式为 application/json;charset=utf-8
* 在这个方法中我们使用流的方式,获取到POST请求的数据
* */
public String getPostJSON(HttpServletRequest request){


	try {


		//1.从request中获取 字符缓冲输入流对象
		BufferedReader reader = request.getReader();
		//2.创建 StringBuffer,用来保存读取出的数据
		StringBuffer sb = new StringBuffer();
		//3.循环读取
		String line = null;
		while((line = reader.readLine()) != null){


			//追加到 StringBuffer中
			sb.append(line);
		}
		//4.将读取到的内容转换为字符串,并返回
		return sb.toString();
	} catch (IOException e) {


	e.printStackTrace();
	return null;
	}
}
- 修改BaseServlet中的doGet方法
1.获取POST请求的 Content-Type类型
2.判断传递的数据是不是JSON格式
3.如果是 就调用上面编写的 getPostJSON方法,获取数据
4.将获取到的JSON格式的字符串转换为 Map
5.从Map中获取要调用的方法名
6.将Map保存到request域对象中 (流只能使用一次)
@Override
protected void doGet(HttpServletRequest req, HttpServletResponse resp)
throws ServletException, IOException {


	//1.获取参数 要访问的方法名
	//String methodName = req.getParameter("methodName");
	String methodName = null;
	//2.获取POST请求的 Content-Type类型
	String contentType = req.getHeader("Content-Type");
	//3.判断传递的数据是不是JSON格式
	if("application/json;charset=utf-8".equals(contentType)){


		//是JOSN格式 调用getPostJSON
		String postJSON = getPostJSON(req);
		//将JSON格式的字符串转化为map
		Map<String,Object> map = JSON.parseObject(postJSON, Map.class);
		//从map集合中获取 methodName
		methodName =(String) map.get("methodName");
		//将获取到的数据,保存到request域对象中
		req.setAttribute("map",map);
	}else{


		methodName = req.getParameter("methodName");
	}
	//2.判断 执行对应的方法
	if(methodName != null){


		//通过反射优化代码 提升代码的可维护性
		try {


			//1.获取字节码文件对象
			Class c = this.getClass();
			//2.根据传入的方法名,获取对应的方法对象 findByName
			Method method = c.getMethod(methodName,
			HttpServletRequest.class, HttpServletResponse.class);
			//3.调用method对象的 invoke方法,执行对应的功能
			method.invoke(this,req,resp);
		} catch (Exception e) {


			e.printStackTrace();
			System.out.println("请求的功能不存在!!");
		}
	}
}
4. 编写接口代码
/**
* 保存&修改 章节信息
* */
public void saveOrUpdateSection(HttpServletRequest request
,HttpServletResponse response){


	try {


		//1.获取参数 从域对象中获取
		Map<String,Object> map = (Map)request.getAttribute("map");
		//2.创建Course_Section
		Course_Section section = new Course_Section();
		//3.使用BeanUtils工具类,将map中的数据封装到 section
		BeanUtils.populate(section,map);
		//4.业务处理
		CourseContentService contentService = new
		CourseContentServiceImpl();
		String result = contentService.saveSection(section);
		//5.响应结果
		response.getWriter().print(result);
	} catch (Exception e) {


	e.printStackTrace();
	}
}
5. 测试接口
- 选择POST请求方式,设置Content-Type = application/json

- 选择raw 发送JSON格式数据

4. 功能三: 章节信息修改
需求分析:
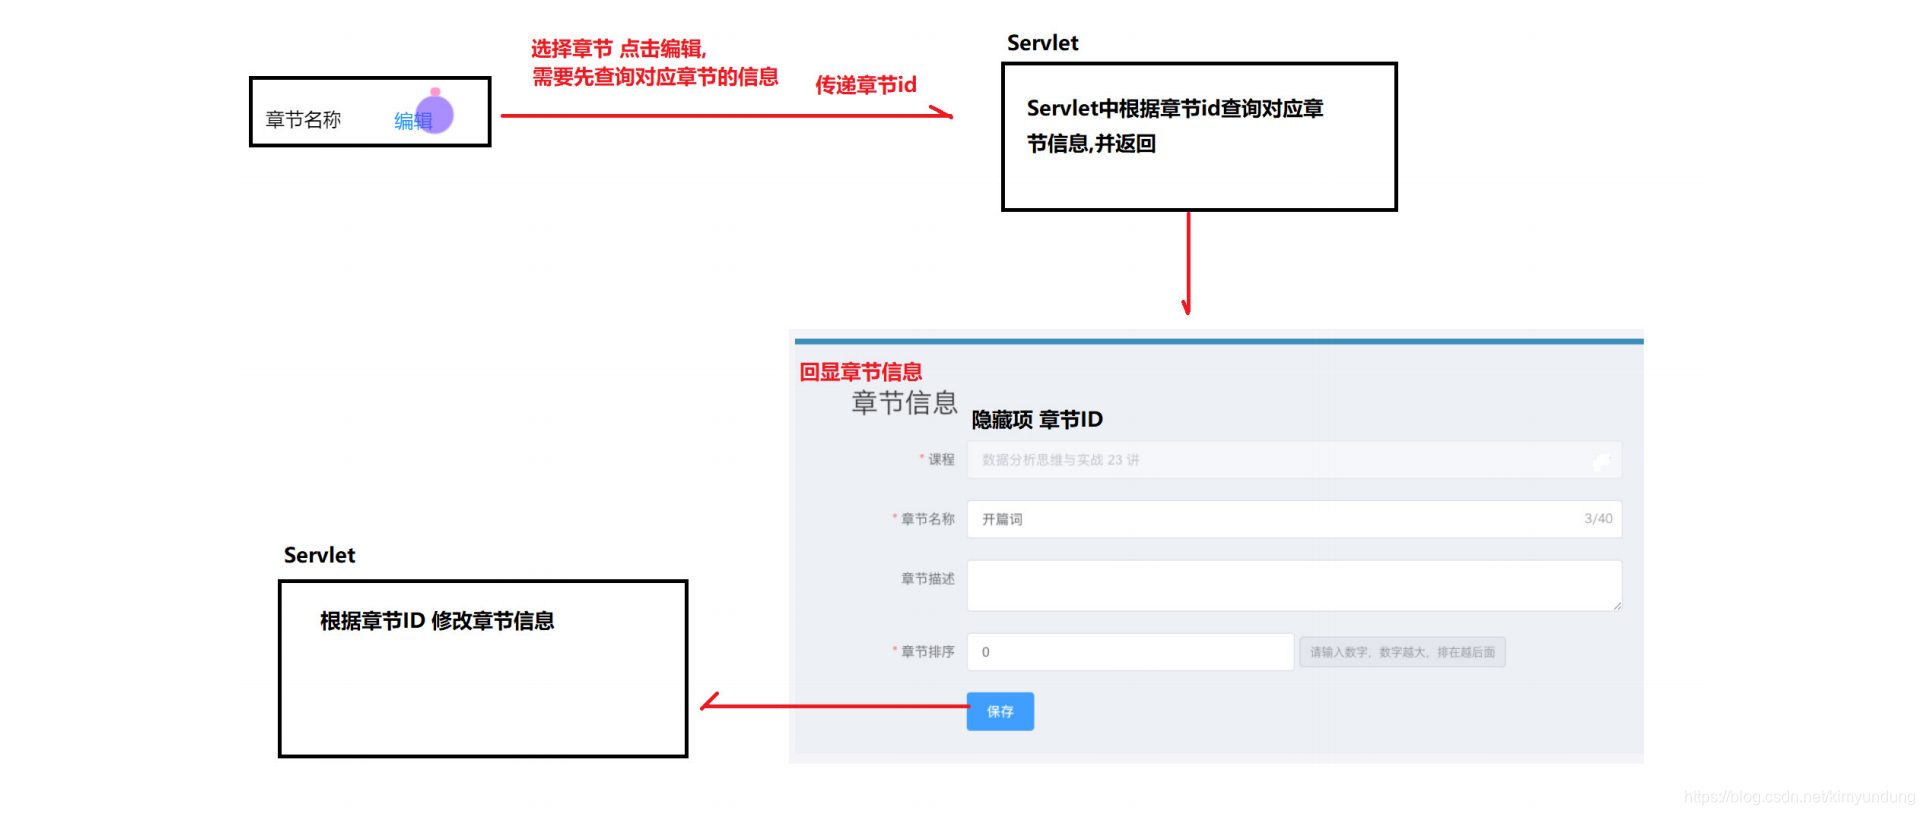
注意: 接口文档中并没有要求编写回显接口,说明回显操作由前端完成.
4.1 DAO层编写
接口
//修改章节信息
public int updateSection(Course_Section section);

接口实现类
/**
* 修改章节信息
* */
@Override
public int updateSection(Course_Section section) {


	try {


		//1.创建QueryRunner
		QueryRunner qr = new QueryRunner(DruidUtils.getDataSource());
		//2.编写SQL
		String sql = "UPDATE course_section SET\n" +
		"section_name = ?,\n" +
		"description = ?,\n" +
		"order_num = ?,\n" +
		"update_time = ? WHERE id = ?;";
		//3.准备参数
		Object[] param =
		{

    section.getSection_name(),section.getDescription(),section.getOrder_num(),
		section.getUpdate_time(),section.getId()};
		//4.执行修改操作
		int row = qr.update(sql, param);
		return row;
	} catch (SQLException e) {


	e.printStackTrace();
	return 0;
	}
}
4.2 Service层编写
接口
public String updateSection(Course_Section section);

实现类
@Override
public String updateSection(Course_Section section) {


	//1.补全章节信息
	String date = DateUtils.getDateFormart();
	section.setUpdate_time(date);
	//2.调用Dao进行插入
	int i = contentDao.updateSection(section);
	//3.根据修改是否成功,封装对应信息
	if(i > 0){


		//保存成功
		String result = StatusCode.SUCCESS.toString();
		return result;
	}else{


		//保存失败
		String result = StatusCode.FAIL.toString();
		return result;
	}
}
4.3 Servlet编写
保存章节信息和修改章节信息,访问的是同一个接口,所以在saveOrUpdateSection方法中中,我们要进行一下判断
- 携带id 就是修改章节操作
- 未携带id就是新增章节操作
/**
* 保存或修改章节信息
* */
public void saveOrUpdateSection(HttpServletRequest request ,
HttpServletResponse response){


	try {


		//1.获取参数
		Map<String, Object> map =(Map) request.getAttribute("map");
		//2.创建 Course_Section
		Course_Section section = new Course_Section();
		//3.使用BeanUtils,将map中的数据封装到section对象里
		BeanUtils.copyProperties(section,map.get("section"));
		//4.业务处理
		CourseContentService contentService = new
		CourseContentServiceImpl();
		if(section.getId() != 0){


			//修改操作
			String result = contentService.updateSection(section);
			//5.返回结果数据
			response.getWriter().println(result);
		}else{


			//添加操作
			String result = contentService.saveSection(section);
			//5.返回结果数据
			response.getWriter().println(result);
		}
	} catch (Exception e) {


	e.printStackTrace();
	}
}
4.4 接口测试
查看接口文档,进行测试
5. 功能四: 章节状态管理
5.1 需求分析
根据选择的状态信息,发送对应的状态编号 进行修改, status 状态,0:隐藏;1:待更新;2:已发布

5.2 DAO层编写
接口
//修改章节的状态
public int updateSectionStatus(int id,int status);

实现类
/**
* 修改章节状态
* */
@Override
public int updateSectionStatus(int id,int status) {


	try {


		//1.创建QueryRunner
		QueryRunner qr = new QueryRunner(DruidUtils.getDataSource());
		//2.编写SQL
		String sql = "UPDATE course_section SET STATUS = ?,update_time = ?
		WHERE id = ?;";
		//3.准备参数
		Object[] param = {

    status , DateUtils.getDateFormart(),id};
		//4.执行修改操作
		int row = qr.update(sql, param);
		return row;
	} catch (SQLException e) {


	e.printStackTrace();
	return 0;
	}
}
5.3 Service层编写
接口
public String updateSectionStatus(int id,int status);

实现类
@Override
public String updateSectionStatus(int id, int status) {


	//调用Dao 修改状态
	int i = contentDao.updateSectionStatus(id,status);
	//3.根据修改是否成功,封装对应信息
	if(i > 0){


		String result = StatusCode.SUCCESS.toString();
		return result;
	}else{


		String result = StatusCode.FAIL.toString();
		return result;
	}
}
5.4 Servlet编写
/**
* 修改章节状态
* */
public void updateSectionStatus(HttpServletRequest request ,
HttpServletResponse response){


	try {


		//1.获取参数
		int id = Integer.parseInt(request.getParameter("id"));
		int status = Integer.parseInt(request.getParameter("status"));
		//4.业务处理
		CourseContentService contentService = new
		CourseContentServiceImpl();
		String result = contentService.updateStatus(id, status);
		//5.返回结果数据findSectionById
		response.getWriter().println(result);
	} catch (Exception e) {


	e.printStackTrace();
	}
}
5.5 接口测试
按照接口文档进行测试
6. Ajax
6.1 ajax概述
传统的网页如果需要更新内容,必须重载这个网页页面。每当用户想服务器发送请求,哪怕只是需要更新一点点的局部内容,服务器都会将整个页面进行刷新。这种方式的缺点是:
- 性能会有所降低(一点内容,刷新整个页面!)
- 用户的操作页面会中断(整个页面被刷新了!)
1. 什么是Ajax
Ajax 即 “Asynchronous Javascript and XMl”,是指一种创建交互式网页英勇的网页开发技术。
Ajax = 异步 JavaScript 和 XML
Ajax是客户端与服务器进行交互时,可以(不必刷新整个浏览器)的情况下,与服务器进行异步通讯的技术

2. Ajax的作用
Ajax可以是网页实现异步更新。这意味着可以在不重新加载整个网页的情况下,对网页的某部分进行更新(局部更新)。

3. Ajax的好处
- 减轻服务器负担,按需要获得数据。
- 无刷新更新页面,减少用户的实际和心理的等待时间。
- 只更新部分页面,有效利用宽带
- 主流浏览器都支持Ajax
4. 异步与同步
浏览器访问服务器的方式
- 同步访问:客户端必须等待服务器端的响应,在等待过程中不能进行其他操作
- 异步访问:客户端不需要等待服务的响应,在等待期间,浏览器可以进行其他操作

6.2 JS方式Ajax的实现(了解)
JS的Ajax:出现最早,使用一个对象XmlHttpRequest对象。专门用于进行Ajax请求发送,和响应的接收使用Ajax发请求,使用Ajax接收相应,使用JS进行页面刷新。
缺点:
- 若使用JS的Ajax技术,为了实现简单功能,就需要书写大量复杂代码。
- JS的Ajax代码,浏览器兼容性比较差。
W3school
https://www.w3school.com.cn/ajax/index.asp
前端JS代码,复制即可
login.jsp
<%@ page contentType="text/html;charset=UTF-8" language="java" %>
<html>
<head>
    <title>Title</title>
</head>
<body>
    <input type="button" value="原生JS发送异步请求" onclick="run()"><br>
    局部刷新<input type="text">

    <script>
        //原生JS方式发送 Ajax请求
        function run() {


            //1.核心对象
            var xmlhttp;

            //2.判断浏览器类型
            if (window.XMLHttpRequest)
            {

     // code for IE7+, Firefox, Chrome, Opera, Safari
                xmlhttp=new XMLHttpRequest();
            }
            else
            {

     // code for IE6, IE5
                xmlhttp=new ActiveXObject("Microsoft.XMLHTTP");
            }

            //3.建立连接
            xmlhttp.open("GET","/hello_maven/login?username=tom",true); //true:异步 false:同步

            //4.发送请求
            xmlhttp.send();

            //5.获取响应结果
            xmlhttp.onreadystatechange=function(){


                //请求以完成,且响应已就绪
                if (xmlhttp.readyState==4 && xmlhttp.status==200) {


                    var text = xmlhttp.responseText;
                    alert("响应结果:"+text);
                }
            }

        }
    </script>
</body>
</html>
Servlet
@WebServlet("/login")
public class LoginServlet extends HttpServlet {


    @Override
    protected void doGet(HttpServletRequest req, HttpServletResponse resp) throws ServletException, IOException {


        //1.获取请求数据
        String username = req.getParameter("username");

        try {


            //模拟后台请求
            Thread.sleep(5000);
        } catch (InterruptedException e) {


            e.printStackTrace();
        }

        //2.进行响应
        System.out.println(username);
        resp.getWriter().write(username);
    }

    @Override
    protected void doPost(HttpServletRequest req, HttpServletResponse resp) throws ServletException, IOException {


        this.doGet(req,resp);
    }
}
6.3 jQuery框架的Ajax
6.3.1JQuery框架的Ajax间接
JQuery是一个优秀的js框架,自然对js原生的ajax进行了封装,封装后的ajax的造作方法更简洁,功能更强大。与ajax操作相关的jquery方法有如下几种,但开发中经常使用的有三种:POST GET AJAX
6.3.2 GET请求方式
通过远程 HTTP GET 请求载入信息。这是一个简单的GET请求功能,如需要复杂的ajax参数设置使用$.ajax
Get请求方式语法
$.get(url, data, callback, type)
- 参数1:url 请求路径
- 参数2:data 请求是携带的数据
格式:key=value 或者 {username=‘baby’,pwd:666} - 参数3:callback 响应成功后的回调函数
- 参数4:type 响应的数据类型 text HTML xml json
代码示例
<%@ page contentType="text/html;charset=UTF-8" language="java" %>
<html>
<head>
    <title>Title</title>
</head>
<body>

    局部刷新<input type="text"><br>

    <input type="button" value="JQuery GET方式发送异步请求" onclick="run2()"><br>

    <script src="http://code.jquery.com/jquery-latest.js"></script>
    <script>

        //JQuery GET
        function run2(){


            //1.url
            var url = "login";

            //2.数据
            var data = {

     username:"jack"};

            //3.发送GET请求
            $.get(
                url,
                data,
                function (param) {


                    alert("Get异步请求 响应成功:" + param);
                }
            )

        }
    </script>
</body>
</html>
6.3.3 POST请求方式
通过远程 HTTP POST 请求载入信息,这是一个简单的POST请求功能,如需要复杂的ajax参数设置请使用$.ajax
Post请求方式语法
$.post(url, data, callback, type)
- 里面的四个参数和get方式是一样,不一样的是请求方式的不同
代码示例
<%--
  Created by IntelliJ IDEA.
  User: kimyu
  Date: 2021/1/23
  Time: 17:59
  To change this template use File | Settings | File Templates.
--%>
<%@ page contentType="text/html;charset=UTF-8" language="java" %>
<html>
<head>
    <title>Title</title>
</head>
<body>

    局部刷新<input type="text"><br>

    <input type="button" value="JQuery POST方式发送异步请求" onclick="run3()"><br>


    <script src="http://code.jquery.com/jquery-latest.js"></script>
    <script>


        //JQuery Post
        function run3(){


            //1.url
            var url = "login";

            //2.数据
            var data = {

     username:"jack"};

            //3.发送GET请求
            $.post(
                url,
                data,
                function (param) {


                    alert("Get异步请求 响应成功:" + param);
                }
            )

        }
    </script>
</body>
</html>
6.3.4 Ajax请求方式
$.ajax()方法可以更加详细的设置底层的参数。该方法通常用于其他方法不能完成的请求。
ajax请求方法语法:
- 方式一:jQuery.ajax({[settings]})
- 方式二:$.ajax({})
settins是一个js字面量形式的对象,格式是键值对{name:value, name:value … },常用的name属性名如下
代码示例
<%@ page contentType="text/html;charset=UTF-8" language="java" %>
<html>
<head>
    <title>Title</title>
</head>
<body>

    局部刷新<input type="text"><br>

    <input type="button" value="JQuery Ajax方式发送异步请求" onclick="run4()">

    <script src="${pageContext.request.contextPath}/js/jquery-3.3.1.min.js"></script>
    <script>

        //Ajax
        function run4(){


            $.ajax({


                url:"/hello_maven/login",
                async:false,             //true:异步  false:同步
                data:{

     username:"giao"},
                type:"GET",            //请求方式
                dataType:"text",        //返回数据的数据类型
                success:function (param) {


                    alert("响应成功! " + param)
                },
                error:function () {


                    alert("响应失败了!")
                }
            })
        }
    </script>
</body>
</html>
6.4 案例:检测用户名是否已经被注册
需求:用户输入用户名,鼠标移除后,对用户名进行判断,提示用户名是否可用

步骤:
- 准备Servlet,对用户名进行校验,并返回结果(是否可用)
- 为页面输入框,绑定鼠标移除事件
- 进行异步请求,获取响应结果
- 根据结果,动态添加html代码
后台Servlet
第5阶段 模块一作业
作业1
- 根据接口文档,完成后台所有接口的编写以及测试.
作业2
添加&修改课时
需求分析:

保存&修改课时接口
- 名称: saveOrUpdateLesson
- 描述: 保存和修改课时信息
- URL: http://localhost:8080/lagou_edu_home/courseContent
- 请求方式: POST
- 请求参数
| 字段 | 说明 | 类型 | 是否必需 | 备注 |
|---|---|---|---|---|
| methodName | 要访问的功能名 | String | 是 | 该字段必须填写,用来确定要访问是哪一个的方法 |
| id | 课时ID | int | 否 | 添加操作不携带id, 修改操作必须携带ID |
| course_id | 课程ID | int | 是 | |
| section_id | 章节ID | int | 是 | |
| theme | 课时名称 | String | 是 | |
| duration | 课时时长(分钟) | int | 是 | |
| is_free | 是否免费,0 免费,1 付费 | int | 是 | |
| order_num | 排序字段 | int | 是 |
- 请求参数示例
JSON 格式数据
{
    "methodName":"saveOrUpdateLesson",
    "course_id":1,
    "section_id":1,
    "theme":"微服务架构",
    "duration":15,
    "is_free":0,
    "order_num ":0
}
- 响应结果
| 字段 | 说明 | 类型 | 是否必须 | 备注 |
|---|---|---|---|---|
| status | 表示执行成功或失败 | String | 是 | 0 表示成功, 1 表示失败 |
| msg | 响应消息 | String | 是 |
- 响应结果示例
成功
{"msg":"success","status":0}

失败
{"msg":"fail","status":1}
使用PostMan测试接口
第五阶段模块二
任务一 Vue.js
1.Vue.js
1.1 Vue.js 介绍
1.1.1 Vue.js是什么?
Vue (读音 /vjuː/,类似于 view) 是一套用于构建用户界面的渐进式框架。与其它大型框架不同的是,Vue 被设计 为可以自底向上逐层应用.
Vue 的核心库只关注视图层,不仅易于上手,还便于与第三方库或既有项目整合。另一 方面,当与现代化的工具链以及各种支持类库结合使用时,Vue 也完全能够为复杂的单页应用提供驱动。
自底向上逐层应用:作为渐进式框架要实现的目标就是方便项目增量开发(即插即用)。
官方网站: https://cn.vuejs.org/v2/guide/ 作者 尤雨溪是中国人.
1.1.2 为甚么使用Vue?
- 声明式渲染: 前后端分离是未来趋势
- 渐进式框架: 适用于各种业务需求
- 简单易学: 国人开发,中文文档,不存在语言障碍,易于理解和学习
1.2 Vue.js 基础
1.2.1 Vue.js的使用
- 在html页面使用script引入vue.js的库即可使用。
远程CDN
<script src="https://cdn.jsdelivr.net/npm/[email protected]/dist/vue.js"></script>
本地
<script src="vue.min.js"></script>
- Vue-CLI脚手架:使用vue.js官方提供的CLI脚本架很方便去创建vue.js工程雏形
1.2.2 入门程序
创建一个vuetest目录, 并且在目录下创建 01_vue入门程序.html 文件.
代码编写步骤:
1、定义html,引入vue.js
2、定义app div,此区域作为vue的接管区域
3、定义Vue实例,接管app区域。
4、定义model(数据对象)
5、在app中展示数据
<!DOCTYPE html>
<html lang="en">
<head>
    <meta charset="UTF-8">
    <meta name="viewport" content="width=device-width, initial-scale=1.0">
    <meta http-equiv="X-UA-Compatible" content="ie=edge">
    <title>Document</title>
    <!-- 1.引入vue.js -->
    <!-- 第一种 引入 vue.js的CDN地址 -->
    <!-- <script src="https://cdn.jsdelivr.net/npm/[email protected]/dist/vue.js"></script> -->
    <!-- 第二种 本地导入 -->
    <script src="./js/vue.min.js"></script>
</head>
<body>
	<!-- 2. 定义app div,此区域作为vue的接管区域 -->
	<div id="app">
		<!-- {

    {}} 双括号是VUE中的差值表达式,将表达式的值输出到HTML页面 -->
		{

   {name}}
	</div>
    <script>
        //3. 创建vue实例
		var VM = new Vue({


			//定义 Vue实例挂载的元素节点,表示vue接管该div
			el:'#app',
			//4.定义model模型数据对象
			data:{


				name:"哈拉少"
			}
		});
    </script>
</body>
</html>

Live Server : 浏览器实时刷新插件

1. { {}}: 插值表达式
- 插值表达式的作用?
通常用来获取Vue实例中定义的数据(data)
属性节点中 不能够使用插值表达式
2. el: 挂载点
- el的作用 ?
定义 Vue实例挂载的元素节点,表示vue接管该区域 - Vue的作用范围是什么 ?
Vue会管理el选项命中的元素,及其内部元素 - el选择挂载点时,是否可以使用其他选择器 ?
可以,但是建议使用 ID选择器 - 是否可以设置其他的DOM元素进行关联 ?
可以但是建议选择DIV, 不能使用HTML和Body标签
3. data: 数据对象
- Vue中用到的数据定义在data中
- data中可以写复杂类型
- 渲染复杂类型数据的时候,遵守js语法
- 一般使用id,
<body>
	<!-- 此区域作为vue的接管区域 -->
	<div id="app">
		{

   {name}} <br>
		{

   {school.name}} {

   {school.mobile}}<br>
		<ul>
			<li>{

   {names[0]}}</li>
			<li>{

   {names[1]}}</li>
			<li>{

   {names[2]}}</li>
		</ul>
	</div>
</body>
<script>
	//创建vue实例
	var VM = new Vue({


		el:'#app',
		data:{


			name:"雷霆八嘎",
			//对象类型数据
			school:{


				name:"拉钩教育",
				mobile:"1001001"
			},
			//数组类型
			names:["小斌","张百万","刘能"]
		}
	});
</script>
1.2.3 声明式渲染的好处
Vue中的声明式渲染,简单理解就是我们声明数据,Vue帮我们将数据渲染到HTML.
<!DOCTYPE html>
<html lang="en">
<head>
<meta charset="UTF-8" />
<meta name="viewport" content="width=device-width, initial-scale=1.0" />
<title>Document</title>
</head>
<body>
	<div id="app">
		<h2>{

   {name}}</h2>
	</div>
</body>
<!--
	jQuery中,如果 DOM 发生变化, js代码也需要做相应的改变,高耦合 .
	<script src="./js/jquery-1.8.3.min.js"></script>
	<script>
	$(document).ready(function () {
	$("#app").append("<h2>Hello Word! !</h2>");
	});
	</script>
-->
<!-- 在用 Vue中,只需要定义好展示数据,并把它放在 DOM 合适的位置就可以. -->
<script src="js/vue.min.js"></script>
<script>
	var VM = new Vue({


		el: "#app", //挂载点
		data: {


			name: "Hello Word! !",
		},
	});
</script>
</html>
1.2.4 Vue常用指令
根据官网的介绍,指令 是带有 v- 前缀的特殊属性。通过指令来操作DOM元素
1. v-text 指令
作用: 获取data数据, 设置标签的内容.
注意: 默认写法会替换全部内容,使用插值表达式{
{}}可以替换指定内容.
代码示例
<body>
	<div id="app">
		<!-- v-text 获取data数据,设置标签内容,会覆盖之前的内容体-->
		<h2 v-text="message">百度</h2>
		<!-- 使用插值表达式,不会覆盖 -->
		<h2>{

   {message}}百度</h2>
		<!-- 拼接字符串 -->
		<h2 v-text="message+1"></h2>
		<h2 v-text="message+'abc'"></h2>
	</div>
	<script>
		var VM = new Vue({


			el:"#app",
			data:{


				message:"Java程序员"
			}
		})
	</script>
</body>
</html>
2. v-html 指令
作用: 设置元素的 innerHTML (可以向元素中写入新的标签)
代码示例
<body>
	<div id="app">
		<!-- 获取普通文本 -->
		{

   {message}}
		<h2 v-text="message"></h2>
		<h2 v-html="message"></h2>
		<!-- 设置元素的innerHTML -->
		<h2 v-html="url"></h2>
		<h2 v-text="url"></h2>
	</div>
</body>
<script src="./js/vue.min.js"></script>
<script>
	var VM = new Vue({


		el: "#app",
		data: {


			message: "Java程序员",
			url: "<a href='https://www.baidu.com'>百度一下</a>",
		},
	});
</script>
3. v-on 指令
作用: 为元素绑定事件, 比如: v-on:click,可以简写为 @click=“方法”
绑定的方法定义在 VUE实例的, method属性中
语法格式
<div id="app">
	<!-- 使用v-on 绑定click 点击事件 -->
	<input type="button" value="点击按钮" v-on:click="方法名">
	<!-- 使用 @符号也可以绑定-->
	<input type="button" value="点击按钮" @click="方法名">
</div>
var VM = new Vue({
	el:"#app",
	//通过methods ,专门存放Vue中的方法
	methods:{
		方法名:function(){
			alert("123!")
		}
	}
})
代码示例
<body>
	<div id="app">
		<!-- 使用v-on 绑定click 点击事件 -->
		<input type="button" value="点击按钮" v-on:click="show">
		<!-- 简写 @方式 -->
		<input type="button" value="点击按钮" @click="show">
		<!-- 双击事件 -->
		<input type="button" value="双击击按钮" @dblclick="show">
		<!-- 绑定点击事件 -->
		<h2 @click="changeFood">{

   {food}}</h2>
	</div>
</body>
<script src="vue.min.js"></script>
<script>
	var VM = new Vue({


		el:"#app",
		data:{


			food:"麻辣小龙虾"
		},
		//通过methods ,专门存放Vue中的方法
		methods:{


			show:function(){


				alert("程序员!")
			},
			changeFood:function(){


				//使用this获取
				console.log(this.food);
				//在VUE中不需要考虑如何更改DOM元素, 重点放在更改数据,数据更新之后,使用数据
				的那个元素会同步更新
				this.food+="真好吃!";
			}
		}
	})
</script>
4. 计数器案例
1) 编码步骤
- data中定义数据: 比如 num 值为1
- methods中添加两个方法: 比如add(递增) ,sub(递减)
- 使用{ {}} 将num设置给 span标签
- 使用v-on 将add,sub 分别绑定给 + ,- 按钮
- 累加到10 停止
- 递减到0 停止
2) 页面准备
<body>
	<div id="app">
		<!-- 计算功能区域 -->
		<div>
			<input type="button" class="btn btn_plus">
			<span>{

   {num}}</span>
			<input type="button" class="btn btn_minus">
		</div>
	</div>
</body>
<script src="vue.min.js"></script>
<script>
	//创建VUE实例
	var VM = new Vue({


		el:"#app",
		data:{


			num:1
		}
	})
</script>
3) 案例演示
<!DOCTYPE html>
<html lang="en">
<head>
<meta charset="UTF-8">
<meta name="viewport" content="width=device-width, initial-scale=1.0">
<title>Document</title>
<link rel="stylesheet" href="./css/inputNum.css">
</head>
<body>
<div id="app">
<!-- 计算功能区域 -->
<div>
<input type="button" class="btn btn_plus" @click="add">
<span>{

   {num}}</span>
<input type="button" class="btn btn_minus" @click="sub">
</div>
</div>
</body>
<script src="vue.min.js"></script>
<script>
	//创建VUE实例
	var VM = new Vue({


		el:"#app",
		data:{


			num:1
		},
		methods: {


			add:function(){


				//console.log("add");
				if(this.num < 10){


					this.num++;
				}else{


					alert("别点啦!最大了!")
				}
			},
			sub:function(){


				//console.log("sub");
				if(this.num > 0){


					this.num--;
				}else{


					alert("别点啦!最小了!")
				}
			}
		}
	})
</script>
</html>
4) 案例总结
- 创建VUE实例时: el(挂载点) , data(数据) , methods(方法)
- v-on 指令的作用是绑定事件,简写为 @
- 方法中使用this关键字,获取data中的数据
- v-text 与 { {}} 的作用都是用来 设置元素的文本值
5. v-show指令
作用: v-show指令, 根据真假值,切换元素的显示状态
页面准备
<body>
	<div id="app">
		<img src="./img/car.gif" alt="">
	</div>
</body>
<script src="vue.min.js"></script>
<script>
	var VM = new Vue({


		el:"#app"
	})
</script>
代码示例
<body>
	<div id="app">
		<input type="button" value="切换状态" @click="changeShow" />
		<img v-show="isShow" src="https://img.imgdb.cn/item/5fc384c7d590d4788aca8f5d.jpg" alt="">
        <!-- <img v-show="age>18" src="https://img.imgdb.cn/item/5fc37e89d590d4788ac8c3bf.jpg" alt=""> -->
	</div>
</body>
<script src="js/vue.min.js"></script>
<script>
	var VM = new Vue({


		el: "#app",
		data: {


			isShow: true,
			age: 19,
		},
		methods: {


			changeShow: function () {


				//触发方法, 对isShow进行取反
				this.isShow = !this.isShow;
			},
		},
	});
</script>
v-show 指令总结
- 原理是修改元素的display,实现显示或者隐藏
- 指令后面的内容,最终会解析为 布尔值
- 值为true 显示, 为false 则隐藏
- 数据改变之后,显示的状态会同步更新
6. v-if 指令
作用: 根据表达值的真假,切换元素的显示和隐藏( 操纵dom 元素 )
代码示例
<body>
<div id="app">
<input type="button" value="切换显示状态" @click="changeShow">
<img v-if="isShow" src="./img/car.gif" alt="">
</div>
</body>
<script src="./vue.min.js"></script>
<script>
	var VM = new Vue({


		el:"#app",
		data:{


			isShow:false
		},
		methods: {


			changeShow:function(){


				this.isShow = !this.isShow;
			}
		}
	})
</script>
v-if 指令总结
- v-if 指令的作用: 根据表达式的真假切换元素的显示状态
- 本质是通过操作dom元素,来切换显示状态
- 表达式为true 元素存在与dom树,为false从dom树中移除
- 频繁切换使用 v-show ,反之使用v-if
7. v-bind 指令
作用: 设置元素的属性 (比如:src,title,class)
语法格式: v-bind:属性名=表达式
<img v-bind:src="imgSrc">
var VM = new Vue({
	el:"#app",
	data:{
		imgSrc:"图片地址"
	}
})
v-bind 可以省略,简写为冒号 :
<img :src="imgSrc">
代码示例
<body>
	<div id="app">
		<!-- 使用v-bind设置src属性值 -->
		<img v-bind:src="imgSrc" alt="">
		<!-- 简写 设置title -->
		<img :src="imgSrc" alt="" :title="imgTitle">
		<!-- 设置class -->
		<div :style="{

        fontSize: size + 'px'}">v-bind指令</div>
	</div>
</body>
<script src="./vue.min.js"></script>
<script>
	var VM = new Vue({


		el:"#app",
		data:{


			imgSrc:"./img/lagou.jpg",
			imgTitle:"拉钩教育",
			size:100
		}
	})
</script>
v-bind指令总结
- v-bind 指令的作用是: 为元素绑定属性
- 完整写法 v-bind:属性名,可以简写为 :属性名
8. v-for 指令
作用: 根据数据生成列表结构
语法结构
<div id="app">
	<ul>
		<li v-for="item in arr"></li>
	</ul>
</div>
var VM = new Vue({
	el:"#app",
	data:{
		arr:[1,2,3,4,5],
		objArr:[
			{name:"tom"},
			{name:"jack"}
		]
	}
})
代码示例
<body>
<div id="app">
<input type="button" value="添加数据" @click="add">
<input type="button" value="移除数据" @click="remove">
<ul>
<!-- 在li标签中获取数组元素 -->
<li v-for="(item,index) in arr">
{

   {index+1 }}城市: {

   {item}}
</li>
</ul>
<!-- 使用h2标签显示
v-for 结合 v-bind一起使用
-->
<h2 v-for="p in persons" v-bind:title="p.name">
{

   {p.name}}
</h2>
</div>
</body>
<script src="./vue.min.js"></script>
<script>
	var VM = new Vue({


		el:"#app",
		data:{


			//普通数组
			arr:["上海","北京","天津","杭州"],
				//对象数组
				persons:[
				{

     name:"尼古拉斯·赵四"},
				{

     name:"莱安纳多·小沈阳"}
			]
		},
		methods: {


			add:function(){


				//push 添加
				this.persons.push({

     name:"多利安·刘能"})
			},
			remove:function(){


				this.persons.shift();
			}
		}
	})
</script>
v-for指令总结
- v-for 指令的作用: 根据数据生成列表结构
- 数组经常和 v-for结合使用,数组有两个常用方法:
push() 向数组末尾添加一个或多个元素
shift() 把数组中的第一个元素删除 - 语法是: (item,index) in 数据
- item和index 可以结合其他指令一起使用
- 数组的长度变化,会同步更新到页面上,是响应式的
9. v-on 指令补充
- 传递自定义参数 : 函数调用传参
- 事件修饰符: 对事件触发的方式进行限制
代码示例
<body>
	<div id="app">
		<!-- 函数传参 -->
		<input
		type="button"
		value="礼物刷起来"
		@click="showTime(666,'爱你老铁!')"
		/>
		<!-- 事件修饰符 指定哪些方式可以触发事件 -->
		<input type="text" @keyup.enter="hi" />
	</div>
</body>
<script src="./js/vue.min.js"></script>
<script>
	var VM = new Vue({


		el: "#app",
		data: {

     },
		methods: {


			showTime: function (p1, p2) {


				console.log(p1);
				console.log(p2);
			},
			hi: function () {


				alert("你好吗?");
			},
		},
	});
</script>
总结
- 事件绑定方法,可以传入自定义参数
- 定义方法时,需要定义形参,来接收实际的参数
- 事件的后面跟上 .修饰符 可以对事件进行限制
- .enter 可以限制触发的按键为回车
- 事件修饰符有许多 使用时可以查询文档
10. MVVM模式
- MVVM 是Model-View-ViewModel 的缩写,它是一种基于前端开发的架构模式.
- MVVM模式将页面,分层了 M 、V、和VM ,解释为:
Model: 负责数据存储
View: 负责页面展示
View Model: 负责业务逻辑处理(比如Ajax请求等),对数据进行加工后交给视图展示
<body>
<div id="app">
<!-- View 视图部分 -->
<h2>{

   {name}}</h2>
</div>
</body>
<script src="./js/vue.min.js"></script>
<script>
	//创建的vue实例,就是 VM ViewModel
	var VM = new Vue({


		el: "#app",
		//data就是MVVM模式中的 model
		data: {


			name: "hello",
		},
	});
</script>
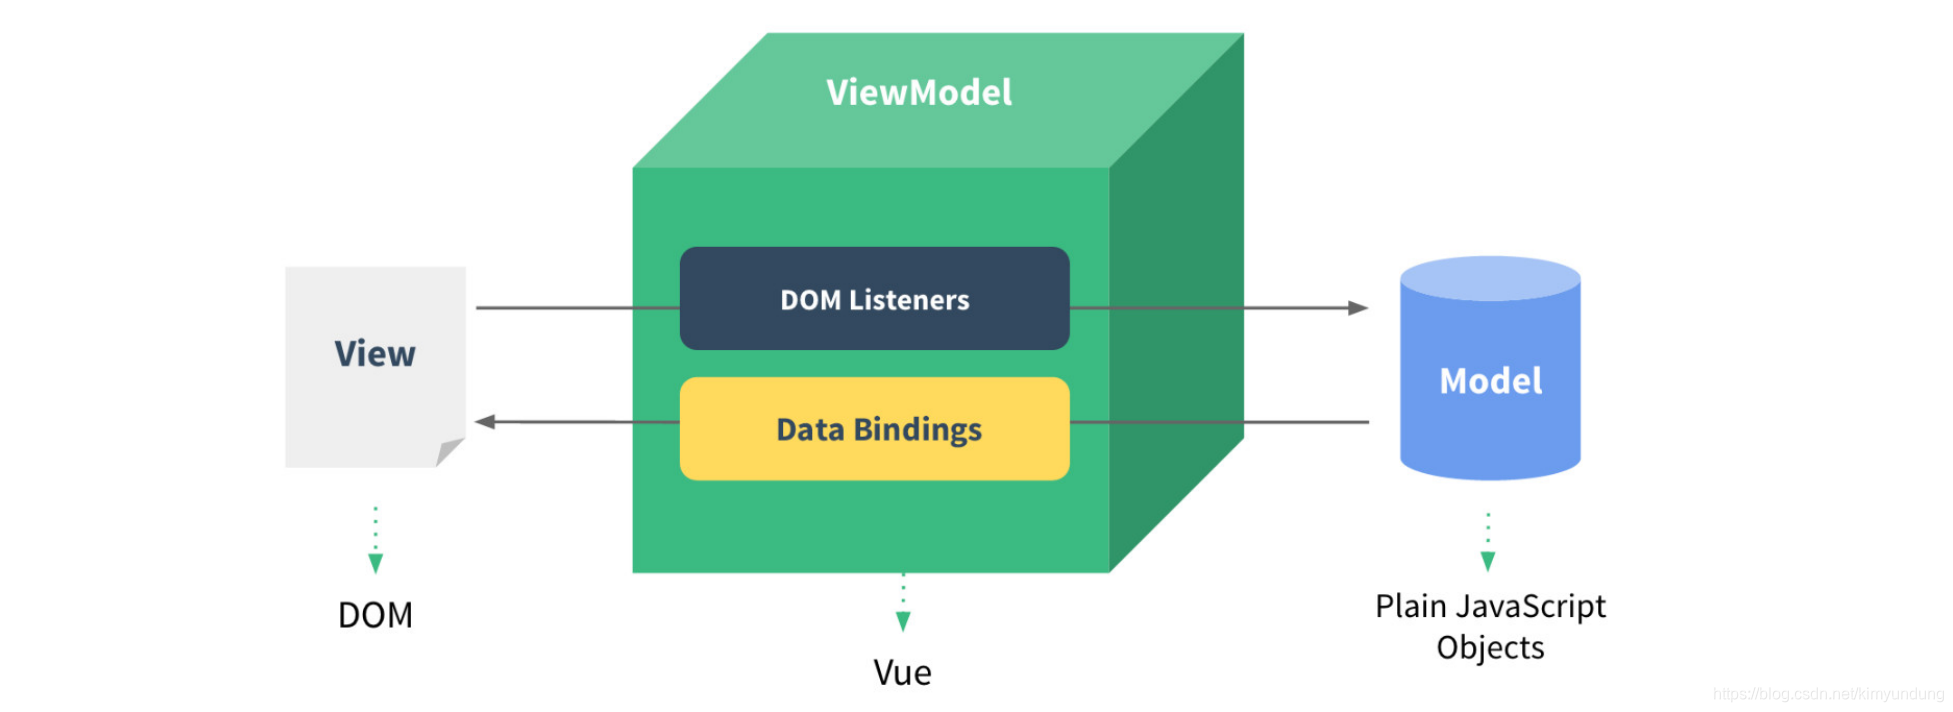
- 首先,我们将上图中的DOM Listeners和Data Bindings看作两个工具,它们是实现双向绑定的关键。
○ 从View侧看,ViewModel中的DOM Listeners工具会帮我们监测页面上DOM元素的变化,如果有变化,则更改Model中的数据;
○ 从Model侧看,当我们更新Model中的数据时,Data Bindings工具会帮我们更新页面中的DOM元素。 - MVVM的思想,主要是为了让我们的开发更加的方便,因为MVVM提供了数据的双向绑定
11. v-mode 指令
作用: 获取和设置表单元素的值(实现双向数据绑定)
- 双向数据绑定
○ 单向绑定: 就是把Model绑定到View,当我们用JavaScript代码更新Model时,View就会自动更新。
○ 双向绑定: 用户更新了View,Model的数据也自动被更新了,这种情况就是双向绑定。 - 什么情况下用户可以更新View呢?
○ 填写表单就是一个最直接的例子。当用户填写表单时,View的状态就被更新了,如果此时MVVM框架可以自动更新Model的状态,那就相当于我们把Model和View做了双向绑定:
代码示例
<body>
	<div id="app">
		<input type="button" value="修改message" @click="update" />
		<!-- View 视图 -->
		<!-- <input type="text" v-bind:value="message" /> -->
		<!-- v-model 实现双向数据绑定 -->
		<input type="text" v-model="message" />
		<input type="text" v-model="password" />
		<h2>{

   {message}}</h2>
	</div>
</body>
<script src="./js/vue.min.js"></script>
<script>
	//VM 业务逻辑控制
	var VM = new Vue({


		el: "#app",
		//Model 数据存储
		data: {


			message: "拉钩教育训练营",
			password: 123,
		},
		methods: {


			update: function () {


				this.message = "拉钩";
			},
		},
	});
</script>
v-model指令总结
- v-model 指令的作用是便捷的设置和获取表单元素的值
- 绑定的数据会和表单元素值相关联
- 双向数据绑定
1.2.5 实现简单记事本
1.功能介绍
2.新增内容
步骤
- 生成列表结构(v-for 数组)
- 获取用户输入(v-model 双向绑定)
- 回车,新增数据(v-on .enter事件修饰符)
- 页面布局不熟悉,可以通过审查元素的方式快速找到元素
<body>
	<!-- VUE示例接管区域 -->
	<section id="app">
		<!-- 输入框 -->
		<header class="header">
			<h1>VUE记事本</h1>
			<!-- v-on 绑定事件 -->
			<input v-model="inputValue" @keyup.enter="add"
			autofocus="autofocus" autocomplete="off" placeholder="输入日程"
			class="new-todo"/>
		</header>
		<!-- 列表区域 -->
		<section class="main">
			<ul class="listview">
				<li class="todo" v-for="(item,index) in list">
					<div class="view">
						<span class="index">{

   {index+1}}</span> <label>{

   {item}}
						</label>
						<button class="destroy"></button>
					</div>
				</li>
			</ul>
		</section>
	</section>
</body>
<script src="https://cdn.jsdelivr.net/npm/vue/dist/vue.js"></script>
<script>
	var VM = new Vue({


	el:"#app",
	data:{


		list:["写代码","吃饭","睡觉"],
		inputValue:"996还是997"
	},
	methods: {


		//新增方法
		add:function(){


			//将用户输入的内容添加到list
			this.list.push(this.inputValue);
		}
	}
	})
</script>
3.删除内容
步骤
- 点击删除指定的内容( 根据索引删除元素)
- 在methods中添加一个删除的方法,使用splice函数进行删除
<!-- 列表区域 -->
<section class="main">
	<ul class="listview">
		<li class="todo" v-for="(item,index) in list">
		<div class="view">
			<span class="index">{

   {index+1}}</span> <label>{

   {item}}</label>
			<!-- 删除按钮 -->
			<button class="destroy" @click="remove(index)"></button>
		</div>
		</li>
	</ul>
</section>
//删除方法
remove:function(index){
	console.log(index);
	//使用splice(元素索引,删除几个) 根据索引删除
	this.list.splice(index,1);
}
4.统计操作
步骤
- 统计页面信息的个数,就是列表中的元素的个数.
- 获取 list数组的长度,就是信息的个数
<!-- 统计和清空 -->
<footer class="footer">
	<span class="todo-count"> <strong>{

   {list.length}}</strong> items left
	</span>
	<button class="clear-completed">
	Clear
	</button>
</footer>
总结:
- 基于数据的开发方式
- v-text设置的是文本,可以使用简化方式 { {}}
5.清空数据
步骤:
- 点击清除所有信息
- 本质就是清空数组
<button class="clear-completed" @click="clear()">Clear</button>
//清空数组元素
clear:function(){
this.list=[];
}
1.3 axios
1.3.1 Ajax回顾
1.3.1.1 什么是Ajax?
Ajax 是指一种创建交互式网页应用的开发技术。Ajax = 异步 JavaScript 和 XML。
1.3.1.2 Ajax的作用
- Ajax 可以使网页实现异步更新。这意味着可以在不重新加载整个网页的情况下,对网页的某部分进行更新(局部更新)。传统的网页如果需要更新内容,必须重载整个网页页面。
- 简单记: Ajax 是一种在无需重新加载整个网页的情况下,能够更新部分网页的技术, 维护用户体验性, 进行网页的局部刷新.
1.3.1.3 异步与同步
- 浏览器访问服务器的方式
○ 同步访问: 客户端必须等待服务器端的响应,在等待过程中不能进行其他操作
○ 异步访问: 客户端不需要等待服务的响应,在等待期间,浏览器可以进行其他操作

1.3.1.4 案例演示
ajax.jsp
<%@ page contentType="text/html;charset=UTF-8" language="java" %>
<html lang="en">
<head>
<meta charset="UTF-8" />
<meta name="viewport" content="width=device-width, initial-scale=1.0" />
<title>Document</title>
</head>
<body>
	<input type="text" />
	<input type="button" value="Jquery发送异步请求" onclick="run1()" />
</body>
<script src="./jquery-1.8.3.min.js"></script>
<script>
	function run1() {


		//JQuery Ajax方式 发送异步请求
		$.ajax({


			url: "/ajax",
			async:true,
			data: {

      name: "天青" },
			type: "post",
			dataType:"text",
			success: function (res) {


				console.log(res)
				alert("响应成功" + res);
			},
			error: function () {


				alert("响应失败!");
			}
		});
	}
</script>
</html>
servlet
@WebServlet("/ajax")
public class AjaxServlet extends HttpServlet {


	@Override
	protected void doGet(HttpServletRequest req, HttpServletResponse resp) throws ServletException, IOException {


		//1.获取请求数据
		String username = req.getParameter("name");
		//模拟业务操作,造成的延时效果
		try {


			Thread.sleep(5000);
		} catch (InterruptedException e) {


		e.printStackTrace();
		}
		//2.打印username
		System.out.println(username);
		resp.getWriter().write("hello hello");
	}
	@Override
	protected void doPost(HttpServletRequest req, HttpServletResponse resp) throws ServletException, IOException {


		doGet(req, resp);
	}
}
1.3.1 axios介绍
VUE中结合网络数据进行应用的开发
- 目前十分流行网络请求库,专门用来发送请求,其内部还是ajax,进行封装之后使用更加方便
- axios作用: 在浏览器中可以帮助我们完成 ajax异步请求的发送.
Vue2.0之后,尤雨溪推荐大家用axios替换JQuery ajax
1.3.2 axios入门
使用步骤:
- 导包
<!-- 官网提供的 axios 在线地址 -->
<script src="https://unpkg.com/axios/dist/axios.min.js"></script>
- 请求方式,以GET和POST举例
GET
axios.get(地址?key=value&key2=value2).then(function(response){},function(error){});

POST
axios.post(地址,{key:value,key2:value2}).then(function(response){},function(error){})
- 根据接口文档, 访问测试接口,进行测试
接口1:随机笑话
请求地址:https://autumnfish.cn/api/joke/list
请求方法:get
请求参数:num(笑话条数,数字)
响应内容:随机笑话
接口2:用户注册
请求地址:https://autumnfish.cn/api/user/reg
请求方法:post
请求参数:username(用户名,字符串)
响应内容:注册成功或失败
代码示例
<body>
	<input type="button" value="get请求" id="get">
	<input type="button" value="post请求" id="post">
</body>
<script src="https://unpkg.com/axios/dist/axios.min.js"></script>
<script>
	/*
		请求地址:https://autumnfish.cn/api/joke/list
		请求方法:get
		请求参数:num(笑话条数,数字)
		响应内容:随机笑话
	*/
	document.getElementById("get").onclick=function(){


		axios.get("https://autumnfish.cn/api/joke/list?num=1")
		.then(function(response){


			//请求成功,调用
			console.log(response);
		},function(error){


			//请求失败,调用
			console.log(error)
		});
	}
	/*
	请求地址:https://autumnfish.cn/api/user/reg
	请求方法:post
	请求参数:username(用户名,字符串)
	响应内容:注册成功或失败
	*/
	document.getElementById("post").onclick=function(){


		axios.post("https://autumnfish.cn/api/user/reg",{

     username:"张百万"})
		.then(function(response){


			console.log(response);
		},function(error){


			console.log(error);
		});
	}
</script>
1.3.3 axios总结
- axios 必须导包才能使用
- 使用get或者post方法,就可以发送请求
- then方法中的回调函数,会在请求成功或者请求失败的时候触发
- 通过回调函数的形参可以获取响应的内容,或者错误信息
1.3.4 获取笑话案例
通过vue+axios 完成一个获取笑话的案例.
接口: 随机获取一条笑话
请求地址:https://autumnfish.cn/api/joke
请求方法:get
请求参数:无
响应内容:随机笑话
代码示例
<body>
	<div id="app">
		<input type="button" value="点击获取一个笑话" @click="getJoke">
		<p>{

   {joke}}</p>
	</div>
</body>
<!-- 引入vue + axios -->
<script src="https://cdn.jsdelivr.net/npm/vue/dist/vue.js"></script>
<script src="https://unpkg.com/axios/dist/axios.min.js"></script>
<script>
	/*
		请求地址:https://autumnfish.cn/api/joke
		请求方法:get
		请求参数:无
		响应内容:随机笑话
	*/
	var VM = new Vue({


		el:"#app",
		data:{


			joke:"笑笑更健康"
		},
		methods: {


			getJoke:function(){


				console.log(this.joke);//笑笑更健康
				var that = this; //把this保存起来
				//异步访问
				axios.get("https://autumnfish.cn/api/joke").then(
					function(response){


					//获取data中的笑话
					console.log(response.data);
					//console.log(this.joke); //undefined 没有获取到this
					that.joke=response.data;
				},
				function(error){

     }
				)
			}
		}
	})
</script>
案例总结
- axios回调函数中this指向已经改变,无法访问data中的数据
- 解决方案: 将this进行保存,回调函数中直接使用保存的this即可
1.3.5 天气查询案例
1.3.5.1 需求分析
功能分析: 回车查询
- 输入内容,点击回车 (v-on.enter)
- 访问接口,查询数据 (axios v-model)
- 返回数据,渲染数据
1.3.5.2 接口文档
请求地址:http://wthrcdn.etouch.cn/weather_mini
请求方法:get
请求参数:city (要查询的城市名称)
响应内容:天气信息
1.3.5.3 案例演示
自定义JS文件
作为一个标准的应用程序,我们将创建VUE实例的代码,抽取到main.js 文件中
main.js
/*
	请求地址:http://wthrcdn.etouch.cn/weather_mini
	请求方法:get
	请求参数:city (要查询的城市名称)
	响应内容:天气信息
*/
var VM = new Vue({


	el:"#app",
	data:{


		city:'',
		//定义空数组接收天气信息
		weatherList:[]
	},
	//编写查询天气方法
	methods: {


		searchWeather:function(){


			console.log("天气查询");
			console.log(this.city);
			//保存this,方便在回调函数中使用
			var that = this;
			//调用接口
			axios.get("http://wthrcdn.etouch.cn/weather_mini?city="+this.city)
			.then(function(respose){


				//console.log(respose);
				//只获取天气数组
				console.log(respose.data.data.forecast);
				that.weatherList = respose.data.data.forecast;
			},function(error){

    });
		}
	}
})
<body>
	<div class="wrap" id="app">
		<div class="search_form">
		<div class="logo">天气查询</div>
			<div class="form_group">
				<!-- 3.绑定点击事件,回车触发,通过v-model绑定数据 -->
				<input v-model="city" @keyup.enter="searchWeather" type="text"
				class="input_txt" placeholder="请输入要查询的城市"/>
				<button class="input_sub">回车查询</button>
			</div>
		</div>
		<ul class="weather_list">
			<!-- 遍历天气信息 -->
			<li v-for="item in weatherList">
				<div class="info_type"><span class="iconfont">{

   {item.type}}</span>
				</div>
				<div class="info_temp">
					<b>{

   {item.low}}</b>
					~
					<b>{

   {item.high}}</b>
				</div>
				<div class="info_date"><span>{

   {item.date}}</span></div>
			</li>
		</ul>
	</div>
	<!-- 开发环境版本,包含了有帮助的命令行警告 -->
	<script src="https://cdn.jsdelivr.net/npm/vue/dist/vue.js"></script>
	<!-- 官网提供的 axios 在线地址 -->
	<script src="https://unpkg.com/axios/dist/axios.min.js"></script>
	<!-- 2.引入自己的js -->
	<script src="./js/main.js"></script>
</body>
1.3.5.4 案例总结
- 应用的逻辑代码,建议与页面进行分离,使用单独的JS编写
- axios回调函数中的 this的指向改变,无法正常使用, 需要另外保存一份
- 服务器返回的数据比较的复杂时,获取数据时要注意层级结构
1.3.6 解决页面闪烁问题
我们发现访问天气预报案例页面时, 使用插值表达式的地方出现了闪烁问题,如何解决呢?
v-cloak指令
作用: 解决插值表达式闪烁问题
当网络较慢,网页还在加载 Vue.js ,而导致 Vue 来不及渲染,这时页面就会显示出 Vue 源代码。我们可以使用 v-cloak 指令来解决这一问题。
- 添加样式
<style>
	/* 通过属性选择器,设置 添加了v-cloak */
	[v-cloak] {


		display: none;
	}
</style>
- 在id为app的div中添加 v-cloak
<div class="wrap" id="app" v-cloak>
1.4 computed 计算属性
1.4.1 什么是计算属性
在Vue应用中,在模板中双向绑定一些数据或者表达式,但是表达式如果过长,或者逻辑更为复杂时,就会变得臃肿甚至难以维护和阅读,比如下面的代码:
<div>
写在双括号中的表达式太长了,不利于阅读
{

   {text.split(',').reverse().join(',')}}
</div>.
将这段操作text.split(',').reverse().join(',') 放到计算属性中,最终返回一个结果值就可以
computed 的作用: 减少运算次数, 缓存运算结果. 运用于重复相同的计算.
1.4.1 代码示例
<body>
	<div id="app">
		<!-- <h1>{

    {a*b}}</h1>
		<h1>{

    {a*b}}</h1> -->
		<!-- <h1>{

    {res()}}</h1>
		<h1>{

    {res()}}</h1> -->
		<h1>{

   {res2}}</h1>
		<h1>{

   {res2}}</h1>
	</div>
</body>
<script src="vue.min.js"></script>
<script>
	var VM = new Vue({


		el: "#app",
		data: {


			a: 10,
			b: 20,
		},
		methods: {


			res: function () {


				console.log("res方法执行");
				return this.a * this.b;
			},
		},
		//使用计算属性进行优化 减少运算次数,用于重复相同的运算
		computed: {


			res2: function () {


				console.log("res2方法执行");
				return this.a * this.b;
			},
		},
	});
</script>
1.4.2 computed总结
- 定义函数也可以实现与 计算属性相同的效果,都可以简化运算。
- 不同的是计算属性是基于它们的响应式依赖进行缓存的。只在相关响应式依赖发生改变时它们才会重新求值。
1.5 filter 过滤器
1.5.1 什么是过滤器
过滤器是对即将显示的数据做进一步的筛选处理,然后进行显示,值得注意的是过滤器并没有改变原来的数据,只是在原数据的基础上产生新的数据。
数据加工车间,对值进行筛选加工.
1.5.2 过滤器使用位置
- 双括号插值内
{

   { msg | filterA }} msg是需要处理的数据, filterA是过滤器, | 这个竖线是管道,通过这个管道
将数据传输给过滤器进行过滤 加工操作
- v-bind绑定的值的地方。
<h1 v-bind:id=" msg | filterA"> {

   { msg }} </h1>
1.5.3 过滤器
1.局部过滤器
需求: 通过过滤器给电脑价格前面 添加一个符号¥
<body>
	<div id="app">
		<p>电脑价格: {

   {price | addIcon}}</p>
	</div>
</body>
<script src="./vue.min.js"></script>
<script>
	var VM = new Vue({


		el: "#app", //挂载点
		data: {


			price: 200,
		},
		methods: {

     }, //方法
		computed: {

     }, //计算属性
		//局部过滤器
		filters: {


			//处理函数,value = price ,是固定参数
			addIcon(value) {


				return "¥" + value;
			},
		},
	});
</script>
2.全局过滤器
需求: 将用户名开头字母大写
<body>
	<div id="app">
		<p>{

   {user.name | changeName}}</p>
	</div>
</body>
<script src="./vue.min.js"></script>
<script>
	//在创建Vue实例之前 创建全局过滤器
	Vue.filter("changeName", function (value) {


		//将姓名开头字母大写,然后再重新拼接
		return value.charAt(0).toUpperCase() + value.slice(1);
	});
	var VM = new Vue({


		el: "#app", //挂载点
		data: {


			user: {

      name: "tom" },
		},
	});
</script>
1.5.4 总结
1.6 watch 侦听器
1.6.1 什么是侦听器
Vue.js 提供了一个方法 watch,它用于观察Vue实例上的数据变动。
作用: 当你有一些数据需要随着其它数据变动而变动时,可以使用侦听属性
1.6.2 案例演示
需求: 监听姓名变化,实时显示

<body>
<div id="app">
<label>名:<input type="text" v-model="firstName" /></label>
<label>姓:<input type="text" v-model="lastName" /></label>
{

   {fullNameComputed}}
</div>
</body>
<script>
	var app = new Vue({


		el: "#app",
		data: {


			firstName: "",
			lastName: "",
			fullName: "",
		},
		//监听,程序在运行的时候,实时监听事件
		watch: {


			//参数说明:1、新值,2、旧值
			firstName(newValue, oldValue) {


				this.fullName = newValue + " " + this.lastName;
			},
			lastName(newValue, oldValue) {


				this.fullName = this.firstName + " " + newValue;
			},
		},
		computed: {


			fullNameComputed() {


				return this.firstName + " " + this.lastName;
			},
		},
	});
</script>
1.7 Component 组件
1.7.1 组件介绍
组件(Component)是自定义封装的功能。在前端开发过程中,经常出现多个网页的功能是重复的,而且很多不同的页面之间,也存在同样的功能。
我们将相同的功能进行抽取,封装为组件,这样,前端人员就可以在组件化开发时,只需要书写一次代码,随处引入即可使用。
组件系统让我们可以用独立可复用的小组件来构建大型应用,几乎任意类型的应用的界面都可以抽象为一个组件树

vue的组件有两种: 全局组件 和 局部组件
1.7.2 全局组件
语法格式:
Vue.component("组件名称", {
	template: "html代码", // 组件的HTML结构代码
	data(){ //组件数据
		return {}
	},
	methods: { // 组件的相关的js方法
		方法名(){
			// 逻辑代码
		}
	}
})
注意:
- 组件名以小写开头,采用短横线分割命名: 例如 hello-Word
- 组件中的data 必须是一个函数,注意与Vue实例中的data区分
- 在template模板中, 只能有一个根元素
<body>
<div id="app">
<!-- 使用组件,可以使用多次 -->
<lagou-header></lagou-header>
<lagou-header></lagou-header>
<lagou-header></lagou-header>
</div>
</body>
<script src="./vue.min.js"></script>
<script>
	//全局组件
	Vue.component("lagou-header", {


		//组件的命名一般使用短横线方式,组件中的模板只能有一个根元素
		template: "<div>头部组件的HTML代码<h1 @click='hello'>{

     {msg}}</h1><div>",
		data() {


			//组件中的data是一个函数
			return {


				msg: "hello这里是组件中的data数据",
			};
		},
		methods: {


			hello() {


				alert("嗨 你好!");
			},
		},
	});
	var VM = new Vue({


		el: "#app",
		data: {

     },
		methods: {

     },
	});
</script>
1.7.3 局部组件
相比起全局组件,局部组件只能在同一个实例内才能被调用。局部组件的写法和全局组件差不多。 唯一不同就是:局部组件要写在Vue实例里面。
new Vue({
	el: "#app",
	components: {
		组件名: {
			// 组件结构
			template: "HTML代码",
			// data数据
			data() { return { msg:"xxxx" };},
		},
	},
});
注意:
创建局部组件,注意 components,注意末尾有 ‘s’,而全局组件是不用+ ‘s’ 的。这意味着,components 里可以创建多个组件。
<body>
	<div id="app">
		<web-msg></web-msg>
	</div>
</body>
<script src="./vue.min.js"></script>
<script>
	var VM = new Vue({


		el: "#app",
		components: {


			//组件名称
			"web-msg": {


				//组件内容
				template: "<div><h1>{

     {msg1}}</h1><h1>{

     {msg2}}</h1></div>",
				data() {


					return {


						msg1: "开发ing...",
						msg2: "开发完成!",
					};
				},
			},
		},
	});
</script>
1.7.4 组件与模板分离
由于把html语言写在组件里面很不方便,也不太好看所以将它们分开写。
<body>
	<div id="app">
		<web-msg></web-msg>
	</div>
	<!-- 将模板写在HTML中, 给模板指定一个ID -->
	<template id="tmp1">
		<div>
			<button @click="show">{

   {msg}}</button>
		</div>
	</template>
</body>
<script src="./vue.min.js"></script>
<script>
	var VM = new Vue({


		el: "#app",
		components: {


			"web-msg": {


				template: "#tmp1",
				data() {


					return {


						msg: "点击查询",
					};
				},
				methods: {


					show() {


						alert("正在查询,请稍等...");
					},
				},
			},
			"web-msg2": {

     },
		},
	});
</script>
总结:
- 上面这种写法,浏览器会把 html 里的 template 标签过滤掉。所以 template 标签的内容是不会在页面中展示的。直到它被 JS 中的 Vue 调用。
- 在 html 中,template 标签一定要有一个 id,因为通过 id 是最直接被选中的。 data 和 methods 等 参数,全部都要放到 Vue 实例里面写
1.8 Vue生命周期
1.8.1 生命周期图示
每个Vue实例在被创建之前都要经过一系列的初始化过程,这个过程就是vue的生命周期
了解生命周期的好处:
- 找错误
- 解决需求
下图展示了实例的生命周期。你不需要立马弄明白所有的东西,不过随着你的不断学习和使用,它的参考价值会越来越高。
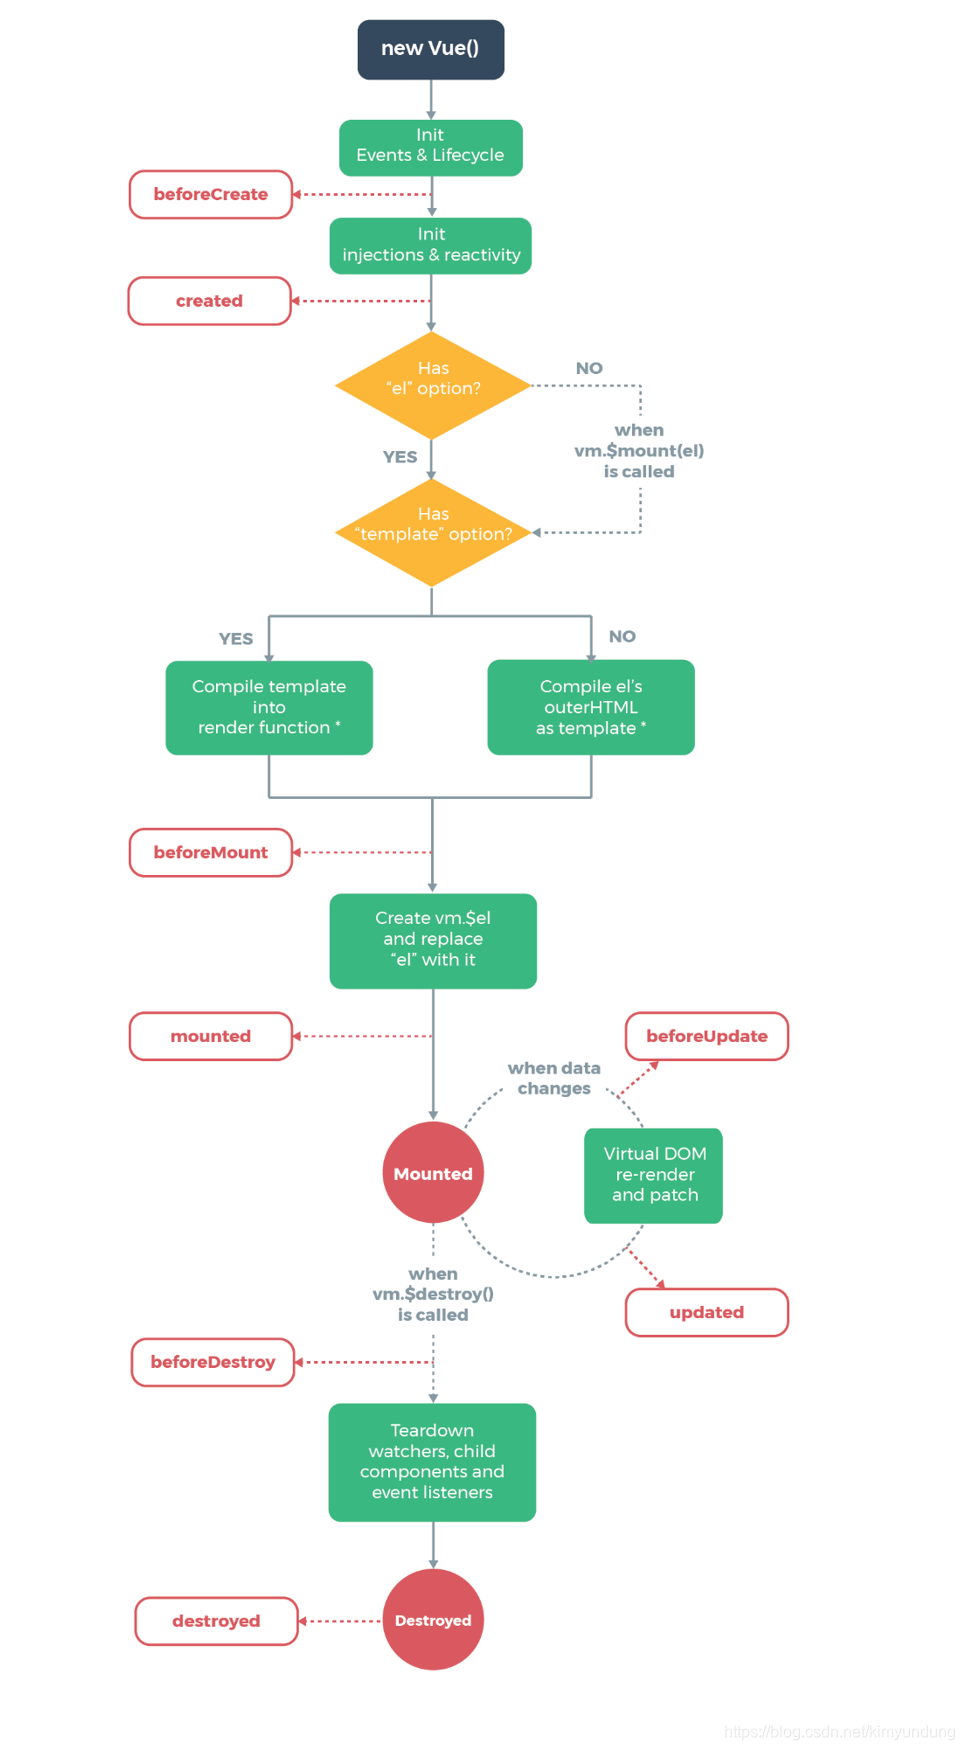
1.8.2 钩子函数介绍
生命周期中的钩子函数
钩子函数:钩子函数是在一个事件触发的时候,在系统级捕获到了他,然后做一些操作
| 函数 | 说明 |
|---|---|
| beforeCreate() | 在创建Vue实例之前,可以执行这个方法. 例如 加载动画操作 |
| created() | 实例创建完成,属性绑定好了,但是DOM还没有生成. |
| beforeMount() | 模板已经在内存中编辑完成了,尚未被渲染到页面中. |
| mounted() | 内存中的模板已经渲染到页面,用户已经可以看见内容. |
| beforeUpdate() | 数据更新的前一刻 , 组件在发生更新之前,调用的函数 |
| updated() | updated执行时,内存中的数据已更新,并且页面已经被渲染 |
| beforeDestroy () | 钩子函数在实例销毁之前调用 |
| destroyed () | 钩子函数在Vue 实例销毁后调用 |
1.8.3 案例演示
<body>
	<div id="app">
		<button @click="next">获取下一句</button>
		<h2 id="msg">{

   {message}}</h2>
	</div>
</body>
<script src="./vue.min.js"></script>
<script>
	var VM = new Vue({


		el: "#app",
		data: {


			message: "想当年,金戈铁马",
		},
		methods: {


			next() {


				this.message = "气吞万里如虎!";
			},
			show() {


				alert("show方法执行!");
			},
		},
		beforeCreate() {


			alert("1.beforeCreate函数在组件实例化之前执行");
			alert(this.message); //undefined
			this.show(); // this.show is not a function
		},
		created() {


			alert("2.created函数执行时,组件实例化完成,但是DOM(页面)还未生成");
			alert(this.message);
			this.show();
		},
		beforeMount() {


			alert(
			"3.beforeMount函数执行时,模板已经在内存中编辑完成了,尚未被渲染到页面中"
			);
			alert(document.getElementById("msg").innerText); //Cannot read property
			'innerText' of null
		},
		mounted() {


			alert("4.mounted函数执行时,模板已经渲染到页面,执行完页面显示");
			alert(document.getElementById("msg").innerText);
		},
		beforeUpdate() {


			alert("5.beforeUpdate执行时,内存中的数据已更新,但是页面尚未被渲染");
			alert("页面显示的内容:" + document.getElementById("msg").innerText);
			alert("data中的message数据是: " + this.message);
		},
		updated() {


			alert("6.updated执行时,内存中的数据已更新,此方法执行完显示页面!");
		},
	});
</script>
1.9 Vue Router 路由
1.9.1 什么是路由?
在Web开发中,路由是指根据URL分配到对应的处理程序。 路由允许我们通过不同的 URL 访问不同的内容。
通过 Vue.js 可以实现多视图单页面web应用(single page web application,SPA)
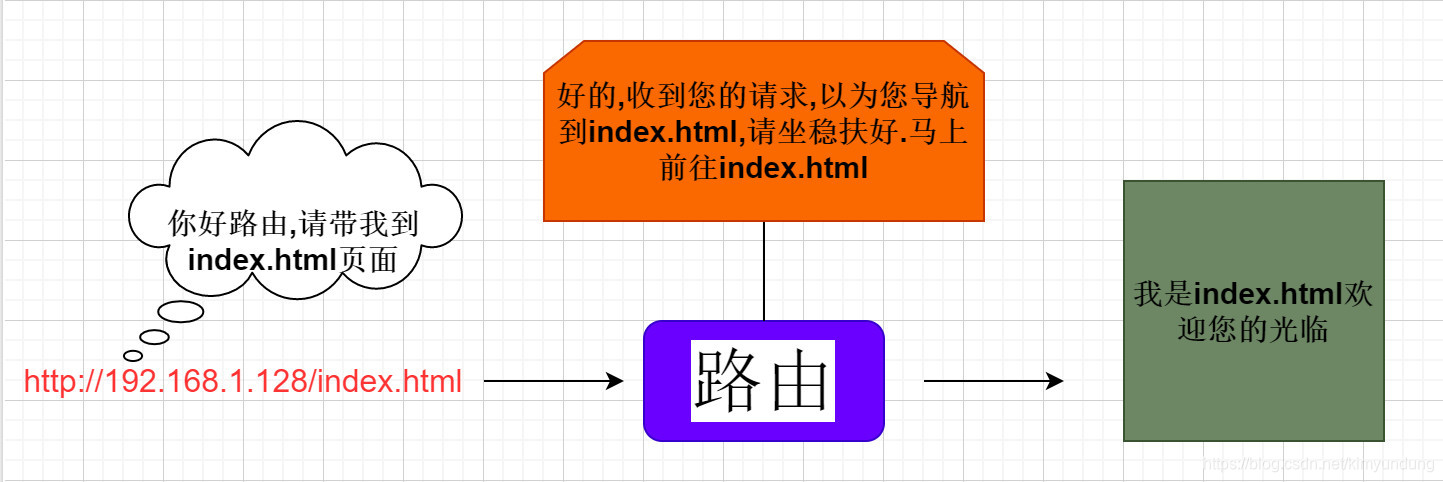
1.9.2 什么是SPA ?
百度百科
- 单页面Web应用(single page web application,SPA),就是只有一张Web页面的应用,是加载单个HTML 页面并在用户与应用程序交互时动态更新该页面的Web应用程序。
单页应用不存在页面跳转,它本身只有一个HTML页面。我们传统意义上的页面跳转在单页应用的概念下转变为了 body 内某些元素的替换和更新,举个例子:

整个body的内容从登录组件变成了欢迎页组件, 从视觉上感受页面已经进行了跳转。但实际上,页面只是随着用户操作,实现了局部内容更新,依然还是在index.html 页面中。
单页面应用的好处:
- 用户操作体验好,用户不用刷新页面,整个交互过程都是通过Ajax来操作。
- 适合前后端分离开发,服务端提供http接口,前端请求http接口获取数据,使用JS进行客户端渲染。
1.9.3 路由相关的概念
- router :
是 Vue.js 官方的路由管理器。它和 Vue.js 的核心深度集成,让构建单页面应用(SPA)变得易如反掌 ,router 就相当于一个管理者,它来管理路由。 - route:
ruter相当于路由器, route就相当于一条路由.比如: Home按钮 => home内容, 这是一条route, news按钮 => news内容, 这是另一条路由。 - routes :
是一组路由,把上面的每一条路由组合起来,形成一个数组。[{home 按钮 =>home内容 }, { about按钮 => about 内容}] - router-link组件:
router-link 是一个组件,是对标签的一个封装. 该组件用于设置一个导航链接,切换不同 HTML 内容。 to 属性为目标地址, 即要显示的内容 - router-view 组件:
路由导航到指定组件后,进行渲染显示页面.
1.9.4 使用路由
1) Vue.js 路由需要载入 vue-router 库
//方式1: 本地导入
<script src="vue-router.min.js"></script>
//方式2: CDN
<script src="https://unpkg.com/vue-router/dist/vue-router.js"></script>
2) 使用步骤
- 定义路由所需的组件
- 定义路由 每个路由都由两部分 path (路径) 和component (组件)
- 创建router路由器实例 ,管理路由
- 创建Vue实例, 注入路由对象, 使用$mount() 指定挂载点
Vue 的$mount()为手动挂载,在项目中可用于延时挂载(例如在挂载之前要进行一些其他操作、判断等),之后要手动挂载上。new Vue时,el和$mount并没有本质上的不同。
3) HTM代码
<body>
	<div id="app">
		<h1>渣浪.com</h1>
		<p>
			<!-- 使用 router-link 组件来导航,to属性指定链接 -->
			<router-link to="/home">go to home</router-link>
			<router-link to="/news">go to news</router-link>
		</p>
		<!-- 路由的出口, 路由匹配到的组件(页面)将渲染在这里 -->
		<router-view></router-view>
	</div>
</body>
4) JS代码
<script src="./vue.min.js"></script>
<script src="./vue-router.min.js"></script>
<script>
	//1.定义路由所需的组件
	const home = {

     template: "<div>首页</div>" };
	const news = {

     template: "<div>新闻</div>" };
	//2.定义路由 每个路由都有两部分 path和component
	const routes = [
		{

     path: "/home", component: home },
		{

     path: "/news", component: news },
	];
	//3.创建router路由器实例,对路由对象routes进行管理.
	const router = new VueRouter({


		routes: routes,
	});
	//4.创建Vue实例, 调用挂载mount函数,让整个应用都有路由功能
	const VM = new Vue({


		router,
	}).$mount("#app"); //$mount是手动挂载代替el
</script>
1.9.5 路由总结
- router是Vue中的路由管理器对象,用来管理路由.
- route是路由对象,一个路由就对应了一条访问路径,一组路由用routes表示
- 每个路由对象都有两部分 path(路径)和component (组件)
- router-link 是对a标签的封装,通过to属性指定连接
- router-view 路由访问到指定组件后,进行页面展示
任务二 Vue-cli&ElementUI
1.Vue-cli
1.1 什么是Vue-cli
- Vue cli是基于Vue的应用开发提供的一个标准的脚手架工具.为应用搭建基础的框架结构,提供插件、开发服务、Preset、构建打包功能
- Vue cli 背后集成了现代化开发的诸多功能,通过简单的命令就可以完成 "零配置"的项目环境搭建
1.2 安装Vue-cli步骤
在安装vue-cli前,要确认自己的电脑是否安装了nodejs和npm.
1.2.1 安装Node.js
安装了node.js才有使用npm ,才能安装vue-cli
1.2.1.1 什么是node.js
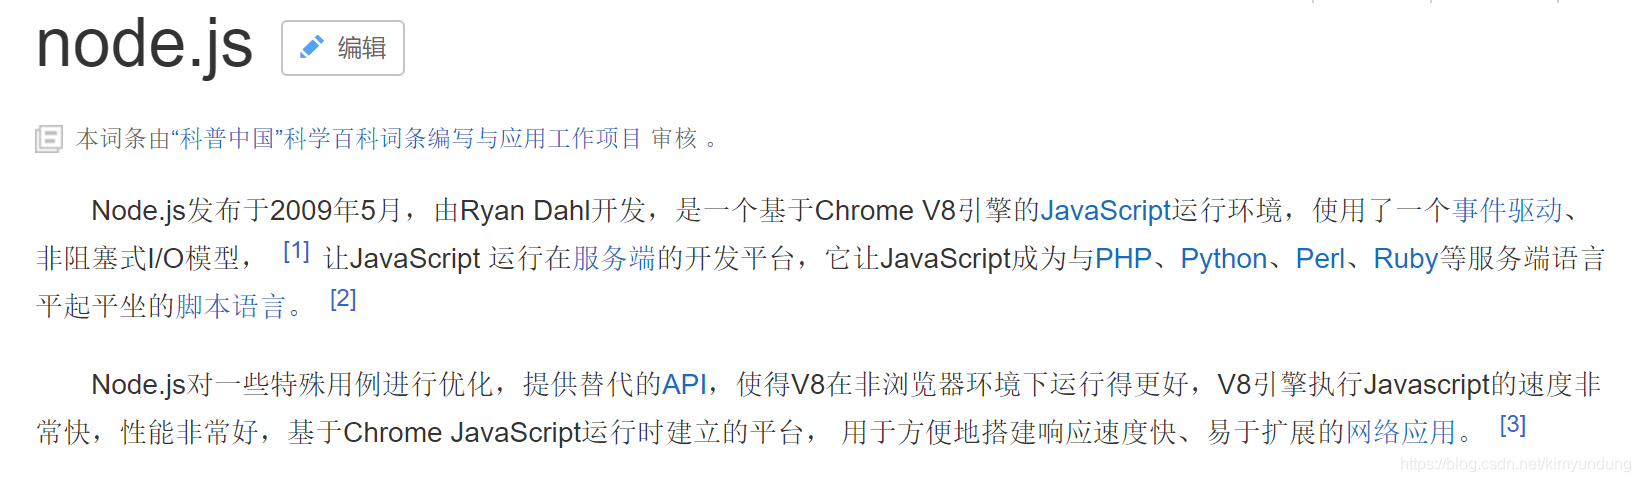
为什么会有node.js?
传统意义上的 JavaScript 运行在浏览器上,Chrome 使用的 JavaScript 引擎是 V8,Node.js 是一个运行在服务端 的框架,它的底层就使用了 V8 引擎,这样就可以使用javascript去编写一些服务端的程序,这样也就实现了用 javaScript去开发 Apache + PHP 以及 Java Servlet所开发的服务端功能,这样做的好处就是前端和后端都采用 javascript,即开发一份js程序即可以运行在前端也可以运行的服务端,这样比一个应用使用多种语言在开发效率上 要高,不过node.js属于新兴产品,一些公司也在尝试使用node.js完成一些业务领域,node.js基于V8引擎,基于 事件驱动机制,在特定领域性能出色,比如用node.js实现消息推送、状态监控等的业务功能非常合适。
1.2.1.2 安装node.js
1) 下载对应你系统的Node.js版本:
https://nodejs.org/en/download/
我们统一安装: node-v12.18.1-x64.msi

2) 选安装目录进行安装, 我选择安装在了E盘: E:\Program Files\nodejs
3) 测试: 在命令提示符下输入命令
node -v //会显示当前node的版本
1.2.2 安装NPM
npm全称Node Package Manager,他是node包管理和分发的工具,使用NPM可以对应用的依赖进行管理,NPM 的功能和服务端项目构建工具maven的依赖管理功能差不多,我们通过npm 可以很方便地下载js库,打包js文件。
1.2.2.1 自动安装NPM
node.js已经集成了npm工具
在命令提示符输入 npm -v 可查看当前npm版本
npm -v

1.2.2.2 查看包管理路径
包路径就是npm从远程下载的js包所存放的路径。 使用 npm config ls 查询NPM管理包路径(NPM下载的依赖包所存放的路径)
npm config ls
我们发现NPM默认的管理包路径在:
C:\Users\86187\AppData\Roaming\npm
1.2.2.3 设置包管理路径
依赖包放在C盘不太合适,为了方便对依赖包管理, 我们将管理包的路径设置在单独的地方:
- 我们选择一个路径,专门存放这些依赖包.我选择创建一个目录: H:\software\nodejs_package
- 在 H:\software\nodejs_package 下再创建 npm_modules 文件夹 和 npm_cache 文件夹:

- 执行下边的命令,设置为自定义的包管理路径:
npm config set prefix "H:\software\nodejs_package\npm_modules"
npm config set cache "H:\software\nodejs_package\npm_cache"
- 此时再使用 npm config ls 查询NPM管理包路径发现路径已更改

1.2.2.4 NPM环境变量配置
1) 查看npm的全局路径是什么
npm config get prefix

2) 配置PATH环境变量
- 添加新的系统变量: key=NODE_HOME , value= H:\software\nodejs_package
- path中添加 %NODE_HOME%\npm_modules
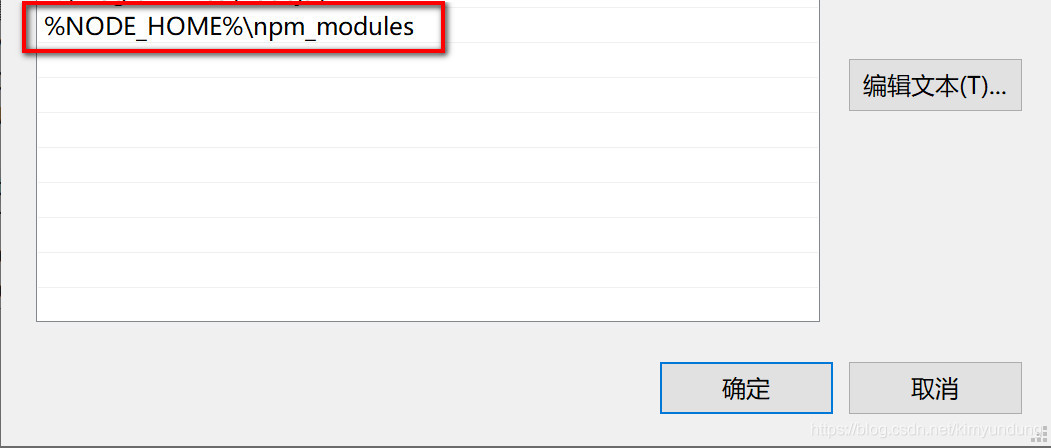
1.2.2.5 安装cnpm
npm默认会去国外的镜像去下载js包,在开发中通常我们使用国内镜像,这里我们使用淘宝镜像
下边我们来安装cnpm: 有时我们使用npm下载资源会很慢,所以我们可以安装一个cnmp(淘宝镜像)来加快下载速度。
1) 联网情况下, 输入命令,进行全局安装淘宝镜像:
//安装
npm install -g cnpm --registry=https://registry.npm.taobao.org
//查看cnpm的版本
cnpm -v
1.2.3 安装vue-cli
目前主流版本是 2.x 和 3.x 版本,安装3.x 以上的版本是因为该版本既可以创建2.x项目与3.x 项目
注意: 以管理员身份打开命令行
1) 安装命令
npm install -g @vue/cli
2) 输入 vue命令

3) 输入 vue -V 查看版本
vue -V

1.3 快速构建Vue项目
1.3.1 步骤说明
我们使用vue-cli 快速构建项目,步骤如下:
- 桌面创建一个空的文件夹

- 以管理员身份运行cmd , 进入到vueTest文件夹
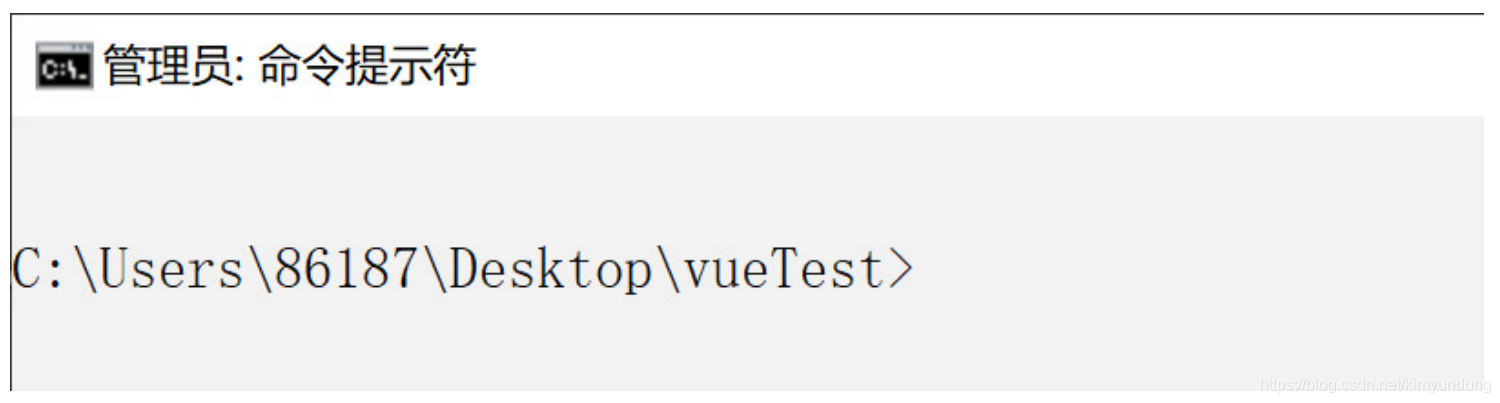
- 执行下面的命令
1.基于交互式命令方式,创建项目
//文件名 不支持驼峰(含大写字母)使用短横线方式
vue create my-project

- 选择自定义安装,点击回车

- 在这列表中,选择我们要安装的组件,使用空格键选择,选好后回车
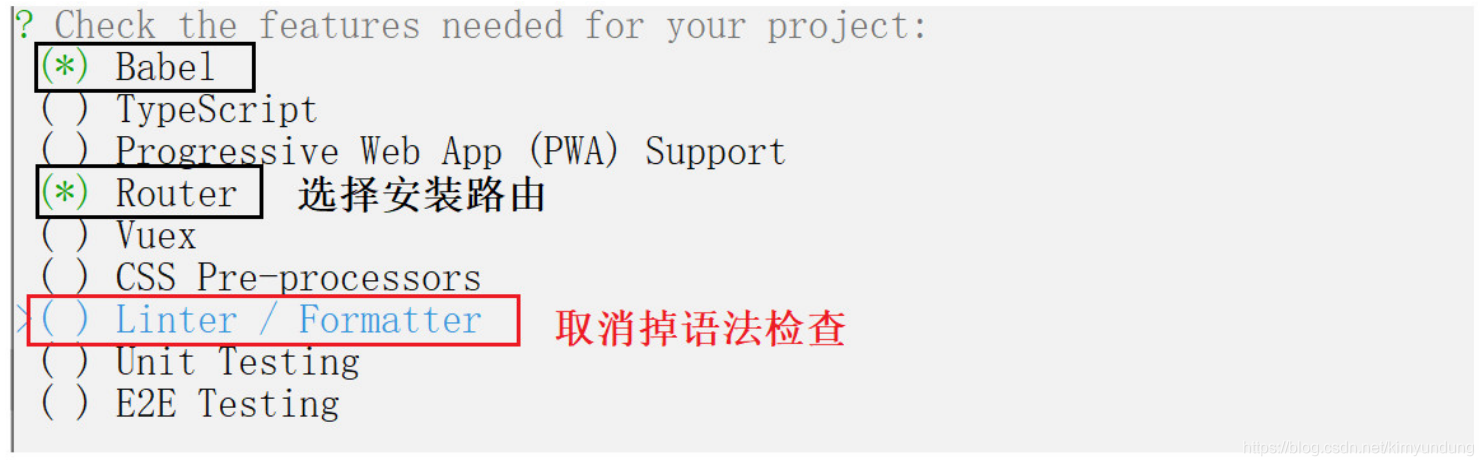
- 按回车之后,提示选择什么模式的路由,我们输入 n (表示选择hash模式)

- 选择项目配置文件单独存放

- 是否保存模板,选择n 不创建

- 安装完成,提示输入执行下面这两个命令

- 首先进入项目目录
cd my-project
- 启动项目
npm run serve

- 访问项目: http://localhost:8080/

- 停止项目 只要关闭命令行窗口就可以
1.3.2 导入Vue项目到VSCode
- VSCode中右键选择打开文件夹
- 选择桌面上的项目
- 打开项目,可以看到如下项目结构

1.3.3 项目结构介绍
|--- my-project 项目名称
	|--- node_modules 存放依赖包的目录
	|--- public 静态资源管理目录
	|--- src 组件源码目录(我们写的代码)
		|--- assets 存放静态图片资源(CSS也可以放在这里)
		|--- components 存放各种组件(一个页面可以看做一个组件),各个组件联系在一起组成一个完整的项目
		|--- router 存放了项目路由文件
		|--- views 放置的为公共组件(主要还是各个主要页面)
		|--- App.vue app.vue可以当做是网站首页,是一个vue项目的主组件,页面入口文件
		|--- main.js 打包运行的入口文件,引入了vue模块和app.vue组件以及路由route
	|--- babel.config.js babel配置文件, 对源代码进行转码(把es6=>es5)
	|--- package.json 项目及工具的依赖配置文件
	|--- paxkage-lock.json 依赖配置文件
	|--- README.md 项目说明
1.3.4 Vue脚手架自定义配置
1.3.4.1 package.json 介绍
每个项目的根目录下面,一般都有一个 package.json 文件,定义了这个项目所需要的各种模块,以及项目的配置信息(比如名称、版本、许可证等元数据)。
npm install 命令根据这个配置文件,自动下载所需的模块,也就是配置项目所需的运行和开发环境。
{


	//1.项目基本信息
	"name": "project3",
	"version": "0.1.0",
	"private": true,
	//2.指定运行脚本命令
	"scripts": {


		"serve": "vue-cli-service serve",
		"build": "vue-cli-service build"
	},
	//4.生产环境所依赖模块的版本
	"dependencies": {


		"core-js": "^3.6.5",
		"vue": "^2.6.11",
		"vue-router": "^3.2.0"
	},
	//5.本地环境开发所依赖的版本
	"devDependencies": {


		"@vue/cli-plugin-babel": "~4.4.0",
		"@vue/cli-plugin-router": "~4.4.0",
		"@vue/cli-service": "~4.4.0",
		"vue-template-compiler": "^2.6.11"
	}
}
1.3.4.2 通过package.json 配置项目
配置内容采用JSON格式,所有的内容都用双引号包裹
打开package.json,再最末端添加如下配置:
"vue":{


	"devServer":{


		"port":"8888",
		"open":true
	}
}
- 配置说明: 该配置设置打包时服务器相关的信息
port : 访问端口
open true: 打包完成自动打开浏览器
启动项目
- 在VSCode中选择项目,右键在终端打开

- 输入命令
npm rum serve
- 运行后发现端口号改为 8888,并且在打包完成后自动打开浏览器

注意: 不推荐这种方式,因为package.json 主要是用来管理包的配置信息.为了方便维护, 我们将Vue脚手架相关的配置单独定义到 vue.config.js 配置文件中
1.3.4.3 单独的配置文件配置项目
- 在项目的根目录创建文件 vue.config.js
- 删除掉package中新添加的配置项.
- 在vue.config.js 文件中进行相关配置
module.exports = {
	devServer:{
		open:true
		port:8889
	}
}
1.3.5 Vue 组件化开发
1.3.5.1 组件化开发
组件化是Vue的精髓,Vue项目就是由一个一个的组件构成的。 我们主要的工作就是开发的组件.
1.3.5.2 组件介绍
1) 我们用 vue-cli 脚手架搭建的项目,里面有很多,如 index.vue 或者 App.vue 这一类的文件.
每一个*.vue 文件都是一个组件 ,是一个自定义的文件类型, 比如 App.vue 就是整个项目的根组件。

2) 常见的组件:
- 页面级别的组件
页面级别的组件,通常是 views 目录下的.vue组件,是组成整个项目的各个主要页面 - 业务上可复用的基础组件
这一类组件通常是在业务中被各个页面复用的组件,这一类组件通常都写到 components 目录下,然后通过import在各个页面中使用
3) 组件的组成部分
- template : 组件的HTML部分
- script: 组件的JS脚本 (使用ES6语法编写)
- style: 组件的CSS样式
<!-- 1.template 代表html结构, template中的内容必须有且只有一个根元素
编写页面静态部分 就是 view部分 -->
<template>
	<div>
		测试页面...
	</div>
</template>
<!-- 2.编写vue.js代码 -->
<script>
	//可以导入其组件
	// import Header from '../components/header.vue'
	//默认写法, 输出该组件
	export default {


		name:"Home", // 组件名称,用于以后路由跳转
		data() {

     // 当前组件中需要使用的数据
		return {

     }
		},
		methods: {

     }
	}
</script>
<!-- 编写当前组件的样式代码 -->
<style scoped>
/* 页面样式 加上scoped 表示样式就只在当前组件有效*/
</style>
1.4 项目运行流程
1.4.1 main.js
- 项目运行 会加载入口文件 main.js
/*
html文件中,通过script src = 'xxx'标签引入js文件。
而vue中,通过 import 变量名 from 文件路径 的方式导入文件,不光可以导入js文件。
1.变量名: 指的是为导入的文件起一个名称,不是指导入的文件的名称,相当于变量名。
2.文件路径: 指的是文件的相对路径
*/
import Vue from 'vue'
import App from './App.vue'
import router from './router'
//关闭启动提示
Vue.config.productionTip = false
//创建Vue实例
new Vue({


	router, //为整个项目添加路由
	render: h => h(App) //这是一个函数ES6语法,作用是生成模板: App = App.vue
}).$mount('#app') //挂载的是App.vue组件中的id为app的区域
1.4.2 App.vue
- App.vue 是vue项目的主组件,是页面入口文件 ,所有页面都是在App.vue下进行切换的
App.vue 中的模板(HTML代码)
<template>
	<div id="app"> 挂载的是这个div
		<div id="nav">
			这里是两个路由导航链接
			1. to="/" 项目根路径 跳转的是首页
			<router-link to="/">Home</router-link> |
			2. to="/about" 点击About按钮,跳转到about组件
			<router-link to="/about">About</router-link>
		</div>
		router-view 的作用是 根据访问的路径,渲染路径匹配到的视图组件
		<router-view/>
	</div>
</template>
1.4.3 router 路由
- 找到路由文件,来看一下具体的路由配置
// 引入所需文件
import Vue from 'vue' //vue库
import VueRouter from 'vue-router' //vue-router库
import Home from '../views/Home.vue' //首页
//使用路由功能
Vue.use(VueRouter)
//创建路由规则
const routes = [
	{


		path: '/', //路径
		name: 'Home', //名称
		component: Home //组件 Home.vue
	},
	{


		path: '/about',
		name: 'About',
		component: () => import(/* webpackChunkName: "about" */
			'../views/About.vue')
	}
]
//创建路由管理器,管理routes
const router = new VueRouter({


	routes
})
//export 用来导出模块 router就代表了整个路由文件
export default router
1.4.4 Home.vue组件
- 默认访问的是Home.vue 首页

视图部分
<template>
	<div class="home">
		首页的logo
		<img alt="Vue logo" src="../assets/logo.png">
		<HelloWorld msg="Welcome to Your Vue.js App"/>
	</div>
</template>
JS部分
<script>
	//导入了一个组件 HelloWorld.vue @符号表示 src这个目录
	import HelloWorld from '@/components/HelloWorld.vue'
	export default {


		name: 'Home',
		components: {


			HelloWorld
		}
	}
</script>
HelloWorld.vue 组件页面
<template>
	<div class="hello">
		<h1>{

   { msg }}</h1>
		<p>
			For a guide and recipes on how to configure / customize this project,<br>
			check out the
			<a href="https://cli.vuejs.org" target="_blank" rel="noopener">vue-cli
			documentation</a>.
		</p>
		<h3>Installed CLI Plugins</h3>
	</div>
</template>
<script>
	export default {


		name: 'HelloWorld',
		props: {


			msg: String
		}
	}
</script>
1.5 组件的使用案例
1.5.1 创建Header.vue组件
- 在components 目录下创建 Header.vue

- 编写Header.vue
<template>
	<div class="header">{

   {msg}}</div>
</template>
<script>
	//JS 部分
	export default {


		name:"Header", //组件的名称
		data() {

      //data函数
			return {


				msg:"这是一个Header组件"
			}
		},
	}
</script>
//scoped 表示当前的样式,只作用与当前组件中的 template 视图.
<style scoped>
	.header {


		height: 100px;
		line-height: 100px;
		background-color: #eee;
		text-align: center;
		color: blue;
	}
</style>
1.5.2 引入 Header组件
修改Home.vue
<template>
	<div class="home">
		<img alt="Vue logo" src="../assets/logo.png">
		<!-- <HelloWorld msg="Welcome to Your Vue.js App"/> -->
		<Header/>
	</div>
</template>
<script>
	// @ is an alias to /src
	//import HelloWorld from '@/components/HelloWorld.vue'
	import Header from '@/components/Header.vue';
	export default {


		name: 'Home',
		components: {


			//HelloWorld
			Header
		}
	}
</script>
1.5.3 组件的传参
props : 是组件中的属性, 表示组件可以接受参数,
<template>
	<div id="Header" class="header">{

   {msg}}</div>
</template>
<script>
	export default {


		name: "Header", //组件名称,用于路由的跳转
		props:['msg']
	};
</script>
// scoped 表示当前style的样式只作用于当前组件的template代码中,其他地方不会被影响
<style scoped>
	.header {


		height: 100px;
		line-height: 100px;
		background-color: #eee;
		text-align: center;
		color: blue;
	}
</style>
2.Element-UI
2.1 Element-UI介绍
element-ui 是饿了么前端出品的基于 Vue.js的 后台组件库,方便程序员进行页面快速布局和构建
Element-UI官方站点:
https://element.eleme.cn/#/zh-CN
2.2 Element-UI使用
2.2.1 命令行方式安装
- 创建 一个新的项目
- 当前项目下打开终端, 安装依赖包 ,执行下面的命令
npm i element-ui -S

- 打开 main.js , 导入Element-UI 相关资源.
- main.js是工程的入口文件,在此文件中加载了很多第三方组件,如:Element-UI、Base64、VueRouter等。
//导入组件库
import ElementUI from 'element-ui'
//导入组件相关样式
import 'element-ui/lib/theme-chalk/index.css'
//配置Vue插件 将El安装到Vue上
Vue.use(ElementUI);
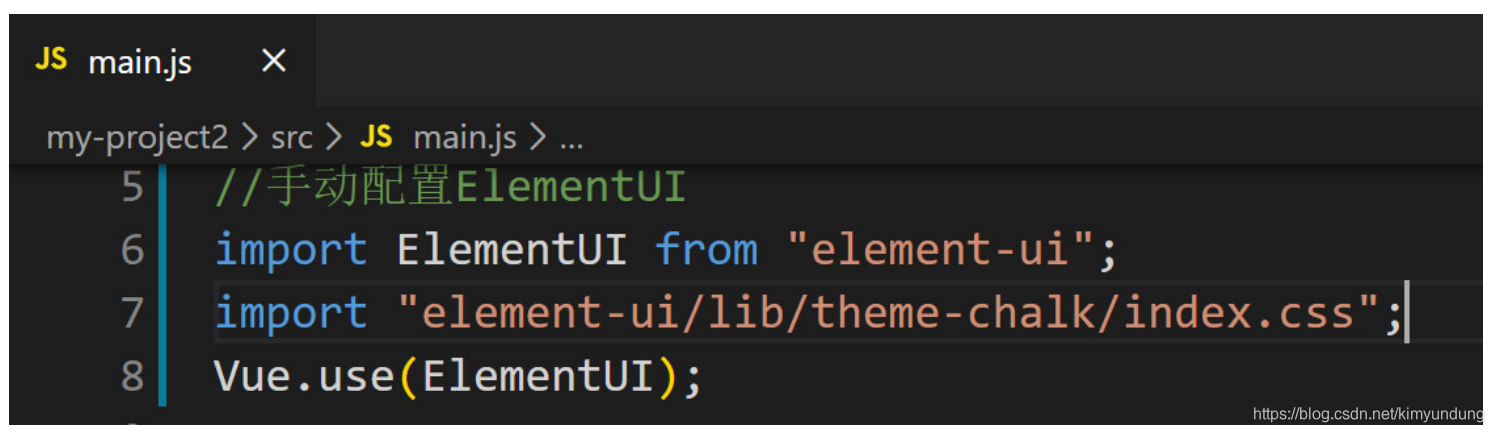
- 复制Element 按钮样式 到app.vue文件的 template下
<template>
	<div id="app">
		<!-- 测试elementUI -->
		<el-row>
			<el-button>默认按钮</el-button>
			<el-button type="primary">主要按钮</el-button>
			<el-button type="success">成功按钮</el-button>
			<el-button type="info">信息按钮</el-button>
			<el-button type="warning">警告按钮</el-button>
			<el-button type="danger">危险按钮</el-button>
		</el-row>
		<div id="nav">
			<router-link to="/">Home</router-link>|
			<router-link to="/about">About</router-link>
		</div>
		<router-view />
	</div>
</template>
- 启动项目 npm run serve, 查看页面
2.2.2 Vue-CLI工程改造
- 删除components 目录下的 HelloWord.vue组件
- 删除App.vue中的部分内容,只保留如下部分
<template>
	<div id="app"></div>
</template>
<style>
</style>
- 删除router文件下的路由文件 index.js部分内容,只保留如下部分
import Vue from 'vue'
import VueRouter from 'vue-router'
Vue.use(VueRouter)
const routes = [
]
const router = new VueRouter({


	routes
})
export default router
- 删除views目录下的 About.vue 与 Home.vue
2.2.3 安装axios
- npm安装:使用npm下载axios包
npm i axios
- 在main.js文件中导入axios 相关资源
//引入axios
import axios from 'axios'
//Vue对象使用axios
Vue.prototype.axios = axios;
2.3 用户登录界面制作
2.3.1 Dialog对话框组件

我们可以用Dialog制作一个登陆弹窗,选择自定义内容
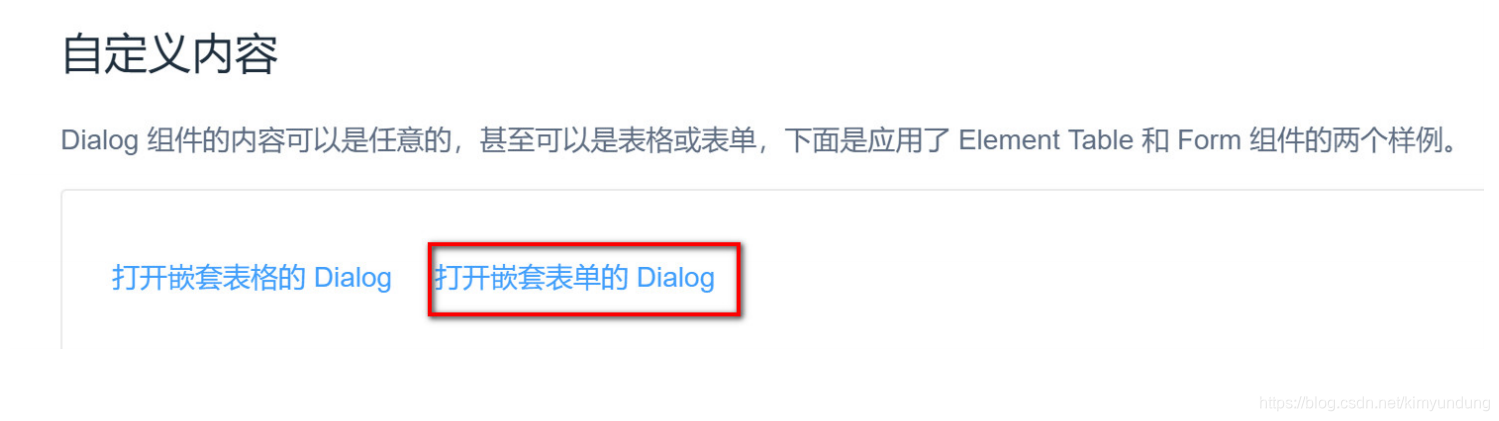
<el-dialog title="收货地址" :visible.sync="dialogFormVisible">
	<el-form :model="form">
		<el-form-item label="活动名称" :label-width="formLabelWidth">
			<el-input v-model="form.name" autocomplete="off"></el-input>
		</el-form-item>
		<el-form-item label="活动区域" :label-width="formLabelWidth">
			<el-select v-model="form.region" placeholder="请选择活动区域">
				<el-option label="区域一" value="shanghai"></el-option>
				<el-option label="区域二" value="beijing"></el-option>
			</el-select>
		</el-form-item>
	</el-form>
	<div slot="footer" class="dialog-footer">
		<el-button @click="dialogFormVisible = false">取 消</el-button>
		<el-button type="primary" @click="dialogFormVisible = false">确 定</elbutton>
	</div>
</el-dialog>
2.3.2 创建login.vue 组件
- 在components 下创建login.vue
- 将Diglog组件的内容,拷贝到login.vue,进行修改:
<template>
	<el-dialog title="登录" :visible.sync="dialogFormVisible">
		<el-form>
			<el-form-item label="用户名称" :label-width="formLabelWidth">
				<el-input autocomplete="off"></el-input>
			</el-form-item>
			<el-form-item label="用户密码" :label-width="formLabelWidth">
				<el-input autocomplete="off"></el-input>
			</el-form-item>
		</el-form>
		<div slot="footer" class="dialog-footer">
			<el-button type="primary" @click="dialogFormVisible = false">登录</elbutton>
		</div>
	</el-dialog>
</template>
<script>
	export default {


		data() {


			return {


				formLabelWidth: "120px", //宽度
				dialogFormVisible: true
			};
		}
	};
</script>
<style scoped>
</style>
2.3.3 配置路由
import Vue from "vue";
import VueRouter from "vue-router";
import Login from "@/components/Login.vue"
Vue.use(VueRouter);
const routes = [
	//访问 /,也跳转到login
	{


		path:'/',
		redirect:'login' //重定向都login
	},
	//登录
	{


		path:'/login',
		name:'login',
		component:Login
	}
];
const router = new VueRouter({


	routes,
});
export default router;
2.3.4 修改App.vue
<template>
	<div id="app">
		<!-- router-view 的作用是根据访问的路径,渲染路径匹配到的视图组件 -->
		<router-view></router-view>
	</div>
</template>
<style>
</style>
2.3.5 编写登录功能
- 去掉关闭按钮, 添加一个属性 :show-close=“false”
<el-dialog title="登录" :show-close="false" :visible.sync="dialogFormVisible">
- 修改登陆触发事件
<el-button type="primary" @click="login">登录</el-button>
- 双向数据绑定
- data 中定义数据
data() {


	return {


		formLabelWidth: "120px", //宽度
		dialogFormVisible: true, //是否关闭对话框
		user: {

     username: "", password: "" }, //登录数据
	};
},
- 使用 v-model, 将视图与模型进行绑定
<el-form>
	<el-form-item label="用户名称" :label-width="formLabelWidth">
		<el-input v-model="user.username" autocomplete="off"></el-input>
	</el-form-item>
	<el-form-item label="用户密码" :label-width="formLabelWidth">
		<el-input v-model="user.password" autocomplete="off"></el-input>
	</el-form-item>
</el-form>
- 编写login方法
methods: {


	login() {


		//定义常量保存 url
		const url = "http";
		//发送请求
		this.axios
		.get(url, {


			//携带参数
			params: {


				username: this.user.username,
				password: this.user.password,
			},
		})
		.then((res) => {


			console.log();
				//成功就将对话框关闭
				this.dialogFormVisible = false;
		})
		.catch((error) => {


			//出现错误使用ElementUI提供的消息提示
			this.$message.error("对不起! 登录错误!");
		});
	},
},
2.3.6 Postman搭建mock server
- Mock server就是模拟一个服务器,我们使用Mock server可以模拟后台接口,对请求进行响应.
- 在前后端分离的开发中 前端利用mockeserver模拟出对应接口,拿到返回数据来调试,无需等后端开发人员完成工作。
postman模拟出一个server 步骤:
- 使用postman模拟出一个server

- 打开如下窗体,创建一个伪服务
- 第一步

- 第二步
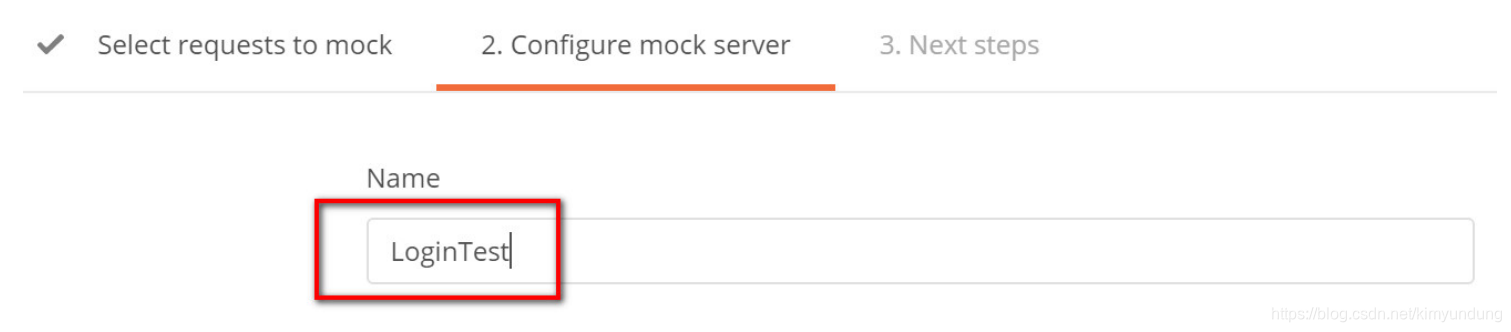
- 第三步
- 第四步 修改请求的URL
const url = "复制上面的地址/login";
2.3.7 登录成功后跳转
- 在js中设置跳转,常用的一种方法是 this.$router.push
methods: {


	login() {


		//定义常量保存 url
		const url =
		"https://33284b33-e976-4124-a3a0-17044addc1e1.mock.pstmn.io/login";
		//发送请求
		this.axios
		.get(url, {


			//携带参数
			params: {


				username: this.user.username,
				password: this.user.password,
			},
		})
		.then((res) => {


			console.log(res.data);
			alert("登录成功!");
			//成功就将对话框关闭
			this.dialogFormVisible = false;
			//跳转页面,前端跳转页面必须使用路由,使用$router对象中的push方法
			this.$router.push('/index');
		})
		.catch((error) => {


			//出现错误使用ElementUI提供的消息提示
			this.$message.error("对不起! 登录错误!");
		});
	},
},
2.4 首页布局页面制作
2.4.1 创建 index.vue
<template>
	<div>
		<el-button type="danger">布局页面</el-button>
	</div>
</template>
<script>
	export default {


	}
</script>
<style scoped>
</style>
2.4.2 配置路由
router目录下 的index.js 路由文件
//导入布局组件
import Index from "@/components/Index.vue"
	//布局路由
	{


		path:'/index',
		name:'index',
		component: Index
	}
];
2.4.3 布局容器
Container 布局容器 ,是用于布局的容器组件,方便快速搭建页面的基本结构:
- 在官方文档中找到布局的容器代码, 复制到 Index.vue
<el-container>
	<el-header>Header</el-header>
	<el-container>
		<el-aside width="200px">Aside</el-aside>
		<el-main>Main</el-main>
	</el-container>
</el-container>
<style scoped>
	.el-container {


		height: 720px;
	}
	.el-header,
	.el-footer {


		background-color: #b3c0d1;
		color: #333;
		text-align: center;
		line-height: 60px;
	}
	.el-aside {


		background-color: #d3dce6;
		color: #333;
		text-align: center;
		line-height: 200px;
	}
	.el-main {


		background-color: #e9eef3;
		color: #333;
		text-align: center;
		line-height: 30px;
	}
</style>
- 拷贝布局容器中的导航菜单代码, 进行修改,代码如下
<template>
	<div>
		<el-container>
			<el-header>后台管理</el-header>
			<el-container>
				<!-- 侧边栏 -->
				<el-aside width="200px">
					<el-menu
					default-active="2"
					class="el-menu-vertical-demo"
					background-color="#d3dce6"
					>
						<el-submenu index="1">
							<template slot="title">
								<i class="el-icon-location"></i>
								<span>导航菜单</span>
							</template>
							<el-menu-item-group>
								<el-menu-item index="1-1"
								><i class="el-icon-menu"></i>课程管理</el-menu-item
								>
							</el-menu-item-group>
						</el-submenu>
					</el-menu>
				</el-aside>
				<!-- 主要区域 -->
				<el-main>Main</el-main>
			</el-container>
		</el-container>
	</div>
</template>
<script>
	export default {

     };
</script>
<style scoped>
	.el-container {


		height: 725px;
	}
	.el-header,
	.el-footer {


		background-color: #b3c0d1;
		color: #333;
		text-align: center;
		line-height: 60px;
	}
	.el-aside {


		background-color: #d3dce6;
		color: #333;
		text-align: center;
		line-height: 200px;
	}
	.el-main {


		background-color: #e9eef3;
		color: #333;
		text-align: center;
		line-height: 160px;
	}
</style>
2.5 课程列表组件制作
当我们点击导航菜单中的课程管理时,要显示课程信息

2.5.1 编写 Course.vue
<template>
	<el-button type="danger">课程信息</el-button>
</template>
<script>
	export default {

     };
</script>
<style scoped></style>
2.5.2 配置路由
- 在index.js路由文件中, 为布局路由添加children 属性表示 子路由
//引入课程组件
import Course from "@/components/Course.vue"
//布局路由
{


	path: "/index",
	name: "index",
	component: Index,
	//添加子路由,使用 children属性 来表示子路由
	children:[
		//课程信息子路由
		{


			path:"/course",
			name:"course",
			component:Course
		}
	]
},
- 修改 Index.vue组件中的 导航菜单属性
router 表示是否使用 vue-router 的模式,启用该模式会在激活导航时以 index 作为 path 进行路由跳转
el-menu中 添加一个 router属性
<el-menu default-active="2" class="el-menu-vertical-demo" backgroundcolor="#d3dce6" router >
- 为index属性指定 路由
<el-menu-item-group>
	<!-- 修改 index的路由地址 -->
	<el-menu-item index="/course">
		<i class="el-icon-menu"></i>课程管理
	</el-menu-item>
</el-menu-item-group>
- 设置路由的出口,将课程信息展示再 main
<!-- 主要区域 -->
<el-main>
<router-view></router-view>
</el-main>
2.6 Table表格组件
我们通过table组件来实现一个课程页面展示的功能,通过查看Element-UI库,我们需要Table 表 格. 进入Element-UI官方,找到Table组件,拷贝源代码到vue页面中,如下

2.6.1 添加表格组件
复制表格组件相关的代码到 Course.vue中
<template>
	<el-table :data="tableData" style="width: 100%">
		<el-table-column prop="date" label="日期" width="180"> </el-table-column>
		<el-table-column prop="name" label="姓名" width="180"> </el-table-column>
		<el-table-column prop="address" label="地址"> </el-table-column>
	</el-table>
</template>
<script>
export default {


	data() {


		return {


			tableData: [
				{


					date: "2016-05-02",
					name: "王小虎",
					address: "上海市普陀区金沙江路 1518 弄"
				},
				{


					date: "2016-05-04",
					name: "王小虎",
					address: "上海市普陀区金沙江路 1517 弄"
				},
				{


					date: "2016-05-01",
					name: "王小虎",
					address: "上海市普陀区金沙江路 1519 弄"
				},
				{


					date: "2016-05-03",
					name: "王小虎",
					address: "上海市普陀区金沙江路 1516 弄"
				}
			]
		};
	}
};
</script>
2.6.2 表格组件说明
我们查看一下,ElementUI的表格的代码,分析一下表格数据是如何显示的
//视图部分 进行页面展示
<template>
	//el-table组件 绑定了tableData数据
	<el-table :data="tableData" style="width: 100%">
		//el-table-column 表示表格的每列,prop属性与模型数据中的key对应 ,label 列名
		<el-table-column prop="date" label="日期" width="180"></el-table-column>
		<el-table-column prop="name" label="姓名" width="180"></el-table-column>
		<el-table-column prop="address" label="地址"></el-table-column>
	</el-table>
</template>
<script>
	//export default 相当于提供一个接口给外界,让其他文件通过 import 来引入使用。
	export default {


		//data() 函数
		data() {


			return {


			//数据部分
			tableData: [
				{


					date: "2016-05-02",
					name: "王小虎",
					address: "上海市普陀区金沙江路 1518 弄"
				}
			};
		}
	};
</script>
2.7 课程内容展示
2.7.1 修改Course.vue
- 编写 template, 复制ElementUI的示例代码,进行改动
<template>
	<div class="table">
		<!-- ElementUI表格 -->
		<el-table
		style="width: 100%"
		border
		height="550"
		:data="courseList"
		v-loading="loading"
		element-loading-text="数据加载中..."
		>
			<el-table-column fixed="left" prop="id" label="ID"></el-table-column>
			<el-table-column prop="course_name" label="课程名称"></el-table-column>
			<el-table-column prop="price" label="价格"></el-table-column>
			<el-table-column prop="sort_num" label="排序"></el-table-column>
			<el-table-column prop="status" label="状态"></el-table-column>
		</el-table>
	</div>
</template>
- 编写VM部分代码
<script>
	export default {


		name: "Course",
		title: "课程管理",
		//数据部分
		data() {


			return {


				//定义数据
				loading: false, //是否弹出加载提示
				courseList: [], //定义集合,保存从接口获取的参数
			};
		},
		//钩子函数,在DOM页面生成之前执行
		created() {


			//在页面生成之前, 调用loadCourse
			this.loadCourse();
		},
		//方法集合
		methods: {


			//方法1: 获取课程信息
			loadCourse() {


				//开启
				this.loading = true;
				//访问后台接口,获取数据并返回
				return this.axios
				.get(
					"http://localhost:8080/lagou_edu_home/course?methodName=findCourseList"
					)
				.then((res) => {


					console.log(res.data);
					//将获取到的数据赋值给 courseList
					this.courseList = res.data;
					this.loading = false;
				});
			},
		},
	};
</script>
2.7.2 跨域问题解决
2.7.2.1 出现跨域问题
当我们在前端项目中,向后端发送请求的获取课程数据的时候,出现了跨域问题:
- 已被CORS策略阻止:请求的资源上没有’ Access-Control-Allow-Origin’标头(跨域请求失败)

Access to XMLHttpRequest at 'http://localhost:8080/lagou_edu_home/course?
methodName=findCourseList' from origin 'http://localhost:8088' has been blocked
by CORS policy: No 'Access-Control-Allow-Origin' header is present on the
requested resource.
2.7.2.2 什么是跨域
跨域是指通过JS在不同的域之间进行数据传输或通信,比如用ajax向一个不同的域请求数据,只要协议、域名、端口有任何一个不同,都被当作是不同的域,浏览器就不允许跨域请求。
- 跨域的几种常见情
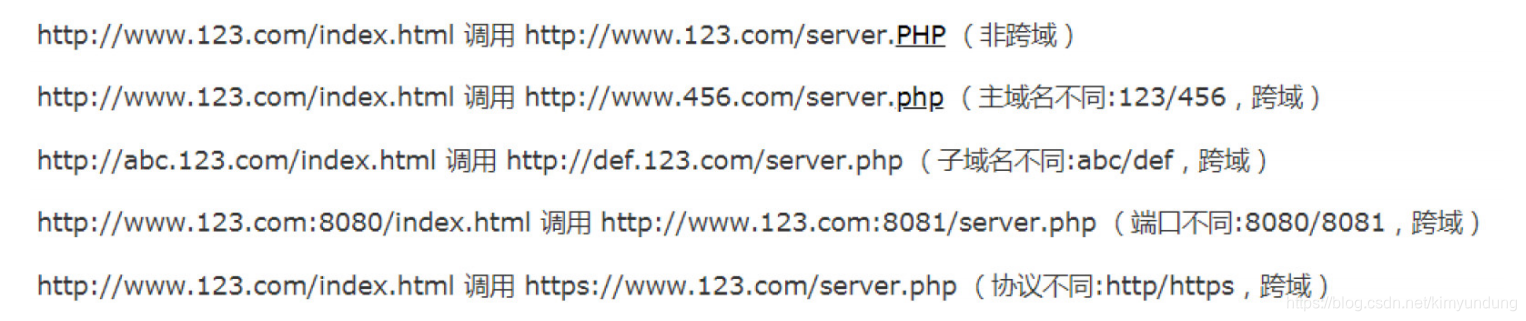
2.7.2.3 解决跨域问题
跨域的允许主要由服务器端控制。服务器端通过在响应的 header 中设置 Access-Control-AllowOrigin 及相关一系列参数,提供跨域访问的允许策略
- 设置响应头中的参数来允许跨域域请求:
Access-Control-Allow-Credentials
Access-Control-Allow-Origin 标识允许跨域的请求有哪些
- 在POM文件中引入依赖
<!-- 解决跨域问题所需依赖 -->
<dependency>
	<groupId>com.thetransactioncompany</groupId>
	<artifactId>cors-filter</artifactId>
	<version>2.5</version>
</dependency>
- 在web.xml中 配置跨域 filter
<!--配置跨域过滤器-->
<filter>
	<filter-name>corsFilter</filter-nam e>
	<filter-class>com.thetransactioncompany.cors.CORSFilter</filter-class>
</filter>
<filter-mapping>
	<filter-name>corsFilter</filter-name>
	<url-pattern>/*</url-pattern>
</filter-mapping>
2.7.2.4 再次查询
解决跨域问题之后,页面显示数据
2.8 条件查询
2.8.1 ElementUI输入框组件
- Input 输入框通过鼠标或键盘输入字符

<el-input
placeholder="请输入内容"
v-model="input4">
<i slot="prefix" class="el-input__icon el-icon-search"></i>
</el-input>
Course.vue 添加输入框
<template>
	<div>
		<!-- 条件查询 -->
		<el-input placeholder="请输入课程名称">
		<i slot="prefix" class="el-input__icon el-icon-search"></i>
		</el-input>
	<!-- 表单显示 ... -->
	</div>
</template>
2.8.2 Layout 布局
- 通过基础的 24 分栏,迅速简便地创建布局。
- 通过 row 和 col 组件,并通过 col 组件的 span 属性我们就可以自由地组合布局。

1) Row 组件 提供 gutter 属性来指定每一栏之间的间隔,默认间隔为 0。
<el-row :gutter="20">
	<el-col :span="6"><div class="grid-content bg-purple"></div></el-col>
	<el-col :span="6"><div class="grid-content bg-purple"></div></el-col>
	<el-col :span="6"><div class="grid-content bg-purple"></div></el-col>
	<el-col :span="6"><div class="grid-content bg-purple"></div></el-col>
</el-row>
2) 使用分隔栏,分隔查询条件
<!-- 条件查询 -->
<el-row :gutter="10">
	<el-col :span="5">
		<el-input clearable placeholder="课程名称">
		<i slot="prefix" class="el-input__icon el-icon-search"></i>
		</el-input>
	</el-col>
</el-row>
3) 添加一个按钮
<el-row :gutter="10">
	<el-col :span="5">
		<el-input clearable placeholder="课程名称">
			<i slot="prefix" class="el-input__icon el-icon-search"></i>
		</el-input>
	</el-col>
	<el-col :span="1">
		<el-button type="primary">查询</el-button>
	</el-col>
</el-row>
2.8.3 完成根据课程名查询
- 双向数据绑定
- Model 模型
//数据部分
data() {


	//定义查询条件
	return {


		loading: false, //是否弹出加载提示
		courseList: [], //定义集合,保存从接口获取的参数
		filter: {

     course_name: "" } //查询条件
	};
},
- View 视图
<el-input v-model="filter.course_name" clearable placeholder="课程名称">
<i slot="prefix" class="el-input__icon el-icon-search"></i>
</el-input>
- 设置点击事件
<el-button type="primary" @click="search">查询</el-button>
- methods中添加方法
search() {
//开启加载提示
this.loading = true;
//发送请求
return this.axios
.get("http://localhost:8080/lagou_edu_home/course", {
//携带参数
params: {
methodName: "findByCourseNameAndStatus",
course_name: this.filter.course_name
}
})
.then(res => {
console.log(res);
this.courseList = res.data;
//关闭加载
this.loading = false;
})
.catch(error => {
this.$message.error("获取数据失败!");
});
}
任务三 前后端项目接口联调
1.联调准备
1.1 运行后台项目
- clean 清空项目的编译文件
- compile 重新编译项目
- 将项目部署到 tomcat
○ 项目名为: lagou_edu_home
○ 端口号: 8080 - 部署图片上传路径为 webapps目录下的 upload目录
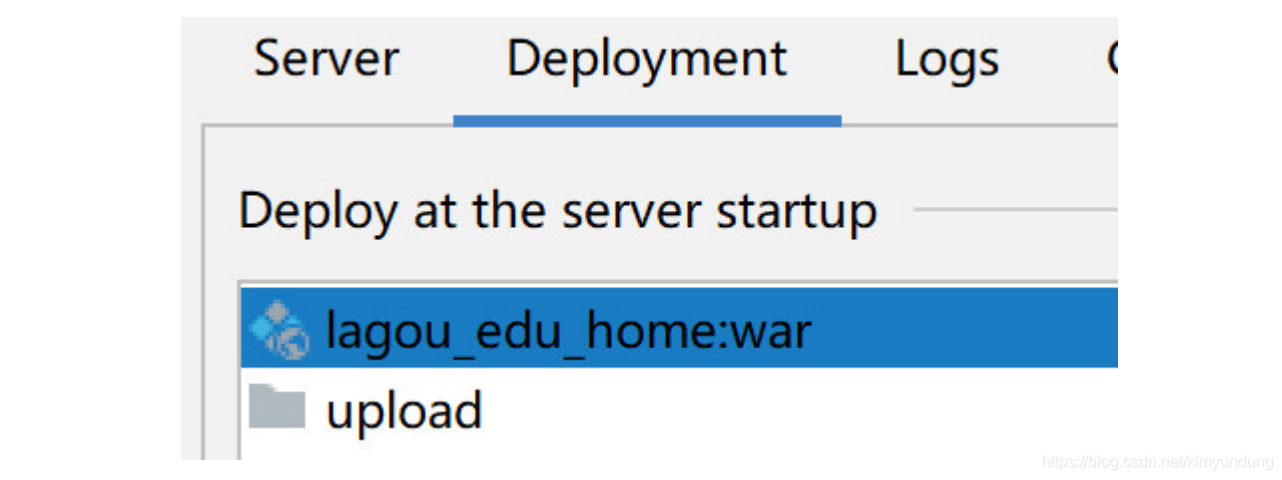
1.2 运行前端项目
- 首先导入前端项目到 VSCode
- 运行项目.
2.课程管理首页
2.1 获取课程列表
JS部分
export default {
name: "Courses",
title: "课程管理",
//定义数据部分
data() {
return {
filter: {
course_name: "", status: "" }, //查询对象
courses: [], //课程信息集合
loading: false //是否弹出加载
};
},
//钩子函数
created() {
this.loadCourses();
},
methods: {
//方法1: 获取课程列表
loadCourses() {
this.loading = true;
//请求后台查询课程列表接口
return axios
.get("/course", {
params: {
methodName: "findCourseList"
}
})
.then(resp => {
console.log(resp);
this.loading = false; //关闭加载
this.courses = resp.data; //取出数据
})
.catch(error => {
this.$message.error("数据获取失败! ! !");
});
},
}
};
</script>
2.2 条件查询课程信息
JS部分
//方法2: 条件查询课程信息
filterQuery() {
this.loading = true;
//定义查询条件对象
const search = {
};
//保存用户输入的条件
if (this.filter.course_name) search.course_name = this.filter.course_name;
if (this.filter.status) search.status = this.filter.status;
//请求后台条件查询接口
return axios
.get("/course", {
//准备参数
params: {
methodName: "findByCourseNameAndStatus",
course_name: search.course_name,
status: search.status
}
})
.then(resp => {
console.log(resp);
this.loading = false;
//将响应数据保存到 courses
this.courses = resp.data;
})
.catch(error => {
this.$message.error("数据获取失败! ! !");
});
},
2.3 跳转到添加课程
JS部分
//方法3: 添加课程跳转方法
addCourse() {
//路由跳转到 CourseItem.vue组件
this.$router.push({
name: "CourseItem", params: {
courseId: "new" } });
},
2.4 修改课程状态
JS部分
//方法4: 修改课程状态
updateStatus(item) {
//item 表示选中的数据 = Course对象
axios
.get("/course", {
params: {
methodName: "updateCourseStatus",
id: item.id
}
})
.then(res => {
console.log(res);
//将返回的状态字段,封装到对象中
Object.assign(item, res.data);
//重新加载页面
window.location.reload;
});
},
2.5 跳转课程营销或内容管理
JS部分
//方法5: 根据路由名称, 导航到对应组件
handleNavigate(name, id) {
this.$router.push({
name, params: {
courseId: id } });
},
3.新建&修改课程
3.1 Course组件中的跳转方法
<!-- 营销信息按钮 -->
<el-button
size="mini"
@click="handleNavigate('CourseItem', scope.row.id)"
>营销信息</el-button>
//方法3: 添加课程跳转方法
addCourse() {
//路由跳转到 CourseItem.vue组件
this.$router.push({
name: "CourseItem", params: {
courseId: "new" } });
},
3.2 router.js 路由
找到name为: CourseItem的路由
//添加课程的路由
{
path: "/courses/:courseId", //路径,携带参数: 课程ID
name: "CourseItem",
//路由导航到的组件
component: () =>
import(/* webpackChunkName: 'courses' */ "../views/CourseItem.vue")
},
3.3 CourseItem组件
3.3.1 JS部分
data() {
//数据
return {
rules, //规则
course: {
}, //课程
loading: false,
params: {
} //参数对象
};
},
//钩子函数
created() {
//1.获取路由传递的参数
const id = this.$route.params.courseId;
//2.判断id是否有值,没有值跳转到 错误页面
if (!id) return this.redirectToError();
//3.判断 是new 还是具体的id
if (id === "new") {
//new 代表新增,添加一个新增课程标题
this.course.title = "新增课程";
} else {
//否则就是修改,调用loadCourse方法进行回显
this.loadCourse(id);
}
},
3.3.2 图片上传分析
页面部分
<!-- 上传图片部分 -->
<el-form-item label="分享小图" prop="share_image_title">
<el-input v-model="course.share_image_title" type="text">
<!-- :auto-upload="false",取消自动上传, :on-change="onchange" 调用onchange
进行处理 -->
<el-upload
slot="prepend"
:auto-upload="false"
:on-change="onchange"
action
:limit="1"
>
<el-button size="small" type="primary">点击上传</el-button>
</el-upload>
</el-input>
</el-form-item>
JS部分
FormData的主要用途有两个
- 将form表单元素的name与value进行组合,实现表单数据的序列化,从而减少表单元素的拼接,提高工作效率。
- 异步上传文件
- 创建FormData对象
//通过FormData构造函数创建一个空对象
var formdata=new FormData();
//可以通过append()方法来追加数据
formdata.append("name","laotie");
//通过get方法对值进行读取
console.log(formdata.get("name"));//laotie
//通过set方法对值进行设置
formdata.set("name","laoliu");
console.log(formdata.get("name"));//laoliu
data中创建FormData
//5.创建FormData对象,将图片与表单一同上传
this.params = new FormData();
methods添加方法
//文件上传
onchange(file) {
//判断文件不为空
if (file != null) {
//将文件信息 保存到params中
this.params.append("file", file.raw, file.name);
}
},
3.3.3 新建课程信息
JS 部分
//保存和修改课程信息
handleSave() {
//检查是否拿到了正确的需要验证的form
this.$refs.form.validate(valid => {
if (!valid) return false;
//1.设置Content-Type为 多部件上传
let config = {
headers: {
"Content-Type": "multipart/form-data"
}
};
//2.获取表单中的数据,保存到params (params 就是 FromData对象)
for (let key in this.course) {
//debugger
console.log(key + "---" + this.course[key]);
this.params.append(key, this.course[key]);
}
//3.保存课程信息
axios
.post("/courseSalesInfo", this.params, config)
.then(res => {
//debugger
if (res.data.status == 0) {
//保存成功,跳转到首页
this.$router.back();
} else if (res.data.status == 1) {
this.$message({
type: "error",
message: res.data.msg
});
}
})
.catch(err => {
this.$message.error("保存失败! ! !");
});
});
},
3.3.4 修改课程信息
//方法2: 根据ID 回显课程信
loadCourse(id) {
this.loading = true;
axios
.get("/course", {
params: {
methodName: "findCourseById",
id: id
}
})
.then(res => {
this.loading = false;
this.course = res.data;
})
.catch(() => {
this.$message.error("回显数据失败! ! !");
});
},
4.内容管理
4.1 Course组件中的跳转方法
<!-- 内容管理按钮 -->
<el-button
size="mini"
@click="handleNavigate('CourseTasks', scope.row.id)">内容管理</el-button>
//方法5: 根据路由名称, 导航到对应组件
handleNavigate(name, id) {
this.$router.push({
name, params: {
courseId: id } });
},
4.2 router.js 路由
//内容管理的路由
{
path: "/courses/:courseId/tasks",
name: "CourseTasks",
meta: {
requireAuth: true },
component: () =>
import(/* webpackChunkName: 'courses' */ "../views/CourseTasks.vue")
}
4.3 CourseTasks组件
4.3.1 树形控件测试
- 打开我们之前编写的VueCLI项目
- 在component目录下,添加一个组件, TestTree.vue
<template>
</template>
<script>
export default {
}
</script>
<style scoped>
</style>
- 在Index.vue组件中的导航菜单位置添加一个 树形控件导航.
注意:要设置index的路径为 /tree
<el-submenu index="1">
<template slot="title">
<i class="el-icon-location"></i>
<span>导航菜单</span>
</template>
<el-menu-item-group>
<!-- 修改 index的路由地址 -->
<el-menu-item index="/course">
<i class="el-icon-menu"></i>课程管理
</el-menu-item>
<el-menu-item index="/tree">
<i class="el-icon-menu"></i>树形控件
</el-menu-item>
</el-menu-item-group>
</el-submenu>
- 在index.js 路由文件中进行配置,在布局路由中再添加一个子路由
//导入树形控件组件
import TestTree from "@/components/TestTree";
//布局路由
{
path: "/index",
name: "index",
component: Index,
//添加子路由,使用 children属性 来表示子路由
children: [
//课程信息子路由
{
path: "/course",
name: "course",
component: Course,
},
//Tree控件测试路由
{
path: "/tree",
name: "tree",
component: TestTree,
},
],
},
- 在ElementUI官网中查找树形控件

- 先来查看基础用法,赋值代码到 TestTree.vue
<template>
<el-tree :data="data" :props="defaultProps" ></el-tree>
</template>
<script>
export default {
data() {
return {
data: [
{
label: "一级 1",
children: [
{
label: "二级 1-1",
children: [
{
label: "三级 1-1-1"
}
]
}
]
},
{
label: "一级 2",
children: [
{
label: "二级 2-1",
children: [
{
label: "三级 2-1-1"
}
]
},
{
label: "二级 2-2",
children: [
{
label: "三级 2-2-1"
}
]
}
]
},
{
label: "一级 3",
children: [
{
label: "二级 3-1",
children: [
{
label: "三级 3-1-1"
}
]
},
{
label: "二级 3-2",
children: [
{
label: "三级 3-2-1"
}
]
}
]
}
],
defaultProps: {
children: "children",
label: "label"
}
};
}
};
</script>
- Tree组件属性分析
- data: 展示数据
- props : 配置树形结构
○ label : 设置节点名称
○ children: 指定生成子树的属性名称
- 自定义树节点内容:
- data: 数据对象
- node: 节点对象
<el-tree :data="data" :props="defaultProps">
<span class="custom-tree-node" slot-scope="{ node, data }">
<span>{
{ data.label}}</span>
<span>级别: {
{node.level}}</span>
</span>
</el-tree>
- 展示树形结构章节与课时
<template>
<el-tree :data="data" :props="defaultProps">
<span class="custom-tree-node" slot-scope="{ node, data }">
<span>{
{ data.section_name || data.theme}}</span>
<span>级别: {
{node.level}}</span>
</span>
</el-tree>
</template>
<script>
export default {
data() {
return {
data: [
{
id: 5,
course_id: 10,
section_name: "麻式太极",
description: "麻式太极拳,你动我试试",
orderNum: 0,
status: 2,
create_time: "2019-07-11 10:55:10.0",
update_time: "2019-10-09 12:43:01.0",
isDel: 0,
lessonList: [
{
id: 32,
course_id: 10,
section_id: 5,
theme: "第一讲:如何给自己洗脑",
duration: 10,
is_free: 1,
order_num: 1,
status: 2,
create_time: "2019-01-23 20:37:02.0",
update_time: "2020-02-24 18:37:34.0",
isDel: 0
},
{
id: 33,
course_id: 10,
section_id: 5,
theme: "第二讲:如何给别人洗脑",
duration: 10,
is_free: 1,
order_num: 1,
status: 2,
create_time: "2019-01-23 20:37:02.0",
update_time: "2020-02-24 18:37:34.0",
isDel: 0
}
]
}
],
defaultProps: {
children: "lessonList",
label: item => {
return item.section_name || item.theme;
}
}
};
}
};
</script>
4.3.2 显示当前课程的名称
- 显示当前课程名称
<el-page-header
@back="() => this.$router.back()"
:content="addSectionForm.course_name"
/>
- data数据
data() {
//定义章节信息
const addSectionForm = {
course_id: undefined,
course_name: "",
section_name: "",
description: "",
order_num: 0
};
//章节与课时信息,树形结构
const treeProps = {
label: item => {
return item.section_name || item.theme;
},
children: "lessonList"
};
//定义章节状态信息
const statusMapping = {
0: "已隐藏",
1: "待更新",
2: "已更新"
};
const statusForm = {
status: 0
};
return {
addSectionForm,
treeProps,
sections: [],
statusForm, //状态表单
statusMapping,
loading: false, //树形控件
showAddSection: false, //添加或修改章节
showStatusForm: false //状态修改
};
},
- 加载课程信息
created() {
//1.显示当前页面在网站中的位置
this.$breadcrumbs = [
{
name: "Courses", text: "课程管理" },
{
text: "课程结构" }
];
//2. 从路由中获取传递的参数, 课程id
const id = this.$route.params.courseId;
if (!id) return this.redirectToError();
//3.加载课程信息
this.loadCourse(id);
//4.加载课程对应的章节与课时
this.loadChildren(id);
},
methods: {
//方法1: 加载课程信息
loadCourse(id) {
axios
.get("/courseContent", {
params: {
methodName: "findCourseById",
course_id: id
}
})
.then(res => {
console.log(res.data);
//将数据保存到表单对象中
this.addSectionForm.course_id = res.data.id;
this.addSectionForm.course_name = res.data.course_name;
})
.catch(error => {
this.$message.error("数据获取失败! ! !");
});
},
4.3.3 加载章节与课时信息
JS部分
//方法2: 加载树(章节与课程)
loadChildren(id) {
this.loading = true;
axios
.get("/courseContent", {
params: {
methodName: "findSectionAndLessonByCourseId",
course_id: id
}
})
.then(resp => {
//获取章节数据,保存到sections
this.sections = resp.data;
this.loading = false;
})
.catch(error => {
this.loading = false;
this.$message.error("数据获取失败! ! !");
});
},
HTML
- el-tree ElementUI树形控件
○ :data 列表数据
○ :props 配置选项
<!-- 树形控件,展示课程对应的章节信息 -->
<el-tree
:data="sections"
:props="treeProps"
v-loading="loading"
element-loading-text="数据加载中..."
>
<!-- slot-scope:代表当前树节点内容,有两个参数 data表示当前树节点, node表示当前节点
状态 -->
<div class="inner" slot-scope="{ data, node }">
<span>{
{ data.section_name || data.theme }}</span>
- :props 配置选项
○ label : 指定节点标签为节点对象的某个属性值
○ children : 指定子树为节点对象的某个属性值
//章节与课时信息,树形结构
const treeProps = {
label: item => {
return item.section_name || item.theme;
},
children: "lessonList"
};
//children: "lessonList" 就是返回的JSON数据中的lessonList集合
- 操作按钮显示
○ node.level 获取当前节点的级别
○ @click.stop 事件冒泡,点击哪个元素,就执行哪个元素绑定的事件
<span class="actions">
<!-- 编辑章节 @click.stop 阻止事件冒泡 -->
<el-button
v-if="node.level == 1"
size="small"
@click.stop="handleEditSection(data)"
>编辑</el-button
>
<!-- 修改章节状态 -->
<el-button
v-if="node.level == 1"
size="small"
@click.stop="handleShowToggleStatus(data)"
>{
{ statusMapping[data.status] }}</el-button
>
</span>
4.3.4 回显信息
HTML
<el-button type="primary" icon="el-icon-plus" @click="handleShowAddSection">添加
章节</el-button>
JS 部分
//方法3: 显示添加章节表单,回显课程信息
handleShowAddSection() {
//显示表单
this.showAddSection = true;
},
4.3.5 添加章节
HTML
<el-button type="primary" @click="handleAddSection">确 定</el-button>
JS
//方法4: 添加&修改章节操作
handleAddSection() {
axios
.post("/courseContent", {
methodName: "saveOrUpdateSection",
section: this.addSectionForm
})
.then(resp => {
//debugger;
this.showAddSection = false;
//重新加载列表
return this.loadChildren(this.addSectionForm.course_id);
})
.then(() => {
//reset 重置表单
this.addSectionForm.section_name = "";
this.addSectionForm.description = "";
this.addSectionForm.order_num = 0;
})
.catch(error => {
this.showAddSection = false;
this.$message.error("操作执行失败! ! !");
});
},
4.3.6 后台接口问题解决
BaseServlet中代码修改
if("application/json;charset=utf-8".equals(contentType))
修改为:
if("application/json;charset=utf-8".equalsIgnoreCase(contentType))
CourseContentServlet中的saveOrUpdateSection方法修改
//3.使用BeanUtils的 copyProperties方法,将map中的数据封装到section对象里
BeanUtils.copyProperties(section,map.get("section"));
4.3.7 修改章节
HTML
<el-button v-if="node.level == 1" size="small"
@click.stop="handleEditSection(data)">编辑</el-button>
JS 回显示方法
//方法5: 修改章节回显方法
handleEditSection(section) {
//对象拷贝
Object.assign(this.addSectionForm, section);
this.showAddSection = true;
},
- 事件冒泡:当点击子元素的事件。如果父元素也有同样的事件的话。他就会一并的触发。
- 解决冒泡事件的方法: @click.stop
<body>
<!-- 事件冒泡: 解决方案 @click.stop -->
<div id="app" @click="log('div点击事件')">
<button @click="log('button点击事件')">事件冒泡</button>
</div>
</body>
<script src="./js/vue.min.js"></script>
<script>
var VM = new Vue({
el: "#app",
methods: {
log(t) {
alert(t);
},
},
});
</script>
4.3.8 章节状态回显
HTML
<!-- 修改章节状态 -->
<el-button
v-if="node.level == 1"
size="small"
@click.stop="showStatus(data)"
>{
{ statusMapping[data.status] }}</el-button
>
JS
//data函数中定义的章节状态
const statusMapping = {
0: "已隐藏",
1: "待更新",
2: "已更新"
};
//方法6: 章节状态修改
showStatus(data) {
this.statusForm.id = data.id;
this.statusForm.status = data.status.toString();
this.statusForm.data = data;
this.showStatusForm = true;//显示状态表单
},
4.3.9 Select选择器
- 打开我们之前编写的VueCLI项目
- 在component目录下,添加一个组件, TestSelect.vue
<template></template>
<script>
export default {
};
</script>
<style scoped>
</style>
- 在Index.vue组件中的导航菜单位置添加一个 Select选择器 导航.
注意:要设置index的路径为 /select
<el-menu-item index="/select">
<i class="el-icon-menu"></i>Select选择器
</el-menu-item>
- 在index.js 路由文件中进行配置,在布局路由中再添加一个子路由
{
path: "/select",
name: "select",
component: Select,
},
- 在ElementUI官网中查找Select选择器

- 查看基础用法,将代码复制到 TestSelect.vue中
<template>
<el-select v-model="value" placeholder="请选择">
<el-option v-for="item in options" :key="item.value" :label="item.label"
:value="item.value"></el-option>
</el-select>
</template>
<script>
export default {
data() {
return {
options: [
{
value: "选项1",
label: "黄金糕"
},
{
value: "选项2",
label: "双皮奶"
},
{
value: "选项3",
label: "蚵仔煎"
},
{
value: "选项4",
label: "龙须面"
},
{
value: "选项5",
label: "北京烤鸭"
}
],
value: ""
};
}
};
</script>
- select 选择器属性分析
- v-model: 的值为当前被选中的 el-option 的 value 属性值
- el-option : 选项
○ label 选项的标签名
○ value 选择的值
- 使用Select选择器展示状态信息
<template>
<el-select v-model="status" placeholder="请选择">
<el-option
v-for="index in Object.keys(statusMappings)"
:key="index"
:label="statusMappings[index]"
:value="index"
></el-option>
</el-select>
</template>
<script>
export default {
data() {
return {
statusMappings: {
0: "已隐藏",
1: "待更新",
2: "已更新"
},
status:0
};
}
};
</script>
- Object.keys()
var obj = {
0: 'a', 1: 'b', 2: 'c' };
console.log(Object.keys(obj)); // console: ['0', '1', '2']
4.4.0 章节状态修改
HTML
<el-button type="primary" @click="updateStatus">确 定</el-button>
JS部分
//方法7: 修改章节状态
updateStatus(statusForm) {
axios
.get("/courseContent", {
params: {
methodName: "updateSectionStatus",
status: this.statusForm.status,
id: this.statusForm.id
}
})
.then(resp => {
this.statusForm.data.status = this.statusForm.status;
this.statusForm = {
};
this.showStatusForm = false;
})
.catch(error => {
this.showStatusForm = false;
this.$message.error("修改状态失败! ! !");
});
},
- v-for里面数据层次太多, 修改过数据变了,页面没有重新渲染,需手动强制刷新。
@change="$forceUpdate()" 强制刷新
任务四 项目上线部署发布
1. 前言
1.1 服务器与操作系统
- 服务器是计算机的一种,它比普通计算机运行更快、负载更高、价格更贵。
- 服务器从硬件上等同于电脑PC。而服务器跟PC都是由CPU、内存、主板、硬盘、电源等组成;但服务器的性能要远远超过PC,因为它要保证全年无休。

- 操作系统: 操作系统是作为应用程序与计算机硬件之间的一个接口
○ 没有安装操作系统的计算机,被称为裸机, 如果想在裸机上运行自己的程序,就需要使用机器语言
○ 安装操作系统之后,就可以配置一些高级语言的环境,进行高级语言的开发 - Linux操作系统
○ Linux系统是最具稳定性的系统
○ Linux是天生就比Windows更具安全性
○ 免费, Linux服务器在应用开发上更能节约成本
1.2 项目的发布部署
- 项目的开发流程大致要经过一下几个步骤:
○ 项目立项
○ 需求分析阶段
○ 原型图设计阶段
○ 开发阶段
○ 测试阶段
○ 系统上线
2.后台项目部署
2.1 安装虚拟机
- 在Linux阶段我们已经安装过了虚拟机, 使用的是 Linux操作系统 CentOS 7 版本
2.2 安装软件环境
以下软件,在Linux阶段都已安装完成.具体操作详见该阶段安装文档.
| 软件 | 版本 |
|---|---|
| JDK | 11 |
| Tomcat | 8.5 |
| MySQL | 5.7 |
- 查看Java版本
java -version
- 查看tomcat是否能够正常启动
# 进入到tomcat目录
cd /usr/tomcat/
# 启动tomcat
./bin/startup.sh
# 关闭tomcat
./bin/shutdown.sh
- 关闭防火墙
#查看已经开放的端口:
firewall-cmd --list-ports
#开启端口
firewall-cmd --zone=public --add-port=8080/tcp --permanent
#命令含义:
–zone #作用域
–add-port=8080/tcp #添加端口,格式为:端口/通讯协议
–permanent #永久生效,没有此参数重启后失效
#重启防火墙
firewall-cmd --reload #重启firewall
#关闭防火墙
systemctl stop firewalld.service #停止firewall
systemctl disable firewalld.service #禁止firewall开机启动
firewall-cmd --state #查看默认防火墙状态(关闭后显示notrunning,开启后显示running)
- 登录MySQL,检查数库连接是否正常
-- 创建用户
CREATE USER 'JiuYuan'@'%' IDENTIFIED BY 'JiuYuan@123';
-- 授予所有权限
GRANT ALL PRIVILEGES ON *.* TO 'JiuYuan'@'%' IDENTIFIED BY 'JiuYuan@123';
-- 刷新
FLUSH PRIVILEGES;
- 使用SQLYog连接Linux上的MySQL, 导入SQL脚本 创建项目所需的数据库

2.3 项目打包 发布
- 修改项目的数据库配置文件, 数据库的IP ,用户名 密码都要修改.
- 修改 Constants常量类中的项目URL
//生产环境地址
public static final String LOCAL_URL = "http://192.168.52.100:8080";
- 修改后启动项目,测试一下 保证数据库连接没有问题
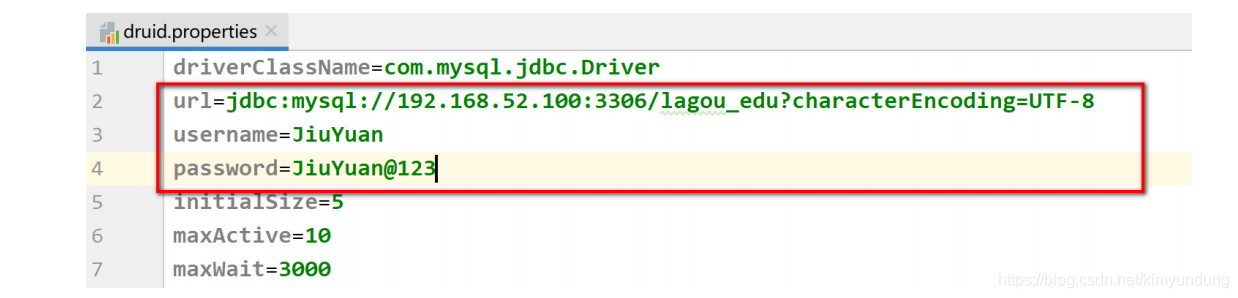
- 检查POM文件,打包方式必须是war,编译版本为JDK11
<packaging>war</packaging>
<properties>
<project.build.sourceEncoding>UTF-8</project.build.sourceEncoding>
<maven.compiler.source>11</maven.compiler.source>
<maven.compiler.target>11</maven.compiler.target>
</properties>
- 执行打包命令
//清除target文件夹
clean
//打包 ,跳过测试
package
-
复制出target目录下的 war包
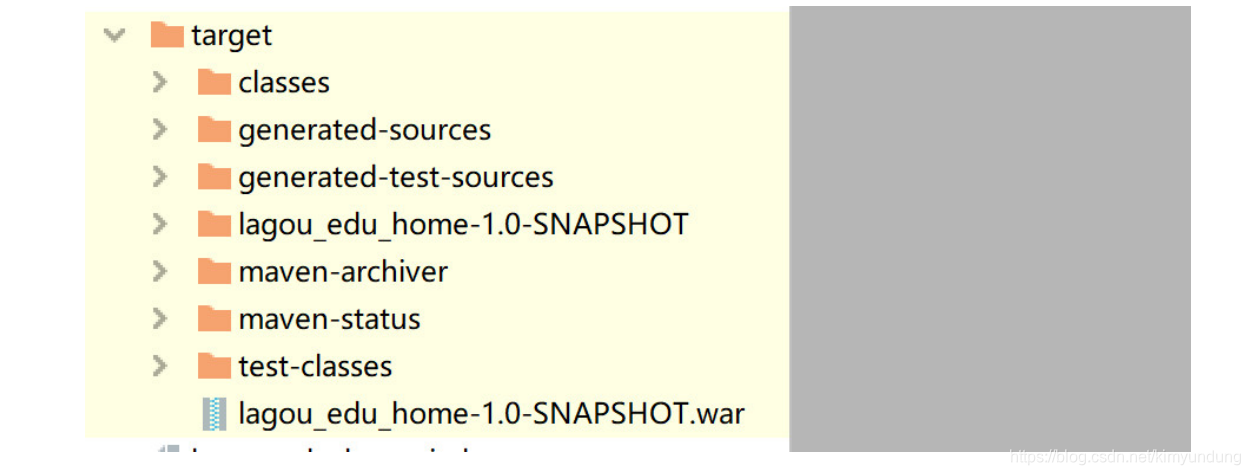
-
修改一下项目名称

-
上传到tomcat中,启动测试

-
访问接口
http://192.168.52.100:8080/lagou_edu_home/course?methodName=findCourseList
3.前端项目部署
3.1 修改配置文件
- 前端项目的配置文件有两个,一个是开发环境的配置文件,一个是生产环境的配置文件.

- 我们先修改一下开发环境文件的 后端服务器访问地址,然后进行一下测试
.env.development 文件
VUE_APP_API_BASE = http://192.168.52.100:8080/lagou_edu_home
- 修改生产环境的配置文件
//.env.production
VUE_APP_API_BASE = http://192.168.52.100:8080/lagou_edu_home
3.2 前端项目打包
- 修改 vue.config.js 配置文件
复制下面内容即可
module.exports = {
// relative path for dev
publicPath: process.env.NODE_ENV === "production" ? "/edu-boss/" : "./",
// for gh-pages
indexPath: "index.html",
assetsDir: "static",
lintOnSave: process.env.NODE_ENV !== "production",
productionSourceMap: false,
css: {
// sourceMap: process.env.NODE_ENV !== 'production'
},
devServer: {
open: true,
port: 8081
}
};
- 执行下面的打包命令
npm run build
-
在项目下会生成一个 dist 目录

-
在本地tomcat的webapps目录下,创建一个edu-boss文件夹,将dist目录中的文件拷贝到里面

-
启动本地tomcat ,访问前端项目 路径为:
http://localhost:8081/edu-boss/
3.3 前端项目发布
- 验证没有问题后,将edu-boos项目压缩,上传到tomcat服务器
//复制一份tomcat
cp -r /usr/tomcat/ /usr/tomcat2
//上传 edu-boss.zip ,并解压
unzip edu-boss.zip
//删除edu-boss.zip
rm -rf edu-boss.zip
-
修改tomcat2的server.xml 配置文件,修改3个端口,避免与tomcat1冲突
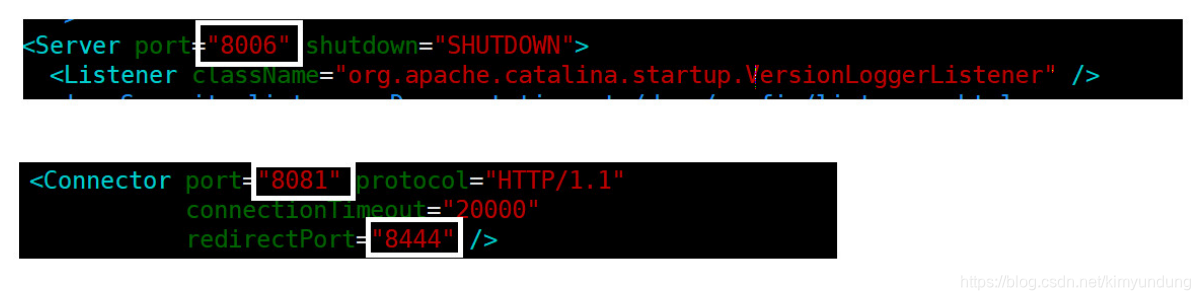
-
在部署后端项目的tomcat1的 webapps目录下创建一个 upload文件夹,保存图片
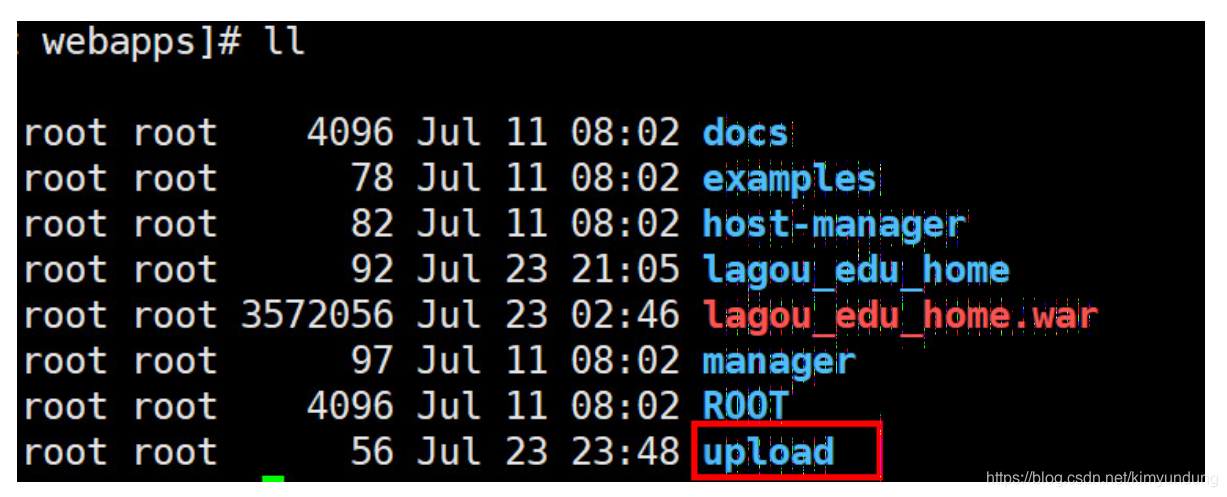
-
运行前端项目
//进入tomcat2,启动项目
./bin/startup.sh
//动态查看日志
tail -f logs/catalina.out
- 运行后端项目
//进入tomcat1,启动项目
./bin/startup.sh
//动态查看日志
tail -f logs/catalina.out
- 前后端都启动后,进行测试