背景
上篇文章我们详细阐述了windows环境下使用ffmpeg进行软解码的步骤,并给出了完整代码。
FFmpeg 4.x 从入门到精通(一)—— QT 中如何用 FFmpeg 实现软件解码
接下来这篇文章继续进行深入,带大家学习使用FFmpeg实现windows下的硬解码。
FFmpeg下载地址(粉丝免费下载):
https://download.csdn.net/download/u012534831/14045436
本文的语言环境基于C++,界面部分是 QT。
流程分析
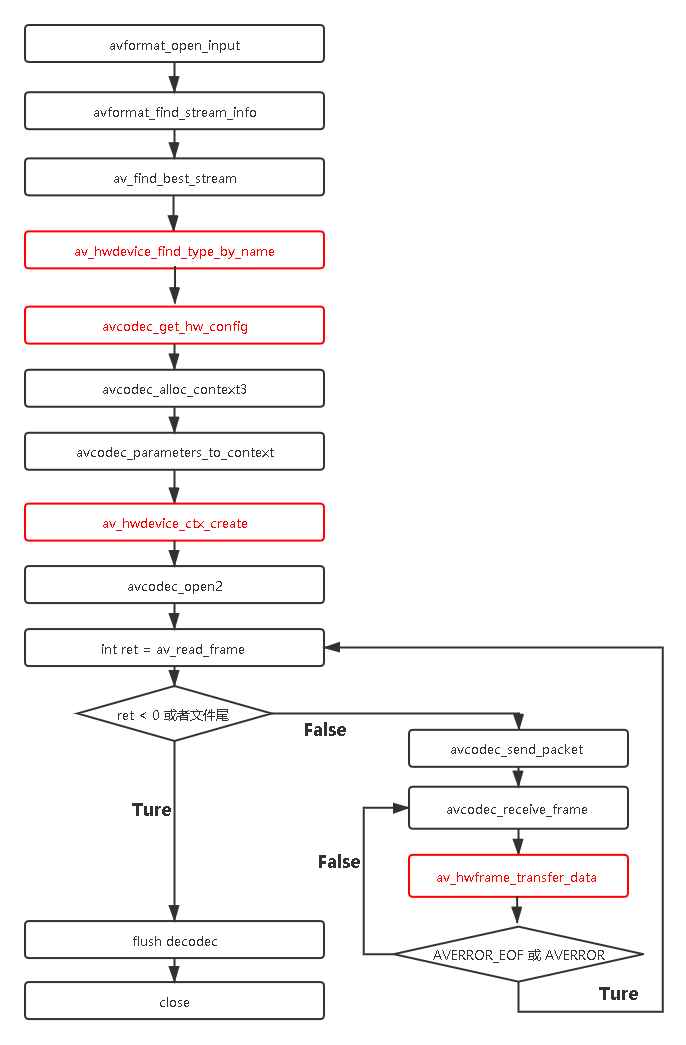
老规矩,在开始看代码之前,我们必须先了解下ffmpeg硬解的常规流程:

红色的部分是和软解的区别。
虽然有些函数在第一篇文章已经解释了,但是为了使文章显得完整,因为本文也会再讲一遍。
1、avformat_open_input
为 AVFormatContext 分配空间,打开输入的视频数据并且探测视频的格式,这个函数里面包含了复杂的格式解析与探测算法,可解析的内容包括:视频流、音频流、视频流参数、音频流参数、视频帧索引等。用雷神的话说就是 可以算作FFmpeg的“灵魂”。
2、avformat_find_stream_info
获取多媒体流的信息,包括码流、帧率、时长等信息。但是有些早期格式或者裸流数据它的索引并没有放到头当中,因此需要在后面进行探测。注意一个视频文件中可能会同时包括视频文件、音频文件、字幕文件等多个媒体流。
3、av_find_best_stream

当视频被解封装出来后,需要分开处理音频和视频,需要找到对应的音频流和视频流,获取音视频对应的stream_index。
*4、enum AVHWDeviceType av_hwdevice_find_type_by_name(const char name)
对于硬解码来说就不能使用avcodec_find_decoder方法来查找解码器了。而是使用av_hwdevice_find_type_by_name方法。要知道avcodec_find_decoder根据 AVCodecID 查找,比如我们要解码H264,那入参就是AV_CODEC_ID_H264,找到先注册的decoder就退出了,可能得到的这个解码器不能去解码AV_CODEC_ID_VP6文件。最主要的是:同一个 AVCodecID 可能对应多个不同的解码器 (AVCodec),他们有不同的 AVCodec.name。
但是比如说你想在windows下使用dxva解码,不管视频源是h264、H265,使用av_hwdevice_find_type_by_name函数,入参是dxva就行,得到的解码器就可以解H264和H265(当然前提是你的解码器支持解码这两种编码)。
所以说这是两个完全不同的方法,可能看起来类似,但千万不要被它迷惑。
**5、const AVCodecHWConfig avcodec_get_hw_config(const AVCodec codec, int index);
获取到该解码器codec的硬件属性,比如可以支持的目标像素格式等。
6、avcodec_alloc_context3
创建AVCodecContext并分配空间。
7、avcodec_parameters_to_context
该函数用于将流里面的参数,也就是AVStream里面的参数直接复制到AVCodecContext的上下文当中,执行真正的内容拷贝。avcodec_parameters_to_context()是新的API,替换了旧版本的avcodec_copy_context()。
8、av_hwdevice_ctx_create
初始化硬件,打开硬件,创建硬件设备相关的上下文信息AVHWDeviceContext,包括分配内存资源、对硬件设备进行初始化。
初始化硬件设备完成后,还有个必须的操作是将获取到的硬件信息绑定到AVCodecContext的hw_device_ctx指针上。
如果使用软解码则默认有一个软解码的缓冲区(获取AVFrame的),而硬解码则需要额外创建硬件解码的缓冲区。这个缓冲区变量为hw_frames_ctx,不手动创建,则在调用avcodec_send_packet()函数内部自动创建一个,但是必须手动赋值硬件解码缓冲区引用hw_device_ctx(它是一个AVBufferRef变量),不然的话调用avcodec_send_packet的时候会返回错误。
9、avcodec_open2
用给定的 AVCodec 去初始化 AVCodecContext。
到这儿,解码器的初始化工作已经完成。下面就可以开始真正的解码操作了。
10、av_read_frame
读取码流中的音频若干帧或者视频一帧,av_read_frame()函数是新型ffmpeg的用法,对 av_read_packet 进行了封装,旧用法之所以被抛弃,就是因为以前获取的数据可能不是完整的,而av_read_frame()保证了视频数据一帧的完整性,使读出的数据总是完整的一帧。
11、avcodec_send_packet
发送数据到后台解码队列。
It can be NULL (or an AVPacket with data set to NULL and
size set to 0); in this case, it is considered a flush
packet, which signals the end of the stream. Sending the
first flush packet will return success. Subsequent ones are
unnecessary and will return AVERROR_EOF. If the decoder
still has frames buffered, it will return them after sending
源码中关于发送一包空数据的解释:
由于ffmpeg内部会缓存帧,在av_read_frame读不到数据的时候,需要通过packet.data = NULL;packet.size = 0;给ffmpeg发送一包空数据,即再avcodec_send_packet一次,将ffmpeg里面缓存的帧全部刷出来,解决最后几帧没有解码出来的问题。
12、avcodec_receive_frame
从解码器读取帧数据,这个函数执行完后,就已经能拿到我们的帧数据了,它被存储在 AVFrame 中。
此处需要注意的是:
一般而言,一次avcodec_send_packet()对应一次avcodec_receive_frame(),但是也会有一次对应多次的情况。这个得看具体的流,并常见于音频流,会存在一个AVPacket对应多个AVFrame的情况。因此可以看我上面的流程图有两个while循环。
13、av_hwframe_transfer_data
- 这个函数是硬解码后将数据从 GPU 拷贝到 CPU,当然前提是你需要在CPU进行数据的操作,比如保存数据或者转为RGB、YUV等,然后通过Opengl渲染出来,但是由于
TexImage2D技术效率很低,因此此方法并不是最优的方案。 - 因此若你不需要拷贝到CPU想要直接把数据渲染出来,有几种方案,比如D3D11解码出的数据格式
AV_PIX_FMT_D3D11VA_VLD,可以直接转换为D3D纹理,然后通过IDirect3DTexture贴图。还有一种方案是使用EGL+OpenglES,或者直接使用 ANGLE(开源的EGL+OpenglES实现) 这个开源项目。 - 此函数会将硬解码出的数据格式进行转换,也就是说会将GPU映射的数据格式转换成CPU方式映射的数据格式,比如将DXVA2解码出来的
AV_PIX_FMT_DXVA2_VLD转换为AV_PIX_FMT_NV12。
代码示例
//头文件

#ifndef MAINWINDOW_H
#define MAINWINDOW_H

#include <QMainWindow>
#include<thread>
extern "C"
{
    #include "libavcodec/avcodec.h"
    #include "libavformat/avformat.h"
    #include "libavutil/pixfmt.h"
    #include "libswscale/swscale.h"
    #include "libavdevice/avdevice.h"
    #include <libavutil/pixdesc.h>
    #include <libavutil/hwcontext.h>
    #include <libavutil/opt.h>
    #include <libavutil/avassert.h>
    #include <libavutil/imgutils.h>
}
typedef struct DecodeContext {
    AVBufferRef *hw_device_ref;
} DecodeContext;

namespace Ui {
class MainWindow;
}

class MainWindow : public QMainWindow
{
    Q_OBJECT

public:
    explicit MainWindow(QWidget *parent = nullptr);
    ~MainWindow();
    void init();
    void play();
private:
   AVBufferRef *hw_device_ctx = NULL;
    static enum AVPixelFormat hw_pix_fmt;
    int ret;
    enum AVHWDeviceType type;
    std::thread m_decodecThread;
    Ui::MainWindow *ui;
    AVFormatContext *pAVFormatCtx;
    AVCodecContext *pAVCodecCtx;
    SwsContext *pSwsCtx = nullptr;
    uint8_t *pRgbBuffer = nullptr;
    AVPacket packet;
    AVFrame *pAVFrameRGB = nullptr;
    int iVideoIndex = -1;
    QImage m_image;
    bool isFinish  =false;
    void decodec();
signals:
    void signalDraw();
public slots:
    void slotDraw();
protected:
    void paintEvent(QPaintEvent *event) override;
private:
    int hw_decoder_init(AVCodecContext *ctx, const enum AVHWDeviceType type);
    static enum AVPixelFormat get_hw_format(AVCodecContext *ctx,const enum AVPixelFormat *pix_fmts);
};

#endif // MAINWINDOW_H
//CPP文件

#include "mainwindow.h"
#include "ui_mainwindow.h"
#include <QDebug>
#include <QPainter>
#include<thread>
#include <QDateTime>
 enum AVPixelFormat MainWindow::hw_pix_fmt = AV_PIX_FMT_NONE;
MainWindow::MainWindow(QWidget *parent) :
    QMainWindow(parent),
    ui(new Ui::MainWindow)
{
    ui->setupUi(this);
    connect(this,&MainWindow::signalDraw,this,&MainWindow::slotDraw);
}

MainWindow::~MainWindow()
{
    delete ui;
}
int MainWindow::hw_decoder_init(AVCodecContext *ctx, const enum AVHWDeviceType type)
{
    int err = 0;
    //初始化硬件,打开硬件,绑定到具体硬件的指针函数上
    //创建硬件设备相关的上下文信息AVHWDeviceContext,包括分配内存资源、对硬件设备进行初始化
    if ((err = av_hwdevice_ctx_create(&hw_device_ctx, type,
                                      NULL, NULL, 0)) < 0) {
        fprintf(stderr, "Failed to create specified HW device.\n");
        return err;
    }
 /* 需要把这个信息绑定到AVCodecContext
     * 如果使用软解码则默认有一个软解码的缓冲区(获取AVFrame的),而硬解码则需要额外创建硬件解码的缓冲区
     *  这个缓冲区变量为hw_frames_ctx,不手动创建,则在调用avcodec_send_packet()函数内部自动创建一个
     *  但是必须手动赋值硬件解码缓冲区引用hw_device_ctx(它是一个AVBufferRef变量)
     */
    ctx->hw_device_ctx = av_buffer_ref(hw_device_ctx);
    return err;
}
enum AVPixelFormat MainWindow::get_hw_format(AVCodecContext *ctx,
                                        const enum AVPixelFormat *pix_fmts)
{
    const enum AVPixelFormat *p;

    for (p = pix_fmts; *p != -1; p++) {
        if (*p == hw_pix_fmt)
            return *p;
    }

    fprintf(stderr, "Failed to get HW surface format.\n");
    return AV_PIX_FMT_NONE;
}

void MainWindow::init()
{
  std::string file = "E:/Video/bb.mp4";
 //描述多媒体文件的构成及其基本信息
 if (avformat_open_input(&pAVFormatCtx, file.data(), NULL, NULL) != 0)
     {
         qDebug() <<"open file fail";
         avformat_free_context(pAVFormatCtx);
         return;
     }

 //读取一部分视音频数据并且获得一些相关的信息
 if (avformat_find_stream_info(pAVFormatCtx, NULL) < 0)
 {
     qDebug() <<"vformat find stream fail";
     avformat_close_input(&pAVFormatCtx);
     return;
 }
// 根据解码器枚举类型找到解码器
    AVCodec *pAVCodec;
    int ret = av_find_best_stream(pAVFormatCtx, AVMEDIA_TYPE_VIDEO, -1, -1, &pAVCodec, 0);
    if (ret < 0) {
        qDebug()<< "av_find_best_stream faliture";
        avformat_close_input(&pAVFormatCtx);
        return;
    }
    iVideoIndex = ret;

    type = av_hwdevice_find_type_by_name("dxva2");
//  type = av_hwdevice_find_type_by_name("d3d11va");
    if (type == AV_HWDEVICE_TYPE_NONE) {
        fprintf(stderr, "Device type %s is not supported.\n", "dxva2");
        fprintf(stderr, "Available device types:");
        while((type = av_hwdevice_iterate_types(type)) != AV_HWDEVICE_TYPE_NONE)
            fprintf(stderr, " %s", av_hwdevice_get_type_name(type));
        fprintf(stderr, "\n");
    }

// 所有支持的硬件解码器保存在AVCodec的hw_configs变量中。对于硬件编码器来说又是单独的AVCodec
    for (int i = 0;; i++) {
        //获取到该解码器codec的硬件属性,比如可以支持的目标像素格式等
        const AVCodecHWConfig *config = avcodec_get_hw_config(pAVCodec, i);
        if (!config) {
            fprintf(stderr, "Decoder %s does not support device type %s.\n",
                    pAVCodec->name, av_hwdevice_get_type_name(type));
        }
	if (config->methods & AV_CODEC_HW_CONFIG_METHOD_HW_DEVICE_CTX &&config->device_type == type) {
            hw_pix_fmt = config->pix_fmt;
            break;
        }
    }

pAVCodecCtx = avcodec_alloc_context3(pAVCodec);
     if (pAVCodecCtx == NULL)
     {
         qDebug() <<"get pAVCodecCtx fail";
         avformat_close_input(&pAVFormatCtx);
         return;
     }
ret = avcodec_parameters_to_context(pAVCodecCtx,pAVFormatCtx->streams[iVideoIndex]->codecpar);
     if (ret < 0)
     {
         qDebug() <<"avcodec_parameters_to_context fail";
         avformat_close_input(&pAVFormatCtx);
         return;
     }
     // 配置获取硬件加速器像素格式的函数;该函数实际上就是将AVCodec中AVHWCodecConfig中的pix_fmt返回
    pAVCodecCtx->get_format  = get_hw_format;

    if (hw_decoder_init(pAVCodecCtx, type) < 0)
        return ;

  if (avcodec_open2(pAVCodecCtx, pAVCodec, NULL) < 0)
     {
         qDebug()<<"avcodec_open2 fail";
         return;
     }
         //为解码帧分配内存
                pAVFrameRGB = av_frame_alloc();
        qDebug()<<"pAVCodecCtx->width:" << pAVCodecCtx->width<<"pAVCodecCtx->height:"  << pAVCodecCtx->height;
         int size = av_image_get_buffer_size(AVPixelFormat(AV_PIX_FMT_RGB32), pAVCodecCtx->width, pAVCodecCtx->height, 1);
         pRgbBuffer = (uint8_t *)(av_malloc(size));
         //旧版本avpicture_fill
av_image_fill_arrays(pAVFrameRGB->data, pAVFrameRGB->linesize, pRgbBuffer, AV_PIX_FMT_RGB32,
                              pAVCodecCtx->width, pAVCodecCtx->height, 1);
//         //AVpacket 用来存放解码数据
         av_new_packet(&packet, pAVCodecCtx->width * pAVCodecCtx->height);
         qDebug()<<"pAVCodecCtx->pix_fmt:" << pAVCodecCtx->pix_fmt;
}


void MainWindow::play()
{
    m_decodecThread = std::thread([this]()
    {
        decodec();
    });
    m_decodecThread.detach();
}

void MainWindow::decodec()
{
    //读取码流中视频帧
        while (true)
        {
            AVFrame *frame = NULL, *sw_frame = NULL;
            AVFrame *tmp_frame = NULL;
            int ret = av_read_frame(pAVFormatCtx, &packet);
            if(ret != 0)
            {
                qDebug()<<"file end";
                isFinish = !isFinish;
                 return;
            }
            if (packet.stream_index != iVideoIndex)
            {
                av_packet_unref(&packet);
                continue;
            }
           int iGotPic = AVERROR(EAGAIN);
//             //解码一帧视频数据
            iGotPic = avcodec_send_packet(pAVCodecCtx, &packet);
            if(iGotPic!=0){
                qDebug()<<"avcodec_send_packet error";
                      continue;
            }
           if (!(frame = av_frame_alloc()) || !(sw_frame = av_frame_alloc())) {
                fprintf(stderr, "Can not alloc frame\n");
                ret = AVERROR(ENOMEM);
                continue;
            }
                          while (0 == avcodec_receive_frame(pAVCodecCtx, frame))
              {
                 qDebug()<<"frame->format:" << frame->format;//53 AV_PIX_FMT_DXVA2_VLD
                  if (frame->format == hw_pix_fmt) {
                      int64_t time = QDateTime::currentDateTime().toMSecsSinceEpoch();
                        qDebug() << "qhttime1:" << time;
                      /* retrieve data from GPU to CPU */
					if ((ret = av_hwframe_transfer_data(sw_frame, frame, 0)) < 0) {
                           fprintf(stderr, "Error transferring the data to system memory\n");
                           break;
                      }
                         tmp_frame = sw_frame;
                    } else
                  {
                       tmp_frame = frame;
                       qDebug()<<"frame img";
                  }
                    if(!pSwsCtx)
                  {
                      pSwsCtx = sws_getContext(pAVCodecCtx->width, pAVCodecCtx->height, (AVPixelFormat)tmp_frame->format,
                                                           pAVCodecCtx->width, pAVCodecCtx->height, AV_PIX_FMT_RGB32,
                                                           SWS_BILINEAR, NULL, NULL, NULL);
                  }
                  int ret = sws_scale(pSwsCtx, (uint8_t const * const *) tmp_frame->data, tmp_frame->linesize, 0,
                            tmp_frame->height, pAVFrameRGB->data, pAVFrameRGB->linesize);
                    qDebug()<<"ret:" << ret;
                  QImage img((uint8_t *)pAVFrameRGB->data[0], tmp_frame->width, tmp_frame->height, QImage::Format_RGB32);
                  qDebug()<<"decode img";
                  m_image = img;
                  emit signalDraw();
            std::this_thread::sleep_for(std::chrono::milliseconds(25));
        }
  //资源回收
        av_free(pAVFrameRGB);
        sws_freeContext(pSwsCtx);
        avcodec_close(pAVCodecCtx);
        avformat_close_input(&pAVFormatCtx);
}

void MainWindow::slotDraw()
{
    update();
}

void MainWindow::paintEvent(QPaintEvent *event)
{
    QPainter painter(this);
    painter.setBrush(Qt::black);
    painter.drawRect(0, 0, this->width(), this->height());

    if (m_image.size().width() <= 0)
        return;

    //比例缩放
    QImage img = m_image.scaled(this->size(),Qt::KeepAspectRatio);
    int x = this->width() - img.width();
    int y = this->height() - img.height();

    x /= 2;
    y /= 2;

    //QPoint(x,y)为中心绘制图像
    painter.drawImage(QPoint(x,y),img);
}
如有兴趣,欢迎加入我的QQ群,QT/Android/音视频 问题在线解答,资源分享。
