Spring概述
1、Spring是一个开源免费的框架、容器
2、Spring是一个轻量级的框架,非入侵式的
3、控制反转IOC、面向切面编程(AOP)
4、对事物的支持、对框架的支持
总结:Spring是一个轻量级的控制反转(IOC)和面向切面(AOP)的容器(框架)
Spring框架是一个分层框架,有七个定义良好的模块组成。Spring模块构建在核心容器纸上,核心容器定义了创建、配置和管理bean的方式。模块的功能如下:
核心容器:核心容器提供 Spring 框架的基本功能。核心容器的主要组件是BeanFactory,它是工厂模式的实现。BeanFactory 使用控制反转(IOC) 模式将应用程序的配置和依赖性规范与实际的应用程序代码分开。Spring上下文:Spring 上下文是一个配置文件,向 Spring 框架提供上下文信息。Spring 上下文包括企业服务,例如 JNDI、EJB、电子邮件、国际化、校验和调度功能。Spring AOP:通过配置管理特性,Spring AOP 模块直接将面向切面的编程功能 , 集成到了 Spring 框架中。所以,可以很容易地使 Spring 框架管理任何支持 AOP的对象。Spring AOP 模块为基于 Spring 的应用程序中的对象提供了事务管理服务。通过使用 Spring AOP,不用依赖组件,就可以将声明性事务管理集成到应用程序中。Srping DAO:JDBC DAO 抽象层提供了有意义的异常层次结构,可用该结构来管理异常处理和不同数据库供应商抛出的错误消息。异常层次结构简化了错误处理,并且极大地降低了需要编写的异常代码数量(例如打开和关闭连接)。Spring DAO 的面向 JDBC 的异常遵从通用的 DAO 异常层次结构。Spring ORM:Spring 框架插入了若干个 ORM 框架,从而提供了 ORM 的对象关系工具,其中包括 JDO、Hibernate 和 iBatis SQL Map。所有这些都遵从 Spring 的通用事务和 DAO 异常层次结构。Spring Web模块:Web 上下文模块建立在应用程序上下文模块之上,为基于 Web 的应用程序提供了上下文。所以,Spring 框架支持与 Jakarta Struts 的集成。Web 模块还简化了处理多部分请求以及将请求参数绑定到域对象的工作。Spring MVC:MVC 框架是一个全功能的构建 Web 应用程序的 MVC 实现。通过策略接口,MVC 框架变成为高度可配置的,MVC 容纳了大量视图技术,其中包括 JSP、Velocity、Tiles、iText 和 POI。
拓展:
SpringBoot 和 SpringCloud
- Spring Boot 是 Spring 的一套快速配置脚手架,可以基于Spring Boot 快速开发单个微服务;
- Spring Cloud是基于Spring Boot实现的;
- Spring Boot专注于快速、方便集成的单个微服务个体,Spring Cloud关注全局的服务治理框架;
- Spring Boot使用了约束优于配置的理念,很多集成方案已经帮你选择好了,能不配置就不配置 , Spring Cloud很大的一部分是基于Spring Boot来实现,Spring Boot可以离开Spring Cloud独立使用开发项目,但是Spring Cloud离不开Spring Boot,属于依赖的关系。
- SpringBoot在SpringClound中起到了承上启下的作用,如果你要学习SpringCloud必须要学习SpringBoot。
核心一:IOC本质
控制反转IoC(Inversion of Control),是一种设计思想,DI(依赖注入)是实现IoC的一种方法,也有人认为DI只是IoC的另一种说法。没有IoC的程序中 , 我们使用面向对象编程 , 对象的创建与对象间的依赖关系完全硬编码在程序中,对象的创建由程序自己控制,控制反转后将对象的创建转移给第三方,个人认为所谓控制反转就是:获得依赖对象的方式反转了。
IoC是Spring框架的核心内容,使用多种方式完美的实现了IoC,可以使用XML配置,也可以使用注解,新版本的Spring也可以零配置实现IoC。
Spring容器在初始化时先读取配置文件,根据配置文件或元数据创建与组织对象存入容器中,程序使用时再从Ioc容器中取出需要的对象。

采用XML方式配置Bean的时候,Bean的定义信息是和实现分离的,而采用注解的方式可以把两者合为一体,Bean的定义信息直接以注解的形式定义在实现类中,从而达到了零配置的目的。
控制反转是一种通过描述(XML或注解)并通过第三方去生产或获取特定对象的方式。在Spring中实现控制反转的是IoC容器,其实现方法是依赖注入(Dependency Injection,DI)。
文章目录
1、入门案例(快速上手Spring)
第一步:导入jar包,利用maven自动下载对应依赖性的特性
    <dependencies>
        <dependency>
            <groupId>org.springframework</groupId>
            <artifactId>spring-webmvc</artifactId>
            <version>5.1.10.RELEASE</version>
        </dependency>
        <!-- https://mvnrepository.com/artifact/org.projectlombok/lombok java代码库,这样能简化我们开发,不用手动添加getter和setter等-->
        <dependency>
            <groupId>org.projectlombok</groupId>
            <artifactId>lombok</artifactId>
            <version>1.18.12</version>
            <scope>provided</scope>
        </dependency>
        <!-- https://mvnrepository.com/artifact/junit/junit 进行单元测试-->
        <dependency>
            <groupId>junit</groupId>
            <artifactId>junit</artifactId>
            <version>4.13.1</version>
            <scope>test</scope>
        </dependency>
    </dependencies>
第二步:编写代码
@AllArgsConstructor
@ToString
@NoArgsConstructor
@Setter
@Getter
public class Hello {


    private String name;
}
第三步:编写我们的Spring文件,这里命名为applicationContext.xml
<?xml version="1.0" encoding="UTF-8"?>
<beans xmlns="http://www.springframework.org/schema/beans"
       xmlns:xsi="http://www.w3.org/2001/XMLSchema-instance"
       xsi:schemaLocation="http://www.springframework.org/schema/beans
       http://www.springframework.org/schema/beans/spring-beans.xsd">

    <!--bean就是java对象 , 由Spring创建和管理-->
    <bean id="hello" class="chen.pojo.Hello">
        <property name="name" value="Spring"/>
    </bean>

</beans>
第四步:测试
    @Test
    public void Spring01(){


        //解析applicationContext.xml文件,生成管理bean对象的工厂
        ApplicationContext appletContext = new ClassPathXmlApplicationContext("applicationContext.xml");
        //getBean:参数即为spring配置文件中的bean的id,指定获取某个对象
        Hello hello = (Hello)appletContext.getBean("hello");
        System.out.println(hello);
    }
思考
- Hello对象由谁创建的?
hello对象是由spring创建的 - Hello对象的属性是怎么设置的?
(1)hello对象的属性是由spring容器设置的这个过程就叫控制反转
(2)控制:谁来控制对象的创建,传统应用程序的对象是由程序本身控制创建的,使用spring后,对象是由spring来创建的
(3)反转:程序本身不创建对象,而变成被动的接收对象 - 依赖注入
就是利用set的方法来进行注入的 IOC是一种变成思想,由主动的编程变成被动的接收
2、IOC创建对象方式
2.1、通过无参构造方法来创建
- User.java
public class User {


    private String name;

    public User(){


        System.out.println("user无参构造方法");
    }

    public void setName(String name){


        this.name = name;
    }

    public void show(){


        System.out.println("name=" + name);
    }

}
- applicationContext.xml
<?xml version="1.0" encoding="UTF-8"?>
<beans xmlns="http://www.springframework.org/schema/beans"
       xmlns:xsi="http://www.w3.org/2001/XMLSchema-instance"
       xsi:schemaLocation="http://www.springframework.org/schema/beans
       http://www.springframework.org/schema/beans/spring-beans.xsd">

    <!--bean就是java对象 , 由Spring创建和管理-->
    <bean id="user" class="chen.pojo.User">
        <property name="name" value="chen"/>
    </bean>

</beans>
- 测试类
    @Test
    public void test(){


        ApplicationContext applicationContext = new ClassPathXmlApplicationContext("applicationContext.xml");

        User user = (User)applicationContext.getBean("user");

        user.show();
    }
- 结果
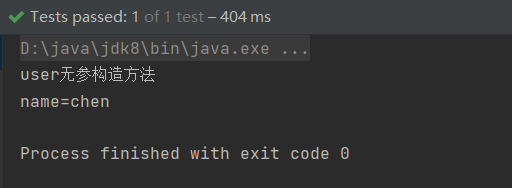
总结:结果可以发现,在调用show方法之前,User对象已经通过无参构造函数初始化了!
2.2、通过有参构造方法来创建
- UserT.java
public class UserT {


   private String name;

   public UserT(String name) {


       this.name = name;
  }

   public void setName(String name) {


       this.name = name;
  }

   public void show(){


       System.out.println("name="+ name );
  }

}
- applicationContext.xml
<!-- 第一种根据index参数下标设置 -->
<bean id="userT" class="com.kuang.pojo.UserT">
   <!-- index指构造方法 , 下标从0开始 -->
   <constructor-arg index="0" value="kuangshen2"/>
</bean>

<!-- 第二种根据参数名字设置 -->
<bean id="userT" class="com.kuang.pojo.UserT">
   <!-- name指参数名 -->
   <constructor-arg name="name" value="kuangshen2"/>
</bean>

<!-- 第三种根据参数类型设置 -->
<bean id="userT" class="com.kuang.pojo.UserT">
   <constructor-arg type="java.lang.String" value="kuangshen2"/>
</bean>
- 测试
    @Test
    public void test2(){


        ApplicationContext applicationContext = new ClassPathXmlApplicationContext("applicationContext.xml");

        UserT userT = (UserT) applicationContext.getBean("userT");

        userT.show();
    }
结论:在配置文件加载的时候。其中管理的对象都已经初始化了!
3、Spring的配置(applicationContext.xml)
- 别名:为bean设置别名,可以设置多个别名
<!--    设置别名,在获取bean的时候可以用别名获取-->
    <alias name="userT" alias="userNew" />
- bean的配置
<!--bean就是java对象,由Spring创建和管理-->

<!--
   id 是bean的标识符,要唯一,如果没有配置id,name就是默认标识符
   如果配置id,又配置了name,那么name是别名
   name可以设置多个别名,可以用逗号,分号,空格隔开
   如果不配置id和name,可以根据applicationContext.getBean(.class)获取对象;

class是bean的全限定名=包名+类名
-->
<bean id="hello" name="hello2" class="com.haust.pojo.Hello">
   <property name="name" value="Spring"/>
</bean>
- import:团队的合作通过import来实现
<import resource="{path}/beans.xml"/>
4、依赖注入(DI)
概念:
(1)依赖注入(Dependency Injection,DI)
(2)依赖:指Bean对象的创建依赖于容器,Bean对象的依赖资源
(3)注入:指Bean对象所依赖的资源,由容器来设置和装配
4.1、构造器注入
之前的案例讲解过
4.2、Set注入(重点)
要求被注入的属性,必须有set方法,set方法的方法名由set + 属性首字母大写,如果属性是boolean类型,没有set方法,是is.
测试pojp类
Address.java
 public class Address {


     private String address;

     public String getAddress() {


         return address;
    }

     public void setAddress(String address) {


         this.address = address;
    }
 }
Student.java
 public class Student {


     private String name;
     private Address address;
     private String[] books;
     private List<String> hobbys;
     private Map<String,String> card;
     private Set<String> games;
     private String wife;
     private Properties info;

     public void setName(String name) {


         this.name = name;
    }

     public void setAddress(Address address) {


         this.address = address;
    }

     public void setBooks(String[] books) {


         this.books = books;
    }

     public void setHobbys(List<String> hobbys) {


         this.hobbys = hobbys;
    }

     public void setCard(Map<String, String> card) {


         this.card = card;
    }

     public void setGames(Set<String> games) {


         this.games = games;
    }

     public void setWife(String wife) {


         this.wife = wife;
    }

     public void setInfo(Properties info) {


         this.info = info;
    }

     public void show(){


         System.out.println("name="+ name
                 + ",address="+ address.getAddress()
                 + ",books="
        );
         for (String book:books){


             System.out.print("<<"+book+">>\t");
        }
         System.out.println("\n爱好:"+hobbys);

         System.out.println("card:"+card);

         System.out.println("games:"+games);

         System.out.println("wife:"+wife);

         System.out.println("info:"+info);

    }
 }
4.2.1、常量注入
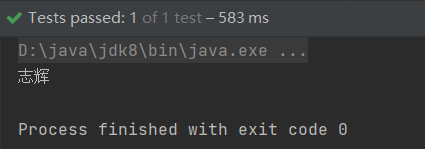
    <bean id="student" class="chen.pojo.Student">
        <property name="name" value="志辉"/>
    </bean>
测试
    @Test
    public void test01(){


        ApplicationContext applicationContext = new ClassPathXmlApplicationContext("applicationContext.xml");

        Student student = (Student) applicationContext.getBean("student");

        System.out.println(student.getName());
    }
4.2.2、Bean注入
注意点:这里的值是一个引用:ref
 <bean id="addr" class="chen.pojo.Address">
     <property name="address" value="福建"/>
 </bean>

 <bean id="student" class="chen.pojo.Student">
     <property name="name" value="志辉"/>
     <property name="address" ref="addr"/>
 </bean>
4.2.3、数组注入
 <bean id="student" class="chen.pojo.Student">
     <property name="name" value="志辉"/>
     <property name="address" ref="addr"/>
     <property name="books">
         <array>
             <value>西游记</value>
             <value>红楼梦</value>
             <value>水浒传</value>
         </array>
     </property>
 </bean>
4.2.4、List注入
 <property name="hobbys">
     <list>
         <value>听歌</value>
         <value>看电影</value>
         <value>爬山</value>
     </list>
 </property>
4.2.5、Map注入
 <property name="card">
     <map>
         <entry key="中国邮政" value="456456456465456"/>
         <entry key="建设" value="1456682255511"/>
     </map>
 </property>
4.2.6、Set注入
 <property name="games">
     <set>
         <value>LOL</value>
         <value>BOB</value>
         <value>COC</value>
     </set>
 </property>
4.2.7、Null注入
<property name="wife"><null/></property>
4.2.8、Properties注入
 <property name="info">
     <props>
         <prop key="学号">20190604</prop>
         <prop key="性别">男</prop>
         <prop key="姓名">小明</prop>
     </props>
 </property>
测试结果

4.3、p命名和c命名注入
User.java:【注意:这里没有参数构造器】
public class User {


    private String name;
    private int age;

    public void setName(String name) {


        this.name = name;
    }

    public void setAge(int age) {


        this.age = age;
    }

    @Override
    public String toString() {


        return "User{" +
                "name='" + name + '\'' +
                ", age=" + age +
                '}';
    }
}
1、p命名空间注入:需要在头文件加入约束文件
 导入约束 : xmlns:p="http://www.springframework.org/schema/p"

 <!--P(属性: properties)命名空间 , 属性依然要设置set方法-->
 <bean id="user" class="com.kuang.pojo.User" p:name="狂神" p:age="18"/>
c命名空间注入:需要在头文件加入约束文件
 导入约束 : xmlns:c="http://www.springframework.org/schema/c"

 <!--C(构造: Constructor)命名空间 , 属性依然要设置set方法-->
 <bean id="user" class="com.kuang.pojo.User" c:name="狂神" c:age="18"/>
发现问题:爆红了,刚才我们没有写有参构造!
解决:把有参构造器加上,这里也能知道,c 就是所谓的构造器注入!
测试代码:
    @Test
    public void test01(){


        ApplicationContext applicationContext = new ClassPathXmlApplicationContext("applicationContext.xml");

        User user = (User) applicationContext.getBean("user");

        System.out.println(user);
    }
5、Bean的作用域
在Spring中,那些组成应用程序的主体及由Spring IoC容器所管理的对象,被称之为bean。简单地讲,bean就是由IoC容器初始化、装配及管理的对象 .

几种作用域中,request、session作用域仅在基于web的应用中使用(不必关心你所采用的是什么web应用框架),只能用在基于web的Spring ApplicationContext环境。
5.1、Singleton
当一个bean的作用域为Singleton,那么Spring IoC容器中只会存在一个共享的bean实例,并且所有对bean的请求,只要id与该bean定义相匹配,则只会返回bean的同一实例。Singleton是单例类型,就是在创建起容器时就同时自动创建了一个bean的对象,不管你是否使用,他都存在了,每次获取到的对象都是同一个对象。注意,Singleton作用域是Spring中的缺省作用域。要在XML中将bean定义成singleton,可以这样配置:
    <bean id="user" class="chen.pojo.User" scope="singleton">
        <property name="name" value="chen"/>
    </bean>
5.2、Prototype
当一个bean的作用域为Prototype,表示一个bean定义对应多个对象实例。Prototype作用域的bean会导致在每次对该bean请求(将其注入到另一个bean中,或者以程序的方式调用容器的getBean()方法)时都会创建一个新的bean实例。Prototype是原型类型,它在我们创建容器的时候并没有实例化,而是当我们获取bean的时候才会去创建一个对象,而且我们每次获取到的对象都不是同一个对象。根据经验,对有状态的bean应该使用prototype作用域,而对无状态的bean则应该使用singleton作用域。在XML中将bean定义成prototype,可以这样配置:
 <bean id="user" class="chen.pojo.User" scope="prototype"/>
  或者
 <bean id="user" class="chen.pojo.User" singleton="false"/>
5.3、Request
当一个bean的作用域为Request,表示在一次HTTP请求中,一个bean定义对应一个实例;即每个HTTP请求都会有各自的bean实例,它们依据某个bean定义创建而成。该作用域仅在基于web的Spring ApplicationContext情形下有效。考虑下面bean定义:
<bean id="user" class="chen.pojo.User" scope="request"/>
针对每次HTTP请求,Spring容器会根据user bean的定义创建一个全新的user bean实例,且该user bean实例仅在当前HTTP request内有效,因此可以根据需要放心的更改所建实例的内部状态,而其他请求中根据usern bean定义创建的实例,将不会看到这些特定于某个请求的状态变化。当处理请求结束,request作用域的bean实例将被销毁。
5.4、Session
当一个bean的作用域为Session,表示在一个HTTP Session中,一个bean定义对应一个实例。该作用域仅在基于web的Spring ApplicationContext情形下有效。考虑下面bean定义:
<bean id="user" class="chen.pojo.User" scope="session"/>
针对某个HTTP Session,Spring容器会根据user bean定义创建一个全新的user bean实例,且该user bean仅在当前HTTP Session内有效。与request作用域一样,可以根据需要放心的更改所创建实例的内部状态,而别的HTTP Session中根据user创建的实例,将不会看到这些特定于某个HTTP Session的状态变化。当HTTP Session最终被废弃的时候,在该HTTP Session作用域内的bean也会被废弃掉。
6、自动装配
6.1、Bean的自动装配
自动装配概述:
(1)自动装配是使用spring满足bean依赖的一种方法
(2)spring会在应用上下文中为某个bean寻找依赖的bean
Spring中bean有三种装配机制,分别是:
(1)在xml中显示配置
(2)在java中显示配置
(3)隐式的bean发现机制和自动装配
Spring的自动装配需要从两个角度实现,或者说是两个操作:
(1)组件扫描(component scanning):spring会自动发现应用上下文中所创建的bean;
(2)自动装配(autowiring):spring自动满足bean之间的依赖,也就是我们说的IoC/DI;
推荐不使用自动装配xml配置 , 而使用注解 .
测试环境搭建
- 新建一个项目
- 新建两个实体类,Cat和Dog 都有一个叫shout()的方法
public class Cat {


   public void shout() {


       System.out.println("miao~");
  }
}
public class Dog {


   public void shout() {


       System.out.println("wang~");
  }
}
- 新建一个用户类User
public class User {


    private Cat cat;
    private Dog dog;
    private String str;

    public void setCat(Cat cat) {


    }

    public void setDog(Dog dog) {


    }

    public void setStr(String str) {


    }

    public Cat getCat() {


        return cat;
    }

    public Dog getDog() {


        return dog;
    }

    public String getStr() {


        return str;
    }


}
- 编写spring的配置文件
<?xml version="1.0" encoding="UTF-8"?>
<beans xmlns="http://www.springframework.org/schema/beans"
      xmlns:xsi="http://www.w3.org/2001/XMLSchema-instance"
      xsi:schemaLocation="http://www.springframework.org/schema/beans
       http://www.springframework.org/schema/beans/spring-beans.xsd">

   <bean id="dog" class="chen.pojo.Dog"/>
   <bean id="cat" class="chen.pojo.Cat"/>

   <bean id="user" class="chen.pojo.User">
       <property name="cat" ref="cat"/>
       <property name="dog" ref="dog"/>
       <property name="str" value="zhihui"/>
   </bean>
</beans>
- 测试
public class MyTest {


   @Test
   public void testMethodAutowire() {


       ApplicationContext context = new ClassPathXmlApplicationContext("applicationContext.xml");
       User user = (User) context.getBean("user");
       user.getCat().shout();
       user.getDog().shout();
  }
}
这里博主有遇到一个问题,就是使用父工程lombok注释的时候,在本个子工程里没用lombok注释,而是用基础的get和set方法,这样最后出来的结果是null,找不到,所以建议新手不要用lombok,踏踏实实用生成器生成就好,所以如果按照步骤,结果是null的话,就试试自己是不是用了lombok。
扩展:1、autowire byName (按名称自动装配)
由于在手动配置xml过程中,常常发生字母缺漏和大小写等错误,而无法对其进行检查,使得开发效率降低。
采用自动装配将避免这些错误,并且使配置简单化。
测试:
1、修改bean配置,增加一个属性 autowire=“byName”
    <bean id="user" class="chen.pojo.User" autowire="byName">
        <property name="cat" ref="cat"/>
        <property name="dog" ref="dog"/>
        <property name="str" value="志辉"/>
    </bean>
2、再次测试,结果依旧成功输出!
3、我们将 cat 的bean id修改为 catXXX
4、再次测试, 执行时报空指针java.lang.NullPointerException。因为按byName规则找不对应set方法,真正的setCat就没执行,对象就没有初始化,所以调用时就会报空指针错误。
小结:
当一个bean节点带有 autowire byName的属性时。
- 将查找其类中所有的set方法名,例如setCat,获得将set去掉并且首字母小写的字符串,即cat。
- 去spring容器中寻找是否有此字符串名称id的对象。
- 如果有,就取出注入;如果没有,就报空指针异常。
扩展:2、autowire byType (按类型自动装配)
使用autowire byType首先需要保证:同一类型的对象,在spring容器中唯一。如果不唯一,会报不唯一的异常
测试:
1、将user的bean配置修改一下 : autowire=“byType”
2、测试,正常输出
3、在注册一个cat 的bean对象!
    <bean id="dog" class="chen.pojo.Dog"/>
    <bean id="cat" class="chen.pojo.Cat"/>
    <bean id="cat2" class="chen.pojo.Cat"/>

    <bean id="user" class="chen.pojo.User" autowire="byName">
        <property name="cat" ref="cat"/>
        <property name="dog" ref="dog"/>
        <property name="str" value="志辉"/>
    </bean>
4、测试,报错:NoUniqueBeanDefinitionException
5、删掉cat2,将cat的bean名称改掉!测试!因为是按类型装配,所以并不会报异常,也不影响最后的结果。甚至将id属性去掉,也不影响结果。
这就是按照类型自动装配!