前言
在上一篇,我们了解了mybatis的整体执行流程,以及内部的各个组件在执行过程中的功能,下面我们来通过源码的方式对其中比较重要的几个组件在执行过程的使用进行简单的分析与说明
环境准备
基于第一篇搭建好的源码过程和demo,我们通过一个简单的查询进行分析,完整的代码如下:
userDao
public interface UserDao {

	User findUserById(int id);
}
MyUserMapper.xml
<mapper namespace="com.congge.demo1.dao.UserDao">

    <select id="findUserById" parameterType="int" resultType="com.congge.demo1.entity.User">
		SELECT * FROM user WHERE id = #{id}
	</select>

</mapper>
SqlMapConfig.xml
<?xml version="1.0" encoding="UTF-8" ?>
<!DOCTYPE configuration
PUBLIC "-//mybatis.org//DTD Config 3.0//EN"
"http://mybatis.org/dtd/mybatis-3-config.dtd">
<configuration>

	<properties resource="demo1/db.properties"></properties>

	<environments default="development">
		<environment id="development">
			<transactionManager type="JDBC" />
			<dataSource type="POOLED">
				<property name="driver" value="${db.driver}" />
				<property name="url" value="${db.url}" />
				<property name="username" value="${db.username}" />
				<property name="password" value="${db.password}" />
			</dataSource>
		</environment>
	</environments>

	<mappers>
		<mapper resource="demo1/UserMapper.xml" />
		<mapper resource="demo1/MyUserMapper.xml" />
	</mappers>

</configuration>
一个测试方法
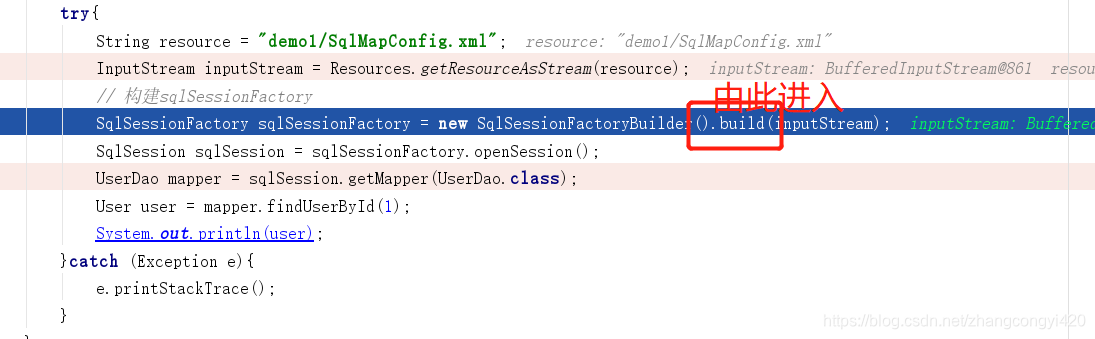
	@Test
    public void testFindUserById() {
        try{
            String resource = "demo1/SqlMapConfig.xml";
            InputStream inputStream = Resources.getResourceAsStream(resource);
            // 构建sqlSessionFactory
            SqlSessionFactory sqlSessionFactory = new SqlSessionFactoryBuilder().build(inputStream);
            SqlSession sqlSession = sqlSessionFactory.openSession();
            UserDao mapper = sqlSession.getMapper(UserDao.class);
            User user = mapper.findUserById(1);
            System.out.println(user);
        }catch (Exception e){
            e.printStackTrace();
        }
    }
按照上一篇最后归纳的3个步骤,我们深入到源码中进行一步步分析各个组件的加载顺序和作用
- 解析配置文件,包括SqlMapConfig.xml以及与业务相关的xml文件
- 将解析好的配置文件,如属性映射,连接数据库信息等封装到Configuration对象
- 执行器执行CRUD并返回结果
1、解析配置文件并封装到Configuration对象
来到这里,发现创建了一个XMLConfigBuilder的对象,在学习spring的时候,我们了解到这个对象就是用于解析xml文件的
public SqlSessionFactory build(InputStream inputStream, String environment, Properties properties) {
    try {
      // XMLConfigBuilder:用来解析XML配置文件
      XMLConfigBuilder parser = new XMLConfigBuilder(inputStream, environment, properties);
      // parser.parse():使用XPATH解析XML配置文件,将配置文件封装为Configuration对象
      // 返回DefaultSqlSessionFactory对象,该对象拥有Configuration对象(封装配置文件信息)
      return build(parser.parse());
    } catch (Exception e) {
      throw ExceptionFactory.wrapException("Error building SqlSession.", e);
    } finally {
      ErrorContext.instance().reset();
      try {
        inputStream.close();
      } catch (IOException e) {
        // Intentionally ignore. Prefer previous error.
      }
    }
  }
简单看看是如何解析SqlMapConfig.xml文件的,继续进入
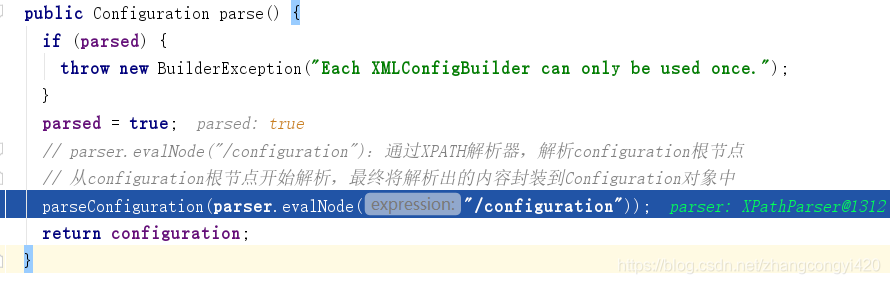
一路跟进,来到这个方法之后,我们发现,其实就是在层层解析SqlMapConfig.xml配置文件中对应的各个属性标签啊

其实解析的过程并没有什么,就是使用类似dom4j那种技术,将标签中的各个属性和值一一解析出来,存储到容器或者对象中去,在截图中的代码中有简单的注释

我们不妨看看某个属性标签解析之后的情况,从下面的代码中,发现最后,解析到的属性是设置到configuration类中去了
比如解析environments标签,要把数据库的连接信息加载进去

configuration中解析到的数据库连接信息

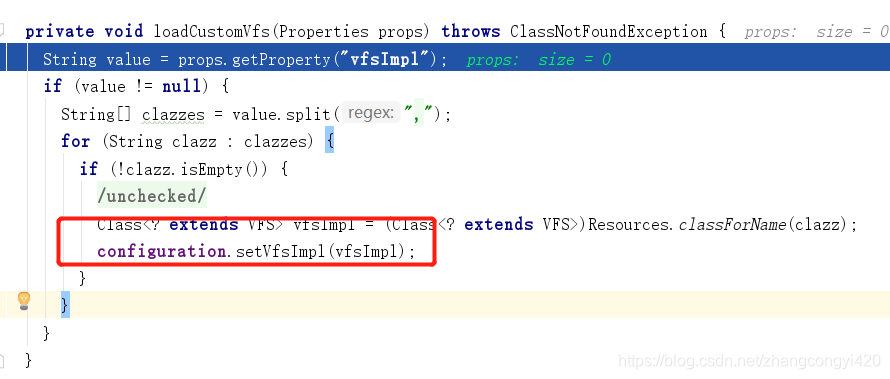
事实上,从官网中可以发现mybatis提供的属性配置是非常多的,从configuration这个类中也可以看出来,但我们真正配置的时候并没有配置那么多,框架在加载的时候对于部分配置属性给了默认值
其中,有一个比较重要的标签需要我们重点关注一下,就是对mapper映射文件的解析
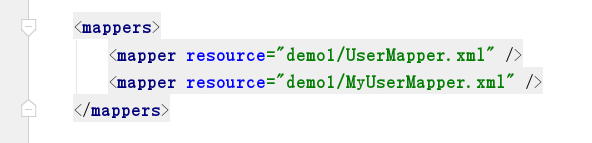
开发过程中,和业务相关的sql语句都放在mapper文件中,mybatis在解析这些文件中做了大量的工作,我们点进去瞧瞧吧
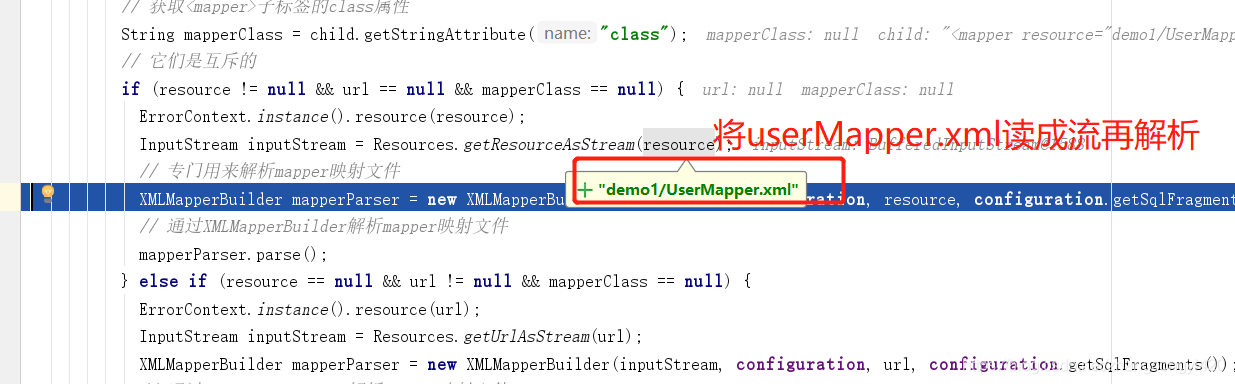
private void mapperElement(XNode parent) throws Exception {
    if (parent != null) {
      // 获取<mappers>标签的子标签
      for (XNode child : parent.getChildren()) {
    	// <package>子标签
        if ("package".equals(child.getName())) {
          // 获取mapper接口和mapper映射文件对应的package包名
          String mapperPackage = child.getStringAttribute("name");
          // 将包下所有的mapper接口以及它的代理对象存储到一个Map集合中,key为mapper接口类型,value为代理对象工厂
          configuration.addMappers(mapperPackage);
        } else {// <mapper>子标签
          // 获取<mapper>子标签的resource属性
          String resource = child.getStringAttribute("resource");
          // 获取<mapper>子标签的url属性
          String url = child.getStringAttribute("url");
          // 获取<mapper>子标签的class属性
          String mapperClass = child.getStringAttribute("class");
          // 它们是互斥的
          if (resource != null && url == null && mapperClass == null) {
            ErrorContext.instance().resource(resource);
            InputStream inputStream = Resources.getResourceAsStream(resource);
            // 专门用来解析mapper映射文件
            XMLMapperBuilder mapperParser = new XMLMapperBuilder(inputStream, configuration, resource, configuration.getSqlFragments());
            // 通过XMLMapperBuilder解析mapper映射文件
            mapperParser.parse();
          } else if (resource == null && url != null && mapperClass == null) {
            ErrorContext.instance().resource(url);
            InputStream inputStream = Resources.getUrlAsStream(url);
            XMLMapperBuilder mapperParser = new XMLMapperBuilder(inputStream, configuration, url, configuration.getSqlFragments());
            // 通过XMLMapperBuilder解析mapper映射文件
            mapperParser.parse();
          } else if (resource == null && url == null && mapperClass != null) {
            Class<?> mapperInterface = Resources.classForName(mapperClass);
            // 将指定mapper接口以及它的代理对象存储到一个Map集合中,key为mapper接口类型,value为代理对象工厂
            configuration.addMapper(mapperInterface);
          } else {
            throw new BuilderException("A mapper element may only specify a url, resource or class, but not more than one.");
          }
        }
      }
    }
  }
首先将业务中的各个mapper.xml文件读成输入流,在进一步解析
以本文的userMapper.xml为例,从上一步的mapperParser.parse()方法进入,开始对userMapper.xml文件及各个标签属性等进行解析
private void configurationElement(XNode context) {
    try {
      // 获取<mapper>标签的namespace值,也就是命名空间
      String namespace = context.getStringAttribute("namespace");
      // 命名空间不能为空
      if (namespace == null || namespace.equals("")) {
        throw new BuilderException("Mapper's namespace cannot be empty");
      }

      // 设置当前的命名空间为namespace的值
      builderAssistant.setCurrentNamespace(namespace);
      // 解析<cache-ref>子标签
      cacheRefElement(context.evalNode("cache-ref"));
      // 解析<cache>子标签
      cacheElement(context.evalNode("cache"));

      // 解析<parameterMap>子标签
      parameterMapElement(context.evalNodes("/mapper/parameterMap"));
      // 解析<resultMap>子标签
      resultMapElements(context.evalNodes("/mapper/resultMap"));
      // 解析<sql>子标签,也就是SQL片段
      sqlElement(context.evalNodes("/mapper/sql"));
      // 解析<select>\<insert>\<update>\<delete>子标签
      buildStatementFromContext(context.evalNodes("select|insert|update|delete"));
    } catch (Exception e) {
      throw new BuilderException("Error parsing Mapper XML. The XML location is '" + resource + "'. Cause: " + e, e);
    }
  }
这个方法在整个初始化解析的工作中,是非常重要的一个,我们说,mybatis框架为什么那么智能,可以通过dao接口的方法找到mapper中的某个执行方法呢?怎么根据dao接口方法中的参数就能传递到mapper方法中去呢?因为在上面这个方法中,将它们的对应关系都提前进行了初步的封装,并封装到configuration中去了
在解析的最后,看看buildStatementFromContext这个方法,还记得上一篇中提到的MappedStatement这个组件的作用吗
维护了一条<select|update|delete|insert>节点的封装
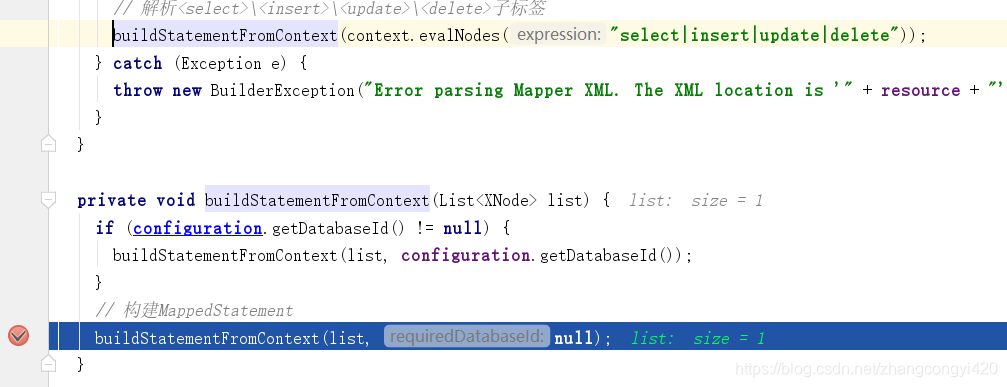
在这个方法中,将会对userMapper.xml文件中的所有sql语句的标签进行解析和封装
public void parseStatementNode() {
	// 获取statement的id属性(特别关键的值)
    String id = context.getStringAttribute("id");
    String databaseId = context.getStringAttribute("databaseId");

    if (!databaseIdMatchesCurrent(id, databaseId, this.requiredDatabaseId)) {
      return;
    }

    Integer fetchSize = context.getIntAttribute("fetchSize");
    Integer timeout = context.getIntAttribute("timeout");
    String parameterMap = context.getStringAttribute("parameterMap");
    // 获取入参类型
    String parameterType = context.getStringAttribute("parameterType");
    // 别名处理,获取入参对应的Java类型
    Class<?> parameterTypeClass = resolveClass(parameterType);
    // 获取ResultMap
    String resultMap = context.getStringAttribute("resultMap");
    // 获取结果映射类型
    String resultType = context.getStringAttribute("resultType");
    String lang = context.getStringAttribute("lang");
    LanguageDriver langDriver = getLanguageDriver(lang);

    // 别名处理,获取返回值对应的Java类型
    Class<?> resultTypeClass = resolveClass(resultType);
    String resultSetType = context.getStringAttribute("resultSetType");

    // 设置默认StatementType为Prepared,该参数指定了后面的JDBC处理时,采用哪种Statement
    StatementType statementType = StatementType.valueOf(context.getStringAttribute("statementType", StatementType.PREPARED.toString()));
    ResultSetType resultSetTypeEnum = resolveResultSetType(resultSetType);

    String nodeName = context.getNode().getNodeName();
    // 解析SQL命令类型是什么?确定操作是CRUD中的哪一种
    SqlCommandType sqlCommandType = SqlCommandType.valueOf(nodeName.toUpperCase(Locale.ENGLISH));
    //是否查询语句
    boolean isSelect = sqlCommandType == SqlCommandType.SELECT;
    boolean flushCache = context.getBooleanAttribute("flushCache", !isSelect);
    boolean useCache = context.getBooleanAttribute("useCache", isSelect);
    boolean resultOrdered = context.getBooleanAttribute("resultOrdered", false);

    // Include Fragments before parsing
    // <include>标签解析
    XMLIncludeTransformer includeParser = new XMLIncludeTransformer(configuration, builderAssistant);
    includeParser.applyIncludes(context.getNode());

    // Parse selectKey after includes and remove them.
    // 解析<selectKey>标签
    processSelectKeyNodes(id, parameterTypeClass, langDriver);

    // Parse the SQL (pre: <selectKey> and <include> were parsed and removed)
    // 创建SqlSource,解析SQL,封装SQL语句(未参数绑定)和入参信息
    SqlSource sqlSource = langDriver.createSqlSource(configuration, context, parameterTypeClass);

    String resultSets = context.getStringAttribute("resultSets");
    String keyProperty = context.getStringAttribute("keyProperty");
    String keyColumn = context.getStringAttribute("keyColumn");
    KeyGenerator keyGenerator;
    String keyStatementId = id + SelectKeyGenerator.SELECT_KEY_SUFFIX;
    keyStatementId = builderAssistant.applyCurrentNamespace(keyStatementId, true);
    if (configuration.hasKeyGenerator(keyStatementId)) {
      keyGenerator = configuration.getKeyGenerator(keyStatementId);
    } else {
      keyGenerator = context.getBooleanAttribute("useGeneratedKeys",
          configuration.isUseGeneratedKeys() && SqlCommandType.INSERT.equals(sqlCommandType))
          ? Jdbc3KeyGenerator.INSTANCE : NoKeyGenerator.INSTANCE;
    }

    // 通过构建者助手,创建MappedStatement对象
    builderAssistant.addMappedStatement(id, sqlSource, statementType, sqlCommandType,
        fetchSize, timeout, parameterMap, parameterTypeClass, resultMap, resultTypeClass,
        resultSetTypeEnum, flushCache, useCache, resultOrdered,
        keyGenerator, keyProperty, keyColumn, databaseId, langDriver, resultSets);
  }
大体来说,这个方法要做的就是,将下面这段标签的所有属性及内部的sql全部解析出来,比如id是什么?返回值类型是什么?原始的sql是什么等等
	<select id="findUserById" parameterType="int" resultType="com.congge.demo1.entity.User">
		SELECT * FROM user WHERE id = #{id}
	</select>
最后通过addMappedStatement这个方法,将解析出来的标签中的属性及包装增强属性一起封装到MappedStatement对象,再将MappedStatement作为一个属性值封装到configuration中去

这里可能有不少小伙伴要问,这样做的目的是什么呢?
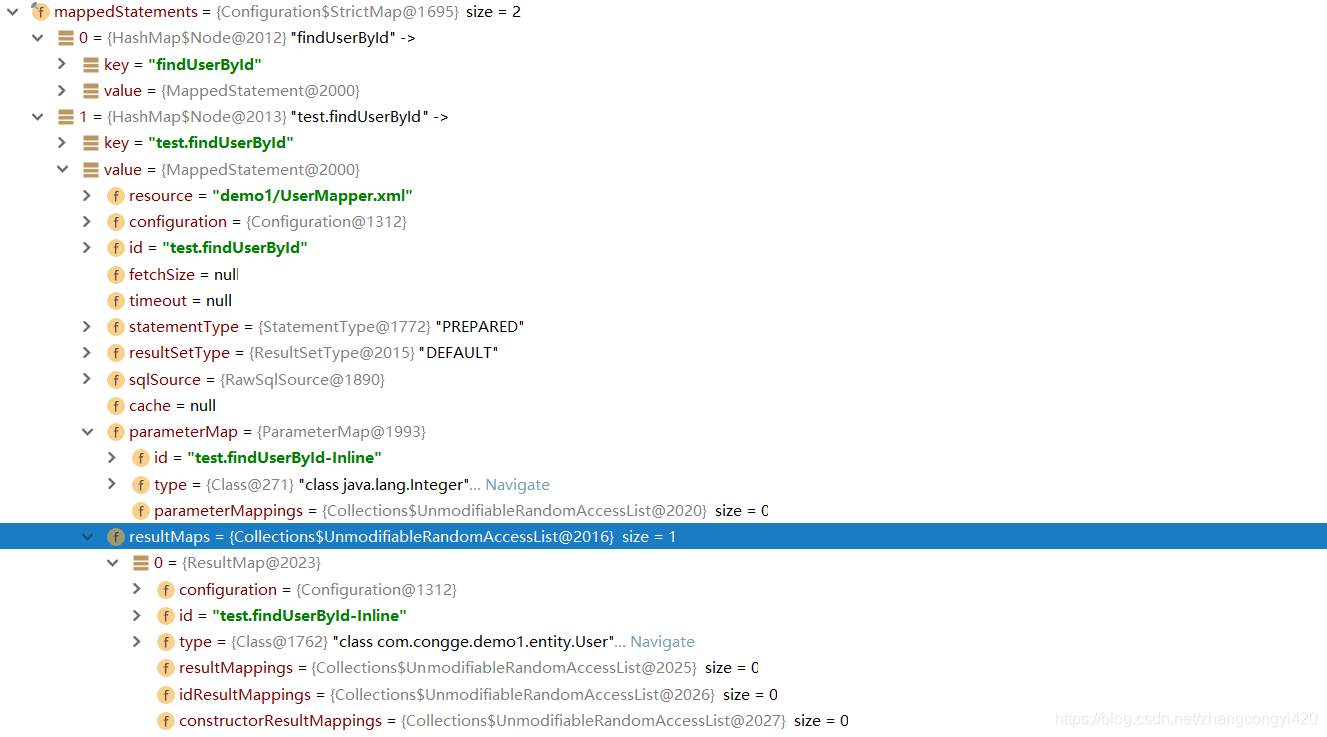
结合mybatis执行流程图,个人理解为解析之后,后续的dao代理对象在调用具体的方法进行数据库crud时就能根据方法的ID,快速定位到对应的MappedStatement,然后进行sql的快速组装,查询,结果映射等功能了
至此,mybatis的初始化配置文件解析工作都这里就告一段落了
2、构建sqlSessionFactory并创建一个sqlSession
第一步解析配置文件并得到configuration之后,就是说CRUD的环境都具备了,下面就需要通过某种方式,建立与数据库的连接并将业务中需要执行的sql语句传入,然后获取执行结果
通过SqlSessionFactory打开一个sqlSession
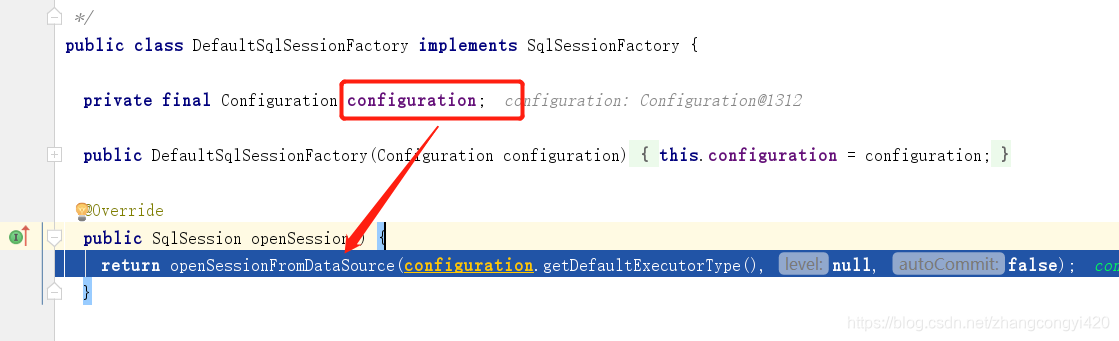
private SqlSession openSessionFromDataSource(ExecutorType execType, TransactionIsolationLevel level, boolean autoCommit) {
    Transaction tx = null;
    try {
      // 获取数据源环境信息
      final Environment environment = configuration.getEnvironment();
      // 获取事务工厂
      final TransactionFactory transactionFactory = getTransactionFactoryFromEnvironment(environment);
      // 获取JdbcTransaction或者ManagedTransaction
      tx = transactionFactory.newTransaction(environment.getDataSource(), level, autoCommit);
      // 创建Executor执行器
      final Executor executor = configuration.newExecutor(tx, execType);
      // 创建DefaultSqlSession
      return new DefaultSqlSession(configuration, executor, autoCommit);
    } catch (Exception e) {
      closeTransaction(tx); // may have fetched a connection so lets call close()
      throw ExceptionFactory.wrapException("Error opening session.  Cause: " + e, e);
    } finally {
      ErrorContext.instance().reset();
    }
  }
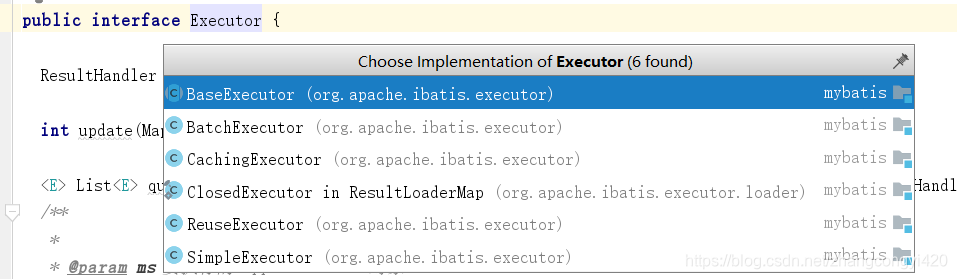
从这里可以发现configuration的强大之处了吧,前面封装的属性直接拿来使用,这里要说一下这个Executor对象,即后面真正执行具体的sql时候的执行器对象

3、通过sqlSession获取代理对象
接下来,就需要通过sqlSession获取代理对象并调用方法执行sql了
	public MapperRegistry getMapperRegistry() {
		return mapperRegistry;
	}
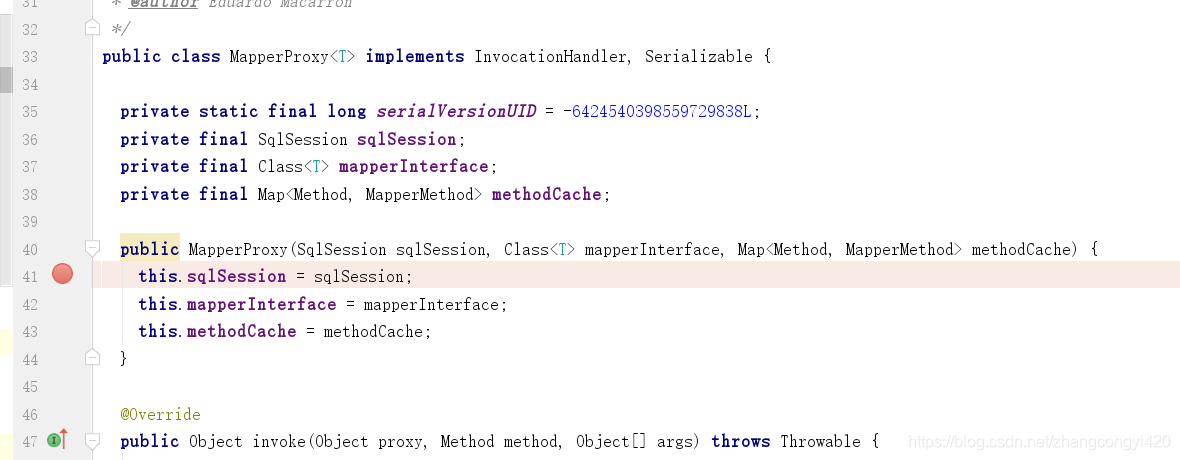
MapperRegistry 这个类很重要,做什么用的呢?我们都知道mybatis最后是通过动态代理,代理到具体的接口执行sql的相关操作的,具体是怎么代理的呢?其实很简单,就是这个MapperRegistry,
1、MapperRegistry,mapper接口和对应的代理对象工厂的注册中心
2、MapperProxyFactory,用于生成mapper接口动态代理的实例对象
3、MapperProxy,实现了InvocationHandler接口,是增强mapper接口的实现
4、MapperMethod,封装了mapper接口中对应的方法信息以及sql语句,是mapper接口与mapper.xml文件的桥梁
简而言之,外部接口文件中的方法要传入到mysql进行执行,需要一个中间人,这个中间人就是一个代理对象,代理对象要做的就是把提前注册到MapperRegistry中的方法与configuration中封装的sql信息进行匹配,并得到执行结果
从MapperProxy这个类,简单分析下即可得出上述结论
MapperRegistry获取mapper
public <T> T getMapper(Class<T> type, SqlSession sqlSession) {
	// 根据Mapper接口的类型,从Map集合中获取Mapper代理对象工厂
    final MapperProxyFactory<T> mapperProxyFactory = (MapperProxyFactory<T>) knownMappers.get(type);
    if (mapperProxyFactory == null) {
      throw new BindingException("Type " + type + " is not known to the MapperRegistry.");
    }
    try {
      // 通过MapperProxyFactory生产MapperProxy,通过MapperProxy产生Mapper代理对象
      return mapperProxyFactory.newInstance(sqlSession);
    } catch (Exception e) {
      throw new BindingException("Error getting mapper instance. Cause: " + e, e);
    }
  }
来到MapperProxyFactory之后,其实底层采用的就是JDK动态代理的方式,将sqlSession作为入参传入得到一个代理执行的对象
public T newInstance(SqlSession sqlSession) {
	// 创建基于JDK实现的Mapper代理对象
    final MapperProxy<T> mapperProxy = new MapperProxy<>(sqlSession, mapperInterface, methodCache);
    return newInstance(mapperProxy);
  }
得到了代理对象,接下来就要开始执行具体的sql了
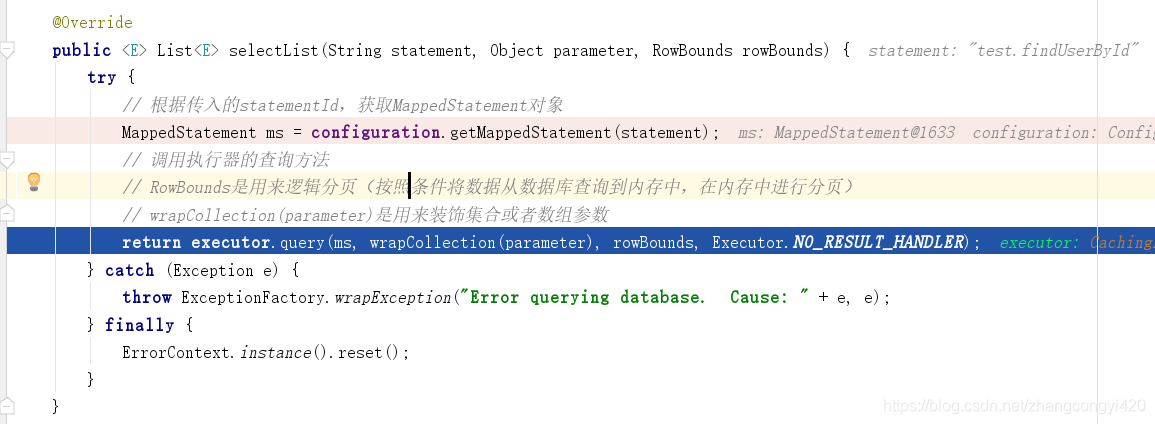
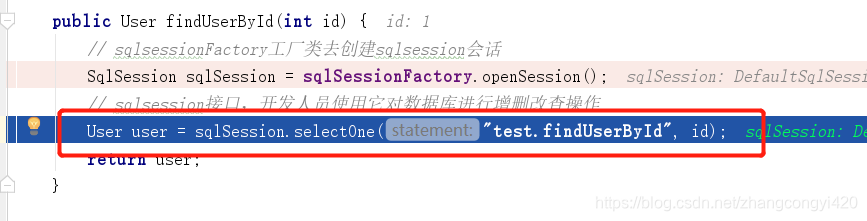
接下来调用executor.query执行查询了

继续往下,将上一步中的查询参数,拼装的sql语句等信息一起传入进来

走到这一步,我们惊奇的发现,竟然使用的是JDBC方式做的,没有看错,最后确实是调用了JDBC的方法执行了CRUD的操作,只不过说,来到这里的时候,所有的参数解析,sql拼装的过程,在前面已经做完了

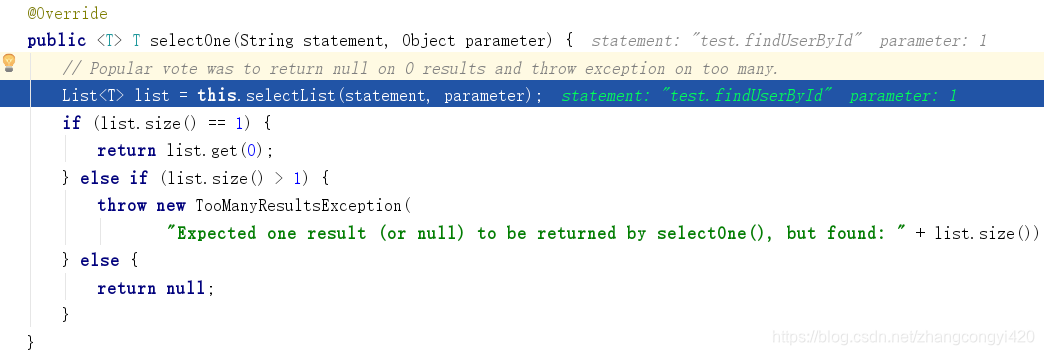
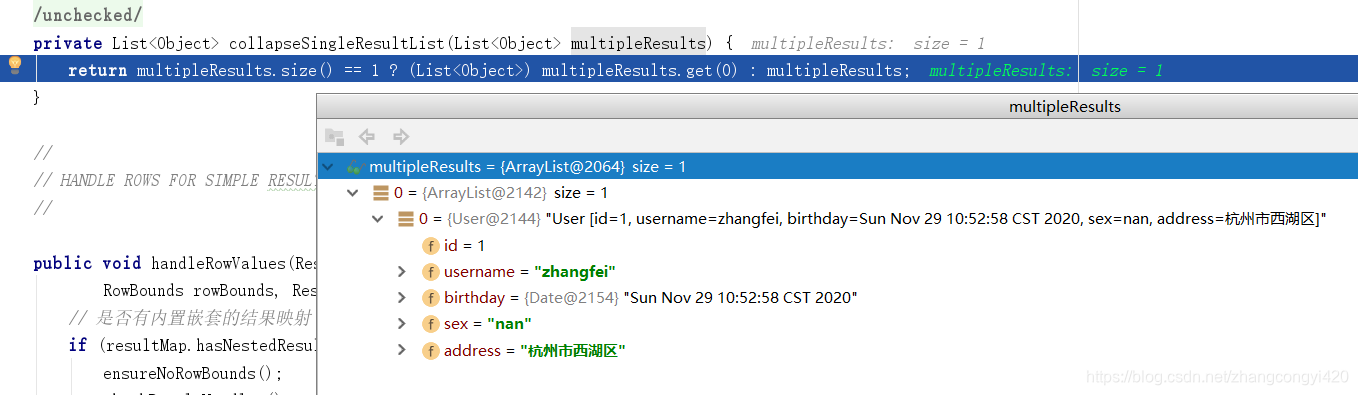
最后,通过handleResultSets这个方法,对结果集进行封装
@Override
	public List<Object> handleResultSets(Statement stmt) throws SQLException {
		ErrorContext.instance().activity("handling results").object(mappedStatement.getId());

		// <select>标签的resultMap属性,可以指定多个值,多个值之间用逗号(,)分割
		final List<Object> multipleResults = new ArrayList<>();

		int resultSetCount = 0;
		// 这里是获取第一个结果集,将传统JDBC的ResultSet包装成一个包含结果列元信息的ResultSetWrapper对象
		ResultSetWrapper rsw = getFirstResultSet(stmt);

		// 这里是获取所有要映射的ResultMap(按照逗号分割出来的)
		List<ResultMap> resultMaps = mappedStatement.getResultMaps();
		// 要映射的ResultMap的数量
		int resultMapCount = resultMaps.size();
		validateResultMapsCount(rsw, resultMapCount);
		// 循环处理每个ResultMap,从第一个开始处理
		while (rsw != null && resultMapCount > resultSetCount) {
			// 得到结果映射信息
			ResultMap resultMap = resultMaps.get(resultSetCount);
			// 处理结果集
			// 从rsw结果集参数中获取查询结果,再根据resultMap映射信息,将查询结果映射到multipleResults中
			handleResultSet(rsw, resultMap, multipleResults, null);

			rsw = getNextResultSet(stmt);
			cleanUpAfterHandlingResultSet();
			resultSetCount++;
		}

		// 对应<select>标签的resultSets属性,一般不使用该属性
		String[] resultSets = mappedStatement.getResultSets();
		if (resultSets != null) {
			while (rsw != null && resultSetCount < resultSets.length) {
				ResultMapping parentMapping = nextResultMaps.get(resultSets[resultSetCount]);
				if (parentMapping != null) {
					String nestedResultMapId = parentMapping.getNestedResultMapId();
					ResultMap resultMap = configuration.getResultMap(nestedResultMapId);
					handleResultSet(rsw, resultMap, null, parentMapping);
				}
				rsw = getNextResultSet(stmt);
				cleanUpAfterHandlingResultSet();
				resultSetCount++;
			}
		}

		// 如果只有一个结果集合,则直接从多结果集中取出第一个
		return collapseSingleResultList(multipleResults);
	}
我们知道,在初始化解析时,某个方法的返回结果类型,resultType已经封装到mappedStatement中了,该方法就是将原始的resultSet中的结果遍历并获取到,解析之后封装到具体的resultType对应的对象中去
那么到这里,对mybatis源码跟踪的分析就到此结束了,结合mybatis整体的执行流程图,再通过断点的方式跟踪一下执行的完整流程,想必对于其底层的运行原理会有更深的理解,大概也是学习源码的一种很有用的方式吧,当然,本篇是对主要的执行流程链路进行了跟踪,涉及到各个相关执行组件的细节,限于篇幅原因,没有面面俱到,比如mybatis的一级二级缓存,在查询完毕之后,会默认放入一级缓存等操作,mybatis中用到的设计模式等,有兴趣的同学可以深入研究

本篇到此结束,最后感谢观看!