文章目录
0. 前言
-
作为新手,我觉得TensorRT的文档并不是特别友好
- 总感觉TensorRT不好入门,对一些基本概念老是比较模糊。
- 一个主要原因在于我对文档不熟悉,不知道哪些内容有,哪些没有。
-
官方文档主要分为以下7个部分
- Getting Started:教程,主要包括
- Quick Start Guide:主要就是跑通第一个样例,包括简介、安装、部署、Runtime API简介,后文单独介绍
- Release Notes
- Support Matrix:每个版本的TensorRT所对应环境(相关软件,如CUDA/cuDNN)、支持的操作/Layer等
- Installation Guilde:下载、安装、卸载教程
- Inference Library:TensorRT库的一些使用相关内容,主要包括
- API Reference:C++ API和Pthon API,内容不多,没啥花头
- Developer Guide:开发者教程,这部分就比较重要了,后文单独介绍
- Sample Support Guide:介绍现有的样例,看这里不如直接看源码以及对应的README
- Performance:TensorRT最佳实践,假设已经有了训练好的模型,要怎么通过TensorRT进行优化,后文单独介绍
- Optimized Frameworks:Nvidia容器(NVIDIA container)相关,也就是NGC
- 没啥可看的,主要是各个版本的release notes。
- Tools:一些实用、独立的工具
- ONNX GraphSurgeon:处理ONNX模型,可能就是增删改查吧
- Polygraphy:没听说过,也查不到什么资料,可能没什么人用吧
- pytorch-quantization’s documentation:英伟达提供的PyTorch模型量化工具……这方面我也不懂,好像PyTorch官方也提供了量化工具
- Licenses:协议,没细看。
- Archives:归档,旧版本的文档就是在这里找。
- Getting Started:教程,主要包括
-
Tips:注意网页右上方,进入文档页面后可以下载PDF
1. Quick Start Guide 详解
- 本教程内容提要
- 安装:包括容器安装、deb安装、pip wheel安装,后面不详细看了
- TensorRT生态:对比不同转换、部署工作流
- ONNX部署样例:介绍模型转换与部署的基本流程,以及一些基本概念。
- TR-TRT集成:暂时不关心,后面不介绍了
- ONNX转换与部署:TF/Pytorch -> ONNX的基本内容
- TensorRT Runtime API介绍:介绍相关TensorRT的C++/Python API
1.1. TensorRT 生态
-
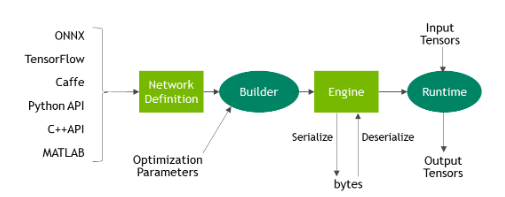
所有TensorRT部署工作都包括将模型转换为 optimized representation(也就是TensorRT中所谓的Engine)。
-
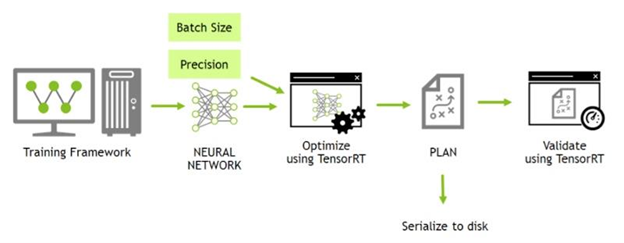
TensorRT基本流程包括:导出模型、设置Batch Size、设置模型精度(即Float32/Float16/Int8等)、转换模型(估计就是转换Engine)、部署模型(估计就是使用Runtime API以及转换好的Engine进行模型推理)。
-
模型转换与部署参数
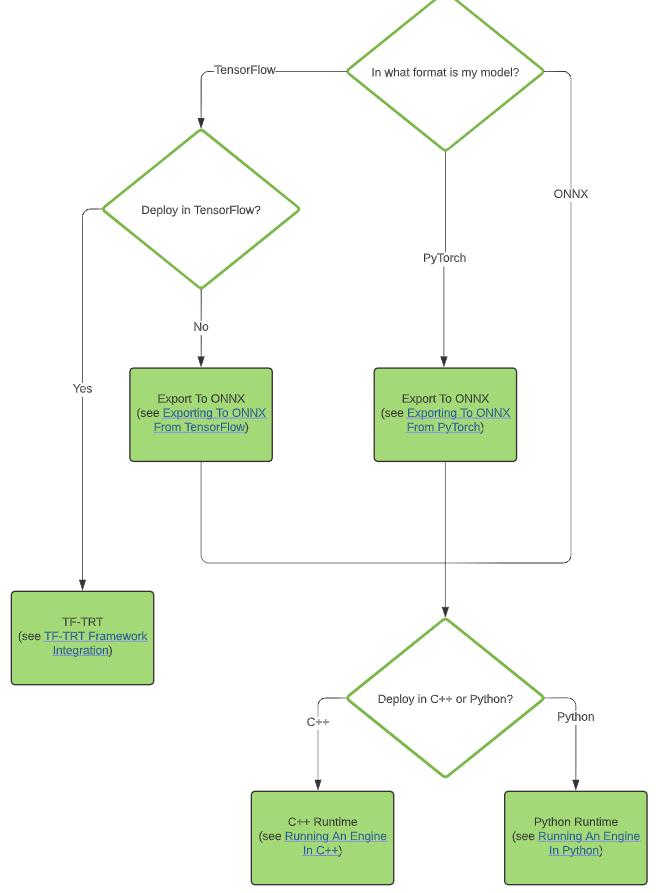
- 模型转换,指的就是将其他类型转换为Engine形式,主要支持TF-TRT、ONNX、以及TensorRT API创建模型三种形式(可以用Python与C++ API)。
- 模型部署,有三种形式,使用TensorFlow部署、使用 standalone TensorRT runtime API、NVIDIA Triton Inference Server(模型部署服务器,BSD3协议,之前看过的一篇介绍博客)
-
选择工作流
1.2. ONNX 样例
-
主要内容:ONNX模型转换以及Python部署
- 第一步:导出模型,获取ONNX官方的Resnet-50模型
- 第二步:设置Batch Size。TensorRT支持动态batch size,但固定值的性能更好。
- 第三步:选择模型参数精度(支持TF32/FP32/FP16/INT8),更多信息请参考这里
- 第四步:模型转换,其实就是通过
trtexec命令- 学习一些相关参数,比如指定输入
--onnx=path/to/model.onnx,指定输出--saveEngine==path/to/model.trt,固定batch size--explicitBatch
- 学习一些相关参数,比如指定输入
- 第五步:部署模型,这里使用了
ONNXClassifierWrapper
-
模型转换进阶
- pytorch/tf -> ONNX 的方法介绍了
- ONNX -> TRT 有两种方法,
trtexec工具以及 TensorRT API(这种方法不会自动保存trt文件)
1.3. TensorRT Runtime API
-
本节对应的代码在 这里
-
C++
- C++ API更底层,性能更好。
- 基本流程如下(分割模型):
// 1. 读取 engine 文件
std::vector<char> engineData(fsize);
engineFile.read(engineData.data(), fsize);
util::UniquePtr<nvinfer1::IRuntime> runtime{

    nvinfer1::createInferRuntime(sample::gLogger.getTRTLogger())};
util::UniquePtr<nvinfer1::ICudaEngine> mEngine(runtime->deserializeCudaEngine(engineData.data(), fsize, nullptr));

// 2. engine的输入输出初始化(也可以理解为 engine context 初始化)
// engine的输入是input,数据类型是float,shape是(1, 3, height, width)
auto input_idx = mEngine->getBindingIndex("input");
assert(mEngine->getBindingDataType(input_idx) == nvinfer1::DataType::kFLOAT);
auto input_dims = nvinfer1::Dims4{

    1, 3 /* channels */, height, width};
context->setBindingDimensions(input_idx, input_dims);
auto input_size = util::getMemorySize(input_dims, sizeof(float));
// engine的输出是output,数据类型是int32,自动获取输出数据shape
auto output_idx = mEngine->getBindingIndex("output");
assert(mEngine->getBindingDataType(output_idx) == nvinfer1::DataType::kINT32);
auto output_dims = context->getBindingDimensions(output_idx);
auto output_size = util::getMemorySize(output_dims, sizeof(int32_t));

// 3. inference 准备工作
// 为输入输出开辟显存空间
void* input_mem{

    nullptr};
cudaMalloc(&input_mem, input_size);
void* output_mem{

    nullptr};
cudaMalloc(&output_mem, output_size);
// 定义图像norm操作
const std::vector<float> mean{

    0.485f, 0.456f, 0.406f};
const std::vector<float> stddev{

    0.229f, 0.224f, 0.225f};
auto input_image{

    util::RGBImageReader(input_filename, input_dims, mean, stddev)};
input_image.read();
auto input_buffer = input_image.process();
// 将处理好的数据转移到显存中
cudaMemcpyAsync(input_mem, input_buffer.get(), input_size, cudaMemcpyHostToDevice, stream);

// 4. 执行 inference 操作
// 通过 executeV2 or enqueueV2 激发 inference 的具体执行
void* bindings[] = {

    input_mem, output_mem};
bool status = context->enqueueV2(bindings, stream, nullptr);
// 获取预测结果
auto output_buffer = std::unique_ptr<int>{

    new int[output_size]};
cudaMemcpyAsync(output_buffer.get(), output_mem, output_size, cudaMemcpyDeviceToHost, stream);
cudaStreamSynchronize(stream);
// 释放资源
cudaFree(input_mem);
cudaFree(output_mem);

// 5. 输出预测结果
const int num_classes{

    21};
const std::vector<int> palette{


	(0x1 << 25) - 1, (0x1 << 15) - 1, (0x1 << 21) - 1};
auto output_image{

    util::ArgmaxImageWriter(output_filename, output_dims, palette, num_classes)};
output_image.process(output_buffer.get());
output_image.write();
- Python
- Python API只是C++ API的binding。
- Python API与numpy等能够很好契合,方便原型开发、测试、调试。
- 代码如下(只关注tensorrt相关)
# 导入 engine 文件
def load_engine(engine_file_path):
    assert os.path.exists(engine_file_path)
    print("Reading engine from file {}".format(engine_file_path))
    with open(engine_file_path, "rb") as f, trt.Runtime(TRT_LOGGER) as runtime:
        return runtime.deserialize_cuda_engine(f.read())

# inference pipeline,即 inference 基本流程
def infer(engine, input_file, output_file):
    # 读取输入图片
    print("Reading input image from file {}".format(input_file))
    with Image.open(input_file) as img:
        input_image = preprocess(img)
        image_width = img.width
        image_height = img.height

    # 创建 execution context 对象,并初始化各种信息
    with engine.create_execution_context() as context:
        # 设置输入数据shape
        # Set input shape based on image dimensions for inference
        context.set_binding_shape(engine.get_binding_index("input"), (1, 3, image_height, image_width))

        # 为输入输出分配显存,
        # Allocate host and device buffers
        # Allocate CUDA device memory for input and output.
        # Allocate CUDA page-locked host memory to efficiently copy back the output.
        bindings = []
        for binding in engine:
            binding_idx = engine.get_binding_index(binding)
            size = trt.volume(context.get_binding_shape(binding_idx))
            dtype = trt.nptype(engine.get_binding_dtype(binding))
            if engine.binding_is_input(binding):
                input_buffer = np.ascontiguousarray(input_image)
                input_memory = cuda.mem_alloc(input_image.nbytes)
                bindings.append(int(input_memory))
            else:
                output_buffer = cuda.pagelocked_empty(size, dtype)
                output_memory = cuda.mem_alloc(output_buffer.nbytes)
                bindings.append(int(output_memory))

        stream = cuda.Stream()
        # 将输入数据转存到显存中
        # Transfer input data to the GPU.
        # Transfer the processed image data into input memory using asynchronous host-to-device CUDA copy.
        cuda.memcpy_htod_async(input_memory, input_buffer, stream)

        # 执行模型推理
        # Run inference
        # Kickoff the TensorRT inference pipeline using the asynchronous execute API.
        context.execute_async_v2(bindings=bindings, stream_handle=stream.handle)

        # 将预测结果从显存转移到内存
        # Transfer prediction output from the GPU.
        # Transfer the segmentation output back into pagelocked host memory using device-to-host CUDA copy.
        cuda.memcpy_dtoh_async(output_buffer, output_memory, stream)

        # Synchronize the stream
        # Synchronize the stream used for data transfers and inference execution to ensure all operations are completes.
        stream.synchronize()

    # Finally, write out the segmentation output to an image file for visualization.
    # postprocess 图像结果后处理函数,从预测结果转换为UINT8 RGB图像
    with postprocess(np.reshape(output_buffer, (image_height, image_width))) as img:
        print("Writing output image to file {}".format(output_file))
        img.convert('RGB').save(output_file, "PPM")


# 如何调用前面两个函数
print("Running TensorRT inference for FCN-ResNet101")
with load_engine(engine_file) as engine:
    infer(engine, input_file, output_file)
2. Developer Guide 详解
- 文档,这教程的PDF有163页,这里也不会全部都介绍,只记录一些我感兴趣的,其他的还是要等用到的时候再说。
- 文档内容包括:
- TensorRT简介,工作流程、优势、适用场景、功能
- C++ API 简介
- Python API 简介
- 自定义Layer(Custom Layers)
- 混合精度(Mixed Precision)
- Reformat-Free Network I/O Tensors,还真不懂这个是啥
- 动态shape(Dynamic Shape)
- Empty Tensors
- Loops
- 量化网络(Quantized Networks)
- DLA
- MultiInstance GPU(MIG)
- 部署一个优化好的模型
- 与其他深度学习框架配合
- DALI
- 常见问题
2.1. TensorRT 简介
- 深度学习的基本阶段
- 第一阶段:模型训练,这一部分一般来说TensorRT不参加。
- 第二阶段:Developing A Deployment Solution(开发一个部署方案)
- 本阶段开始时需要有一个训练好的模型。
- 首先,考虑模型所在系统,设计并实现一个合理的部署方案(这个英文长句有点读不懂 Think about how the neural network functions within the larger system of which it is a part of and design and implement an appropriate solution.)。
- 所谓“模型所在系统”就有很多情况了,比如自动驾驶系统、公共场景下的监控系统、终端语音交互系统等
- 确定部署方案优先级。要考虑的问题有很多
- 是单模型部署还是多模型部署
- 使用什么设备进行推理,CPU/GPU/混合/多GPU
- 模型输入是什么,文件/摄像头/网络连接
- 数据预处理是什么,如果是图片的话需要切片、旋转吗
- 模型延时以及吞吐量要求是什么
- 是否需要多个请求集中处理(batch together multiple requests)
- 是否需要构建同一个模型的多个拷贝,从而实现延时以及吞吐量要求
- 模型预测结果要如何使用
- 是否需要进行模型结果后处理
- 其次,在确定优先级后,需要将训练好的模型进行转换
- 再次,考虑优化参数( optimization options ),如batch size,workspace size,mixed precision,dynamitcs shape上下限
- 之后,验证优化后的模型,测试精度等
- 最后,保存Engine文件
- 第三阶段:Deploying A Solution(实际部署)
- 在确定了部署方案后,进行实际部署。
- TensorRT的原理
- TensorRT获取模型结构与权重、进行模型优化、生成engine。
- 这一步被称为 build phase,耗时较长(特别在嵌入式设备上),所以需要保存为一个本地文件。
- 生成的文件不同在不同设备、不同TensorRT版本下使用。
- 具体执行的优化包括
- Elimination of layers whose outputs are not used,如果layer的结果后续没有用到则删除该layer
- Elimination of operations which are equivalent to no-op,删除 no-op 节点
- The fusion of convolution, bias and ReLU operations,根据预定义,将一些算子合并为一个算子
- Aggregation of operations with sufficiently similar parameters and the same source tensor (for example, the 1x1 convolutions in GoogleNet v5’s inception module),这个没看懂,说是将有相同输入且参数类似的操作合并,不知道指的是啥
- Merging of concatenation layers by directing layer outputs to the correct eventual destination.合并concat层,这个有一点理解,大概是先开辟好空间,直接将concat几个输入的结果分别保存到开辟好空间的不同位置中吧。
- 如有必要,也会在build过程中修改参数的精度
- TensorRT获取模型结构与权重、进行模型优化、生成engine。
- TensorRT提供了哪些功能
- 模型定义:将其他深度学习框架训练好的模型转换为TensorRT的形式
- Optimization Profile:不知道该怎么翻译,是为了动态shape进行的
- Builder Configuration: 定义了创建engine的一些细节,感觉就是一些配置
- Builder:定义了从模型到engine构建的接口
- Engine:执行engine的一些接口
- Caffe/UFF/ONNX Parser,就是解析Caffe/UFF/ONNX模型
2.2. C++/Python API
- 两者对比
- 总体来说,两者差不多。
- C++ API应该用在性能优先、安全性非常重要的场景中。
- Python API的主要优势是数据预处理与后处理非常方便,有众多第三方包的支持。
- 剩下的内容其实就是一些代码实例,下面大概罗列一下,用到的时候再查吧,现在看了到时候也忘了
- API介绍(没单独说的就是Python和C++都支持)
- 创建TensorRT对象(仅C++):主要包括
IExecutionContext(用于inference)和ICudaEngine(engine) - 创建网络:包括直接通过TensorRT API一层一层构建,或通过ONNX/UFF/Caffe Parser转换
- 创建Engine
- 序列化Engine
- Inference
- 内存管理(仅C++)
- refit an engine(仅C++):就是将engine文件替换参数
- Algorithm Selection(仅C++):不知道干什么用的,好像是Engine创建过程中的算法?
- 创建TensorRT对象(仅C++):主要包括
3. Best Practices For TensorRT Performance 详解
- TensorRT性能优化最佳实践,主要内容包括
- 如何评估性能,介绍了一堆性能指标以及工具
- 如何提高TensorRT性能
- 如何提高Layer的性能
- 如何提高Plugins的性能
- 如何提高Python的性能
3.1. 如何评估性能
- 指标
- Latency,inference时间,
- Throughout,吞吐量,固定时间内执行了多少次推理
- 如何选择时间点(性能都有时间,时间的起止时间点选择非常重要)
- 整体系统的性能一般会计算所有时间(包括数据预处理与后处理等)
- 但不同任务的数据预处理、后处理等时间差距太大,所以本文只考虑模型推理时间。
- 另外一种测试方式是,确定latency的最大值(猜测超过最大值就结束本次推理),计算固定时间内的inference次数。这种方法是
quality-of-service measurement,可以很好的比较用户体验与系统性能。
- 工具:
trtexec提供了相关工具- 也可以通过NVIDIA Triton Inference Server来测试并行推理性能。
- CPU时间测试,有一段测试代码
- CUDA Events:由于存在 host/device 同步问题,不能通过直接的方法获取时间。这可以通过CUDA Events来实现
- TensorRT内置Profile
- CUDA Profiling:说有俩工具NVIDIA Nsight Compute和NVIDIA Nsight Systems,没细看。
- 内存:说是通过a simple custom GPU allocator来监控,但也没细说。
3.2. 如何提高TensorRT性能
- 说白了,就是为了提高性能,TensorRT提供了哪些功能
- 文档里还说了一句,CUDA程序员看这些很合适,其他菜鸡(比如我)可能就看不懂了
- Mixed Precision
- 混合精度,也就是权重的数据类型,支持FP32/FP16/INT8
- 默认是FP32,如果选择FP16模式则使用FP16或FP32,如果选择INT8模式则使用INT8或FP32
- 为了获得更好的性能,可以同时指定FP16和INT8模式,三种精度混用。
- 还可以使用
trtexec中的--best选项
- Batching
- 一个Batch就是一组输入。
- 这种策略增加了每个输入的latency,但提高了总体吞吐量
- Streaming
- CUDA 中的streams是处理同步任务的一种方式,即同步命令放到一个stream中,其中的命令会按顺序依次执行。同一个stream中是确定同步执行的,多个streams则是异步的。
- 使用多个stream提高并行度从而提高性能。
- 使用流程大概是:
- Identify the batches of inferences that are independent.
- Create a single engine for the network.
- Create a CUDA stream using cudaStreamCreate for each independent batch and an IExecutionContext for each independent batch.
- Launch inference work by requesting asynchronous results using IExecutionContext::enqueue from the appropriate IExecutionContext and passing in the appropriate stream.
- After all the work has been launched, synchronize with all the streams to wait for results. The execution contexts and streams can be reused for later batches of independent work.
- Thread Safety
- 一个TesnorRT builder只能被一个线程使用,如果要多线程就需要创建多个builder
- 只要每个object使用不同的execution context,那么TensorRT runtime就可以被多个线程同时使用
- Initializing The Engine
- 初始化Engine的时候会进行很多优化,并进行测试
- Enabling Fusion:使用Fusion操作,其实就是合并操作
3.3. 如何提高 Layer/Plugin/Python 的性能
- Layer:介绍了一些Layer的优化方法,包括concat/gather/matrixmultiply/fc/reduce/rnn/topk
- Plugins:连插件是啥我都没了解,这部分就没看
- Python:跟C++没啥区别,model inference的时间应该和C++差不多