一、HTML网页中如何使用CSS
HTML中引入CSS样式的第一种方式:内联定义方式
<!DOCTYPE html>
<html>
	<head>
		<meta charset="utf-8">
		<title>HTML中引入CSS样式的第一种方式:内联定义方式</title>
	</head>
	<body>
	<!--
		width 宽度样式
		height 高度样式
		background-color  背景色样式
		display  布局样式(none 表示隐藏,block表示显示)
	-->
	<div style="width: 300px; height: 300px; background-color: #CCFFFF;
	 display:block;
	 border-color: red;border-width: 1px;border-style: solid;
	 "></div>
	 <br><br>

	 <!--
	 border样式
	 border: 1px solid  black;
	 -->
	 <div style="width: 300px; height: 300px; background-color: gray;
		display: block;
		border: 10px black solid;">

	 </div>
	</body>
</html>

2.HTML中引入样式的第二种方式:样式块
<!DOCTYPE html>
<html>
<head>
<meta charset="utf-8">
<title>HTML中引入样式的第二种方式:样式块</title>
<style>
/*
这是CSS注释
*/
/* id选择器
语法格式:
#id{
样式名:样式值;
样式名:样式值;
.....
} */
#usernameErrorMsg{
color: red;
font-size: 20px;
}
/* 标签选择器
语法格式:
标签名{
样式名:样式值;
样式名:样式值;
.....
}
标签选择器作用范围比id选择器广. */
div{
background-color: black;
border: red 3px solid;
width: 100px;
height: 100px;
}
/*
类选择器
语法格式:
.类名{
样式名:样式值;
样式名:样式值;
.....
}
*/
.student{
border: 1px solid red;
width: 400px;
height: 30px;
}
</style>
</head>
<body>
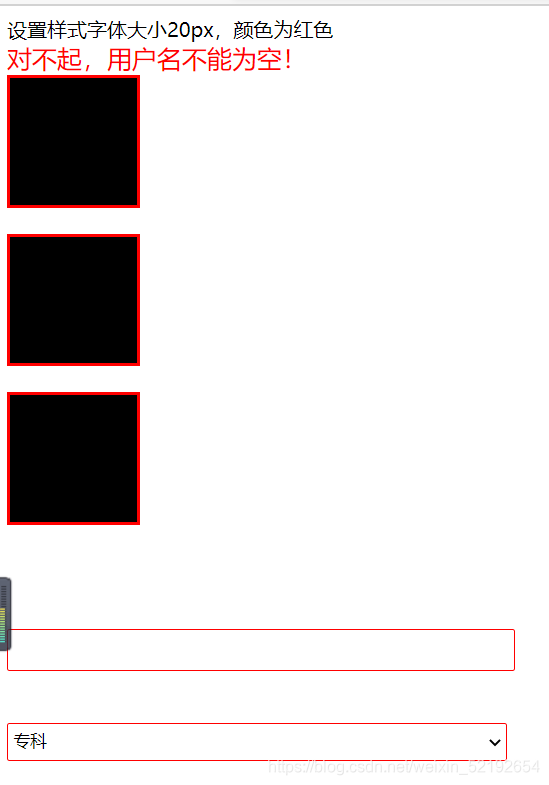
设置样式字体大小20px,颜色为红色<br>
<span id="usernameErrorMsg">
对不起,用户名不能为空!
</span>
<div></div><br>
<div></div><br>
<div></div><br>
<br><br><br>
<!-- class相同的标签可以认位是同一类标签 -->
<input type="text" class="student"/>
<br><br><br>
<select class="student">
<option>专科</option>
<option>本科</option>
</select>
</body>
</html>
3.在HTML中使用CSS样式的第三种方式:引入外部独立的css文件
<!DOCTYPE html>
<html>
	<head>
		<meta charset="utf-8">
		<title>在HTML中使用CSS样式的第三种方式:引入外部独立的css文件</title>

		<!-- 引入css -->
		<link rel="stylesheet" type="text/css" href="./1.css"/>

	</head>
	<body>
		<a href="http://www.baidu.com">打开百度</a>

		<span id="baiduSpan">点击我链接到百度</span>
	</body>
</html>
CSS
a{
	text-decoration: none;
}

/* cursor:鼠标样式,pointer是小手,hand也是,但是hand有浏览器兼容问题,建议使用pointer */
#baiduSpan{
	text-decoration: underline;
	cursor: pointer;
}
3.样式列表
<!DOCTYPE html>
<html>
<head>
<meta charset="utf-8">
<title>列表样式</title>
<style type="text/css">
ul{
/* list-style-type: square; */
/* list-style-type: none; */
list-style-type:circle;
}
</style>
</head>
<body>
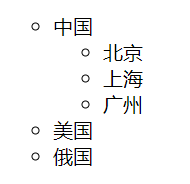
<ul>
<li>中国
<ul>
<li>北京</li>
<li>上海</li>
<li>广州</li>
</ul>
</li>
<li>美国</li>
<li>俄国</li>
</ul>
</body>
</html>
4.测试选择器分组
<!DOCTYPE html>
<html>
	<head>
		<meta charset="utf-8">
		<title>测试选择器分组</title>
		<style>
			.td1,p span{
				color: red;
				font-size: 30px;
			}

		</style>
	</head>
	<body>
		<h1>选择器分组</h1>
		<h2>将同样的样式应用于多个选择器选中的元素上,不同的选择器之间使用 , 分割</h2>

		<table border="1px" width="300px" cellspacing="0" cellpadding="2px">
		<tr>
			<td class="td1">张三</td>
			<td>23</td>
			<td>xian</td>
		</tr>

		<tr>
			<td class="td1">李四</td>
			<td>23</td>
			<td>xian</td>
		</tr>

		<tr>
			<td class="td1">王五</td>
			<td>23</td>
			<td>xian</td>
		</tr>
		</table>
		<h2>注意:css的选择器在使用的时候,不是单一去应用,而是通过不同的组合形式来使用。</h2>
		<p>测试选择器的<span>分组</span>用法</p>
		<p>测试选择器的分组用法</p>
		<p>测试选择器的<span>分组</span>用法</p>
	</body>
</html>
<!DOCTYPE html>
<html>
<head>
<meta charset="utf-8">
<title>测试属性选择器</title>
<style type="text/css">
p[class]{
font-size: 30px;
color: red;
}
span[class='p1'][id='span']{
font-size: 40px;
color: blue;
}
#h3[class=test3]{
color: blue;
}
h3[align=absbottom]{
color: yellow;
}
</style>
</head>
<body>
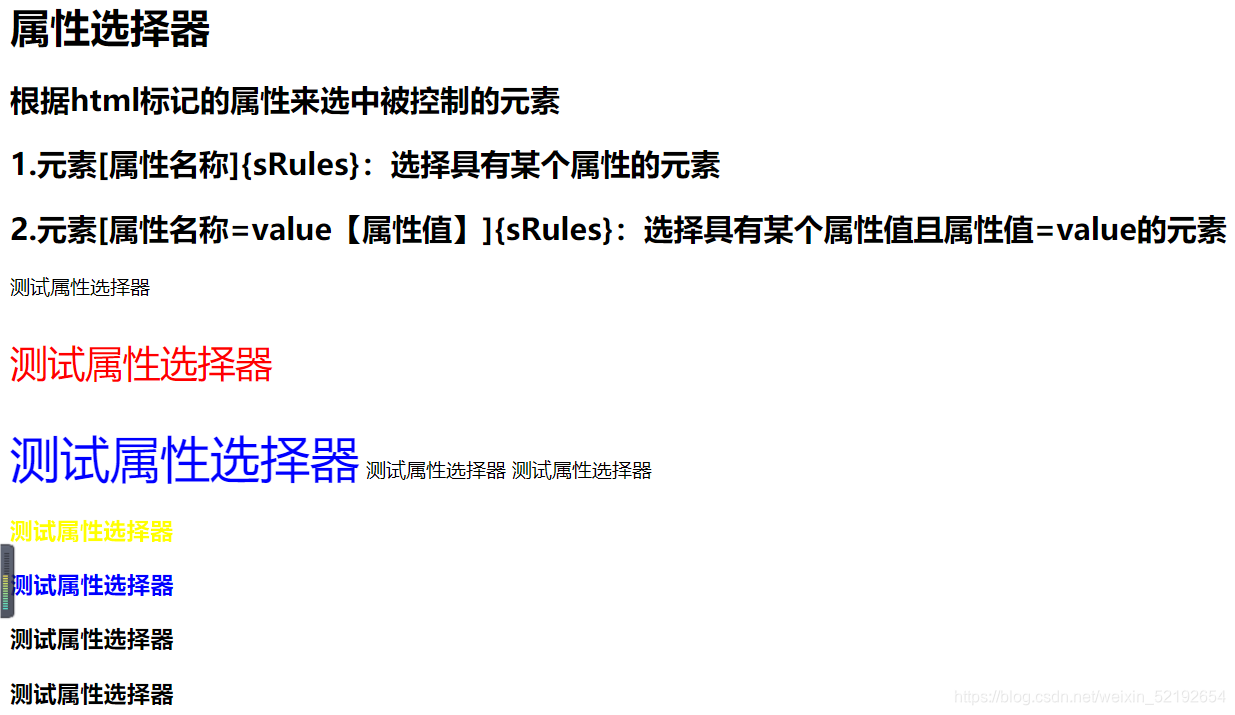
<h1>属性选择器</h1>
<h2>根据html标记的属性来选中被控制的元素</h2>
<h2>1.元素[属性名称]{sRules}:选择具有某个属性的元素</h2>
<h2>2.元素[属性名称=value【属性值】]{sRules}:选择具有某个属性值且属性值=value的元素</h2>
<p id="p1">测试属性选择器</p>
<p id="p1" class="p1">测试属性选择器</p>
<span id="span" class="p1">测试属性选择器</span>
<span class="p1">测试属性选择器</span>
<span class="p3">测试属性选择器</span>
<h3 align="absbottom" id="h3">测试属性选择器</h3>
<h3 id="h3" class="test3">测试属性选择器</h3>
<h3 id="h3">测试属性选择器</h3>
<h3 id="h3">测试属性选择器</h3>
</body>
</html>

5测试属性选择器
<!DOCTYPE html>
<html>
	<head>
		<meta charset="utf-8">
		<title>测试属性选择器</title>
		<style type="text/css">
			p[class]{
				font-size: 30px;
				color: red;
			}
			span[class='p1'][id='span']{
				font-size: 40px;
				color: blue;
			}
			#h3[class=test3]{
				color: blue;
			}
			h3[align=absbottom]{
				color: yellow;
			}
		</style>
	</head>
	<body>
		<h1>属性选择器</h1>
		<h2>根据html标记的属性来选中被控制的元素</h2>
		<h2>1.元素[属性名称]{sRules}:选择具有某个属性的元素</h2>
		<h2>2.元素[属性名称=value【属性值】]{sRules}:选择具有某个属性值且属性值=value的元素</h2>
		<p id="p1">测试属性选择器</p>
		<p id="p1" class="p1">测试属性选择器</p>
		<span id="span" class="p1">测试属性选择器</span>
		<span class="p1">测试属性选择器</span>
		<span class="p3">测试属性选择器</span>
		<h3 align="absbottom" id="h3">测试属性选择器</h3>
		<h3 id="h3" class="test3">测试属性选择器</h3>
		<h3 id="h3">测试属性选择器</h3>
		<h3 id="h3">测试属性选择器</h3>
	</body>
</html>
6.子元素选择器
<!DOCTYPE html>
<html>
	<head>
		<meta charset="utf-8">
		<title>子元素选择器</title>
		<style type="text/css">
			div{
				width: 300px;
				height: 500px;
				background-color: oldlace;
			}
			div ol>li p{
					font-size: 30px;
			}
		</style>
	</head>
	<body>
		<div>
			<!-- 无序 -->
			<ul>
				<li><p>姓名张三</p></li>
				<li>年龄23</li>
				<li><p>地址西安</p></li>
				<li>注册时间2020-11-11</li>
			</ul>
			<!-- 有序 -->
			<ol>
			<li><p>姓名张三</p></li>
			<li>年龄23</li>
			<li><p>地址西安</p></li>
			<li>注册时间2020-11-11</li>
			</ol>
			<p>不在ul中的p元素</p>
			<p>不在ul中的p元素</p>
		</div>
	</body>
</html>

7.测试伪类元素
<!DOCTYPE html>
<html>
<head>
<meta charset="utf-8">
<title>测试常用的伪类</title>
<style type="text/css">
a{
text-decoration: none;
}
a:link{
font-size: 30px;
color: blue;
}
a:hover{
font-size: 40px;
color: #FFFF00;
}
a:active{
font-size: 50px;
color: green;
}
img{
width: 400px;
height: 400px;
}
img:hover{
width: 300px;
height: 300px;
}
img:active{
border: 10px solid #0000FF;
}
#div{
display: none;
}
</style>
<script type="text/javascript">
test1=function(){
window.document.getElementById("div").style.display="block";
}
function test2(){
window.document.getElementById("div").style.display="none";
}
</script>
</head>
<body>
<h1>link-设置 a 标记在未被访问前的样式</h1>
<h2>格式:a:link{css 样式属性}</h2>
<h1>hover--设置对象在其鼠标悬停时的样式</h1>
<h2>格式:Selector:active{css样式属性}</h2>
<h1>active:--设置对象在被用户激活(在鼠标点击与释放之间发生的事件)时的样式,应用于任何对象</h1>
<h2>格式:Selector:active{css样式属性}</h2><!-- Selector 选择器-->
<a href="#">测试伪类元素</a><br>
<!-- onmouseover 当鼠标指针移动到元素上时触发
onmouseout 当鼠标离开时触发
-->
<img src="./imgs/24.jpg" onmouseover="test1()" onmouseout="test2()" >
<div id="div">
<h1>XXX公司员工</h1>
</div>
</body>
</html>
8.关于字体的css属性设置
<!DOCTYPE html>
<html>
<head>
<meta charset="utf-8">
<title>关于字体的css属性设置</title>
<style type="text/css">
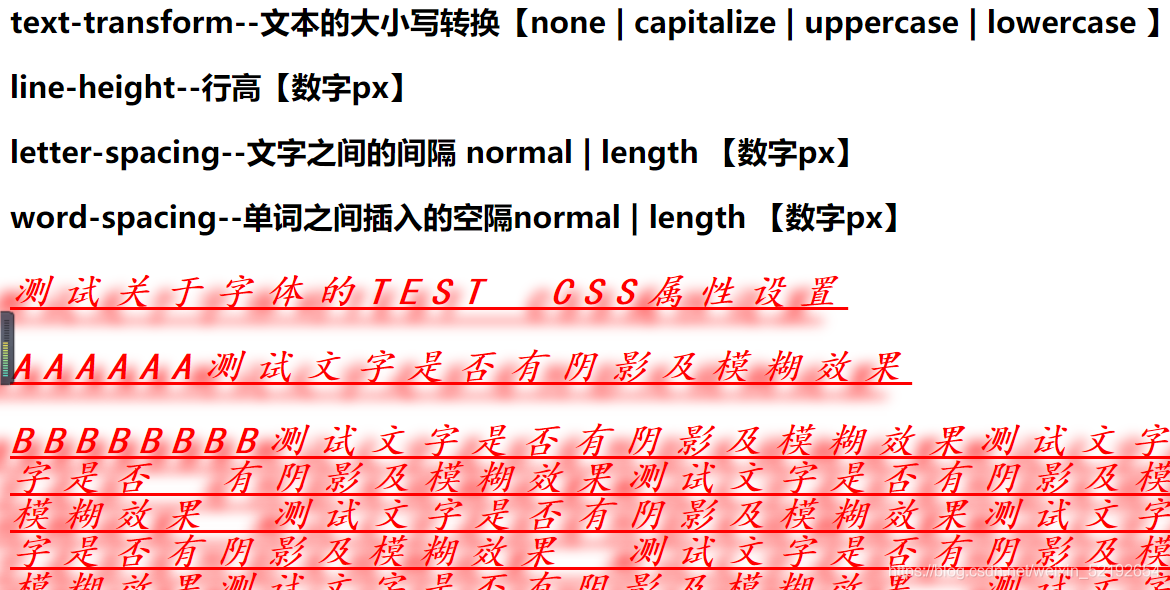
p{
color: red;
font-family:"楷体";
font-size: 30px;
font-style: italic;
font-weight: 900;
text-decoration:underline ;
text-transform:uppercase ;
letter-spacing: 10px;
word-spacing:20px;
text-shadow: -20px 10px 10px red;
line-height: 30px;
}
</style>
</head>
<body>
<h1>关于字体的css属性设置</h1>
<h2 >color--设置字体颜色[颜色单词/颜色码【#0000ff】]</h2>
<h2>font-family---设置字体名称[黑体.....]</h2>
<h2>font-size --设置字体大小【数字px】</h2>
<h2>font-style--设置字体倾斜【normal | italic | oblique 】</h2>
<h2>font-weight--设置字体粗细【整百的数字【100~900】】</h2>
<h2>text-decoration--设置字体的修饰线【none || underline下划线
|| overline上划线 || line-through贯穿线 】</h2>
<h2>text-shadow--文本的文字是否有阴影及模糊效果</h2>
<h3>text-shadow:10px 0px 0px red;</h3>
<h3>第一个值:水平移动距离 0px 0px red;</h3>
<h3>第二个值:前后移动距离 0px 0px red;</h3>
<h3>第三个值:模糊效果</h3>
<h3>第四个值:阴影颜色</h3>
<h2>text-transform--文本的大小写转换【none |
capitalize | uppercase | lowercase 】</h2>
<h2>line-height--行高【数字px】</h2>
<h2>letter-spacing--文字之间的间隔 normal | length 【数字px】</h2>
<h2>word-spacing--单词之间插入的空隔normal | length 【数字px】</h2>
<p>测试关于字体的test css属性设置</p>
<p>aaaaaa测试文字是否有阴影及模糊效果</p>
<p>BBBBBBBB测试文字是否有阴影及模糊效果测试文字是否有阴影及模糊效果测试文字是否
有阴影及模糊效果测试文字是否有阴影及模糊效果测试文字是否有阴影及模糊效果
测试文字是否有阴影及模糊效果测试文字是否有阴影及模糊效果测试文字是否有阴影及模糊效果
测试文字是否有阴影及模糊效果测试文字是否有阴影及模糊效果测试文字是否有阴影及模糊效果
测试文字是否有阴影及模糊效果测试文字是否有阴影及模糊效果</p>
</body>
</html>
9.关于文本属性设置
<!DOCTYPE html>
<html>
	<head>
		<meta charset="utf-8">
		<title>关于文本属性的设置</title>
		<style type="text/css">
			/* text-indent:30px;缩进 */
			#p1{
				font-size: 20px;
				text-indent:30px;

			}
			#p2{
				font-size: 20px;
				text-indent: 30px;
			}

			tr{
				text-align: right;
				vertical-align:bottom;
			}


		</style>
	</head>
	<body>
		<h1>关于文本属性设置</h1>
				<h2>text-indent :文本的缩进 length 【数字px】</h2>
				<h2>vertical-align:垂直对齐方式top  middle bottom </h2>
				<h2>text-align :水平对齐方式left | right | center </h2>
				<p id="p1">关于文本属性设置关于文本属性设置关于文本属性设置</p>
				<p id="p2">关于文本属性设置关于文本属性设置关于文本属性设置</p>
				<table border="1px" width="600px" height="200px">
					<tr>
						<td>text-align</td>
						<td>水平对齐方式left | right | center</td>
					</tr>
					<tr>
						<td>vertical-align</td>
						<td>垂直对齐方式top  middle bottom</td>
					</tr>
				</table>
	</body>
</html>

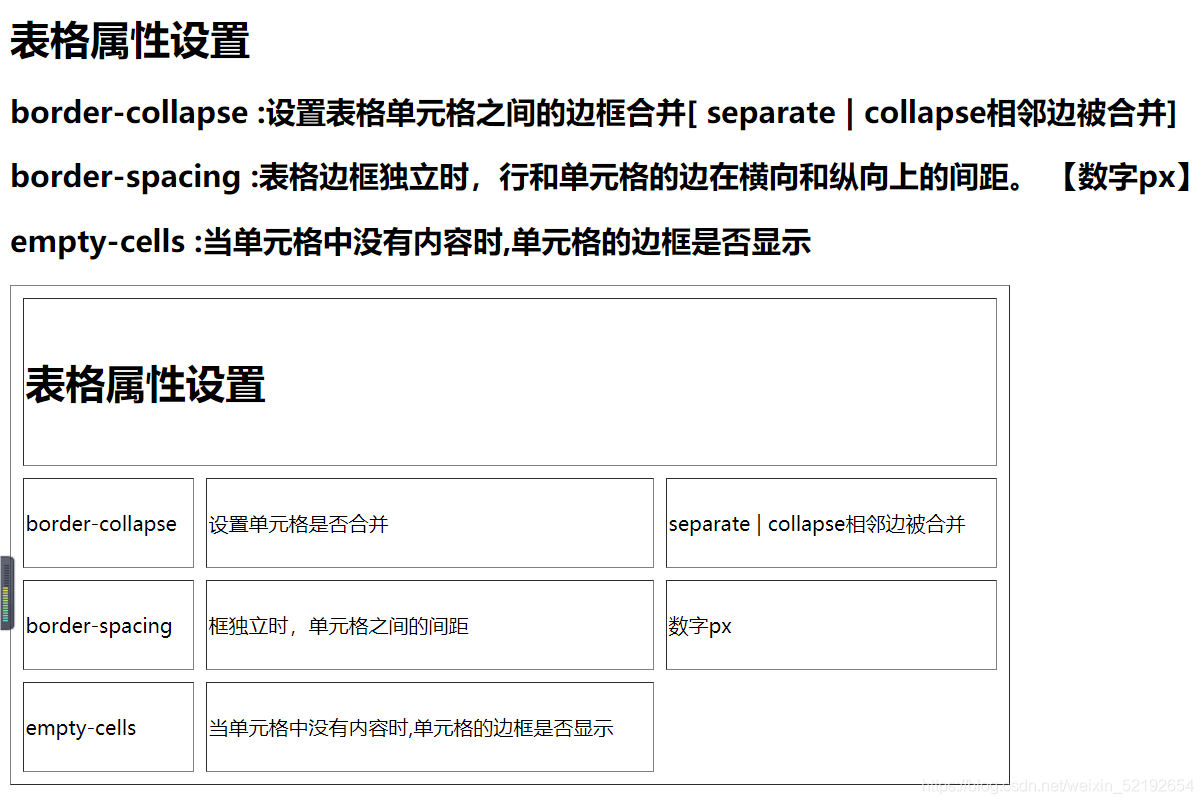
10.关于表格的设置
<!DOCTYPE html>
<html>
	<head>
		<meta charset="utf-8">
		<title>表格属性设置</title>
		<style type="text/css">
			table{
				width: 800px;
				height: 400px;
				/* border-collapse:collapse ;相邻的边界被折叠成一个单一的边界。 */
				/* border-collapse:inherit ;该属性的指定值与元素的父元素的属性相同。 */
				/* border-collapse: initial; */
				/* border-collapse: separate;初始值。边界是分离的(标准HTML)。 */
				/* border-collapse:unset ;作为“继承”或“初始化”,取决于属性是否被继承。 */
				border-collapse:separate ;
				/* border-spacing: ;指定表中相邻单元格边界之间的距离。 */
				border-spacing: 10px;
				/* empty-cells: ;指定是显示还是隐藏空单元格的边框。 */
				/* 呈现具有继承边框和样式的空单元格 */
				/* empty-cells: show; */
				/* 隐藏具有继承边框和样式的空单元格 */
				empty-cells: hide;

			}


		</style>
	</head>
	<body>
		<h1>表格属性设置</h1>
				<h2>border-collapse :设置表格单元格之间的边框合并[ separate | collapse相邻边被合并] </h2>
				<h2>border-spacing :表格边框独立时,行和单元格的边在横向和纵向上的间距。 【数字px】</h2>
				<h2>empty-cells :当单元格中没有内容时,单元格的边框是否显示 </h2>
				<table border="1px">
					<tr>
						<td colspan="3"><h1>表格属性设置</h1></td>
					</tr>
					<tr>
						<td>border-collapse</td>
						<td>设置单元格是否合并</td>
						<td>separate | collapse相邻边被合并</td>
					</tr>
					<tr>
						<td>border-spacing</td>
						<td>框独立时,单元格之间的间距</td>
						<td>数字px</td>
					</tr>
					<tr>
						<td>empty-cells</td>
						<td>当单元格中没有内容时,单元格的边框是否显示</td>
						<td></td>
					</tr>
				</table>
	</body>
</html>
11.补丁设置
<!-- 补丁--子元素和父元素之间的距离
如果设置的是父元素---内补丁【padding】
如果设置的是子元素---外补丁【margin】
padding:12px 15px  28px  35px
四个参数值,将按上-右-下-左的顺序作用于四边。
padding:12px
提供一个,将用于全部的四边
padding:12px 15px
两个,第一个用于上-下,第二个用于左-右
padding:12px 15px  28px
提供三个,第一个用于上,第二个用于左-右,第三个用于下 -->
<!DOCTYPE html>
<html>
	<head>
		<meta charset="utf-8">
		<title>补丁设置</title>
		<style type="text/css">
			div{
				width: 500px;
				height: 400px;
				background-color: black;
			}
			#div1{
				padding: 50px;
			}

			#img2{
				margin: 100px;
			}
			img{
				width: 300px;
			}

		</style>
	</head>
	<body>
		<div id="div1">
			<img id="img1" src="imgs/bioati.png" />
		</div>
				<br>

		<div id="div2">
			<img id="img2" src="imgs/bioati.png" />
		</div>
	</body>
</html>

12.设置元素浮动
<!-- float:html元素是否及如何浮动【none没有 | left{左浮动} | right{右浮动} 】
块级元素:其元素的前后会自动折行
行内元素:按照由左向右一次排列,除非使用<br>元素强制换行。 -->
<!-- <!DOCTYPE html>
<html>
<head>
<meta charset="utf-8">
<title>设置元素浮动</title>
<style type="text/css">
span{
float: right;
}
</style>
</head>
<body>
<font size="7" color="black">设置元素浮动</font>
<span id="span1">
<a href="#">登录</a>
<a href="#">注册</a>
</span>
</body>
</html> -->
<!DOCTYPE html>
<html>
<head>
<meta charset="utf-8" />
<meta name="viewport" content="width=device-width, initial-scale=1">
<title>设置元素浮动</title>
<style type="text/css">
span{
float: right;
}
ul{
list-style-type: none;
}
ul li{
float: left;
padding-left: 50px;
}
ul li a{
font-size: 30px;
text-decoration: none;
color: darkgrey;
}
ul li a:hover{
color: red;
}
</style>
</head>
<body>
<font size="7" color="black">设置元素浮动</font>
<hr color="darkgray">
<ul>
<li><a href="http://news.baidu.com/">新闻</a></li>
<li><a href="#">hao123</a></li>
<li><a href="#">地图</a></li>
<li><a href="#">视频</a></li>
<li><a href="#">贴吧</a></li>
<li><a href="#">学术</a></li>
<li><a href="#">更多</a></li>
</ul>
<br><br>
<hr color="darkgray">
</body>
</html>
13.
设置html元素的隐藏和显示
<!--
display:html元素是否及如何显示
block:显示
none:隐藏
visibility:是否显示html元素
visible:显示
hidden:隐藏
display与visibility的区别?
Display隐藏元素之后,元素的物理空间也会消失,
Visibility:隐藏元素之后,元素的物理空间不会消失,会留出空白。
 -->
<!DOCTYPE html>
<html>
	<head>
		<meta charset="utf-8">
		<title>设置html元素的隐藏和显示</title>
		<style type="text/css">
			img{
				width: 300px;
			}
		</style>
		<script type="text/javascript">
			function test1(){
				window.document.getElementById("img1").style.display="none";
			}
			test2=function(){
				window.document.getElementById("img1").style.display="block";
			}
			function testvisibility1(){
				window.document.getElementById("img2").style.visibility="hidden";
			}
			function testvisibility2(){
				window.document.getElementById("img2").style.visibility="visible";
			}

		</script>
	</head>
	<body>
		<h1>设置html元素的隐藏和显示</h1>
		<h2>display:html元素是否及如何显示</h2>
		<h3>block:显示</h3>
		<h3>none:隐藏</h3>
		<h1 onmouseover="test1();" onmouseout="test2();">图片的隐藏和显示1</h1><br>
		<img id="img1" src="imgs/1.jpg" /><br>
		<img id="img2" src="imgs/10.jpg" />
		<h2>visibility:是否显示html元素</h2>
		<h3>visible:显示</h3>
		<h3>hidden:隐藏</h3>
		<h1 onmouseover="testvisibility1();" onmouseout="testvisibility2();">图片的隐藏和显示2</h1><br>
	</body>
</html>

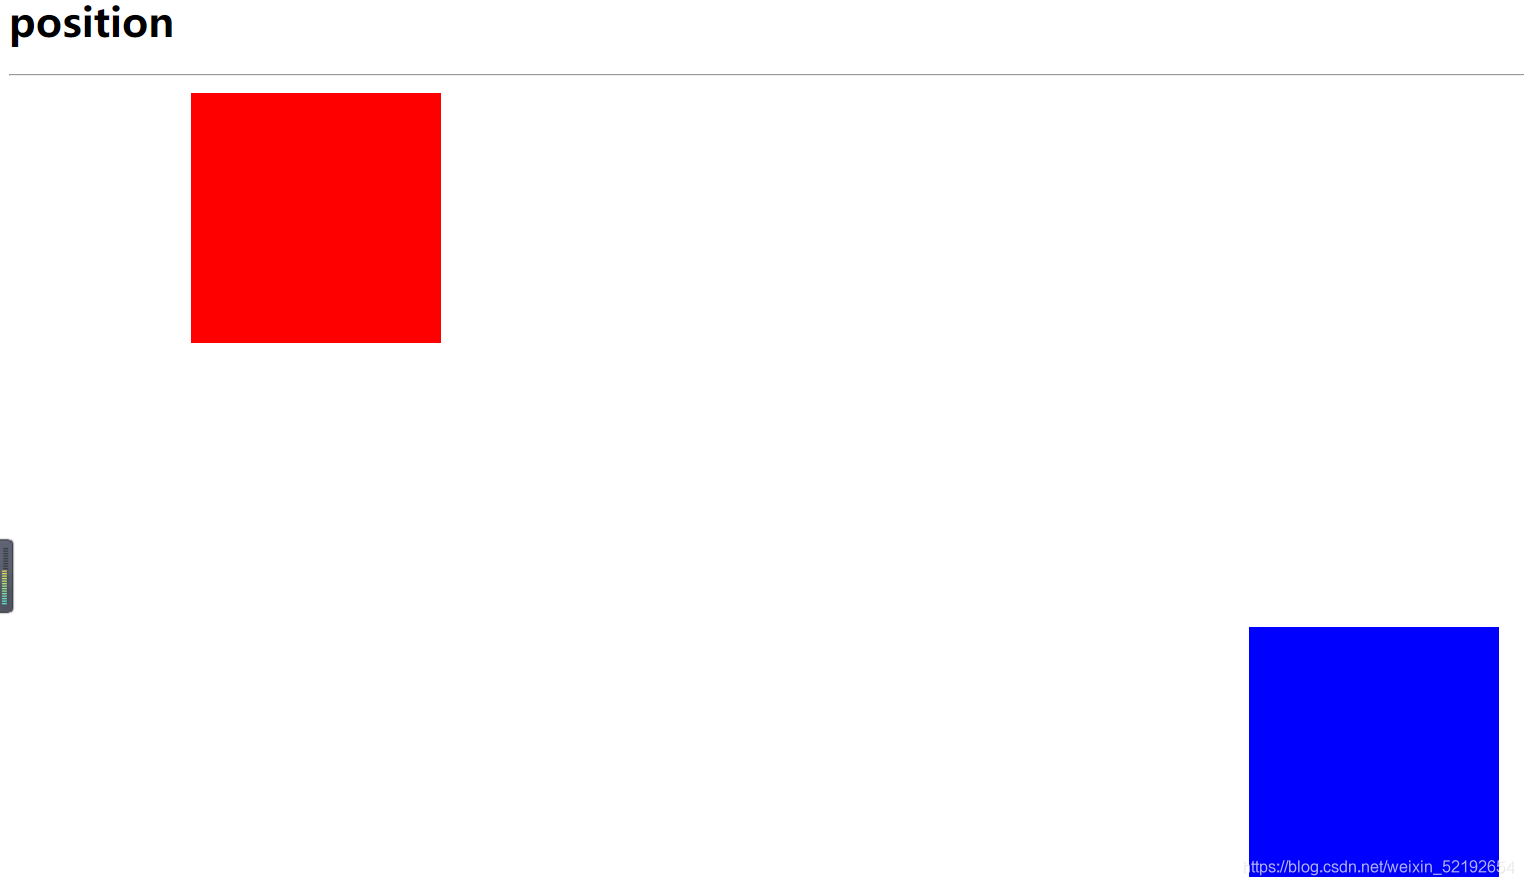
14.关于定位的属性设置
<!--
position:设置HTML元素的定位方式
static:默认值。无特殊定位,html元素遵循HTML定位规则
absolute:绝对定位。脱离HTML默认的定位规则,使用left , right , top , bottom 等属性相对于其最接近的一个最有定位设置的父对象进行绝对定位。
relative:相对定位。不脱离HTML默认的定位规则,但将依据 left , right , top , bottom 等属性在正常文档流中偏移位置
 left【左距】,right【右距】 , top【上距】 , bottom【下距】
 必须定义 position 属性值为 absolute 或者 relative 此取值方可生效。
 HTML默认的定位规则,html元素在HTML文件中按照从左上角向右下角一次排列,遇见块级元素折行。
 -->
<!DOCTYPE html>
<html>
	<head>
		<meta charset="utf-8">
		<title>定位设置</title>
		<style type="text/css">
			#div1 {
				width: 200px;
				height: 200px;
				background-color: red;
				position: absolute;
				left: 10%;
				top: 100px;
			}

			#div2 {
				width: 200px;
				height: 200px;
				background-color: blue;
				position: absolute;
				left: 1000px;
				top: 70%;
			}
		</style>
	</head>
	<body>
		<h1>position</h1>
		<hr>
		<div id="div1"></div>
		<div id="div2"></div>
	</body>
</html>
15.z-index:设置对象的层叠顺序
<!-- z-index:设置对象的层叠顺序
较大 number 值的对象会覆盖在较小 number 值的对象之上
注意:z-index属性是的有效性与position属性有关。
 position属性的absolute与relative
 相对定位是“相对于“元素在文档流中初始位置的,而绝对定位是”相对于“最近的已经定位的祖先元素。
 -->

<!DOCTYPE html>
<html>
	<head>
		<meta charset="utf-8">
		<title>设置元素的层叠</title>
		<style type="text/css">
			#div1{
				width: 300px;
				height: 200px;
				background-color: red;
				position: absolute;
				left: 100px;
				top: 100px;
				z-index: 1;
			}

			#div2 {
				width: 300px;
				height: 200px;
				background-color: blue;
				position: absolute;
				left: 150px;
				top: 160px;
				z-index: 2;
			}

			#div3 {
				width: 300px;
				height: 200px;
				background-color: yellow;
				position: absolute;
				left: 200px;
				top: 220px;
				z-index: 3;
			}

			#div4 {
				width: 300px;
				height: 200px;
				background-color: green;
				position: relative;
				left: 250px;
				top: 280px;
				z-index: 4;
			}

			div p {
				font-size: 20px;
			}
		</style>
		<script type="text/javascript">
			function test1(){
				window.document.getElementById("div2").style.left="700px";

			}
			function test2(){
				var div3byid=window.document.getElementById("div2");
				div3byid.style.left="150px";
			}

		</script>
	</head>
	<body>
		<div id="div1">
			<p align="right">div1--[z-index=1]</p>
		</div>
		<div onclick="test1()" ondblclick="test2()" id="div2">
			<p align="right">div2--[z-index=2]</p>
		</div>
		<div id="div3">
			<p align="right">div3--[z-index=3]</p>
		</div>
		<div id="div4">
			<p align="right">div4--[z-index=4]</p>
		</div>
	</body>
</html>
