前言
上篇不得不知道的 Redis 通信协议 并没有讲的太深,因为觉得没有必要,好哥哥们能知道连接客户端和请求响应是怎么回事就可以了(太深了我也不会)。今天这篇讲道理,好哥哥们应该都用过,不讲道理的好哥哥看完这篇就懂
Jedis了。讲道理的好哥哥们又想杠了,这个我玩过,就不看了吧。别别别,还是有干货的。
概述
Jedis属于Java的第三方开发包,也就是属于 Redis Java语言的客户端,同时也是 Redis 官方推荐的Java连接开发工具(推荐归推荐,用这个还是少,猛男用的比较多的还是RedisTemplate)。当然,这篇的话是不会弄源码解析的(后面会有的,先欠着)。
源码地址
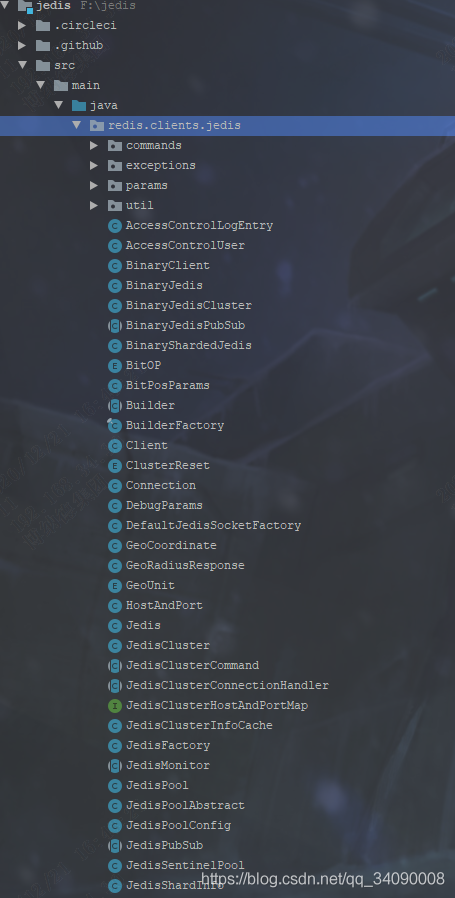
源码结构
命令是真多啊!!!

获取依赖
在 Java 中获取第三方开发包通常有两种方式:
- 直接下载目标版本的
Jedis-${version}.jar包加入到项目中。 - 使用集成构建工具,例如
maven、gradle(maven 仓库地址)等将Jedis目标版本的配置加入到项目中。
正常项目是不会使用第一种方式的,除非很老的那种。另外的话现在基本上都是Springboot的项目,所以在实际项目中通常使用第二种方式。maven 依赖如下,有不想用这个版本的可以到上面 maven 仓库地址中自行选择(猛男我选的是用的人最多的那一个)。
<dependency>
    <groupId>redis.clients</groupId>
    <artifactId>jedis</artifactId>
    <version>2.9.0</version>
</dependency>
关于版本选择上,好哥哥们还是不能太儿戏。因为 Redis 更新速度比较快,如果客户端跟不上服务端的速度,有些特性和 bug 不能及时更新,那就很不利于日常开发。所以选择版本上应该选择比较稳定的版本,也就是尽可能选择稳定的里程碑版本(别学我啊,哪个用的人多选哪个)。另外的话选择更新活跃的第三方开发包,因为想 Redis 升级会带来一些新功能,如果开发包一直不支持提供方不会尴尬,那就是你尴尬了,换第三方包工作量还是有点大的。
基本使用方法
Jedis 的使用方法非常简单,只要下面三行代码就可以实现 get 功能。另外的话,Jedis提供了很多种构造函数,好哥哥们可以自行去研究
初体验
public static void main(String[] args) {


        // 1. 获取一个Jedis对象,其最终host和port为Jedis服务器的ip和端口号
        Jedis jedis = new Jedis("127.0.0.1", 6379);
        // 2. 设置密码(没有配置则不需要这个步骤)
        jedis.auth("123456");
        // 3. jedis 执行 get 操作 , value="world"
        String value = jedis.get("hello");
    }
上面的这种写法只是为了演示使用,在实际项目中比较推荐使用try catch finally的形式来进行代码的书写:一方面可以在Jedis 出现异常的时候(本身是网络操作),将异常进行捕获或者抛出;另一个方面无论执行成功或者失败,将Jedis 连接关闭掉,在开发中关闭不用的连接资源是一种好的习惯,代码类似如下:
public static void main(String[] args) {


        Jedis jedis = null;
        try {


            jedis = new Jedis("127.0.0.1", 6379);
            jedis.get("hello");
        } catch (Exception e) {


            System.out.println(e);
        } finally {


            if (jedis != null) {


                jedis.close();
            }
        }
    }
下面的话会把几个常用的五种数据结构相关的方法做个简单示范
public static void main(String[] args) {


        Jedis jedis = null;
        try {


            jedis = new Jedis("127.0.0.1", 6379);
            // 1.string 输出结果: OK
            jedis.set("hello", "world");
            //  输出结果: world
            jedis.get("hello");
            //  输出结果: 1
            jedis.incr("counter");
            // 2.hash
            jedis.hset("myhash", "f1", "v1");
            jedis.hset("myhash", "f2", "v2");
            //  输出结果: {f1=v1, f2=v2}
            jedis.hgetAll("myhash");
            // 3.list
            jedis.rpush("mylist", "1");
            jedis.rpush("mylist", "2");
            jedis.rpush("mylist", "3");
            //  输出结果: [1, 2, 3]
            jedis.lrange("mylist", 0, -1);
            // 4.set
            jedis.sadd("myset", "a");
            jedis.sadd("myset", "b");
            jedis.sadd("myset", "a");
            //  输出结果: [b, a]
            jedis.smembers("myset");
            // 5.zset
            jedis.zadd("myzset", 99, "tom");
            jedis.zadd("myzset", 66, "peter");
            jedis.zadd("myzset", 33, "james");
            //  输出结果: [[["james"],33.0], [["peter"],66.0], [["tom"],99.0]]
            jedis.zrangeWithScores("myzset", 0, -1);
        } catch (Exception e) {


            System.out.println(e);
        } finally {


            if (jedis != null) {


                jedis.close();
            }
        }
    }
序列化
在我们平常的开发中,某些场景中需要将一个Java 对象存入 Redis,Jedis本身没有提供序列化的工具,也就是说开发者需要自己引入序列化的工具。序列化的工具有很多,例如XML 、Json 、谷歌的Protobuf 、Facebook 的Thrift 等等,对于序列化工具的选择开发者可以根据自身需求决定,下面以protostuff (Protobuf 的 Java 客户端)为例子进行说明。
- 添加 protostuff 的 Maven 依赖
<protostuff.version>1.6.0</protostuff.version>
<dependency>
    <groupId>io.protostuff</groupId>
    <artifactId>protostuff-runtime</artifactId>
    <version>${protostuff.version}</version>
</dependency>
<dependency>
    <groupId>io.protostuff</groupId>
    <artifactId>protostuff-core</artifactId>
    <version>${protostuff.version}</version>
</dependency>
- 定义实体类
@Data
public class User implements Serializable {


    public User() {


    }

    public User(Long id, String name, int age) {


        this.id = id;
        this.name = name;
        this.age = age;
    }

    // 编号
    private Long id;
    // 姓名
    private String name;
    // 年龄
    private int age;
}
- 序列化工具类
ProtostuffSerializer提供了序列化和反序列化方法, 我这里就写死了User类,好哥哥们可以优化一下
/**
 * 序列化工具
 */
public class ProtostuffSerializer {


    private Schema<User> schema = RuntimeSchema.createFrom(User.class);

    public byte[] serialize(final User user) {


        final LinkedBuffer buffer = LinkedBuffer.allocate(LinkedBuffer.DEFAULT_BUFFER_SIZE);
        try {


            return serializeInternal(user, schema, buffer);
        } catch (final Exception e) {


            throw new IllegalStateException(e.getMessage(), e);
        } finally {


            buffer.clear();
        }
    }

    public User deserialize(final byte[] bytes) {


        try {


            User user = deserializeInternal(bytes, schema.newMessage(), schema);
            if (user != null) {


                return user;
            }
        } catch (final Exception e) {


            throw new IllegalStateException(e.getMessage(), e);
        }
        return null;
    }

    private <T> byte[] serializeInternal(final T source, final Schema<T>
            schema, final LinkedBuffer buffer) {


        return ProtostuffIOUtil.toByteArray(source, schema, buffer);
    }

    private <T> T deserializeInternal(final byte[] bytes, final T result, final
    Schema<T> schema) {


        ProtostuffIOUtil.mergeFrom(bytes, result, schema);
        return result;
    }
- 结果测试
public static void main(String[] args) {


        Jedis jedis = null;
        try {


            ProtostuffSerializer serializer = new ProtostuffSerializer();
            User user = new User(1L, "Lisi", 18);
            // 序列化用户对象
            byte[] userByte = serializer.serialize(user);
            byte[] key = "User:1".getBytes();
            jedis = new Jedis("127.0.0.1", 6379);
            // 存储用户对象
            jedis.set(key, userByte);
            // 获取用户对象
            byte[] resultByte = jedis.get(key);
            // 反序列化
            User userResult = serializer.deserialize(resultByte);
        } catch (Exception e) {


            System.out.println(e);
        } finally {


            if (jedis != null) {


                jedis.close();
            }
        }
    }
连接池使用
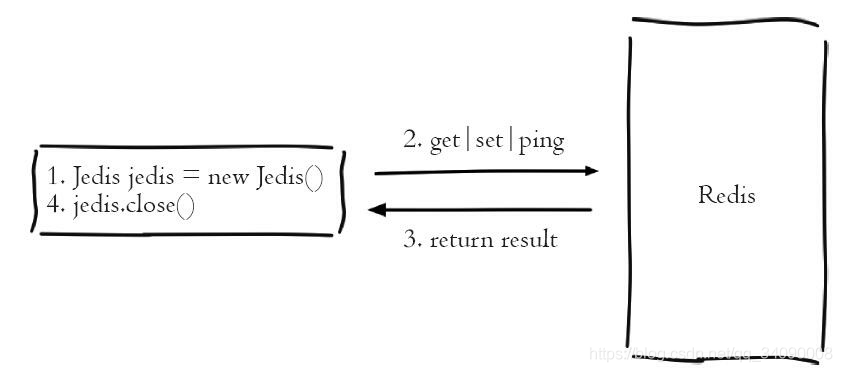
上面所讲的都是直连模式,Jedis每次都会新建TCP连接,使用后再断开连接,对于频繁访问 Redis 的场景显然不是高效的使用,方式原理如下图

池化技术 (Pool) 是一种很常见的编程技巧,在请求量大时能明显优化应用性能,降低系统频繁建连的资源开销。我们日常工作中常见的有数据库连接池、线程池、对象池等,它们的特点都是将 昂贵的 、费时的 的资源维护在一个特定的 池子 中,规定其最小连接数、最大连接数、阻塞队列等配置,方便进行统一管理和复用,通常还会附带一些探活机制、强制回收、监控一类的配套功能。
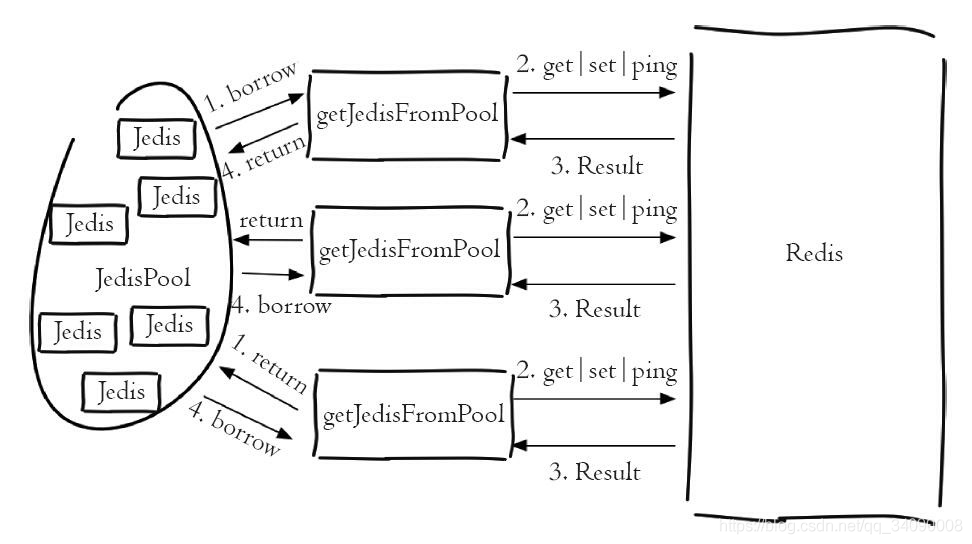
Jedis提供了JedisPool这个类作为对Jedis的连接池,同时使用了Apache的
通用对象池工具common-pool作为资源的管理工具。原理图如下:

池化和直连对比
客户端连接 Redis 使用的是TCP协议,直连的方式每次需要建立TCP连接,而连接池的方式是可以预先初始化好Jedis连接,所以每次只需要从Jedis连接池借用即可,而借用和归还操作是在本地进行的,只有少量的并发同步开销,远远小于新建TCP连接的开销。另外直连的方式无法限制Jedis对象的个数,在极端情况下可能会造成连接泄露,而连接池的形式可以有效的保护和控制资源的使用。

连接池举例
Jedis提供了JedisPool这个类作为对Jedis的连接池,同时使用了Apache的通用对象池工具common-pool作为资源的管理工具。在构建连接池对象的时候,需要提供池对象的配置对象,及JedisPoolConfig(继承自GenericObjectPoolConfig)。我们可以通过这个配置对象对连接池进行相关参数的配置(如最大连接数,最大空数等)。
/**
 * 省略try-catch-finally
 *
 * @param args
 */
public static void main(String[] args) {


    // 池化配置,属性就不细说了
    JedisPoolConfig config = new JedisPoolConfig();
    config.setMaxIdle(8);
    config.setMaxTotal(18);
    // 实例化一个连接池
    JedisPool pool = new JedisPool(config, "127.0.0.1", 6379, 2000);
    // 获取一个连接
    Jedis jedis = pool.getResource();
    // 获取值
    String value = jedis.get("hello");
    System.out.println(value);
}
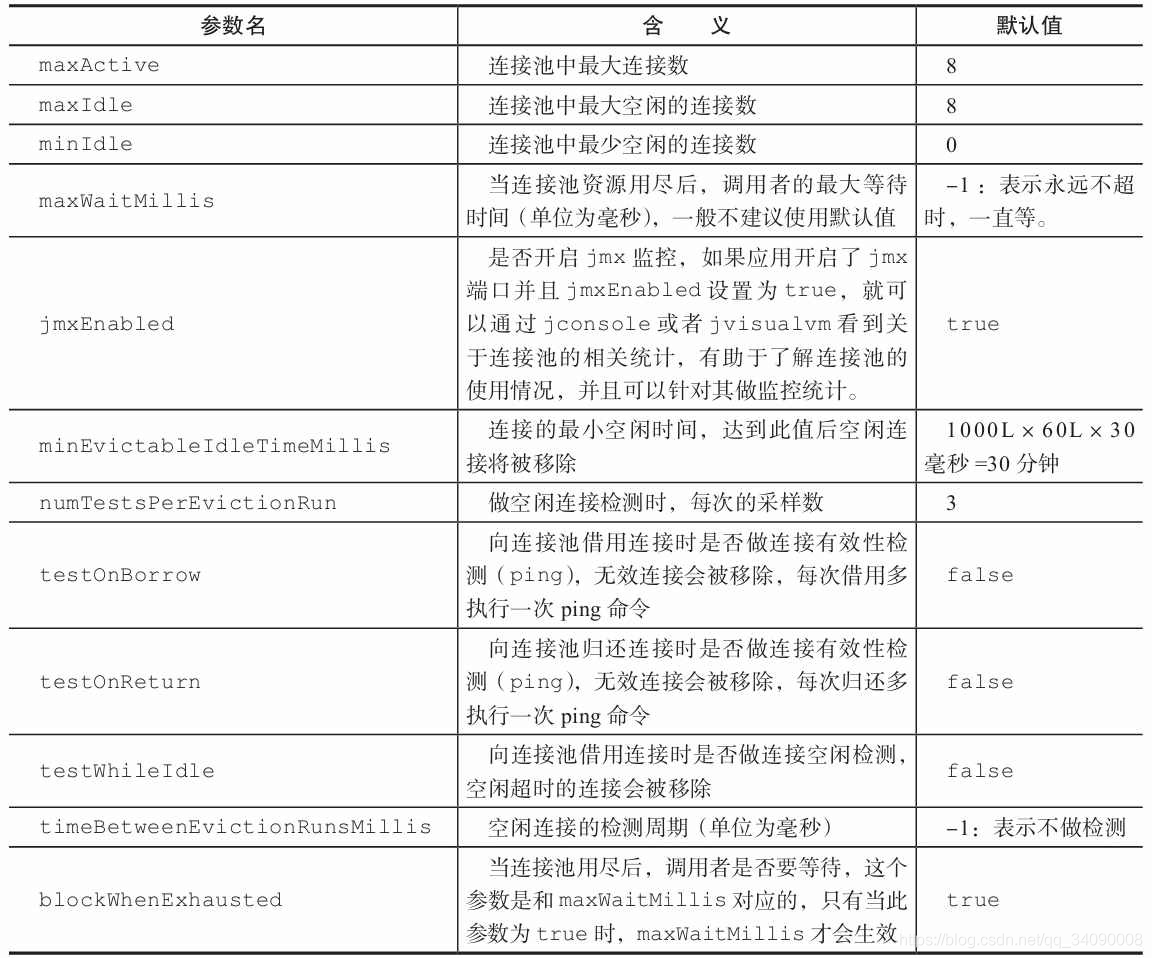
基础属性如下图:

Pipeline 使用
居然还有好哥哥不熟悉Pipeline的,没关系,我这里都给你们准备好了。看完Redis Pipeline 这一篇就够了 ,真就够了。Jedis支持Pipeline特性,我们知道 Redis 提供了mget、mset方法,但是并没有提供mdel方法,如果想实现这个功能,可以借助 Pipeline 来模拟批量删除,虽然不会像mget和mset那样是一个原子命令,但是在绝大数场景下可以使用。
/**
 * 省略try-catch-finally
 * @param args
 */
public static void main(String[] args) {


    List<String> keys = Lists.newArrayList();
    keys.add("hello");
    keys.add("test");
    Jedis jedis = new Jedis("127.0.0.1");
    // 1. 生成 pipeline 对象
    Pipeline pipeline = jedis.pipelined();
    // 2. pipeline 执行命令(添加到命令组),注意此时命令并未真正执行
    for (String key : keys) {


        pipeline.del(key);
    }
    // 3. 执行命令
    pipeline.sync();
}
Lua 使用
什么,好哥哥们还没有用过Lua,看Redis 万字长文 Lua 详解 补补课吧(你看看,都说以前那些事基础篇了,叫你们不好好看)。Jedis下执行Lua和在redis-cli中都差不多,下面的栗子包含了两种执行Lua的方式
/**
  * 省略try-catch-finally
  *
  * @param args
  */
 public static void main(String[] args) {


     // 池化配置,属性就不细说了
     JedisPoolConfig config = new JedisPoolConfig();
     config.setMaxIdle(8);
     config.setMaxTotal(18);
     // 实例化一个连接池
     JedisPool pool = new JedisPool(config, "127.0.0.1", 6379, 2000);
     // 获取一个连接
     Jedis jedis = pool.getResource();
     String key = "hello";
     String script = "return redis.call('get',KEYS[1])";
     // 1. 直接执行一个脚本
     Object eval = jedis.eval(script, 1, key);
     // 加载一个脚本到Redis
     String scriptSha = jedis.scriptLoad(script);
     // 2. 执行脚本
     Object evalsha = jedis.evalsha(scriptSha, 1, key);
     System.out.println(evalsha.toString());
 }
总结
这篇的话还是没有讲到太深的只是点,都是说一些Jedis提供的API,虽然都不难,但是要动手实践才能记忆深刻一点,好哥哥们还是别偷懒哦。另外,使用Jedis还需要注意以下的几点:
Jedis操作需要放在try catch finally里更加合理。- 上面直连和池化的区别需要了解清楚,正常都是会用池化这门技术的。
- 连接池的各个属性要根据服务器的配置不同而不同。
- 如果
key和value涉及了字节数组,需要自己选择适合的序列化方法。 - 这篇还缺少了关于
Jedis对 Redis 高可用(哨兵和集群模式)相关的案例。
本期就到这啦,有不对的地方欢迎好哥哥们评论区留言,另外求关注、求点赞
