目录
2: 下载vagrant 虚拟机镜像管理工具,安装直接下一步
5:虚拟机安装docker,docker官网有详细步骤,按照步骤即可
项目基础篇
1: 下载virtualBox虚拟机,安装直接下一步
2: 下载vagrant 虚拟机镜像管理工具,安装直接下一步
验证vagrant是否安装成功,cmd命令:vagrant -v
3: 下载centos/7.box 镜像文件
4:将下载好的centos7加入到vagrant中
如果之前已经创建了vagrantfile文件,要在上述步骤之前删除
--命令:
vagrant box add (name) (文件位置)

例:vagrant box add centos7 C:\Users\Administrator\Desktop\vagrant-centos-7.box

--初始化vagrant
vagrant init centos7

--启动vagrant
vagrant up
5:虚拟机安装docker,docker官网有详细步骤,按照步骤即可
找到文档步骤: Develops----Docs----Guides----Get Docker----Docker for Linux----Docker Engine----Installation per distro----install on Centos(这块镜像文件ubuntu等可选)
--下载docker,sudo管理员权限
sudo yum remove docker \
                  docker-client \
                  docker-client-latest \
                  docker-common \
                  docker-latest \
                  docker-latest-logrotate \
                  docker-logrotate \
                  docker-engine

--sudo yum install -y yum-utils

--sudo yum-config-manager \
    --add-repo \
    https://download.docker.com/linux/centos/docker-ce.repo

--启动docker
sudo systemctl start docker

--设置开机自启动
sudo systemctl enable docker

--检查docker安装成功
docker -v
配置docker镜像:
阿里云网址:www.aliyun.com ,登录-----容器镜像服务-----镜像加速器----加速器地址
--创建docker目录
sudo mkdir -p /etc/docker

--配置daemon.json
sudo tee /etc/docker/daemon.json <<-'EOF'
{
  "registry-mirrors": ["https://chqac97z.mirror.aliyuncs.com"]
}
EOF
--加载配置文件
sudo systemctl daemon-reload
--重启docker
sudo systemctl restart docker
docker安装Mysql5.7
--切换root用户,密码为vagrant
su root

--下载mysql5.7
docker pull mysql:5.7

--查看mysql 镜像
--docker images

--启动myql
--name指定容器名字 -v目录挂载 -p指定端口映射  -e设置mysql参数 -d后台运行
sudo docker run -p 3306:3306 --name mysql \
-v /mydata/mysql/log:/var/log/mysql \
-v /mydata/mysql/data:/var/lib/mysql \
-v /mydata/mysql/conf:/etc/mysql \
-e MYSQL_ROOT_PASSWORD=root \
-d mysql:5.7

--查看mysql实例
docker ps

--创建my.conf文件
vi /mydata/mysql/conf/my.conf

--配置文件my.conf
[client]
default-character-set=utf8
[mysql]
default-character-set=utf8
[mysqld]
init_connect='SET collation_connection = utf8_unicode_ci'
init_connect='SET NAMES utf8'
character-set-server=utf8
collation-server=utf8_unicode_ci
skip-character-set-client-handshake
skip-name-resolve

--重启mysql
docker restart mysql

--进入mysql实例
docker exec -it mysql bash

--测试mysql是否启动成功,密码root
mysql -uroot -p

--退出
exit

--用本地sqlyog连接测试
docker安装redis
--下载redis
docker pull redis

--查看redis镜像
docker images

--配置redis持久化,因为默认存在内存中,虚拟机重启,redis的值就没有了
--在虚拟机中,创建文件redis.conf
mkdir -p /mydata/redis/conf
touch /mydata/redis/conf/redis.conf
--修改文件redis.conf,开启持久化
appendonly yes

--启动redis, -v 挂载目录, 挂载的目的是当有多个redis实例时候,只需要用挂载在虚拟机的一套配置即可
docker run -p 6379:6379 --name redis \
-v /mydata/redis/data:/data \
-v /mydata/redis/conf/redis.conf:/etc/redis/redis.conf \
-d redis redis-server /etc/redis/redis.conf

--查看redis实例
docker ps

--进入redis实例,进入redis控制台
docker exec -it redis redis-cli

--测试redisl启动成功,和是否开启持久化
set aa bb
get aa
重启redis,然后在看aa还存在吗

--用redis manager工具连接redis
注意重启虚拟机和docker后里面的容器就关了
需要配置mysql和redis跟随虚拟机启动而启动
# 我们接下来设置我们要用的容器每次都是自动启动
sudo docker update redis --restart=always
sudo docker update mysql --restart=always
配置maven的setting.xml
配置阿里云镜像
	  <mirror>
            <id>nexus-aliyun</id>
            <mirrorOf>central</mirrorOf>
            <name>Nexus aliyun</name>
            <url>http://maven.aliyun.com/nexus/content/groups/public/</url>
        </mirror>
配置jdk版本 1.8
	<profile>

	<id>jdk-1.8</id>

		<activation>

			<activeByDefault>true</activeByDefault>
			<jdk>1.8</jdk>
		</activation>
		<properties>
			<maven.compiler.source>1.8</maven.compiler.source>
			<maven.compiler.target>1.8</maven.compiler.target>
			<maven.compiler.compilerVersion>1.8</maven.compiler.compilerVersion>
		</properties>
	</profile>
IDEA安装插件
Lombok插件,MybatisX插件
安装VSCode工具,开发前端
安装插件
Auto Close Tag
Auto Rename Tag
Chinese
ESlint
HTML CSS Support
HTML Snippets
JavaScript ES6
Live Server
open in brower
Vetur
Vue 2 Snippet
安装git,以及使用git
参照我之前的文章:git如何使用
执行数据库脚本
在sqlyog建立数据库:字符集选utf8mb4,他能兼容utf8且能解决一些乱码的问题。分别建立了下面数据库
gulimall-oms
gulimall-pms
gulimall-sms
gulimall-ums
gulimall-wms
VSCode准备
点击执行sql脚本,依次选择评论区给的压缩包里的sql语句
人人开源
在码云上搜索人人开源,我们使用renren-fast,renren-fast-vue项目。
https://gitee.com/renrenio
--后台系统
git clone https://gitee.com/renrenio/renren-fast.git
--前台系统
git clone https://gitee.com/renrenio/renren-fast-vue.git
人人vue
用VSCode打开renren-fast-vue
安装node:http://nodejs.cn/download/ 选择windows下载。下载完安装。
NPM是随同NodeJS一起安装的包管理工具,如JavaScript-NPM,java-Maven。
命令行输入node -v 检查配置好了,配置npm的镜像仓库地址,再执
node -v
npm config set registry http://registry.npm.taobao.org/
然后取VScode的终端中输入 npm install,会报错,然后进行如下操作:
其次大部分错误是报node-sass4.9.0安装失败。
执行以下步骤可以完美解决
首先把项目文件夹下的package.json里面的node-sass4.9.0改成4.9.2(不改可能也没关系,不过我改了,防止踩坑)
然后项目文件夹下打开cmd命令窗口(和Visual Studio Code的终端命令是一样的)(我在VScode中不成功,还是用cmd吧,在cmd中注意切换到renren-fast-vue项目目录)
执行:
npm i node-sass --sass_binary_site=https://npm.taobao.org/mirrors/node-sass/等待挺长时间,执行成功看看有没有报错,如果没报错执行下面命令
npm install ,
没报错就是安装成功,然后在下面目录下使用npm run dev (运行项目)就ok了
注:这么做得原理就是先单独从淘宝镜像吧nod-sass下载下来,然后再进行编译,因为这句命令好像是不成功的,(npm config set registry http://registry.npm.taobao.org/),默认从github下载,导致报错的
如果之前安装失败的。先清理 缓存
清理缓存:npm rebuild node-sass
npm uninstall node-sass
IDEA项目准备
逆向工程搭建
人人开源逆向工程
git clone https://gitee.com/renrenio/renren-generator.git注意本地idea加载人人开源的 renren-fast,renren-generator的时候一直依赖下不来,具体解决如下
在pom.xml中的parent依赖中加上<relativePath />,这个样下载依赖就从本地下载就不从远程下载了
<parent>
   <groupId>org.springframework.boot</groupId>
   <artifactId>spring-boot-starter-parent</artifactId>
   <version>2.2.6.RELEASE</version>
   <relativePath />
</parent>
搭建完是这样的,具体项目结构看实际项目
    <modules>
        <module>qiyun-coupon</module>
        <module>qiyun-member</module>
        <module>qiyun-order</module>
        <module>qiyun-product</module>
        <module>qiyun-ware</module>
        <module>renren-fast</module>
        <module>renren-generator</module>
        <module>qiyun-common</module>
    </modules>
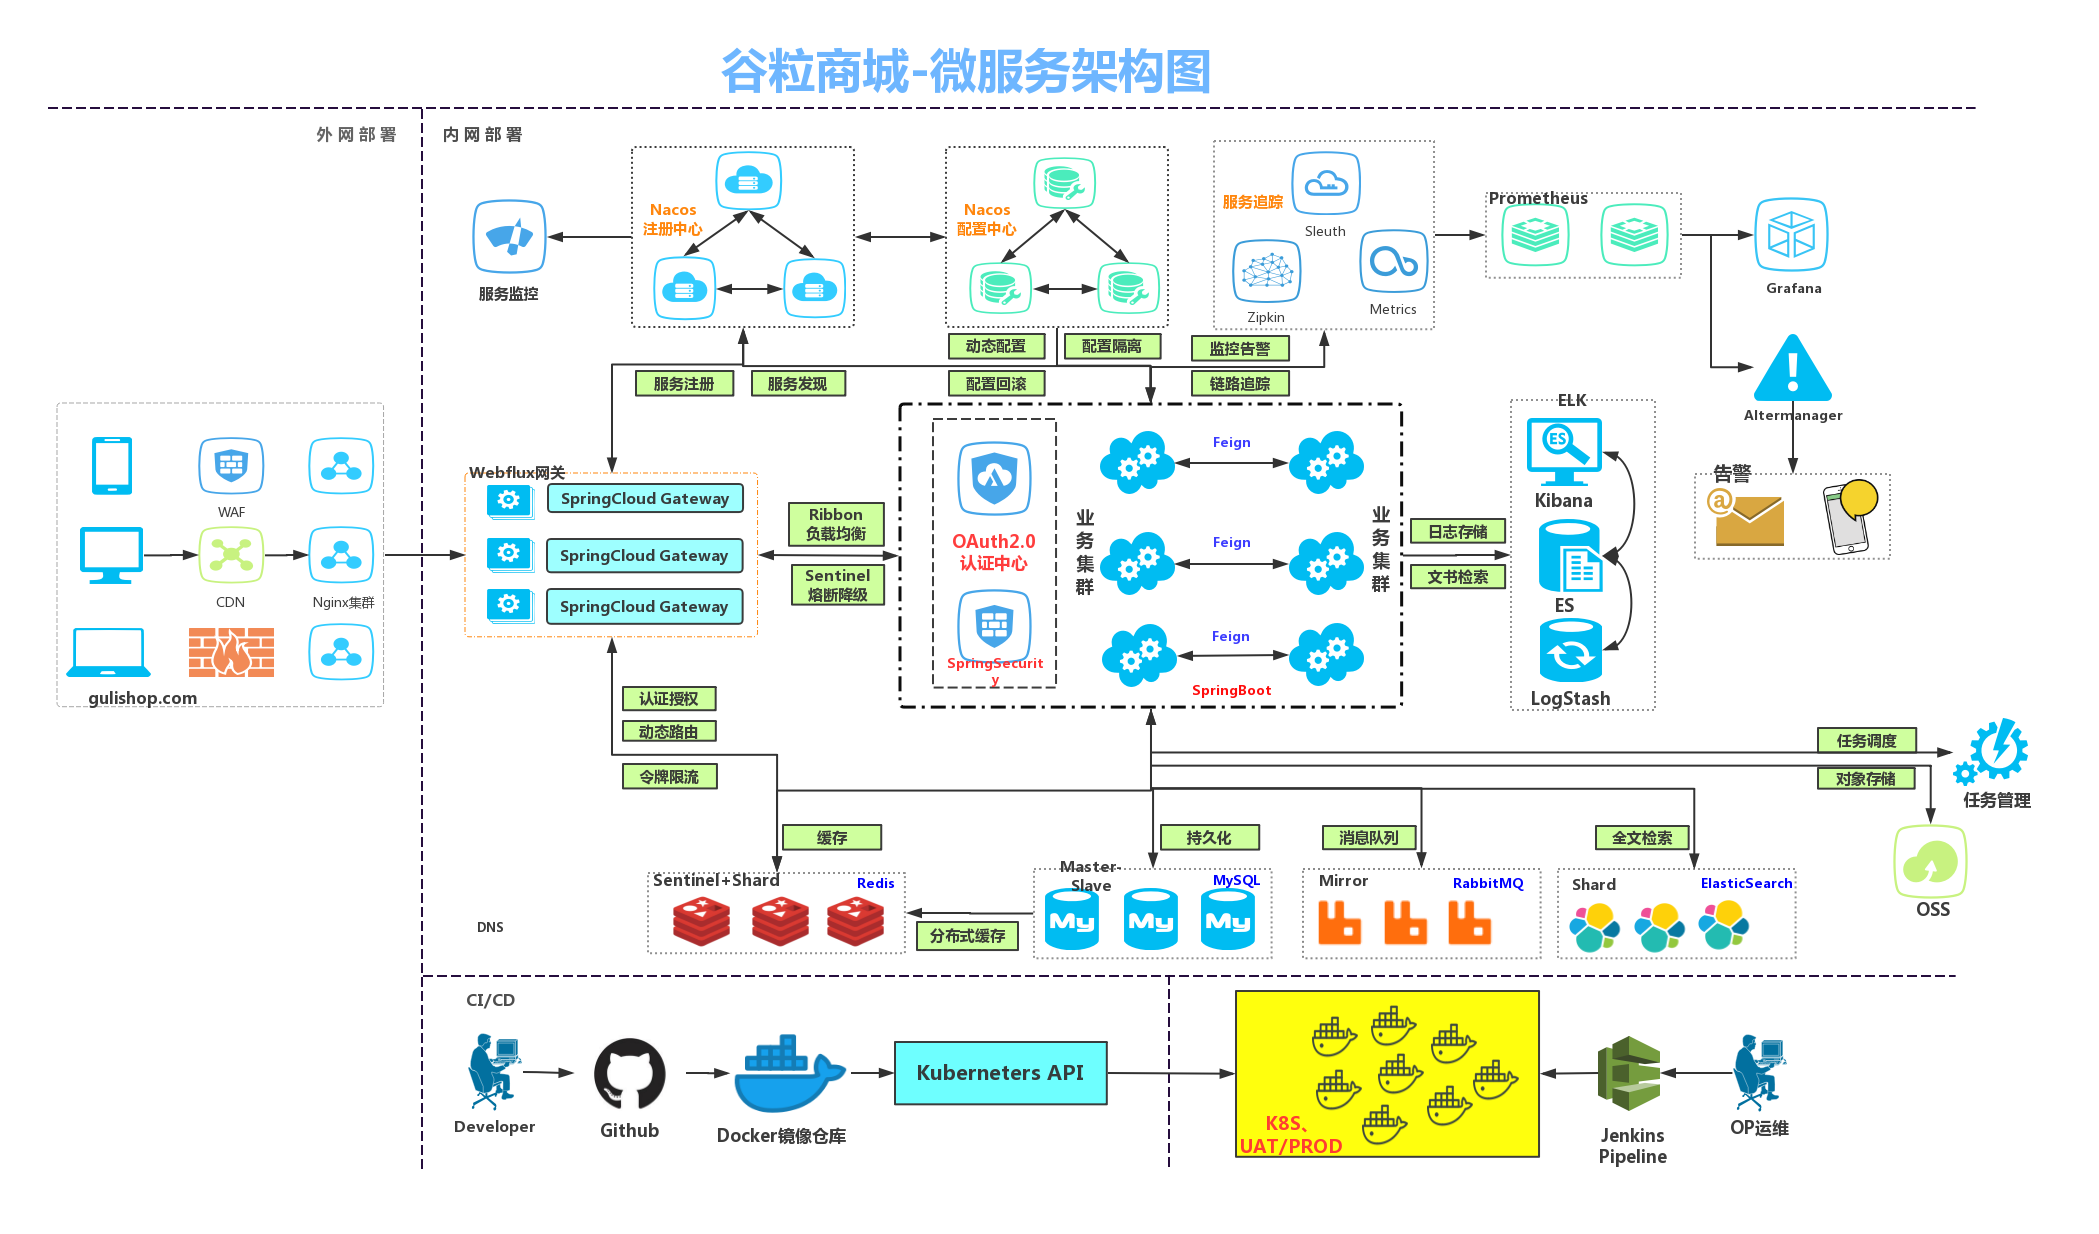
SpringCloud Alibaba简介
分享一个不错博主的笔记:https://blog.csdn.net/hancoder/article/details/109063671
版本对照

nacos注册中心
1:下载nacos 服务端,找到bin目录启动即可,访问localhost:8848/nacos
2: 项目集成nacos
依赖
        <!-- nacos客户端 -->
        <dependency>
            <groupId>com.alibaba.cloud</groupId>
            <artifactId>spring-cloud-starter-alibaba-nacos-discovery</artifactId>
</dependency>在启动类上加上注解 @EnableDiscoveryClient 即可
服务调用 openFeign
远程服务调用,http调用
依赖
        <dependency>
            <groupId>org.springframework.cloud</groupId>
            <artifactId>spring-cloud-starter-openfeign</artifactId>
        </dependency>
在调用者的启动类加上,注解 ,里面的包名是feign接口的包名
@EnableFeignClients(basePackages = {"com.qiyun.service.member.feign"})在调用者的模块创建feign包,里面写feign接口,案例如下,需要注意的是里面的方法路径一定要是全路径的

nacos配置中心
服务注册,发现,配置中心
依赖
        <!-- nacos配置中心 -->
        <dependency>
            <groupId>com.alibaba.cloud</groupId>
            <artifactId>spring-cloud-starter-alibaba-nacos-config</artifactId>
        </dependency>
注解:
@value("${}") 从application.properties获取值
@RefreshScope 开启自动刷新
1:创建bootstrap.properties 文件,加上如下配置(文件加载顺序是 bootstrap---application)
spring.cloud.nacos.config.server-addr=127.0.0.1:8848
spring.application.name=qiyun-member
# namespace 指定命名空间
spring.cloud.nacos.config.namespace=5a93ebf5-41e6-4390-b4c5-55d018ea1287
# 分组设置,默认是default
spring.cloud.nacos.config.group=dev

# 加载多配置集
spring.cloud.nacos.config.extension-configs[0].data-id=mysql.yaml
spring.cloud.nacos.config.extension-configs[0].group=dev
spring.cloud.nacos.config.extension-configs[0].refresh=true

spring.cloud.nacos.config.extension-configs[1].data-id=mybaties.yml
spring.cloud.nacos.config.extension-configs[1].group=dev
spring.cloud.nacos.config.extension-configs[1].refresh=true
nacos服务端的配置

标红的对应的---bootstrap.properties中的namespace
标绿色的对应的---bootstrap.properties中的group
标蓝色的对应--- 多配置集
其中data ID 的规则是 :服务名+文件后缀(目前只支持properties和yml)
实际应用中,我们g一般这样用: 命名空间按照微服务的模块规定, 分组group 我们按照环境划分为 dev test pro , 多数据集配置 :我们配置文件中的配置细分为多个配置,例如mysql.yml,mybaties.yml ,易于管理
网关gateway
网关是请求流量的入口 :路由转发,鉴权,限流控制,负载
三大核心概念: route ,Predicate断言 ,Filter过滤器
参考手册:网关gateway文档
创建一个gateway 的模块
1:依赖:
        <dependency>
            <groupId>org.springframework.cloud</groupId>
            <artifactId>spring-cloud-starter-gateway</artifactId>
        </dependency>
2:在启动类加上@EnableDiscoveryClient ,在nacos注册中心主注册
3:在application.yml中配置,路由各种规则
1:例如:uri: lb://renren-fast 注释// lb 这里表示 load balance 做负载均衡,配置服务名,网关会去nacos注册中心查找
2:predicates:
- Path=/api/** 注释//过滤所有路径中带有 /api的请求
3:filters:
- RewritePath=/api/(?<segment>.*),/renren-fast/$\{segment} 注释// 利用过滤器,重新修改路径 把前面的 改成后面的
spring:
  application:
    name: qiyun-gateway
  cloud:
    gateway:
      routes:
        # 配置参考文档:https://cloud.spring.io/spring-cloud-gateway/2.2.x/reference/html/
        - id: qiyun-product_route
          uri: lb://qiyun-product
          predicates:
            - Path=/api/product/**
          filters:
            - RewritePath=/api/(?<segment>.*),/$\{segment}

        - id: renren-fast_route
          # lb 这里表示 load balance 做负载均衡,配置服务名,网关会去nacos注册中心查找
          uri: lb://renren-fast
          # 断言
          predicates:
          # 过滤所有路径中带有 /api的请求
            - Path=/api/**
          filters:
          # 利用过滤器,重新修改路径 把前面的 改成后面的
            - RewritePath=/api/(?<segment>.*),/renren-fast/$\{segment}
前端vue和element-ui 学习
参考我的别的文章:前端vue
也可参考其他文章:参考
MVVM思想
- M:model 包括数据和一些基本操作
- V:view 视图,页面渲染结果
- VM:View-model,模型与视图间的双向操作(无需开发人员干涉)
添加组件:
VSCode中安装 Vue 2 Snippets插件,vue语法提醒
火狐浏览器安装 Vue.js devtools vue 调试工具
实现商品分类tree树展示
1:添加前端代码片段
{
    // Place your 全局 snippets here. Each snippet is defined under a snippet name and has a scope, prefix, body and
    // description. Add comma separated ids of the languages where the snippet is applicable in the scope field. If scope
    // is left empty or omitted, the snippet gets applied to all languages. The prefix is what is
    // used to trigger the snippet and the body will be expanded and inserted. Possible variables are:
    // $1, $2 for tab stops, $0 for the final cursor position, and ${1:label}, ${2:another} for placeholders.
    // Placeholders with the same ids are connected.
    // Example:
    // "Print to console": {
    // 	"scope": "javascript,typescript",
    // 	"prefix": "log",
    // 	"body": [
    // 		"console.log('$1');",
    // 		"$2"
    // 	],
    // 	"description": "Log output to console"
    // }
    "生成vue模板": {
        "prefix": "vue",
        "body": [
            "<!-- $1 -->",
            "<template>",
            "<div class='$2'>$5</div>",
            "</template>",
            "",
            "<script>",
            "//这里可以导入其他文件(比如:组件,工具js,第三方插件js,json文件,图片文件等等)",
            "//例如:import 《组件名称》 from '《组件路径》';",
            "",
            "export default {",
            "//import引入的组件需要注入到对象中才能使用",
            "components: {},",
            "data() {",
            "//这里存放数据",
            "return {",
            "",
            "};",
            "},",
            "//监听属性 类似于data概念",
            "computed: {},",
            "//监控data中的数据变化",
            "watch: {},",
            "//方法集合",
            "methods: {",
            "",
            "},",
            "//生命周期 - 创建完成(可以访问当前this实例)",
            "created() {",
            "",
            "},",
            "//生命周期 - 挂载完成(可以访问DOM元素)",
            "mounted() {",
            "",
            "},",
            "beforeCreate() {}, //生命周期 - 创建之前",
            "beforeMount() {}, //生命周期 - 挂载之前",
            "beforeUpdate() {}, //生命周期 - 更新之前",
            "updated() {}, //生命周期 - 更新之后",
            "beforeDestroy() {}, //生命周期 - 销毁之前",
            "destroyed() {}, //生命周期 - 销毁完成",
            "activated() {}, //如果页面有keep-alive缓存功能,这个函数会触发",
            "}",
            "</script>",
            "<style lang='scss' scoped>",
            "//@import url($3); 引入公共css类",
            "$4",
            "</style>"
        ],
        "description": "生成VUE模板"
    },
    "http-get请求": {
        "prefix": "httpget",
        "body": [
            "this.\\$http({",
            "url: this.\\$http.adornUrl(''),",
            "method: 'get',",
            "params: this.\\$http.adornParams({})",
            "}).then(({ data }) => {",
            "})"
        ],
        "description": "httpGET请求"
    },
    "http-post请求": {
        "prefix": "httppost",
        "body": [
            "this.\\$http({",
            "url: this.\\$http.adornUrl(''),",
            "method: 'post',",
            "data: this.\\$http.adornData(data, false)",
            "}).then(({ data }) => { });"
        ],
        "description": "httpPOST请求"
    }
}
1:后台接口编写,product模块
controller层
    @ApiOperation(value = "查询商品分类列表,返回tree型数据")
    @GetMapping("/getTeeList")
    public R getTreeList(){
        List<CategoryEntity> list = categoryService.getTeeList();
        return R.ok().put("data", list);
    }
service实现层,用lamda 流式表达式写的
我写的lamda简单测试用例连接:lamda简单使用
我写的swagger2使用步骤连接: swagger使用
    @Override
    public List<CategoryEntity> getTeeList() {
//        QueryWrapper<CategoryEntity> query = new QueryWrapper<>();
        List<CategoryEntity> list = this.list();
        // 获取第一层级商品,h
        List<CategoryEntity> collect = list.stream()
                .filter(entity -> entity.getParentCid() == 0)
                .map(entity -> {
                    entity.setChildren(getChildrenList(entity, list));
                    return entity;
                })
                .sorted(Comparator.comparing(CategoryEntity::getSort))
                .collect(Collectors.toList());

        return collect;
    }

    /**
     * 递归获取三级菜单
     * @param categoryEntity
     * @param list
     * @return
     */
    public List<CategoryEntity> getChildrenList(CategoryEntity categoryEntity,List<CategoryEntity> list){
        List<CategoryEntity> collect = list.stream()
                .filter(entity -> entity.getParentCid() == categoryEntity.getCatId())
                .map(entity -> {
                    entity.setChildren(getChildrenList(entity, list));
                    return entity;
                })
                .sorted(Comparator.comparing(CategoryEntity::getSort))
                .collect(Collectors.toList());

        return collect;
    }
2:前端分类展示功能实现
先在系统管理---菜单管理界面,添加 商品分类 的 目录和菜单,步骤为下,增加以后可以去查看对应gulimall-admin库的sys_menu会相应增加两条数据

注意一下几点:
1: 上面填写的路由 很重要,例如 product/category ,这种中间带有斜杆 在真正路由时候会变成 product-category,
并且页面也是根据路由查找的,默认路径是: src/views/modules/ 这个文件夹下去寻找对应的页面,例如我路由是product/category,那么就在 src/views/modules/product/下面创建 category.vue 文件
2:如果使用过vue开发过的去找文件就会知道: $http 就是axios请求,在utils/httpRequest.js里面封装了axios和拦截器,然后在main.js中挂载全局,这个样全局就可以使用,
以前我们的请求是写在api目录的单独文件夹里面,需要导入import,但是现在不用直接$http({})在里面直接写路径和参数,其实本意跟之前也是一样的,只是请求接口的地方换了
category.vue 文件代码如下
element-ui组件链接:https://element.eleme.cn/#/zh-CN
<template>
    <el-tree :data="data" :props="defaultProps" @node-click="handleNodeClick"></el-tree>
</template>

<script>
export default {

    data() {
        return {
            data: [],
        defaultProps: {
          children: 'children',
          label: 'name'
        }
        };
    },
    created() {
        this.getTreeList()
    },
    methods: {
        handleNodeClick(data) {
        console.log(data);
      },
      getTreeList(){
        // $http 就是axios请求,在utils/httpRequest.js里面封装了axios和拦截器,然后在main.js中挂在全局,这个样全局就可以使用
        // 以前我们的请求是写在api目录的单独文件夹里面,需要导入import,但是现在不用直接$http({})在里面直接写路径和参数,
        // 其实本意跟之前也是一样的,只是请求接口的地方换了
        this.$http({
          url: this.$http.adornUrl('/product/category/getTeeList'),
          method: 'get'
        })
        .then(response=>{
          // console.log(response)
          this.data=response.data.data;
        })

      }
    },
};
</script>

<style >

</style>
3:跨域问题及解决步骤
首先要知道当 协议,ip ,端口 三个只要有一个不一致就会导致跨域
解决跨域有几种我知道的方案:
1: 在每个微服务模块的controller类都加上@CrossOrigin 注解,此注解当访问此接口时候,就不会发生跨域问题,但是缺点是每个controller类都要加,比较麻烦
2: 就是在gateway中,我们这个项目中用到的,编写Filter类,统一处理跨域问题
3:用nginx把前端和微服务后台都放到同一域中管理,意思就是用nginx的请求转发功能把前端和后台的代码都映射上,那么访问前台和后台接口的域就是nginx本身的域,就是在同一个域了
在网关gateway模块下 处理跨域问题 ,实现如下:
在编写CorsConfig类即可,,,(注意:因为renren-fast模块的代码之前以前单独处理过跨域,我们要先把它下面的CorsConfig类注释掉,不然解决两次跨域renren-fast 模块会访问不了)
@Configuration
public class CrosConfig {
    /**
     * 配置跨域信息,这样就可以不用在后续所有微服务的模块配置跨域了
     * @return
     */
    @Bean // 添加过滤器
    public CorsWebFilter corsWebFilter(){
        // 需要注意的是:因为renren-fast模块,已经做了跨域文件,所以要把人人-fast先注释掉
        // 基于url跨域,选择reactive包下的
        UrlBasedCorsConfigurationSource source=new UrlBasedCorsConfigurationSource();
        // 跨域配置信息
        CorsConfiguration corsConfiguration = new CorsConfiguration();
        // 允许跨域的头
        corsConfiguration.addAllowedHeader("*");
        // 允许跨域的请求方式
        corsConfiguration.addAllowedMethod("*");
        // 允许跨域的请求来源
        corsConfiguration.addAllowedOrigin("*");
        // 是否允许携带cookie跨域
        corsConfiguration.setAllowCredentials(true);
        // 任意url都要进行跨域配置
        source.registerCorsConfiguration("/**",corsConfiguration);
        return new CorsWebFilter(source);
    }
}
4品牌列表展示
用renren-generator 生成前端vue代码,直接放到文件夹下,启动即可
阿里云OSS云存储文件实现
首先: 1:创建一个单独第三方的模块,里面都是集成第三方接口实现
2: 后台接口参考我之前文章:后台实现阿里云上传文件
3: 前端实现文件图片文件组件和图片展示: 前端上传组件实现步骤
标注几点:
1: 阿里云oss上传文件 有两种方式:
第一种:是视频中老的方式,导入aliyun-sdk-oss 依赖,实现原理是,通过阿里云给的密钥参数,直接在后台JAVA 直接编写上传的代码,实现上传
第二种:是视频中教的方式,导入aliyun-oss-spring-boot-starter 依赖,实现原理是,通过阿里云给的密钥参数,直接调用后台java编写请求返回签名,然后把签名和地址一些参数返回给前端,在前端直接实现上传文件了,这样后台不用写上传代码了,因为前端拿到了签名,可以直接上传,这里记住要解决一个oss跨域问题。
个人看法:我比较习惯用第一种,前端代码少,也不涉及跨域问题
jse303: valid参数格式校验规则
1: 首先在实体类的属性上加上如下这些注解,注解在javax.validation包下,如下这些注解都可以用在实体类的属性上

2: 在controller层的方法的参数上加上@Valid ,即可开启对于类属性的各种验证
 @ApiOperation(value = "测试添加功能")
    @PostMapping("/save")
    public R save(@Valid @RequestBody BrandEntity brand){
		brandService.save(brand);
        return R.ok();
}标注下:视频中还讲了,分组校验,groups ,@Validated,自定义分组,个人觉得在项目中这种用法很少,而且多个注解都注释在一个属性上,然后还要在controller的方法分开写方法去调用,分组才可用,这种其实用的很少,像这种的我们也可以用代码实现,这个以后维护起来也比较方便,个人觉的比一堆注解在属性上更直观
全局异常处理和统一日志处理
全局异常处理我的文章连接: 全局异常处理连接
统一日志处理我的文章连接: 统一日志处理
二:商品分类和品牌管理的关联
1:后台实现
controller层
    @ApiOperation(value = "测试根据分类catid获取品牌列表")
    @GetMapping("/list/{catId}")
    public R list(@RequestParam(required = false) Map<String, Object> params,
                  @PathVariable(value = "catId") String catId){
        PageUtils page = brandService.queryPageByCatId(params,catId);

        return R.ok().put("page", page);
    }
service层
    @Override
    public PageUtils queryPageByCatId(Map<String, Object> params,String catId) {
        QueryWrapper<BrandEntity> brandEntityQueryWrapper = new QueryWrapper<>();

        // 首先根据中间表,查询出catId对应的品牌的id
        if(!StringUtils.isEmpty(catId)){
            QueryWrapper<CategoryBrandRelationEntity> queryWrapper = new QueryWrapper<>();
            queryWrapper.select("brand_id").eq("catelog_id",catId);
            List<CategoryBrandRelationEntity> list = categoryBrandRelationService.list(queryWrapper);
            // 品牌ids 集合
            List<Long> catIds = new ArrayList<Long>();
            list.stream().forEach(item->{
                catIds.add(item.getBrandId());
            });
            if(!CollectionUtils.isEmpty(catIds)){
                // 再根据品牌ids,查询数据
                brandEntityQueryWrapper.in("brand_id",catIds);
            }else{
                return new PageUtils( new Page<BrandEntity>());
            }
        }
        // 判断key是否存在
        if (!StringUtils.isEmpty(params.get("key"))) {
            // 根据前端传过来的条件查询,带有key,是检索条件
            brandEntityQueryWrapper.and(query -> {
                query.eq("brand_id", params.get("key")).or().like("name", params.get("key"));
            });
        }
        // 分页查询,根据条件
        IPage<BrandEntity> page = this.page(
                new Query<BrandEntity>().getPage(params),
                brandEntityQueryWrapper
        );

        return new PageUtils(page);
    }
2:前端实现:父子组件的调用
1:先封装一个组件,在Compentens/目录下创建自己的组件 ,里面内容是category.vue的内容
<template>
  <div>
    <!-- <el-tree
    :data="data"
    :props="defaultProps"
    @node-click="handleNodeClick"
  >
  </el-tree> -->
    <el-tree :data="data" :props="defaultProps" :render-after-expand="true" @node-click="getTreeClick">
      <span class="custom-tree-node" slot-scope="{ node, data }">
        <span>{

   { node.label }}</span>
      </span>
    </el-tree>

  </div>
</template>

<script>
export default {
  data() {
    return {
      data: [],
      defaultProps: {
        children: "children",
        label: "name",
      },
    };
  },
  created() {
    this.getTreeList();
  },
  methods: {
    // handleNodeClick(data) {
    //   console.log(data);
    // },
    getTreeList() {
      // $http 就是axios请求,在utils/httpRequest.js里面封装了axios和拦截器,然后在main.js中挂在全局,这个样全局就可以使用
      // 以前我们的请求是写在api目录的单独文件夹里面,需要导入import,但是现在不用直接$http({})在里面直接写路径和参数,
      // 其实本意跟之前也是一样的,只是请求接口的地方换了
      this.$http({
        url: this.$http.adornUrl("/product/category/getTeeList"),
        method: "get",
      }).then((response) => {
        // console.log(response)
        this.data = response.data.data;
      });
    },

    getTreeClick(data,node,category){
      if(node.level==3){
        // console.log("我是三级,我被点击了",data,node,category);
        // 当三级被点击,给此组件附上点击事件,然后回传到父页面,也就是调用此组件的页面,然后只需要在引用组件时候根据事件调用即可
        // $emit : 就是把cate-tree-list 这个事件名称,data,node,category这个三个参数传回调用页面
         this.$emit("cate-tree-list",data,node,category)
      }
    }
  },
};
</script>

<style >
</style>
2:在父组件调用此compentens组件
第一步,先导入组件:
import CategoryTree from "@/components/CategoryTree";
第二步:加载组件:components: {AddOrUpdate,CategoryTree, //加载组件},
第三步:引用组件:<category-tree @cate-tree-list="getCatTreeList"></category-tree>
注意:
如何实现子组件的事件传递大到父组件:
第一步:
// 当三级被点击,给此组件附上点击事件,然后回传到父页面,也就是调用此组件的页面,然后只需要在引用组件时候根据事件调用即可
// $emit : 就是把cate-tree-list 这个事件名称,data,node,category这个三个参数传回调用页面
this.$emit("cate-tree-list",data,node,category)
第二步:通过@绑定子组件传递的事件
<category-tree @cate-tree-list="getCatTreeList"></category-tree>
IDEA操作批量重启模块,给模块设置栈内存
1:打开edit Configurations

2:点击+号,选择Compound,把要启动的都加在这里面,启动时候点一次启动就可以了

3:添加所有启动项

4:给每个启动模块设置运行需要的堆内存 -Xmx100m

基础篇总结:

注意点:
1:
大数据量的表 ,尽量不要用leftjoin 这种关联查询,因为这样 迪卡尔积特别高,所以我们推荐尽量把数据单表查询出来,
然后用java代码在去梳写逻辑去解决这种关联问题, 因为处理数据是在内存中处理,所以速度也很快2:
Spring Boot 使用事务非常简单,首先使用注解 @EnableTransactionManagement 开启事务支持后,
然后在访问数据库的Service方法上添加注解 @Transactional 便可。事务的详细说明连接: https://blog.csdn.net/abysscarry/article/details/80189232 , https://blog.csdn.net/Z__Sheng/article/details/89489053
3:
mybatiesPlus 3.0.5 和3.3.2 的区别: 3.3.2的假删除 直接加@TableLogic ,不需要配置组件了;sql性能分析组件
Oauth2.0
