整个工程的目录结构(先整体了解下项目的结构 ,我用idea开发的 基于 maven)
好了了解了项目的结构 ,我们来
配置文件
,我们来
配置文件
,我们来
配置文件
pom.xml
<project xmlns="http://maven.apache.org/POM/4.0.0" xmlns:xsi="http://www.w3.org/2001/XMLSchema-instance"
         xsi:schemaLocation="http://maven.apache.org/POM/4.0.0 http://maven.apache.org/maven-v4_0_0.xsd">
  <modelVersion>4.0.0</modelVersion>
  <groupId>logistics</groupId>
  <artifactId>logistics</artifactId>
  <packaging>war</packaging>
  <version>1.0-SNAPSHOT</version>
  <name>logistics Maven Webapp</name>
  <url>http://maven.apache.org</url>
  <dependencies>
    <dependency>
      <groupId>junit</groupId>
      <artifactId>junit</artifactId>
      <version>4.10</version>
      <scope>test</scope>
    </dependency>

    <!--mybatis-->
    <dependency>
      <groupId>org.mybatis</groupId>
      <artifactId>mybatis</artifactId>
      <version>3.4.5</version>
    </dependency>

    <!--spring-->
    <dependency>
      <groupId>org.springframework</groupId>
      <artifactId>spring-webmvc</artifactId>
      <version>4.3.3.RELEASE</version>
    </dependency>

    <dependency>
      <groupId>org.springframework</groupId>
      <artifactId>spring-jdbc</artifactId>
      <version>4.3.3.RELEASE</version>
    </dependency>

    <!--mysql驱动包-->
    <dependency>
      <groupId>mysql</groupId>
      <artifactId>mysql-connector-java</artifactId>
      <version>5.1.40</version>
    </dependency>

    <!--c3po-->
    <dependency>
      <groupId>com.mchange</groupId>
      <artifactId>c3p0</artifactId>
      <version>0.9.5.1</version>
    </dependency>

    <!--mybatis和spring的整合包-->
    <dependency>
      <groupId>org.mybatis</groupId>
      <artifactId>mybatis-spring</artifactId>
      <version>1.3.1</version>
    </dependency>

    <dependency>
      <groupId>javax.servlet</groupId>
      <artifactId>javax.servlet-api</artifactId>
      <version>4.0.0</version>
    </dependency>

    <!--jetty-->
    <dependency>
      <groupId>org.aspectj</groupId>
      <artifactId>aspectjweaver</artifactId>
      <version>1.8.8</version>
    </dependency>

    <!--fastjson-->
    <dependency>
      <groupId>com.alibaba</groupId>
      <artifactId>fastjson</artifactId>
      <version>1.2.38</version>
    </dependency>

    <!--log4j-->
    <dependency>
      <groupId>log4j</groupId>
      <artifactId>log4j</artifactId>
      <version>1.2.17</version>
    </dependency>

    <dependency>
      <groupId>commons-logging</groupId>
      <artifactId>commons-logging</artifactId>
      <version>1.2</version>
    </dependency>
    <!-- shiro核心包 -->
    <dependency>
      <groupId>org.apache.shiro</groupId>
      <artifactId>shiro-core</artifactId>
      <version>1.2.2</version>
    </dependency>
    <!-- 添加shiro web支持 -->
    <dependency>
      <groupId>org.apache.shiro</groupId>
      <artifactId>shiro-web</artifactId>
      <version>1.2.2</version>
    </dependency>
    <!-- 添加shiro spring支持 -->
    <dependency>
      <groupId>org.apache.shiro</groupId>
      <artifactId>shiro-spring</artifactId>
      <version>1.2.2</version>
    </dependency>

    <dependency>
      <groupId>org.apache.shiro</groupId>
      <artifactId>shiro-ehcache</artifactId>
      <version>1.2.3</version>
    </dependency>
  </dependencies>
  <build>
    <pluginManagement>
      <plugins>
        <plugin>
          <groupId>org.eclipse.jetty</groupId>
          <artifactId>jetty-maven-plugin</artifactId>
          <version>9.4.7.v20170914</version>
          <configuration>
            <scanIntervalSeconds>10</scanIntervalSeconds>
            <stopKey>foo</stopKey>
            <stopPort>9999</stopPort>
          </configuration>
          <executions>
            <execution>
              <id>start-jetty</id>
              <phase>pre-integration-test</phase>
              <goals>
                <goal>start</goal>
              </goals>
              <configuration>
                <scanIntervalSeconds>0</scanIntervalSeconds>
              </configuration>
            </execution>
            <execution>
              <id>stop-jetty</id>
              <phase>post-integration-test</phase>
              <goals>
                <goal>stop</goal>
              </goals>
            </execution>
          </executions>
        </plugin>
      </plugins>
    </pluginManagement>
    <resources>
      <resource>
        <directory>src/main/java</directory>
        <includes>
          <include>**/*.xml</include>
        </includes>
      </resource>
      <resource>
        <directory>src/main/resources</directory>
        <includes>
          <include>**/*.xml</include>
          <include>**/*.properties</include>
        </includes>
      </resource>
    </resources>
  </build>
</project>
pom配置完了我们接下来配置log4j.properties (直接从官方拷贝过来)


    log4j.rootLogger=Error, Console
#  log4j.rootLogger=DEBUG, Consoled
#当整个项目出错的时候打印出来
#Console
log4j.appender.Console=org.apache.log4j.ConsoleAppender
log4j.appender.Console.layout=org.apache.log4j.PatternLayout
log4j.appender.Console.layout.ConversionPattern=%d [%t] %-5p [%c] - %m%n
#log4j.logger.java.sql.ResultSet=INFO
#log4j.logger.org.apache=INFO
#log4j.logger.java.sql.Connection=DEBUG
#log4j.logger.java.sql.Statement=DEBUG
#log4j.logger.java.sql.PreparedStatement=DEBUG
web.xml(添加Spring监听器、Shiro过滤器和SpringMVC支持)
<web-app xmlns:xsi="http://www.w3.org/2001/XMLSchema-instance" xmlns="http://java.sun.com/xml/ns/javaee"
         xsi:schemaLocation="http://java.sun.com/xml/ns/javaee http://java.sun.com/xml/ns/javaee/web-app_3_0.xsd"
         id="WebApp_ID" version="3.0">
  <servlet>
    <!-- 添加springmvc支持 -->
    <servlet-name>springmvc</servlet-name>
    <servlet-class>org.springframework.web.servlet.DispatcherServlet</servlet-class>
    <init-param>
      <param-name>contextConfigLocation</param-name>
      <param-value>classpath:springmvc.xml</param-value>
    </init-param>
    <load-on-startup>1</load-on-startup>
  </servlet>

  <servlet-mapping>
    <servlet-name>springmvc</servlet-name>
    <url-pattern>*.do</url-pattern>
  </servlet-mapping>
  <!-- spring -->
  <context-param>
    <param-name>contextConfigLocation</param-name>
    <param-value>classpath:applicationContext.xml</param-value>
  </context-param>
  <!-- 添加shiro过滤器 -->
  <filter>
    <filter-name>shiroFilter</filter-name>
    <filter-class>org.springframework.web.filter.DelegatingFilterProxy</filter-class>
    <init-param>
      <!-- 该值缺省为false,表示声明周期由SpringApplicationContext管理,设置为true表示ServletContainer管理 -->
      <param-name>targetFilterLifecycle</param-name>
      <param-value>true</param-value>
    </init-param>
  </filter>
  <filter-mapping>
    <filter-name>shiroFilter</filter-name>
    <url-pattern>/*</url-pattern>
  </filter-mapping>

  <!-- 编码过滤器 -->
  <filter>
    <filter-name>encodingFilter</filter-name>
    <filter-class>org.springframework.web.filter.CharacterEncodingFilter</filter-class>
    <async-supported>true</async-supported>
    <init-param>
      <param-name>encoding</param-name>
      <param-value>UTF-8</param-value>
    </init-param>
  </filter>
  <listener>
    <listener-class>org.springframework.web.context.ContextLoaderListener</listener-class>
  </listener>
</web-app>
db.properties
连接池配置文件db.properties是java中采用数据库连接池技术完成应用对数据库的操作的配置文件信息的文件。在applicationContext.xml里要导入的数据库的
uname=root
upass=123456
url=jdbc:mysql://localhost:3306/logistics
driver_Class=com.mysql.jdbc.Driver

initPoolSize=5
maxPoolSize=20
applicationContext.xml(整个工程的核心配置文件)
<?xml version="1.0" encoding="UTF-8"?>
<beans xmlns="http://www.springframework.org/schema/beans"
xmlns:context="http://www.springframework.org/schema/context"
xmlns:tx="http://www.springframework.org/schema/tx"
xmlns:xsi="http://www.w3.org/2001/XMLSchema-instance"
xmlns:aop="http://www.springframework.org/schema/aop"
xmlns:jee="http://www.springframework.org/schema/jee"
xsi:schemaLocation="http://www.springframework.org/schema/beans http://www.springframework.org/schema/beans/spring-beans.xsd
http://www.springframework.org/schema/context http://www.springframework.org/schema/context/spring-context.xsd
http://www.springframework.org/schema/tx http://www.springframework.org/schema/tx/spring-tx.xsd
http://www.springframework.org/schema/jee http://www.springframework.org/schema/jee/spring-jee-4.0.xsd
http://www.springframework.org/schema/aop http://www.springframework.org/schema/aop/spring-aop-4.0.xsd ">
<!--导入jdbc.properties-->
<context:property-placeholder location="classpath:db.properties"></context:property-placeholder>
<!--配置数据源-->
<bean class="com.mchange.v2.c3p0.ComboPooledDataSource" id="dataSource">
<property name="jdbcUrl" value="${url}"></property>
<property name="driverClass" value="${driver_Class}"></property>
<property name="user" value="${uname}"></property>
<property name="password" value="${upass}"></property>
<property name="initialPoolSize" value="${initPoolSize}"></property>
<property name="maxPoolSize" value="${maxPoolSize}"></property>
</bean>
<!--配置SqlSessionFactoryBean-->
<bean class="org.mybatis.spring.SqlSessionFactoryBean" id="sqlSessionFactory">
<!--依赖dataSource-->
<property name="dataSource" ref="dataSource"></property>
<!--需要管理mybatis,所以需要引入mybatis-config.xml文件-->
<property name="configLocation" value="classpath:mybatis-config.xml"></property>
<!--扫描所有的映射文件-->
<property name="mapperLocations" value="classpath:com/shadow/entity/*.xml"></property>
</bean>
<!--扫描所有的mapper接口-->
<bean class="org.mybatis.spring.mapper.MapperScannerConfigurer">
<property name="basePackage" value="com.shadow.dao"></property>
</bean>
<!-- (事务管理)transaction manager, use JtaTransactionManager for global tx -->
<bean id="transactionManager"
class="org.springframework.jdbc.datasource.DataSourceTransactionManager">
<property name="dataSource" ref="dataSource" />
</bean>
<tx:annotation-driven transaction-manager="transactionManager" />
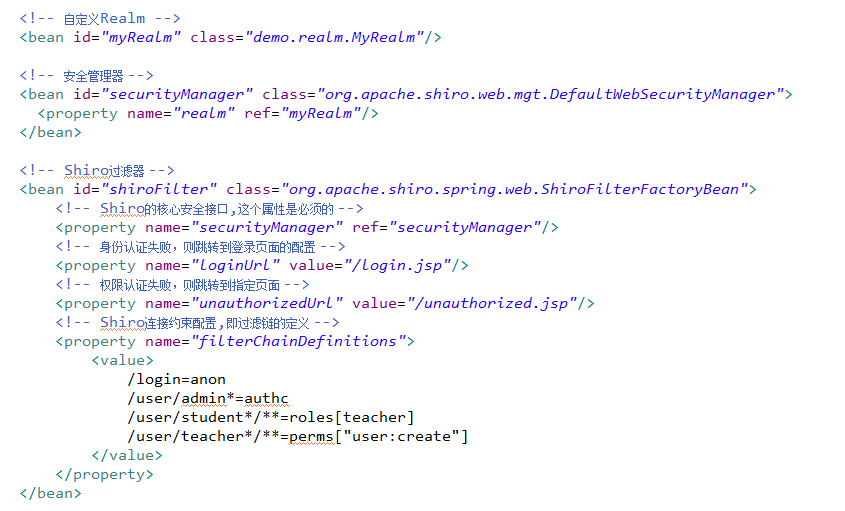
<!--<!– 配置自定义Realm –>-->
<bean id="myRealm" class="com.shadow.shiro.MyRealm"/>
<!-- 安全管理器 -->
<bean id="securityManager" class="org.apache.shiro.web.mgt.DefaultWebSecurityManager">
<property name="realm" ref="myRealm"/>
</bean>
<!-- Shiro过滤器 -->
<bean id="shiroFilter" class="org.apache.shiro.spring.web.ShiroFilterFactoryBean">
<!-- Shiro的核心安全接口,这个属性是必须的 -->
<property name="securityManager" ref="securityManager"/>
<!-- 身份认证失败,则跳转到登录页面的配置 -->
<property name="loginUrl" value="/login.html"/>
<!-- 权限认证失败,则跳转到指定页面 -->
<property name="unauthorizedUrl" value="/unauthorized.jsp"/>
<!-- Shiro连接约束配置,即过滤链的定义 -->
<property name="filterChainDefinitions">
<value>
/login=anon
/user/admin*=authc
/user/student*/**=roles[teacher]
/user/teacher*/**=perms["user:create"]
</value>
</property>
</bean>
<!-- 保证实现了Shiro内部lifecycle函数的bean执行 -->
<bean id="lifecycleBeanPostProcessor" class="org.apache.shiro.spring.LifecycleBeanPostProcessor"/>
<!-- 开启Shiro注解 -->
<bean class="org.springframework.aop.framework.autoproxy.DefaultAdvisorAutoProxyCreator" depends-on="lifecycleBeanPostProcessor"/>
<bean class="org.apache.shiro.spring.security.interceptor.AuthorizationAttributeSourceAdvisor">
<property name="securityManager" ref="securityManager"/>
</bean>
<!-- 配置事务通知属性 -->
<tx:advice id="txAdvice" transaction-manager="transactionManager">
<!-- 定义事务传播属性 -->
<tx:attributes>
<tx:method name="insert*" propagation="REQUIRED" />
<tx:method name="update*" propagation="REQUIRED" />
<tx:method name="edit*" propagation="REQUIRED" />
<tx:method name="save*" propagation="REQUIRED" />
<tx:method name="add*" propagation="REQUIRED" />
<tx:method name="new*" propagation="REQUIRED" />
<tx:method name="set*" propagation="REQUIRED" />
<tx:method name="remove*" propagation="REQUIRED" />
<tx:method name="delete*" propagation="REQUIRED" />
<tx:method name="change*" propagation="REQUIRED" />
<tx:method name="check*" propagation="REQUIRED" />
<tx:method name="get*" propagation="REQUIRED" read-only="true" />
<tx:method name="find*" propagation="REQUIRED" read-only="true" />
<tx:method name="load*" propagation="REQUIRED" read-only="true" />
<tx:method name="*" propagation="REQUIRED" read-only="true" />
</tx:attributes>
</tx:advice>
<!-- 配置事务切面 -->
<aop:config>
<aop:pointcut id="serviceOperation"
expression="execution(* com.shadow.dao.*.*(..))" />
<aop:advisor advice-ref="txAdvice" pointcut-ref="serviceOperation" />
</aop:config>
</beans>
整合MyBatis
mybatis的全局配置文件mybatis-config.xml
<?xml version="1.0" encoding="UTF-8" ?>
<!DOCTYPE configuration
        PUBLIC "-//mybatis.org//DTD Config 3.0//EN"
        "http://mybatis.org/dtd/mybatis-3-config.dtd">
<configuration>

    <settings>
        <setting name="logImpl" value="STDOUT_LOGGING"/>
    </settings>

    <typeAliases>
        <package name="com.shadow.entity"></package>
    </typeAliases>

</configuration>
pojo
UserEntity(对象,只贴下字段省略了get\set\构造方法、tostring可自行加上)
//用户表
public class UserEntity {
    private int user_id;//用户ID
    private String uname;//  登录账号
    private String password;//  密码
    private String createtime;//   创建时间
配置mapper映射文件
配置一下entity里UserEntity的映射xml
<?xml version="1.0" encoding="UTF-8" ?>
<!DOCTYPE mapper
        PUBLIC "-//mybatis.org//DTD Mapper 3.0//EN"
        "http://mybatis.org/dtd/mybatis-3-mapper.dtd">
<mapper namespace="com.shadow.dao.UserDao">
    <sql id="Base_Column_List" >
        user_id, uname, password,createtime
    </sql>

<!--根据用户名字查询-->
    <select id="getByUsername" parameterType="String" resultType="UserEntity">
        select * from user where uname=#{uname}
    </select>

<!--用户表与角色表联表查中间表-->
    <select id="getRole" parameterType="String" resultType="String">
     SELECT u.*,r.* FROM `user` u,role r,user_role ur where u.user_id = ur.user_id and r.role_id = ur.role_id and  u.uname=#{uname}
    </select>
<!--用户表与权限表联表查中间表-->
    <select id="getAuthorization" parameterType="String" resultType="String">
      SELECT u.*,a.* FROM `user` u,authorization a,authorization_user au where u.user_id = au.user_id and a.anthor_id = au.author_id and  u.uname=#{uname}
    </select>
</mapper>
Dao接口(我没写servier)
整合SpringMVC
spring-mvc.xml
<?xml version="1.0" encoding="UTF-8"?>
<beans xmlns="http://www.springframework.org/schema/beans"
       xmlns:context="http://www.springframework.org/schema/context"
       xmlns:mvc="http://www.springframework.org/schema/mvc"
       xmlns:xsi="http://www.w3.org/2001/XMLSchema-instance"
       xsi:schemaLocation="http://www.springframework.org/schema/beans http://www.springframework.org/schema/beans/spring-beans.xsd
         http://www.springframework.org/schema/mvc  http://www.springframework.org/schema/mvc/spring-mvc.xsd
                        http://www.springframework.org/schema/context http://www.springframework.org/schema/context/spring-context.xsd">

<context:component-scan base-package="com.shadow.controler"></context:component-scan>

<bean class="org.springframework.web.servlet.view.InternalResourceViewResolver">
    <property name="prefix" value="/WEB-INF/jsp/"></property>
    <property name="suffix" value=".jsp"></property>
</bean>
<mvc:annotation-driven></mvc:annotation-driven>

<!-- 加了@ResponseBody的方法自动返回JSON -->
<bean class="org.springframework.web.servlet.mvc.annotation.AnnotationMethodHandlerAdapter">
    <property name="messageConverters">
        <list>
            <bean class="com.alibaba.fastjson.support.spring.FastJsonHttpMessageConverter">
                <property name="supportedMediaTypes">
                    <value>text/html;charset=UTF-8</value>
                </property>
            </bean>
        </list>
    </property>
</bean>

</beans>
controller
@Controller

public class UserControler {
    @Resource
    UserDao userDao;


    //登录

    @RequestMapping("/login")
    public String login(UserEntity userEntity, HttpServletRequest request) throws SQLException {

        Subject subject = SecurityUtils.getSubject();
        UsernamePasswordToken token=new UsernamePasswordToken(userEntity.getUname(),userEntity.getPassword());
       // System.out.println(token+"n    kjjjj");
       // System.out.println(userEntity.getUname() + "__" + userEntity.getPassword());
        try{

            subject.login(token);//会跳到我们自定义的realm中
            request.getSession().setAttribute("userEntity", userEntity);
            return "bill_handout";
        }catch(Exception e){
            e.printStackTrace();
            request.getSession().setAttribute("userEntity", userEntity);
            request.setAttribute("error", "用户名或密码错误!");
            return "aa";
        }
    }


}
自定义realm
上面用户登录会执行一个subject.login(token);
这里会跳转到我们自定义的realm中,接下来就来定义一下我们自己的realm,由于这里是和mybatis整合了
 * 自定义Realm实现认证,实现授权
 * @author Administrator
 *
 */

public class MyRealm  extends AuthorizingRealm{
@Resource
UserDao userDao;
    /**
     * 用于的权限的认证。
     * @param principalCollection
     * @return
     */
// 为当前登陆成功的用户授予权限和角色,已经登陆成
    @Override
    protected AuthorizationInfo doGetAuthorizationInfo(PrincipalCollection principalCollection) {
        //获取用户名
        String uname = (String) principalCollection.getPrimaryPrincipal(); //获取用户名
        SimpleAuthorizationInfo info = new SimpleAuthorizationInfo() ;

       info.setRoles(userDao.getRole(uname));
       info.setStringPermissions(userDao.getAuthorization(uname));
        return info;

    }

    /**
     * 首先执行这个登录验证
     * @param token
     * @return
     * @throws AuthenticationException
     */
    @Override
    protected AuthenticationInfo doGetAuthenticationInfo(AuthenticationToken token)
            throws AuthenticationException {
    //获取用户输入的用户名和密码
        UsernamePasswordToken token2=(UsernamePasswordToken) token;
        //获取用户账号
        String uname=token2.getUsername();
        String password=token2.getPassword().toString();


      UserEntity userEntity=userDao.getByUsername(uname);

      if(userEntity!=null){
          AuthenticationInfo info=new SimpleAuthenticationInfo(userEntity.getUname(),userEntity.getPassword(),"myRealm");
     return info;
      }else{
          return null;
      }
    }
}
html页面(jsp)
登录界面我是用bootstrap写的,http://www.bootcss.com/下载bootstrap当然你们可以不用我就不贴bootstrap的了
<body>
<formaction="/login.do"method="post">
username:<inputtype="text"name="username"/><br>
password:<inputtype="password"name="password"/><br>
<inputtype="submit"value="登陆">${error }</form></body>
到此已经结束了很多人dao都是接口有遇到这种错(密码错误了也会报这个错的)
还有就是Realm中 uname报空指针异常
这个呢只要把dao注入就好了不能自己手动new 这样会导致其他为空
因为dao里面可能就用到其他的对象
如果你是new出来的话 spring 就不会帮你去管理这个对象的依赖关系了
如果你是new出来的话 spring 就不会帮你去管理这个对象的依赖关系了
只要注入dao就好了