快速上手教你如何简单实现手动解析JSON、Gson框架技术和FastJson框架技术
- 手动解析JSON、Gson框架技术和FastJson框架技术
-
- JSON的简介
- JSON对象转换为Java对象
- JSON数组转换为Java集合
- 复杂的json数据的解析
- JSONFormat工具的安装
- 特殊的JSON的数据解析
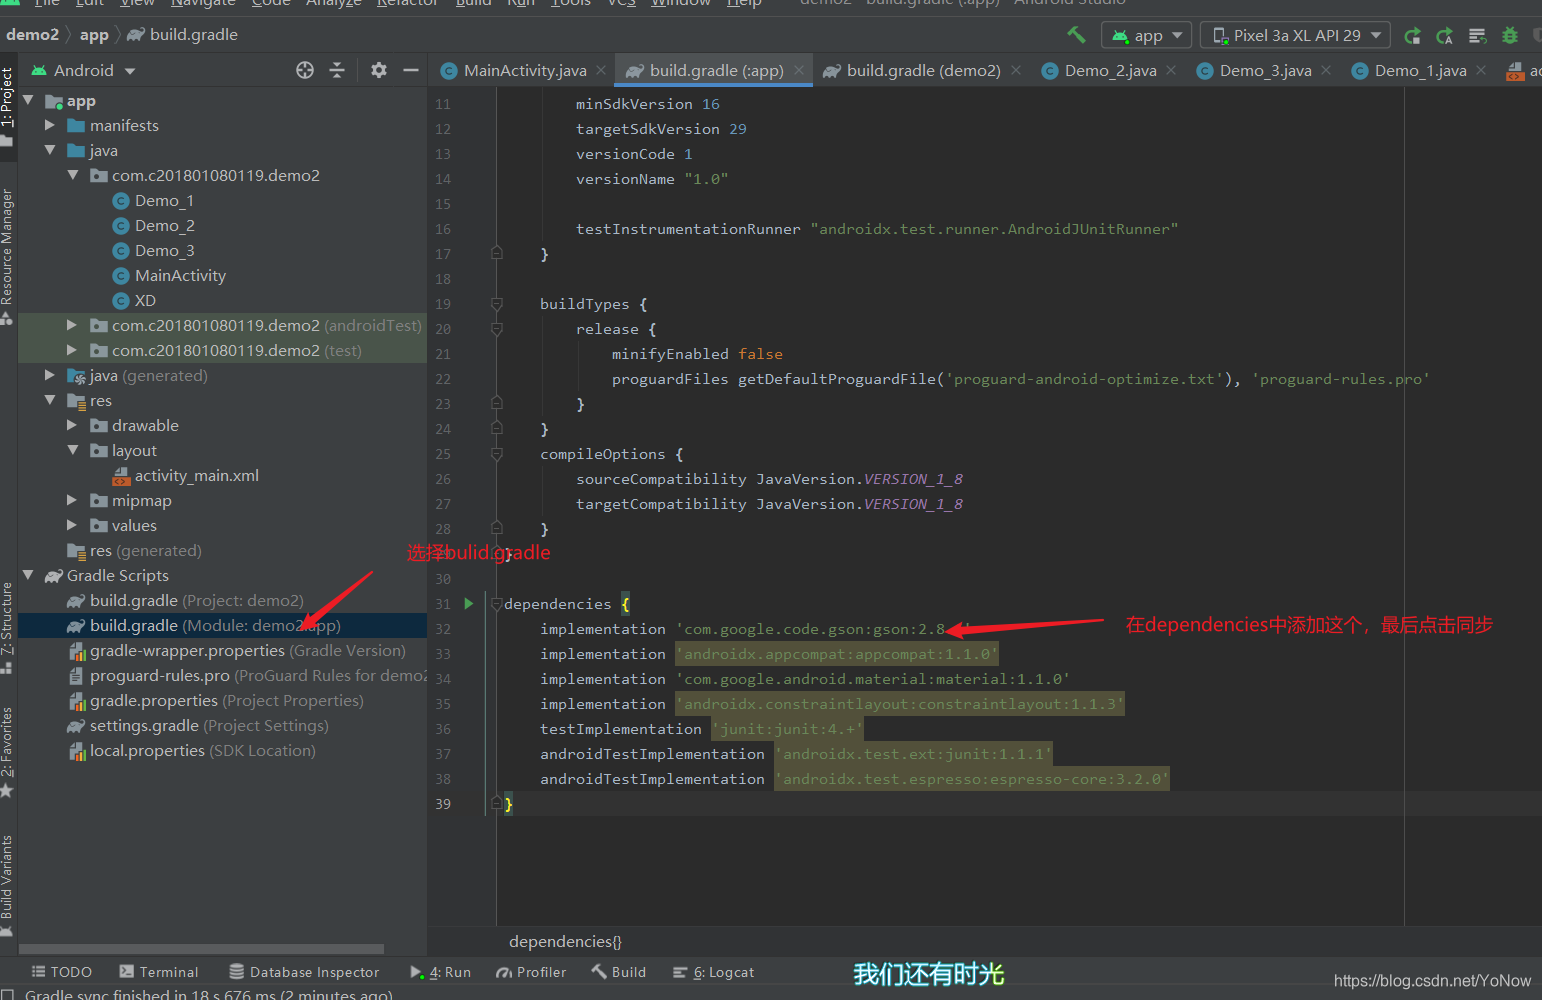
- 安装Gson
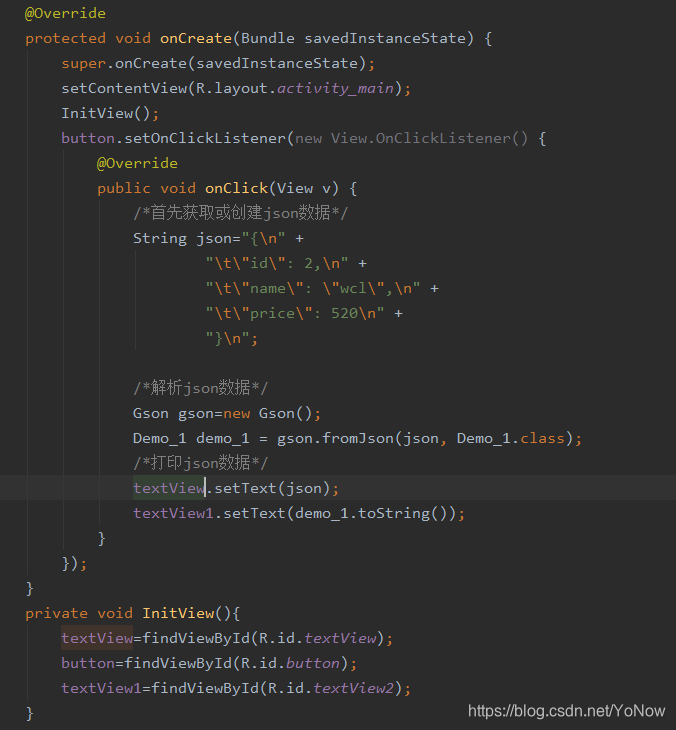
- 使用Gson将Json格式的字符串转换为Java对象
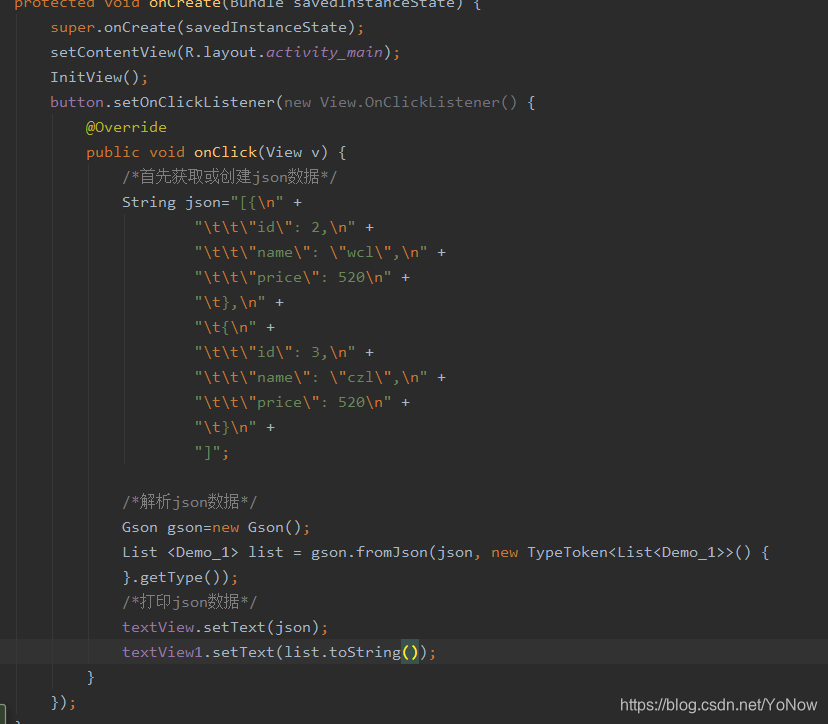
- 使用Gson将Json格式的字符串转换为Java对象的List
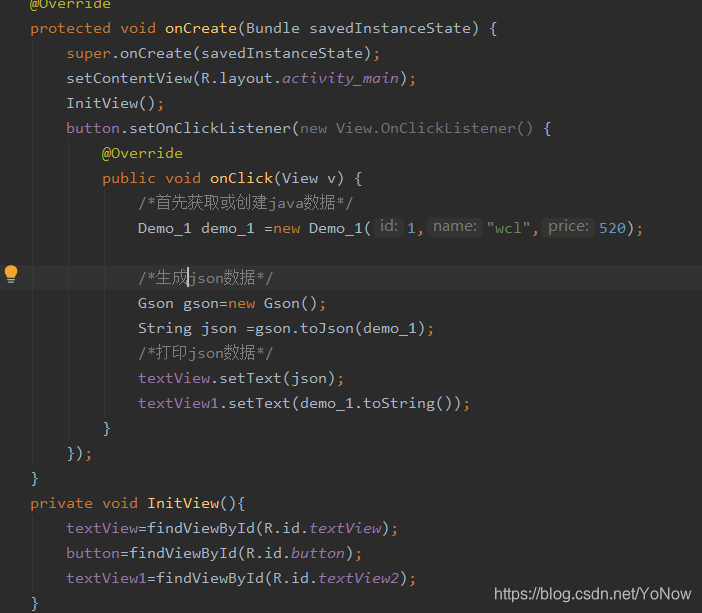
- 使用Gson将java对象转换为JSON字符串
- 使用Gson将List转换为JSON字符串
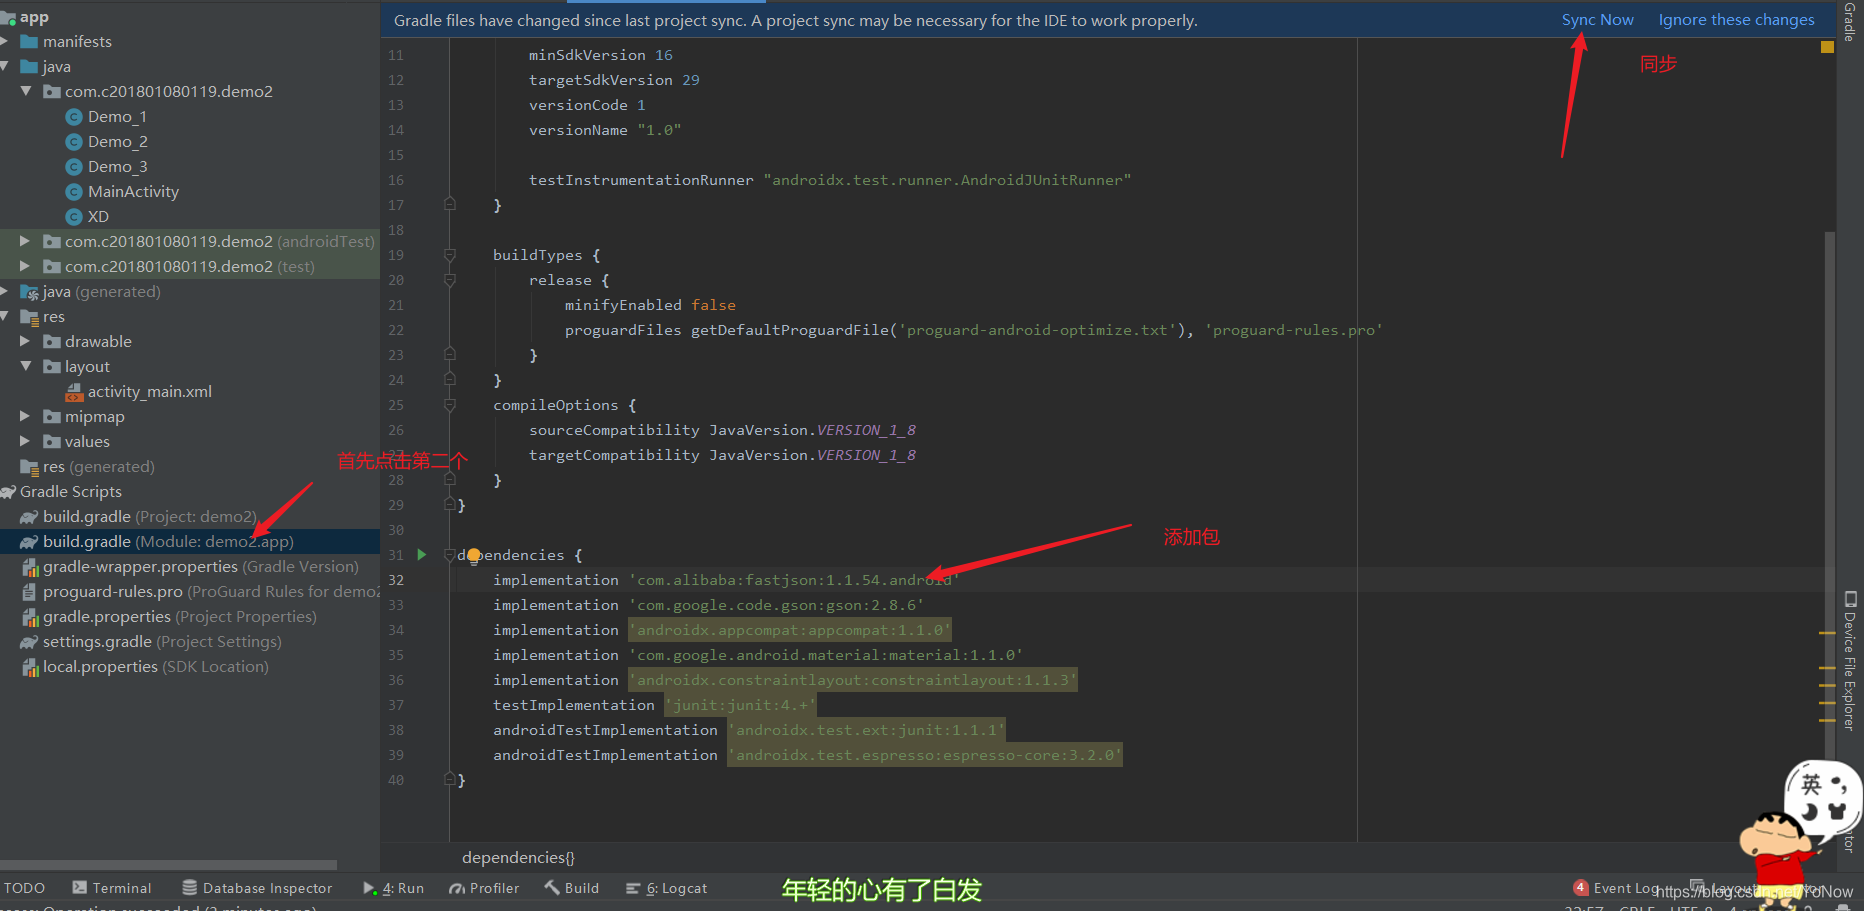
- 如何导入FastJson包(其用法和Gson差不多)
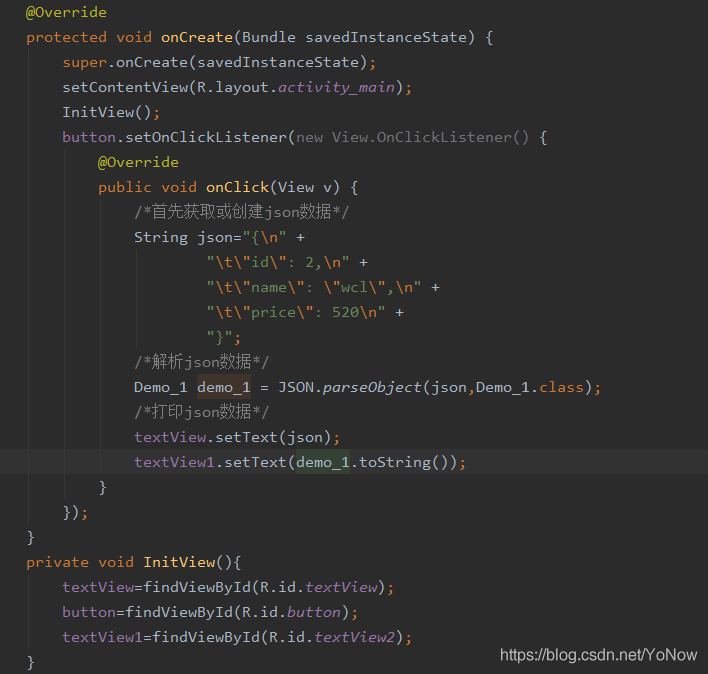
- 使用FastJson将Json格式的字符串转换为Java对象
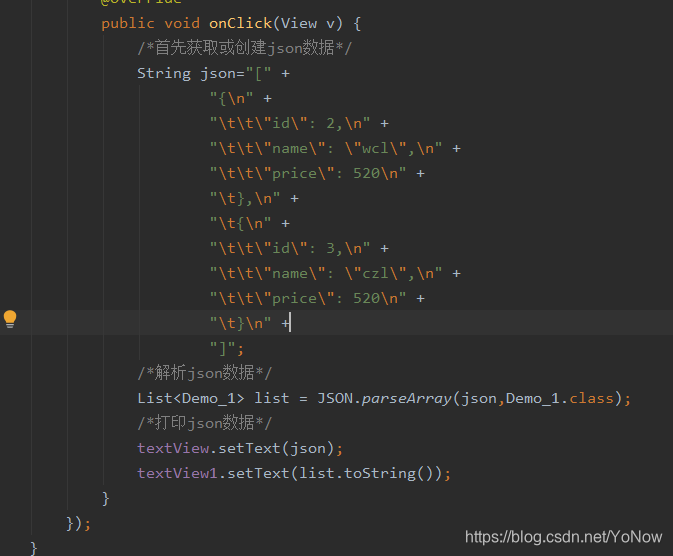
- 使用Fastjson将Json格式的字符串转换为Java对象的List
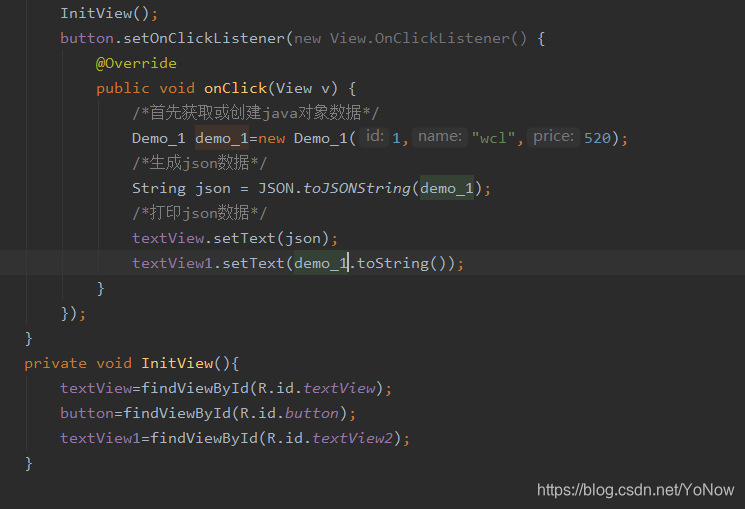
- 使用FastJson将java对象转换为JSON字符串
- 使用Fastjson将List转换为JSON字符串
手动解析JSON、Gson框架技术和FastJson框架技术
接下来这段时间我会不定期的更新博客,大多数是关于Android方面,后续也会提供一些面试经验等等。
JSON的简介
JSON(JavaScript Object Notation, JS 对象简谱) 是一种轻量级的数据交换格式,解析Json数据首先是需要获取或者创建一个json数据,然后再一步步把数据进行解析。在接下来每次做测试的时候,我都会给大家提供一个json的测试数据。
JSON对象转换为Java对象
测试数据:
{
“id”: 2,
“name”: “wcl”,
“price”: 520
}
解析json数据的时候,第一步我们需要去获取json数据,然后才开始解析。
在解析数据的时候有两种方法:
- 采用jsonObject.getInt(),jsonObject.getString(),等方法去获取数据
- 采用jsonObject.optInt(),jsonObject.optString(),等方法去获取数据
两种方式都可以获得数据,没有什么多大的区别,建议采用第二种方式,因为第二种方式不会报告空指针异常的情况。
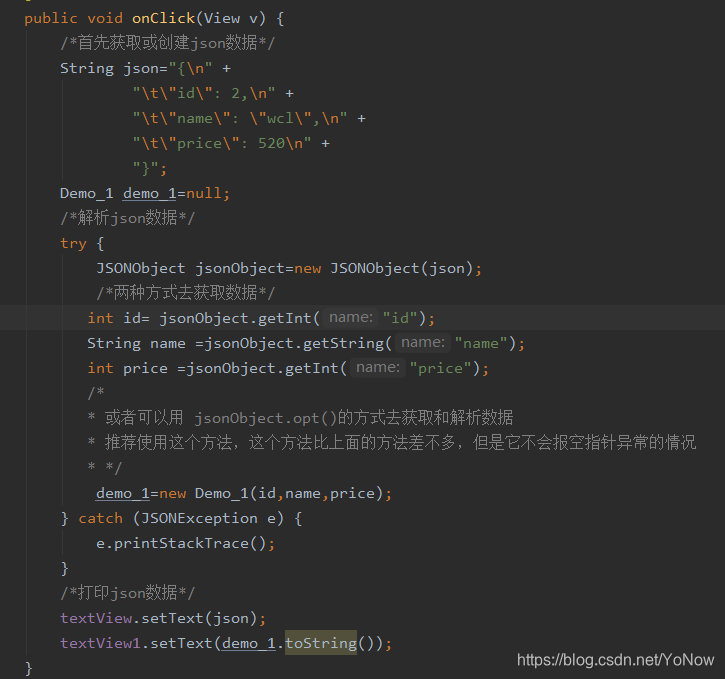
我在这里创建了一个Demo_1的class文件主要是为了存储解析后的json对象。
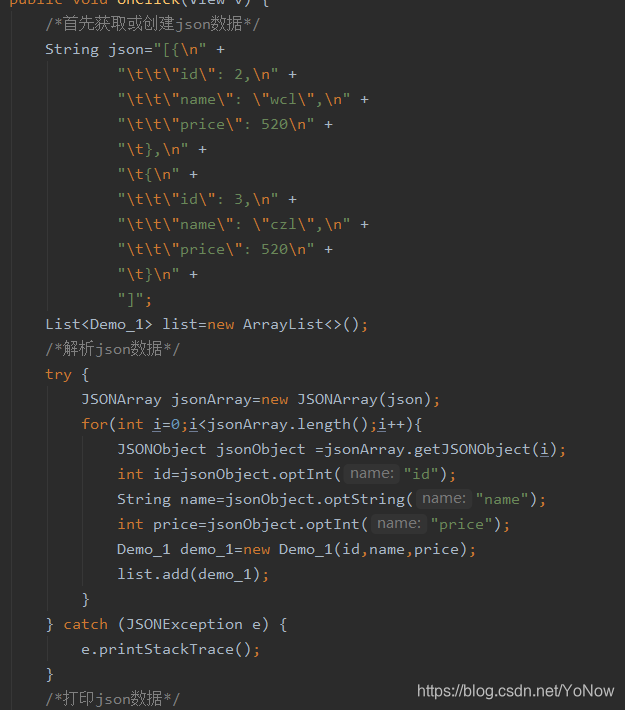
JSON数组转换为Java集合
json数据:
[
{
“id”: 2,
“name”: “wcl”,
“price”: 520
},
{
“id”: 3,
“name”: “czl”,
“price”: 520
}
]
解析JSON数组一般采用JSONArray去解析
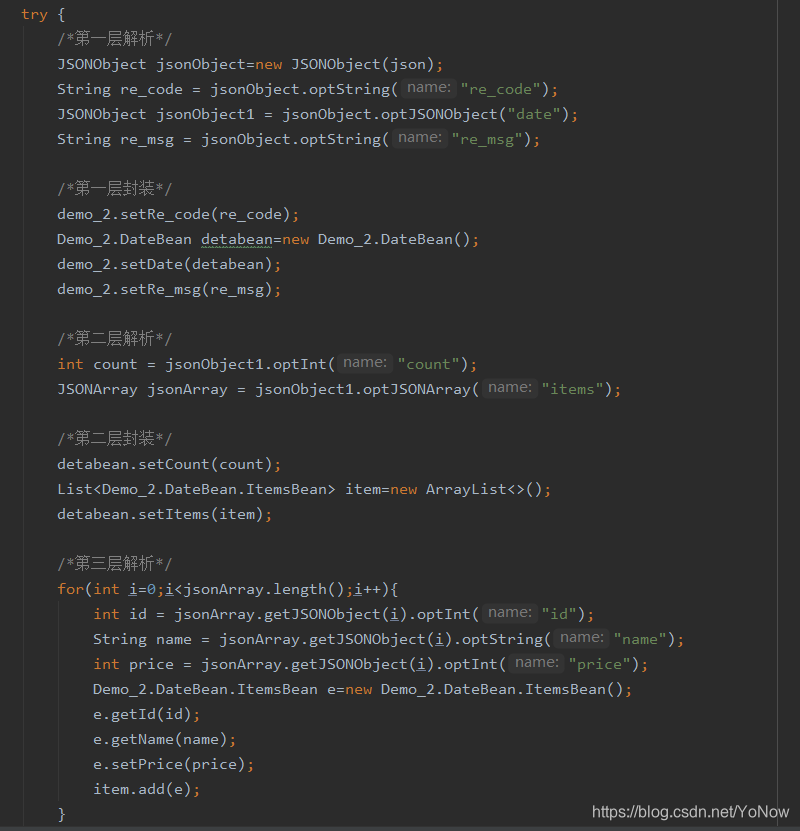
复杂的json数据的解析
json数据
{
“re_code”: “1000”,
“date”: {
“count”: 2,
“items”: [{
“id”: 2,
“name”: “wcl”,
“price”: 520
},
{
“id”: 3,
“name”: “czl”,
“price”: 520
}
]
},
“re_msg”: “success”
}
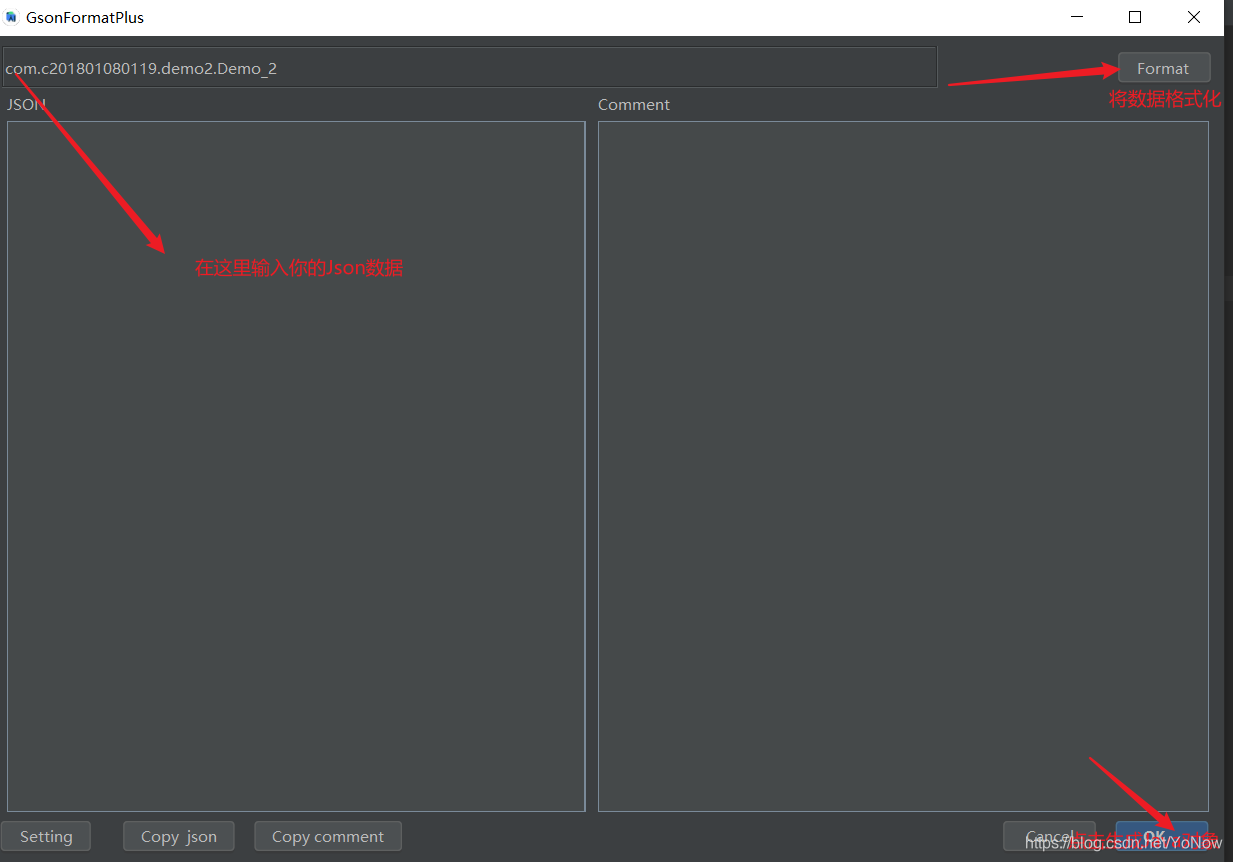
JSONFormat工具的安装


这一款工具是帮助我们快速生成JSON数据所对应的的Java对象的,使用方法Alt+Enter+s
特殊的JSON的数据解析
JSON数据:
{
“re_code”: “1000”,
“date”: {
“items”: {
“0”: {
“id”: 2,
“name”: “wcl”,
“price”: 520
},
“1”: {
“id”: 3,
“name”: “czl”,
“price”: 520
}
}
}
}
为什么说这是一个特殊的JSON数据呢,因为数字在Java中不能作为类名的,当我们用JSONFormat工具时会发现它并不会帮我正确的创建,那么我们该怎么办呢?
首先创建一个class类
import java.util.List;

public class Demo_3 {


    /**
     * re_code : 1000
     * date : {"items":{"0":{"id":2,"name":"wcl","price":520},"1":{"id":3,"name":"czl","price":520}}}
     */
    private String re_code;
    private List<FileBean> list;

    @Override
    public String toString() {


        return "Demo_3{" +
                "re_code='" + re_code + '\'' +
                ", list=" + list +
                '}';
    }

    public String getRe_code() {


        return re_code;
    }

    public void setRe_code(String re_code) {


        this.re_code = re_code;
    }

    public List<FileBean> getList() {


        return list;
    }

    public void setList(List<FileBean> list) {


        this.list = list;
    }

    public static class FileBean{


        private int id;

        public int getId() {


            return id;
        }

        public void setId(int id) {


            this.id = id;
        }

        public String getName() {


            return name;
        }

        public void setName(String name) {


            this.name = name;
        }

        public int getPrice() {


            return price;
        }

        public void setPrice(int price) {


            this.price = price;
        }

        private String name ;
        private int price;

        @Override
        public String toString() {


            return "FileBean{" +
                    "id=" + id +
                    ", name='" + name + '\'' +
                    ", price=" + price +
                    '}';
        }
    }
}
其次我们再来解析JSON数据
package com.c201801080119.demo2;

import androidx.appcompat.app.AppCompatActivity;

import android.os.Bundle;
import android.view.View;
import android.widget.Button;
import android.widget.TextView;

import org.json.JSONArray;
import org.json.JSONException;
import org.json.JSONObject;

import java.util.ArrayList;
import java.util.List;

public class MainActivity extends AppCompatActivity {


    private Button button;
    private TextView textView;
    private TextView textView1;
    @Override
    protected void onCreate(Bundle savedInstanceState) {


        super.onCreate(savedInstanceState);
        setContentView(R.layout.activity_main);
        InitView();
        button.setOnClickListener(new View.OnClickListener() {


            @Override
            public void onClick(View v) {


                /*首先获取或创建json数据*/
                String json="{\n" +
                        "\t\"re_code\": \"1000\",\n" +
                        "\t\"date\": {\n" +
                        "\t\t\"items\": {\n" +
                        "\t\t\t\"0\": {\n" +
                        "\t\t\t\t\"id\": 2,\n" +
                        "\t\t\t\t\"name\": \"wcl\",\n" +
                        "\t\t\t\t\"price\": 520\n" +
                        "\t\t\t},\n" +
                        "\t\t\t\"1\": {\n" +
                        "\t\t\t\t\"id\": 3,\n" +
                        "\t\t\t\t\"name\": \"czl\",\n" +
                        "\t\t\t\t\"price\": 520\n" +
                        "\t\t\t}\n" +
                        "\t\t}\n" +
                        "\t}\n" +
                        "}";
                Demo_3 demo_3=new Demo_3();
                /*解析json数据*/
                try {


                    /*第一层解析*/
                    JSONObject jsonObject=new JSONObject(json);
                    String re_code = jsonObject.optString("re_code");
                    JSONObject list = jsonObject.optJSONObject("date");
                    /*第一层封装*/
                    demo_3.setRe_code(re_code);
                    List<Demo_3.FileBean> lists=new ArrayList<>();
                    demo_3.setList(lists);

                    /*第二层解析*/
                    for(int i=0;i<list.length();i++){


                        JSONObject jsonObject1 = list.optJSONObject(i + "");
                        if(jsonObject1!=null){


                            int id = jsonObject1.optInt("id");
                            String name = jsonObject1.optString("name");
                            int price = jsonObject1.optInt("price");
                            /*第二层封装*/
                            Demo_3.FileBean fileBean=new Demo_3.FileBean();
                            fileBean.setId(id);
                            fileBean.setName(name);
                            fileBean.setPrice(price);
                            lists.add(fileBean);
                        }
                    }


                } catch (JSONException e) {


                    e.printStackTrace();
                }
                /*打印json数据*/
                textView.setText(json);
                textView1.setText(demo_3.toString());
            }
        });
    }
    private void InitView(){


        textView=findViewById(R.id.textView);
        button=findViewById(R.id.button);
        textView1=findViewById(R.id.textView2);
    }
}
安装Gson
使用Gson将Json格式的字符串转换为Java对象
json数据:
{
“id”: 2,
“name”: “wcl”,
“price”: 520
}
使用Gson将Json格式的字符串转换为Java对象的List
json数据
[{
“id”: 2,
“name”: “wcl”,
“price”: 520
},
{
“id”: 3,
“name”: “czl”,
“price”: 520
}
]
使用Gson将java对象转换为JSON字符串
使用Gson将List转换为JSON字符串

如何导入FastJson包(其用法和Gson差不多)
使用FastJson将Json格式的字符串转换为Java对象
json数据:
{
“id”: 2,
“name”: “wcl”,
“price”: 520
}
使用Fastjson将Json格式的字符串转换为Java对象的List
json数据
[{
“id”: 2,
“name”: “wcl”,
“price”: 520
},
{
“id”: 3,
“name”: “czl”,
“price”: 520
}
]
使用FastJson将java对象转换为JSON字符串
使用Fastjson将List转换为JSON字符串
