Activity的创建
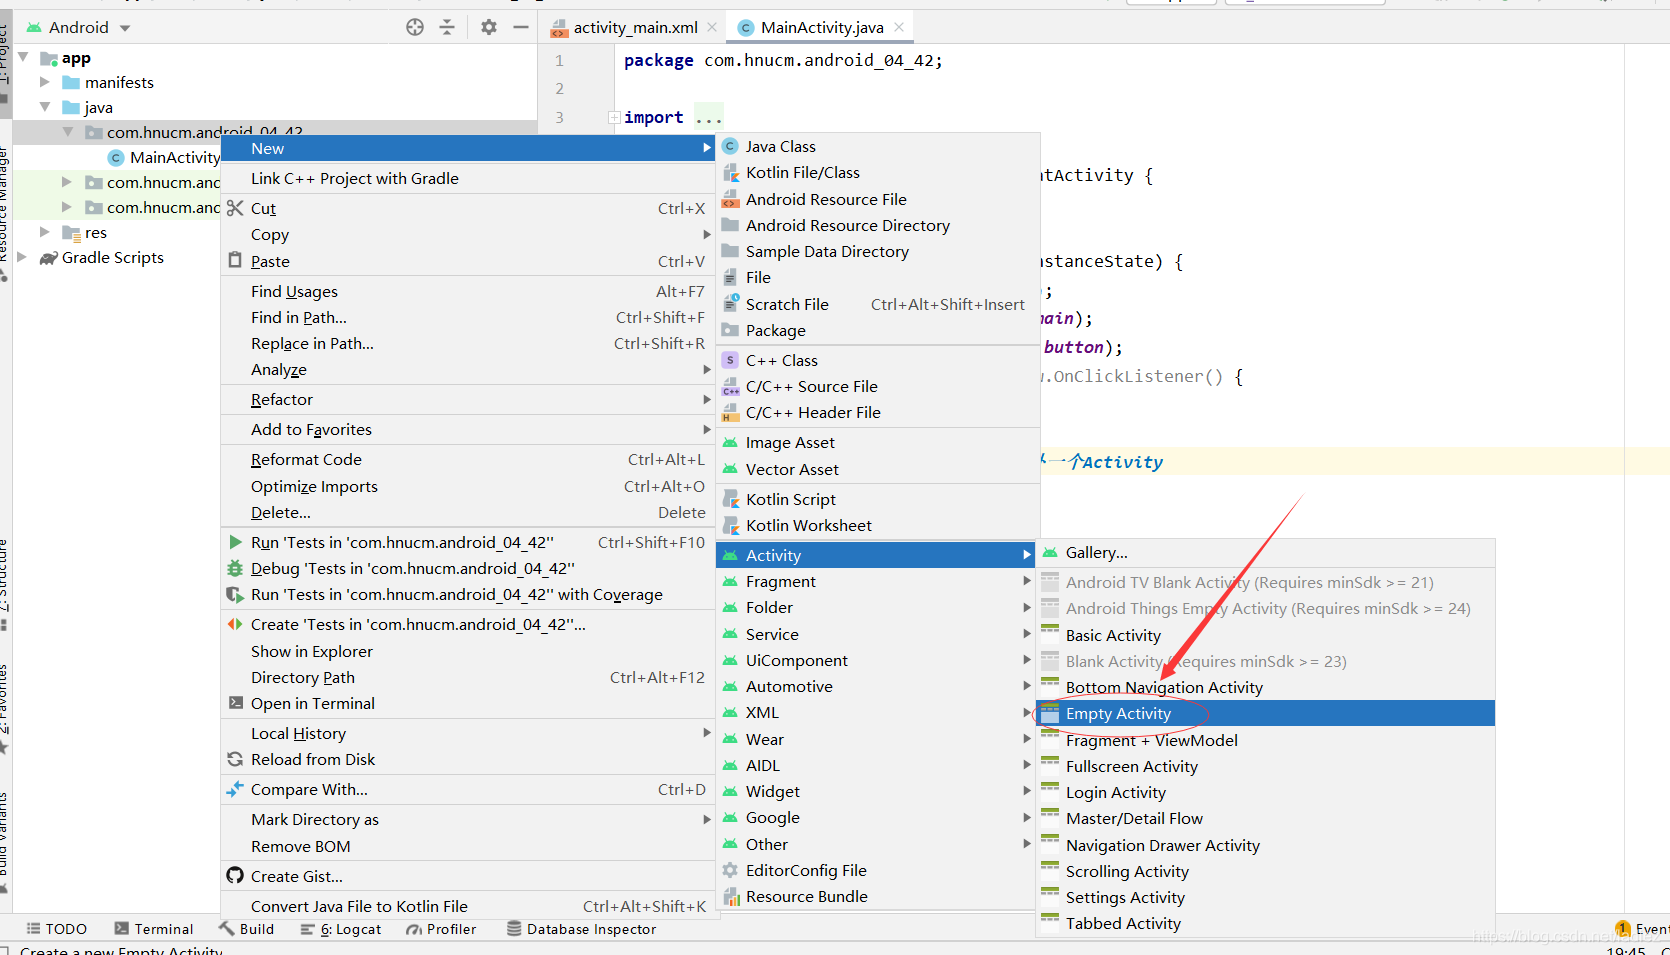
如下操作

我们创建的activity命名为MainActivity2,后面简称为Activity2,默认的简称为Activity。然后会生成一个java文件和一个xml布局。

所有的activity都一定要在manifests中注册,刚刚创建的过程会自动注册。

简单跳转案例
核心代码
Intent intent=new Intent(MainActivity.this,MainActivity2.class);
startActivity(intent);
这里就不贴xml布局了,这个案例的组件只有一个button,用来实现简单跳转。
Activity
package com.hnucm.android_04_42;

import androidx.appcompat.app.AppCompatActivity;

import android.content.Intent;
import android.os.Bundle;
import android.view.View;
import android.widget.Button;

public class MainActivity extends AppCompatActivity {


    @Override
    protected void onCreate(Bundle savedInstanceState) {


        super.onCreate(savedInstanceState);
        setContentView(R.layout.activity_main);
        Button button = findViewById(R.id.button);
        button.setOnClickListener(new View.OnClickListener() {


            @Override
            public void onClick(View v) {


                // TODO: 点击按钮跳转到另外一个Activity
//                第一步:创建一个activity
//                跳转到第二个activity
                Intent intent=new Intent(MainActivity.this,MainActivity2.class);
                startActivity(intent);
            }
        });
    }
}
Activity
package com.hnucm.android_04_42;

import androidx.appcompat.app.AppCompatActivity;

import android.os.Bundle;

public class MainActivity2 extends AppCompatActivity {


    @Override
    protected void onCreate(Bundle savedInstanceState) {


        super.onCreate(savedInstanceState);
        setContentView(R.layout.activity_main2);
    }
}
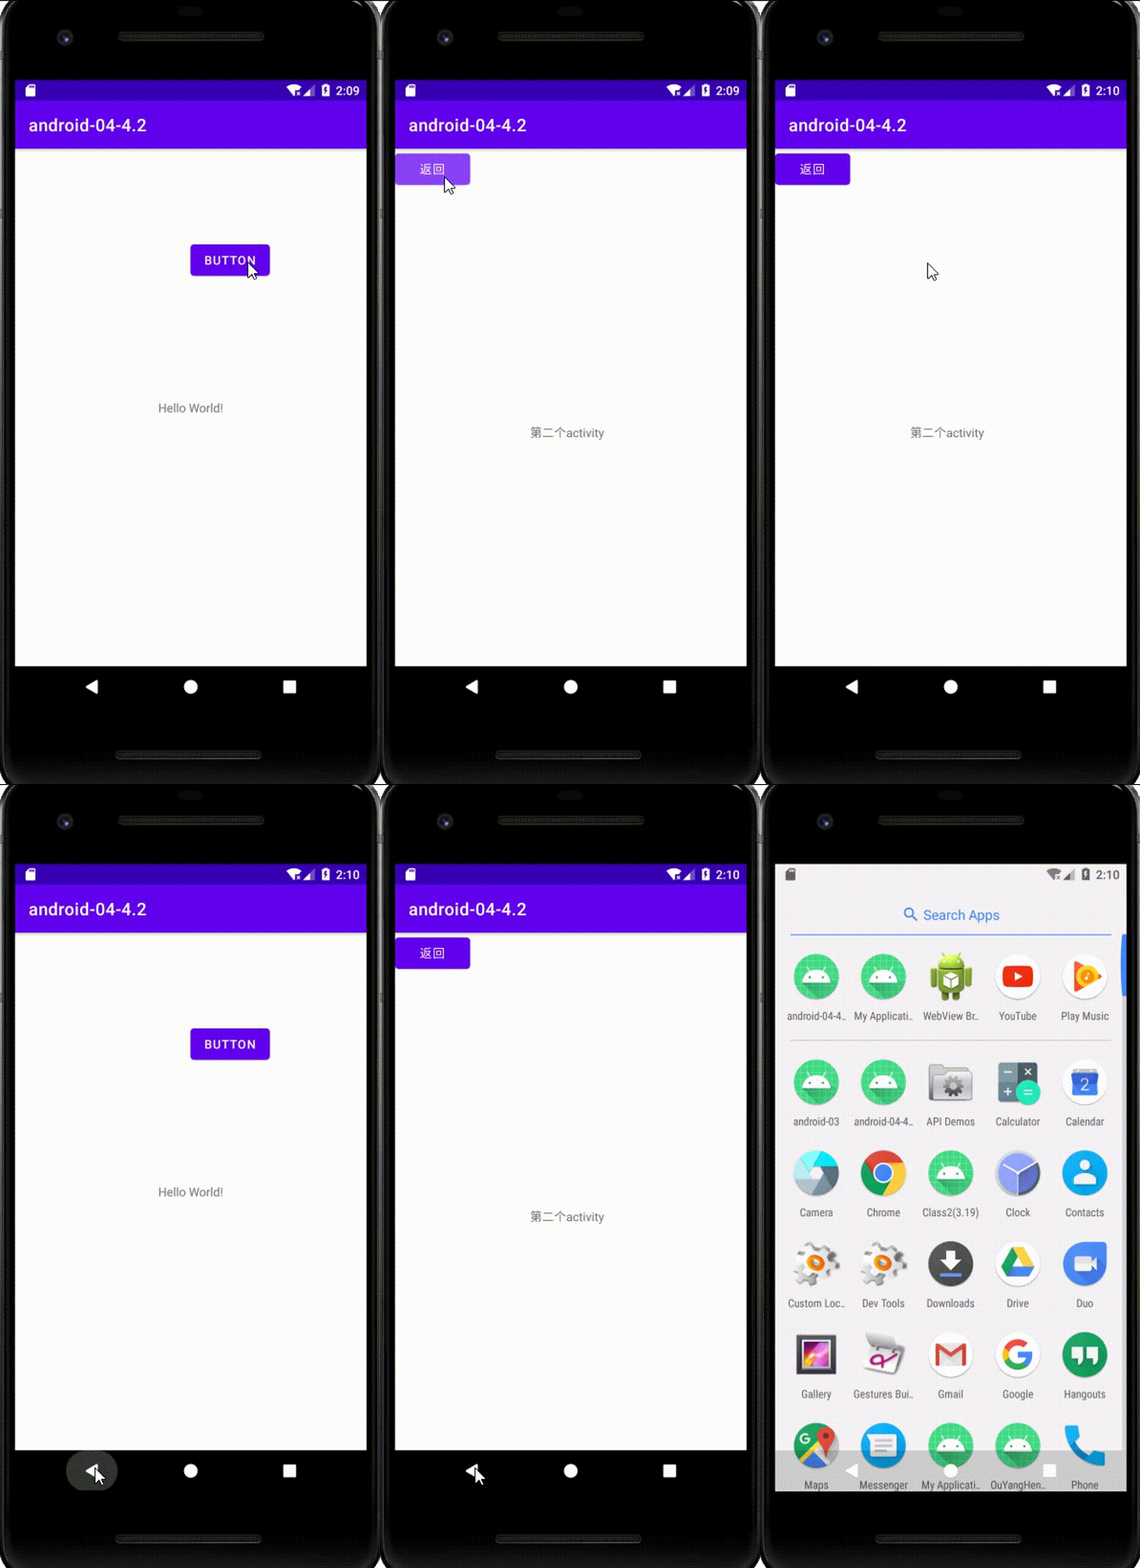
结果


默认的界面是哪一个?

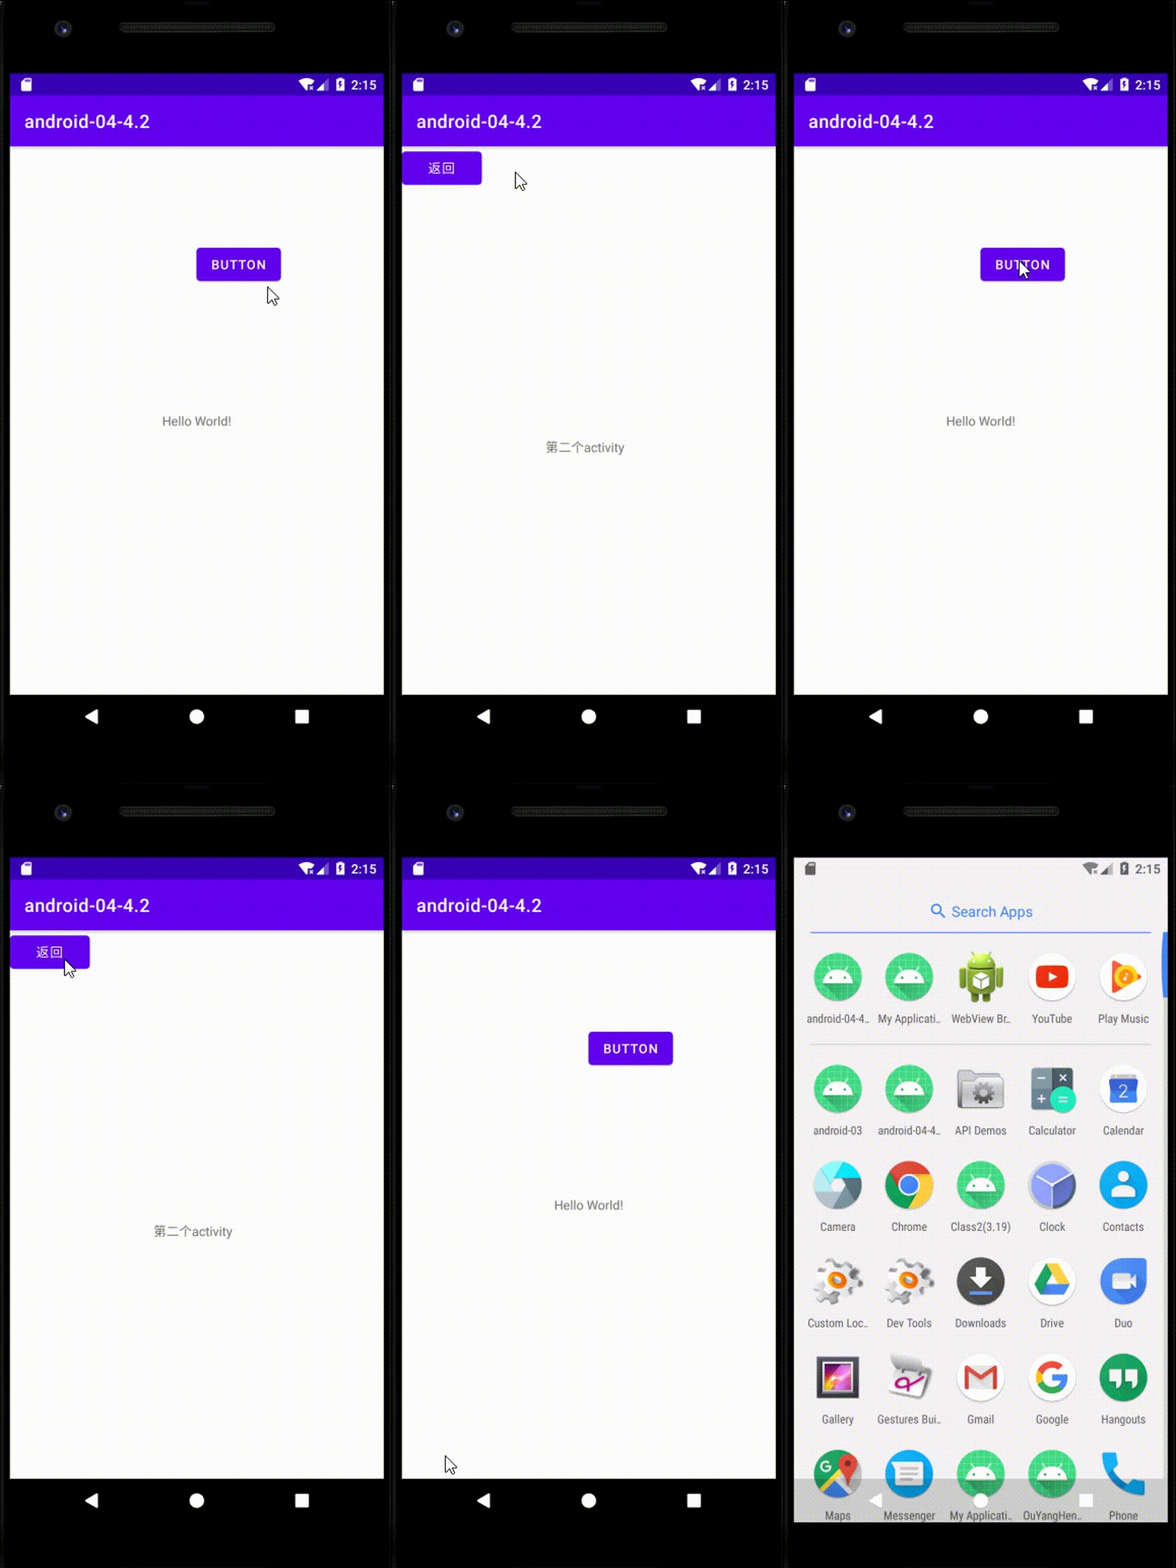
实现跳转后返回到原来的页面
修改Activity2
package com.hnucm.android_04_42;

import androidx.appcompat.app.AppCompatActivity;

import android.content.Intent;
import android.os.Bundle;
import android.view.View;
import android.widget.Button;

public class MainActivity2 extends AppCompatActivity {


    @Override
    protected void onCreate(Bundle savedInstanceState) {


        super.onCreate(savedInstanceState);
        setContentView(R.layout.activity_main2);

        Button button = findViewById(R.id.button2);
        button.setOnClickListener(new View.OnClickListener() {


            @Override
            public void onClick(View v) {


                // TODO 返回到上一个acticity
                //finish();
                Intent intent=new Intent(MainActivity2.this,MainActivity.class);
                startActivity(intent);
            }
        });
    }
}

从上面的示例我们看出来,我们分别点了两次跳转和返回,但是点击左下角手机自带的返回点了五次才回到了桌面
这是为什么呢?
因为activity任务栈机制
Activity任务栈机制

每次使用Intent跳转,都会在安卓的任务栈中产生一个新的Activity,压入栈顶。而我们点击右下角返回时是不断出栈的过程,才导致了上述的情况。而我们想要实现的是只启动一个Activity和一个Activity2就可以了。
解决方法:finish方式把activity清除


实现跳转后传值
方法一
比之前的跳转案例多了两行代码,xml布局中加入了两个文本框
将两个文本框中的值传递
Activity代码
核心代码
intent.putExtra("name",nameTv.getText().toString());
intent.putExtra("price",priceTv.getText().toString());
package com.hnucm.android_04_42;

import androidx.appcompat.app.AppCompatActivity;

import android.content.Intent;
import android.os.Bundle;
import android.view.View;
import android.widget.Button;
import android.widget.TextView;

public class MainActivity extends AppCompatActivity {


    @Override
    protected void onCreate(Bundle savedInstanceState) {


        super.onCreate(savedInstanceState);
        setContentView(R.layout.activity_main);
        Button button = findViewById(R.id.button);
        TextView nameTv=findViewById(R.id.textView);
        TextView priceTv=findViewById(R.id.textView3);

        button.setOnClickListener(new View.OnClickListener() {


            @Override
            public void onClick(View v) {


                // TODO: 点击按钮跳转到另外一个Activity
//                第一步:创建一个activity
//                跳转到第二个activity
//                页面的值传过去
                Intent intent=new Intent(MainActivity.this,MainActivity2.class);

                intent.putExtra("name",nameTv.getText().toString());
                intent.putExtra("price",priceTv.getText().toString());
                startActivity(intent);
            }
        });
    }
}
activity2代码
核心代码(接收值)
String name = getIntent().getStringExtra("name");
String price = getIntent().getStringExtra("price");
package com.hnucm.android_04_42;

import androidx.appcompat.app.AppCompatActivity;

import android.content.Intent;
import android.os.Bundle;
import android.view.View;
import android.widget.Button;
import android.widget.TextView;

public class MainActivity2 extends AppCompatActivity {


    @Override
    protected void onCreate(Bundle savedInstanceState) {


        super.onCreate(savedInstanceState);
        setContentView(R.layout.activity_main2);
//接收上一个页面传过来的值
        String name = getIntent().getStringExtra("name");
        String price = getIntent().getStringExtra("price");

        TextView nameTv=findViewById(R.id.textView4);
        TextView priceTv=findViewById(R.id.textView5);

        nameTv.setText(name);
        priceTv.setText(price);

        Button button = findViewById(R.id.button2);
        button.setOnClickListener(new View.OnClickListener() {


            @Override
            public void onClick(View v) {


                // TODO 返回到上一个acticity
                finish();
                //Intent intent=new Intent(MainActivity2.this,MainActivity.class);
                //startActivity(intent);
            }
        });
    }
}
跳转前

跳转后,原本的文本是默认的,跳转后前一个页面的值传递过来了

方法二:
当参数很多的话 把参数打包放到一个对象传过去
新建一个Product类
package com.hnucm.android_04_42;

import java.io.Serializable;

public class Product implements Serializable {


    private String name;
    private String price;

    public String getName() {


        return name;
    }

    public void setName(String name) {


        this.name = name;
    }

    public String getPrice() {


        return price;
    }

    public void setPrice(String price) {


        this.price = price;
    }
}
Activity代码
核心代码
Product product=new Product();
product.setName(nameTv.getText().toString());
product.setPrice(priceTv.getText().toString());
intent.putExtra("product",product);
package com.hnucm.android_04_42;

import androidx.appcompat.app.AppCompatActivity;

import android.content.Intent;
import android.os.Bundle;
import android.view.View;
import android.widget.Button;
import android.widget.TextView;

public class MainActivity extends AppCompatActivity {


    @Override
    protected void onCreate(Bundle savedInstanceState) {


        super.onCreate(savedInstanceState);
        setContentView(R.layout.activity_main);
        Button button = findViewById(R.id.button);
        TextView nameTv=findViewById(R.id.textView);
        TextView priceTv=findViewById(R.id.textView3);

        button.setOnClickListener(new View.OnClickListener() {


            @Override
            public void onClick(View v) {


                // TODO: 点击按钮跳转到另外一个Activity
//                第一步:创建一个activity
//                跳转到第二个activity
//                页面的值传过去
                Intent intent=new Intent(MainActivity.this,MainActivity2.class);
//                当参数很多的话   把参数打包放到一个对象传过去
                Product product=new Product();
                product.setName(nameTv.getText().toString());
                product.setPrice(priceTv.getText().toString());
                intent.putExtra("product",product);

                //intent.putExtra("name",nameTv.getText().toString());
                //intent.putExtra("price",priceTv.getText().toString());
                startActivity(intent);
            }
        });
    }
}
Activity2代码
核心代码
Product product = (Product) getIntent().getSerializableExtra("product");
nameTv.setText(product.getName());
priceTv.setText(product.getPrice());
package com.hnucm.android_04_42;

import androidx.appcompat.app.AppCompatActivity;

import android.content.Intent;
import android.os.Bundle;
import android.view.View;
import android.widget.Button;
import android.widget.TextView;

import java.io.Serializable;

public class MainActivity2 extends AppCompatActivity {


    @Override
    protected void onCreate(Bundle savedInstanceState) {


        super.onCreate(savedInstanceState);
        setContentView(R.layout.activity_main2);
//接收上一个页面传过来的值
//String name = getIntent().getStringExtra("name");
//String price = getIntent().getStringExtra("price");
        Product product = (Product) getIntent().getSerializableExtra("product");


        TextView nameTv=findViewById(R.id.textView4);
        TextView priceTv=findViewById(R.id.textView5);

        nameTv.setText(product.getName());
        priceTv.setText(product.getPrice());

        Button button = findViewById(R.id.button2);
        button.setOnClickListener(new View.OnClickListener() {


            @Override
            public void onClick(View v) {


                // TODO 返回到上一个acticity
                finish();
                //Intent intent=new Intent(MainActivity2.this,MainActivity.class);
                //startActivity(intent);
            }
        });
    }
}
实现Activity跳转回传值
在很多的时候我们需要将跳转后的页面修改的值回传,那么我们要做的操作如下。
在刚刚跳转的基础上修改
Activity代码
核心代码
startActivityForResult(intent,0);
 @Override
    protected void onActivityResult(int requestCode, int resultCode, @Nullable Intent data) {


        super.onActivityResult(requestCode, resultCode, data);

        String s = data.getStringExtra("price");
        priceTv.setText(s);
    }

重写方法

activity2代码
在前一个案例的基础上加了以下核心代码
核心代码
//                把值传回去
                Intent intent=getIntent();
                intent.putExtra("price",priceTv.getText().toString());
                setResult(1,intent);
                finish();

activity_main代码
<?xml version="1.0" encoding="utf-8"?>
<androidx.constraintlayout.widget.ConstraintLayout xmlns:android="http://schemas.android.com/apk/res/android"
    xmlns:app="http://schemas.android.com/apk/res-auto"
    xmlns:tools="http://schemas.android.com/tools"
    android:layout_width="match_parent"
    android:layout_height="match_parent"
    tools:context=".MainActivity">

    <TextView
        android:id="@+id/textView"
        android:layout_width="wrap_content"
        android:layout_height="wrap_content"
        android:text="iphone 12"
        app:layout_constraintBottom_toBottomOf="parent"
        app:layout_constraintHorizontal_bias="0.478"
        app:layout_constraintLeft_toLeftOf="parent"
        app:layout_constraintRight_toRightOf="parent"
        app:layout_constraintTop_toBottomOf="@+id/button"
        app:layout_constraintVertical_bias="0.159" />

    <Button
        android:id="@+id/button"
        android:layout_width="wrap_content"
        android:layout_height="wrap_content"
        android:layout_marginTop="268dp"
        android:layout_marginEnd="156dp"
        android:layout_marginRight="156dp"
        android:text="跳转"
        app:layout_constraintEnd_toEndOf="parent"
        app:layout_constraintTop_toTopOf="parent" />

    <TextView
        android:id="@+id/textView3"
        android:layout_width="wrap_content"
        android:layout_height="wrap_content"
        android:layout_marginStart="4dp"
        android:layout_marginLeft="4dp"
        android:layout_marginTop="24dp"
        android:text="6999"
        app:layout_constraintStart_toStartOf="@+id/textView"
        app:layout_constraintTop_toBottomOf="@+id/textView" />

</androidx.constraintlayout.widget.ConstraintLayout>
activity_main2代码
<?xml version="1.0" encoding="utf-8"?>
<androidx.constraintlayout.widget.ConstraintLayout xmlns:android="http://schemas.android.com/apk/res/android"
    xmlns:app="http://schemas.android.com/apk/res-auto"
    xmlns:tools="http://schemas.android.com/tools"
    android:layout_width="match_parent"
    android:layout_height="match_parent"
    tools:context=".MainActivity2">

    <TextView
        android:id="@+id/textView2"
        android:layout_width="wrap_content"
        android:layout_height="wrap_content"
        android:layout_marginStart="168dp"
        android:layout_marginLeft="168dp"
        android:layout_marginTop="284dp"
        android:text="第二个activity"
        app:layout_constraintStart_toStartOf="parent"
        app:layout_constraintTop_toTopOf="parent" />

    <Button
        android:id="@+id/button2"
        android:layout_width="wrap_content"
        android:layout_height="wrap_content"
        android:layout_marginStart="12dp"
        android:layout_marginLeft="12dp"
        android:layout_marginBottom="88dp"
        android:text="返回"
        app:layout_constraintBottom_toTopOf="@+id/textView2"
        app:layout_constraintStart_toStartOf="@+id/textView2" />

    <TextView
        android:id="@+id/textView4"
        android:layout_width="wrap_content"
        android:layout_height="wrap_content"
        android:layout_marginTop="36dp"
        android:layout_marginEnd="12dp"
        android:layout_marginRight="12dp"
        android:text="TextView"
        app:layout_constraintEnd_toEndOf="@+id/textView2"
        app:layout_constraintTop_toBottomOf="@+id/textView2" />

    <EditText
        android:id="@+id/textView5"
        android:layout_width="wrap_content"
        android:layout_height="wrap_content"
        android:layout_marginTop="30dp"
        android:layout_marginEnd="3dp"
        android:layout_marginRight="3dp"
        android:text="TextView"
        app:layout_constraintEnd_toEndOf="@+id/textView4"
        app:layout_constraintTop_toBottomOf="@+id/textView4" />
</androidx.constraintlayout.widget.ConstraintLayout>
补充
以下两个都是生命周期函数

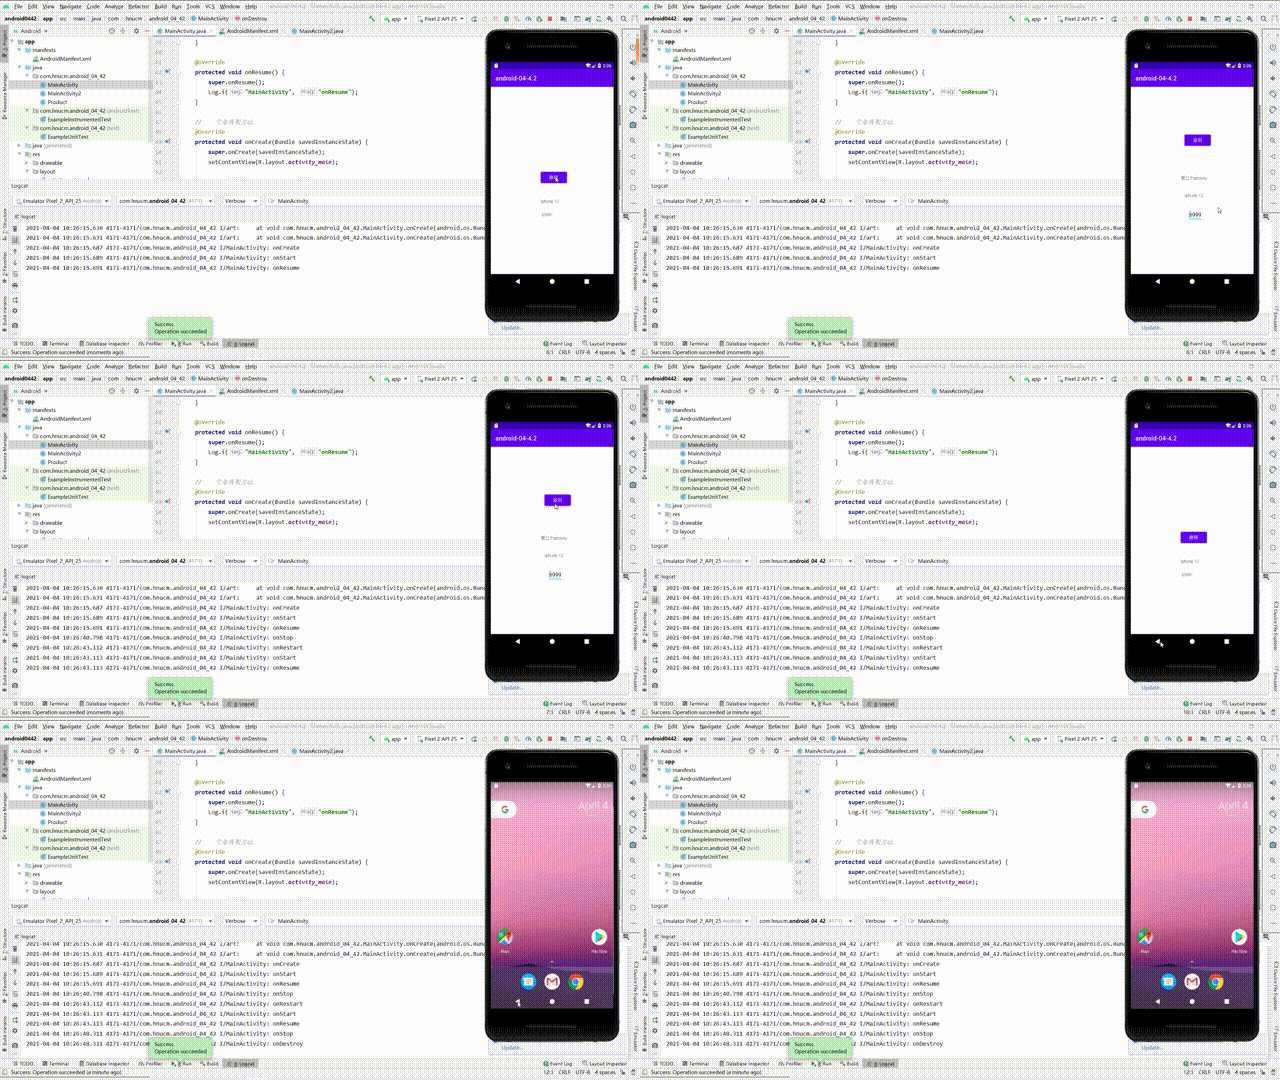
运行时出现顺序

跳转后返回本页面再次进入了onResume方法。
除了这两个生命周期函数
还有onStart(),onRestart(),onPause(),onStop(),onDestory()。
执行顺序如下

Android第一讲笔记(常用控件以及线性布局)
Android第二讲笔记(约束布局ConstraintLayout)
Android第三讲笔记(Activity简单操作)
欢迎批评指正…