C文件接口
写文件
#include<stdio.h>
#include<string.h>

int main(){


	FILE *fp=fopen("myfile.txt","w");
	if(!fp){


		printf("open error!\n");
		return 1;
	}
	const char *msg="Hello World!\n";
	//这里不用 +1,具体查看man手册对该函数得说明
	fwrite(msg,strlen(msg),1,fp);

	fclose(fp);
	return 0;
}
读文件
#include<stdio.h>
#include<string.h>

int main(){


  FILE * fp=fopen("myfile.txt","r");
  if(!fp){


    printf("open error!\n");
  }

  char buf[1024];
  ssize_t s=fread(buf,sizeof(char),sizeof(buf),fp);
  if(s>0){


    buf[s]=0;
    printf("%s\n",buf);

  }
  fclose(fp);

  return 0;
}
输出信息到显示器
#include<stdio.h>
#include<string.h>

int main(){


	  const char* msg="hello fwrite!!\n";
		//系统调用接口
	  fwrite(msg,sizeof(char),strlen(msg),stdout);
	  //直接向屏幕打印内容
	  printf("hello printf!!\n");
		//C提供的库函数,向显示器中打印
	  fprintf(stdout,"hello fprintf!!\n");

	  return 0;
}
stdin & stdout & stderr
C语言会默认打开三个输入输出流:
1.stdin(标准输出)。2.stdout(标准输入)。3.stderr(标准错误)。
这三个输入输出流都是FILE * 类型,文件指针类型。
打开文件方式
	   r      Open  text file for reading.  The stream is positioned at the beginning of the
              file.

       r+     Open for reading and writing.  The stream is positioned at  the  beginning  of
              the file.

       w      Truncate  file  to zero length or create text file for writing.  The stream is
              positioned at the beginning of the file.

       w+     Open for reading and writing.  The file is created if it does not exist,  oth‐
              erwise  it  is  truncated.   The  stream is positioned at the beginning of the
              file.

       a      Open for appending (writing at end of file).  The file is created if  it  does
              not exist.  The stream is positioned at the end of the file.

       a+     Open  for reading and appending (writing at end of file).  The file is created
              if it does not exist.  The initial file position for reading is at the  begin‐
              ning of the file, but output is always appended to the end of the file.
系统文件I/O
接口(open)介绍
#include <sys/types.h>
#include <sys/stat.h>
#include <fcntl.h>

int open(const char *pathname, int flags);
int open(const char *pathname, int flags, mode_t mode);

pathname: 要打开或创建的目标文件

flags: 打开文件时,可以传入多个参数选项,用下面的一个或者多个常量进行“或”运算,构成flags。

	参数:
		O_RDONLY: 只读打开
		O_WRONLY: 只写打开
		O_RDWR : 读,写打开
		这三个常量,必须指定一个且只能指定一个
		O_CREAT : 若文件不存在,则创建它。需要使用mode选项,来指明新文件的访问权限
		O_APPEND: 追加写
	返回值:
		成功:新打开的文件描述符
		失败:-1
write read close lseek ,类比C文件相关接口
系统调用和库函数
上面的fopen、fclose、fread、fwrite都是C标准库当中的函数,称为
库函数(libc)。
open、close、read、write、lseek都属于系统提供的接口,称为系统调用。
看操作系统层次结构图,我们就对系统调用接口和库函数清楚明了。我们可以认为C标准库当中的函数(f#系列)都是对系统调用接口的封装,方便二次开发。

open返回值
文件描述符 fd
通过对open函数的学习,文件描述符就是一个小整数。
0 & 1 & 2
Linux进程默认情况下会有3个缺省打开的文件描述符:标准输出0,标准输入1,标准错误2。
0,1,2对应的硬件设备一般是:键盘,显示器,显示器。

文件描述符就是一个从0开始的小整数。当我们打开文件时,OS在内存中要创建相应的数据结构来描述目标文件。于是有了file结构体,表示一个已经打开的文件对象。而进程执行open系统调用,所以必须让进程和文件关联起来。每个进程都有一个指针*files,指向一张表files_struct,该表最重要的部分就是一个指针数组,每个元素都有一个指向打开文件的指针!所以,本质上,文件描述符就是该数组的下标。所以只要拿到文件描述符,就可以找到对应的文件。每个struct file中包含了打开文件的相关内容和一些列的函数指针,这样只需要读写相对应的函数指针就能够对每个文件进行读写操作。
文件描述符的分配规则
文件描述符的分配规则:在files_struct数组当中,找到当前没有被使用的最小的一个下标,作为新的文件描述符。
重定向
#include<stdio.h>
#include<sys/stat.h>
#include<sys/wait.h>
#include<fcntl.h>
#include<string.h>
#include<unistd.h>

int main(){


  close(1);
  int fd=open("log.txt",O_CREAT | O_WRONLY ,0644);

  if(fd<0){


    printf("open error!!\n");
  }

  const char* str1="hello world!!: printf";

  printf("%s\n",str1);

  fflush(stdout);

  close(fd);
  return 0;
}
此时我们发现本来应该输出到显示器的内容,输出到了文件log.txt当中,其中fd=1,这种现象叫做输出重定向。常见的重定向有:>、>>、<
本质

我们知道对于标准输出默认打开的是fd=1的文件描述符,那么当我们关闭标准输出时,当我们打开文件log.txt。系统会为log.txt分配最小未使用的文件描述符,就是我们刚刚关闭的文件,所以给log.txt分配的文件描述符就是1。所以这时当我们调用printf库函数时,这时就会往文件描述符为1的那个文件里面写内容,就是我们刚刚打开的那个文件。这就是重定向。
本质
因为IO相关函数与系统调用接口对应,并且库函数封装系统调用,所以本质上,访问文件都是 通过fd来访问的。
所以可以推断,C库函数当中的FILE结构体必定封装了文件描述符fd。
实验代码
#include<stdio.h>
#include<sys/stat.h>
#include<sys/wait.h>
#include<fcntl.h>
#include<string.h>
#include<unistd.h>


int main(){


  close(1);
  int fd=open("log.txt",O_CREAT | O_WRONLY ,0644);
  if(fd<0){


    printf("open error!!\n");
  }

  const char* msg="hello world!!\n";

  const char* str1="hello world!!: printf";

  const char* str2="hello world!!: fprintf";

  write(fd,msg,strlen(msg));
  printf("%s\n",str1);

  fprintf(stdout,"%s\n",str2);


  fork();
  fflush(stdout);

  close(fd);
  return 0;
}
运行结果
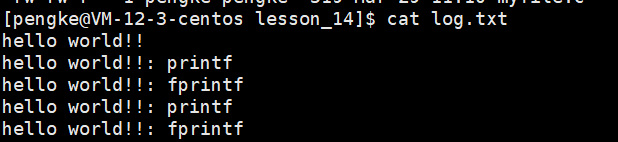
我们发现 printf 和 fprintf (库函数) 都打印了两次,而write系统调用只打印了一次。这是为什么?这肯定和fork有关。
一般C库函数写
文件时是全缓冲,而显示器是行缓冲。
printf和fprintf库函数是自带缓冲区的,当发生重定向时,由输出数据到显示器变为输出到文件,所以缓冲方式由行缓冲变为了全缓冲。
而我们放在缓冲区的数据不会立即刷新,甚至fork之后。
但是当我们进程结束时,会统一刷新到文件。
但是当fork的时候,父子进程会发生写时拷贝,所以当父进程刷新数据的时候,子进程也有了相同的一份数据,子进程也会刷新,所以也就会产生两份数据。
write没有变化,所以没有所谓的缓冲区。
综上所述:printf和fprintf这些库函数会自带缓冲区,而write系统调用没有带缓冲区。我们这里所说的都是用户级缓冲区,其实为了提升整体性能,OS也会提供相关内核级缓冲区,不过不再我们讨论范围之内。那这个缓冲区谁提供呢? printf fprintf 是库函数, write 是系统调用,库函数在系统调用的“上层”, 是对系统调用的“封装”,但是 write 没有缓冲区,而 printf fwrite 有,足以说明,该缓冲区是二次加上的,由C标准库提供。
// 在/usr/include/libio.h
struct _IO_FILE {


	int _flags; /* High-order word is _IO_MAGIC; rest is flags. */
	#define _IO_file_flags _flags

	//缓冲区相关
	/* The following pointers correspond to the C++ streambuf protocol. */
	/* Note: Tk uses the _IO_read_ptr and _IO_read_end fields directly. */
	char* _IO_read_ptr; /* Current read pointer */
	char* _IO_read_end; /* End of get area. */
	char* _IO_read_base; /* Start of putback+get area. */
	char* _IO_write_base; /* Start of put area. */
	char* _IO_write_ptr; /* Current put pointer. */
	char* _IO_write_end; /* End of put area. */
	char* _IO_buf_base; /* Start of reserve area. */
	char* _IO_buf_end; /* End of reserve area. */
	/* The following fields are used to support backing up and undo. */
	char *_IO_save_base; /* Pointer to start of non-current get area. */
	char *_IO_backup_base; /* Pointer to first valid character of backup area */
	char *_IO_save_end; /* Pointer to end of non-current get area. */
	struct _IO_marker *_markers;
	struct _IO_FILE *_chain;

	int _fileno; //封装的文件描述符,就是fd,对于stdin:_fileno=0,stdout:_fileno=1,stderr:_fileno=2
	#if 0
	int _blksize;
	#else
	int _flags2;
	#endif
	_IO_off_t _old_offset; /* This used to be _offset but it's too small. */
	#define __HAVE_COLUMN /* temporary */
	/* 1+column number of pbase(); 0 is unknown. */
	unsigned short _cur_column;
	signed char _vtable_offset;
	char _shortbuf[1];
	/* char* _save_gptr; char* _save_egptr; */
	_IO_lock_t *_lock;
	#ifdef _IO_USE_OLD_IO_FILE
};
使用dup2系统调用实现重定向
#include<unistd.h>

int dup2(int oldfd,int newfd);

//若成功则为非负的描述符,若出错则为-1
dup2函数复制描述符表表项oldfd到描述符表表项newfd,覆盖描述符表表项newfd以前的内容,若newfd已经打开,dup2会在复制oldfd之前关闭newfd。
dup2(4,1)
调用dup2之前,fd=1(标准输出)对应的文件A,fd=4对应文件B。A和B的引用计数都为1。调用之后,两个文件描述符都指向B;文件A已经关闭,并且它的文件表和v-node表表项已经删除。文件B的计数引用已经增加。从此以后,任何写到标准输出的数据都被重定向到文件B。

文件系统
我们使用ls -l 的时候看到的除了文件名,还看到了文件元数据。
[root@VM-12-3-centos pengke]# ls -l
total 40
drwxrwxr-x 7 pengke pengke  4096 Mar 26 17:14 BitStudy
-rw-rw-r-- 1 pengke pengke   827 Mar 20 15:05 install.sh
drwxrwxr-x 4 pengke pengke  4096 Mar 30 12:20 Linux
-rwxrwxr-x 1 pengke pengke 21784 Mar 20 20:14 sort
drwxrwxr-x 3 pengke pengke  4096 Mar 26 17:12 test
ls -l 读取存储在磁盘上的文件信息,然后显示出来。其实除了这种方式可以读取出来还可以用命令stat命令读取文件的更多信息。
[root@VM-12-3-centos Linux]# stat Mystring.h
  File: ‘Mystring.h’
  Size: 2493      	Blocks: 8          IO Block: 4096   regular file
Device: fd01h/64769d	Inode: 793845      Links: 1
Access: (0664/-rw-rw-r--)  Uid: ( 1001/  pengke)   Gid: ( 1001/  pengke)
Access: 2021-03-28 08:55:36.174026236 +0800
Modify: 2021-03-28 08:55:36.172026228 +0800
Change: 2021-03-28 08:55:36.172026228 +0800
 Birth: -
inode
为了搞清楚inode我们先来看看文件系统:
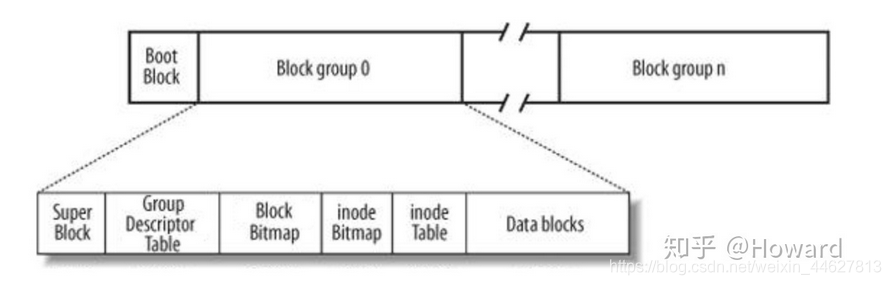
Linux ext2文件系统,上图是磁盘文件系统图(内核内存映像肯定有所不同),磁盘是典型的块设备,硬盘分区被划分为一个个block。一个block的大小是由格式化的时候确定的,并且不可以更改的,例如mke2fs的-b选项可以设定block大小为1024、2048或4096字节。而上图中启动块(Boot Block)的大小是确定的。
Block Group:ext2文件系统会根据分区的大小划分为数个Block Group。而每个Block Group都有着相同的结构组成。
超级块(Super Block):存放文件系统本身的结构信息。记录的信息主要有:bolck 和 inode的总量,未使用的block和inode的数量,一个block和inode的大小,最近一次挂载的时间,最近一次写入数据的时间,最近一次检验磁盘的时间等其他文件系统的相关信息。Super Block的信息被破坏,可以说整个文件系统结构就被破坏了。
GDT(Group Descriptor Table):块组描述符,描述块组属性信息。
块位图(Block Bitmap):Block Bitmap中记录着Data Block中哪个数据块已经被占用,哪个数据块没有被占用。
inode位图(inode Bitmap):每个bit表示一个inode是否空闲可用。
节点表(inode Table):存放文件属性 如 文件大小,所有者,最近修改时间等。
数据区(Data blocks):存放文件数据。
当我们创建一个文件是,属性和数据是怎样存储的呢?
[root@localhost linux]# touch abc
[root@localhost linux]# ls -i abc
263466 abc
为了说明问题,我们将画一个简化图:

由上图可知:
1、目录中的block中记录的是目录下以及子文件和子目录的文件名和inode的对应。
2、文件中的block中记录的是文件实际存储的数据。
创建一个新文件主要有以下四个操作:
1、存储文件:内核先找到一个空闲的inode节点(这里是263466)。内核记录文件信息。
2、存储数据:该文件需要存储到三个磁盘块,内核找到三个空闲块:300、400、600。将内核缓存区的数据依次复制到磁盘块。
3、记录分配情况:文件内容按顺序300,500,800存放。内核在inode上的磁盘分布区记录了上述块列表。
4、添加文件名到目录:新的文件名abc。linux如何在当前的目录中记录这个文件?内核将入口(263466,abc)添加到目录文件。文件名和inode之间的对应关系将文件名和文件的内容及属性连接起来。
软硬链接
在Linux中快捷方式有两种:
硬链接和软链接。
硬链接
我们知道磁盘上的文件信息,是存储在inode当中的,每个文件的 inode 号都应该是不一样的。inode 号就相当于文件 ID,我们在查找文件的时候,要先查找 inode 号,才能读取到文件的内容。创建硬链接就相当于多一个文件名指向inode。硬链接不会建立自己的 inode 索引和 block(数据块),而是直接指向源文件的 inode 信息和 block,所以硬链接和源文件的 inode 号是一致的。
创建一个硬链接:
ln filename hardlinkName

硬链接特点
1、不论是修改源文件(test 文件),还是修改硬链接文件(test-hard 文件),另一个文件中的数据都会发生改变。
2、不论是删除源文件,还是删除硬链接文件,只要还有一个文件存在,这个文件都可以被访问。
3、硬链接不会建立新的 inode 信息,也不会更改 inode 的总数。
4、硬链接不能跨文件系统(分区)建立,因为在不同的文件系统中,inode 号是重新计算的。
5、硬链接不能链接目录,因为如果给目录建立硬链接,那么不仅目录本身需要重新建立,目录下所有的子文件,包括子目录中的所有子文件都需要建立硬链接,这对当前的 Linux 来讲过于复杂。
软链接
软链接会真正建立自己的 inode 索引和 block,所以软链接和源文件的 inode 号是不一致的,而且在软链接的 block 中,写的不是真正的数据,是源文件的文件名及 inode 号。
创建一个软链接:
ln -s filename softlinkName

软链接特点
1、不论是修改源文件,还是修改软链接文件,另一个文件中的数据都会发生改变。
2、 删除软链接文件,源文件不受影响。而删除原文件,软链接文件将找不到实际的数据,从而显示文件不存在。
3、软链接会新建自己的 inode 信息和 block,只是在 block 中不存储实际文件数据,而存储的是源文件的文件名及 inode 号。
4、软链接可以链接目录、跨分区。
动静态库
1、静态库(.a):程序在编译链接的时候把库的代码链接到可执行文件中。程序运行的时候将不再需\要静态库。可移植性强于动态库。体积较动态库大。
2、动态库(.so):程序在运行的时候才去链接动态库的代码,多个程序共享使用库的代码。
3、一个与动态库链接的可执行文件仅仅包含它用到的函数入口地址的一个表,而不是外部函数所在目标文件的整个机器码。
4、在可执行文件开始运行以前,外部函数的机器码由操作系统从磁盘上的该动态库中复制到内存中,这个过程称为动态链接(dynamic linking)。
5、动态库可以在多个程序间共享,所以动态链接使得可执行文件更小,节省了磁盘空间。操作系统采用虚拟内存机制允许物理内存中的一份动态库被要用到该库的所有进程共用,节省了内存和磁盘空间。
测试代码
//myadd.h
#pragma once

#include<stdio.h>
int Myadd(int x,int y);

//myadd.c
#include"myadd.h"

int Myadd(int x,int y)
{


	return x+y;
}

//mysub.h
#pragma once

#include<stdio.h>
int Mysub(int x,int y);

//mysub.c
#include"mysub.h"

int Mysub(int x,int y)
{


	return x-y;
}

//mytest.c
#include<stdio.h>

#include"myadd.h"
#include"mysub.h"

int main(){


  int x=20,y=10;
  printf("x + y = %d\n",Myadd(x,y));
  printf("x - y = %d\n",Mysub(x,y));
  printf("Hello World\n");

  return 0;
}
生成静态库
#生成目标文件
[root@localhost linux]# gcc -c myadd.c -o myadd.o
[root@localhost linux]# gcc -c mysub.c -o mysub.o

#生成静态库
[root@localhost linux]# ar -rc libmymath.a myadd.o mysub.o
# ar是gnu归档工具,rc表示(replace and create)

#查看静态库中的目录列表
[root@localhost linux]# ar -tv libmymath.a
rw-r--r-- 0/0 1240 Sep 15 16:53 2017 myadd.o
rw-r--r-- 0/0 1240 Sep 15 16:53 2017 mysub.o
# t:列出静态库中的文件
# v:verbose 详细信息
将上面的文件按照这样存放:
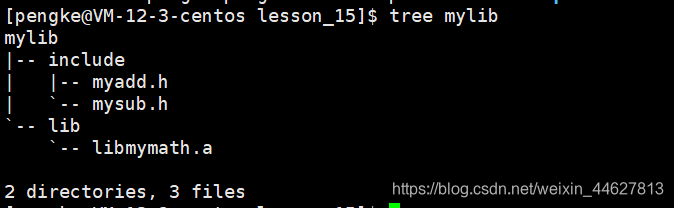
编写Makefile文件:
path=$(shell pwd)
mytest:mytest.c
	gcc $^ -o $@ -I$(path)/mylib/include -L$(path)/mylib/lib -lmymath -static

.PHONY:clean

clean:
	rm -f mytest

# -I 头文件
# -L 指定库路径
# -l 指定库名

#测试目标文件生成后,静态库删掉,程序照样可以运行
可以直接将库文件和头文件放到系统的头文件和库文件池(不建议会污染系统的头文件和库文件池):
# 目标文件:myadd.h mysub.h ---> /usr/include/stdio.h
# 库文件:libmymath.a ---> /usr/lib64
生成动态库
测试代码
//myadd.h
#pragma once

#include<stdio.h>
int Myadd(int x,int y);

//myadd.c
#include"myadd.h"

int Myadd(int x,int y)
{


	return x+y;
}

//mysub.h
#pragma once

#include<stdio.h>
int Mysub(int x,int y);

//mysub.c
#include"mysub.h"

int Mysub(int x,int y)
{


	return x-y;
}
生成动态库:
-shared: 表示生成共享库格式
-fPIC:产生位置无关码(position independent code)
-库名规则:libxxx.so
编写生成动态库Makefile文件:
libmymath.so:myadd.o mysub.o
	gcc -shared $^ -o $@

# 生成的.o文件要与位置无关
myadd.o:myadd.c
	gcc -fPIC -c $<
mysub.o:mysub.c
	gcc -fPIC -c $<
#清除命令
.PHONY:clean
clean:
	rm *.o output libmymath.so

#发布命令
.PHONY:output
output:
	mkdir -p mylib/include
	mkdir -p mylib/lib
	mv *.h mylib/include
	mv *.so mylib/lib
将上面的文件按照这样存放:
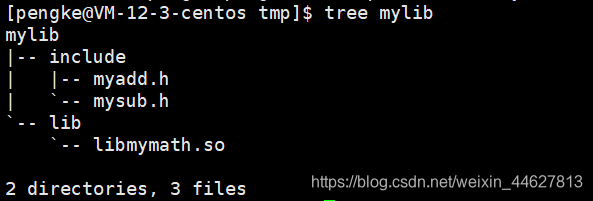
编写测试mytest.c文件
#include<stdio.h>
#include<myadd.h>
#include<mysub.h>

int main(){


  int x=20,y=10;
  printf("x + y = %d\n",myadd(x,y));
  printf("x - y = %d\n",mysub(x,y));
  printf("Hello World\n");

  return 0;
}
编写测试Makefile文件
path=$(shell pwd)

#-I:动态库目录,-L动态库头文件目录,-l:动态库的库名(去掉lib以及版本号和后最缀名:libmymath.so-->mymath)
mytest:mytest.c
	gcc $^ -o $@ -I$(path)/mylib/include -L$(path)/mylib/lib -lmymath

.PHONY:clean

clean:
	rm -f mytest
告诉操作系统运行时到哪里寻找动态库:
方法一:
拷贝.so文件到系统共享库路径下, 一般指/usr/lib
方法二:
导入环境变量LD_LIBRARY_PATH(例如:export LD_LIBRARY_PATH=/home/pengke/Linux/lesson_15/mylibso/tmp/mylib/lib)