Springboot的使用以及配置.
1.什么是Springboot
1.1 首先我们要了解什么是Spring
Spring是2003年开发出来的一种轻量级框架,他出现的目的就是简化企业级应用开发.
1.2 他是如何简化开发的
- pojo的轻量性和最小侵入性
pojo就是一个类,spring不会像EJB一样需要在原本我们的代码上造成大量改动,需要继承方法之类的,Spring尽量不会去修改我们的代码,他只需要属性,以及get,set方法就可以了最坏的情况就是在类上添加注解. - 依赖注入参考
依赖注入的目的就是为了解耦,以前都是我们程序员区new需要的对象,耦合性很大,spring帮我们去配置,通过依赖注入降低耦合性.
springboot就是在之前SSM框架后简化配置的一个架构,他是通过运行jar包运行的,他内置集成了Tomcat,
- 应用切面
把公共的代码块分离出来降低书写代码量. - 使用摸版减少样板式代码书写量.
了解到这两个点后,其实Springboot就是一个javaweb框架,他相较于SSM之前的框架,简化了配置,并且约定大于配置,只需要在yml文件中配置属性.能迅速开发一个web应用.
2 什么是微服务
所谓的微服务是SOA架构下的最终产物,该架构的设计目标是为了肢解业务,使得服务能够独立运行。微服务设计原则:1、各司其职 2、服务高可用和可扩展性.
简单的讲就是将项目中的各项业务进行拆分形成一个单独的服务并且可以独立运行提供外部接口.高内聚,低耦合.使用Springboot可以迅速帮我们搭建微服务

什么是orm
ORM就是ObjectRelationalMapping对象关系映射,简单的说就是通过实例对象的语法去操作关系型数据库.当用户流量访问量少是,用于简化CRUD的数据库访问框架ORM是影响项目开发的关键.
存在的问题:
代码耦合,开发维护困难

无法针对不同模块进行针对性优化

无法水平扩展

单点容错率低,并发能力差
mvc
就是Model View Controller,当用户量访问加大,ORM框架就显得力不从心,使用垂直应用架构可以拆分业务,增加并发能力,根据模块拆分业务.
mvc就是一种设计思想.
RPC Remote Procedure Call Protocol
当应用变多后,应用之间的交互就不可避免.我们可以把核心应用服务抽取出来,形成一个稳定的服务,不同的业务模块可以调用该服务.
rpc需要解决的问题
通讯问题 : 主要是通过在客户端和服务器之间建立TCP连接,远程过程调用的所有交换的数据都在这个连接里传输。连接可以是按需连接,调用结束后就断掉,也可以是长连接,多个远程过程调用共享同一个连接。
寻址问题 : A服务器上的应用怎么告诉底层的RPC框架,如何连接到B服务器(如主机或IP地址)以及特定的端口,方法的名称名称是什么,这样才能完成调用。比如基于Web服务协议栈的RPC,就要提供一个endpoint URI,或者是从UDDI服务上查找。如果是RMI调用的话,还需要一个RMI Registry来注册服务的地址。
序列化 与 反序列化 : 当A服务器上的应用发起远程过程调用时,方法的参数需要通过底层的网络协议如TCP传递到B服务器,由于网络协议是基于二进制的,内存中的参数的值要序列化成二进制的形式,也就是序列化(Serialize)或编组(marshal),通过寻址和传输将序列化的二进制发送给B服务器。
同理,B服务器接收参数要将参数反序列化。B服务器应用调用自己的方法处理后返回的结果也要序列化给A服务器,A服务器接收也要经过反序列化的过程。
 SOA
SOA
面向服务的架构(SOA)是一个组件模型,它将应用程序的不同功能单元(称为服务)进行拆分,并通过这些服务之间定义良好的接口和契约联系起来。接口是采用中立的方式进行定义的,它应该独立于实现服务的硬件平台、操作系统和编程语言。这使得构建在各种各样的系统中的服务可以以一种统一和通用的方式进行交互。
当服务越来越多,容量的评估,小服务资源的浪费等问题逐渐显现,此时需增加一个调度中心基于访问压力实时管理集群容量,提高集群利用率。 此时,用于提高机器利用率的 资源调度和治理中心(SOA) 是关键。
1 透明化的远程方法调用
像调用本地方法一样调用远程方法;只需简单配置,没有任何API侵入。
2 软负载均衡及容错机制
可在内网替代nginx lvs等硬件负载均衡器。
3服务注册中心自动注册 & 配置管理
-不需要写死服务提供者地址,注册中心基于接口名自动查询提供者ip。
使用类似zookeeper等分布式协调服务作为服务注册中心,可以将绝大部分项目配置移入zookeeper集群。
4服务接口监控与治理
-Dubbo-admin与Dubbo-monitor提供了完善的服务接口管理与监控功能,
针对不同应用的不同接口,可以进行 多版本,多协议,多注册中心管理。
3. Springboot自动配置原理
1.在pom文件的spring-boot-starter-parent父工程文件中
-
spring-boot-dependencies帮我们管理了大量依赖版本.
-
所有核心依赖都在父工程中.
2.启动器
- 简单说springboot的启动场景
- 当我们引入一个web启动器,他会自动帮我们引入所有关于web的依赖.
- springboot将所有的功能场景编程一个启动器我们需要哪个就引入哪个.
3.主程序
- @SpringbootApplication (标注这是个Springboot应用)
在该注解下还有三个注解- @SpringBootConfiguration
它就是springboot的配置- @Configuration
这说明这本质是一个组件是一个spring的一个组件
- @Configuration
- @EnableAutoConfiguration
开启自动配置功能,自动导入配置,他会根据你的maven导入的包自动配置.- @AutoConfigurationPackage
将主动配置类的包作为自动配置包,这个注解是自动配置包,主要是使用的@Import来给Spring容器中导入一个组件 ,这里导入的是Registrar.class。- @Import({Registrar.class})
导入选择器
@Import({AutoConfigurationImportSelector.class})
导入一个类到ioc容器中,meta-inf根据spring。factory配置
@componentscan
它是将我们启动器所在包下的组件总动装配到spring容器中
springboot根据配置文件自动装配所属依赖的类,在通过动态代理注入到spring容器中
- @Import({Registrar.class})
- @AutoConfigurationPackage
- @SpringBootConfiguration
    static class Registrar implements ImportBeanDefinitionRegistrar, DeterminableImports {


        Registrar() {


        }

        public void registerBeanDefinitions(AnnotationMetadata metadata, BeanDefinitionRegistry registry) {


            AutoConfigurationPackages.register(registry, (String[])(new AutoConfigurationPackages.PackageImports(metadata)).getPackageNames().toArray(new String[0]));//是通过这个方法获取扫描的包路径
        }

        public Set<Object> determineImports(AnnotationMetadata metadata) {


            return Collections.singleton(new AutoConfigurationPackages.PackageImports(metadata));
        }
    }
那么那个元数据metadata是什么呢?
说白了就是将主配置类(即@SpringBootApplication标注的类)的所在包及子包里面所有组件扫描加载到Spring容器。所以包名一定要注意。
- @Import({AutoConfigurationImportSelector.class})
导入选择器,里面有环境,资源加载器,bean加载器等待.
里面有个selectImport方法可以选择组件,就是在pom中配置的的一些组件
getAutoConfigurationEntry方法中获取一些配置 ,将所有需要导入的组件以全类名的方式返回;这些组件就会被添加到容器中。
    public String[] selectImports(AnnotationMetadata annotationMetadata) {


        if (!this.isEnabled(annotationMetadata)) {


            return NO_IMPORTS;
        } else {


            AutoConfigurationImportSelector.AutoConfigurationEntry autoConfigurationEntry = this.getAutoConfigurationEntry(annotationMetadata);
            return StringUtils.toStringArray(autoConfigurationEntry.getConfigurations());
        }
    }
有了自动配置类,免去了我们手动编写配置注入功能组件等的工作。
那他是如何获取到这些配置类的呢,看看下面面这个方法:
  public String[] selectImports(AnnotationMetadata annotationMetadata) {


        if (!this.isEnabled(annotationMetadata)) {


            return NO_IMPORTS;
        } else {


            AutoConfigurationImportSelector.AutoConfigurationEntry autoConfigurationEntry = this.getAutoConfigurationEntry(annotationMetadata);
            return StringUtils.toStringArray(autoConfigurationEntry.getConfigurations());
        }
    }
进入getAutoConfigurationEntry(annotationMetadata);方法
    protected AutoConfigurationImportSelector.AutoConfigurationEntry getAutoConfigurationEntry(AnnotationMetadata annotationMetadata) {


        if (!this.isEnabled(annotationMetadata)) {


            return EMPTY_ENTRY;
        } else {


            AnnotationAttributes attributes = this.getAttributes(annotationMetadata);
            List<String> configurations = this.getCandidateConfigurations(annotationMetadata, attributes);
            configurations = this.removeDuplicates(configurations);
            Set<String> exclusions = this.getExclusions(annotationMetadata, attributes);
            this.checkExcludedClasses(configurations, exclusions);
            configurations.removeAll(exclusions);
            configurations = this.getConfigurationClassFilter().filter(configurations);
            this.fireAutoConfigurationImportEvents(configurations, exclusions);
            return new AutoConfigurationImportSelector.AutoConfigurationEntry(configurations, exclusions);
        }
    }
进入getCandidateConfigurations(annotationMetadata, attributes);这个方法
  protected List<String> getCandidateConfigurations(AnnotationMetadata metadata, AnnotationAttributes attributes) {


        List<String> configurations = SpringFactoriesLoader.loadFactoryNames(this.getSpringFactoriesLoaderFactoryClass(), this.getBeanClassLoader());
        Assert.notEmpty(configurations, "No auto configuration classes found in META-INF/spring.factories. If you are using a custom packaging, make sure that file is correct.");
        return configurations;
    }
我们发现它会从META-INF/spring.factories这个文件中获取资源通过properties加载
 public static List<String> loadFactoryNames(Class<?> factoryType, @Nullable ClassLoader classLoader) {


        String factoryTypeName = factoryType.getName();
        return (List)loadSpringFactories(classLoader).getOrDefault(factoryTypeName, Collections.emptyList());
    }

    private static Map<String, List<String>> loadSpringFactories(@Nullable ClassLoader classLoader) {


        MultiValueMap<String, String> result = (MultiValueMap)cache.get(classLoader);
        if (result != null) {


            return result;
        } else {


            try {


                Enumeration<URL> urls = classLoader != null ? classLoader.getResources("META-INF/spring.factories") : ClassLoader.getSystemResources("META-INF/spring.factories");
                LinkedMultiValueMap result = new LinkedMultiValueMap();

                while(urls.hasMoreElements()) {


                    URL url = (URL)urls.nextElement();
                    UrlResource resource = new UrlResource(url);
                    Properties properties = PropertiesLoaderUtils.loadProperties(resource);
                    Iterator var6 = properties.entrySet().iterator();

                    while(var6.hasNext()) {


                        Entry<?, ?> entry = (Entry)var6.next();
                        String factoryTypeName = ((String)entry.getKey()).trim();
                        String[] var9 = StringUtils.commaDelimitedListToStringArray((String)entry.getValue());
                        int var10 = var9.length;

                        for(int var11 = 0; var11 < var10; ++var11) {


                            String factoryImplementationName = var9[var11];
                            result.add(factoryTypeName, factoryImplementationName.trim());
                        }
                    }
                }

                cache.put(classLoader, result);
                return result;
            } catch (IOException var13) {


                throw new IllegalArgumentException("Unable to load factories from location [META-INF/spring.factories]", var13);
            }
        }
    }
Springboot在启动的时候会从META-INF/spring.factories中获取EnableAutoConfiguration指定的值,将这些值作为自动配置类导入到容器中,自动配置类就生效,帮我们进行自动配置工作。以前我们需要自己配置的东西,自动配置类都帮我们完成了。
总体的整合方案以及配置都在spring.factories中

 static class Registrar implements ImportBeanDefinitionRegistrar, DeterminableImports {


        Registrar() {


        }
//元数据
        public void registerBeanDefinitions(AnnotationMetadata metadata, BeanDefinitionRegistry registry) {


            AutoConfigurationPackages.register(registry, (String[])(new AutoConfigurationPackages.PackageImports(metadata)).getPackageNames().toArray(new String[0]));
        }

        public Set<Object> determineImports(AnnotationMetadata metadata) {


            return Collections.singleton(new AutoConfigurationPackages.PackageImports(metadata));
        }
    }
总结.springboot配置原理
springboot自动配置原理简单的讲就是在@SpringbootApplication中有两个核心注解第一个是springbootConfiguration,它表明这是一个spring组件,还有一个注解@EnableAutoConfiguration该注解里面的内容有@AutoConfigurationPackage 他的作用是自动配置包,打开该注解发现里面还有个@import(Registrar)导入包的注册器.关系是@componentScan扫描到的包到Registrar.
该注解的作用是导入需要的组件在SpringbootApp包下的所有组件,元数据.注册进去
@EnableAutoConfiguration中另一个注解
自动配置导入选择器@Import({AutoConfigurationImportSelector.class}),
该类中有一个selectImports方法,获取所有配置类,将所有需要导入的组件以全类名的方式返回;通过spring.factories.
Spring Boot在启动的时候从类路径下的META-INF/spring.factories中获取EnableAutoConfiguration指定的值,将这些值作为自动配置类导入到容器中,自动配置类就生效,帮我们进行自动配置工作。以前我们需要自己配置的东西,自动配置类都帮我们完成了。
为什么那么多配置有的会不生效
需要导入start启动类才可以生效,有个核心注解@ConditionalONXXXX,如果满足这个条件才会生效.
结论
Springboot配置中通过@SpringbootApplication注解来去扫描与加载配置与组件,但是不一定都会生效,需要导入对应的start启动类jar包.
1.springboot 启动的时候会从 /META-INF/spring.factories 通过url.nextElement得到配置信息.
2.将这些自动配置类导入进去,配置类就会生效,当然也不是全部生效会有@Conditionalon判断
3.autoConfigure包下的配置文件会以全类名的方式返回并添加到容器中.
4.容器中有很多XXXAutoConfigure配置文件,导入后就会导入所有组件.比如@Bean.
有了自动配置类,就会免去我们手动编写.
4.Springboot.run方法分析
该方法主要分为两部分,一部分是springApplication实例化,二是run方法执行.
SpringbootApplication
这个类做了以下四件事:
- 根据导入的依赖包推断是web应用还是java应用
- 查找并加载所有初始化器,设置到initializers属性中
- 找出所有应用程序监听器设置到listeners属性中
- 推断并设置main方法定义表找到运行主类.
5.application.yml配置
在该文件中我们可以对已有默认配置的变量进行修改,也可以写自定义类并将值赋值进去.
 编写person类添加注解@ConfigurationProperties(prefix = “person”)
 运行输出
运行输出

运行成功
除了使用yml方法外还可以使用
PropertyResource注解


 cp只要写一次就可以,使用@value需要全部添加.
cp支持松散绑定 就是类似配置驼峰的东西.
cp支持数据校验
yml可以封装复杂对象,pro不能
总结:
- yml和properties都可以获取到值,但是推荐使用yml.
- 只需要配置文件的某个值可以使用@value
JSR303数据校验
首先我们需要引入依赖
  <dependency>
            <groupId>org.springframework.boot</groupId>
            <artifactId>spring-boot-starter-validation</artifactId>
   </dependency>
在@Configuration注解下添加@Validated注解
在你需要校验的成员变量添加校验注解
 当我们测试运行后报错:这不是一个合法的电子邮箱
配置文件的位置
可以放在
- file/ 项目根目录下
- file/config 项目config目录下
- classpath: resource目录下
- classpath/config resource/config目录下
优先级从大到小:
2>1>4>3
springboot 多环境配置
在开发过程中会有测试环境,线上环境,开发环境,那么该如何切换呢?
这时需要配置spring.profile.active

使用dev环境直接修改
spring:
  profiles:
    active: dev
当然我们也可以把所有的环境都写在一个配置文件当中
但需要—分隔符.
6.深入理解自动配置原理
配置文件与spring.factories的联系
首先我们随便打开一个自动配置类文件
 该类中的@ConditionalOnProperty
prefix=“spring.application.admin”
对应的是application.yml中的配置前缀
成员变量可以通过配置application.yml来赋值


7.静态资源导入原理
要知道原理一定要看源码。
- 双击 shift进入WebMvcAutoConfig配置类里面有我们想要的答案。
- 找到WebMvcAutoConfigurationAdapter静态类,找到addResourceHandlers这个方法
分析下列代码
 public void addResourceHandlers(ResourceHandlerRegistry registry) {


            if (!this.resourceProperties.isAddMappings()) {


                logger.debug("Default resource handling disabled");
            } else {


                Duration cachePeriod = this.resourceProperties.getCache().getPeriod();
                CacheControl cacheControl = this.resourceProperties.getCache().getCachecontrol().toHttpCacheControl();
                if (!registry.hasMappingForPattern("/webjars/**")) {


                    this.customizeResourceHandlerRegistration(registry.addResourceHandler(new String[]{

    "/webjars/**"}).addResourceLocations(new String[]{

    "classpath:/META-INF/resources/webjars/"}).setCachePeriod(this.getSeconds(cachePeriod)).setCacheControl(cacheControl));
                }

                String staticPathPattern = this.mvcProperties.getStaticPathPattern();
                if (!registry.hasMappingForPattern(staticPathPattern)) {


                    this.customizeResourceHandlerRegistration(registry.addResourceHandler(new String[]{

    staticPathPattern}).addResourceLocations(WebMvcAutoConfiguration.getResourceLocations(this.resourceProperties.getStaticLocations())).setCachePeriod(this.getSeconds(cachePeriod)).setCacheControl(cacheControl));
                }

            }
        }
首先看第一个判断if(!this.resourceProperties.isAddMappings())
如果自定义了静态资源则直接生效,我们自定义的路径为静态路径。
那么怎么自定义静态路径呢?
找到源码中webMvcproperties
3. 继续往下走看到关于webjars相关的,他表示通过maven引入的js文件,这里不做介绍。重点要看接下来方法中的this
 点进去里面有属性是配置自定义静态资源路径的。
staticPathPattern
我么直接可以再yml文件中设置`
spring:
  mvc:
    static-path-pattern: /kui
同时在该类中 还有个this.resourceProperties,点进去一直
会发现最后有个配置静态资源的数组
        private static final String[] CLASSPATH_RESOURCE_LOCATIONS = new String[]{

    "classpath:/META-INF/resources/", "classpath:/resources/", "classpath:/static/", "classpath:/public/"};
就在这里定义了我们静态资源的路径。如果我们不配置自定义路径那么一共有五个静态资源路径classpath:/META-INF/resources/", “classpath:/resources/”, “classpath:/static/”, "classpath:/public/和/**
优先级:resource》static》public
这里要注意的是配置自定义路径后,默认的静态资源路径就不好使了
8.扩展与装配Springmvc
Spring Boot为Spring MVC提供了自动配置,可与大多数应用程序完美配合。
自动配置会在Spring的默认设置之上添加以下功能:
包含ContentNegotiatingViewResolver和BeanNameViewResolver Bean。
支持服务静态资源,包括对WebJars的支持.
自动注册Converter,GenericConverter 比如传入user中的字段,springmvc会帮助我们自动封装,Formatter Bean 封装日期形式。
对HttpMessageConverters的支持。比如转化json
自动注册MessageCodesResolver。
静态index.html支持。
自定义Favicon支持(在本文档后面介绍)。
自动使用ConfigurableWebBindingInitializer Bean(在本文档后面介绍)。
如果您想保留Spring Boot MVC功能并想添加其他MVC配置(拦截器,格式化程序,视图控制器和其他功能),则可以添加自己的类型为WebMvcConfigurer的@Configuration类,但不添加@EnableWebMvc。如果希望提供RequestMappingHandlerMapping,RequestMappingHandlerAdapter或ExceptionHandlerExceptionResolver的自定义实例,则可以声明一个WebMvcRegistrationsAdapter实例以提供此类组件。
那么为什么不能加@EnableWebMvc呢.点开源码
发现该注解导入了一个类
@Import({DelegatingWebMvcConfiguration.class})
打开该类发现他继承了WebMvcConfigurationSupport 这个类.
我们再次打开webmvc自动配置类
 发现@ConditionalOnMissingBean({WebMvcConfigurationSupport.class})这个注解
那么这也就意味着当我们使用这个@EnableWebMvc注解会使整个自动配置类失效崩掉.
9.Springboot拦截器具体实现
登录连接器 使用intercepter 拦截
10.spring security的使用

导入包
  <dependency>
            <groupId>org.springframework.boot</groupId>
            <artifactId>spring-boot-starter-security</artifactId>
        </dependency>
Spring Security 是针对Spring项目的安全框架,也是Spring Boot底层安全模块默认的技术选型,他可以实现强大的Web安全控制,对于安全控制,我们仅需要引入 spring-boot-starter-security 模块,进行少量的配置,即可实现强大的安全管理!
记住几个类:
WebSecurityConfigurerAdapter:自定义Security策略
AuthenticationManagerBuilder:自定义认证策略
@EnableWebSecurity:开启WebSecurity模式
Spring Security的两个主要目标是 “认证” 和 “授权”(访问控制)。
“认证”(Authentication)
身份验证是关于验证您的凭据,如用户名/用户ID和密码,以验证您的身份。
身份验证通常通过用户名和密码完成,有时与身份验证因素结合使用。
“授权” (Authorization)
授权发生在系统成功验证您的身份后,最终会授予您访问资源(如信息,文件,数据库,资金,位置,几乎任何内容)的完全权限。
这个概念是通用的,而不是只在Spring Security 中存在。
10.1 简单的demo
实现用户登录拦截请求:
首先写一个配置类
@EnableWebSecurity
public class SecurityConfig extends WebSecurityConfigurerAdapter {


    @Override
    protected void configure(HttpSecurity http) throws Exception {


        http.authorizeRequests().antMatchers("/","index").permitAll().antMatchers("/main").hasRole("VIP");
       //设置登录跳转页面以及失败跳转页面成功跳转页面
        http.formLogin().loginPage("/").loginProcessingUrl("/user/login")
                .failureUrl("/").defaultSuccessUrl("/main").permitAll();
    }

    @Override
    protected void configure(AuthenticationManagerBuilder auth) throws Exception {


    //授权,这里要注意密码需要硬编码处理否则会报错在 2.1版本中
        auth.inMemoryAuthentication().passwordEncoder(new BCryptPasswordEncoder()).
                withUser("kui").password(new BCryptPasswordEncoder().encode("123")).roles("VIP");
    }
}
但是 用户登录后,有些东西是不想让没有权限的人看到的,那么如何在前端页面控制呢?
导入Thymeleaf和security整合包
 <dependency>
            <groupId>org.thymeleaf.extras</groupId>
            <artifactId>thymeleaf-extras-springsecurity4</artifactId>
            <version>3.0.2.RELEASE</version>
        </dependency>
zaihtml引入该标签
<html lang="en" xmlns:th="http://www.thymeleaf.org" xmlns:sec="http://www.thymeleaf.org/thymeleaf-extras-springsecurity4">
11 shiro
11.1 搭建shiro环境
Apache Shiro 是 Java 的一个安全框架。目前,使用 Apache Shiro 的人越来越多,因为它相当简单,对比 Spring Security,可能没有 Spring Security 做的功能强大,但是在实际工作时可能并不需要那么复杂的东西,所以使用小而简单的 Shiro 就足够了。对于它俩到底哪个好,这个不必纠结,能更简单的解决项目问题就好了。
首先引入maven依赖
<dependency>
			<groupId>org.apache.shiro</groupId>
			<artifactId>shiro-spring</artifactId>
			<version>1.6.0</version>
		</dependency>
编写shiroconfig
@Configuration
public class ShiroConfig {
@Bean
public UserRealm userRealm(){
return new UserRealm();
}
@Bean
public DefaultWebSecurityManager defaultWebSecurityManager(UserRealm userRealm){
DefaultWebSecurityManager d=new DefaultWebSecurityManager();
d.setRealm(userRealm);
return d;
}
@Bean
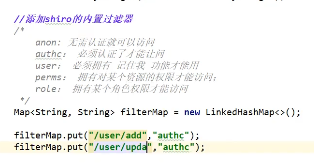
public ShiroFilterFactoryBean shiroFilterFactoryBean (DefaultWebSecurityManager defaultWebSecurityManager){
ShiroFilterFactoryBean s=new ShiroFilterFactoryBean();
s.setSecurityManager(defaultWebSecurityManager);
Map filterMap=new LinkedHashMap();
filterMap.put("/main","authc");
s.setFilterChainDefinitionMap(filterMap);
s.setLoginUrl("/");
s.setSuccessUrl("/main");
//未授权跳转url
s.setUnauthorizedUrl("/");
return s;
}
}
编写userrealm
public class UserRealm extends AuthorizingRealm {


    @Override
    protected AuthorizationInfo doGetAuthorizationInfo(PrincipalCollection principalCollection) {


     System.out.println("执行了授权");
        SimpleAuthorizationInfo  info=new SimpleAuthorizationInfo();
        String s = (String) SecurityUtils.getSubject().getPrincipal();
        info.addStringPermission(s);
        return info;
    }

    @Override
    protected AuthenticationInfo doGetAuthenticationInfo(AuthenticationToken authenticationToken) throws AuthenticationException {


        UsernamePasswordToken usertoken=(UsernamePasswordToken)authenticationToken;
        if (!usertoken.getUsername().equals("kui"))
            throw new UnknownAccountException();
//这里第一个参数可以传任意对象,最终获取到的只不过是授权地址。我这里直接传入授权地址
        return new SimpleAuthenticationInfo("main","123","");
    }
}
11.2 整合Thymeleaf-shiro
导入依赖
<dependency>
			<groupId>org.apache.shiro</groupId>
			<artifactId>shiro-spring</artifactId>
			<version>1.6.0</version>
		</dependency>
		<dependency>
		<groupId>org.apache.shiro</groupId>
		<artifactId>shiro-core</artifactId>
		<version>1.4.0</version>
		</dependency>
		<dependency>
			<groupId>com.github.theborakompanioni</groupId>
			<artifactId>thymeleaf-extras-shiro</artifactId>
			<version>2.0.0</version>
		</dependency>
配置shiroconfig
@Configuration
public class ShiroConfig {


    @Bean
    public UserRealm userRealm(){


        return new UserRealm();
    }
    @Bean
    public DefaultWebSecurityManager defaultWebSecurityManager(UserRealm userRealm){


        DefaultWebSecurityManager d=new DefaultWebSecurityManager();
        d.setRealm(userRealm);
        return d;
    }
    @Bean
    public ShiroFilterFactoryBean shiroFilterFactoryBean (DefaultWebSecurityManager defaultWebSecurityManager){


        ShiroFilterFactoryBean s=new ShiroFilterFactoryBean();
        s.setSecurityManager(defaultWebSecurityManager);
        Map filterMap=new LinkedHashMap();
        filterMap.put("/main","authc");
        filterMap.put("/main","perms[main]");
        s.setFilterChainDefinitionMap(filterMap);
        s.setUnauthorizedUrl("/noauth");
        s.setLoginUrl("/");
        s.setSuccessUrl("/main");
        return s;
    }
    //需要使用Thymeleaf必需配置bean
    @Bean
    public ShiroDialect shiroDialect(){


        return new ShiroDialect();
    }
}