安装wxml-to-canvas
wxml-to-canvas源码库
https://github.com/wechat-miniprogram/wxml-to-canvas
wxml-to-canvas扩展组件教程
https://developers.weixin.qq.com/miniprogram/dev/extended/component-plus/wxml-to-canvas.html
1、在小程序项目根目录内,初始化npm
npm init -y2、执行命令安装wxml-to-canvas的npm包
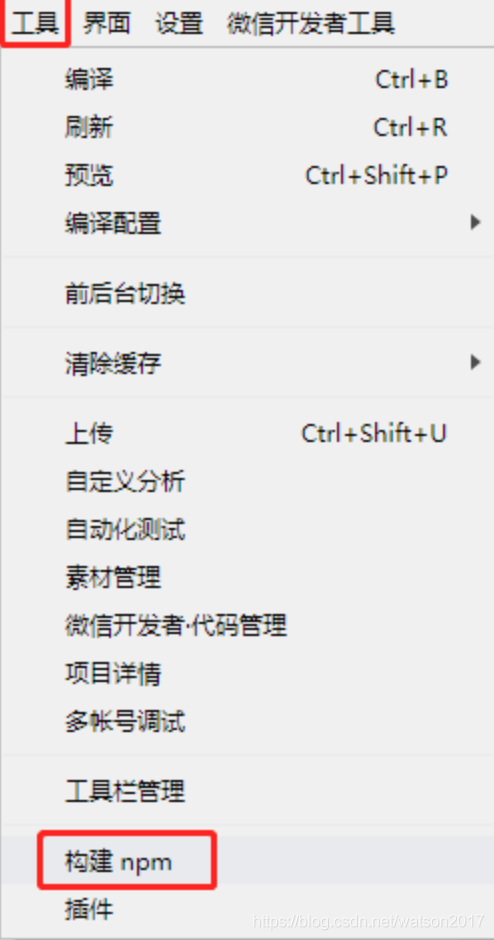
npm install --save wxml-to-canvas3、在微信开发者工具中的菜单栏:工具 --> 构建 npm
完成构建后可以在目录树里看到了miniprogram_npm以及里面的wxml-to-canvas组件文件夹
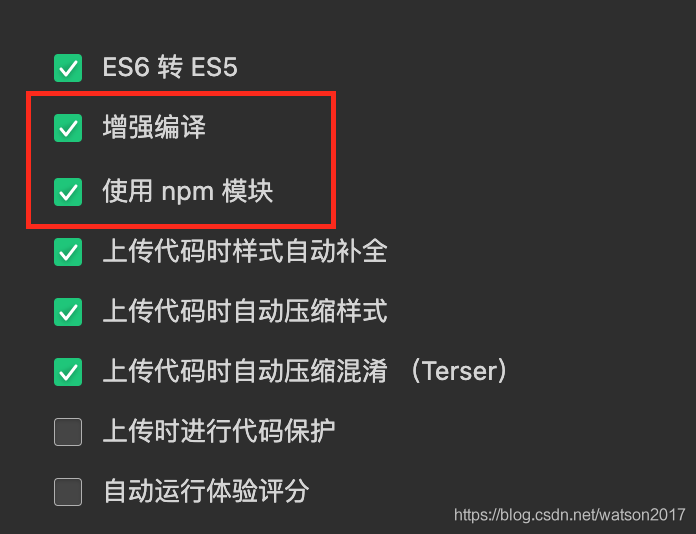
4、在微信开发者工具中的菜单栏:工具 --> 项目详情,勾选“使用npm模块”和“增强编译”
5、使用wxml-to-canvas组件库
.json配置
"usingComponents": {
    "wxml-to-canvas": "../../miniprogram_npm/wxml-to-canvas"
}
.wxml里引入组件:
<wxml-to-canvas class="widget" width="375" height="550"></wxml-to-canvas>
-
class属性用来标识该组件,可通过设置不同的值来创建不同的wxml-to-canvas组件实例
//在页面js文件中获取该组件实例 onload:function() { this.widget = this.selectComponent('.widget') } -
上面的语句this.widget = this.selectComponent('.widget')是完成widget对象初始化的,但canvas生成是需要一定时间的,onload函数中widget对象还没有初始化完毕就去调用this.widget.renderToCanvas({wxml,style})将wxml模板和wxss样式绘制到canvas上 的话,会导致页面报错。
.js生成截图
const {wxml, style} = require('./demo.js')
Page({
  data: {
    src: ''
  },
  onLoad() {
    this.widget = this.selectComponent('.widget')
  },
  renderToCanvas() {
    const p1 = this.widget.renderToCanvas({ wxml, style })
    p1.then((res) => {
      this.container = res
      this.extraImage()
    })
  },
  extraImage() {
    const p2 = this.widget.canvasToTempFilePath()
    p2.then(res => {
      this.setData({
        src: res.tempFilePath,
        width: this.container.layoutBox.width,
        height: this.container.layoutBox.height
      })
    })
  }
})
wxml 模板
支持 view、text、image 三种标签,通过 class 匹配 style 对象中的样式。
注意:需为每个元素指定 width 和 height 属性,否则会导致布局错误。
元素均为 flex 布局。left/top 等 仅在 absolute 定位下生效。
image加载的图片只能为网络图片或者base64图片,如果加载本地图片会失败。
demo.js
const wxml = `
<view class="container">
  <view class="item-box red">
  </view>
  <view class="item-box green" >
    <text class="text">yeah!</text>
  </view>
  <view class="item-box blue">
  </view>
  <image class="img" src="https://www.demo.com/upload//ca168bc52ce60ee8ed609bf920dbce5a.png"></image>
</view>
`

const style = {
  container: {
    width: 300,
    height: 200,
    flexDirection: 'row',
    justifyContent: 'space-around',
    backgroundColor: '#ccc',
    alignItems: 'center',
  },
  itemBox: {
    width: 80,
    height: 60,
  },
  red: {
    backgroundColor: '#ff0000'
  },
  green: {
    backgroundColor: '#00ff00'
  },
  blue: {
    backgroundColor: '#0000ff',
    alignItems: 'center',
    justifyContent: 'center',
  },
  text: {
    width: 80,
    height: 60,
    textAlign: 'center',
    verticalAlign: 'middle',
  },
  img: {
    width: 40,
    height: 40,
    borderRadius: 20,
  }
}

module.exports.wxml = wxml
module.exports.style = style
将生成的图片保存到相册
  saveToAlbum() {
    wx.saveImageToPhotosAlbum({
      filePath: this.data.src,
      success(res) {
        console.log(res)
      }
    })
  },
在实际真机测试过程中,发现海报高度 > 1350 的话在手机中生成海报报错。所以生成的海报画布最好不要大于这个值。