健康检查由kubelet操作,包括
1)存活检查(livenessProbe): 如果检查失败 -> 杀死容器 并根据Pod的restartPolicy来操作
2)就绪检查(readinessProbe): 如果检查失败 -> 把Pod从service endpoints中剔除
@重启策略(restartPolicy)
Never:容器终止退出不重启容器
Always:容器终止退出后重启容器(默认策略)
OnFailure:容器异常退出(退出状态码非0)才重启容器
@检查方法
exec: 执行Shell命令 -> 返回状态码是0为成功
httpGet: 发送HTTP请求 -> 返回200-400范围状态码为成功
tcpSocket: 发起TCP Socket建立成功
【例】httpGet
生成一个deployment的yaml,kubectl create deployment test-probe --image=nginx --dry-run=client -o yaml > test-probe.yaml,编辑test-probe.yaml的内容
apiVersion: apps/v1
kind: Deployment
metadata:
  labels:
    app: test-probe
  name: test-probe
spec:
  replicas: 3
  selector:
    matchLabels:
      app: test-probe
  strategy: {}
  template:
    metadata:
      labels:
        app: test-probe
    spec:
      containers:
      - image: nginx
        name: nginx
        resources: {}
        livenessProbe:
          tcpSocket:
            port: 80
          initialDelaySeconds: 30
          periodSeconds: 10
        readinessProbe:
          tcpSocket:
            port: 80
          initialDelaySeconds: 30
          periodSeconds: 10
说明:
livenessProbe和readinessProbe与containers -> image 对齐
initialDelaySeconds: 30 #启动容器后30秒健康检查
periodSeconds: 10 #以后每间隔10秒检查一次
创建deployment,可以查看到3个pod
[root@k8s-master ~]# kubectl apply -f test-probe.yaml
deployment.apps/test-probe created
[root@k8s-master ~]#
[root@k8s-master ~]# kubectl get pod
NAME                         READY   STATUS    RESTARTS   AGE
test-probe-766bcd6cf-2qpz4   1/1     Running   0          130m
test-probe-766bcd6cf-p9f8p   1/1     Running   0          130m
test-probe-766bcd6cf-tx52m   1/1     Running   0          130m
[root@k8s-master ~]#
例如查看第一个pod的日志,kubectl logs test-probe-766bcd6cf-2qpz4 -f,每隔10秒会打印两条日志,分别对应存活检查和就绪检查
[root@k8s-master ~]# kubectl logs test-probe-766bcd6cf-2qpz4 -f
……
192.168.231.123 - - [21/Aug/2021:06:07:45 +0000] "GET /index.html HTTP/1.1" 200 612 "-" "kube-probe/1.20" "-"
192.168.231.123 - - [21/Aug/2021:06:07:47 +0000] "GET /index.html HTTP/1.1" 200 612 "-" "kube-probe/1.20" "-"
192.168.231.123 - - [21/Aug/2021:06:07:55 +0000] "GET /index.html HTTP/1.1" 200 612 "-" "kube-probe/1.20" "-"
192.168.231.123 - - [21/Aug/2021:06:07:57 +0000] "GET /index.html HTTP/1.1" 200 612 "-" "kube-probe/1.20" "-"
192.168.231.123 - - [21/Aug/2021:06:08:05 +0000] "GET /index.html HTTP/1.1" 200 612 "-" "kube-probe/1.20" "-"
192.168.231.123 - - [21/Aug/2021:06:08:07 +0000] "GET /index.html HTTP/1.1" 200 612 "-" "kube-probe/1.20" "-"
192.168.231.123 - - [21/Aug/2021:06:08:15 +0000] "GET /index.html HTTP/1.1" 200 612 "-" "kube-probe/1.20" "-"
192.168.231.123 - - [21/Aug/2021:06:08:17 +0000] "GET /index.html HTTP/1.1" 200 612 "-" "kube-probe/1.20" "-"
……
@存活检查测试
第一个窗口执行 kubectl get pods -w
第二个窗口进入pod,删掉主页
[root@k8s-master ~]# kubectl exec -it test-probe-766bcd6cf-2qpz4 -- bash
root@test-probe-766bcd6cf-2qpz4:/# cd /usr/share/nginx/html/
root@test-probe-766bcd6cf-2qpz4:/usr/share/nginx/html# ls
50x.html  index.html
root@test-probe-766bcd6cf-2qpz4:/usr/share/nginx/html# rm -rf index.html
root@test-probe-766bcd6cf-2qpz4:/usr/share/nginx/html# command terminated with exit code 137
[root@k8s-master ~]#
在第一个窗口可以观察到该pod被重启了
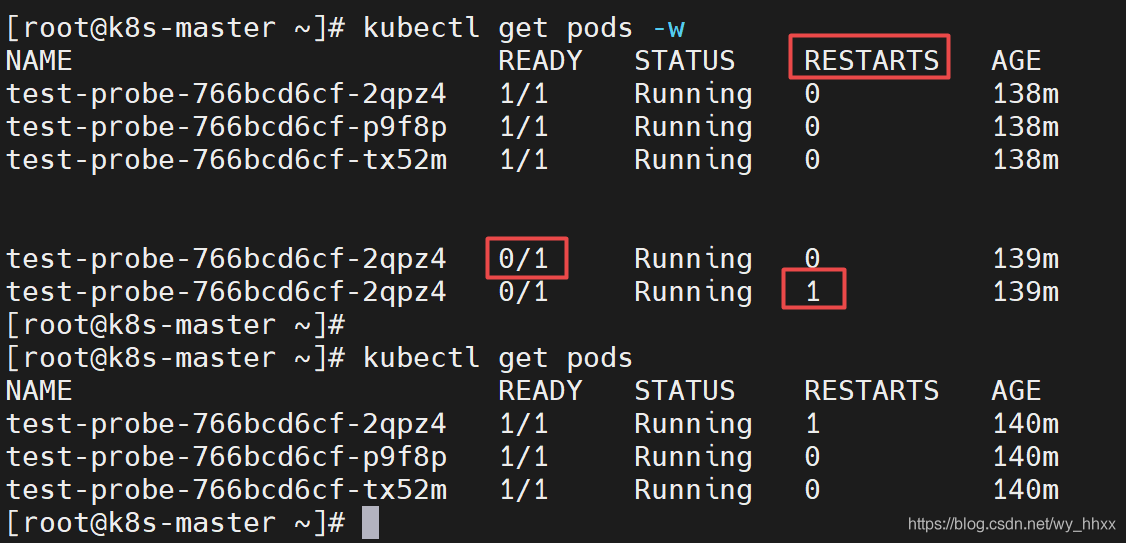
kubectl describe pod test-probe-766bcd6cf-2qpz4 可以看到检测失败的记录,可以注意到,存活探测和就绪探测都失败了,然后重新拉起了该pod

@就绪检查测试
生成一个svc的yaml,kubectl expose deployment test-probe --port=90 --target-port=80 --type=NodePort --dry-run=client -o yaml > test-probe-svc.yaml,编辑test-probe-svc.yaml的内容
apiVersion: v1
kind: Service
metadata:
  labels:
    app: test-probe
  name: test-probe
spec:
  ports:
  - port: 90
    protocol: TCP
    targetPort: 80
  selector:
    app: test-probe
  type: NodePort
查看endpoint
[root@k8s-master ~]# kubectl apply -f test-probe-svc.yaml
service/test-probe created
[root@k8s-master ~]# kubectl get svc
NAME         TYPE        CLUSTER-IP       EXTERNAL-IP   PORT(S)        AGE
kubernetes   ClusterIP   10.96.0.1        <none>        443/TCP        26d
test-probe   NodePort    10.110.173.120   <none>        90:30070/TCP   9s
[root@k8s-master ~]# kubectl get ep
NAME         ENDPOINTS                                           AGE
kubernetes   192.168.231.121:6443                                26d
test-probe   10.244.169.141:80,10.244.36.65:80,10.244.36.67:80   12s
[root@k8s-master ~]#
同样打开两个窗
第一个窗口执行 kubectl get ep -w
第二个窗口进入pod,删掉主页
在第一个窗口可以观察到endpoint中,这个节点被剔除,稍后又加回去了
