前言:本文介绍一下 V8 关于 Inspector 的实现,不过不会涉及到具体命令的实现,V8 Inspector 的命令非常多,了解了处理流程后,如果对某个命令感兴趣的话,可以单独去分析。
首先来看一下 V8 Inspector 中几个关键的角色。
1. V8InspectorSession
class V8_EXPORT V8InspectorSession {


 public:
  // 收到对端端消息,调用这个方法判断是否可以分发
  static bool canDispatchMethod(StringView method);
  // 收到对端端消息,调用这个方法判断分发
  virtual void dispatchProtocolMessage(StringView message) = 0;
};
V8InspectorSession 是一个基类,本身实现了 canDispatchMethod 方法,由子类实现 dispatchProtocolMessage 方法。看一下 canDispatchMethod 的实现。
bool V8InspectorSession::canDispatchMethod(StringView method) {


  return stringViewStartsWith(method,
                              protocol::Runtime::Metainfo::commandPrefix) ||
         stringViewStartsWith(method,
                              protocol::Debugger::Metainfo::commandPrefix) ||
         stringViewStartsWith(method,
                              protocol::Profiler::Metainfo::commandPrefix) ||
         stringViewStartsWith(
             method, protocol::HeapProfiler::Metainfo::commandPrefix) ||
         stringViewStartsWith(method,
                              protocol::Console::Metainfo::commandPrefix) ||
         stringViewStartsWith(method,
                              protocol::Schema::Metainfo::commandPrefix);
}
canDispatchMethod 决定了 V8 目前支持哪些命令。接着看一下 V8InspectorSession 子类的实现。
class V8InspectorSessionImpl : public V8InspectorSession,
                               public protocol::FrontendChannel {


 public:
  // 静态方法,用于创建 V8InspectorSessionImpl
  static std::unique_ptr<V8InspectorSessionImpl> create(V8InspectorImpl*,
                                                        int contextGroupId,
                                                        int sessionId,
                                                        V8Inspector::Channel*,
                                                        StringView state);
  // 实现命令的分发
  void dispatchProtocolMessage(StringView message) override;
  // 支持哪些命令
  std::vector<std::unique_ptr<protocol::Schema::API::Domain>> supportedDomains() override;

 private:
  // 发送消息给对端
  void SendProtocolResponse(int callId, std::unique_ptr<protocol::Serializable> message) override;
  void SendProtocolNotification(std::unique_ptr<protocol::Serializable> message) override;

  // 会话 id
  int m_sessionId;
  // 关联的 V8Inspector 对象
  V8InspectorImpl* m_inspector;
  // 关联的 channel,channel 表示会话的两端
  V8Inspector::Channel* m_channel;
  // 处理命令分发对象
  protocol::UberDispatcher m_dispatcher;
  // 处理某种命令的代理对象
  std::unique_ptr<V8RuntimeAgentImpl> m_runtimeAgent;
  std::unique_ptr<V8DebuggerAgentImpl> m_debuggerAgent;
  std::unique_ptr<V8HeapProfilerAgentImpl> m_heapProfilerAgent;
  std::unique_ptr<V8ProfilerAgentImpl> m_profilerAgent;
  std::unique_ptr<V8ConsoleAgentImpl> m_consoleAgent;
  std::unique_ptr<V8SchemaAgentImpl> m_schemaAgent;
};
下面看一下核心方法的具体实现。
- 创建 V8InspectorSessionImpl
V8InspectorSessionImpl::V8InspectorSessionImpl(V8InspectorImpl* inspector,
                                               int contextGroupId,
                                               int sessionId,
                                               V8Inspector::Channel* channel,
                                               StringView savedState)
    : m_contextGroupId(contextGroupId),
      m_sessionId(sessionId),
      m_inspector(inspector),
      m_channel(channel),
      m_customObjectFormatterEnabled(false),
      m_dispatcher(this),
      m_state(ParseState(savedState)),
      m_runtimeAgent(nullptr),
      m_debuggerAgent(nullptr),
      m_heapProfilerAgent(nullptr),
      m_profilerAgent(nullptr),
      m_consoleAgent(nullptr),
      m_schemaAgent(nullptr) {


  m_runtimeAgent.reset(new V8RuntimeAgentImpl(this, this, agentState(protocol::Runtime::Metainfo::domainName)));
  protocol::Runtime::Dispatcher::wire(&m_dispatcher, m_runtimeAgent.get());

  m_debuggerAgent.reset(new V8DebuggerAgentImpl(this, this, agentState(protocol::Debugger::Metainfo::domainName)));
  protocol::Debugger::Dispatcher::wire(&m_dispatcher, m_debuggerAgent.get());

  m_profilerAgent.reset(new V8ProfilerAgentImpl(this, this, agentState(protocol::Profiler::Metainfo::domainName)));
  protocol::Profiler::Dispatcher::wire(&m_dispatcher, m_profilerAgent.get());

  m_heapProfilerAgent.reset(new V8HeapProfilerAgentImpl(this, this, agentState(protocol::HeapProfiler::Metainfo::domainName)));
  protocol::HeapProfiler::Dispatcher::wire(&m_dispatcher,m_heapProfilerAgent.get());

  m_consoleAgent.reset(new V8ConsoleAgentImpl(this, this, agentState(protocol::Console::Metainfo::domainName)));
  protocol::Console::Dispatcher::wire(&m_dispatcher, m_consoleAgent.get());

  m_schemaAgent.reset(new V8SchemaAgentImpl(this, this, agentState(protocol::Schema::Metainfo::domainName)));
  protocol::Schema::Dispatcher::wire(&m_dispatcher, m_schemaAgent.get());
}
V8 支持很多种命令,在创建 V8InspectorSessionImpl 对象时,会注册所有命令和处理该命令的处理器。我们一会单独分析。
2. 接收请求
void V8InspectorSessionImpl::dispatchProtocolMessage(StringView message) {


  using v8_crdtp::span;
  using v8_crdtp::SpanFrom;
  span<uint8_t> cbor;
  std::vector<uint8_t> converted_cbor;
  if (IsCBORMessage(message)) {


    use_binary_protocol_ = true;
    m_state->setBoolean("use_binary_protocol", true);
    cbor = span<uint8_t>(message.characters8(), message.length());
  } else {


    auto status = ConvertToCBOR(message, &converted_cbor);
    cbor = SpanFrom(converted_cbor);
  }
  v8_crdtp::Dispatchable dispatchable(cbor);
  // 消息分发
  m_dispatcher.Dispatch(dispatchable).Run();
}
接收消息后,在内部通过 m_dispatcher.Dispatch 进行分发,这就好比我们在 Node.js 里收到请求后,根据路由分发一样。具体的分发逻辑一会单独分析。
3. 响应请求
void V8InspectorSessionImpl::SendProtocolResponse(
    int callId, std::unique_ptr<protocol::Serializable> message) {


  m_channel->sendResponse(callId, serializeForFrontend(std::move(message)));
}
具体的处理逻辑由 channel 实现,channel 由 V8 的使用者实现,比如 Node.js。
4. 数据推送
void V8InspectorSessionImpl::SendProtocolNotification(
    std::unique_ptr<protocol::Serializable> message) {


  m_channel->sendNotification(serializeForFrontend(std::move(message)));
}
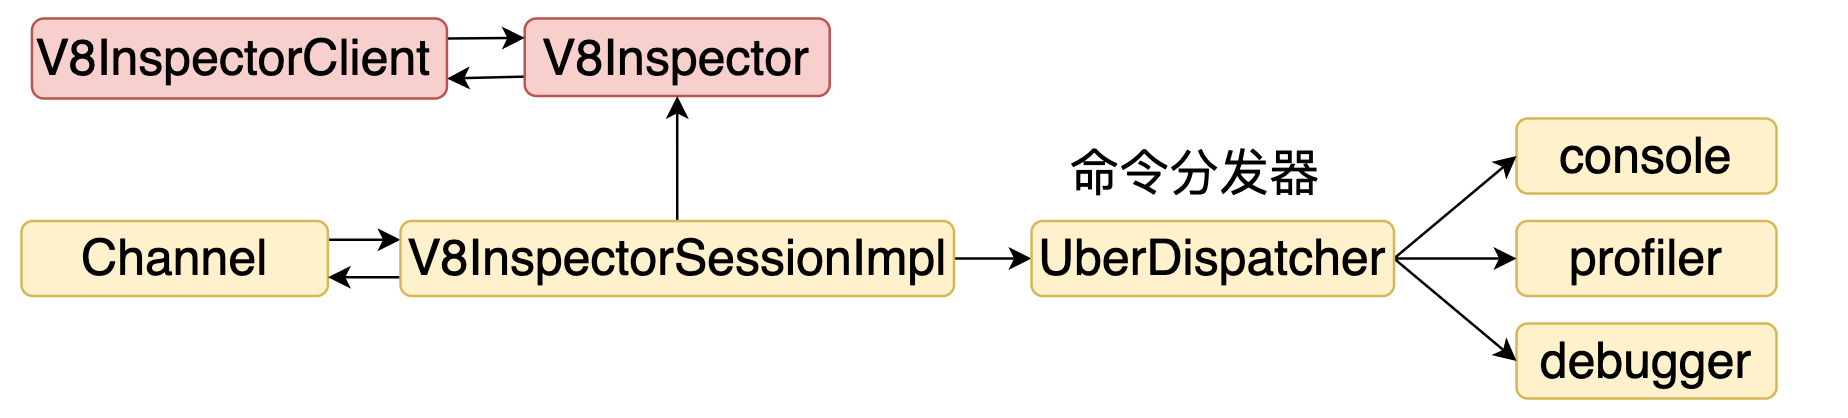
除了一个请求对应一个响应,V8 Inspector 还需要主动推送的能力,具体处理逻辑也是由 channel 实现。从上面点分析可以看到 V8InspectorSessionImpl 的概念相当于一个服务器,在启动的时候注册了一系列路由,当建立一个连接时,就会创建一个 Channel 对象表示。调用方可以通过 Channel 完成请求和接收响应。结构如下图所示。
2. V8Inspector
class V8_EXPORT V8Inspector {


 public:
  // 静态方法,用于创建 V8Inspector
  static std::unique_ptr<V8Inspector> create(v8::Isolate*, V8InspectorClient*);
  // 用于创建一个 V8InspectorSession
  virtual std::unique_ptr<V8InspectorSession> connect(int contextGroupId,
                                                      Channel*,
                                                      StringView state) = 0;
};
V8Inspector 是一个通信的总管,他不负责具体的通信,他只是负责管理通信者,Channel 才是负责通信的角色。下面看一下 V8Inspector 子类的实现 。
class V8InspectorImpl : public V8Inspector {


 public:
  V8InspectorImpl(v8::Isolate*, V8InspectorClient*);
  // 创建一个会话
  std::unique_ptr<V8InspectorSession> connect(int contextGroupId,
                                              V8Inspector::Channel*,
                                              StringView state) override;

 private:
  v8::Isolate* m_isolate;
  // 关联的 V8InspectorClient 对象,V8InspectorClient 封装了 V8Inspector,由调用方实现
  V8InspectorClient* m_client;
  // 保存所有的会话
  std::unordered_map<int, std::map<int, V8InspectorSessionImpl*>> m_sessions;
};
V8InspectorImpl 提供了创建会话的方法并保存了所有创建的会话,看一下创建会话的逻辑。

std::unique_ptr<V8InspectorSession> V8InspectorImpl::connect(int contextGroupId, V8Inspector::Channel* channel, StringView state) {


  int sessionId = ++m_lastSessionId;
  std::unique_ptr<V8InspectorSessionImpl> session = V8InspectorSessionImpl::create(this, contextGroupId, sessionId, channel, state);
  m_sessions[contextGroupId][sessionId] = session.get();
  return std::move(session);
}
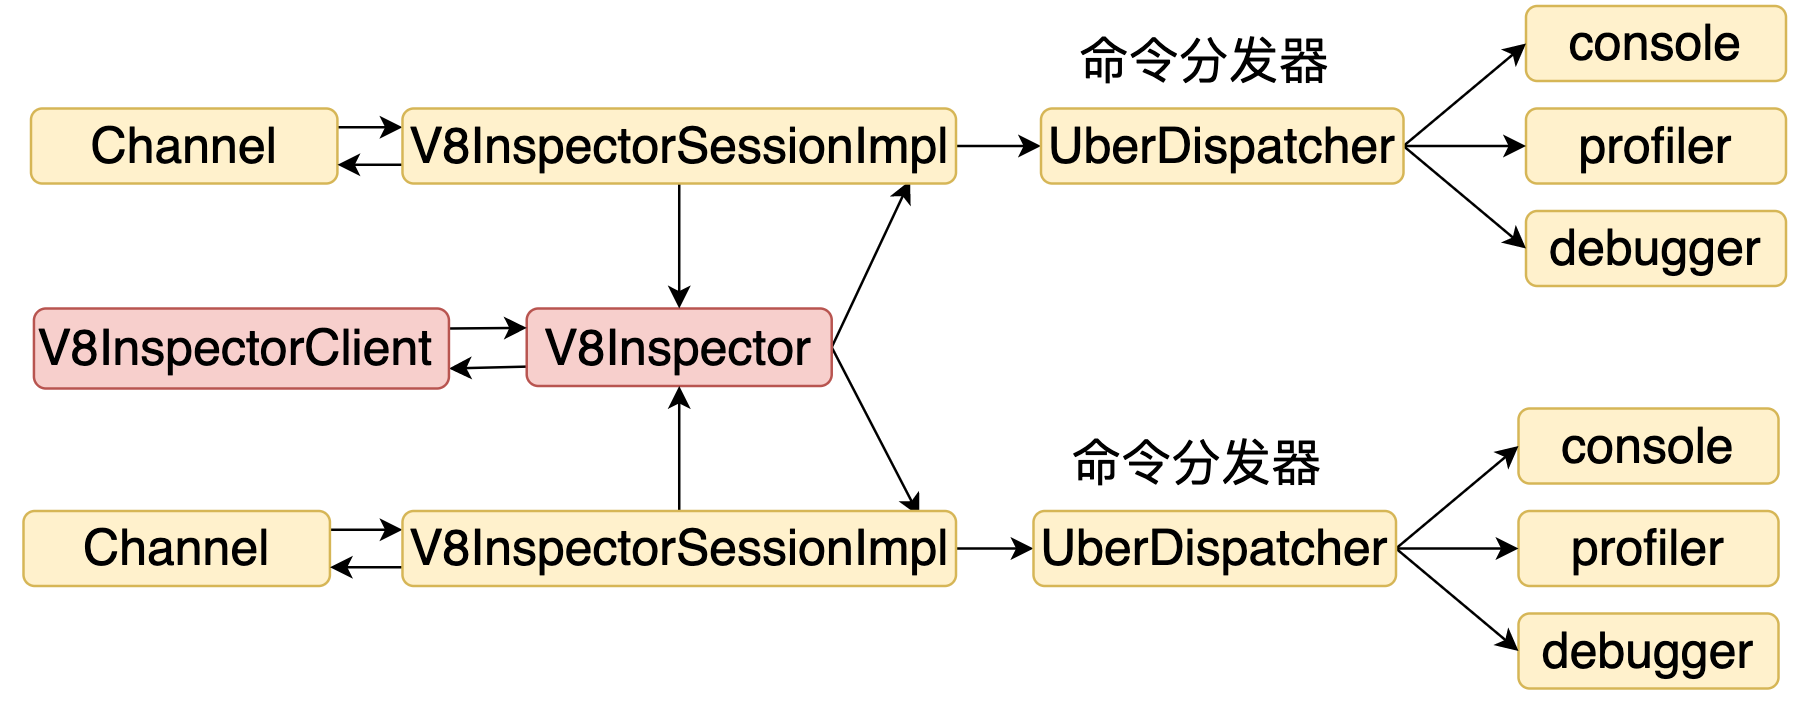
connect 是创建了一个 V8InspectorSessionImpl 对象,并通过 id 保存到 map中。结构图如下。
3. UberDispatcher
UberDispatcher 是一个命令分发器。
class UberDispatcher {


 public:
  // 表示分发结果的对象
  class DispatchResult {

    };
  // 分发处理函数
  DispatchResult Dispatch(const Dispatchable& dispatchable) const;
  // 注册命令和处理器
  void WireBackend(span<uint8_t> domain,
                   const std::vector<std::pair<span<uint8_t>, span<uint8_t>>>&,
                   std::unique_ptr<DomainDispatcher> dispatcher);

 private:
  // 查找命令对应的处理器,Dispatch 中使用
  DomainDispatcher* findDispatcher(span<uint8_t> method);
  // 关联的 channel
  FrontendChannel* const frontend_channel_;
  std::vector<std::pair<span<uint8_t>, span<uint8_t>>> redirects_;
  // 命令处理器队列
  std::vector<std::pair<span<uint8_t>, std::unique_ptr<DomainDispatcher>>>
      dispatchers_;
};
下面看一下注册和分发的实现。
- 注册
void UberDispatcher::WireBackend(span<uint8_t> domain, std::unique_ptr<DomainDispatcher> dispatcher) {


  dispatchers_.insert(dispatchers_.end(), std::make_pair(domain, std::move(dispatcher))););
}
WireBackend 就是在队列里插入一个新的 domain 和 处理器组合。
2. 分发命令
UberDispatcher::DispatchResult UberDispatcher::Dispatch(
    const Dispatchable& dispatchable) const {


  span<uint8_t> method = FindByFirst(redirects_, dispatchable.Method(),
                                     /*default_value=*/dispatchable.Method());
  // 找到 . 的偏移,命令格式是 A.B
  size_t dot_idx = DotIdx(method);
  // 拿到 domain,即命令的第一部分
  span<uint8_t> domain = method.subspan(0, dot_idx);
  // 拿到命令
  span<uint8_t> command = method.subspan(dot_idx + 1);
  // 通过 domain 查找对应的处理器
  DomainDispatcher* dispatcher = FindByFirst(dispatchers_, domain);
  if (dispatcher) {


    // 交给 domain 对应的处理器继续处理
    std::function<void(const Dispatchable&)> dispatched =
        dispatcher->Dispatch(command);
    if (dispatched) {


      return DispatchResult(
          true, [dispatchable, dispatched = std::move(dispatched)]() {


            dispatched(dispatchable);
          });
    }
  }
}
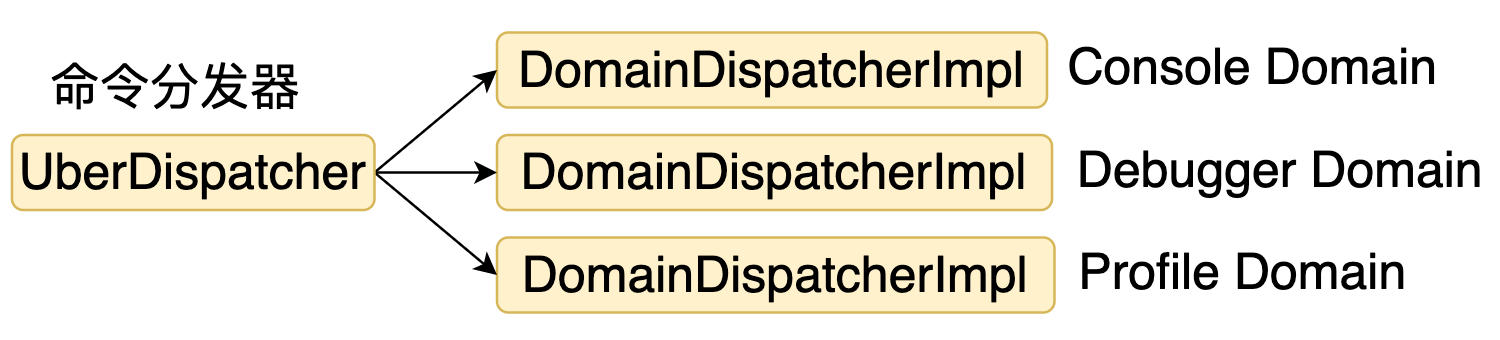
4. DomainDispatcher
刚才分析了 UberDispatcher,UberDispatcher 是一个命令一级分发器,因为命令是 domain.cmd 的格式,UberDispatcher 是根据 domain 进行初步分发,DomainDispatcher 则是找到具体命令对应的处理器。
class DomainDispatcher {


  // 分发逻辑,子类实现
  virtual std::function<void(const Dispatchable&)> Dispatch(span<uint8_t> command_name) = 0;

  // 处理完后响应
  void sendResponse(int call_id,
                    const DispatchResponse&,
                    std::unique_ptr<Serializable> result = nullptr);
 private:
  // 关联的 channel
  FrontendChannel* frontend_channel_;
};
DomainDispatcher 定义了命令分发和响应的逻辑,不同的 domain 的分发逻辑会有不同的实现,但是响应逻辑是一样的,所以基类实现了。
void DomainDispatcher::sendResponse(int call_id,
                                    const DispatchResponse& response,
                                    std::unique_ptr<Serializable> result) {


  std::unique_ptr<Serializable> serializable;
  if (response.IsError()) {


    serializable = CreateErrorResponse(call_id, response);
  } else {


    serializable = CreateResponse(call_id, std::move(result));
  }
  frontend_channel_->SendProtocolResponse(call_id, std::move(serializable));
}
通过 frontend_channel_ 返回响应。接下来看子类的实现,这里以 HeapProfiler 为例。
class DomainDispatcherImpl : public protocol::DomainDispatcher {


public:
    DomainDispatcherImpl(FrontendChannel* frontendChannel, Backend* backend)
        : DomainDispatcher(frontendChannel)
        , m_backend(backend) {

    }
    ~DomainDispatcherImpl() override {

     }

    using CallHandler = void (DomainDispatcherImpl::*)(const v8_crdtp::Dispatchable& dispatchable);
	// 分发的实现
    std::function<void(const v8_crdtp::Dispatchable&)> Dispatch(v8_crdtp::span<uint8_t> command_name) override;
	// HeapProfiler 支持的命令
    void addInspectedHeapObject(const v8_crdtp::Dispatchable& dispatchable);
    void collectGarbage(const v8_crdtp::Dispatchable& dispatchable);
    void disable(const v8_crdtp::Dispatchable& dispatchable);
    void enable(const v8_crdtp::Dispatchable& dispatchable);
    void getHeapObjectId(const v8_crdtp::Dispatchable& dispatchable);
    void getObjectByHeapObjectId(const v8_crdtp::Dispatchable& dispatchable);
    void getSamplingProfile(const v8_crdtp::Dispatchable& dispatchable);
    void startSampling(const v8_crdtp::Dispatchable& dispatchable);
    void startTrackingHeapObjects(const v8_crdtp::Dispatchable& dispatchable);
    void stopSampling(const v8_crdtp::Dispatchable& dispatchable);
    void stopTrackingHeapObjects(const v8_crdtp::Dispatchable& dispatchable);
    void takeHeapSnapshot(const v8_crdtp::Dispatchable& dispatchable);
 protected:
    Backend* m_backend;
};
DomainDispatcherImpl 定义了 HeapProfiler 支持的命令,下面分析一下命令的注册和分发的处理逻辑。下面是 HeapProfiler 注册 domain 和 处理器的逻辑(创建 V8InspectorSessionImpl 时)
// backend 是处理命令的具体对象,对于 HeapProfiler domain 是 V8HeapProfilerAgentImpl
void Dispatcher::wire(UberDispatcher* uber, Backend* backend)
{


	// channel 是通信的对端
    auto dispatcher = std::make_unique<DomainDispatcherImpl>(uber->channel(), backend);
    // 注册 domain 对应的处理器
    uber->WireBackend(v8_crdtp::SpanFrom("HeapProfiler"), std::move(dispatcher));
}
接下来看一下收到命令时具体的分发逻辑。
std::function<void(const v8_crdtp::Dispatchable&)> DomainDispatcherImpl::Dispatch(v8_crdtp::span<uint8_t> command_name) {


  // 根据命令查找处理函数
  CallHandler handler = CommandByName(command_name);
  // 返回个函数,外层执行
  return [this, handler](const v8_crdtp::Dispatchable& dispatchable) {


    (this->*handler)(dispatchable);
  };
}
看一下查找的逻辑。
DomainDispatcherImpl::CallHandler CommandByName(v8_crdtp::span<uint8_t> command_name) {


  static auto* commands = [](){


    auto* commands = new std::vector<std::pair<v8_crdtp::span<uint8_t>, DomainDispatcherImpl::CallHandler>>{


		// 太多,不一一列举
	    {


	          v8_crdtp::SpanFrom("enable"),
	          &DomainDispatcherImpl::enable
	    },
    };
    return commands;
  }();
  return v8_crdtp::FindByFirst<DomainDispatcherImpl::CallHandler>(*commands, command_name, nullptr);
}
再看一下 DomainDispatcherImpl::enable 的实现。
void DomainDispatcherImpl::enable(const v8_crdtp::Dispatchable& dispatchable)
{


    std::unique_ptr<DomainDispatcher::WeakPtr> weak = weakPtr();
    // 调用 m_backend 也就是 V8HeapProfilerAgentImpl 的 enable
    DispatchResponse response = m_backend->enable();
    if (response.IsFallThrough()) {


        channel()->FallThrough(dispatchable.CallId(), v8_crdtp::SpanFrom("HeapProfiler.enable"), dispatchable.Serialized());
        return;
    }
    if (weak->get())
        weak->get()->sendResponse(dispatchable.CallId(), response);
    return;
}
DomainDispatcherImpl 只是封装,具体的命令处理交给 m_backend 所指向的对象,这里是 V8HeapProfilerAgentImpl。下面是 V8HeapProfilerAgentImpl enable 的实现。
Response V8HeapProfilerAgentImpl::enable() {


  m_state->setBoolean(HeapProfilerAgentState::heapProfilerEnabled, true);
  return Response::Success();
}
结构图如下。

5. V8HeapProfilerAgentImpl
刚才分析了 V8HeapProfilerAgentImpl 的 enable 函数,这里以 V8HeapProfilerAgentImpl 为例子分析一下命令处理器类的逻辑。
class V8HeapProfilerAgentImpl : public protocol::HeapProfiler::Backend {


 public:
  V8HeapProfilerAgentImpl(V8InspectorSessionImpl*, protocol::FrontendChannel*,
                          protocol::DictionaryValue* state);

 private:

  V8InspectorSessionImpl* m_session;
  v8::Isolate* m_isolate;
  // protocol::HeapProfiler::Frontend 定义了支持哪些事件
  protocol::HeapProfiler::Frontend m_frontend;
  protocol::DictionaryValue* m_state;
};
V8HeapProfilerAgentImpl 通过 protocol::HeapProfiler::Frontend 定义了支持的事件,因为 Inspector 不仅可以处理调用方发送的命令,还可以主动给调用方推送消息,这种推送就是以事件的方式触发的。
class  Frontend {


public:
  explicit Frontend(FrontendChannel* frontend_channel) : frontend_channel_(frontend_channel) {

    }
    void addHeapSnapshotChunk(const String& chunk);
    void heapStatsUpdate(std::unique_ptr<protocol::Array<int>> statsUpdate);
    void lastSeenObjectId(int lastSeenObjectId, double timestamp);
    void reportHeapSnapshotProgress(int done, int total, Maybe<bool> finished = Maybe<bool>());
    void resetProfiles();

  void flush();
  void sendRawNotification(std::unique_ptr<Serializable>);
 private:
  // 指向 V8InspectorSessionImpl 对象
  FrontendChannel* frontend_channel_;
};
下面看一下 addHeapSnapshotChunk,这是获取堆快照时用到的逻辑。
void Frontend::addHeapSnapshotChunk(const String& chunk)
{


    v8_crdtp::ObjectSerializer serializer;
    serializer.AddField(v8_crdtp::MakeSpan("chunk"), chunk);
    frontend_channel_->SendProtocolNotification(v8_crdtp::CreateNotification("HeapProfiler.addHeapSnapshotChunk", serializer.Finish()));
}
最终触发了 HeapProfiler.addHeapSnapshotChunk 事件。另外 V8HeapProfilerAgentImpl 继承了 Backend 定义了支持哪些请求命令和 DomainDispatcherImpl 中的函数对应,比如获取堆快照。
class  Backend {


public:
    virtual ~Backend() {

     }
    // 不一一列举
    virtual DispatchResponse takeHeapSnapshot(Maybe<bool> in_reportProgress, Maybe<bool> in_treatGlobalObjectsAsRoots, Maybe<bool> in_captureNumericValue) = 0;
};
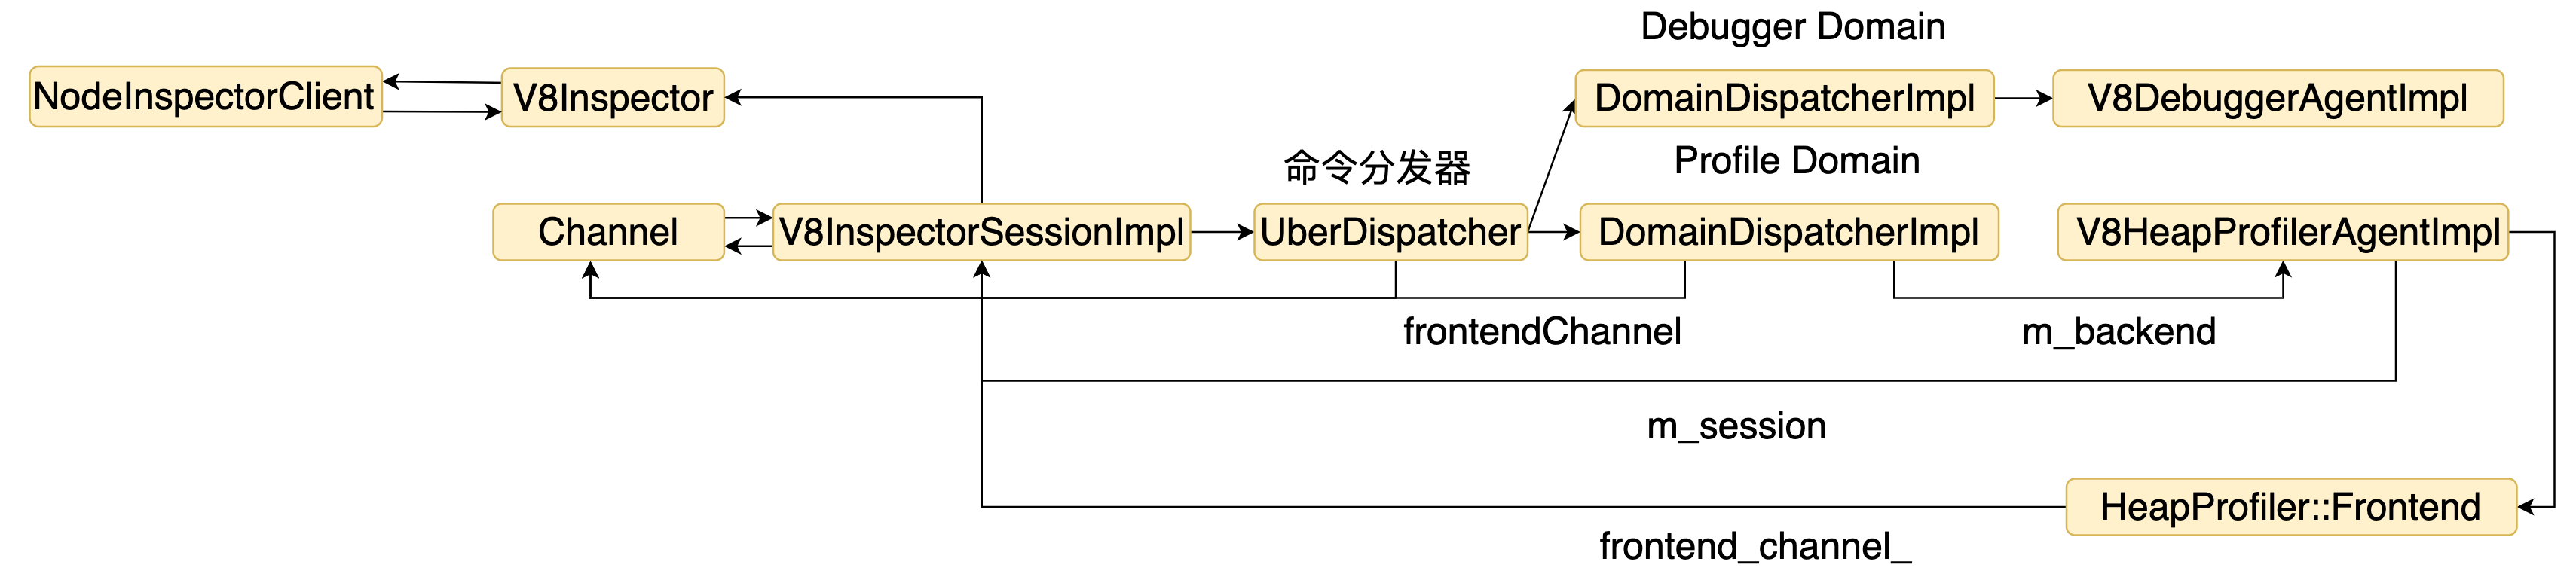
结构图如下。
6. Node.js 对 V8 Inspector 的封装
接下来看一下 Node.js 中是如何使用 V8 Inspector 的,V8 Inspector 的使用方需要实现 V8InspectorClient 和 V8Inspector::Channel。下面看一下 Node.js 的实现。
class NodeInspectorClient : public V8InspectorClient {


 public:
  explicit NodeInspectorClient() {


    // 创建一个 V8Inspector
    client_ = V8Inspector::create(env->isolate(), this);
  }

  int connectFrontend(std::unique_ptr<InspectorSessionDelegate> delegate,
                      bool prevent_shutdown) {


    int session_id = next_session_id_++;
    channels_[session_id] = std::make_unique<ChannelImpl>(env_,
                                                          client_,
                                                          getWorkerManager(),
                                                          // 收到数据后由 delegate 处理
                                                          std::move(delegate),
                                                          getThreadHandle(),
                                                          prevent_shutdown);
    return session_id;
  }

  std::unique_ptr<V8Inspector> client_;
  std::unordered_map<int, std::unique_ptr<ChannelImpl>> channels_;
};
NodeInspectorClient 封装了 V8Inspector,并且维护了多个 channel。Node.js 的上层代码可以通过 connectFrontend 连接到 V8 Inspector,并拿到 session_id,这个连接用 ChannelImpl 来实现,来看一下 ChannelImpl 的实现。
explicit ChannelImpl(const std::unique_ptr<V8Inspector>& inspector,
					 std::unique_ptr<InspectorSessionDelegate> delegate):
					 // delegate_ 负责处理 V8 发过来的数据
					 delegate_(std::move(delegate)) {


    session_ = inspector->connect(CONTEXT_GROUP_ID, this, StringView());
}
ChannelImpl 是对 V8InspectorSession 的封装,通过 V8InspectorSession 实现发送命令,ChannelImpl 自己实现了接收响应和接收 V8 推送数据的逻辑。了解了封装 V8 Inspector 的能力后,通过一个例子看一下整个处理过程。通常我们通过以下方式和 V8 Inspector 通信。
const {

     Session } = require('inspector');
new Session().connect();
我们从 connect 开始分析。
 connect() {


    this[connectionSymbol] =
      new Connection((message) => this[onMessageSymbol](message));
  }
新建一个 C++ 层的对象 JSBindingsConnection。
JSBindingsConnection(Environment* env,
                       Local<Object> wrap,
                       Local<Function> callback)
                       : AsyncWrap(env, wrap, PROVIDER_INSPECTORJSBINDING),
                         callback_(env->isolate(), callback) {


    Agent* inspector = env->inspector_agent();
    session_ = LocalConnection::Connect(inspector, std::make_unique<JSBindingsSessionDelegate>(env, this));
}

static std::unique_ptr<InspectorSession> Connect(
     Agent* inspector, std::unique_ptr<InspectorSessionDelegate> delegate) {


   return inspector->Connect(std::move(delegate), false);
}

std::unique_ptr<InspectorSession> Agent::Connect(
    std::unique_ptr<InspectorSessionDelegate> delegate,
    bool prevent_shutdown) {


  int session_id = client_->connectFrontend(std::move(delegate),
                                            prevent_shutdown);
  return std::unique_ptr<InspectorSession>(
      new SameThreadInspectorSession(session_id, client_));
}
JSBindingsConnection 初始化时会通过 agent->Connect 最终调用 Agent::Connect 建立到 V8 的通道,并传入 JSBindingsSessionDelegate 作为数据处理的代理(channel 中使用)。最后返回一个 SameThreadInspectorSession 对象保存到 session_ 中,后续就可以开始通信了,继续看一下 通过 JS 层的 post 发送请求时的逻辑。
  post(method, params, callback) {


    const id = this[nextIdSymbol]++;
    const message = {

     id, method };
    if (params) {


      message.params = params;
    }
    if (callback) {


      this[messageCallbacksSymbol].set(id, callback);
    }
    this[connectionSymbol].dispatch(JSONStringify(message));
  }
为每一个请求生成一个 id,因为是异步返回的,最后调用 dispatch 函数。
 static void Dispatch(const FunctionCallbackInfo<Value>& info) {


    Environment* env = Environment::GetCurrent(info);
    JSBindingsConnection* session;
    ASSIGN_OR_RETURN_UNWRAP(&session, info.Holder());

    if (session->session_) {


      session->session_->Dispatch(
          ToProtocolString(env->isolate(), info[0])->string());
    }
  }
看一下 SameThreadInspectorSession::Dispatch (即session->session_->Dispatch)。
void SameThreadInspectorSession::Dispatch(
    const v8_inspector::StringView& message) {


  auto client = client_.lock();
  if (client)
    client->dispatchMessageFromFrontend(session_id_, message);
}
SameThreadInspectorSession 中维护了一个sessionId,继续调用 client->dispatchMessageFromFrontend, client 是 NodeInspectorClient 对象。
void dispatchMessageFromFrontend(int session_id, const StringView& message) {


   channels_[session_id]->dispatchProtocolMessage(message);
 }
dispatchMessageFromFrontend 通过 sessionId 找到对应的 channel。继续调 channel 的 dispatchProtocolMessage。
  void dispatchProtocolMessage(const StringView& message) {


    std::string raw_message = protocol::StringUtil::StringViewToUtf8(message);
    std::unique_ptr<protocol::DictionaryValue> value =
        protocol::DictionaryValue::cast(protocol::StringUtil::parseMessage(
            raw_message, false));
    int call_id;
    std::string method;
    node_dispatcher_->parseCommand(value.get(), &call_id, &method);
    if (v8_inspector::V8InspectorSession::canDispatchMethod(
            Utf8ToStringView(method)->string())) {


      session_->dispatchProtocolMessage(message);
    }
  }
最终调用 V8InspectorSessionImpl 的 session_->dispatchProtocolMessage(message),后面的内容前面就讲过了,就不再分析。最后看一下数据响应或者推送时的逻辑。下面代码来自 ChannelImpl。
void sendResponse(
  int callId,
    std::unique_ptr<v8_inspector::StringBuffer> message) override {


  sendMessageToFrontend(message->string());
}

void sendNotification(
    std::unique_ptr<v8_inspector::StringBuffer> message) override {


  sendMessageToFrontend(message->string());
}

void sendMessageToFrontend(const StringView& message) {


  delegate_->SendMessageToFrontend(message);
}
我们看到最终调用了 delegate_->SendMessageToFrontend, delegate 是 JSBindingsSessionDelegate对象。
void SendMessageToFrontend(const v8_inspector::StringView& message)
        override {


  Isolate* isolate = env_->isolate();
  HandleScope handle_scope(isolate);
  Context::Scope context_scope(env_->context());
  MaybeLocal<String> v8string =
      String::NewFromTwoByte(isolate, message.characters16(),
                             NewStringType::kNormal, message.length());
  Local<Value> argument = v8string.ToLocalChecked().As<Value>();
  connection_->OnMessage(argument);
}
接着调用 connection_->OnMessage(argument),connection 是 JSBindingsConnection 对象。
void OnMessage(Local<Value> value) {


  MakeCallback(callback_.Get(env()->isolate()), 1, &value);
}
C++ 层回调 JS 层。
[onMessageSymbol](message) {


    const parsed = JSONParse(message);
    try {


      // 通过有没有 id 判断是响应还是推送
      if (parsed.id) {


        const callback = this[messageCallbacksSymbol].get(parsed.id);
        this[messageCallbacksSymbol].delete(parsed.id);
        if (callback) {


          if (parsed.error) {


            return callback(new ERR_INSPECTOR_COMMAND(parsed.error.code,
                                                      parsed.error.message));
          }

          callback(null, parsed.result);
        }
      } else {


        this.emit(parsed.method, parsed);
        this.emit('inspectorNotification', parsed);
      }
    } catch (error) {


      process.emitWarning(error);
    }
  }
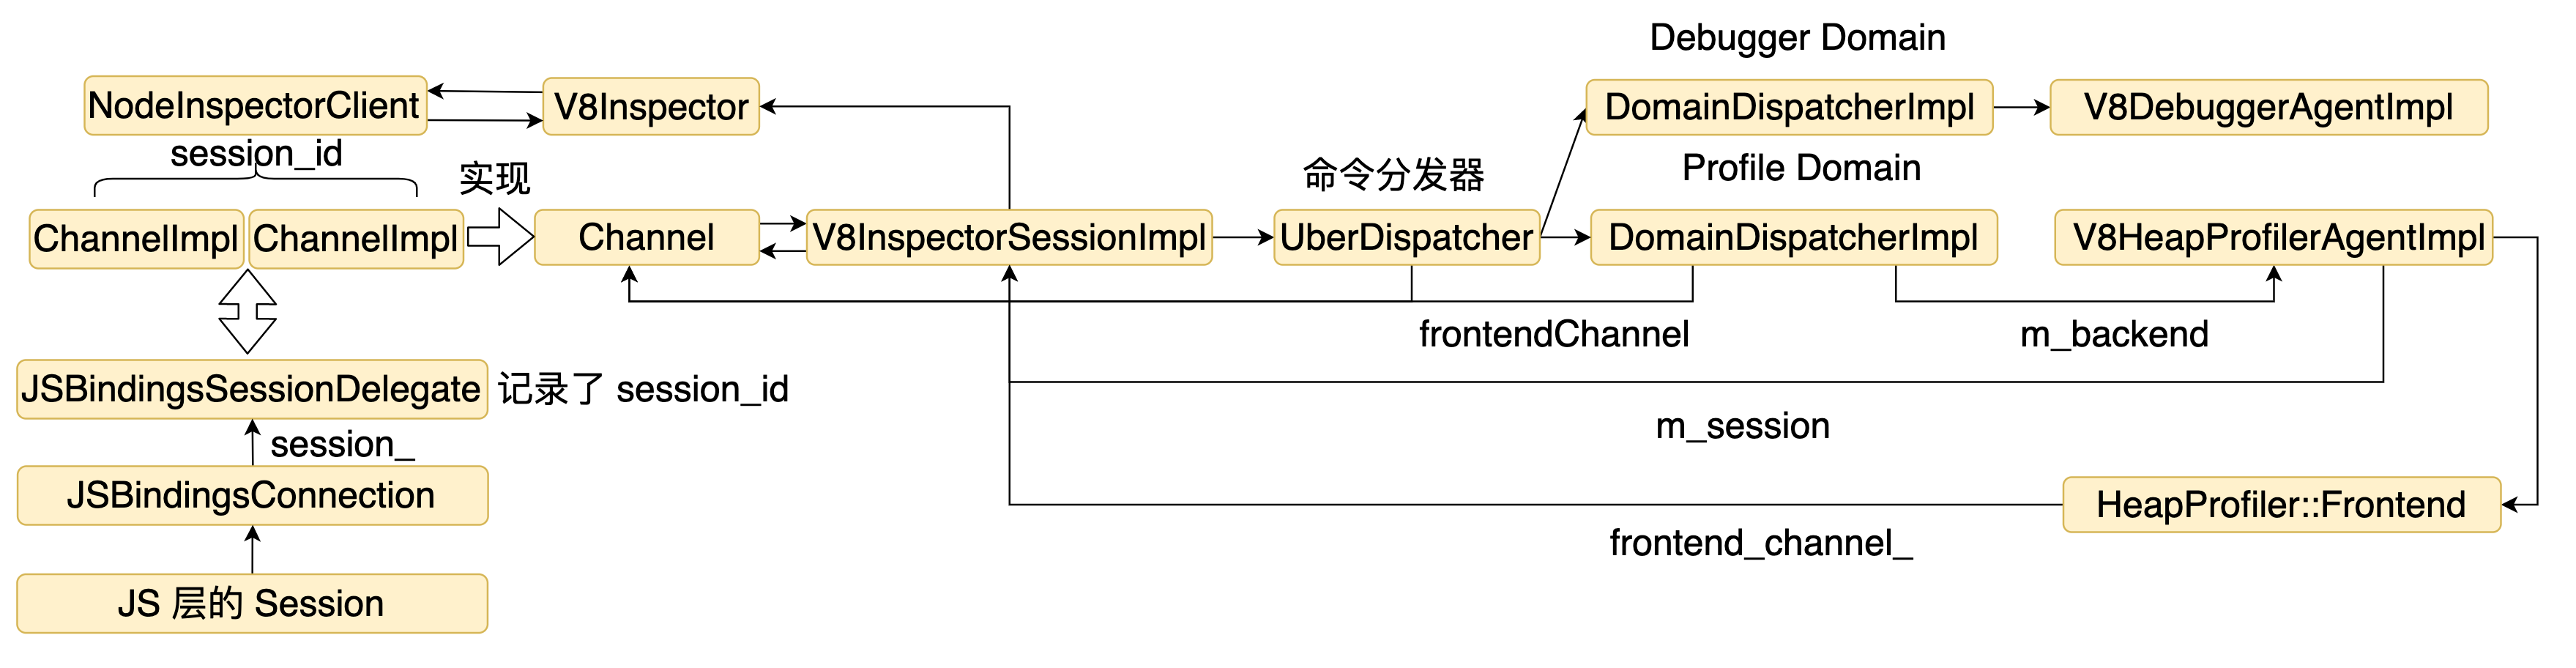
以上就完成了整个链路的分析。整体结构图如下。
7. 总结
V8 Inspector 的设计和实现上比较复杂,对象间关系错综复杂。因为 V8 提供调试和诊断 JS 的文档似乎不多,也不是很完善,就是简单描述一下命令是干啥的,很多时候不一定够用,了解了具体实现后,后续碰到问题,可以自己去看具体实现。