一、 动机
ROS下有许多界面工具如rqt_plot, rqt_tf_tree, rqt_graph和rviz等。如果要实现一个自己的程序小界面,那么最快的方式还是在已有界面上加上一些小插件plugin了,在已有的界面上做文章,适合快速demo。

照例先来看看官网的介绍。官网的例子共六步,按1,3跑完就行。
http://wiki.ros.org/rqt/Tutorials
ROS里的rqt plugin以Python语言编写的居多,c++的较少,如rqt_image_view和rviz是C++。具体列表这里可以查到:http://wiki.ros.org/rqt/Plugins
二、整体概况
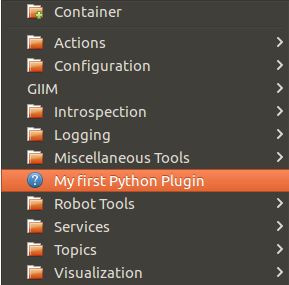
rqt_mypkg官方程序运行结果,rqt的菜单项plugins出现一个plugin,点击后页面中有个按钮。官网并没有实现按钮回调函数的操作,但是搜寻一番找到了答案,这部分可以翻看本文文末的代码做参考。
先来看看整体的目录情况。
cd ~/pcl_ws/src (任一个ROS工作空间即可,我这里为pcl_ws, 你可以替换为catkin_ws)
catkin_create_pkg rqt_mypkg rospy rqt_gui rqt_gui_py


按照官网的顺序:
1. 修改package.xml,填入export语句让我们的plugin能够被系统找到进行调用。
2. 创建plugin.xml ,描述plugin,最重要的是,在rqt_gui界面中的分组与顺序。
3. setup.py 通过ROS的catkin, 利用CMake 来将脚本文件放在一个不在PATH中但是又跟package关联的文件夹下让系统找得到。
4. 修改CMakeLists.txt
5. 创建src/rqt_mypkg,添加__init__.py和my_module.py
6. 界面元素及布局 MyPlugin.ui
整个package的运行顺序:
scripts/rqt_mypkg >> src/rqt_mypkg/my_module.py >> resource/MyPlugin.ui
三、文件详述
3.1 package.xml
<export>
    <rqt_gui plugin="${prefix}/plugin.xml"/>
</export>
3.2 plugin.xml
<library path="src">
  <class name="My Plugin" type="rqt_mypkg.my_module.MyPlugin" base_class_type="rqt_gui_py::Plugin">
    <description>
      An example Python GUI plugin to create a great user interface.
    </description>
    <qtgui>
      <!-- optional grouping...
      <group>
        <label>Group</label>
      </group>
      <group>
        <label>Subgroup</label>
      </group>
      -->
      <label>My first Python Plugin</label>
      <icon type="theme">system-help</icon>
      <statustip>Great user interface to provide real value.</statustip>
    </qtgui>
  </class>
</library>
这里要注意的地方是type,它指的是后文的src/rqt_mypkg/my_module.py这个文件中的MyPlugin类。如果不一样,需要稍作修改。另外group这里没有设置,即我们的plugin在rqt_gui的根目录下,名字为My first Python Plugin。
3.3 setup.py
from distutils.core import setup
from catkin_pkg.python_setup import generate_distutils_setup

d = generate_distutils_setup(
    packages=['rqt_mypkg'],
    package_dir={'': 'src'},
)

setup(**d)
3.4 CMakeList.txt
catkin_python_setup()

install(PROGRAMS scripts/rqt_mypkg
  DESTINATION ${CATKIN_PACKAGE_BIN_DESTINATION}
)

install(DIRECTORY
  resource
  DESTINATION ${CATKIN_PACKAGE_SHARE_DESTINATION}
)

install(FILES
  plugin.xml
  DESTINATION ${CATKIN_PACKAGE_SHARE_DESTINATION}
)
注意下第一个install的路径
3.5 my_module.py
import os
import rospy
import rospkg
from qt_gui.plugin import Plugin
from python_qt_binding import loadUi
from python_qt_binding.QtWidgets import QWidget
class MyPlugin(Plugin):
def __init__(self, context):
super(MyPlugin, self).__init__(context)
# Give QObjects reasonable names
self.setObjectName('MyPlugin')
# Process standalone plugin command-line arguments
from argparse import ArgumentParser
parser = ArgumentParser()
# Add argument(s) to the parser.
parser.add_argument("-q", "--quiet", action="store_true",
dest="quiet",
help="Put plugin in silent mode")
args, unknowns = parser.parse_known_args(context.argv())
if not args.quiet:
print 'arguments: ', args
print 'unknowns: ', unknowns
# Create QWidget
self._widget = QWidget()
# Get path to UI file which should be in the "resource" folder of this package
ui_file = os.path.join(rospkg.RosPack().get_path('rqt_mypkg'), 'resource', 'MyPlugin.ui')
# Extend the widget with all attributes and children from UI file
loadUi(ui_file, self._widget)
# Give QObjects reasonable names
self._widget.setObjectName('MyPluginUi')
# Show _widget.windowTitle on left-top of each plugin (when
# it's set in _widget). This is useful when you open multiple
# plugins at once. Also if you open multiple instances of your
# plugin at once, these lines add number to make it easy to
# tell from pane to pane.
if context.serial_number() > 1:
self._widget.setWindowTitle(self._widget.windowTitle() + (' (%d)' % context.serial_number()))
# Add widget to the user interface
context.add_widget(self._widget)
def shutdown_plugin(self):
# TODO unregister all publishers here
pass
def save_settings(self, plugin_settings, instance_settings):
# TODO save intrinsic configuration, usually using:
# instance_settings.set_value(k, v)
pass
def restore_settings(self, plugin_settings, instance_settings):
# TODO restore intrinsic configuration, usually using:
# v = instance_settings.value(k)
pass
#def trigger_configuration(self):
# Comment in to signal that the plugin has a way to configure
# This will enable a setting button (gear icon) in each dock widget title bar
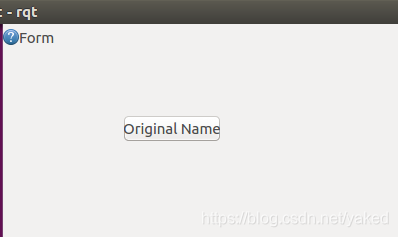
# Usually used to open a modal configuration dialog3.6 my_Plugin.ui
界面中有个按钮,按钮叫做Test,显示的文字是Original Name
<?xml version="1.0" encoding="UTF-8"?>
<ui version="4.0">
 <class>Form</class>
 <widget class="QWidget" name="Form">
  <property name="geometry">
   <rect>
    <x>0</x>
    <y>0</y>
    <width>400</width>
    <height>300</height>
   </rect>
  </property>
  <property name="windowTitle">
   <string>Form</string>
  </property>
  <widget class="QPushButton" name="Test">
   <property name="geometry">
    <rect>
     <x>120</x>
     <y>70</y>
     <width>98</width>
     <height>27</height>
    </rect>
   </property>
   <property name="text">
    <string>Original Name</string>
   </property>
  </widget>
 </widget>
 <resources/>
 <connections/>
</ui>
4. 启动
rqt --list-plugins 查看本机的plugins

rosrun rqt_mypkg rqt_mypkg
或rqt -s rqt_mypkg (-s, 指的是standalone)
如果没有找到试试 rqt --force-discover
小结:
入口函数
scripts/rqt_mypkg这个文件是一个Python文件,但是不以py结尾。文件内容
#!/usr/bin/env python

import sys

from rqt_mypkg.my_module import MyPlugin
from rqt_gui.main import Main

plugin = 'rqt_mypkg'
main = Main(filename=plugin)
sys.exit(main.main(standalone=plugin))特别注意第一个import语句,my_module,即src/rqt_mypkg/my_module.py 稍后的文件名也要以此为准,需要和src/rqt_mypkg/文件夹下的对应上。乍一看, 感觉怎么都不可能运行这个程序就能进入到我们的Plugin的界面, 毕竟我们写好的界面程序都放在src/rqt_mypkg下面。实际上, 这里的Main是rqt框架下的一个类, 我们这里告诉它包含我们的plugin这个包的名字是’rqt_mypkg’, 然后它会自动去’rqt_mypkg’这个包下面找到plugin.xml文件, 然后根据这两个文件中定义的参数来运行和调用我们写好的界面程序。
5. 扩展
见到有网友将界面和回调函数分开写的, 值得学习。
src/rqt_mypkg/mypkg.py
import os
import rospy
import rospkg
from qt_gui.plugin import Plugin
from mypkg_widget import MyWidget


class MyPlugin(Plugin):
    def __init__(self, context):
        super(MyPlugin, self).__init__(context)
        self.setObjectName('MyPlugin')
        self._widget = MyWidget()  # MY GUI Widget
        if context.serial_number() > 1:
            self._widget.setWindowTitle(self._widget.windowTitle() +
                                        (' (%d)' % context.serial_number()))
        context.add_widget(self._widget)  # Add widget to the user interface

    def shutdown_plugin(self):
        self._widget.close_plugin()
        # Just make sure to stop timers and publishers, unsubscribe from Topics etc in the shutdown_plugin method.
        pass

    def save_settings(self, plugin_settings, instance_settings):
        pass

    def restore_settings(self, plugin_settings, instance_settings):
        pass
src/rqt_mypkg/mypkg_widget.py
from __future__ import division
# Qt
from python_qt_binding import loadUi
from python_qt_binding.QtCore import Qt, QTimer, Signal, Slot
from python_qt_binding.QtGui import QImage, QPixmap
from python_qt_binding.QtWidgets import QHeaderView, QMenu, QTreeWidgetItem, QWidget
# ROS
import roslib
import roslib.message
import roslib.names
import rospkg
import rospy
import rostopic
# Others
import os


class MyWidget(QWidget):
    def __init__(self):
        super(MyWidget, self).__init__()
        # read UI file
        rp = rospkg.RosPack()
        ui_file = os.path.join(rp.get_path('rqt_mypkg'), 'resource',
                               'MyPlugin.ui')
        loadUi(ui_file, self)
        self.setObjectName('MyPluginUi')
        # connect widget with slot function
        self.Test.clicked.connect(
            self.open_button_slot)  #! Caution the button name here.
        self.progressBar.setValue(3)

    @Slot()
    def open_button_slot(self):
        topic_type, real_topic, fields = rostopic.get_topic_type(
            "/camera/rgb/image_raw")
        data_class = roslib.message.get_message_class(topic_type)
        self.mysub = rospy.Subscriber(real_topic, data_class, self.my_callback)
        pass

    def my_callback(self, msg):
        print("callback")
        pass

    def close_plugin(self):
        try:
            self.mysub.unregister()
        except AttributeError as e:
            rospy.logerr("Subscriber doesn't open.")
如果这样,则入口函数那里也需要做修改,即rqt_mypkg/scripts/rqt_mypkg文件中
from rqt_mypkg.mypkg import MyPlugin
还有plugin.xml中
<class name="MyPlugin" type="rqt_mypkg.mypkg.MyPlugin" base_class_type="rqt_gui_py::Plugin">
参考链接:
https://github.com/ros-visualization/rqt_common_plugins/tree/groovy-devel/rqt_bag
https://github.com/lucasw/rqt_mypkg/tree/master/rqt_example_py
https://blog.csdn.net/handsome_for_kill/article/details/104587804